

Replication
Replication is the technique of duplicating data between multiple directories for performance, scalability and redundancy. It is a way to bring multiple geographic areas together into one enterprise directory.
These multiple copies are kept in sync with one or more main directory server called Supplier or what most call a master or writable server and one or more Consumers or what most call replica or read only servers.
Through replication, a change made to one directory is propagated to one or more additional directories. In effect, a change to one directory shows up on multiple different directories.
Replication provides a directory user with two main advantages:
•Reliability: The consumers act as backup copies of the suppliers and data can be restored from the consumer in case all data is lost from the supplier due to some catastrophic failure. With multiple masters you will also have a writable backup to take over if the first master goes down.
•Performance: Client search requests can be distributed across the Consumers instead of the single Supplier, thereby reducing the response time of the Supplier and hence increasing performance. With multiple master you will also be able to distribute applications to different masters to offload the writable work on having only one master.
13.1 General replication concepts
This section defines the general replication concepts.
13.1.1 Terminology
IBM Directory 4.1 and earlier supported a master-replica replication model. There are three types of directories for this: masters, replicas, and peers.
1. Master: The master server contains the master directory information from where updates are propagated to the replicas. All changes are made and occur on the master server, and the master is responsible for propagating these changes to the replicas.
2. Replica: An additional server that contains a directory replica. The replicas must be exact copies of the master. The replica provides a backup to the master server. Even if the master server crashes, or is unreadable, the replica can still fulfill search requests and provide access to the data. A replica can be promoted to a master if the master will no longer be available.
3. Peer to Peer: Peer replication is a replication in which multiple servers are masters. However, unlike a multi-master environment. no conflict resolution is done among peer servers. LDAP servers accept the updates provided by peer servers, and update their own copies of the data. No consideration is given for the order the updates are received, or whether multiple updates conflict.
With IBM Directory 5.1 and later there have been a number of changes and improvements. The master/replica model was changed to a Supplier/Consumer model. The following identify the supplier/consumer replication methods available:
1. Cascading replication: A replication topology in which there are multiple tiers of servers. A peer/master server replicates to a set of read-only (forwarding) servers which in turn replicate to other servers. Such a topology off-loads replication work from the master servers.
2. Consumer server: A server which receives changes through replication from another (supplier) server.
3. Credentials: Identifies the method and required information that the supplier uses in binding to the consumer. For simple binds, this includes the DN and password. The credentials are stored in an entry and the DN of this entry is specified in the replica agreement.
4. Forwarding server: A read-only server that replicates all changes sent to it. This contrasts to a peer/master server in that it is read only and it can have no peers.
5. Gateway server: A server that forwards all replication traffic from the local replication site where it resides to other Gateway servers in the replicating network. Also receives replication traffic from other Gateway servers within the replication network, which it forwards to all servers on its local replication site. Gateway servers must be masters (writable).
6. Master server: A server which is writable (can be updated) for a given subtree.
7. Nested subtree: A subtree within a replicated subtree of the directory.
8. Peer server: The term used for a master server when there are multiple masters for a given subtree. A peer server does not replicate changes sent to it from another peer server; it only replicates changes that are originally made on it or are received from another client not bound as the Master Server DN.
9. Replica group: The first entry created under a replication context has objectclass ibm-replicaGroup and represents a collection of servers participating in replication. It provides a convenient location to set ACLs to protect the replication topology information. The administration tools currently support one replica group under each replication context, named ibm-replicagroup=default.
10. Replica subentry: Below a replica group entry, one or more entries with objectclass ibm-replicaSubentry may be created; one for each server participating in replication as a supplier. The replica subentry identifies the role the server plays in replication: master or read-only. A read-only server might, in turn, have replication agreements to support cascading replication.
11. Replicated subtree: A portion of the DIT that is replicated from one server to another. Under this design, a given subtree can be replicated to some servers and not to others. A subtree can be writable on a given server, while other subtree’s may be read-only.
12. Replicating network: A network that contains connected replication sites.
13. Replication agreement: Information contained in the directory that defines the 'connection' or 'replication path' between two servers. One server is called the supplier (the one that sends the changes) and the other is the consumer (the one that receives the changes). The agreement contains all the information needed for making a connection from the supplier to the consumer and scheduling replication.
14. Replication context: Identifies the root of a replicated subtree. The ibm-replicationContext auxiliary object class may be added to an entry to mark it as the root of a replicated area. The configuration information related to replication is maintained in a set of entries created below a replication context.
15. Replication site: A Gateway server and any master, peer or replica servers configured to replicate together.
16. Schedule: Replication can be scheduled to occur at particular times, with changes on the supplier accumulated and sent in a batch. The replica agreement contains the DN for the entry that supplies the schedule.
17. Supplier server: A server which sends changes to another (consumer) server.
13.1.2 How replication functions
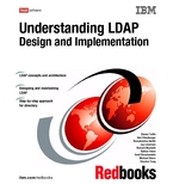
Specific entries (suffixes or non-suffix entries) in the directory are identified as the roots of replicated subtrees by adding the ibm-replicationContext auxiliary class to them. Any entry added below this root, as its direct or indirect child, will be replicated to the respective replica servers as defined in the replication agreement. The replicated subtree continues down the DIT until it reaches another entry with the ibm-replicationContext auxiliary class. At this point the former replicated subtree ends and new replicated subtree begins. All the replicated subtrees get independently replicated and may get replicated to the same or different replicas using the same or different credentials.
All replicated roots have a replica group entry created directly below them. It gives a collective view of server participating in replication for the particular replicated root as all replica subentries and agreements are created below it.
Every server that acts as a supplier has a corresponding ibm-replicaSubentry entry created below the replica group. This entry contains the mandatory server-id of the supplier server among other things.
Each replica server is represented by an ibm-replicationAgreement entry created below the ibm-replicaSubentry. The replication agreement represents a path from the supplier to the consumer. If we have an ibm-replicationAgreement entry for server B created directly below the ibm-replicaSubentry for server A, then B is replica of A for the given subtree. Hence, any changes made to the given replicated root/subtree at server A will be propagated to server B.
Any updates directed against a read-only replica are automatically redirected to the corresponding supplier which then sends the updates to the replica.
Figure 13-1 on page 323 shows the hierarchy of the above mentioned objectclasses in the DIT.
|
Note: While adding the objectclasses, additional information as required for the objectclasses should be entered. Two replicas have been shown in the figure, but any number of replicas can be configured for a given supplier.
|
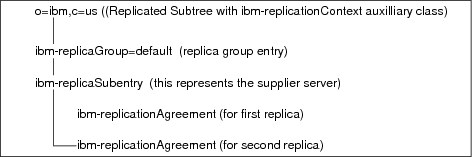
Figure 13-1 Hierarchy of the different object classes required in replication
Starting with IBM Directory Server 5.1, the roles played by a directory server in a replication topology no more apply to the entire server (DIT) but to a particular subtree in the Server (DIT). This means, a given directory server can be a Master / Peer (Supplier) with respect to one subtree and a replica (Consumer) with respect to another subtree at the same time.
Another change that was made to the IBM Directory starting with 5.1 was the adding of ibm-slapd Server Id. This is a single value attribute that identifies the server for use in replication. By default when you install the directory for the first time a UUID type number is generated and assigned to that directory. This is used anytime you need to identify a server in the replication. It can be found in the ibmslapd.conf file under dn: cn=Configuration
ibm-slapdServerId: 1320e26e-3457-4e9c-8682-4edfd9dd0143
|
Note: This ServerID can be used but it does present a problem with troubleshooting and making complex replication agreements. One thing that you can do is to change this number into a more defined name that you can used to better understand and create replication agreements. One main thing that you need to make sure is that these names need to be unique. For example:
#ibm-slapdServerId: 1320e26e-3457-4e9c-8682-4edfd9dd0143
ibm-slapdServerId: win2k1uid
The best time to do this is when you first install the directory and before you config the directory with ldapxcfg. Edit the ibmslapd.conf file and add the following line after ibm-slapdPwEncryption: imask -
ibm-slapdServerId: win2k1uid
Then save the file and go back to ldapxcfg and finish the configuration of the directory.
|
13.2 Major replication topologies
The major replication topologies found in IBM Tivoli Directory server can be one of the following types. But these can be more or less complex depending upon the number or directory servers participating in the topology.
13.2.1 Simple master-replica topology
It is the simplest of all topologies. It consists of one Master (supplier) directly propagating the changes to a replica (consumer) server. In case of multiple masters updating a single replica server, each subtree in the replica should receive updates from only one master. Otherwise, changes made by one master on the replica will be overwritten by the other. Two masters writing to the same subtree in the replica is only possible in case of peer to peer topology.
In Figure 13-2, M1 is the master and R1 and R2 are two replicas.

Figure 13-2 Simple master-replica scenario
13.2.2 Master-forwarder-replica topology (ITDS 5.2 and later)
In this scenario, the master (supplier) does not send the updates to the replica directly. Another server, called the Forwarder, lies between the Master and the replica and all changes from the master come via the forwarder to the replica. Hence, two replication agreements, one from the master to the forwarder and the other from the forwarder to the replica have to be created. The forwarder is read-only copy and cannot have peers. The forwarder itself maintains copy of the data that it receives from the master and then replicates it to the replicas. Such a replication scenario is also called Cascading Replication.
The advantages of using a forwarder is that the master need not replicate the changes to all the replicas. It sends the changes to the forwarder and its the responsibility of the forwarder to push them to all the replicas. Thus the master is free to do other tasks. Having a forwarder causes redundancy of data to deal with any catastrophic incident resulting in loss of data. Also, the forwarder can be promoted to a master in case all data from the master is lost.
A forwarder is created by inserting a replica beneath an existing replica. The existing replica becomes a forwarder.
In Figure 13-3, M1 is the master, F1 was the previous replica, which is now a forwarder and R1 is the new replica which was inserted below the existing replica to convert it into a forwarder.

Figure 13-3 Master-forwarder replica topology
The main advantages of using peer servers in replication is performance enhancement (by providing local servers for accepting updates in widely distributed network) and reliability (since a peer server acts as a backup server for the other peer server).
13.2.3 GateWay Replication Topology (ITDS 5.2 and later)
Gateway servers are special types of peer servers which replicate changes received only from remote replication sites to all masters/replicas in the local replication site. A replication site is collection of masters/peers, gateways, forwarders and replicas. A master/peer is converted into a gateway server by adding the ibm-replicaGateway auxiliary class to the ibm-replicaSubentry entry corresponding to the master/peer. A replica or forwarder cannot be a gateway server.
The main advantage of using gateway servers is to reduce network traffic between two replication sites. If the replication sites are located in different LANs, the network traffic between the LANs is reduced. Gateway servers replicate the changes to all the servers, including peers, in the local site but not to other gateway servers.
Figure 13-4 shows an example topology using gateway servers.

Figure 13-4 Replication topology with gateway servers
13.2.4 Peer replication
With any project design that would consist of two or more Peer to Peer servers for fault tolerant 24x7x365 uptime. All directory operations will be performed on one Peer server. These changes will be replicated automatically and immediately to the second or more peers. If the first peer fails, or needs to be taken offline for maintenance, the application can be reconfigure to route directory protocol traffic to the another peer. The other peers will queue any updates they process and forward them to the first peer as soon as it is brought back online.
Peer replication is an environment in which more that one LDAP server accepts updates from clients. The servers accept changes from other peer servers and apply them to their own copies of the DIT. The changes are applied in the order they receive them. A peer to peer LDAP configuration can often be the most effective way to deploy the IBM Tivoli Directory Server LDAP to meet the business requirement for an enterprise directory service to be continually available for update on a 24x7 basis. A Multiple Peer configuration avoids loss of directory updates capability due to the failure of a single master server, hardware failure or site disaster, or the need to take the master LDAP server offline for service.
Update conflict prevention in peer configurations
Peer replication between IBM Directory Server peers may be used when the access patterns of the applications that update directory entries are controlled to prevent update conflicts. The LDAP name space and applications must be designed to ensure that the same directory entries will not be updated concurrently by clients on different peers. This is normally done by using a load balancer type device that can be either hardware or software controlled.
How peer to peer works
When a peer receives an update from a client, it makes the change to its own DIT and forwards the change to all the other Peer and Replica servers it knows. A peer must be configured to know about all other peers and replica servers that should be updated when it accepts an update from a client and how to connect to them.
Updates that are received from peer servers are not propagated to any other replica or peer server definitions. When an update is received by a peer server, the update is applied to the database. If the update was received from a peer server, the update is applied and processing stops. If the update was made by another client, the directory is updated, and the update information is propagated to the other peers and replicas. This prevents peers from continually replicating an update to each other. Because peer servers do not propagate updates to other replica definitions.
A peer maintains a copy of each change it accepts from a client in its replication queue until it receives a positive acknowledgement from all other peers and replicas that the change has been accepted. If a peer cannot contact another peer or replica, it will log the problem in its slapd.errors file and keep the change in its replication queue. It will periodically attempt to connect to the failed server until the problem is corrected. Therefore, a failed peer server should be unconfigured if it is not going to be restarted.
At startup, a server queries the database to determine if there are any replica objects. These objects define replica or peer servers for this particular server. The schema definition for these objects describes how a server can locate and connect to the replica or peer server, as well as other replication properties.
Configuration for peer to peer in IBM Directory 4.1 and earlier
Within the slapd32.conf file there are currently several parameters relating to replication. If an ibm-slapdMasterServerDn and ibm-slapdMasterServerPW are specified, this server is presumed to be a read-only replica. The ibm-slapdMasterServerDn and ibm-slapdMasterServerPW in the slapd32.conf file must match the replicaBindDn and replicaCredentials in the replica object definition found on the master server. A peer server is designated in the slapd32.conf file with the attributes ibm-slapdPeerDn and ibm-slapdPeerPW in the cn=Master,cn=Configuration object.
|
Note: The ibm-slapdPeerDn cannot be the same as the ibm-slapdAdminDn for peer replication to function correctly. This designates a writable copy of the database.
|
Add a replica definition to all servers within the peer network representing each of the other peer and replica servers in the network. This is different from the replica, which does not have any replica definitions within the database. The ibm-slapdPeerDn and the ibm-slapdPeerPW in a server's slapd32.conf file must match the replicaBindDn and replicaCredentials in replica objects on the other peer servers that bind to it. Because these passwords must match, the same peer replica object definitions can be used on all peer servers.
A server can be either a replica server or a peer server, it can not be both. That means that the ibm-slapdMasterServerDn parameter in the slapd32.conf file is mutually exclusive with the ibm-slapdPeerDn configuration file attribute. If both are defined in the slapd32.conf file, the server does not start and the following message is logged in the slapd.errors file: Can not specify both masterServerDn and peerDn
Configuration for Multiple Peer to Peer from a normal master/slave as shown in the next two figures. The first figure (Figure 13-5 on page 329) shows how the master/slave was set up the next figure (Figure 13-6 on page 330) shows how peer to peer will look like when it is configured.
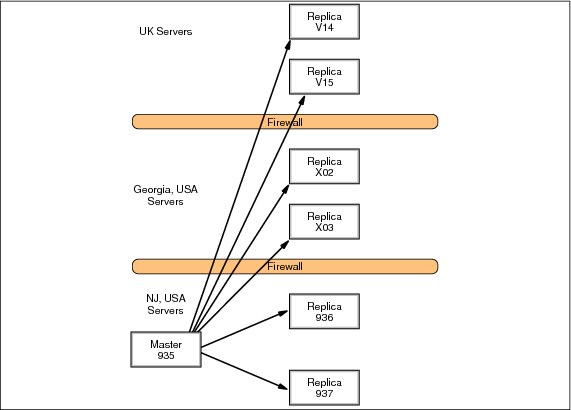
Figure 13-5 Original LDAP flow

Figure 13-6 Multiple peer LDAP flow
Peer 935 listens on port 636 (using SSL), and is a peer server of Peer X03 and Peer V15 in (Figure 13-6). Before we put in Replica X03 and Replica V15 as Peer servers (Figure 13-5 on page 329), you will have an entry dn: cn=Master Server, cn=Configuration in the slapd32.conf file. This tells us that these servers are Replicas. What will be needed is to turn off replication, and stop the server before proceeding.
Peer 1 is configured to recognize Peer 2 and 3 as a peer and the password Peer 2 and 3 will use to bind to Peer 1 by the following LDIF file. This LDIF file updates the slapd32.conf file. This configuration may also be added to the configuration file manually. If you do update the file manually, you should always make a backup copy of the file first. All three machine peers must use the same ID and passwords.
dn:cn=Master Server, cn=Configuration
cn:Master Server
ibm-slapdPeerDn:cn=peer
ibm-slapdPeerPW:< same peer password>
objectclass:ibm-slapdReplication
objectclass:top
A replica object is added to the Peer 1 database through the following ldif file. The replica object is added to the cn=localhost suffix of the database. It specifies the bind DN and password that Peer 1 will use when it binds as a peer to Peer 2 and 3. You would also add all the replica info of the other replicas in your tree to this list (not shown).
dn: cn=Peer2, cn=localhost
cn: Peer2
replicaBindDN: cn=peer
replicaCredentials: <same peer password>
replicaPort: 636
replicaHost: <fully-qualified-hostname>
replicaBindMethod: Simple
replicaUseSSL: TRUE
replicaUpdateTimeInterval: 0
objectclass: replicaObject
objectclass: top
dn: cn=Peer3, cn=localhost
cn: Peer3
replicaBindDN: cn=peer
replicaCredentials: <same peer password>
replicaPort: 636
replicaHost: <fully-qualified-hostname>
replicaBindMethod: Simple
replicaUseSSL: TRUE
replicaUpdateTimeInterval: 0
objectclass: replicaObject
objectclass: top
If you are not using SSL for your LDAP do the following:
dn: cn=Peer2, cn=localhost
cn: Peer2
replicaBindDN: cn=peer
replicaCredentials: <same peerpassword>
replicaPort: 389
replicaHost: <fully-qualified-hostname>
replicaBindMethod: Simple
replicaUseSSL: FALSE
replicaUpdateTimeInterval: 0
objectclass: replicaObject
objectclass: top
dn: cn=Peer3, cn=localhost
cn: Peer3
replicaBindDN: cn=peer
replicaCredentials: <same peerpassword>
replicaPort: 389
replicaHost: <fully-qualified-hostname>
replicaBindMethod: Simple
replicaUseSSL: FALSE
replicaUpdateTimeInterval: 0
objectclass: replicaObject
objectclass: top
Peer 2 and 3 listens on port 636 (using SSL), and is a peer server of Peer 1. This configuration may also be added to the configuration file manually. If you do update the file manually, you should always make a backup copy of the file first. All three machine peers must use the same ID and passwords.
dn:cn=Master Server, cn=Configuration
cn:Master Server
ibm-slapdPeerDn:cn=peer
ibm-slapdPeerPW:< same peer password>
objectclass:ibm-slapdReplication
objectclass:top
A replica object is added to the Peer 2 database through the following ldif files. It specifies the bind DN and password that Peer 2 will use to bind as a peer to Peer 1. This must match the information in the slapd32.conf file for Peer 1. You would also add all the replica info of the other replicas in your tree to this list (not shown).
dn: cn=Peer1, cn=localhost
cn: Peer1
replicaBindDN: cn=peer
replicaCredentials: <same peer password>
replicaPort: 636
replicaHost: <fully-qualified-hostname>
replicaBindMethod: Simple
replicaUseSSL: TRUE
replicaUpdateTimeInterval: 0
objectclass: replicaObject
objectclass: top
dn: cn=Peer3, cn=localhost
cn: Peer3
replicaBindDN: cn=peer
replicaCredentials: <same peer password>
replicaPort: 636
replicaHost: <fully-qualified-hostname>
replicaBindMethod: Simple
replicaUseSSL: TRUE
replicaUpdateTimeInterval: 0
objectclass: replicaObject
objectclass: top
If you are not using SSL for your LDAP do the following:
dn: cn=Peer1, cn=localhost
cn: Peer1
replicaBindDN: cn=peer
replicaCredentials: <same peer password>
replicaPort: 389
replicaHost: <fully-qualified-hostname>
replicaBindMethod: Simple
replicaUseSSL: FALSE
replicaUpdateTimeInterval: 0
objectclass: replicaObject
objectclass: top
dn: cn=Peer3, cn=localhost
cn: Peer3
replicaBindDN: cn=peer
replicaCredentials: <same peer password>
replicaPort: 389
replicaHost: <fully-qualified-hostname>
replicaBindMethod: Simple
replicaUseSSL: FALSE
replicaUpdateTimeInterval: 0
objectclass: replicaObject
objectclass: top
A replica object is added to the Peer 3 database through the following ldif files. It specifies the bind DN and password that Peer 3 will use to bind as a peer to Peer 1. This must match the information in the slapd32.conf file for Peer 1. You would also add all the replica info of the other replicas in your tree to this list (not shown).
dn: cn=Peer1, cn=localhost
cn: Peer1
replicaBindDN: cn=peer
replicaCredentials: <same peer password>
replicaPort: 636
replicaHost: <fully-qualified-hostname>
replicaBindMethod: Simple
replicaUseSSL: TRUE
replicaUpdateTimeInterval: 0
objectclass: replicaObject
objectclass: top
dn: cn=Peer2, cn=localhost
cn: Peer2
replicaBindDN: cn=peer
replicaCredentials: <same peer password>
replicaPort: 636
replicaHost: <fully-qualified-hostname>
replicaBindMethod: Simple
replicaUseSSL: TRUE
replicaUpdateTimeInterval: 0
objectclass: replicaObject
objectclass: top
If you are not using SSL for your LDAP do the following:
dn: cn=Peer1, cn=localhost
cn: Peer1
replicaBindDN: cn=peer
replicaCredentials: <same peer password>
replicaPort: 389
replicaHost: <fully-qualified-hostname>
replicaBindMethod: Simple
replicaUseSSL: FALSE
replicaUpdateTimeInterval: 0
objectclass: replicaObject
objectclass: top
dn: cn=Peer2, cn=localhost
cn: Peer2
replicaBindDN: cn=peer
replicaCredentials: <same peer password>
replicaPort: 389
replicaHost: <fully-qualified-hostname>
replicaBindMethod: Simple
replicaUseSSL: FALSE
replicaUpdateTimeInterval: 0
objectclass: replicaObject
objectclass: top
Change replicas and original master server into Peer Servers
First you will have to make sure that the replica is sync up with the master and there are no changes pending.
On the original master server you will need to put it into read-only mode. And restart the server. Then break the replication agreement with the replica that you are going to change into a peer server. For our example this would be UK Replica V15 and Georgia X03 servers.
Create three ldif's to configure the Peer Servers, one for Peer1 and one for Peer2 and one for Peer3. See the following LDIF examples in this document (on page 336). These LDIF examples will include the replica information of the other 4 replicas.
Shut down the slapd process on the original master server NJ 935.
Use ldif2db command to load the following ldif file. Using the ldif2db with the slapd process shutdown will input the replication peer data into the servers when they are down. This way when the slapd process is brought back up it will know of the other servers and set them up in the DB2 database and start saving any changes in the change tables.
ldif2db -i e:migrationpeer1.ldif
Make needed changes to the slapd32.conf file.
dn:cn=Master Server, cn=Configuration
cn:Master Server
ibm-slapdPeerDn:cn=peer
ibm-slapdPeerPW:< same peer password>
objectclass:ibm-slapdReplication
objectclass:top
Restart slapd process on the new Peer 935 server.
Shut down the slapd process on the Georgia X03 server.
Use the ldif2db command to load the following ldif file.
ldif2db -i e:migrationpeer2.ldif
Make the needed changes to the slapd32.conf file for the Georgia X03 server.
dn:cn=Master Server, cn=Configuration
cn:Master Server
ibm-slapdPeerDn:cn=peer
ibm-slapdPeerPW:< same peer password>
objectclass:ibm-slapdReplication
objectclass:top
Restart slapd process on the new Peer X03 server.
Shut down the slapd process on the UK V15 server.
Use the ldif2db command to load the following ldif file.
ldif2db -i e:migrationpeer3.ldif
Make the needed changes to the slapd32.conf file for the UK V15 server.
dn:cn=Master Server, cn=Configuration
cn:Master Server
ibm-slapdPeerDn:cn=peer
ibm-slapdPeerPW:< same peer password>
objectclass:ibm-slapdReplication
objectclass:top
Restart the slapd process on the new Peer V15 server.
Check the slapd.errors file on the Peer 935 server to make sure that it has connected back up to all the six servers.
Make a change on one of the peers and then check to see that the change went to the other peers.
Then do it in reverse from each of the other two peers make a different change to make sure changes are made all three ways.
Reconfigure the remaining replicas in the UK and Georgia to now refer there write traffic to the new peer server in each of there respective sites. UK replica to the UK peer and the Georgia replica to the Georgia peer.
Now a test needs to be made to check to make sure that the other sites will work with out the NJ site. This will be done by bringing down the Peer 935 slapd process and the Application process and then trying to log into the UK and the Georgia sites and authenticating to there applications. This is to simulate the main site (NJ) going down due to power outages.
Peer LDIF files
The following shows the peer LDIF files for NJ, Georgia, and the UK sites:
•NJ Peer 935 Peer1.ldif
dn: cn=xxgasrv03, cn=localhost
cn: xxgasrv03
replicaBindDN: cn=ibmpeer
replicaCredentials: XXXXXXX
replicaPort: 636
replicaHost: xxgasrv03.us.ibm.com
replicaBindMethod: Simple
replicaUseSSL: TRUE
replicaUpdateTimeInterval: 0
objectclass: replicaObject
objectclass: top
dn: cn=gouksrv15, cn=localhost
cn: gouksrv15
replicaBindDN: cn=ibmpeer
replicaCredentials: XXXXXXX
replicaPort: 636
replicaHost: gouksrv15.uk.ibm.com
replicaBindMethod: Simple
replicaUseSSL: TRUE
replicaUpdateTimeInterval: 0
objectclass: replicaObject
objectclass: top
dn: cn=usnj936,cn=localhost
cn: usnj936
replicahost: usnj936.us.ibm.com
replicabinddn: cn=usuk936
replicacredentials: XXXXXXX
replicaport: 636
replicabindmethod: SIMPLE
replicausessl: TRUE
replicaupdatetimeinterval: 0
seealso::
description::
objectclass: replicaObject
objectclass: top
dn: cn=usnj937,cn=localhost
cn: usnj937
replicahost: usnj937.us.ibm.com
replicabinddn: cn=usnj937
replicacredentials: XXXXXXX
replicaport: 636
replicabindmethod: SIMPLE
replicausessl: TRUE
replicaupdatetimeinterval: 0
seealso::
description::
objectclass: replicaObject
objectclass: top
dn: cn=xxgasrv02,cn=localhost
cn: xxgasrv02
replicahost: xxgasrv02.us.ibm.com
replicabinddn: cn=xxgasrv02
replicacredentials: XXXXXXX
replicaport: 636
replicabindmethod: SIMPLE
replicausessl: TRUE
replicaupdatetimeinterval: 0
seealso::
description::
objectclass: replicaObject
objectclass: top
dn: cn=gouksrv14,cn=localhost
cn: gouksrv14
replicahost: gouksrv14.uk.ibm.com
replicabinddn: cn=gouksrv14
replicacredentials: XXXXXXX
replicaport: 636
replicabindmethod: SIMPLE
replicausessl: TRUE
replicaupdatetimeinterval: 0
seealso::
description::
objectclass: replicaObject
objectclass: top
•Georgia USA Peer X03 Peer2.ldif
dn: cn=usnj935, cn=localhost
cn: usnj935
replicaBindDN: cn=ibmpeer
replicaCredentials: XXXXXXX
replicaPort: 636
replicaHost: usnj935.us.ibm.com
replicaBindMethod: Simple
replicaUseSSL: TRUE
replicaUpdateTimeInterval: 0
objectclass: replicaObject
objectclass: top
dn: cn=gouksrv15, cn=localhost
cn: gouksrv15
replicaBindDN: cn=ibmpeer
replicaCredentials: XXXXXXX
replicaPort: 636
replicaHost: gouksrv15.us.ibm.com
replicaBindMethod: Simple
replicaUseSSL: TRUE
replicaUpdateTimeInterval: 0
objectclass: replicaObject
objectclass: top
dn: cn=usnj936,cn=localhost
cn: usnj936
replicahost: usnj936.us.ibm.com
replicabinddn: cn=usnj936
replicacredentials: XXXXXXX
replicaport: 636
replicabindmethod: SIMPLE
replicausessl: TRUE
replicaupdatetimeinterval: 0
seealso::
description::
objectclass: replicaObject
objectclass: top
dn: cn=usnj937,cn=localhost
cn: usnj937
replicahost: usnj937.us.ibm.com
replicabinddn: cn=usnj937
replicacredentials: XXXXXXX
replicaport: 636
replicabindmethod: SIMPLE
replicausessl: TRUE
replicaupdatetimeinterval: 0
seealso::
description::
objectclass: replicaObject
objectclass: top
dn: cn=xxgasrv02,cn=localhost
cn: xxgasrv02
replicahost: xxgasrv02.us.ibm.com
replicabinddn: cn=xxgasrv02
replicacredentials: XXXXXXX
replicaport: 636
replicabindmethod: SIMPLE
replicausessl: TRUE
replicaupdatetimeinterval: 0
seealso::
description::
objectclass: replicaObject
objectclass: top
dn: cn=gouksrv14,cn=localhost
cn: gouksrv14
replicahost: gouksrv14.uk.ibm.com
replicabinddn: cn=gouksrv14
replicacredentials: XXXXXXX
replicaport: 636
replicabindmethod: SIMPLE
replicausessl: TRUE
replicaupdatetimeinterval: 0
seealso::
description::
objectclass: replicaObject
objectclass: top
•UK Peer V15 Peer3.ldif
dn: cn=xxgasrv03, cn=localhost
cn: xxgasrv03
replicaBindDN: cn=ibmpeer
replicaCredentials: XXXXXXX
replicaPort: 636
replicaHost: xxgasrv03.us.ibm.com
replicaBindMethod: Simple
replicaUseSSL: TRUE
replicaUpdateTimeInterval: 0
objectclass: replicaObject
objectclass: top
dn: cn=usnj935, cn=localhost
cn: usnj935
replicaBindDN: cn=ibmpeer
replicaCredentials: XXXXXXX
replicaPort: 636
replicaHost: usnj935.us.ibm.com
replicaBindMethod: Simple
replicaUseSSL: TRUE
replicaUpdateTimeInterval: 0
objectclass: replicaObject
objectclass: top
dn: cn=usnj936,cn=localhost
cn: usnj936
replicahost: usnj936.us.ibm.com
replicabinddn: cn=usnj936
replicacredentials: XXXXXXX
replicaport: 636
replicabindmethod: SIMPLE
replicausessl: TRUE
replicaupdatetimeinterval: 0
seealso::
description::
objectclass: replicaObject
objectclass: top
dn: cn=usnj937,cn=localhost
cn: usnj937
replicahost: usnj937.us.ibm.com
replicabinddn: cn=usnj937
replicacredentials: XXXXXXX
replicaport: 636
replicabindmethod: SIMPLE
replicausessl: TRUE
replicaupdatetimeinterval: 0
seealso::
description::
objectclass: replicaObject
objectclass: top
dn: cn=xxgasrv02,cn=localhost
cn: xxgasrv02
replicahost: xxgasrv02.us.ibm.com
replicabinddn: cn=xxgasrv02
replicacredentials: XXXXXXX
replicaport: 636
replicabindmethod: SIMPLE
replicausessl: TRUE
replicaupdatetimeinterval: 0
seealso::
description::
objectclass: replicaObject
objectclass: top
dn: cn=gouksrv14,cn=localhost
cn: gouksrv14
replicahost: gouksrv14.uk.ibm.com
replicabinddn: cn=gouksrv14
replicacredentials: XXXXXXX
replicaport: 636
replicabindmethod: SIMPLE
replicausessl: TRUE
replicaupdatetimeinterval: 0
seealso::
description::
objectclass: replicaObject
objectclass: top
Peer-to-peer replication topology for ITDS 5.1 and later
Peer servers are Masters which not only propagate changes to replicas and forwarders below them but also receive changes from other master servers. Hence, peers are read-write replicas. Starting with ITDS 5.1, peers are configured in exactly the same way as the master servers and the terms Peer and Master can be used interchangeably.
Peer servers replicate all client updates but do not replicate updates received from other masters/peers. Client update refers to updates made by a bind DN other than the Master ServerDN (represented by ibm-slapdMasterDN attribute in the config file).
An example peer-to-peer replication topology is shown in Figure 13-7 on page 342.
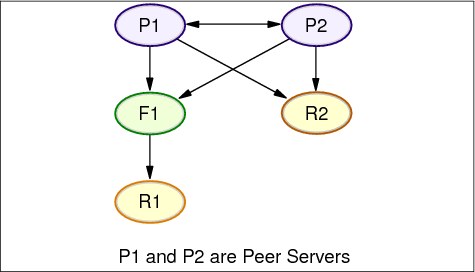
Figure 13-7 Peer-to-peer replication topology
13.3 Replication agreements
A replication agreement is an entry in the directory with the object class ibm-replicationAgreement created beneath a replica subentry to define replication from the server represented by the subentry to another server. These objects are similar to the replicaObject entries used by ITDS 4.1 and earlier.
The replication agreement consists of the following items:
•A user friendly name, used as the naming attribute for the agreement. This name might be the consumer server name or some other descriptive string.
•An LDAP URL specifying the server, port number, and whether SSL should be used.
•The consumer server id, if ITDS 5.1 and later will be defined in the ibmslapd.conf file as the ibm-slapdServerId, It will show unknown for a server whose server ID is not known as in a server running on IDS 4.1 and earlier. The consumer server id is used by the administrative GUI to traverse the topology. Given the consumer’s server ID, GUI can find the corresponding subentry and its agreements.
•The DN of an object containing the credentials used by the supplier to bind to the consumer. Because the replication agreement can be replicated, a DN to a credentials object is used. This allows the credentials to be stored in a nonreplicated area of the directory, like the cn=localhost. Replicating the credentials objects (from which clear text credentials must be obtainable) represents a potential security exposure. Use of a separate object also makes it easier to support various authentication methods; new object classes can be created rather than trying to make sense of numerous optional attributes.
•An optional DN pointer to an object containing the schedule information for replication. If the attribute is not present, changes are replicated immediately.
•You can designate that part of a replicated subtree not be replicated by adding the ibm-replicationContext auxiliary class to the root of the subtree, without defining any replica subentries.
|
Note: The Web Administration Tool also refers to agreements as queues when referring to the set of changes that are waiting to be replicated under a given agreement.
|
13.4 Configuring replication topologies
The following section describes the steps required for configuring IBM Tivoli Directory 5.2 server with the following examples:
1. One master with two replicas. And the directory has two suffixes.
2. One main master with two peer servers for one suffix and two peer servers for another suffix.
3. Sub tree replication where you take a non-suffix container and have a master with one replica for that sub tree.
For more configuring other types of topologies please refer to the IBM Tivoli Directory Server 5.2 administration guide at:
13.4.1 Simple master-replica topology
Configuring a simple master-replica scenario involves the following four steps:
1. Choose one server to act as the master and select the subtree in it to be replicated. For our example we will be having one master and two replicas with each replica being a replica on one of the two suffixes.
2. Create credentials to be used by the Master server.
3. Create replica servers.
4. Export data to the replica servers.
Using the Web Administration Tool
|
Note: If you are trying to make a non-suffix entry the replicated root, for example a sub container that is under the suffix, the following steps need to be done before the Add Subtree function is used.
Go to the Manage Entries panel. Select the entry and click Edit ACL. If you want to add Non-filtered ACLs, select that tab and add an entry cn=this with the role access-id for both ACLs and owners. Ensure that Propagate ACLs and Propagate owner are checked. If you want to add Filtered ACLs select that tab and add an entry cn=this with the role access-id for both ACLs and owners. Ensure that Accumulate filtered ACLs is unchecked and that Propagate owner is checked.
For manual loading by way of a ldif. you will need to add the following to the DN that you want to replicate.
For non-filtered ACLs:
ownersource: <same as the entry DN>
ownerpropagate: TRUE
aclsource: <same as the entry DN>
aclpropagate: TRUE
For filtered ACLs you will need to add the following:
ibm-filteraclinherit: FALSE
The above steps are not required for a suffix entry since a suffix gets all these ACLs by default.
|
Creating the Master Server
This task designates an entry as the root of an independently replicated subtree and creates a ibm-replicasubentry representing this server as the single master for the subtree. To create a replicated subtree, you must designate the subtree that you want the server to replicate.
|
Note: On the Linux, Solaris, and HP-UX platforms, if a referral fails because the server being referred to is not running, ensure that the environment variable LDAP_LOCK_REC has been set in your system environment. No specific value is required.
set LDAP_LOCK_REC=anyvalue
|

Figure 13-8 Web Admin Tool - Manage credentials
Creating credentials
Expand the Replication management category in the navigation area of the Web Administration Tool and click Manage credentials.
1. Select the location that you want to use to store the credentials from the list of subtrees. The Web Administration Tool allows you to define credentials in three locations:
– cn=replication,cn=localhost, which keeps the credentials only on the current server.
|
Note: In most replication cases, locating credentials in cn=replication,cn=localhost is preferred because it provides greater security than replicated credentials located on the subtree. If you are going to do this you will need to export the cn=replication,cn=localhost like the following:
cn=replication,cn=localhost
objectclass=container
objectclass=top
cn=replication
cn=masterbind,cn=replication,cn=localhost
replicaCredentials=secret01
description=master bind credential
objectclass=ibm-replicationCredentials
objectclass=ibm-replicationCredentialsSimple
objectclass=top
replicaBindDN=cn=masterbind
cn=masterbind
To each of the other replicas so they will have the credentials.n situations in which credentials located on cn=replication,cn=localhost are not available.
|
If you are trying to add a replica under a server, for example server A and you are connected to a different server with the Web Administration Tool, server B, the Select credentials field does not display the option cn=replication,cn=localhost. This is because you cannot read the information or update any information under cn=localhost of the server A when you are connected to server B.The cn=replication,cn=localhost is only available when the server under which you are trying to add a replica is the same server that you are connected to with the Web Administration Tool.
– cn=replication,cn=IBMpolicies, which is available even when the server under which you are trying to add a replica is not the same server that you are connected to with the Web Administration Tool. Credentials placed under this location are replicated to the servers.
|
Note: The location cn=replication,cn=IBMpolicies is only available, if the IBMpolicies support OID, 1.3.18.0.2.32.18, is present under the ibm-supportedcapabilities of the root DSE.
|
– Within the replicated subtree, in which case the credentials are replicated with the rest of the subtree. Credentials placed in the replicated subtree are created beneath the ibm-replicagroup=default entry for that subtree.
If no subtrees are displayed, go to “Creating the Master Server” on page 344 (replicated subtree) for instructions about creating the subtree that you want to replicate.
2. Click Add.
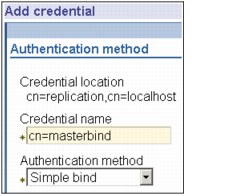
Figure 13-9 Add credential
3. Enter the name for the credentials you are creating, for example, masterbind, cn= is prefilled in the field for you, as shown in Figure 13-9.
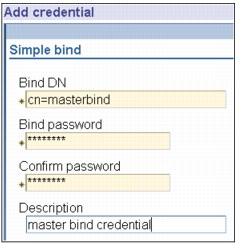
Figure 13-10 Simple bind
4. Select the type of authentication method you want to use and click Next, as shown in Figure 13-10 on page 347.
– If you selected simple bind authentication:
• Enter the DN that the server uses to bind to the replica, for example, cn=masterbind.
• Enter the password uses when it binds to the replica, for example, secret.
• Enter the password again to confirm that there are no typographical errors.
• If you want, enter a brief description of the credentials.
• Click Finish.
– If you selected Kerberos authentication:
• Enter your Kerberos bind DN.
• Enter the bind password.
• Reenter the bind password to confirm it.
• If you want, enter a brief description of the credentials. No other information is necessary.
• Click Finish.
By default, the supplier uses its own service principal to bind with the consumer. For example, if the supplier is named master.our.org.com and the realm is SOME.REALM, the DN is ibm-Kn=ldap/[email protected]. The realm value is case insensitive. If there is more than one supplier, you must specify the principal and password to be used by all of the suppliers.
On the server where you created the credentials:
Expand Directory management and click Manage entries.
Select the subtree where you stored the credentials, for example cn=localhost, and click Expand.
Select cn=replication and click Expand.
Select the kerberos credentials (ibm-replicationCredentialsKerberos) and click Edit attributes.
Click the Other attributes tab.
Enter the replicaBindDN, for example, [email protected].
Enter the replicaCredentials. This is the KDC password used for myprincipal. This principal and password should be the same as the ones you use to run kinit from the command line.
On Replica:
Click Manage replication properties in the navigation area.
Select a supplier from the Supplier information drop-down menu or enter the name of the replicated subtree for which you want to configure supplier credentials.
Click Edit.
Enter the replication bindDN. In this example, [email protected].
Enter and confirm the Replication bind password. This is the KDC password used for myprincipal.
If you selected SSL with certificate authentication you do not need to provide any additional information, if you are using the server's certificate. If you choose to use a certificate other than the server's:
Enter the key file name.
Enter the key file password.
Reenter the key file password to confirm it.
Enter the key label.
If you want, enter a brief description.
Click Finish.
5. Expand the Replication Management category in the navigation area and click Manage topology.

Figure 13-11 Add replicated subtree
b. Enter the DN of the subtree that you want to replicate or click Browse to expand the entries to select the entry that is to be the root of the subtree.
c. The master server referral URL is displayed in the form of an LDAP URL, for example ldap://<myservername>.<mylocation>.<mycompany>.com. This is optional and is used only if server contains (or will contain) any read-only subtrees.
d. To define a referral URL that is returned for updates to any read-only subtree on the server.
e. You could also just use the servername if you have defined in the hosts file or are using a DNS.
f. Click OK.
6. The new server is displayed on the Manage topology panel under the heading Replicated subtrees (Figure 13-12).
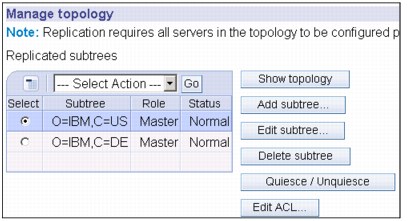
Figure 13-12 Manage topology
7. Create the Replica Server.
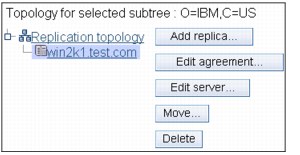
Figure 13-13 Show topology
Expand the Replication management category in the navigation area and click Manage topology, as shown in Figure 13-13 on page 350.
a. Select the subtree that you want to replicate and click Show topology.
b. Click the arrow next to the Replication topology selection to expand the list of supplier servers.
c. Select the supplier server and click Add replica.

Figure 13-14 Add replica
d. On the Server tab of the Add replica window (shown in Figure 13-14):
i. Enter the host name and port number for the replica you are creating. The default port is 389 for non-SSL and 636 for SSL. These are required fields.
ii. Select whether to enable SSL communications.
iii. Enter the replica name or leave this field blank to use the host name.
iv. Enter the replica ID. If the server on which you are creating the replica is running, click Get replica ID to automatically fill this field. This is a required field, if the server you are adding is going to be a peer or forwarding server. It is recommended for all IBM Tivoli Directory Server Version 5.2 replica servers.
v. Enter a description of the replica server.
vi. If a credential object is not selected in the Additional Tab, an error message will be displayed as shown in Figure 13-15.
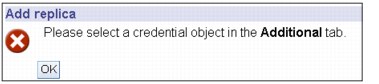
Figure 13-15 Error message when Additional is not used
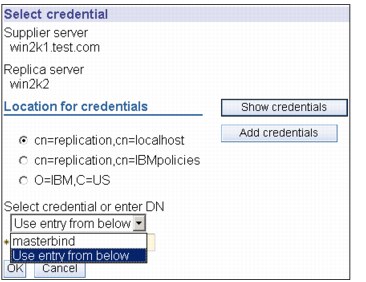
Figure 13-16 Additional tab - Select credential
8. On the Additional tab, shown in Figure 13-16, specify the credentials that the replica uses to communicate with the master. The Web Administration Tool allows you to define credentials in three places:
a. cn=replication,cn=localhost, which keeps the credentials only on the server that uses them.
b. cn=replication,cn=IBMpolicies, which is available even when the server under which you are trying to add a replica is not the same server that you are connected to with the Web Administration Tool. Credentials placed under this location are replicate to the servers. The location cn=replication,cn=IBMpolicies is only available, if the IBMpolicies support OID, 1.3.18.0.2.32.18, is present under the ibm-supportedcapabilities of the root DSE.
c. Within the replicated subtree, in which case the credentials are replicated with the rest of the subtree. Credentials placed in the replicated subtree are created beneath the ibm-replicagroup=default entry for that subtree.
|
Note: Placing credentials in cn=replication,cn=localhost is considered more secure.
|
d. Click Select.
e. Select the location for the credentials you want to use. Preferably this is cn=replication,cn=localhost.
f. Click Show credentials.
g. Expand the list of credentials and select the one you want to use.
h. Click OK.
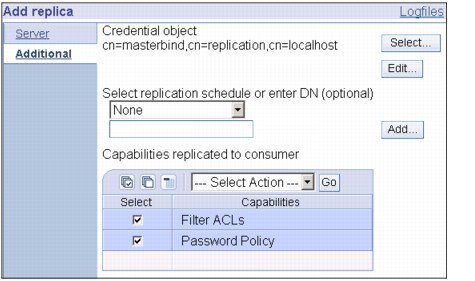
Figure 13-17 Replication schedule and capabilities
9. Specify a replication schedule from the drop-down list or click Add to create one, as shown in Figure 13-17. If you do not specify one it will be default as immediately See Creating replication schedules (page 381).
10. From the list of supplier capabilities, you can deselect any capabilities that you do not want replicated to the consumer.
– If your network has a mix of servers of different releases, capabilities are available on later releases that are not available on earlier releases. Some capabilities, like filter ACLs and password policy, make use of operational attributes that are replicated with other changes. In most cases, if these features are used, you want all servers to support them. If all of the servers do not support the capability, you do not want to use it. For example, you would not want different ACLs in effect on each server. However, there might be cases where you might want to use a capability on the servers that support it, and not have changes related to the capability replicated to servers that do not support the capability. In such cases, you can use the capabilities list to mark certain capabilities to not be replicated.
– Click OK to create the replica.
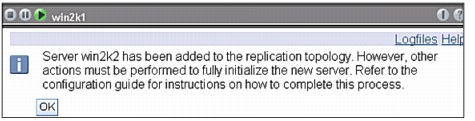
Figure 13-18 Add replica message
11. A message is displayed noting that additional actions must be taken, as shown in Figure 13-18.
– Click OK.
– The topology will now look like Figure 13-19.
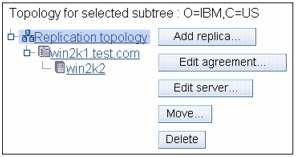
Figure 13-19 Topology after the add
|
Note: If you are adding more servers as additional replicas or are creating a complex topology, do not proceed with Copying data to the replica (that is, the next step) or Adding the supplier information to the replica until you have finished defining the topology on the master server. If you create the masterfile.ldif after you have completed the topology, it contains the directory entries of the master server and a complete copy of the topology agreements. When you load this file on each of the servers, each server then has the same information.
|
12. Copy data to the replica.
After creating the replica, you must now export the topology from the master to the replica. This is a manual procedure.
On the master server create an LDIF file for the data. To copy all the data contained on the master server, issue the command:
db2ldif -o c:masterfile.ldif
Also you will need to issue the following command to get a copy of the credentials that are in the cn=localhost:
db2ldif -o c:localhost.ldif -s "cn=replication,cn=localhost"
The ‘-s’ will allow you to just get the data from a single subtree like cn=replication,cn=localhost.
|
Note: The four operational attributes, createTimestamp, creatorsName, modifiersName, and modifyTimestamp are exported to the LDIF file unless the -j option is specified.
|
On the machine which you are configuring as the replica:
1. Ensure that the suffixes used by the master are defined in the ibmslapd.conf file.
2. Stop the replica server.
3. Copy both ldif files to the replica and issue the commands:
ldif2db -r no -i masterfile.ldif
ldif2db -r no -i localhost.ldif
(The ‘-r no’ says not to replicate the data that is loaded.)
The replication agreements, schedules, credentials and entry data are loaded on the replica.
4. Start the server.
Adding supplier information to the replica
You need to change the replica's configuration to identify who is authorized to replicate changes to it, and add a referral to a master.
You can use either of these two options, depending on your situation.
•Set the replication bind DN (and password) and a default referral for all subtrees replicated to a server using the 'default credentials and referral'. This might be used when all subtrees are replicated from the same supplier.
•Set the replication bind DN and password independently for each replicated subtree by adding supplier information for each subtree. This might be used when each subtree has a different supplier (that is, a different master server for each subtree).
On the machine where you are creating the replica (that is, connect the Web admin tool to the replica server) for normal master and replica replication it is best to use 'default credentials and referral'. We will cover the user of a subtree later in this section.
1. Expand Replication management in the navigation area and click Manage replication properties, as shown in Figure 13-20.
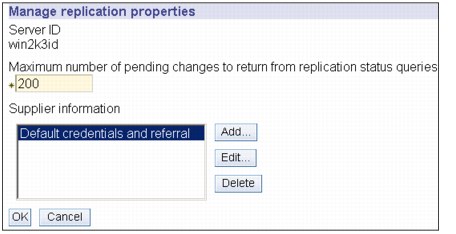
Figure 13-20 Manage replication properties
2. Highlight default credentials and referral and click Edit, and the window in Figure 13-21 on page 357 is shown.
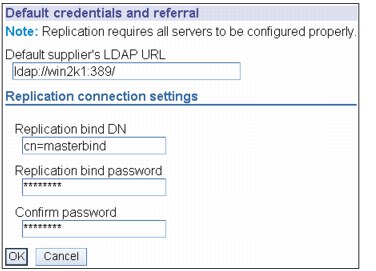
Figure 13-21 Edit default credentials and referral
3. Enter in the suppliers LDAP URL in this format: ldap://supplier name: port number/.
4. Enter the replication bindDN. In this example, cn=masterbind.
5. Depending on the type of credential, enter and confirm the credential password. (You previously recorded this for future use.)
– Simple Bind - Specify the DN and password.
– Kerberos - If the credentials on the supplier do not identify the principal and password, that is, the server's own service principal is to be used, then the bind DN is ibm-kn=ldap/<yourservername@yourrealm>. If the credentials has a principal name such as <myprincipal@myrealm>, use that as the DN. In either case a password in not needed.
– SSL w/ EXTERNAL bind - Specify the subject DN for the certificate and no password.
6. Click OK.
7. You must restart the replica for the changes to take effect.
|
Note: What this last step really did was to add the following to the ibmslapd.conf file:
dn: cn=Master Server, cn=configuration
cn: Master Server
ibm-slapdMasterDN: cn=masterbind
ibm-slapdMasterPW: >encrypted password<
ibm-slapdMasterReferral: ldap://win2k1:389/
objectclass: ibm-slapdConfigEntry
objectclass: ibm-slapdReplication
objectclass: top
This is the reason why you need to re-start the ibmslapd process. This will be read in when you bring back up ibmslapd.
|
8. The replica is in a suspended state by default when you create them and no replication is occurring. After you have finished setting up your replication topology, you must log onto the Web Admin tool on the Master server and click Manage queues, the window shown in Figure 13-22 is shown.

Figure 13-22 Manage queues on the master server
9. Select the replica and click Suspend/resume to start replication. It will come up in Active state first, as shown in Figure 13-23 on page 359.

Figure 13-23 Manage queues select replica

Figure 13-24 Queue details
11. Click Last attempted details and then click Refresh. This shows OK, as shown in Figure 13-25 on page 360

Figure 13-25 Queue status last attempted details

Figure 13-26 Queue details pending changes
12. Pending changes shows the count of ‘0’. This means that there are no more changes pending, as shown in Figure 13-26.
13. See Manage queues, as shown in Figure 13-27 on page 361, for more detailed information. The replica now receives updates from the master.
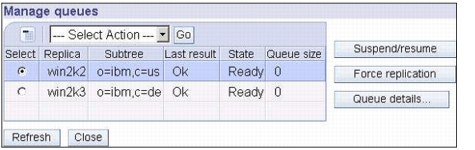
Figure 13-27 Manage queues showing both subtrees replication working
14. Doing the same steps for the other suffix, now both suffixes replication is working with out problems.
13.4.2 Using the command line
|
Note: As you can tell from using the Web admin tool that it does take time. It is better if you use the Web admin tool for only simple replication scenarios and use command line and LDIF files for any complex replication scenarios.
This scenario assumes that you are creating new replicated subtrees.
|
Create a LDIF file with the information in Example 13-1 on page 362, named masterreplica.ldif and then load with the following command after you stop the master and replicas:
ldif2db -r no -i c:masterreplica.ldif
Load this Into all the servers in the replication before you load customer data. To create one or more replicas for one or more subtrees, you need to create a replica agreement between the master and the replicas. The relationship between the three servers is that the master is the supplier to the two replicas and the replicas are a consumer of the master.
In Example 13-1 on page 362 we used the changed ibm-slapdServerId instead of the ID that would have been generated. The ones we used were win2k1uid, win2k2id, and win2k3id. If you were using the regular ones that were generated on install then you would have to use those in place of the ones we used. This ldif file is built for servers that are ITDS 5.1 and later.
|
Note: If you are copying a subtree to a IDS 4.1 or earlier server, you must not copy the ibm-replicagroup=default subtree and you must remove the ibm-replicationcontext auxiliary class, because neither of these are supported by the 4.1 schema.
|
Example 13-1 masterreplica.ldif file
###Replication Context - needs to be on all servers in replication
dn: cn=replication,cn=localhost
objectclass=container
objectclass=top
cn=replication
###Replication Credentials - needs to be on all servers in ###replication agreement
dn: cn=masterbind,cn=replication,cn=localhost
replicaCredentials=secret
description=master bind credential
objectclass=ibm-replicationCredentials
objectclass=ibm-replicationCredentialsSimple
objectclass=top
replicaBindDN=cn=masterbind
cn=masterbind
###New objectclass ibm-replicationContext needs to be attach to each ###subtree / suffix that is replicated and what the replica referral ###URL will be for that replication
dn: o=ibm,c=us
objectclass: organization
objectclass: top
objectclass: ibm-replicationContext
o: ibm
ibm-replicareferralurl: ldap://win2k1:389
dn: o=ibm,c=de
objectclass: organization
objectclass: top
objectclass: ibm-replicationContext
o: ibm
ibm-replicareferralurl: ldap://win2k1:389
###Replication entry for IBMpolicies
dn: cn=replication,cn=IBMpolicies
objectclass: container
objectclass: top
cn: replication
###Replica Group for o=ibm,c=us
dn: ibm-replicaGroup=default,o=ibm,c=us
ibm-replicaGroup: default
objectclass: ibm-replicaGroup
objectclass: top
###Replica SubEntry for o=ibm,c=us
dn: cn=win2k1.test.com,ibm-replicaGroup=default,o=ibm,c=us
objectclass: ibm-replicaSubentry
objectclass: top
ibm-replicaServerId: win2k1uid
ibm-replicationServerIsMaster: TRUE
cn: win2k1.test.com
###Replica Group for o=ibm,c=de
dn: ibm-replicaGroup=default,o=ibm,c=de
ibm-replicaGroup: default
objectclass: ibm-replicaGroup
objectclass: top
###Replica SubEntry for o=ibm,c=de
dn: cn=win2k1.test.com,ibm-replicaGroup=default,o=ibm,c=de
objectclass: ibm-replicaSubentry
objectclass: top
ibm-replicaServerId: win2k1uid
ibm-replicationServerIsMaster: TRUE
cn: win2k1.test.com
###Replication Agreement to Replica Sever for o=ibm,c=us
dn: cn=win2k2,cn=win2k1.test.com,ibm-replicaGroup=default,O=IBM,C=US
ibm-replicaConsumerId: win2k2id
ibm-replicationOnHold: TRUE
ibm-replicaCredentialsDN: cn=masterbind,cn=replication,cn=localhost
ibm-replicaURL: ldap://win2k2:389
description: Win 2k 2 server
objectclass: ibm-replicationAgreement
objectclass: top
cn: win2k2
###Replication Agreement to Replica Sever for o=ibm,c=de
dn: cn=win2k3,cn=win2k1.test.com,ibm-replicaGroup=default,O=IBM,C=DE
ibm-replicaConsumerId: win2k3id
ibm-replicationOnHold: TRUE
ibm-replicaCredentialsDN: cn=masterbind,cn=replication,cn=localhost
ibm-replicaURL: ldap://win2k3:389
description: win 2k 3 replica
objectclass: ibm-replicationAgreement
objectclass: top
cn: win2k3
Add the following to the ibmslapd.conf files or the replicas:
dn: cn=Master Server, cn=configuration
cn: Master Server
ibm-slapdMasterDN: cn=masterbind
ibm-slapdMasterPW: secret
ibm-slapdMasterReferral: ldap://win2k1:389/
objectclass: ibm-slapdConfigEntry
objectclass: ibm-slapdReplication
objectclass: top
When you have done these steps you can start all the servers and test out to see if replication is working. The best way to do this is to bring up the Web Administration tool and check manage queues, as shown in Figure 13-27 on page 361.
13.4.3 Promoting a replica to peer/master
The below scenario describes the steps required to promote a replica to master so that it becomes a peer to its former master. In order to configure a server as a peer to a given server, it has to be added as a replica to the master and then promoted to a peer as described below. We will take what we did with the scenario we just finish working with and now make them peer to peer for each suffix.
1. Connect the Web Administration Tool to the master and click Replication Management.
2. Select the appropriate subtree from the right hand panel and click Show topology. The replication topology for the given subtree is displayed in Figure 13-28 on page 365.
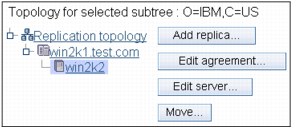
Figure 13-28 Show topology
|
Note: The replica that you want to promote to a peer should not have other replicas configured below it.
|
3. Select the appropriate replica you want to promote to a peer from the replication topology and click Move.
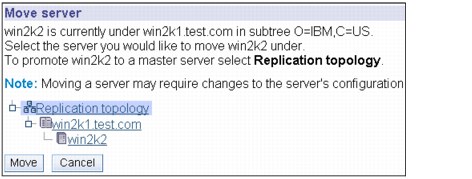
Figure 13-29 Move server
4. On the screen that appears (Figure 13-29), Replication topology is highlined by default. Take the default and click Move.

Figure 13-30 Additional supplier agreements
5. The next screen (Figure 13-30) asks for agreements to be created from the newly promoted peer to the existing masters and replicas in the topology. It will default with a checkmark on the one that you will make peer to peer. Click Continue.

Figure 13-31 Move message
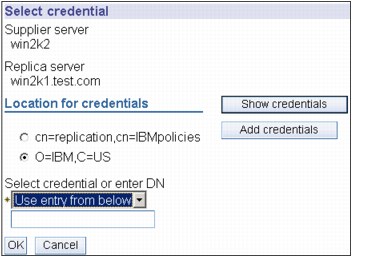
Figure 13-32 Select credential
7. You will need to click Add Credentials with the radio button on o=ibm,c=us, as shown in Figure 13-32.
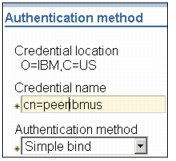
Figure 13-33 Authentication method
8. Fill in Credential name for example, cn=peeribmus and keep it Simple Bind, as shown in Figure 13-33.
9. Click Next.

Figure 13-34 Simple bind
10. Fill in the bind DN, that is, cn=peeribmus and the Bind password, that is, secret. Enter the same password to confirm. You can put in a description if you want, as shown in Figure 13-34.
11. Click Finish.
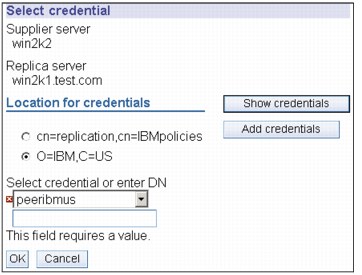
Figure 13-35 Select credential
12. Click the down arrow and pick the credential you just made (peeribmus), as shown in Figure 13-35.
13. Click OK.
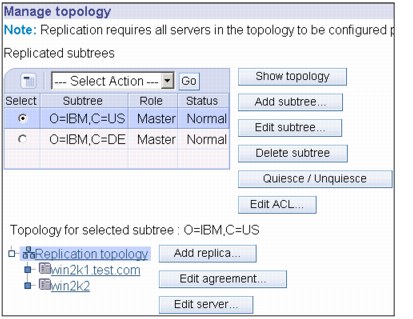
Figure 13-36 Manage topology
14. The screen in Figure 13-36, shows that the replica has been promoted to a peer.
15. The next step is to build the supplier (win2k2) information on the new replica (win2k1) Click Add and pick o=ibm,c=us. Then click OK, as shown in Figure 13-37 on page 370.
.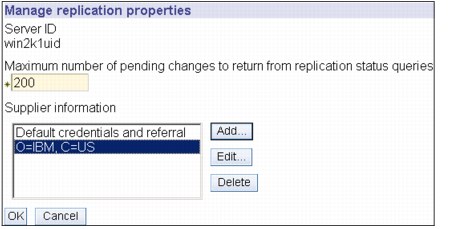
Figure 13-37 Manage replication properties on master server
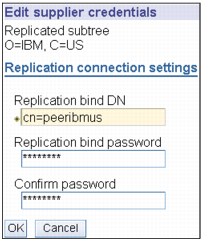
Figure 13-38 Supplier credentials
16. Enter the bind DN that you created on the supplier, that is, cn=peeribmus and enter bind password twice, that is, secret, as shown in Figure 13-38.
17. Click OK.
18. Restart the replica to have it take affect.
19. Log on to the Web Admin Tool for Win2k2 the new supplier and click Manage queues, as shown in Figure 13-39 on page 371.
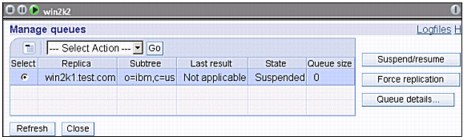
Figure 13-39 Manage queues for Win2k2 supplier
20. Click Suspend/resume to start up the replication. Buy default it will come up in Suspended state, as shown in Figure 13-40.

Figure 13-40 Manage queues
21. Do the same steps for the other suffix on Win2k3 for o=ibm,c=de, as shown in Figure 13-41.

Figure 13-41 Topology for o=ibm,c=de
|
Note: When you are adding the supplier information to the replica for the new peers the following is added to the new replica’s ibmslapd.conf file:
dn: cn=Supplier1073686491445, cn=configuration
cn: Supplier1073686491445
ibm-slapdMasterDN: cn=peeribmus
ibm-slapdMasterPW: >encrypted password<
ibm-slapdReplicaSubtree: O=IBM, C=US
objectclass: ibm-slapdConfigEntry
objectclass: ibm-slapdSupplier
objectclass: top
dn: cn=Supplier1073687936616, cn=configuration
cn: Supplier1073687936616
ibm-slapdMasterDN: cn=peeribmde
ibm-slapdMasterPW: >encrypted password<
ibm-slapdReplicaSubtree: O=IBM, C=DE
objectclass: ibm-slapdConfigEntry
objectclass: ibm-slapdSupplier
objectclass: top
|
13.4.4 Command line for a complex replication
For any Complex Replication agreements it is best that you do it by command line and load individual LDIF loads. This way you can lay everything out first. It will take a very long time and more work to do it with the Web Admin Tool.
For this scenario we will be using only one bind credential that will be under cn=localhost. There are two subtree replications. There is one master server that has both subtree fully loaded and one of the two subtrees has two more peer masters and the other subtree has two more peer masters for a total of five servers.
Example 13-2 LDIF file for complex replication setup
dn: cn=replication,cn=localhost
objectclass: container
objectclass: top
cn: replication
###Replication Group
dn: ibm-replicaGroup=default,ou=people,o=ibm,c=us
objectclass: top
objectclass: ibm-replicaGroup
ibm-replicaGroup: default
###Bind Credentials/method to Peer server - replication agreement
###points to this.
dn: cn=ReplicationCreds,cn=replication,cn=localhost
objectclass: ibm-replicationCredentialsSimple
cn: ReplicationCreds
replicaBindDN: cn=master
replicaCredentials: master
description: Bindmethod of master to Peer1
###Master SubEntry for ou=people,o=ibm,c,us
dn: cn=win2k1.test.com,ibm-replicaGroup=default,ou=people,o=ibm,c=us
objectclass: top
objectclass: ibm-replicaSubentry
ibm-replicaServerId: win2k1
ibm-replicationServerIsMaster: true
cn: masterpeer
description: masterpeer server
### Peer2 Subentry
dn: cn=win2k2.test.com,ibm-replicaGroup=default,ou=people,o=ibm,c=us
objectclass: top
objectclass: ibm-replicaSubentry
ibm-replicaServerId: win2k2
ibm-replicationServerIsMaster: true
cn: peer2
description: peer2 server
### Peer3 SubEntry
dn: cn=win2k3.test.com,ibm-replicaGroup=default,ou=people,o=ibm,c=us
objectclass: top
objectclass: ibm-replicaSubentry
ibm-replicaServerId: win2k3
ibm-replicationServerIsMaster: true
cn: peer3
description: peer3 server
###Masterpeer to peer2 agreement
dn: cn=peer2,cn=win2k1.test.com,ibm-replicaGroup=default,ou=people,o=ibm,c=us
objectclass: top
objectclass: ibm-replicationAgreement
cn: peer2
ibm-replicaConsumerId: win2k2
ibm-replicaUrl: ldap://win2k2:389
ibm-replicaCredentialsDN: cn=ReplicationCreds,cn=replication,cn=localhost
description: Masterpeer to peer2 server
###Masterpeer to peer3 agreement
dn: cn=peer3,cn=win2k1.test.com,ibm-replicaGroup=default,ou=people,o=ibm,c=us
objectclass: top
objectclass: ibm-replicationAgreement
cn: peer3
ibm-replicaConsumerId: win2k3
ibm-replicaUrl: ldap://win2k3:389
ibm-replicaCredentialsDN: cn=ReplicationCreds,cn=replication,cn=localhost
description: Masterpeer to peer3 server
###peer2 to Master agreement
dn: cn=masterpeer,cn=win2k2test.com,ibm-replicaGroup=default,ou=people,o=ibm,c=us
objectclass: top
objectclass: ibm-replicationAgreement
cn: Masterpeer
ibm-replicaConsumerId: win2k1
ibm-replicaUrl: ldap://win2k1:389
ibm-replicaCredentialsDN: cn=ReplicationCreds,cn=replication,cn=localhost
description: Peer 2 to Masterpeer server
###peer2 to Peer3 agreement
dn: cn=peer3,cn=win2k2test.com,ibm-replicaGroup=default,ou=people,o=ibm,c=us
objectclass: top
objectclass: ibm-replicationAgreement
cn: peer3
ibm-replicaConsumerId: win2k3
ibm-replicaUrl: ldap://win2k3:389
ibm-replicaCredentialsDN: cn=ReplicationCreds,cn=replication,cn=localhost
description: Peer 2 to Peer 3 server
###peer3 to Master agreement
dn: cn=masterpeer,cn=win2k3.test.com,ibm-replicaGroup=default,ou=people,o=ibm,c=us
objectclass: top
objectclass: ibm-replicationAgreement
cn: Masterpeer
ibm-replicaConsumerId: win2k1
ibm-replicaUrl: ldap://win2k1:389
ibm-replicaCredentialsDN: cn=ReplicationCreds,cn=replication,cn=localhost
description: Peer 3 to Masterpeer server
###peer3 to Peer2 agreement
dn: cn=peer2,cn=win2k3.test.com,ibm-replicaGroup=default,ou=people,o=ibm,c=us
objectclass: top
objectclass: ibm-replicationAgreement
cn: peer2
ibm-replicaConsumerId: win2k2
ibm-replicaUrl: ldap://win2k2:389
ibm-replicaCredentialsDN: cn=ReplicationCreds,cn=replication,cn=localhost
description: Peer 3 to Peer 2 server
###Replication Group
dn: ibm-replicaGroup=default,ou=app,o=ibm,c=us
objectclass: top
objectclass: ibm-replicaGroup
ibm-replicaGroup: default
###Master SubEntry ou=app,o=ibm,c=us
dn: ibm-replicaServerId=win2k1,ibm-replicaGroup=default,ou=app,o=ibm,c=us
objectclass: top
objectclass: ibm-replicaSubentry
ibm-replicaServerId: win2k1
ibm-replicationServerIsMaster: true
cn: master
description: master server
###Peer 4 SubEntry
dn: ibm-replicaServerId=win2k4,ibm-replicaGroup=default,ou=app,o=ibm,c=us
objectclass: top
objectclass: ibm-replicaSubentry
ibm-replicaServerId: win2k4
ibm-replicationServerIsMaster: true
cn: peer4
description: Peer 4 server
### Peer5 Subentry
dn: cn=win2k5.test.com,ibm-replicaGroup=default,ou=app,o=ibm,c=us
objectclass: top
objectclass: ibm-replicaSubentry
ibm-replicaServerId: win2k5
ibm-replicationServerIsMaster: true
cn: peer5
description: peer1 server
###Master to peer5 agreement
dn: cn=win2k5,cn=win2k1.test.com,ibm-replicaGroup=default,ou=app,o=ibm,c=us
objectclass: top
objectclass: ibm-replicationAgreement
cn: peer5
ibm-replicaConsumerId: win2k5
ibm-replicaUrl: ldap://win2k5:389
ibm-replicaCredentialsDN: cn=ReplicationCreds,cn=replication,cn=localhost
description: master to peer5 server
###peer5 to master agreement
dn: cn=win2k1,cn=win2k5.test.com,ibm-replicaGroup=default,ou=app,o=ibm,c=us
objectclass: top
objectclass: ibm-replicationAgreement
cn: master
ibm-replicaConsumerId: win2k1
ibm-replicaUrl: ldap://win2k1:389
ibm-replicaCredentialsDN: cn=ReplicationCreds,cn=replication,cn=localhost
description: peer5 to master server
###master to peer4 agreement
dn: cn=win2k4,cn=win2k1.test.com,ibm-replicaGroup=default,ou=app,o=ibm,c=us
objectclass: top
objectclass: ibm-replicationAgreement
cn: peer4
ibm-replicaConsumerId: win2k4
ibm-replicaUrl: ldap://win2k4:389
ibm-replicaCredentialsDN: cn=ReplicationCreds,cn=replication,cn=localhost
description: master to peer4 server
###peer4 to master agreement
dn: cn=win2k1,cn=win2k4.test.com,ibm-replicaGroup=default,ou=app,o=ibm,c=us
objectclass: top
objectclass: ibm-replicationAgreement
cn: master
ibm-replicaConsumerId: win2k4
ibm-replicaUrl: ldap://win2k4:389
ibm-replicaCredentialsDN: cn=ReplicationCreds,cn=replication,cn=localhost
description: peer4 to master server
###Peer4 to peer5 agreement
dn: cn=win2k5,cn=win2k4.test.com,ibm-replicaGroup=default,ou=app,o=ibm,c=us
objectclass: top
objectclass: ibm-replicationAgreement
cn: peer4
ibm-replicaConsumerId: win2k5
ibm-replicaUrl: ldap://win2k5:389
ibm-replicaCredentialsDN: cn=ReplicationCreds,cn=replication,cn=localhost
description: peer4 to peer5 server
###peer5 to peer4 agreement
dn: cn=win2k4,cn=win2k5.test.com,ibm-replicaGroup=default,ou=app,o=ibm,c=us
objectclass: top
objectclass: ibm-replicationAgreement
cn: peer5
ibm-replicaConsumerId: win2k4
ibm-replicaUrl: ldap://win2k4:389
ibm-replicaCredentialsDN: cn=ReplicationCreds,cn=replication,cn=localhost
description: peer5 to peer4 server one
Add the following to the ibmslapd.conf files for all five servers:
dn: cn=Master Server, cn=configuration
cn: Master Server
ibm-slapdMasterDN: cn=masterbind
ibm-slapdMasterPW: secret
ibm-slapdMasterReferral: ldap://win2k1:389/
objectclass: ibm-slapdConfigEntry
objectclass: ibm-slapdReplication
objectclass: top
13.5 Web administration tasks for managing replication
This part of the section covers tasks that have not be covers elsewhere in this section on Replication that can done using the Web Administration GUI.
13.5.1 Managing topology
In this section we discuss managing topology.
Editing an agreement
From the Replication topology displayed, select a replication agreement by clicking it. Then click Edit agreement. You can change the following information for the replica:
•On the Server tab you can only change:
– Hostname
– Port
– Enable SSL
– Description
•On the Additional tab you can change:
– Credentials.
– Replication schedules.
– Change the capabilities replicated to the consumer replica. From the list of supplier capabilities, you can deselect any capabilities that you do not want replicated to the consumer.
Editing a server
|
Note: A gateway server must be an IBM Tivoli Directory Server Version 5.2 server or an IBM Directory Server Version 5.1 server with a fix pack (FP1 or later) that supports gateway replication.
|
You can designate whether a master server is to have the role of a gateway server in the replication site.
To designate a master as a gateway server, select the Server is a gateway check box.
To remove the role of a gateway server from a master server, deselect the Server is a gateway check box.
Demoting a master server
To change the role of a server from a master to a replica do the following:
1. Connect the Web Administration Tool to the server that you want to demote.
2. Click Manage topology.
3. Select the subtree and click Show topology.
4. Delete all the agreements for the server you want to demote.
5. Select the server you are demoting and click Move.
6. Select the server under which you are going to place the demoted server and click Move.
7. Just as you would for a new replica, create new supplier agreements between the demoted server and its supplier.
Replicating a subtree
To replicate a subtree, expand the Replication management category in the navigation area and click Manage topology, and perform the following steps:
1. Click Add subtree.
2. Enter the DN of the subtree that you want to replicate or click Browse to expand the entries to select the entry that is to be the root of the subtree.
3. Enter the master server referral URL. This must be in the form of an LDAP URL, for example ldap://<myservername>.<mylocation>.<mycompany>.com.
4. Click OK.
5. The new subtree is displayed on the Manage topology panel under the heading Replicated subtrees.
|
Note: On the Linux, Solaris, and HP-UX platforms, if a referral fails, ensure that the environment variable LDAP_LOCK_REC has been set in your system environment. No specific value is required.
set LDAP_LOCK_REC=anyvalue
|
Editing a subtree
Use this option to change the URL of the master server that this subtree and its replicas send updates to. You need do this if you change the port number or host name of the master server, change the master to a different server. To edit a subtree perform the following steps:
1. Select the subtree you want to edit.
2. Click Edit subtree.
3. Enter the master server referral URL. This must be in the form of an LDAP URL, for example ldap://<mynewservername>.<mylocation>.<mycompany>.com.
Depending on the role being played by the server on this subtree (whether it is a master, replica or forwarder), different labels and buttons appear on the panel.
•When the subtree's role is replica, a label indicating that the server acts as a replica or forwarder is displayed along with the button Make server a master. If this button is clicked then the server which the Web Administration Tool is connected to becomes a master.
•When the subtree is configured for replication only by adding the auxiliary class (no default group and subentry present), then the label This subtree is not replicated is displayed along with the button Replicate subtree. If this button is clicked, the default group and the subentry is added so that the server with which the Web Administration Tool is connected to becomes a master.
•If no subentries for the master servers are found, the label No master server is defined for this subtree is displayed along with the button titled Make server a master. If this button is clicked, the missing subentry is added so that the server with which the Web Administration Tool is connected to becomes a master.
Removing a subtree
To remove a subtree:
1. Select the subtree you want to remove
2. Click Delete subtree.
3. When asked to confirm the deletion, click OK.
4. The subtree is removed from the Replicated subtree list.
|
Note: This operation succeeds only if the ibm-replicaGroup=default is entry is empty.
|
Quiescing the subtree
This function is useful when you want to perform maintenance on or make changes to the topology. It minimizes the number of updates that can be made to the server. A quiesced server does not accept client requests. It accepts requests only from an administrator using the Server Administration control. This function is Boolean. To quiesce or unquiesce the subtree perform the following steps:
1. Click Quiesce/Unquiesce to quiesce the subtree.
2. When asked to confirm the action, click OK.
3. Click Quiesce/Unquiesce to unquiesce the subtree.
4. When asked to confirm the action, click OK.
Editing access control lists
Replication information (replica subentries, replication agreements, schedules, possibly credentials) are stored under a special object, ibm-replicagroup=default. The ibm-replicagroup object is located immediately beneath the root entry of the replicated subtree. By default, this subtree inherits ACL from the root entry of the replicated subtree. This ACL might not be appropriate for controlling access to replication information.
Required authorities:
•Control replication - You must have write access to the ibm-replicagroup=default object (or be the owner/administrator).
•Cascading control replication - You must have write access to the ibm-replicagroup=default object (or be the owner/administrator).
•Control queue - You must have write access to the replication agreement.
13.5.2 Modifying replication properties
Expand the Replication management category in the navigation area and click Manage replication properties. On this panel you can:
•Change the maximum number of pending changes to return from replication status queries. The default is 200.
•Add, edit, or delete supplier information. Click OK. The subtree of the supplier is added to the Supplier information list.
Editing supplier information
To edit the supplier information, perform the following:
1. Select the supplier subtree that you want to edit.
2. Click Edit.
3. If you are editing Default credentials and referral, which is used to create the cn=Master Server entry under cn=configuration, enter the URL of the server from which the client wants to receive replica updates in the Default supplier's LDAP URL field. This needs to be a valid LDAP URL (ldap://). Otherwise, skip to step 4.
4. Enter the replication bind DN for the new credentials you want to use.
5. Enter and confirm the credential password.
6. Click OK.
Removing supplier information
To remove the supplier information, perform the following steps:
1. Select the supplier subtree that you want to remove.
2. Click Delete.
3. When asked to confirm the deletion, click OK.
4. The subtree is removed from the Supplier information list.
13.5.3 Creating replication schedules
By default, the changes made on the master/peer server are replicated immediately. But, we can define an optional replication schedule object and attach it to a replication agreement in order to allow replication of changes at given times in a day and given day in a week. Schedules are defined per replication agreement.
Expand the Replication management category in the navigation area and click Manage schedules.
Creating a daily schedule
In this section we discuss creating a daily schedule.

Figure 13-42 Add daily schedule
On the Daily schedule tab, select the subtree for which you want to create the schedule and click Show schedules. If any schedules exist, they are displayed in the Daily schedules box. To create or add a new schedule, refer to Figure 13-42, and perform the following steps:
1. Click Add. Enter a name for the schedule. For example monday1.
2. Select the time zone setting, either UTC or local.
3. Select a replication type from the drop-down menu:
– Immediate
Performs any pending entry updates since the last replication event and then updates entries continuously until the next scheduled update event is reached.
– Once
Performs all pending updates prior to the starting time. Any updates made after the start time wait until the next scheduled replication event.
Select a start time for the replication event.
4. Click Add. The replication event type and time are displayed.
a. Add or remove events to complete your schedule. The list of events is refreshed in chronological order.
b. When you are finished, click OK.
|
Note: If replication events are scheduled too closely together, a replication event might be missed if the updates from the previous event are still in progress when the next event is scheduled
|
c. You can select a day and click Add a daily schedule to create a daily replication schedule for it. If you create a daily schedule it becomes the default schedule for each day of the week. You can:
• Keep the daily schedule as the default for each day or select a specific day and change the schedule back to none. Remember that the last replication event that occurred is still in effect for a day that has no replication events scheduled.
• Modify the daily schedule by selecting a day and clicking Edit a daily schedule. Remember changes to a daily schedule affect all days using that schedule, not just the day you selected.
• Create a different daily schedule by selecting a day and clicking Add a daily schedule. After you have created this schedule it is added to the Daily schedule drop-down menu. You must select this schedule for each day that you want the schedule to be used.
d. When you are finished, click OK.
Creating a weekly schedule
In this section we discuss how to create a weekly schedule.
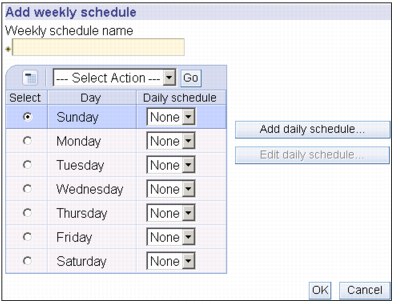
Figure 13-43 Add weekly schedule
On the Weekly schedule tab, select the subtree for which you want to create the schedule and click Show schedules. If any schedules exist, they are displayed in the Weekly schedules box. To create or add a new schedule, refer to Figure 13-43, and perform the following steps:
1. Click Add.
2. Enter a name for the schedule. For example schedule1.
3. For each day, Sunday through Saturday, the daily schedule is specified as None. This means that no replication update events are scheduled. The last replication event, if any, is still in effect. Because this is a new replica, there are no prior replication events, therefore, the schedule defaults to immediate replication.
13.5.4 Managing queues
This task allows you to monitor status of replication for each replication agreement (queue) used by this server.
Expand the Replication management category in the navigation area and click Manage queues.
1. Select the replica for which you want to manage the queue.
2. Depending on the status of the replica, you can click Suspend/resume to stop or start replication.
3. Click Force replication to replicate all the pending changes regardless of when the next replication is scheduled.
4. Click Queue details, for more complete information about the replica's queue. You can also manage the queue from this selection.
5. Click Refresh to update the queues and clear server messages.
Queue details
If you clicked Queue details, three tabs are displayed:
•Status
•Last attempted details
•Pending changes
The Status tab displays the replica name, its subtree, its status, and a record of replication times. From this panel you can suspend or resume replication by clicking Resume. Click Refresh to update the queue information.
The Last attempted details tab gives information about the last update attempt. If an entry is not able to be loaded click Skip blocking entry to continue replication with the next pending entry. Click Refresh to update the queue information.
The Pending changes tab shows all the pending changes to the replica. If replication is blocked you can delete all the pending changes by clicking Skip all. Click Refresh to update the list of pending changes to reflect any new update or updates that have been processed.
13.6 Repairing replication differences between replicas
This section discusses ways to repair replication differences between replicas, and provides two examples, Example 13-3 on page 392 and Example 13-4 on page 393.
13.6.1 The ldapdiff command tool
LDAPDIFF is the LDAP replica synchronization tool. If you find that you have a replica that might be out of sync with the master you can use this process to sync up the replica to match the master for both data and schema.
Synopsis
This shows how to use the ldapdiff to test to see if there are differences between master and replicas data:
ldapdiff -b baseDN -sh host -ch host [-a] [-C countnumber]
[-cD dn] [-cK keyStore] [-cw password] -[cN keyStoreType]
[-cp port] [-cP keyStorePwd] [-ct trustStoreType] [-cT trustStore]
[-cY trustStorePwd] [-cZ] [-F] [-j] [-L filename] [-sD dn]
[-sK keyStore] [-sw password] -[sN keyStoreType] [-sp port]
[-sP keyStorePwd] [-st trustStoreType] [-sT trustStore]
[-sY trustStorePwd] [-sZ] [-v]
This shows how to use the ldapdiff to test to see if there are differences between master and replicas Schema:
ldapdiff -S -sh host -ch host [-a] [-C countnumber][-cD dn]
[-cK keyStore] [-cw password] -[cN keyStoreType] [-cp port]
[-cP keyStorePwd] [-ct trustStoreType] [-cT trustStore]
[-cY trustStorePwd] [-cZ] [-j][-L filename] [-sD dn]
[-sK keyStore] [-sw password] [-sN keyStoreType] [-sp port]
[-sP keyStorePwd] [-st trustStoreType] [-sT trustStore]
[-sY trustStorePwd] [-sZ] [-v]
Description
This tool synchronizes a replica server with its master. To display syntax help for ldapdiff, type:
ldapdiff -?
Options
The following options apply to the ldapdiff command. There are two subgroupings that apply specifically to either the supplier server or the consumer server.
•-a - Specifies to use server administration control for writes to a read-only replica.
•-b baseDN - Use searchbase as the starting point for the search instead of the default. If -b is not specified, this utility examines the LDAP_BASEDN environment variable for a searchbase definition.
•-C countnumber - Counts the number of entries to fix. If more than the specified number of mismatches are found, the tool exits.
•-F - This is the fix option. If specified, content on the consumer replica is modified to match the content of the supplier server. This cannot be used if the -S is also specified.
•-j - Indicates to ignore the operational attributes in the LDIF file.
•-L - If the -F option is not specified, use this option to generate an LDIF file for output. The LDIF file can be used to update the consumer to eliminate the differences.
•-S - Specifies to compare the schema on both of the servers.
•-v - Use verbose mode, with many diagnostics written to standard output.
Options for a replication supplier: The following options apply to the consumer server and are denoted by an initial fsf in the option name.
•-sD - dn Use dn to bind to the LDAP directory. dn is a string-represented DN.
•-sh - host Specifies the host name.
•-sK keyStore - Specify the name of the SSL key database file with default extension of kdb. If the key database file is not in the current directory, specify the fully-qualified key database filename. If a key database filename is not specified, this utility will first look for the presence of the SSL_KEYRING environment variable with an associated filename. If the SSL_KEYRING environment variable is not defined, the default keyring file will be used, if present.
A default keyring file that is, ldapkey.kdb, and the associated password stash file that is, ldapkey.sth, are installed in the /lib directory under LDAPHOME, where LDAPHOME is the path to the installed LDAP support. LDAPHOME varies by operating system platform:
•AIX operating systems - /usr/ldap
•HP-UX operating systems - /usr/IBMldap
•Linux operating systems - /usr/ldap
•Solaris operating systems - /opt/IBMldaps
•Windows operating systems - c:Program FilesIBMLDAP
|
Note: This is the default install location. The actual LDAPHOME is determined during installation.
|
See IBM Directory C-Client SDK Programming Reference (available at: http://publib.boulder.ibm.com/tividd/td/IBMDirectoryServer5.2.html) for more information about default key database files, and default Certificate Authorities.
If a keyring database file cannot be located, a hard-coded set of default trusted certificate authority roots is used. The key database file typically contains one or more certificates of certificate authorities (CAs) that are trusted by the client. These types of X.509 certificates are also known as trusted roots. For more information on managing an SSL key database, This parameter effectively enables the -sZ switch.
•-sN keyStoreType - Specify the label associated with the client certificate in the key database file. If the LDAP server is configured to perform server authentication only, a client certificate is not required. If the LDAP server is configured to perform client and server Authentication, a client certificate might be required. keyStoreType is not required if a default certificate/private key pair has been designated as the default. Similarly, keyStoreType is not required if there is a single certificate/private key pair in the designated key database file. This parameter is ignored if neither -sZ nor -sK is specified.
•-sp ldapport - Specify an alternate TCP port where the ldap server is listening. The default LDAP port is 389. If -sp is not specified and -sZ is specified, the default LDAP SSL port 636 is used.
•-sP keyStorePwd - Specify the key database password. This password is required to access the encrypted information in the key database file, which may include one or more private keys. If a password stash file is associated with the key database file, the password is obtained from the password stash file, and the -sP parameter is not required. This parameter is ignored if neither -sZ nor -sK is specified.
•-st trustStoreType - Specify the label associated with the client certificate in the trust database file. If the LDAP server is configured to perform server authentication only, a client certificate is not required. If the LDAP server is configured to perform client and server Authentication, a client certificate might be required. trustStoreType is not required if a default certificate/private key pair has been designated as the default. Similarly, trustStoreType is not required if there is a single certificate/private key pair in the designated key database file. This parameter is ignored if neither -sZ nor -sT is specified.
•-sT trustStore - Specify the name of the SSL trust database file with default extension of tdb. If the trust database file is not in the current directory, specify the fully-qualified trust database filename. If a trust database filename is not specified, this utility will first look for the presence of the SSL_KEYRING environment variable with an associated filename. If the SSL_KEYRING environment variable is not defined, the default keyring file will be used, if present.
A default keyring file that is, ldapkey.tdb, and the associated password stash file that is, ldapkey.sth, are installed in the /lib directory under LDAPHOME, where LDAPHOME is the path to the installed LDAP support. LDAPHOME varies by operating system platform:
•AIX operating systems - /usr/ldap
•HP-UX operating systems - /usr/IBMldap
•Linux operating systems - /usr/ldap
•Solaris operating systems - /opt/IBMldaps
•Windows operating systems - c:Program FilesIBMLDAP
|
Note: This is the default install location. The actual LDAPHOME is determined during installation.
|
See IBM Directory C-Client SDK Programming Reference (available at: http://publib.boulder.ibm.com/tividd/td/IBMDirectoryServer5.2.html) for more information about default key database files, and default Certificate Authorities.
If a keyring database file cannot be located, a hard-coded set of default trusted certificate authority roots is used. The key database file typically contains one or more certificates of certificate authorities (CAs) that are trusted by the client. These types of X.509 certificates are also known as trusted roots. For more information on managing an SSL key database,
This parameter effectively enables the -sZ switch.
•-sw password | ? - Use password as the password for authentication. Use the ? to generate a password prompt. Using this prompt prevents your password from being visible through the ps command.
•-sY - The password for the trusted database.
•-sZ - Use a secure SSL connection to communicate with the LDAP server. The -Z option is only supported when the SSL component entry, as provided by IBM’s GSKit, is installed.
Options for a replication consumer
The following options apply to the consumer server and are denoted by an initial fcf in the option name.
•-cD dn - Use dn to bind to the LDAP directory. dn is a string-represented DN.
•-ch host - Specifies the host name.
•-cK keyStore - Specify the name of the SSL key database file with default extension of kdb. If the key database file is not in the current directory, specify the fully-qualified key database filename. If a key database filename is not specified, this utility will first look for the presence of the SSL_KEYRING environment variable with an associated filename. If the SSL_KEYRING environment variable is not defined, the default keyring file will be used, if present.
A default keyring file that is, ldapkey.kdb, and the associated password stash file that is, ldapkey.sth, are installed in the /lib directory under LDAPHOME, where LDAPHOME is the path to the installed LDAP support. LDAPHOME varies by operating system platform:
•AIX operating systems - /usr/ldap
•HP-UX operating systems - /usr/IBMldap
•Linux operating systems - /usr/ldap
•Solaris operating systems - /opt/IBMldaps
•Windows operating systems - c:Program FilesIBMLDAP
|
Note: This is the default install location. The actual LDAPHOME is determined during installation.
|
See IBM Directory C-Client SDK Programming Reference (available at: http://publib.boulder.ibm.com/tividd/td/IBMDirectoryServer5.2.html) for more information about default key database files, and default Certificate Authorities.
If a keyring database file cannot be located, a hard-coded set of default trusted certificate authority roots is used. The key database file typically contains one or more certificates of certificate authorities (CAs) that are trusted by the client. These types of X.509 certificates are also known as trusted roots. For more information on managing an SSL key database,
This parameter effectively enables the -cZ switch.
•-cN keyStoreType - Specify the label associated with the client certificate in the key database file. If the LDAP server is configured to perform server authentication only, a client certificate is not required. If the LDAP server is configured to perform client and server Authentication, a client certificate might be required. keyStoreType is not required if a default certificate/private key pair has been designated as the default. Similarly, keyStoreType is not required if there is a single certificate/private key pair in the designated key database file. This parameter is ignored if neither -cZ nor -cK is specified.
•-cp ldapport - Specify an alternate TCP port where the ldap server is listening. The default LDAP port is 389. If -cp is not specified and -cZ is specified, the default LDAP SSL port 636 is used.
•-cP keyStorePwd - Specify the key database password. This password is required to access the encrypted information in the key database file, which may include one or more private keys. If a password stash file is associated with the key database file, the password is obtained from the password stash file, and the -cP parameter is not required. This parameter is ignored if neither -cZ nor -cK is specified.
•-ct trustStoreType - Specify the label associated with the client certificate in the trust database file. If the LDAP server is configured to perform server authentication only, a client certificate is not required. If the LDAP server is configured to perform client and server Authentication, a client certificate might be required. trustStoreType is not required if a default certificate/private key pair has been designated as the default. Similarly, trustStoreType is not required if there is a single certificate/private key pair in the designated key database file. This parameter is ignored if neither -cZ nor -cT is specified.
•-cT trustStore - Specify the name of the SSL trust database file with default extension of tdb. If the trust database file is not in the current directory, specify the fully-qualified trust database filename. If a trust database filename is not specified, this utility will first look for the presence of the SSL_KEYRING environment variable with an associated filename. If the SSL_KEYRING environment variable is not defined, the default keyring file will be used, if present.
A default keyring file that is, ldapkey.tdb, and the associated password stash file that is, ldapkey.sth, are installed in the /lib directory under LDAPHOME, where LDAPHOME is the path to the installed LDAP support. LDAPHOME varies by operating system platform:
•AIX operating systems - /usr/ldap
•HP-UX operating systems - /usr/IBMldap
•Linux operating systems - /usr/ldap
•Solaris operating systems - /opt/IBMldaps
•Windows operating systems - c:Program FilesIBMLDAP
|
Note: This is the default install location. The actual LDAPHOME is determined during installation.
|
See IBM Directory C-Client SDK Programming Reference (available at: http://publib.boulder.ibm.com/tividd/td/IBMDirectoryServer5.2.html) for more information about default key database files, and default Certificate Authorities.
If a keyring database file cannot be located, a hard-coded set of default trusted certificate authority roots is used. The key database file typically contains one or more certificates of certificate authorities (CAs) that are trusted by the client. These types of X.509 certificates are also known as trusted roots. For more information on managing an SSL key database,
This parameter effectively enables the -cZ switch.
•-cw password | ? - Use password as the password for authentication. Use the ? to generate a password prompt. Using this prompt prevents your password from being visible through the ps command.
•-cY - The password for the trusted database.
•-cZ - Use a secure SSL connection to communicate with the LDAP server. The -cZ option is only supported when the SSL component entry, as provided by IBMfs GSKit, is installed.
Example 13-3 Checking data differences between replica and master
ldapdiff -b <baseDN> -sh <supplierhostname> -ch <consumerhostname> [options]
•This shows that there are differences between the master and replica
C:>ldapdiff -b "o=ibm,c=us" -sh win2k1 -ch win2k2 -L c:ldapdiff.ldif
Traversing the tree on both the servers...
! ou=Austin,o=ibm,c=us
< ibm-entryuuid : 71ce21da-f737-4c38-8646-6eba6a9e03a7
> ibm-entryuuid : c9d47e80-bb66-4aa6-8992-a374cae3a85d
< modifyTimeStamp : 20040218032345.000000Z
> modifyTimeStamp : 20040218035213.000000Z
< createTimeStamp : 20040218032345.000000Z
> createTimeStamp : 20040218035213.000000Z
! ou=In Flight Systems,ou=Austin,o=ibm,c=us
< ibm-entryuuid : 9033545f-3675-4788-88a7-3aa77053715f
> ibm-entryuuid : 81a86631-36e2-4f03-a55a-b8a870133c3f
< businesscategory : aircraft
< modifyTimeStamp : 20040218032348.000000Z
> modifyTimeStamp : 20040218035217.000000Z
< createTimeStamp : 20040218032348.000000Z
> createTimeStamp : 20040218035217.000000Z
! ou=Home Entertainment,ou=Austin,o=ibm,c=us
< ibm-entryuuid : debc5755-53f4-41b1-bbf5-27c81f0da706
> ibm-entryuuid : d8f381c7-6c44-4dbb-8133-aa9033daf8fe
< businesscategory : Home Entertainment
< modifyTimeStamp : 20040218032349.000000Z
> modifyTimeStamp : 20040218035217.000000Z
< createTimeStamp : 20040218032349.000000Z
> createTimeStamp : 20040218035217.000000Z
! ou=Groups,o=ibm,c=us
< ibm-entryuuid : c5b95edf-c40f-4293-b97d-be802dd40238
> ibm-entryuuid : bcc28748-f07e-41f6-a11d-851922d3c1bf
< modifyTimeStamp : 20040218032349.000000Z
> modifyTimeStamp : 20040218035217.000000Z
< createTimeStamp : 20040218032349.000000Z
> createTimeStamp : 20040218035217.000000Z
C:>
•This shows that there are no differences between the master and replica
C:>ldapdiff -b "o=ibm,c=de" -sh win2k1 -ch win2k3
Traversing the tree on both the servers...
C:>
Example 13-4 Checking schema between replica and master server
ldapdiff -S -sh <supplierhostname> -ch <consumerhostname> [options]
C:>ldapdiff -S -sh win2k1 -ch win2k2
Schema compare is in progress...
This may take a few minutes...
Schema compare is complete.
|
Note: If no DN arguments are provided, the ldapdiff command waits to read a list of DNs from standard input. To break out of the wait, use Ctrl+C or Ctrl+D.
|
SSL, TLS notes for ldapdiff
To use the SSL or TLS -related functions associated with this utility, the SSL or TLS libraries and tools must be installed. The SSL or TLS libraries and tools are provided with IBMfs Global Security Kit (GSKit), which includes security software developed by RSA Security Inc.
|
Note: For information regarding the use of 128-bit and triple DES encryption by LDAP applications, including the LDAP sample programs, see LDAP_SSL in the IBM Directory C-Client SDK Programming Reference (available at: http://publib.boulder.ibm.com/tividd/td/IBMDirectoryServer5.2.html). This section describes the steps required to build the sample programs and your applications so they can use SSL with the strongest encryption algorithms available.
|
See the makefile associated with the sample programs for more information on linking an LDAP application so that it has access to 128-bit and triple-DES encryption algorithms.
The gsk7ikm utility is used to define the set of trusted certification authorities (CAs) that are to be trusted by the client. By obtaining certificates from trusted CAs, storing them in the key database file, and marking them as ftrustedf, you can establish a trust relationship with LDAP servers that use ftrustedf certificates issued by one of the trusted CAs. The gsk7ikm utility can also be used to obtain a client certificate, so that client and server authentication can be performed. If the LDAP servers accessed by the client use server authentication only, it is sufficient to define one or more trusted root certificates in the key database file. With server authentication, the client can be assured that the target LDAP server has been issued a certificate by one of the trusted CAs. In addition, all LDAP transactions that flow over the SSL or TLS connection with the server are encrypted including the LDAP credentials that are supplied on the ldap_bind or ldap_simple_bind_s. For example, if the LDAP server is using a high-assurance VeriSign certificate, you should obtain a CA certificate from VeriSign, import it into your key database file, and mark it as trusted. If the LDAP server is using a self-signed server certificate, the administrator of the LDAP server can supply you with a copy of the serverfs certificate request file. Import the certificate request file into your key database file and mark it as trusted.
If the LDAP servers accessed by the client use client and server authentication, it is necessary to:
•Define one or more trusted root certificates in the key database file. This allows the client to be assured that the target LDAP server has been issued a certificate by one of the trusted CAs. In addition, all LDAP transactions that flow over the SSL or TLS connection with the server are encrypted, including the LDAP credentials that are supplied on the ldap_bind or ldap_simple_bind_s.
•Create a key pair using gsk7ikm and request a client certificate from a CA. After receiving the signed certificate from the CA, store the certificate in the client key database file.
LDAPDIFF diagnostics
Exit status is 0 if no errors occur. Errors result in a non-zero exit status and a diagnostic message being written to standard error.
..................Content has been hidden....................
You can't read the all page of ebook, please click here login for view all page.