Today’s Web sites bear no resemblance to the Web sites that appeared when the Web first began. After all, the concept of regular people like you and me actually owning a computer never occurred to the scientists who were devising what J.C.K. Licklider of MIT referred to as the “Galactic Network.” Instead, they used the new Internet as a means to share research between scientific and educational institutions. The sole emphasis was on connecting computers.
Nowadays, we don’t give a second thought to the connectivity of computers. Just about everyone in the modern world has Internet access, and many of those people have broadband connections. The Internet revolution is among us, and the ubiquitous connectivity we now enjoy has transformed the Internet into something entirely different from the original intent.
We now expect every company and every organization to have a Web site. We want to pay our bills online. We want to be able to change our cable or satellite service online. We want to get details on our cell phone service online. It has become quite obvious that static Web pages no longer fill the bill.
To meet all the above expectations, companies must implement some means of accessing their backend data systems via the Internet. There are many technologies available today for doing just that, and Microsoft’s latest offering in that arena is ASP.NET 2.0.
You may already be familiar with ASP.NET, but if you haven’t used ASP.NET 2.0 yet, you’re in for a real treat! The folks on the ASP.NET product team have put a lot of work into making ASP.NET 2.0 approachable for developers of all levels. They’ve also packed it with great features that Web developers have been screaming for. Expression Web fully supports the rendering of ASP.NET controls, and it also supports configuring properties of controls, including IntelliSense for ASP.NET controls in Code View.
Note
This book will not teach you how to program in ASP.NET because that is outside the scope of a book on Expression Web. If you’d like to learn how to fully utilize the power of ASP.NET, read Sams’ Teach Yourself ASP.NET 2.0 in 24 Hours, Complete Starter Kit from Sams Publishing (ISBN 0672327384).
If you need some basic information on connecting ASP.NET code files to a user interface you have created in Expression Web, see “Using Expression Web with Visual Web Developer Express Edition”, p. 655 (Appendix A). For many of you, that will be all you need to start developing ASP.NET applications.
It should be obvious that before you can use ASP.NET controls, you’ll need to create an ASP.NET Web page. ASP.NET Web pages are called Web Forms and they have an .aspx file extension. When you create an ASP.NET Web Form, you will also choose a language for the page. Expression Web provides the choices of C# (pronounced C-sharp), Visual J# (pronounced J-sharp), and Visual Basic (VB).
Tip
ASP.NET Code in Expression Web
Expression Web doesn’t provide very good support for writing ASP.NET code. It does have great support for rendering ASP.NET controls, however. What you’ll likely want to do is design your layout and set basic control properties in Expression Web and then use Visual Studio 2005 or Visual Web Developer Express Edition to write your C#, VB, or J# code.
→ | For more information on using Microsoft Visual Studio with Expression Web, see “Using Expression Web with Visual Web Developer Express Edition”, p. 655 (Appendix A). |
To create a new ASP.NET Web Form in Expression Web:
Click File, New, Page.
On the Page tab in the New dialog, select
ASPXfrom the list of file types, as shown in Figure 28.1.Choose your language in the Programming Language dropdown.
Click
OK.

After your ASP.NET Web Form has been created, you’ll see an empty form, as shown in Figure 28.2. Any ASP.NET controls that you add to your page will be inserted into this form.

You’re now ready to start adding some ASP.NET controls to your page, so let’s have a look at the Standard ASP.NET controls available.
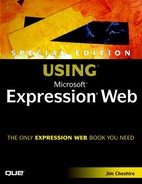
All ASP.NET controls are available via the Toolbox in Expression Web. The Toolbox is divided into two sections, as shown in Figure 28.3: HTML and ASP.NET Controls.

To use the ASP.NET 2.0 controls, you’ll need to install the Microsoft .NET Framework 2.0 redistributable. (There’s also a .NET Framework SDK, which includes the redistributable along with other developer tools.) If the .NET Framework 2.0 is not installed, Expression Web displays a notification in the ASP.NET Toolbox, as shown in Figure 28.4.
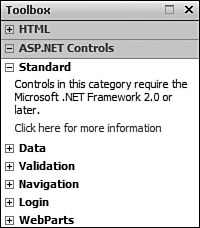
Click the link in the ASP.NET Controls section of the Toolbox and the dialog shown in Figure 28.5 opens. From there, you can click the link to download the .NET Framework 2.0 redistributable.
The ASP.NET Controls section of the Toolbox has several subsections. We’ll cover the Standard controls in this chapter and other controls in subsequent chapters. Following is a brief description of the sets of controls in the ASP.NET section of the Toolbox:
Standard—. Standard ASP.NET controls such as radio buttons, textboxes, dropdowns, and so on.
Data—. Controls that are designed to retrieve and display data on an ASP.NET Web Form.
Validation—. Controls that allow you to configure form field validation on your ASP.NET Web Forms.
Navigation—. Controls that are specifically designed for navigating in a Web site.
Login—. Controls that allow you to easily create a membership system for an ASP.NET Web site.
→ | For more information on ASP.NET Data controls, see “Accessing Data with ASP.NET”, p. 635 (Chapter 35). |
→ | For more information on ASP.NET Validation controls, see “Implementing Form Validation with ASP.NET”, p. 595 (Chapter 32). |
→ | For more information on ASP.NET Navigation controls, see “Using ASP.NET Navigation Controls”, p. 527 (Chapter 29). |
→ | For more information on ASP.NET Login controls, see “Developing a Login System with ASP.NET”, p. 569 (Chapter 31). |
Many of the Standard ASP.NET controls are similar to their HTML counterparts. For example, the ASP.NET TextBox control is functionally the same as the HTML text input control, and the ASP.NET DropDownList control is functionally the same as the HTML Drop-Down Box control. Other ASP.NET controls (such as the Calendar control) have no HTML control counterpart.
When you insert ASP.NET controls into a page, Expression Web generates the ASP.NET code necessary for ASP.NET to render the controls. For example, when you insert a TextBox control onto an ASP.NET Web Form, the following code is added in Code View:
<asp:TextBox runat="server" id="textbox1"></asp:TextBox>
This is obviously not normal HTML code, and a Web browser won’t understand this code. Therefore, when this page is browsed, the ASP.NET runtime environment will render the code as an HTML <input> tag, similar to the following:
<input name="textbox1" type="text" id="textbox1" />
A TextBox control is a simple example of how ASP.NET renders controls. Not all controls are this simple. For example, an ASP.NET Calendar control looks quite simple within Code View in Expression Web:
<asp:Calendar runat="server" id="calendar1"></asp:Calendar>
But when the page is browsed, ASP.NET builds some pretty complex HTML to render the Calendar control correctly in the Web browser. As a matter of fact, there’s so much code that gets rendered by ASP.NET for a control like the Calendar that it would take over a page of this book to show it all to you. By using ASP.NET to implement a calendar on your Web page, you can avoid having to write a large amount of code yourself.
ASP.NET controls use control properties to affect their behavior and appearance. Control properties can be specified either by selecting the control and using the Tag Properties pane to manipulate the properties or by changing the properties directly in Code View.
Tip
We’ve already covered the Tag Properties pane in Chapter 12, “Editing Tag Properties”, but just in case you skipped that part, I’ll give you a tip here: When a property description appears as bolded blue in the Tag Properties pane, it means that the value of that property has been changed from the default value.
→ | For more information on using the Tag Properties pane, see “Editing Tag Properties”, p. 215 (Chapter 12). |
→ | For more information on using Code View in Expression Web, see “Using Web Page Views”, p. 127 (Chapter 8). |
Note
Another Method of Accessing Control Properties
There is actually a third way to access the properties of an ASP.NET control—programmatically. However, in this book, we are going to work with changing properties via the Tag Properties pane since ASP.NET 2.0 allows you to take advantage of most controls without writing any code.
If you want more information on how to program ASP.NET applications, see “Resources on Expression Web, Web Design, and ASP.NET”, p. 695 (Appendix D).
Let’s add an ASP.NET control to a page and set some properties on that control:
Click File, New, Page and select
ASPXfrom the list of file types to create a new ASP.NET Web Form. ClickOK.Save the page as
default.aspx.Scroll down to the
Labelcontrol in the Standard ASP.NET controls section of the Toolbox.Double-click on the Label control in the Toolbox to add it to the Web Form. Your page should now look like Figure 28.6.
Save and browse the page to ensure that the Label control displays correctly. You should see the word
Labeldisplayed in the browser.

Note
You may have found it strange to create a new disk-based Web site in Step 1 even though this is an ASP.NET site. Expression Web uses the ASP.NET Development Server to browse ASP.NET pages in a disk-based Web site. Using this method is the easiest way to design and test ASP.NET Web sites.
→ | For more information on creating Web sites in Expression Web, see “Creating a Web Site”, p. 25 (Chapter 2). |
Note

If the page displays in the browser but the Label control does not appear, see “ASP.NET Controls Do Not Appear in the Browser” in the “Troubleshooting” section of this chapter.
Note
If you see an error in the browser that says “The XML page cannot be displayed”, see “XML Error When Browsing ASP.NET Page” in the “Troubleshooting” section of this chapter.
Tip
You might have noticed that Expression Web will only allow you to place ASP.NET controls inside the form that is automatically inserted onto the page when it’s created. All ASP.NET controls must be placed within a form that is configured to run on the server. Expression Web prevents you from shooting yourself in the foot by not allowing you to place ASP.NET controls outside a form. It will also recreate the form automatically if you accidentally delete it.
Now you’ve got a Label control that displays the word “Label” on the Web page. The next step is to manipulate the properties of the control to make it useful.
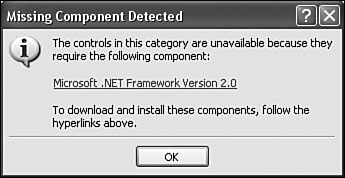
Select the
Labelcontrol on the Web Form.In the Tag Properties pane, change the
Textproperty of the Label control toAn ASP.NET Label, as shown in Figure 28.7.

Your label should look like Figure 28.8. When you browse this page in a browser, it will now display the text “An ASP.NET Label”.
Now let’s have a look under the covers and see exactly what happened in the code for default.aspx when we changed the Text property. Switch over to Code View and you’ll see that the <asp:Label> tag has a new Text attribute with a value of “An ASP.NET Label”, as shown in Figure 28.9.

Specifying property values inside the control’s tag in this manner is referred to as declarative syntax. As it turns out, ASP.NET 2.0 allows you to do some very powerful things using declarative syntax, as you’ll see later when we get into accessing data with ASP.NET.
Now that you have a general idea of how to set properties for ASP.NET controls, let’s dig deeper into the Standard ASP.NET controls.
Table 28.1 lists all of the Standard ASP.NET controls in the Toolbox.
Table 28.1. The ASP.NET Standard Controls
Control Name | Description |
|---|---|
| Allows for rotating banner ads |
| Provides programmatic access to a bulleted list |
| A basic button |
| Allows for easy date selection/display |
| A basic checkbox |
| A group of associated |
| Used with ASP.NET Master Pages |
| A basic dropdown list |
| A textbox and Browse button for file uploads |
| A basic hidden form field |
| Renders as a typical hyperlink |
| Displays an image in the browser |
| Uses an image as a button |
| Allows for the creation of image maps |
| Displays static text |
| A button or link that runs code on the server |
| A multi-line textbox |
| A placeholder for HTML content |
| A placeholder for localized text |
| A container for multiple |
| A container for multiple controls |
| A placeholder for dynamically added controls |
| A basic radio button |
| A list of |
| Allows part of a page to be exempt from caching |
| A basic table |
| A basic textbox |
| A control in a |
| A step-based wizard control |
| Allows for the display of XML data |
For more information on ASP.NET Master Pages, see “Using ASP.NET Master Pages and User Controls”, p. 549 (Chapter 30). | |
→ | For more information on XML data, see “Primer on Data Access Technologies”, p. 629 (Chapter 34). |
We won’t go into detail on these basic controls, but the sections that follow will cover the more complex ones. In these sections, we’ll discuss enough of the general details to give you a good base knowledge to use any of the ASP.NET controls available in Expression Web.
Banner advertisements aren’t just for the big-name sites. The entrepreneurial nature of the Internet has made them popular with the little guys as well. Many e-commerce sites on the Internet offer affiliate programs that will pay you a commission on referred sales. To effectively take advantage of such programs, you need to implement some sort of advertising on your site, and banner ads have consistently proven to be an effective choice.
The AdRotator control uses an XML file called an advertisement file to feed it information to display banners and links. This XML file must be in the format shown in Listing 28.1.
Example 28.1. XML Coding for AdRotator Control
 1  <?xml version="1.0" encoding="utf-8" ?>
 2  <Advertisements>
 3    <Ad>
 4      <ImageUrl>http://www.site.com/banners/banner2.jpg</ImageUrl>
 5      <NavigateUrl>http://affiliates.site.com?aff=jimco</NavigateUrl>
 6      <AlternateText>Get a really cool product by clicking here.</AlternateText>
 7      <Height>60</Height>
 8      <Width>468</Height>
 9      <Keyword>Technical</Keyword>
10      <Impressions>1000</Impressions>
11    </Ad>
12  </Advertisements>
The file can have any number of <Ad> blocks. Table 28.2 lists the XML elements in the advertisement file and their use.
Table 28.2. XML Elements in an Advertisement File
Element Name | Description | Required |
|---|---|---|
| The URL for the image that is displayed. This can be a relative or absolute URL. | Yes |
| The URL that the user will navigate to when the banner is clicked. | No |
| The text that appears in a tooltip when the user hovers over the banner. Also read by screen readers. | No |
| The height of the banner. | No |
| The width of the banner. | No |
| A keyword that allows the control to filter based on categories. | No |
| A value that defines how likely a specific banner will display in relation to other ads. | No |
The Impressions element uses an arbitrary value that only has meaning in relation to the values specified for other ads. In other words, if one ad has an Impressions value of 500 and a second ad has an Impressions value of 1000, the second ad is twice as likely to appear.
Tip
URLs that you enter in the advertisement file must be encoded. Therefore, if your link contains special characters such as an ampersand, you must use the HTML encoded version of that character. In the case of an ampersand, & should be entered as &.
The Keyword element is a powerful element and one that you will probably find many uses for. Suppose that you have an AdRotator control on two different pages. One of those pages features computer articles and the other features articles on finance. By specifying a keyword of Computers for ads of interest to readers of your computer articles and a keyword of Finance for ads of interest to readers of your finance articles, you can ensure that the most relevant ads are displayed to your users.
Let’s create a simple Web Form that displays rotating banner ads using the AdRotator control. You’ll need a few graphic files with the same dimensions to create the page. If you don’t have any handy, you can find an assortment of banners on the CD that accompanies this book.
Begin by creating a new ASP.NET Web Form in a new Web site. Save the Web Form as adrotator.aspx. Now we’re ready to set up the rotating banners.
Add a new
AdRotatorcontrol to the Web Form by either double-clicking on theAdRotatorcontrol in the Toobox or by dragging and dropping anAdRotatorcontrol onto the page.You should see the Common AdRotator Tasks popup, as shown in Figure 28.10. Ignore that dialog and save
adrotator.aspx.

Next we need to add some images to use in the AdRotator control. Create a new folder in your Web site called images and either copy the images from the Chapter42Banners directory on the CD into that folder or add your own images.
The next step is to create an advertisement file to feed to the AdRotator control. Remember that an advertisement file is an XML file in a specific format that tells the AdRotator control how to behave, including what banners to display and where to link for each banner.
Create a new XML file by clicking File, New, Page and choosing
XMLfrom theGeneralsection, as shown in Figure 28.11.Add the following XML code to the new XML file:
<Advertisements> <Ad> <ImageUrl>~/images/ComputerTown.jpg</ImageUrl> <NavigateUrl>http://www.jimcosoftware.com</NavigateUrl> <Keyword>Computers</Keyword> <AlternateText>The best computers in town!</AlternateText> <Impressions>100</Impressions> </Ad> <Ad> <ImageUrl>~/images/dsw.jpg</ImageUrl> <NavigateUrl>http://www.microsoft.com</NavigateUrl> <Keyword>Computers</Keyword> <AlternateText>All the software you need.</AlternateText> <Impressions>100</Impressions> </Ad> <Ad> <ImageUrl>~/images/Taxman.jpg</ImageUrl> <NavigateUrl>http://www.asp.net</NavigateUrl> <Keyword>Finance</Keyword> <AlternateText>Don't be late for April 15th.</AlternateText> <Impressions>100</Impressions> </Ad> </Advertisements>Switch back to the
adrotator.aspxpage and click on theAdRotatorcontrol you added previously to select it.In the Tag Properties pane, click on the
AdvertisementFileproperty and click the button, as shown in Figure 28.12.Browse to the
ads.xmlfile that you saved in Step 3 and select it.Click Open to set the
AdvertisementFileproperty of theAdRotatorcontrol.


Now save the adrotator.aspx page and browse it to see your ads in action. If you refresh the page a few times, you’ll see the ads change.
Notice that even though the AdRotator control appears quite small in Design View in Expression Web, it resizes itself to match the size of your banner ads. To aid in the layout of your page, you might want to change the Height and Width properties of the AdRotator control to match the banners you are using. You will then easily be able to see how much page real estate is being taken up by the control while you’re designing your page.
Tip
Some people think that the AdRotator control rotates ads at a preset interval while a page is being displayed. That’s not the way it works. What it does is choose a random ad to display when the page is loaded. The chosen ad will not change until the page is reloaded.
In this example, the ad that is chosen is truly random because the Impressions element is the same for all the ads. (Even though we configured a Keyword element for each ad, we haven’t implemented any keyword filtering yet.) You can change the probability that a particular ad will display by changing the value of the Impressions element for that ad.
Open the ads.xml file in Expression Web and change the value of the Impressions element for one of the ads from this
<Impressions>100</Impressions>
to this
<Impressions>500</Impressions>
and then save ads.xml and browse the adrotator.aspx page again. Refresh the page a few times and you’ll notice that the ad you changed will show up much more often than the other ads.
Tip
If you track the effectiveness of the ads you use, you can use the Impressions property to ensure that the ads that are most effective appear more often.
As noted previously, you can use the Keyword element in your advertisement file to ensure that ads that aren’t relevant to readers of a particular page in your Web site are not displayed. When we created the ads.xml file earlier, we added a Keyword element for each of our ads. We’ll now use the KeywordFilter property of the AdRotator control to restrict the ads that are displayed based on the specified keyword.
Change the
Impressionselement that you modified earlier back to the original value of100.Save the
ads.xmlfile.Open the
adrotator.aspxWeb Form in Expression Web.Click the
AdRotatorcontrol to make it active.In the Tag Properties pane, change the
KeywordFilterproperty toComputers, as shown in Figure 28.13.Save the
adrotator.aspxpage.

Now browse the adrotator.aspx page and refresh it several times. Notice that only the ads with a keyword of Computers get displayed. The finance ad will not be displayed on this page.
Note
Some of you who have worked with ASP.NET (and possibly some who haven’t) may be wondering what happens to your ads if the page that’s being displayed is cached. The developers of ASP.NET thought about that too. What they did was write the AdRotator control so that it explicitly prevents the caching of ads. Even if you cache the page on which the AdRotator control appears, you are always guaranteed to get fresh ads.
The ASP.NET Calendar control serves two purposes: it displays a date in a familiar format and it accepts user input of a date. The Calendar control can also be formatted using one of many auto-formatting styles.
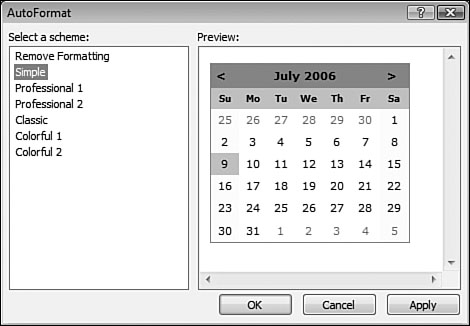
When you first insert a Calendar control onto a page, you are presented with the Common Calendar Tasks popup, as shown in Figure 28.14. By clicking the AutoFormat link in the popup, you can easily apply a preset style to the Calendar control, as shown in Figure 28.15.

The Calendar control is most powerful when paired with an ASP.NET code file so that you can access the selected date programmatically. For general information on how to accomplish this, see “Using Expression Web with Visual Web Developer Express Edition”, p. 655 (Appendix A). |
The Calendar control exposes many properties to control not only its appearance, but also its behavior. Let’s have a look at some of the properties that are available when using the Calendar control.
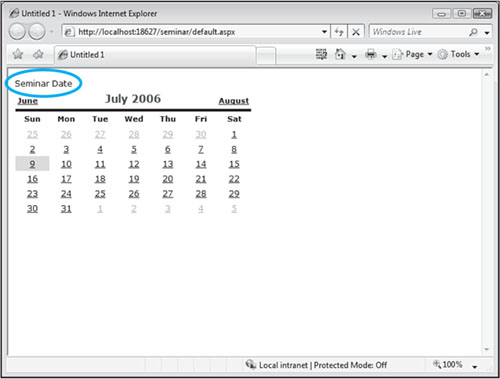
The CaptionAlign property controls the alignment of the text that is specified in the Caption property. Valid values are NotSet, Top, Bottom, Left, and Right. Figure 28.16 shows a Calendar control with a left-aligned caption of “Seminar Date”.
The DayNameFormat property defines how day names appear on your calendar. This property only applies when the ShowDayHeader property is set to True.
Table 28.3 lists the valid values for this property.
Table 28.3. DayNameFormat Property Values
Property Value | Description |
|---|---|
| Displays the full day name (i.e., |
| Displays the short day name (i.e., |
| Displays only the first letter of the day (i.e., |
| Displays the first two letters of the day (i.e., |
| Uses the shortest format possible to provide a unique value for each day (i.e., |
The FirstDayOfWeek property configures which day appears as the leftmost day of the week in the Calendar control. Valid values are Default, Sunday, Monday, and so on. When set to Default, Sunday appears as the first day of the week.
The NextMonthText property configures the text for the link that moves to the next month when the ShowNextPrevMonth property is True and the NextPrevFormat property is set to CustomText. By default, the value is >, which appears as “>” in the Calendar control.
The Calendar control, shown previously in Figure 28.14, shows the default value of > for the NextMonthText property as displayed in the Calendar control.
The NextPrevFormat property controls the format of the NextMonthText and PrevMonthText properties. Valid values are CustomText, ShortMonth, and FullMonth. When the value is set to CustomText, the format is dictated by the NextMonthText property.
The PrevMonthText property is identical to the NextMonthText property except that it configures the text for the link that moves to the previous month when the ShowNextPrevMonth property is True and the NextPrevFormat property is set to CustomText. The default value is <, which appears as “<” in the Calendar control.
The SelectedDate property configures the date that is selected when the Calendar control first loads in the Web browser. You can also use this property in server-side ASP.NET code to determine the date that has been selected in the control.
By default, the Calendar control allows you to select a specific date. However, the SelectionMode property allows you to configure the Calendar control so you can also select an entire week using the DayWeek value, an entire month using the DayWeekMonth value, or nothing at all by using the None value.
The SelectMonthText property allows you to configure the link text that is clicked to select the month displayed in the Calendar control. By default, the value is >>, which appears as “>>”.
This property is only applicable when the SelectionMode property is set to DayWeekMonth.
The SelectWeekText property configures the link text that is clicked to select an entire week. By default, the value is >, which appears as “>”.
This property is only applicable when the SelectionMode property is set to DayWeek or DayWeekMonth.
The ShowDayHeader property is a Boolean property (True or False) that controls whether or not the day of the week appears as a header in each column of the Calendar control. The default value is True.
The ShowGridLines property is a Boolean property (True or False) that controls whether or not the Calendar control displays gridlines with each date in its own cell. The default value is False.
The ShowNextPrevMonth property is a Boolean property (True or False) that controls whether or not the Calendar control displays links that allow for navigation between the currently displayed month and the previous/next month. The default value is True.
The ShowTitle property is a Boolean property (True or False) that controls whether or not the month is displayed on the Calendar control. The default value is True.
The TitleFormat property controls the appearance of the calendar’s title when the ShowTitle property is set to True. The TitleFormat property can be set to either MonthYear or Month. In Figure 28.16, the value of this property is MonthYear.
The UseAccessibleHeader property causes ASP.NET to render the Calendar control with Title attributes on the HTML tags for accessibility purposes. The Title attribute shows up as a tooltip when the HTML element is hovered over. It is also read by screen readers.
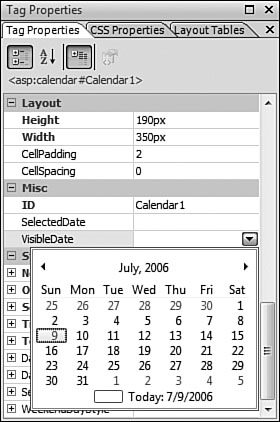
The VisibleDate property controls what month is displayed when the Calendar control is loaded. Figure 28.17 shows the calendar that Expression Web provides to aid in setting this property. Note that only the month of the date you select is applicable.
Collecting data is a popular task for a Web developer. The traditional approach to accomplishing this task is to build large forms that are often cumbersome. In cases where there is a large amount of data to collect, Web developers will often use forms that span multiple pages. E-commerce sites are famous for this kind of approach, usually during the checkout process of a Web transaction.
A wizard is a much better approach because it provides an interface that’s similar to a regular Windows application and it presents the user with a linear approach to collecting data.
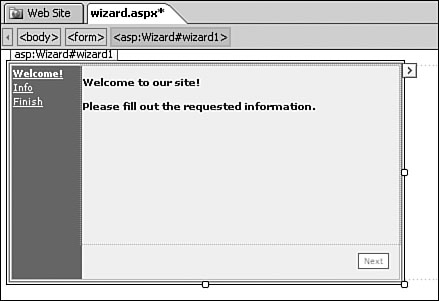
The ASP.NET Wizard control takes care of all the plumbing so that if a user has to click the Previous button in the wizard to correct a previous entry, none of the data the user has entered into the wizard is lost. The Wizard control (Figure 28.18) is an incredibly powerful control that can be utilized easily without writing any code at all.
A Wizard control is made up of individual wizard steps, and each step is a particular type of step depending on its position within the wizard. Table 28.4 lists the types of steps in the Wizard control.
Table 28.4. Wizard Control Step Types
Step Type | Description |
|---|---|
| The step type is determined by its position within the wizard. |
| This is the last step in the wizard. No buttons are displayed in this step. |
| This is the final step where user information is collected. Previous and Finish buttons are displayed in this step. |
| The first step in the wizard. This is often an introduction step. A Next button is displayed in this step. |
| A normal step in the wizard. |
To gain a full understanding of how the Wizard control works, let’s create a simple wizard using the control and test some of the options available.
Note
If you’d prefer, you can review the completed files from this chapter in the ExamplesCh28Website folder on the CD that accompanies this book.
We’ll create a simple wizard that does the following:
Start by creating a new disk-based Web site and a new ASP.NET Web Form. Save the Web Form as wizard.aspx. After you’ve done that, you’re ready to add the Wizard control and begin customizing it.
Double-click on the
Wizardcontrol in the Toolbox to add a new wizard to the page.If the Common Wizard Tasks pop-up isn’t visible, click the arrow button at the upper right of the Wizard control to display it.
Click the
AutoFormatlink in the Common Wizard Tasks pop-up.Select
Professionalfrom the list of schemes and clickOK.
Your page should now look like Figure 28.19.
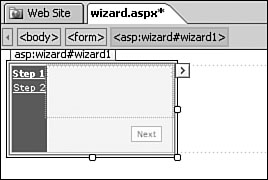
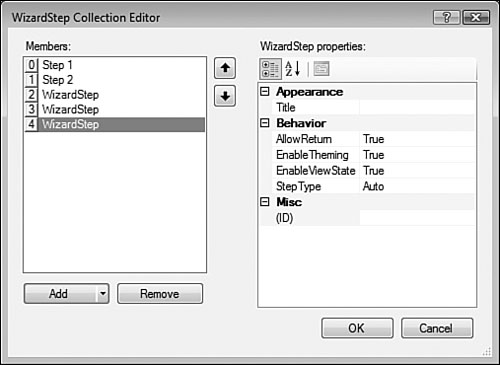
Note that two steps are created for you automatically. In this case, we’ll need five steps, so we need to create three additional steps.
If the Common Wizard Tasks pop-up isn’t visible, click the arrow button at the upper right of the
Wizardcontrol to display it.Click the
Add/Remove WizardStepslink to display the WizardStep Collection Editor.Click the
Addbutton three times to add three steps. The WizardStep Collection Editor should now look like Figure 28.20.Note
Notice that the Add button has a downward-pointing arrow at the right edge of the button. Clicking that arrow will allow you to choose between a WizardStep and a TemplatedWizardStep. We haven’t talked about TemplatedWizardSteps yet, so if you click the arrow on the Add button, choose WizardStep from the menu that appears.
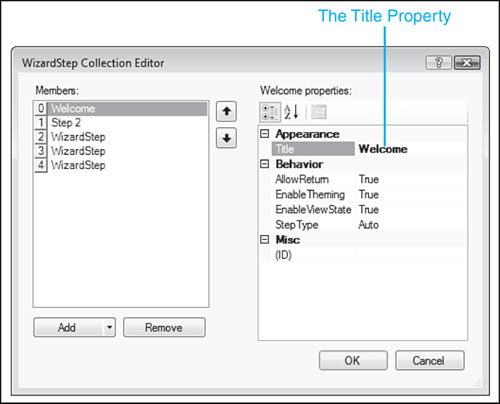
Select Step 1 in the list of steps and change the
Titleproperty to “Welcome”, as shown in Figure 28.21.Select Step 2 in the list of steps and change the
Title propertyto “Name/E-mail”.Select the third step in the list of steps and change the
Titleproperty to “Address”.Select the fourth step in the list of steps and change the
Title propertyto “Lists”.Select the final step in the list and change the
Title propertyto “Finish”.Click
OK.
By default, the Wizard control is too small to contain the controls that we’ll need to add for our wizard, so you’ll need to adjust the size. Using the Tag Properties pane, set the Width property of the Wizard control to 425px and the Height to 225px. After you make that change, the sidebar at the left side of the Wizard control will be far too wide. To correct that, expand the SideBarStyle section of the Tag Properties pane and change the Width property to 120px, as shown in Figure 28.22.

Your wizard should now look like Figure 28.23. Notice that the Title property that you set in the WizardStep Collection Editor is displayed in the sidebar so that the user can clearly identify the current step when navigating through the Wizard control.

Now we’re ready to add the necessary controls to the Wizard control so that we can collect the information we need. Expression Web makes that easy by allowing you to navigate to each step in the Wizard control in the designer, just as you would in your Web browser.
Click Welcome in the sidebar to switch to the first step. You will need to add a brief welcome message here. Click in the clear area at the right of the sidebar and enter the following text:
Welcome. Please complete the following information.
Click Next to continue.
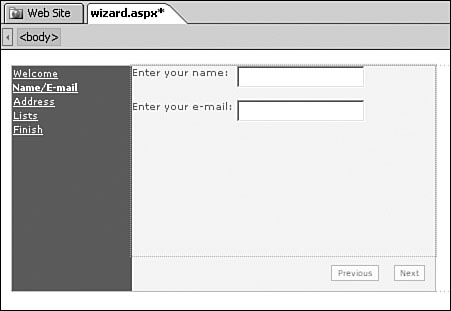
Click Name/E-mail in the sidebar to switch to the second step. We’ll add a couple of TextBox controls here to collect the user’s name and e-mail address.
Click inside the clear area at the right of the sidebar and add the text “
Enter your name:”.Make sure the insertion point is located at the right of the text you entered in Step 1. Double-click on the
TextBoxcontrol in the Toolbox to add a new textbox.Click at the right of the textbox so that it’s not selected and then press Enter twice.
Enter the text “
Enter your e-mail:”.Make sure the insertion point is located at the right of the text you just entered. Double-click on the
TextBoxcontrol in the Toolbox to add a new textbox.
Your Wizard control should now look like Figure 28.24.
We’re now ready to move on to Step 3 and create the interface for collecting the street address. Click Address in the sidebar to move to Step 3 of the wizard.
Click inside the clear area at the right of the sidebar and add the text “
Enter your address:”.Press Enter to insert a new line.
Double-click on the
TextBoxcontrol in the Toolbox to add a new textbox.Drag the right side of the
TextBoxcontrol to make it wide enough to accommodate a street address (approximately260px).Click at the right of the textbox so that it’s not selected and press Enter twice.
Enter the text “
City:” and then press Enter.Double-click on the
TextBoxcontrol in the Toolbox to add a new textbox.Click at the right of the textbox so that it’s not selected and press Enter twice.
Enter the text “
State:” and then press Enter.Double-click on the
TextBoxcontrol in the Toolbox to add a new textbox.Drag the right side of the
TextBoxcontrol and make it approximately40pxin width.Click at the right of the textbox so that it’s not selected and press Enter twice.
Enter the text “
ZIP:” and then press Enter.Double-click on the
TextBoxcontrol in the Toolbox to add a new textbox.
Your Wizard control should now look like Figure 28.25.

In Step 4 of our wizard, we’ll use checkboxes to allow users to sign up for various mailing lists. A check in a box means that the user wishes to subscribe to that particular list. Click Lists in the sidebar to move to Step 4 of the wizard.
Click inside the clear area at the right of the sidebar and enter the text “
Sign up for the following mailing lists:”.Press Enter twice to insert two new lines.
Double-click on the
CheckBoxcontrol in the Toolbox to insert a new checkbox.With the
CheckBoxcontrol still selected, change theTextproperty in the Tag Properties pane to “New Products”.Click at the right of the checkbox to ensure that it’s not selected and press Enter.
Double-click on the
CheckBoxcontrol in the Toolbox to insert a new checkbox.With the
CheckBoxcontrol still selected, change theTextproperty in the Tag Properties pane to “Expression Web Tips”.Click at the right of the checkbox to ensure that it’s not selected and press Enter.
Double-click on the
CheckBoxcontrol in the Toolbox to insert a new checkbox.With the
CheckBoxcontrol still selected, change theTextproperty in the Tag Properties pane to “Monthly Newsletter”.
Your Wizard control should now look like Figure 28.26.

The final step should simply display a message thanking the user for subscribing. Click Finish in the sidebar to move to Step 4 of the wizard. Only the following task is required to complete the wizard:
Click inside the clear area at the right of the sidebar and enter the text “
Thank you for signing up for our mailing lists!”.
You’re now ready to preview your wizard, but first you should switch back to the Welcome step by clicking on Welcome in the sidebar. You will need to do this because the wizard will always start on the step that is selected in the designer, even if that step is not the first one. After you’ve selected the Welcome step, save and browse the wizard.aspx page to test your Wizard control. As you fill out the information in the Wizard control, try clicking on the Previous button. You’ll see that the Wizard control will always maintain the information that you’ve entered so you never have to worry about re-entering information if you need to go back to a previous step.
You’ve experienced just a tiny taste of the capabilities of ASP.NET 2.0 in this chapter. There are some powerful and easy-to-configure controls in the standard Toolbox, but ASP.NET offers much more, some of which we will cover in the next few chapters.
Even after reading all the material in this book, you will still need to experiment and try your hand at some real applications to grow your knowledge. The best way to learn a complex technology such as ASP.NET is to use it for one of your Web sites. Hopefully you’ll find that the knowledge base we’ve given you here will serve you well as you go out on your own.
My ASP.NET controls do not appear in the browser when I browse my pages. Instead, I just see an empty page or some text.
For ASP.NET pages to be rendered as HTML code that the browser can understand, they must be handled by the ASP.NET engine. Otherwise, the browser will see tags it doesn’t understand and will display nothing at all.
To resolve this problem, make sure that your ASP.NET page has an .aspx file extension. That will cause it to be executed by ASP.NET so it displays correctly.
When I browse my ASP.NET page, I see an error in the browser that says “The XML page cannot be displayed.” I’m not trying to browse an XML page. Why does it say this?
The code that makes up ASP.NET controls in your Web Form is actually composed of XML tags. However, when things are working as they should, ASP.NET transforms those tags into regular HTML code.
If you see an error that the XML page cannot be displayed when browsing your page, it usually means that you are trying to browse the page using a file path such as C:websitespage.aspx. ASP.NET pages must be browsed on a Web server for them to work correctly.
Expression Web ships with the ASP.NET Development Server, which you can use to browse your ASP.NET pages when your site is a disk-based Web site. To make sure that the ASP.NET Development Server is being used:
Click Site, Site Settings and then click the
Previewtab.The
Preview using Web site URLoption should be selected.The
Use Microsoft ASP.NET Development Servercheckbox should be checked.
→ | For more information on the ASP.NET Development Server, see “Using the ASP.NET Development Server”, p. 485 (Chapter 27). |
Expression Web enables you to apply direct formatting to ASP.NET controls like the Wizard control. However, you’re going to be much better off in the long run if you use CSS to format your controls.
The Wizard control has many properties that allow you to take advantage of CSS styles. For example,
NavigationButtonStyleControls the formatting of the navigation buttons (Next, Previous, Finish, and so on).SideBarButtonStyleControls the formatting of the sidebar buttons. In the example wizard you created, the sidebar buttons are the links that appear in the sidebar.SideBarStyleControls the formatting of the sidebar.StepStyleControls the formatting of the wizard’s steps.
There are numerous other styles as well that will allow you to format your Wizard control exactly the way you want.
→ | For more information on CSS in Expression Web, see “Managing CSS Styles”, p. 311 (Chapter 18). |