
6
Publishing Sites
HOW TO…
It’s no secret that SharePoint was originally targeted at internal websites (that is, intranets). However, Microsoft has been working for many releases to break SharePoint out of the internal server box. SharePoint publishing sites allow you to create and edit pages that are more akin to the web pages that people associate with their favorite Internet sites. Many companies have chosen to use the SharePoint for Internet Sites license option to create public-facing websites in SharePoint. For example, the impressive-looking Ferrari website runs on SharePoint (www.ferrari.com).
As well as allowing you to create web pages, publishing sites offer many useful features that are enabled by the SharePoint framework. For example, you’ll be able to use content approval workflow or require users to check out pages before they can be edited. All of these features help to maintain a consistent publishing process.
 | The publishing site functionality is a feature that can be enabled in SharePoint Server. Publishing features aren’t available in SharePoint Foundation. |
Publishing Site Template
The publishing templates are a big part of WCM with SharePoint. WCM is such a huge topic that an entire book could be written about SharePoint WCM; in fact, a couple of books have been written specifically about SharePoint ECM and WCM. In this section, we’ll take a look at the publishing site templates and some of the options they enable.
Naturally, the first step for this exercise is to create a publishing site, and you’ll need to have sufficient rights to create a new site. If you’ve read the previous chapters, you know that you can access the Site Contents page from the gear icon menu or the quick launch navigation. From there, click the new subsite option to create a new site and choose the Publishing Site template (see Figure 6-1).

FIGURE 6-1 Creating a new publishing site
Once you have selected the Publishing Site template and given your new site a name and URL address, you can click the Create button. SharePoint will provision a site that you can use to try the examples in this section. The reason you are given a chance to enter both a name and a URL is that you may want to use an abbreviation for the URL. For example, spaces will be converted to “%20” in a URL, so many users choose to eliminate the spaces that appear in the name.
| The Quick Launch setting option will change to Navigation once you have publishing enabled. And you won’t find Quick Launch in the Site Settings options after publishing is enabled. |
Before you can make changes to your publishing pages, you need to switch to edit mode, and that leads right into the next topic.
Editing a Page
To enter edit mode from the publishing site home page, click the little edit icon in the top right of the page—it looks like a pencil. You can also click the Page tab on the ribbon, and then click Edit. When you switch to edit mode, you will see that a wealth of functionality is available for your publishing pages (see Figure 6-2).
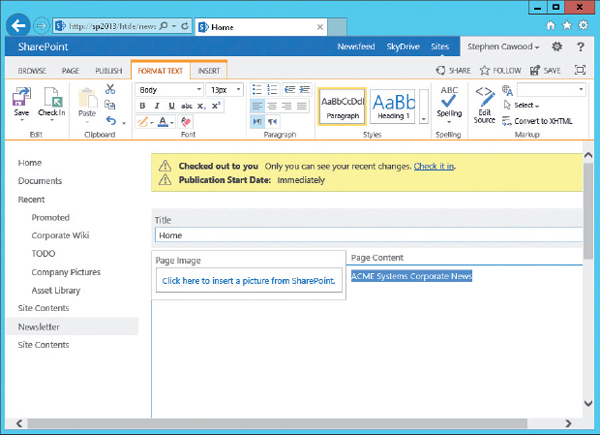
FIGURE 6-2 A publishing page in edit mode
The most obvious edits that you might want to make would be in the Page Content section of the page (where the cursor is located in Figure 6-2). You’ll be able to use various editing features, such as spell check and markup styles.
You also have quick access to the Title and Page Image areas. For example, you can simply click the link to set the page image, and then browse your SharePoint server for the link to use as the page image (see Figure 6-3).
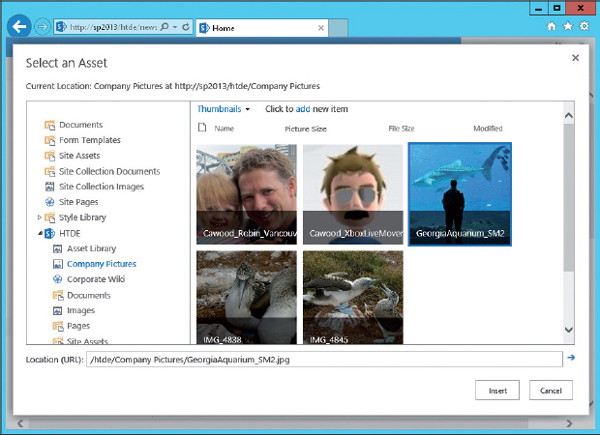
FIGURE 6-3 Browsing to select a page image
When you have the page in edit mode, you can use the Insert tab options. These include options to add tables, pictures, audio, video, links, files, app parts, and web parts. You can also add items from the Reusable Content list. For example, you might want to have a standard copyright notice or signature that can be easily reused. If you choose the More Choices option from the Reusable Content menu, you’ll be shown the current content in the list, and also be able to open the list to add more (see Figure 6-4).

FIGURE 6-4 The default Reusable Content options
After you’ve edited your page, don’t forget to click Save. If the page requires check-in, you’ll also need to check it in before it can be published. Your changes won’t be visible to users who have only read access until you have published the page. Use the Publish tab in the ribbon to access the available publishing options.
Summary Links
Near the bottom of the default home page, you’ll find a section for summary links. When you want to add a link, switch to edit mode and click the New Link option under Summary Links. When you choose to add a link, you’ll be presented with a New Link dialog that provides you with many options (see Figure 6-5).

FIGURE 6-5 Adding a new link
Web Parts and App Parts
Directly below the summary links, you’ll find some web part zones (see Figure 6-6). As you may have guessed, web part zones are containers for web parts and app parts.
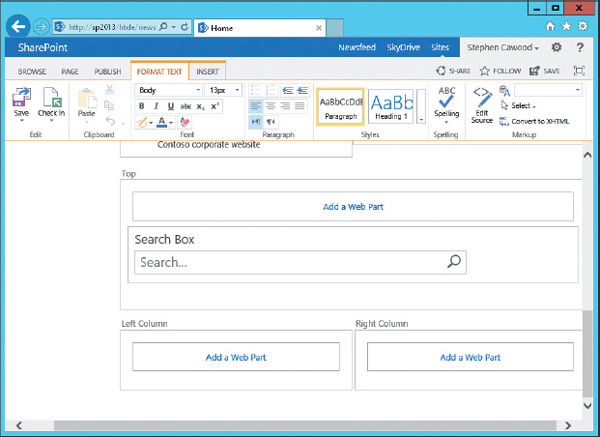
FIGURE 6-6 The top web part zone after adding a search box
Adding web parts to your pages is as easy as clicking one of the Add a Web Part links. The various web parts and app parts that come with SharePoint are discussed in Chapter 8.
Adding Pages and Using Page Layouts
Clearly, you’ll need to create your own pages if you want to fully utilize publishing sites. To create a new page, select the Page tab in the ribbon, and then click New Page. You’ll be asked to supply the name of the page you want to create. When you click Create, the new page will open.
Most likely, the first thing you’ll want to do is select the page layout that will be used for the new page. Page layouts determine the position of elements on publishing pages, but they also help determine the options available within the page. For example, some page layouts include a prominent image, and others do not.
To change the page layout, make sure that you have the page in edit mode, and then click the Page tab on the ribbon and click the Page Layout drop-down button to show the available page layouts (see Figure 6-7).

FIGURE 6-7 Choosing a page layout
The Pages List
While it’s true that you could navigate to each page when you have page tasks to complete, you might also want to be able to apply actions to multiples pages at the same time. Since the pages within a publishing site are stored within a pages list, you can navigate to the list and view the pages in SharePoint’s famous list view.
To find the pages list, choose Site Contents, and then scroll down a bit to find the Pages library. Once you have navigated to the Pages library, you’ll see the regular list view showing all the pages in the publishing site. If you expand the drop-down menu next to one of the page names, you’ll see the options available (see Figure 6-8). The options include Check In, Check Out, Discard Check Out, Version History, Manage Permissions, Send To, Compliance Details, and Delete. Of course, some options are contextual, so not all of these options will appear in all cases.
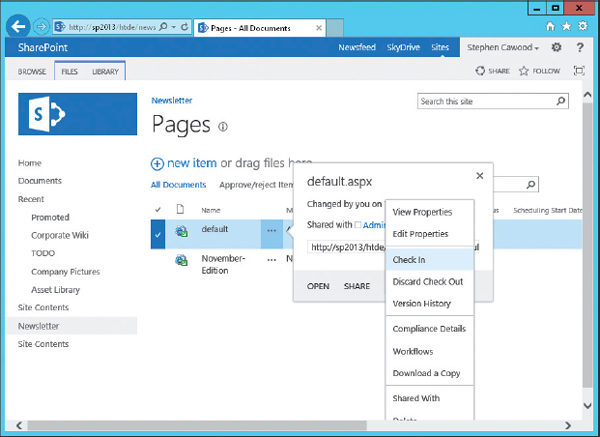
FIGURE 6-8 Selecting the actions menu for a page list item
Remember that you have the option of choosing multiple pages by clicking the check box next to the items you want to select. You can select all items by checking the box next to the Type column.
The Gear Menu
Like the item options, the gear menu’s options (top-right corner of the page) are also contextual. As you navigate from one type of site to another, you’ll find that you see different options. Publishing sites offer these choices:
• Shared with… Allows you to grant user’s permission to view the site.
• Edit Page Puts the current page in edit mode.
• Add a Page Creates a new page in the site.
• Add an App Adds a new app to the site.
• Site Contents Shows the contents of the current site. If you’re trying to find an app or subsite, this view can be very useful.
• Design Manager Allows web designers to use their favorite HTML editor to design SharePoint pages, and then upload those designs into SharePoint. This feature is new to SharePoint 2013.
• Site Settings Allows you to set the options for the current site.
Master Pages
Page layouts are useful, but if you really want to change the look and feel of your site, you need to switch or customize the master page. Master pages define the underlying structure of SharePoint pages.
To change the master page, you’ll need to have publishing enabled. Go to the Site Settings page and, under the Look and Feel section, click Master Page. The Site Master Page Settings page will open and let you customize the master page settings (see Figure 6-9).

FIGURE 6-9 Settings for the master page
Publishing Site with Workflow
If you would like to add some more structure to your publishing experience, you might want to create a publishing site with workflow instead of a regular publishing site. As the name implies, edits under this type of site need to be approved by a user who has sufficient rights.
One thing you’ll notice about the Publishing Site with Workflow template is that you’ll have another option in the Publish tab of the ribbon: Schedule. The scheduling feature allows you to set a time frame for publishing the page (see Figure 6-10). Using the Publish tab on the ribbon, you can open the scheduling window and set both start and end dates for the page to be live.
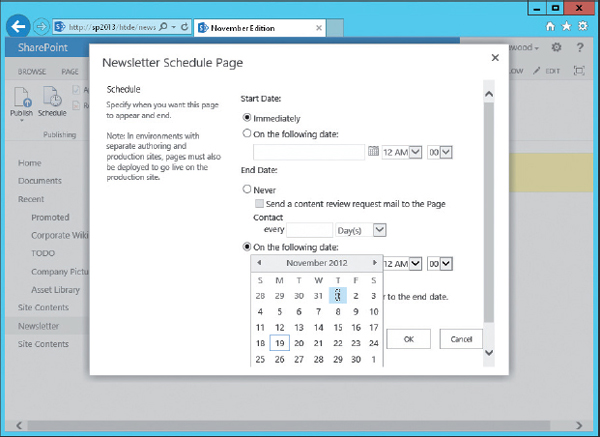
FIGURE 6-10 Setting the start and end dates for a page to be published
The other options you’ll see in the Publish tab are for the content approval workflow. If you are logged in as a user who has permission to edit changes but not approve them, you’ll find that your edits will not go live until a user with sufficient permissions approves the changes. Of course, it is also possible that your changes can be rejected. Content approval workflow is discussed in more detail in Chapter 3.
Real-World Publishing Site Exercise
This quick review exercise will walk you through the process of creating a new SharePoint publishing site and give you a chance to try some of the formatting features available in SharePoint publishing site pages. For this exercise, you’ll be creating a publishing site with workflow. At the end of the exercise, you’ll have a publishing site with a home page that looks something like Figure 6-11. The example shown here is a site advertising a company charity drive.
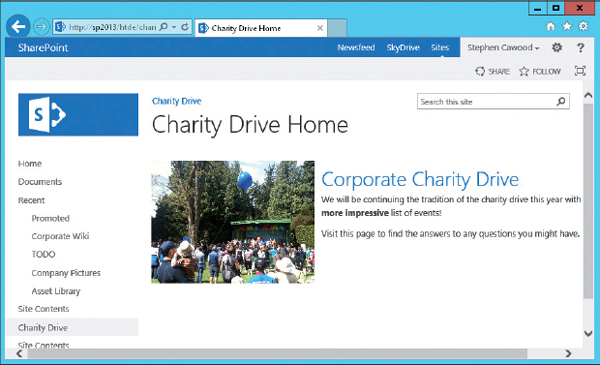
FIGURE 6-11 The final result
Creating the Site
The first thing you’ll want to do is create the site and add some content to the main page.
1. Navigate to the site that will be the parent site of the new publishing site.
2. Choose Site Content | New subsite.
3. When the Create dialog opens, choose the Publishing category.
4. Select Publishing Site with Workflow, and then enter a name and URL.
5. When the new site has been provisioned, click the Edit button in the ribbon.
6. Now that you’re in the site and have the home page open in edit mode, enter some text in the Page Content section. Here, you can try some of the formatting features, such as the following:
• Add a heading line to the top of your page content and use the Markup Styles option in the ribbon to assign the Heading 1 (H1) style.
• Add some color and other formatting, such as bold and italics.
• Change the name of your home page. For example, in this case, the home page name has been changed to Charity Drive Home.
Adding an Image
Next, you’ll add an image to the home page.
1. If you already have your image in SharePoint, you can skip the upload step. Otherwise, you’ll need to upload your home page image before you can select it. Make sure you’ve saved the changes to your home page. You’ll find a little Save & Close icon where the Edit button used to be.
2. After you’ve saved the page, go to Site Contents. As you saw in previous chapters, this will bring up a listing of everything under the current site. In this case, you’ll add your image from your computer to the Images library for the charity site.
3. Under Document Libraries, click Images.
4. Click Add New Item.
5. Click Browse. Find your image from your computer, and then click OK to add the image to the Images library. Since there is content approval on this site, you may need to choose to check in the image.
6. From the breadcrumb navigation, click the link to the home page of your site. In the example, it’s called Corporate Charity Drive.
 | You can also navigate to the site’s home page by clicking the site image in the top-left corner of the page. Since you have not changed it yet, it will look like an orange box with three people in it. |
7. You should be back to the site home page. Once again, click Edit to get the home page in edit mode.
8. You are now ready to add your page image, so click the link that reads Click Here to Insert a Picture from SharePoint.
9. Next to Selected Image, click the Browse button, find your image in the Images library, select it, and click OK.
10. In the Edit Image Properties dialog, you’ll find a number of choices, including the alt text that appears when someone hovers over the image and some useful layout options, such as the image alignment. Once you’ve set your options, click OK to add the image to the page.
| If the image is not the right size, you can change how it is displayed by dragging the anchors around the border. This action does not actually resize the original image, but simply changes how it is displayed. |
Adding a New Page
Next, you’ll add a new page where you can provide directions to the event. As you’ve seen throughout this book, there are generally multiple methods to complete actions in SharePoint. To create a new page, you could use the Site Actions menu, or you could even navigate to the Pages library and add a new item from there. However, since you’re already on the home page, for this example, you will use the wiki-style page creation shortcut.
1. Type the name of the page you wish to create in square brackets (for this example, [Directions]), and then save the page
2. Click the Directions link to create the new page.
3. Choose Create, and you’ll be taken to the new publishing page.
4. At this time, you don’t need to make any changes to the Directions page, so click the home page icon or the home page breadcrumb link to get back to the main page.
Publishing Your New Page
Finally, you will publish your new page so that others can enjoy it.
1. From the home page, switch to the Publish tab in the ribbon and choose to Publish your page. If you did not have rights to publish, you might only be able to submit the changes for approval by someone who has approval rights on the page.
2. You’ll be asked for a comment so that a history of each modification will be maintained.
Congratulations, you have created your publishing site!
Summary
This chapter introduced publishing sites and some of the features that will help you create your own masterful pages. You also learned how you can customize your pages by using app parts, web parts, text formatting, and images.
The chapter also covered master pages and page layouts, which help present your pages in a style that suits your audience and subject matter. You learned that a publishing site with a workflow template is available if you require an approval process in your organization. The chapter concluded with a simple example for you to try.
This chapter has given you the information you need to wade into publishing sites. It’s up to you how deep you choose to dive.
..................Content has been hidden....................
You can't read the all page of ebook, please click here login for view all page.