
2
SharePoint Concepts
HOW TO…
The goal of this chapter is to get you familiar with SharePoint terminology and the types of containers, pages, and items you’ll find inside SharePoint Server 2013. Unlike with so-called traditional websites, you can’t look through the directories on a SharePoint server and find the site hierarchy and other assets that comprise the SharePoint content. This is because SharePoint is a dynamic, database-driven application. The site hierarchy is just one example of something that is stored within the SharePoint SQL Server databases and then dynamically retrieved by SharePoint`s web server, Internet Information Services (IIS), when a user browses to a SharePoint site.
Inside a SharePoint server farm, the largest organizational container is called a site collection. Site collections contain sites and allow administrators to define permission boundaries and separate resources such as space quotas and features. Since this book is not focused on the administrator’s perspective, we’re going to skip site collections and cover what you’ll be working with on a day-to-day basis, such as SharePoint sites, apps, lists, libraries, and items.
 | Technically, there are two other ways to organize SharePoint that are higher level than site collections: web applications and farms. Web applications can be used to add administrative security boundaries. SharePoint farms can contain multiple SharePoint servers, each of which can have specific functions within the farm—for example, indexing content for search or serving pages to end users. |
Sites
It’s not hard to argue that sites are the most important containers in SharePoint. Security is often defined at the site level, and the various site templates determine what type of functionality is enabled by default within each site. It’s true that list templates also define functionality, but sites do it at a macro level.
Although there has always been a platform component to SharePoint, it`s fair to say that SharePoint was originally designed as an application for easily building collaborative intranet websites. Over the years, it has grown into an enterprise class, general-purpose platform, but it has also maintained its value as a means to quickly deploy a website.
| Historically, SharePoint farms have been freely customized. However, when Microsoft Vice President Jeff Teper introduced the SharePoint 2013 Preview, he encouraged organizations to use the out-of-the-box functionality. In the Microsoft SharePoint Team Blog (http://sharepoint.microsoft.com/blog/Pages/BlogPost.aspx?pID=1012), he wrote, “Use SharePoint as an out-of-box application whenever possible … we designed the new SharePoint UI to be clean, simple and fast and work great out-of-box. We encourage you not to modify it which could add complexity, performance and upgradeability and to focus your energy on working with users and groups to understand how to use SharePoint to improve productivity and collaboration and identifying and promoting best practices in your organization.” |
Site Templates
To help users create sites easily, SharePoint provides multiple site templates out of the box. Site templates determine the functionality that comes with a particular type of site. These templates allow users with sufficient rights to effortlessly roll out a new team collaboration site, publishing site, or maybe even a record center. For those with sufficient permissions, it is possible to augment a site or remove functionality from it at any time. For example, you can add or remove apps or lists. However, the site template defines the starting point, so it makes sense to choose the template that comes with the functionality that most closely matches what you require for your site.
SharePoint Foundation 2013 includes site templates organized by category, as listed in the following sections, with the descriptions provided by Microsoft.
| Although the site template descriptions are available in the UI, going through all the categories—as I have for the book—and looking up the descriptions for each one is not exactly a quick exercise (especially when some of the descriptions are only visible as tooltips). I’ve included the descriptions here to make them readily accessible. In some cases, the description from SharePoint 2010 was more detailed, and I’ve included both the old and the new descriptions. |
Collaboration Templates
The following templates are in the Collaboration category:
• Team Site A place to work together with a group of people.
• SharePoint 2010 Description A site for teams to quickly organize, author, and share information. It provides a document library, and lists for managing announcements, calendar items, tasks, and discussions.
 | The Team Site template is one of the most popular site templates—if not the most popular—because it provides a good base of functionality for collaborating on a project. |
• Blank Site A blank site for you to customize based on your requirements.
• Document Workspace A site for colleagues to work together on a document. It provides a document library for storing the primary document and supporting files, a tasks list for assigning to-do items, and a links list for resources related to the document.
• Blog A site for a person or team to post ideas, observations, and expertise that site visitors can comment on.
• Group Work Site This template provides a groupware solution that enables teams to create, organize, and share information quickly and easily. It includes Group Calendar, Circulation, Phone-Call Memo, the Document Library, and the other basic lists.
• Project Site A site for managing and collaborating on a project. This site template brings all status, communication, and artifacts relevant to the project into one place.
• Community Site A place where community members discuss topics of common interest. Members can browse and discover relevant content by exploring categories, sorting discussions by popularity or by viewing only posts that have a best reply. Members gain reputation points by participating in the community, such as starting discussions and replying to them, liking posts and specifying best replies.
Publishing
In a SharePoint Server 2013 server, with the publishing feature activated, the following site templates are added in the Publishing category:
• Publishing Site A blank site for expanding your Web site and quickly publishing Web pages. Contributors can work on draft versions of pages and publish them to make them visible to readers. The site includes document and image libraries for storing Web publishing assets.
• Publishing Site with Workflow A site for publishing Web pages on a schedule by using approval workflows. It includes document and image libraries for storing Web publishing assets. By default, only sites with this template can be created under this site.
• Enterprise Wiki A site for publishing knowledge that you capture and want to share across the enterprise. It provides an easy content editing experience in a single location for co-authoring content, discussions, and project management.
Enterprise
The SharePoint Server Enterprise Edition also includes the following templates:
• Document Center A site to centrally manage documents in your enterprise.
• Records Center This template creates a site designed for records management. Records managers can configure the routing table to direct incoming files to specific locations. The site also lets you manage whether records can be deleted or modified after they are added to the repository.
• Business Intelligence Center A site for presenting Business Intelligence content in SharePoint.
• Enterprise Search Center A site for delivering the search experience. The welcome page includes a search box with two tabs: one for general searches, and another for searches for information about people. You can add and customize tabs to focus on other search scopes or result types.
• Basic Search Center A site for delivering the search experience. The site includes pages for search results and advanced searches.
• Visio Process Repository A site for viewing, sharing and storing Visio process diagrams. It includes a versioned document library and templates for the Basic Flowcharts, Cross-functional Flowcharts, and BPMN diagrams.
Opening a Site
Getting to a SharePoint site is as simple as entering the site’s URL into your favorite browser (see Figure 2-1). If you have read permission, you’ll be able to open the URL.
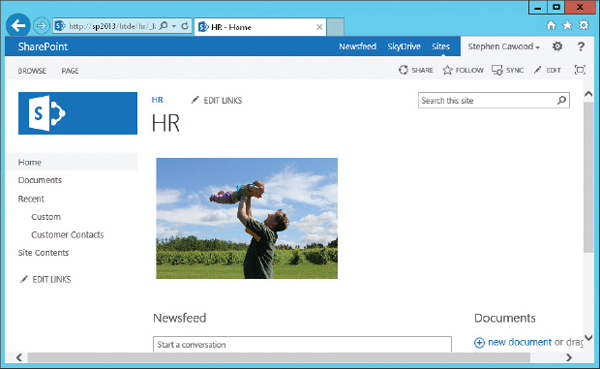
FIGURE 2-1 A SharePoint Server 2013 site home page
It’s important to note that content with any URL under the site (for example, a library URL) is being managed by the settings at the site level. For example, lists, libraries, apps, and items commonly inherit their user permissions from their parent site. It is possible to set more granular permissions, but in many cases, this complicates the security model, so list-level permissions—and especially item-level permissions—are often avoided.
Configuring Site Settings
Site templates are one way that SharePoint provides flexibility at the site level, but another key aspect to flexibility is the options in each template’s site settings.
To change the configuration of a site, you need to open the Site Settings page. From most locations within SharePoint, you’ll be able to access the settings for the current site from the Settings menu (see Figure 2-2).

FIGURE 2-2 The Settings menu
| SharePoint administration options are security trimmed, so if you do not have sufficient rights, you will not see some configuration options. |
The options on the Site Settings page are extensive (see Figure 2-3). The following sections list these options by category, along with the descriptions provided by Microsoft, for your convenience. Many of the options are not the sort that you’ll use in your day-to-day SharePoint activities; however, some of them will be covered in more detail in later chapters.

FIGURE 2-3 The Site Settings page
In addition to the site settings, you’ll see some general information about the site on the right side of the Site Settings page. For example, you can see the site URL and the mobile site URL listed under the heading Site Information.
Users and Permissions
The following Users and Permissions options are available:
• People and groups Specify users and user groups who have access to this site and any subsite which inherits permissions.
• Site permissions Define what capabilities each user or user group can perform on this site and all subsites inheriting permissions.
• Site collection administrators Add or remove users from the site collection administrators group, which allows members full control over all sites in this site collection. (Available only if you’re a site collection administrator.)
• Site app permissions Manage app access to content in this site.
Web Designer Galleries
The following Web Designer Galleries options are available:
• Site columns Manage the collection of columns available when defining lists.
• Site content types Manage the collection of content types, which enables consistent handling of content across sites.
• Web parts Select which web parts are available to page owners. (Available at the root site level.)
| You can also manage web parts here. For example, you can upload web parts you may have created or acquired elsewhere. |
• List templates Upload templates that are available when creating lists. (Available at the root site level.)
• Master pages (and page layouts) Manage the collection of look and feel templates available to sites. (If the site is using publishing features or the collaboration portal template, you will also see “and page layouts” here.)
• Solutions Upload and manage solutions, which can contain additional functionality and templates for sites. (Available at the root site level.)
• Themes (Available at the root site level.)
• Composed Looks Select a style which defines the fonts and colors for this site.
Site Administration
The following Site Administration options are available:
• Regional settings Configure regional settings such as locale, time zone, calendar format, and work week for this site.
• Site libraries and lists View and customize the lists and libraries in this site.
• User alerts Manage alert settings for site users.
• RSS Enable or Disable syndication feeds for this site.
• Sites and workspaces Review and create subsites and workspaces.
• Workflow settings Manage the workflows that are associated with this site.
• Site Closure and Deletion View or change the information management policy used on this site and configure dates that drive site lifecycle actions.
• Term store management Manage taxonomy metadata and keyword used by this site.
• Popularity Trends Review popularity trends reports, which provide insight into how and what content is being accessed.
• Content and structure Use the content and structure application to rearrange the physical layout of all your sites, lists and libraries.
• Content and structure logs Review the long running operation logs, which provide a history of operations and recovery information for operations in error.
• Translation status Review variation logs, which provide tracking and history for the variations publishing process.
Search
The following Search options are available:
• Result Sources Manage search result sources.
• Result Types Manage Result Types.
• Query Rules Search Query Rules.
• Schema Manage crawled and managed properties.
• Search Settings Change the behavior of Search for this site.
• Searchable Columns Select which site columns should not be crawled by the search engine.
• Search and offline availability Define whether this site should appear in search results and how search should handle pages with advanced security restrictions.
• Configuration Import Import a search configuration file.
• Configuration Export Export a search configuration file.
Look and Feel
The following Look and Feel options are available:
• Design Manager Create and modify page templates and more.
• Master Page Select the look and feel template to use on this site. (Available for publishing sites.)
• Page layouts and site templates Define set of page layouts and site templates available to other sites. (Available for publishing sites.)
• Welcome page Specify the default page for this site. (Available for publishing sites.)
• Title, description, and logo Configure the title, description, and logo displayed on this site.
• Device channels Create and organize device channels to optimize the way your site is rendered to mobile and alternate devices.
• Tree view Show or hide the quick launch and hierarchical tree view of sites, lists, and folders.
• Change the look Select a style which defines the fonts and colors for this site.
• Import Design Package Import a Design Package or Design Files.
• Navigation Manage the links on the quick launch (within a site) and global navigation (across sites). (Available for publishing sites.)
• Image Renditions Use this page to configure the image renditions that are available for every image uploaded to this site.
Site Actions
The following Site Actions options are available:
• Manage site features Activate or deactivate features that provide additional web parts, pages, and other functionality to your site.
• Save site as template Save this site as a template, which can be reused when creating other sites. (If site publishing is not enabled.)
• Enable search configuration export Activate features to enable export of search settings.
• Reset to site definition Remove all customizations from a single page or all pages in this site.
• Delete this site Permanently remove this site and all contained content. Click to see more information about this operation.
Site Collection Administration
The following Site Collection Administration options are available:
• Recycle Bin Restore or permanently remove items that users have deleted on this site. (Available at the root site.)
• Search Result Sources Manage search result sources.
• Search Result Types Manage Result Types.
• Search Query Rules Search Query Rules.
• Search Schema Manage crawled and managed properties.
• Search Settings Change the behavior of Search for this site.
• Search Configuration Import Import a search configuration file.
• Search Configuration Export Export a search configuration file.
• Site collection features Activate or deactivate features that provide additional Web Parts, pages, and other functionality to sites in this site collection. Some features may require activation at the Site Administration level.
• Site hierarchy Review the complete list of sites in this site collection.
• Site collection navigation Configure navigation settings to improve the usability of navigation across the site. (Available at the root site.)
• Site collection audit settings Configure auditing, which tracks user actions on all sites in this site collection. (Available at the root site.)
• Audit log reports Review available audit log reports, which provide comprehensive event tracking for content activity, security, policy, or other filters. (Available at the root site.)
• Portal site connection Define a parent site which will appear in the breadcrumb of this site collection. (Available at the root site.)
• Site collection policies Manage information management policies, which provide policy statements, labels, auditing, expiration, and barcodes to all sites in this site collection. (Available at the root site.)
• Storage Metrics View site storage metrics.
• Site collection app permissions Manage app access to content in this site collection.
• Site Policies Site policies define how a site and its content are managed and disposed. They can be shared across Site Collections via the Content Type Publishing mechanism.
• Popularity and Search Reports Review popularity trends reports, which provide insight into how and what content is being accessed.
• Content type publishing View content types consumed by the site and the corresponding shared applications.
• Variations Settings Configure variations settings, which allow you to configure variations source locations and propagation behavior.
• Variation labels Create variations labels for managing different language or branded versions of the source site structure and content.
• Variation logs Review variation logs, which provide tracking and history for the variations publishing process.
• Translatable columns Define which site columns in the site collection should be translated when variations content is exported for translation.
• Suggested content browser locations Add or remove locations that will be suggested to users when they use the Content Browser to select images, rich media or other assets.
• HTML Field Security Control the security settings for HTML fields under this site collection.
• Help settings
• SharePoint designer settings
• Site collection health checks Run pre-upgrade health checks for the site collection.
• Site collection upgrade Perform upgrade or review upgrade status for the collection.
Creating New Sites
Creating SharePoint sites is probably not something that you’ll be doing every day. However, when you first set up your SharePoint server, you’ll obviously need to create some sites. You’ll need to plan in advance exactly which sites you need and where to put them. Many SharePoint users do not do this, and they end up creating sites in an ad hoc fashion as the sites are needed. This can lead to the dreaded problem of SharePoint sprawl— out-of-control SharePoint servers that grow without a unifying architecture or plan.
To keep the lid on SharePoint sprawl, there are many cases where the average SharePoint user does not have sufficient permissions to create or delete sites. However, if you are able to do so, this section shows you how to perform these operations.
To create a new site under the current site, click the gear icon to open the Settings menu and choose View Site contents, or simply click the Site Contents link if it’s available in the left-hand navigation. Once you’re on the Site Contents page, scroll down until you find the Subsites section and click new subsite (see Figure 2-4).
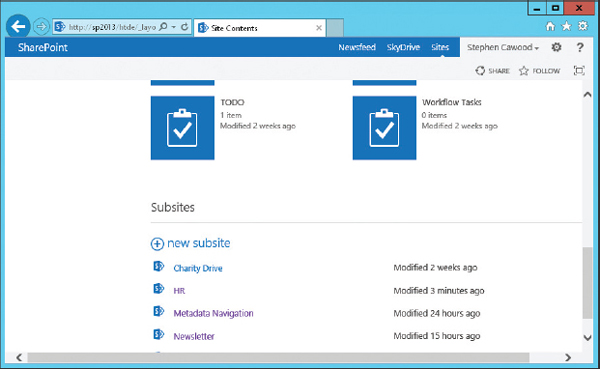
FIGURE 2-4 The new subsite option on the Site Contents page
The Create dialog opens and asks you to choose from a list of the available site templates (see Figure 2-5). The site template determines the features that will be available within the new site, so it’s important to understand what each offers and to choose wisely.

FIGURE 2-5 Creating a new site
| There are third-party SharePoint management tools that will let you convert lists or sites to a new template. This can be useful when you upgrade to a new version of SharePoint and want to migrate your content to a template that offers new or more appropriate functionality. |
If you need to delete a SharePoint 2013 publishing site, the easiest way to delete a site is to use the Delete this site link from the Site Settings page. You can also delete a site through the Site Content and Structure interface, as described in the next section.
Managing Content and Structure
When you’re working with publishing sites, there is a handy interface for performing a number of operations. Whether you want to delete a site, move a list, or just see a tree view of your site structure, the Site Content and Structure interface is the place to go. To open the page, choose Content and Structure from the Site Settings page. If the option does not appear on the Site Settings page, you likely do not have rights to manage the SharePoint hierarchy.
To delete a subsite, click the down arrow that appears when you hover over the name of the site and select the Delete option (see Figure 2-6).
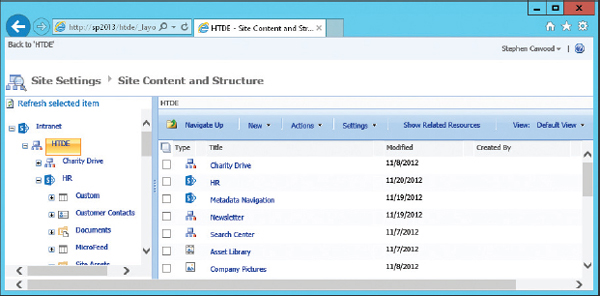
FIGURE 2-6 Deleting a site in the Site Content and Structure interface
| You cannot delete a top-level site from the Site Content and Structure interface. |
You might want to take some time to explore the options available on this page. Understanding your management options will help you decide which decisions about your site structure need to be made in advance and which you can play by ear.
Apps, Lists, and Libraries
Sites may be the primary building blocks within SharePoint, but there’s no doubt that the workhorses are lists. In SharePoint 2013, there are three terms associated with lists. This is a change from SharePoint 2010, which used the terms list and library. In SharePoint 2013, the concept of a SharePoint app has been introduced.
There are now apps available for download from the SharePoint app store. These apps can be developed in-house and added to a private corporate catalog, or they can be installed from the public SharePoint app store. However, that’s not the only reason for using the term app when referring to functionality that would have previously been called lists. Due to the success of various app stores (for example, those that sell apps for mobile phones), most people are now familiar with the concept of an app. To make SharePoint more accessible, Microsoft has decided that app would be a good term to use both for the new SharePoint app store and as a general label when referring to functionality that can be added to a SharePoint site.
Lists, apps, and libraries contain pretty much all of the content within SharePoint, and the list templates determine the sort of information and functionality available to users accessing that content. SharePoint libraries are special types of lists that have been augmented for particular functionality. You can think of them as lists with attachments. For example, picture libraries have an option to display a slide show of the images in the list. As you’ll see in the next chapter, document libraries have a great deal of functionality added for managing documents.
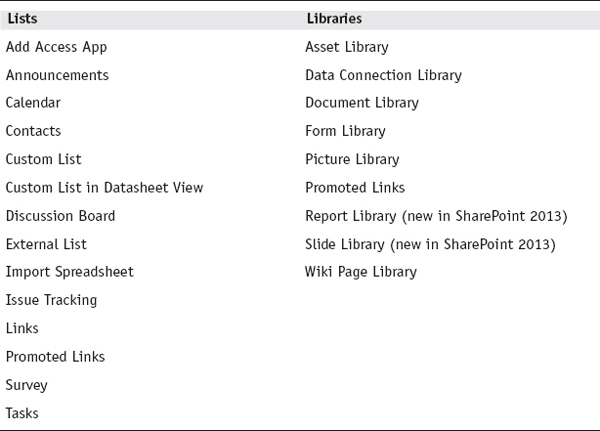
SharePoint Foundation includes these list and app templates:
Viewing App, List, and Library Content
As with sites, any app can be opened by navigating directly to the app URL. If the app has been added to the site navigation, it might be easy to find by navigating to its parent site. However, you can always choose the View Site Contents option from the Settings menu and find all the apps, lists, and libraries that have not been added to the navigation.
Apps, lists, and libraries are displayed using SharePoint views. Some standard views are provided out of the box (see Figure 2-7), but if you need something slightly different, you’re free to create your own custom view by clicking the List or Library tab in the ribbon and choosing to create a new view. Some customizations, such as which columns to display, can be made quickly using the SharePoint web interface. However, it is also possible to make more substantial changes using Microsoft SharePoint Designer and Microsoft Visual Studio.
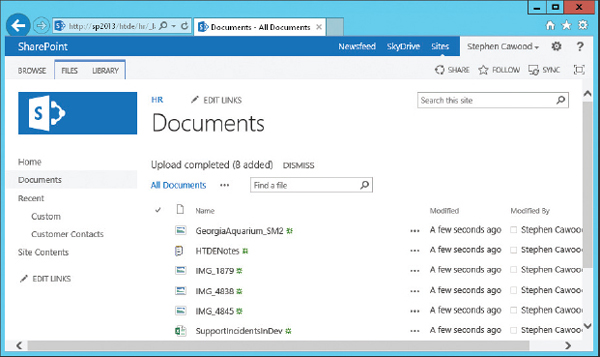
FIGURE 2-7 The default list view for a document library
If you are looking for something specific in a large list, you might need to sort the data to find what you want. Many of the list columns are enabled for sorting. To use one of them to specify a sort order, simply click the column heading. If you click the column heading a second time, the sort order will be reversed, just as with sorting in Windows Explorer. When you choose to sort by a column, a little up or down arrow appears, indicating that a sort order has been applied to the view (see Figure 2-8).

FIGURE 2-8 Column sorting options
If a column supports filtering, you will also see filtering options when you open the callout menu for a column. Filtering allows you to clear out items that don’t meet the criteria that interest you (see Figure 2-9).
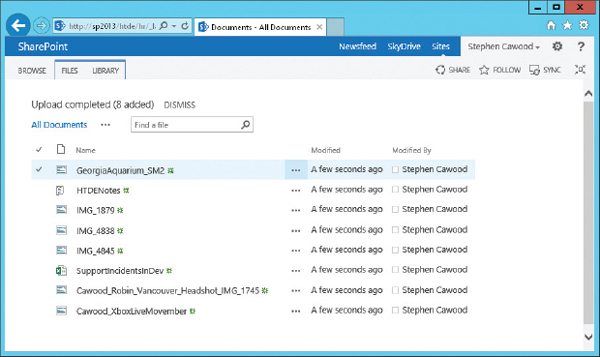
FIGURE 2-9 A list sorted by the Name column
 |
You Can Bookmark Your List Views |
Rather than going to a list URL and then changing the view, you can simply bookmark the list already in the view that you wish to use.
| You can add visible drop-down menus to each column that allows filtering by adding ?Filter=1 to the URL of a list. This allows you to see at a glance which columns are available for filtering. For example, http://sp2013/_layouts/15/start.aspx#/Shared%20Documents/Forms/AllItems.aspx would become http://sp2013/_layouts/15/start.aspx#/Shared%20Documents/Forms/AllItems.aspx?Filter=1. |
Sometimes, just sorting the data isn’t enough. If the default view does not show you the data that you need to see, or in the format that you prefer, you can alter the list view, as shown in Figure 2-10.

FIGURE 2-10 Selecting a different list view
Configuring a List or Library
In the same way that you can customize site settings, apps; lists; and libraries also have many configuration options. For example, when you click the Library tab on the ribbon, you’ll see the list options that are available to you in the Library section (see Figure 2-11). Note that not every type of list will have this option.
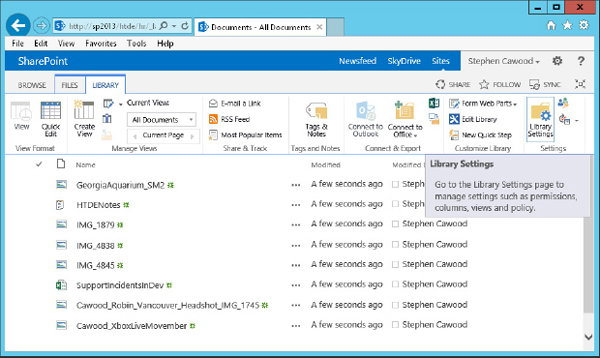
FIGURE 2-11 The Library Settings option in the ribbon
When you open the Settings page, you will have the option to adjust settings such as workflow, versioning, and permissions.
Customizing apps, lists, and libraries is discussed in more detail in Chapter 9.
Creating and Deleting Lists
If you would like to add an app to your site, the quickest way to do that is to click the Site Contents link in the quick launch navigation, and then click the add an app link at the top of the Site Contents page (see Figure 2-12).

FIGURE 2-12 The Site Contents page has an add an app link.
After you click the add an app link, the Your Apps page opens, and gives you the choice of creating the various types of apps, libraries, lists, pages, and sites that are available on your SharePoint server (see Figure 2-13). These choices are defined by the list and site templates that have been installed on your server. For example, SharePoint Foundation users will find that they don’t have as many choices as SharePoint Server users.

FIGURE 2-13 The Your Apps page showing the available choices of app, list, and library templates
Items and Documents
Items make up the content that fills apps, lists, and libraries. For example, the items inside a tasks list are tasks, and the items within a picture library are images. Another way to think about items is that they are rows in the SharePoint content database, and each piece of information about an item is stored in a column for that row.
Documents are a type of item. Many specific options are available in document libraries, and documents are so popular that they receive special treatment in this book; see Chapter 3.
Metadata
Metadata is the invaluable information associated with content in SharePoint. The term comes from the Greek word meta, which can mean with. So a simple way to explain metadata is to say that it’s information that goes with data, and in SharePoint, that data is your content—documents, lists, folders, sites, and more. However, if you’re more technically inclined, you might prefer to think of content as rows in the SharePoint database and metadata as the columns associated with those rows. Either way, when you look at the properties associated with items, documents, lists, sites, or any other SharePoint assets, you are looking at metadata. Examples can include something as simple as the title of a document to taxonomy data or workflow status—it’s all metadata.
Pages
An important aspect of an enterprise content management (ECM) solution such as SharePoint is the web content management (WCM) facilities. The following types of pages are included with SharePoint Server 2013:
• Content page
• Publishing page
• Web part page
These pages are used for content management functionality.
App Parts and Web Parts
App parts and web parts are certainly one of the most fundamental benefits of SharePoint. You can think of them as pieces of functionality that can be added to pages within your SharePoint sites.
|
|
SharePoint WCM Is Based on MCMS |
The WCM features within SharePoint Server are fundamentally based on functionality from a former Microsoft product called Microsoft Content Management Server (MCMS). When both SharePoint and MCMS were being developed, there was confusion as to why Microsoft was producing two different products that could be used as platforms for building websites. Having heard the feedback, Microsoft decided to add the MCMS development team to the SharePoint team and consolidate on one platform. They were introduced together for the first time in Microsoft Office SharePoint Server 2007 (MOSS 2007).
App parts and web parts can be used to show all sorts of information and add a wide range of functionality. For example, you might choose to add a web part to show your Outlook calendar or track a list of tasks you need to complete.
A number of app parts and web parts come with SharePoint. Roughly 70 come with SharePoint Server 2013, but using the SharePoint framework, developers can write custom code and deploy it to SharePoint as a web part.
Web parts and app parts are covered in depth in Chapter 8, but to get you going, this section presents a run-through of how to add an app part or a web part to a SharePoint page.
| App parts are much the same as web parts, but unlike web parts, they are used by developers to create the user interface for SharePoint apps. In other words, an app part allows a SharePoint user to interact with a SharePoint app. |
Adding an App Part or a Web Part to a Page
To add an app part or a web part to a web part page, first navigate to a page that you have rights to edit. Once there, choose the Edit Page option from the Settings callout menu, or click the Edit link in the top-right area, and the page will be refreshed in edit mode (see Figure 2-14).
FIGURE 2-14 A page in edit mode
With the page in edit mode, you’ll be able to see various editing options available to you. On some pages, this will include the ability to add app parts or web parts. Click the Insert option on the ribbon to add app parts or web parts to a page (see Figure 2-15).

FIGURE 2-15 Web parts and app parts can be added into web part zones.
Another way to add a web part or an app part to your page is to simply click the Add a Web Part link within one of the web part zones. Once you click the link, you’ll be asked to choose from the available app parts and web parts. The options available to you at this point are determined by which app parts and web parts have been installed on your server. SharePoint Foundation users will see a subset of the app parts and web parts available on a SharePoint Server 2013 server. Also, if any custom or third-party app parts or web parts have been installed on your SharePoint installation, these may also appear among your choices. To make it easier to find what you’re looking for, the available web parts are divided into categories (see Figure 2-16).

FIGURE 2-16 You can choose from various types of app parts and web parts.
As noted earlier, the functionality of the out-of-the-box app parts and web parts is covered in Chapter 8.
The Recycle Bin
I’m sure everyone has experienced that “oh no!” second that comes immediately after accidentally deleting a file that should not have been deleted. In a feature that is similar to the Microsoft Windows Recycle Bin, SharePoint users also have access to a Recycle Bin. With SharePoint, however, you have access to the Recycle Bin from anywhere because you access it through the SharePoint web-based UI.
The Recycle Bin stores documents, list items, lists, folders, files, and even sites. If you delete an app, you will not find it in the Recycle Bin. To navigate to the site Recycle Bin, click the Site Contents link, and then click the Recycle Bin link on the right side of the page.
There are other ways to access the Recycle Bin. For example, if you navigate to the Site Settings page, the Recycle Bin link is also available (see Figure 2-17). When the Site Settings page is open, you’ll see a Recycle Bin link on the left side. Click this link, and the Recycle Bin page will open (see Figure 2-18).

FIGURE 2-17 The Recycle Bin is also accessible from the Site Settings page.

FIGURE 2-18 Viewing the Recycle Bin
 | It is paramount to think of the SharePoint site Recycle Bin as a last resort. Items within SharePoint’s site Recycle Bin are emptied after 30 days, so there is no guarantee that your deleted content will be there when you realize that you need it back. There is another Recycle Bin that administrators can access, but that Recycle Bin has rules about how much data to store, so you can ask, but you might not be able to get your content back from that bin either. |
Permissions
SharePoint permissions fundamentally define two things: who can see things and who can do things. Permissions can be applied at many different levels, but for ease of management, they are usually defined at the site level. Generally, groups are then used to control which users have rights to each site. This makes permissions for the most common collaboration scenarios relatively easy to manage.
Furthermore, many SharePoint sites, lists, and items are configured to use permissions inheritance. This means that many assets in SharePoint don’t have their own permissions applied—they inherit permissions from their parent. This is not only convenient, but it is also a SharePoint best practice.
To modify the permissions on a site, go to the Site Settings page and find the Site Permissions link. Click it to open the Permissions page (see Figure 2-19).
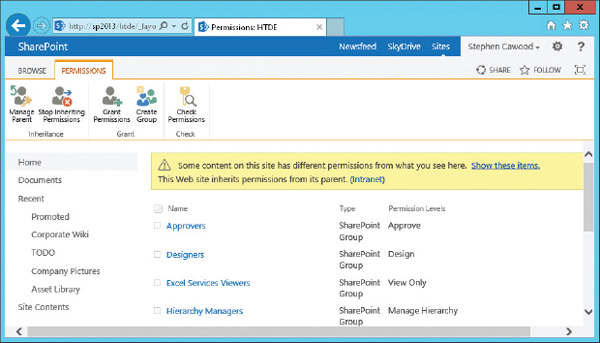
FIGURE 2-19 A site’s Permissions page, accessed via the Site Settings page
| Although it is possible to assign permissions to SharePoint items, it is generally not considered to be a good idea. Once you start using permissions other than at the site level, it becomes vastly more difficult to manage and track the permissions of each user. |
In SharePoint 2010, a feature called Check Permissions was added. This allows you to go to the settings of a list and quickly see which rights a particular user or group has to the list. To use the feature, go to the Permissions page for a list and click Check Permissions (see Figure 2-20).
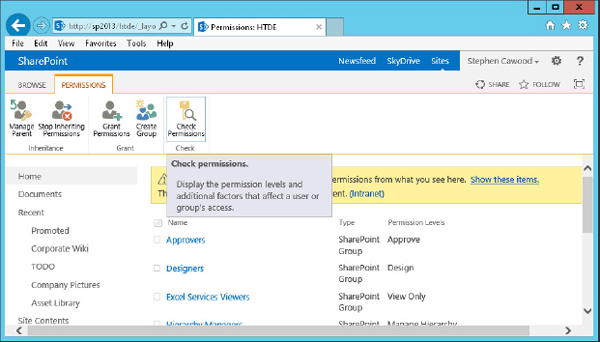
FIGURE 2-20 The Check Permissions option in the ribbon
After you enter the name of a user or group, the results will show the relevant rights and whether those rights have been granted directly or as a result of group membership (see Figure 2-21).
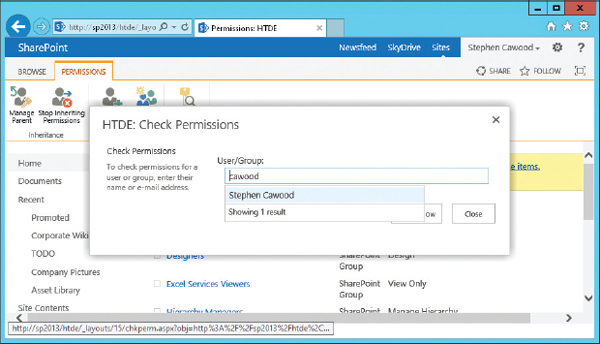
FIGURE 2-21 Check Permissions results
Content Types
The concept of content types has confused many a SharePoint user, but it doesn’t have to be a confusing topic. A content type is simply a way to define a particular set of information. In the case of the document content type, this includes the actual file and some metadata such as the title and filename.
Here is the Microsoft definition of content types from the SharePoint 2010 section of the MSDN website (http://msdn.microsoft.com/en-us/library/ms472236.aspx):
A content type is a reusable collection of metadata (columns), workflow, behavior, and other settings for a category of items or documents in a Microsoft SharePoint Foundation 2010 list or document library. Content types enable you to manage the settings for a category of information in a centralized, reusable way.
For example, imagine a business situation in which you have three different types of documents: expense reports, purchase orders, and invoices. All three types of documents have some characteristics in common; for one thing, they are all financial documents and contain data with values in currency. Yet each type of document has its own data requirements, its own document template, and its own workflow. One solution to this business problem is to create four content types. The first content type, Financial Document, could encapsulate data requirements that are common to all financial documents in the organization. The remaining three, Expense Report, Purchase Order, and Invoice, could inherit common elements from Financial Document. In addition, they could define characteristics that are unique to each type, such as a particular set of metadata, a document template to be used in creating a new item, and a specific workflow for processing an item.
Most users do not need to worry about content types. However, it’s a good idea to understand that content types can have a parent/child relationship. For example, Document is a content type in SharePoint, but an unlimited number of specific types of documents could inherit from the Document content type and augment it to create a new content type.
If, for example, you wanted to create a Resumé content type in SharePoint, you might choose to use the base Document content type, and then add some useful information such as a photo (although that’s not allowed in many places, but let’s set that aside for a minute) or maybe the current status of the candidate’s application. The Document content type already has associated columns for most of the metadata you would like to store with each resumé (for example, Title, Last Modified By, and so forth). To add a photo to each resumé in the list, you could add a column that provides a lookup into a picture library. This allows you to associate a photo with every resumé, and you could even make it a required field. You could view your resumés in the standard document library list template, or you could create your own custom template that shows the picture of the person associated with each resumé.
A Real-World Example
In this example, you’ll be creating a new site and adding some functionality via the add web part option. The first step is to create a new site. Assuming your root site is using the default navigation, click the Subsites link, and then scroll to the bottom of the page to find the new subsite link. After you choose to create a new subsite, type in a name (such as ProjectX) and a description. Next, type something into the Web Site Address text box—this is what you’ll actually type into a browser’s address bar to get to the new site.
| It is almost always a good idea to avoid using spaces in a URL. Spaces in URLs are nasty because browsers convert each space to “%20”—the ASCII representation of a space—which uses three characters instead of one, and also makes the URL far less human-readable. |
The next step is to choose a template for the new site. In this case, select Team Site. By selecting this template, you’re choosing the default functionality you’ll find within your site. Of course, you are generally free to add or remove functionality after you’ve selected the template. You can leave the rest of the creation options at their default settings.
When you click the Create button, your site will be created, and you’ll be taken to the home page of your new site. You’ll see that the Team Site template includes adding a document library called Documents to the site.
In this example, you’re going to be tracking the status of a project, so you’ll need a tasks list. To add this list, click the Site Contents link in the quick launch navigation, and then click the add an app link. Choose the tasks list type, and give it a name (such as ProjectX Tasks). After you add the new list, you’ll be back at the Site Contents page (see Figure 2-22). Click the new tasks list, and you can try out creating some task items.

FIGURE 2-22 The Site Contents page after adding a tasks list
Note that you can bulk edit the entries in a list more quickly by choosing the Quick Edit option from the List tab of the ribbon (see Figure 2-23).
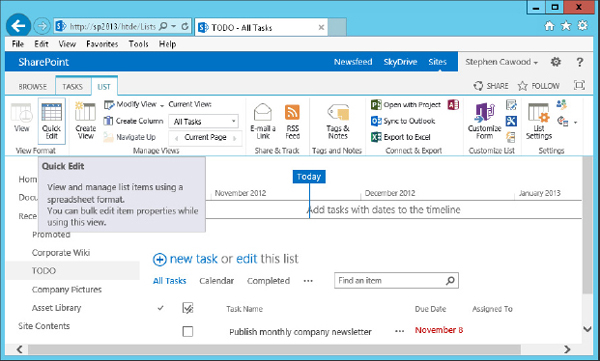
FIGURE 2-23 The List tab of the ribbon
Summary
This chapter has introduced you to the various SharePoint concepts that you’ll be dealing with in your day-to-day interaction with your own SharePoint server. Working with sites, apps, lists, libraries, and items is clearly a skill that all SharePoint users will employ regularly. While you may never need to know the specifics of content types or how information is stored as metadata, it’s always useful to have an understanding of what’s happening under the hood.
..................Content has been hidden....................
You can't read the all page of ebook, please click here login for view all page.