
3
Working with Documents
HOW TO…
In most offices, the ability to collaborate on documents is a daily necessity. However, many companies still do not have any proper document management software. When SharePoint was conceived, this was one of the primary problems it was designed to resolve. Instead of creating many copies of the same document—and often sending them over e-mail—the idea was to use a common repository that is authoritative and reliable, but also flexible enough to meet the users’ needs.
At face value, collaborating on documents from a central store may seem like a simple system to build. But, as with many software problems, the devil is in the details. Offering users flexibility is often in conflict with facilitating features such as a structured content approval process, versioning, and publishing. The complexity of document management was summed up this way in the Microsoft TechNet document “SharePoint Portal Server 2001 Managing Content” (http://technet.microsoft.com/en-us/library/cc750859.aspx#XSLTsection123121120120):
As an organization creates and collects information, employees spend valuable time searching, organizing, and managing that information. Microsoft® SharePoint™ Portal Server 2001 integrates document management and search functions with the tools you use every day.
…
Employees may find large and complex information sources, such as multiple file shares, difficult to organize and use because there is little or no organizational framework in place. The difficulty increases with the addition of information sources such as websites, e-mail servers, and databases.
Employees might also have difficulty collaborating with others on documents, controlling access to those documents, and publishing documents in their organization. Important documents can also be lost, overwritten, or hard to find. SharePoint Portal Server offers a number of features to help streamline your document development and avoid these common problems.
To help you manage documents, SharePoint Portal Server offers:
• Version tracking to record the history of documents
• Application of descriptive, searchable information to identify a document
• Document publishing control
• Automated routing of documents to reviewers
• Web discussions for online comments by multiple document reviewers
• Control of document access based on user roles
SharePoint Portal Server helps you collaborate with others, receive feedback from reviewers, identify the document with descriptive information such as keywords, and publish the document to a wide audience.
Looking at this text, it’s clear that the document management goals have remained consistent throughout the many versions of SharePoint. It’s also fair to say that, although SharePoint has included document management features since its first release, many end users would still agree that the ability to easily share documents with version control and content approval remains one of SharePoint’s killer features.
The goal of this chapter is to cover the most important document management features available from within SharePoint document libraries and also some functionality available from Microsoft Office client applications. This will help you and your team members start collaborating on SharePoint documents right away.
Using Document Libraries
In SharePoint Server 2013, there are many types of libraries, but none are used as often as document libraries. This is not surprising, since one of the reasons organizations adopt SharePoint is frustration with managing electronic documents. Furthermore, document libraries are custom designed for addressing the complexity of collaboration.
 | If you know that you’ll be using certain document libraries, consider adding shortcuts to those libraries. You can do this by bookmarking the libraries in your web browser or by creating desktop shortcuts. Also, if you have rights to the Edit Links option, you could add them to the quick launch navigation within their parent SharePoint site. If you’re not sure, check with your SharePoint administrator to see whether you can edit the navigation on your own. You can read more about customizing navigation in Chapter 9. |
Opening a Document for Editing
Opening a document from within a SharePoint document library is as simple as clicking the name of the document. Once you click the link, SharePoint asks if you would like to open the document for editing (if you have rights to edit it) or open a read-only copy.
The exact behavior when you click a document will vary slightly based on the browser you’re using and the SharePoint setup. For example, the first time you open a Microsoft Office document, you may see a warning that reminds you to open documents only from trusted sources.
 | When you open a document, SharePoint saves a copy in a temporary file location. This is akin to the way Internet Explorer handles a Microsoft Office document that you open from a website. This usually isn’t a problem, because you generally don’t want to save a SharePoint document to your local drive—it defeats many of the benefits of having the document managed by SharePoint. However, if you do want to save a copy, make sure that you save it to a location where you can find it later. |
Using the SharePoint Ribbon
In SharePoint 2013, libraries continue to use the ribbon interface that was introduced in SharePoint 2010. The ribbon is part of the SharePoint Fluent UI, and you may recognize it from other Microsoft applications. The ribbon appears along the top of the window in Figure 3-1.
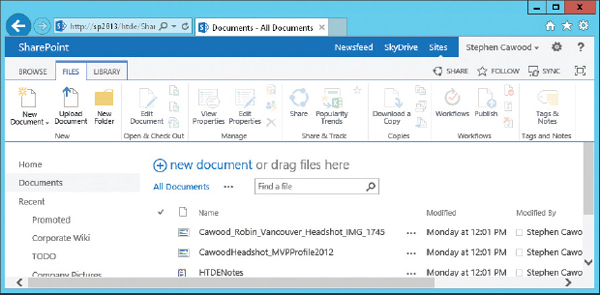
FIGURE 3-1 The SharePoint ribbon
 |
You Can Be a Ribbon Hero |
Microsoft Office applications (such as Microsoft Word and Excel) were the first to adopt the idea of showing menus in the new ribbon paradigm, but ribbon fever has swept across the Microsoft product teams in Redmond. There is even a Ribbon Hero game, which collects data while players earn points by using the ribbon interface or working through challenges. The game was popular enough that there is now a Ribbon Hero 2, Clippy’s Second Chance (http://ribbonhero.com).
Many of the operations you’ll want to perform within SharePoint libraries are offered on the ribbon, so it seems like a good idea to mention it up front. If you worked with older versions of SharePoint, you’ll see the benefits right away. If you haven’t, you’ll need to imagine clicking through menus of links instead of using the new interface, or maybe you would prefer to blissfully stay in the present.
| If you’re not planning on editing the document, opening it in read-only mode is a good idea because there won’t be any chance of you accidentally making a change and then being asked by SharePoint if you would like to save your changes. This could be invaluable if you had opened the document days earlier and don’t quite remember if you intended to make a change. |
Adding Documents to SharePoint
Before you try some of the SharePoint document management features, you’ll obviously need some content within SharePoint. The most common way to get documents into SharePoint is by using the SharePoint web interface. However, there are other methods for getting your stuff into SharePoint. This section covers a few ways that you can get your files into SharePoint and start taking advantage of all the management features, as well as general SharePoint benefits, such as regular backups.
Uploading an Existing Document
One way to add a single document to a document library is through the Files tab of the ribbon in the document library. First, navigate to the document library from within SharePoint. Once you’re at the right document library, click the Files tab on the ribbon. This tab gives you access to the most common document library operations, including editing operations, content approval tasks, and publishing options. In this case, you’re looking for the Upload Document option (see Figure 3-2).

FIGURE 3-2 The Upload Document option in the ribbon
Clicking the Upload Document option launches a dialog that allows you to browse for the document you would like to upload (see Figure 3-3). At this point, you can click Browse to navigate through the file system and find your document. Note that you can get to the same Upload Document dialog by clicking the new document link at the top of the list view.

FIGURE 3-3 The Upload Document dialog
 | The Upload Document dialog is an example of a new type of dialog that was introduced in SharePoint 2010. In previous versions, this sort of operation required that the whole page be requested from the server (this is called an ASP .NET postback), whereas now a smaller window opens and then closes to show the original page. Those extra requests to the server—in this case, asking again for the list of documents—had a significant impact on performance. In SharePoint 2013, the UI has been overhauled again to introduce an Ajax UI and further performance improvements. |
The Choose File to Upload dialog should look familiar to any Windows user (see Figure 3-4). Simply navigate through the folders on the left, select the file that you would like to upload to SharePoint, and then click Open. You can also skip the last step by double-clicking the file.
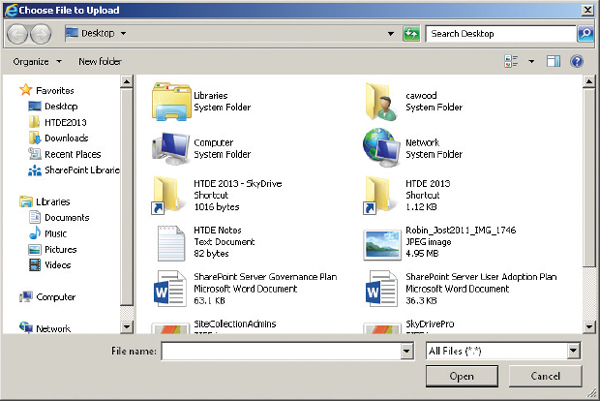
FIGURE 3-4 Browsing for a file to add to a SharePoint document library
| SharePoint will not allow blank documents to be uploaded. If you want to upload a test file, simply open the file and add some content to it before you try to add it to SharePoint. Filenames cannot contain any of these characters: / : * ? “ <> | # { } % ~ &. Also, you cannot start or end a filename with a period or use two periods consecutively. |
After you select your file, you’ll be returned to the Upload Document dialog with the path to your file included. Click OK to begin the upload.
| If you already have the file path for your file, you can simply enter or paste it into the Name field of the Windows Explorer–style dialog that opens when you choose to browse, and avoid the actual browsing altogether. |
It may take some time for large documents to upload. During the file transfer, you’ll see a spinning animation to indicate that SharePoint is working on your request.
| SharePoint sites have a setting for the maximum file upload size. By default, the value is 250MB. If your file is larger than this setting, you’ll need to either reduce the size of the file or change the setting in SharePoint Central Administration. This topic is discussed in Chapter 11. If you do not have sufficient rights to change the setting, you need to talk to your SharePoint administrator. |
When the upload is complete, you may be asked for some more information about the document that you are adding to the document library. However, the default document library list template will not ask you for any additional metadata. Optionally, you can provide a name and/or title, which does not need to match the filename. In fact, the Title field is specifically provided so that you can use a friendly name instead of a potentially cryptic filename. The title of the document can appear in the list of documents in the library.
After you click the Save button, you’ll be returned to the document library, and the list will now include the document you uploaded.
Adding a document in this manner is a great illustration of a standard SharePoint task. Using the ribbon UI and dialogs, you’ll be able to perform many similar operations and gain access to powerful document management functionality.
Of course, uploading files one at a time is not ideal if you want to import an entire directory into SharePoint. For that, you’ll want to use the SharePoint features for uploading multiple documents.
Adding Documents with Windows Explorer
It may seem that SharePoint has already provided enough options for adding content to your server, but there are more. Here, we’ll look at the option to add documents through Windows Explorer.
|
|
You Can E-mail Documents to SharePoint |
Document libraries and certain types of lists can be e-mail enabled to allow you to simply e-mail a document to them instead of uploading the files through the SharePoint web UI. Speak to your SharePoint administrator if this option is not enabled on your SharePoint server.
As you may know, SharePoint stores its content within a SQL Server database, so SharePoint files will not generally be accessible in your Windows folders. However, this doesn’t mean that you can’t use Windows Explorer to quickly get files into SharePoint and copy them out of SharePoint. To use this time-saving feature, go to the document library and, from the Library ribbon tab, choose Open with Explorer (see Figure 3-5).
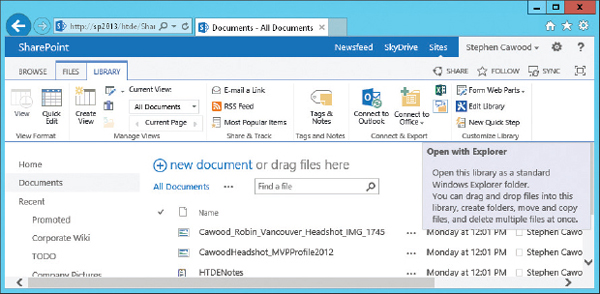
FIGURE 3-5 The open with Explorer link in the upload file dialog
| Open with Windows Explorer works only if you are using the Internet Explorer browser, and you must be using the 32-bit version. The 64-bit version of Internet Explorer (and other web browsers) will show the Open with Windows Explorer link grayed out. |
SharePoint launches Windows Explorer and enables you to access your SharePoint content. Once you have the library open, you can drag-and-drop from your Windows folders into the document library, or vice versa (see Figure 3-6).
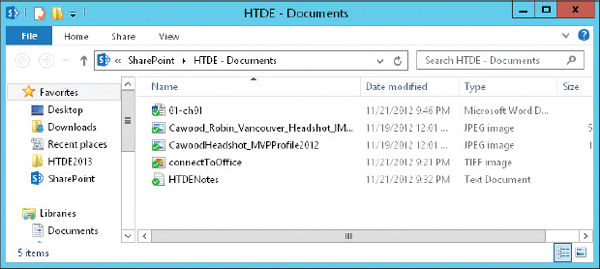
FIGURE 3-6 Dragging a file into SharePoint using Windows Explorer
| If you copy a file out of SharePoint using Windows Explorer, you are doing just that: making a copy. The copy will not be bound by any workflow or management features enabled on the source SharePoint library. This is the same caution that applies to saving a copy of a document you opened from SharePoint. |
You may be feeling flush with power after seeing how easy it is to copy your documents into SharePoint. Just bear in mind that uploading documents in Windows Explorer isn’t the only way to add content.
| A great time-saver is to add your SharePoint library or folder to the Favorites list in Windows Explorer. After you’ve done this, you can open Windows Explorer and go directly to the bookmarked list. To add SharePoint content to Favorites, simply drag the item into the Favorites area. |
Uploading Multiple Documents with Drag-and-Drop
Although the Windows Explorer view is useful, you may want to quickly add some files into SharePoint without the bother of opening another window. SharePoint 2013 adds the option to simply drag-and-drop files into your browser (see Figure 3-7).

FIGURE 3-7 Dropping files into a document library
Clearly, the upload multiple document options are great time-savers. Don’t waste your time and effort uploading a bunch of files individually; simply upload them in bulk.
Creating a New Document
If you have Microsoft Office installed, you’ll also have the option of creating a new document from the document library ribbon. This is useful if you’re starting a new Microsoft Office document and you know that you’ll be uploading it to SharePoint eventually. Rather than going through multiple steps, you can simply create the file from within SharePoint.
First, go to the library where you want the document to be stored. Then find the New Document option on the trusty SharePoint ribbon (see Figure 3-8). This will create a new document using the document library’s default document template. For example, if the default template is Microsoft Word 2013, Word will open and allow you to start creating your new document. You can work on the temporary copy of the document as long as you want, and when you choose to save the file, the client application will ask you to save it in SharePoint.

FIGURE 3-8 The New Document option in the ribbon
The choice of whether to first create new documents and then upload them to SharePoint or to begin the whole process within SharePoint is yours. Remember, though, that getting your content into SharePoint as soon as possible often is the best plan, because it allows you to leverage features such as versioning, workflow, and possibly, regular backups as well.
Managing Documents
Now that you know how to get files into your SharePoint server, you’re probably eager to learn what you can do with your content. With that in mind, this section introduces some common document management tasks. We’ll begin with how to remove documents from SharePoint.
Deleting a Document
Although SharePoint does have a Recycle Bin, content in the bin will expire over time, so before you trash something, make sure that you really don’t need it. After something has been completely removed from SharePoint, the only way to recover it is to get it from a database backup. Without a third-party restore tool, this can literally take an entire day, since it involves spinning up a new SharePoint server and then restoring the entire database—basically, not a fun time for the SharePoint administrator.
To delete a document, you can select its row by clicking an area of the row that does not contain a link. Clicking a field that contains a link simply opens that document, rather than selecting the row. If you want to delete more than one document, you can select those documents by checking their boxes in the documents list and then choosing Delete Document from the Files tab of the ribbon.
Another way to delete a document is to choose Delete from the drop-down menu that appears when you click the ellipses link next to the document’s name (see Figure 3-9).
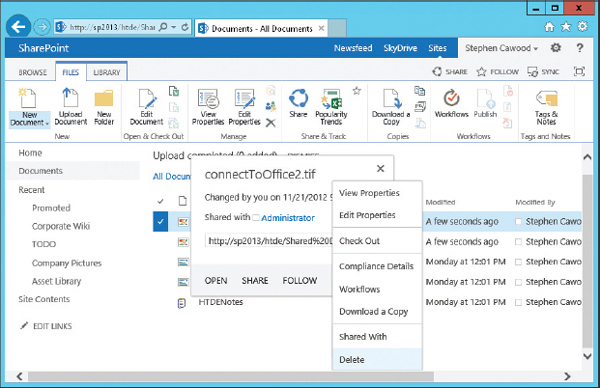
FIGURE 3-9 Selecting the option to delete a document from the list
As you would expect, SharePoint then asks you to confirm the delete action via a dialog. You’ll need to confirm that you do, in fact, want to delete the selected items from the list. After you confirm the delete action, you may see an indicator that SharePoint is removing the selected files, which appears on the far right of the screen.
| You can also delete an item by selecting it and then pressing the delete key. Many more SharePoint keyboard shortcuts are available. Check online for a complete list. For example, http://office.microsoft.com/en-us/sharepoint-server-help/keyboard-shortcuts-HA010369395.aspx. |
When the document has been removed, it may not be completely purged from the SharePoint server; as previously mentioned, it will usually end up in the site’s Recycle Bin. This leads to the next topic. What if you want to recover a document that you or someone else has deleted?
Recovering a Document from the Recycle Bin
If you discover that you or someone else has deleted a file that you need to return to SharePoint, you should first check the Recycle Bin. If you check before the content expires, you’ll be able to restore the file easily.
To check the Recycle Bin, navigate to the site that contained the deleted document and click the Site Contents option in the quick launch navigation. The Recycle Bin link is on the right-hand side. Click this link, and the site’s Recycle Bin will open (see Figure 3-10).
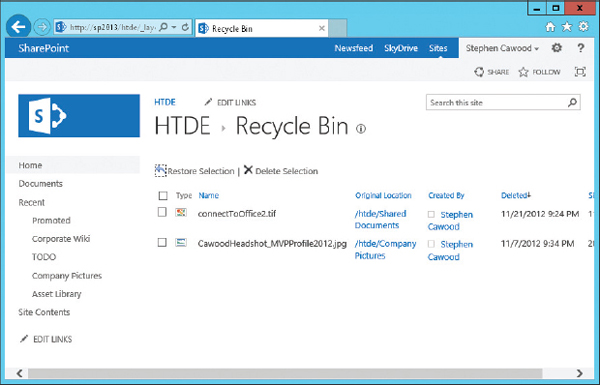
FIGURE 3-10 The SharePoint Recycle Bin
In the site’s Recycle Bin, you’ll see a list of all the content that can be restored. Click the check box next to each item you need to restore, and then click Restore Selection. A dialog pops up and asks if you’re really, truly sure that you want to restore the selected content.
The Recycle Bin is certainly a useful tool in SharePoint. However, it should be considered a last resort. Try to avoid making use of it on a regular basis.
| SharePoint actually has a two-stage Recycle Bin system. If you cannot find your file, ask your administrator to check the site collection Recycle Bin. Neither of the bins is permanent, so eventually, deleted items will be removed from the SharePoint database. The first stage, the site Recycle Bin, can be set to expire after a certain number of days (30 days is the default setting). The second stage, the site collection Recycle Bin, can be set to expire when it reaches a certain storage capacity (50 percent of the site quota is the default setting). So, by default, deleted items stay in the site Recycle Bin for 30 days and then move to the site collection Recycle Bin, from which the administrator can still recover the items (subject to sufficient storage capacity). You can think of the second stage as the “global” Recycle Bin. |
Viewing Document Properties
You’ll often need to check into the finer details of your documents. This information is stored in the document’s metadata. Metadata is basically data about data, and it is used for everything from search to sorting.
| SharePoint supports a great number of metadata options. It is possible that your documents will already be loaded with useful information, but metadata doesn’t necessarily get “automagically” populated by the system. Getting metadata into the system often relies on the diligence of users. |
The quickest way to look for metadata is to access the default document properties. What you’ll find there will vary slightly, but information such as name and title is common. To see the properties of your documents, select a document from within a document library, click its ellipses link and the ellipses link on the callout menu, and then choose View Properties (see Figure 3-11). Alternatively, you can skip all that by using the View Properties option in the ribbon.
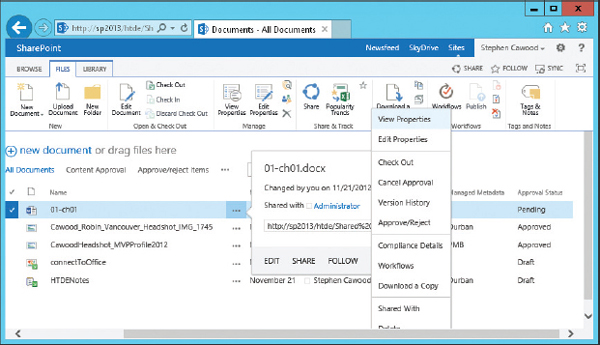
FIGURE 3-11 Choosing to view the properties of a document
After you make your selection, the properties dialog opens, showing the properties of the document (see Figure 3-12). The properties you see for each document will vary based on the list template. For example, if you add a number of custom columns, you’ll see that data appear by default in the properties dialog.
FIGURE 3-12 Viewing the properties of a document
Along with viewing properties, if you have sufficient permissions, you’ll also be able to make changes to the property settings.
Editing Document Properties
There are countless reasons why you might want to change the metadata associated with documents in SharePoint. For example, maybe the filenames used during the upload were the cryptic filename values from the file system, and now you want to make use of SharePoint’s potential by assigning user-friendly titles.
To edit properties, first find your document. Then click the Edit Properties button on the ribbon or click the document’s drop-down arrow and select the Edit Properties option. When the dialog opens, you’ll be able to alter any properties that you have rights to edit.
You will not be able to see every metadata value in the property edit dialog. You can think of each column of data in a list as a different metadata value. Not all of the columns are shown in the default list view, and they certainly are not all shown in the property edit dialog. If you are looking for information that does not show by default, you may need to create your own custom view. Creating your own list views is discussed in Chapter 9.
| With the Enterprise Metadata Management (EMM) functionality in SharePoint, it’s possible that you’ll need to frequently edit document properties to tag them with taxonomy metadata. The information you add may seem unrelated to your daily tasks, but it will empower a number of use cases on your SharePoint server. For example, adding extra metadata will improve searches so that you can find content throughout the server. SharePoint taxonomy is discussed in Chapter 5. Since the underlying taxonomy service is called the Managed Metadata Service, many SharePoint folks refer to this functionality as MMS. |
Using Document Versioning
Now that you have an understanding of how easy it is to add, remove, open, and edit a document in SharePoint, it’s time to talk about version control. Versioning is not required on document libraries, but it’s a useful feature and widely used.
Versioning gives you the ability to create a new copy—for a minor or major version—of a document each time you make an edit. Of course, you wouldn’t want two people working on the same version of the document at the same time, so you also need another important SharePoint document management feature: workflow.
The simplest workflow in SharePoint is the content approval workflow that’s included in the document library versioning settings. This requires that a user check out a document before that user can make a change. If other users want to edit the same document, they will need to wait until the document is checked in before they can check it out and make changes.
| For clarity, this book will occasionally refer to manual operations such as check-in and check-out as part of a content approval workflow. You can also create custom workflows for SharePoint Server 2013. Search online if you’re interested in learning about creating your own workflows. For example, the article Get started with workflows in SharePoint 2013 on MSDN (http://msdn.microsoft.com/en-us/library/jj163917.aspx). |
Checking Out Documents
If a document library has been configured to require check-out before making changes, then you’ll need to select the document by clicking its check box, and then click the Check Out option in the ribbon before you’ll be allowed to open it for editing (see Figure 3-13).

FIGURE 3-13 Using the ribbon to check out a document
After you choose Check Out, SharePoint opens a dialog that asks whether you would like to copy the file into your local drafts folder. If you choose Yes, you’ll be able to disconnect from the SharePoint server (for example, to take your laptop home) and work on the document offline. Once you are finished with your edits, you can reconnect to the server and save your document back into its document library. If you choose not to copy a local version, you’ll be able to save your changes only while you’re connected to the SharePoint server.
| When you choose to save a copy to your local drafts folder, a SharePoint Drafts folder will be created in your Documents folder in Windows. |
If you’re working on a desktop computer, you might choose not to save a local copy. This has the advantage in that any time you save that document, you’ll be saving your work back to the server. However, if you are on a slow connection, this could slow down your productivity. Regardless of which option you choose, you simply need to remember to save your changes back to the server when you’re finished.
After a file has been checked out, SharePoint will change the icon next to the document to a little green arrow.
| If you choose to edit your document in the default editor assigned to the document type (for example, Microsoft Word), you will still be prompted to check out the file if check-out is required for that document library. Once the document is checked out, you will be able to edit and save your changes. |
Checking In Documents
Naturally, the topic to cover after checking out a document is how to check in a document. In addition to the usual contextual menu (ellipses link) and ribbon options previously discussed, if you’re using Microsoft Office clients, there’s also a way to check in from the client.
Checking In with SharePoint
The first technique for checking in a document is to simply go to the library and use the ribbon. You might expect that SharePoint would simply check in the document and you would be finished, but that’s not the case. When you check in, SharePoint asks if you want to retain the check-out status after the document has been checked in (see Figure 3-14).

FIGURE 3-14 You can retain the check-out status after checking in a document.
|
|
Check Out from the Document Properties Dialog |
It’s also possible to check out a document from the document properties dialog, as shown below. You may not use this feature, but just keep in mind that it’s there.

This option may seem counterintuitive at first, but there is a logical reason for it. If you were working on a document and wanted to check it in to create a version, but you didn’t want anyone altering the document before you made further changes, then you could retain the check-out status and not risk the chance that another user would check out the document before you remembered to check it out again.
In this dialog, you’ll also be asked for a check-in comment. In the default content approval process, this comment is optional, but it can be very useful when you’re looking through old versions of files and trying to figure out why a certain change was made.
Checking In with Microsoft Word
Another way to check in a SharePoint file is from one of the many clients that support SharePoint content approval workflow. If you’re editing a file in Word, when you save and close the file, the client will ask if you want to check in (see Figure 3-15).
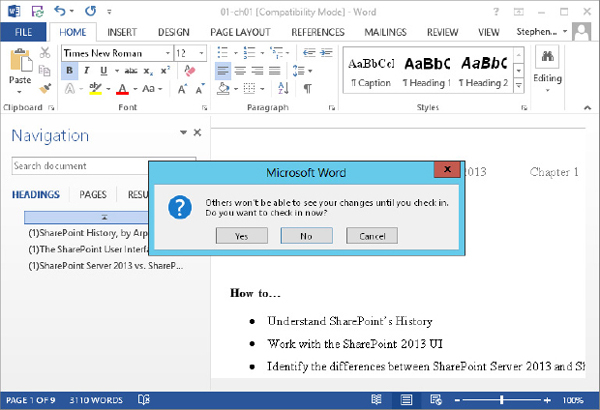
FIGURE 3-15 Check in from Microsoft Word 2013
If you want to check in a file from a client without closing the document, you can also choose File | Info, and then choose to check in from the available options (see Figure 3-16).
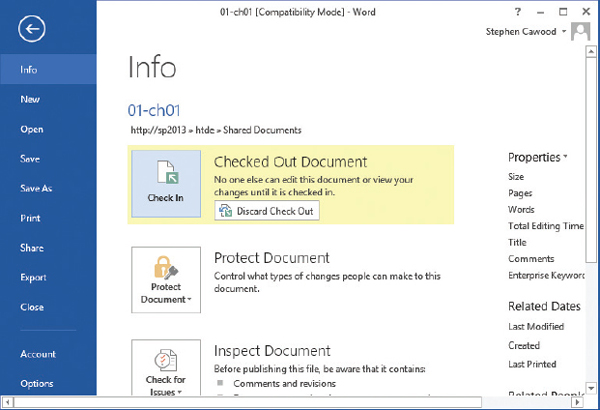
FIGURE 3-16 Check in from the Microsoft Word 2013 File menu
| The interface used for this example is part of the Microsoft Office Backstage view. Backstage offers a tighter integration between SharePoint and Microsoft applications, including Access, Excel, InfoPath, OneNote, PowerPoint, Project, Publisher, SharePoint Designer, Visio, and Word. |
As with the other techniques, the client program will ask you to enter a check-in comment (see Figure 3-17).
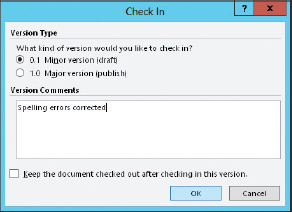
FIGURE 3-17 Adding a check-in comment from Microsoft Word
| The client Info page shows all sorts of interesting information about SharePoint files. You’ll be able to see properties of the document, as well as information about versions, permissions, and more. |
Approving a Document for Publishing
The subject of SharePoint workflow could easily fill a couple of books on its own. Topics include the default built-in content approval workflow associated with various list templates, designing workflows with the visual workflow designer, designing custom workflows in SharePoint Designer, and even developing custom workflows in Visual Studio. In this book, only the built-in SharePoint content approval workflow functionality will be discussed. This section provides just a few key examples.
Content approval requires that an item be approved before it is published in SharePoint. In fact, this simple type of workflow is so commonplace that there is an option to enable it in the library settings of document libraries. Once the option has been enabled, any document that is checked in will need to be approved before the changes are available. To approve the changes, a user with approval rights needs to select the Approve/Reject option from the ribbon (see Figure 3-18).
FIGURE 3-18 The Approve/Reject menu option
You probably noticed that the option Approve/Reject implies that there’s more to this option than just approving an edit. In addition to the ability to approve any edits since the last approval, you also have the option to reject the changes, or you could select Pending to set the document so that it remains visible to just its creator and users who can see draft items (see Figure 3-19). In addition, there is a Comment text box that allows you to enter text that explains your choice or adds information for anyone who might be interested in the history of the document.
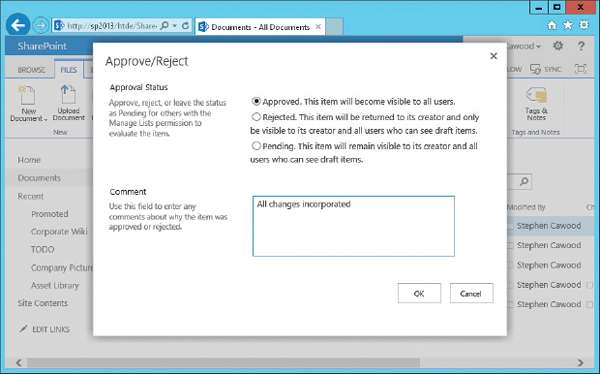
FIGURE 3-19 The Approve/Reject dialog
After you have selected the appropriate option, you’ll be returned to the document library, and the change will be shown in the Approval Status column.
| The Approval Status column appears only if the library has been set to require approval. In SharePoint 2013, there is a new Approve/reject Items link, which appears above the document library main area in libraries where content approval has been turned on by the library administrator. This is simply a filtered view of the main library that lets you quickly spot and review items up for review. |
Having covered the straightforward options in basic content approval workflow, the next topics delve a little deeper into the document version options. For example, what if versioning isn’t enabled on a library, or what if you needed to find previous versions of a document?
More About Versions
There are many reasons to take advantage of the document versioning features available in SharePoint. This section covers turning on versioning, setting versioning options, and working with version history.
Turning On Versioning
Suppose that your organization is legally required to keep all versions of documents. To make what might seem like a cumbersome task easy to enforce, simply enable SharePoint version control.
To turn on versioning in a document library, click the Library tab on the ribbon and then click Library Settings (see Figure 3-20). There are many options within the Document Library Settings page. Versioning Settings is the second link down in the General Settings section.
FIGURE 3-20 The library settings are accessible from the ribbon.
| Any settings page in SharePoint has a URL, so just as with any other page, you can bookmark a settings page for easy access in the future. |
On the Document Library Versioning Settings page, you have a number of options (see Figure 3-21). The settings are divided into the following sections:
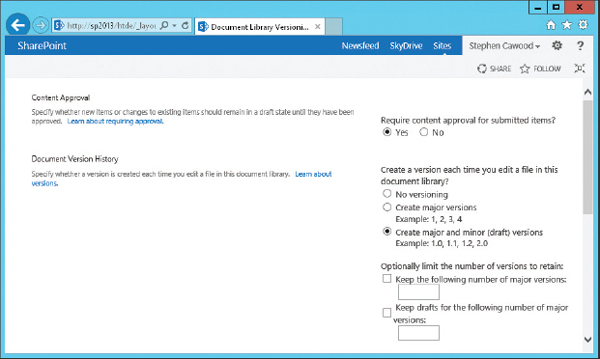
FIGURE 3-21 The version settings page for a document library
• Content Approval Here, you can specify whether approval is required for items in the library. This is an example of using a simple out-of-the-box SharePoint workflow feature.
• Document Version History This section gives you options for how versions will be created. If you want, you can disable versioning, create just major versions, or create major versions and minor versions. In addition, you have the option to specify how many versions of the document SharePoint will retain. If storage is more important than retaining every copy of your documents, you may choose to limit the number of versions SharePoint keeps in its database. The decision of whether to create minor (draft) versions is more subtle; there may be many cases where the difference isn’t important to you. However, if you want to be able to create multiple draft versions and then only “publish” by creating a major version, then you’ll need to have both types of versions available.
• Draft Item Security This option allows you to restrict access to minor versions. As you would expect, this option is available only if both minor and major versions are enabled.
• Require Check Out This is another handy built-in workflow feature. If you want to enforce that only one person can be working on an item at a time, you can require users to check out the document before editing.
| The number of versions you decide to keep will be N+1. For example, if you chose to keep five versions, there could be six copies of a document in the library: the current “master” copy and five historical versions of it. |
Working with Version History
Naturally, versions are useful only if you have an easy way to access the metadata for your versions, view old versions, and—in the worst case—restore an old version over the top of the current version. To see a list of the versions of a particular document that SharePoint has stored, select a document and choose the Version History option in the ribbon.
The version history dialog will open and show the versions that are stored in SharePoint (see Figure 3-22). This dialog shows both minor and major versions, as well as the modified date, who modified the version, the size of the particular version of the file, and any version comments that have been added.
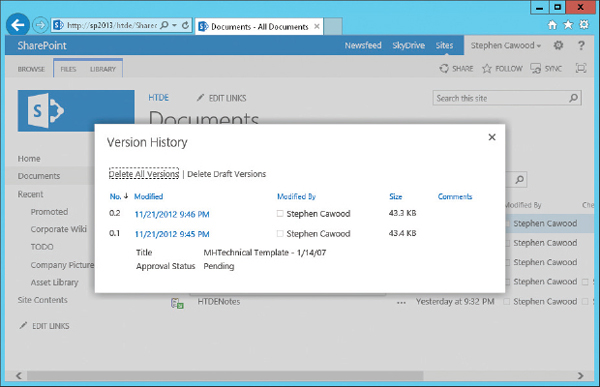
FIGURE 3-22 Version history dialog
If you click the date field in the Modified column, a drop-down menu appears with the options to View, Restore, or Delete that version (see Figure 3-23).
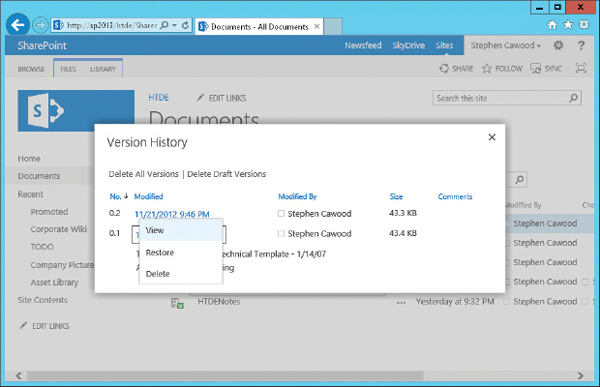
FIGURE 3-23 Version dialog drop-down menu
Choosing to view the information about a version will open a new dialog in which you can see all the metadata about the version in question. For the default document library list template, this includes the name, title, managed keywords, and approval status. You’ll also see information that will be helpful if you need to figure out which version contains some information that you need to view again. This includes the version numbers, the created date, and the last modified date—the latter two also include the user information for that data.
If you choose to delete a version, you will be prompted to confirm the operation (see Figure 3-24). One reason you might delete old versions is to save space.

FIGURE 3-24 Deleting a document version
| The default of infinite versions could lead to a full server, so you might want to set a maximum number of versions in the library settings. Just remember that after some time, there may be no way to easily recover the versions that are removed as a result of the policy you set. |
Restoring a version is just as easy as deleting one. When you choose Restore in the drop-down menu, the dialog shown in Figure 3-25 appears. Restore could be particularly useful in cases where versioning has been enabled on a library, but approval is not required. If a team is collaborating on items in such a library, one user may make a change that isn’t acceptable to another user. Since no approval was required when the item was checked in, the best way to undo the edits might be to restore one of the older versions.

FIGURE 3-25 Restoring a version
| Restore makes the selected old version the current version. This means that the current version will get stored as an older version in the history. In other words, if you restore a version, you are putting it “in front of” the most recent version, thus demoting that newer version to an older version. |
A Real-World Example
Let’s imagine that you’re using a SharePoint document library to store project documents that are being edited by multiple members of your team. You’re all fed up with the idea of e-mailing around copies of your documents and keeping track of versions by changing the name. No one wants to have a document called something like Proposal5_SC_Approved_LatestNew-FINALSeptember16.docx.
With the clear goal of streamlining your document management process, you’ve created a document library for the project files, and you’ve enabled the built-in workflow so that all files must be checked out before they can be edited. This is a great start, but it’s not the end of the potential of SharePoint by any stretch. To easily keep track of what’s going on with your documents, there are a number of handy features you can use.
You know that you can bookmark the URL of your document library in your favorite browser, but if you’re going to be editing documents frequently, you might want to also create a shortcut inside Windows Explorer. The Connect to Office option in the document library ribbon is an easy way to do this (see Figure 3-26).
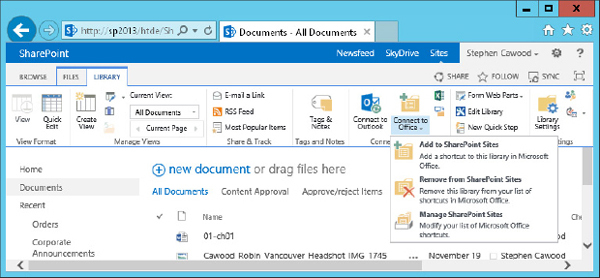
FIGURE 3-26 The Connect to Office option in the ribbon
After choosing this option, Microsoft Office clients will show a shortcut to this SharePoint list (see Figure 3-27).
FIGURE 3-27 The SharePoint list added to the Office Backstage view
You may also want to easily see which of your team members is working on each document. For this, you can customize the default view to include a column for the name of the user who currently has the document checked out. To edit the current view, click the Modify this View link in the ribbon (see Figure 3-28).
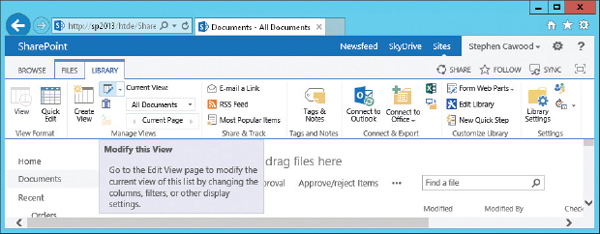
FIGURE 3-28 The Modify this View option in the ribbon
Once you have the Edit View page open, scroll down to the section that shows the current columns. You’ll see that each has a numeric value next to it and a check box that indicates whether the column is visible. Check the box for the Checked out to column, and then click the drop-down and change it to the number 3.
With these changes in place, you’ll be able to easily see who has checked out each document, and you’ll be able to quickly open your SharePoint documents from within the Microsoft Office clients.
Summary
This chapter provided the information you need to start working efficiently with SharePoint documents. Whether you need to add documents, use the SharePoint content approval workflow, or work with document versions, the topics covered will help you quickly navigate the various options and choose what will work best for you and your team.
..................Content has been hidden....................
You can't read the all page of ebook, please click here login for view all page.