
11
Introduction to SharePoint Administration
HOW TO…
You can think of this chapter (and the next chapter, which is an introduction to SharePoint development) as additional reading if you want to go beyond what the typical SharePoint user needs to know. Many SharePoint users may not have an interest in SharePoint administration, but plenty of readers out there will be curious about various aspects of administering a SharePoint server. If you fit into the curious category, then this chapter is meant for you.
Installing SharePoint
If you want to install SharePoint, I strongly suggest that you sign up for a free account with the Critical Path Training program and use its SharePoint setup guide. In this section, we’ll walk through a short installation for people who want a relatively simple setup on a Windows 8 client machine (that is, not running Windows Server 2012 as the host operating system).
 | At the time of writing, the SharePoint 2013 version of the setup guide had not been posted yet. However, it should be available from the Critical Path website: www.criticalpathtraining.com/Members/ContinualLearning. |
For me, one of the biggest enhancements in Windows 8 is the ability to run Hyper-V in the client operating system (O/S). This means I don’t need a server O/S running on my laptop (or desktop for that matter). I can simply run virtual machines (VMs) with whatever I need—for example, the shiny new RTM build of SharePoint Server 2013.
| Microsoft Hyper-V is a virtualization platform that allows users to run virtual machines within their computer. This is commonly done to allow different operating systems to run (often simultaneously) on the same computer. |
You don’t need to install SharePoint in a virtual environment, but if your goal is to have your own SharePoint environment for development or to learn more about SharePoint, I strongly suggest that you go with a VM setup. Installing SharePoint in a VM allows you to easily create a backup version and move the image from one machine to another. Of course, if you’re setting up a production SharePoint server, then you should read the Microsoft TechNet SharePoint installation guide (http://technet.microsoft.com/en-US/library/cc303424(v=office.15).aspx), and stick to the best practices for production environments.
 | Hyper-V will work only if your BIOS, hardware, and CPU support Hyper-V. It’s a really good idea to check first before you try to use it and get frustrated. Whenever I order new hardware, I explicitly ask if it supports virtualization and Hyper-V. That way, when I get something (such as a CPU) that doesn’t work—and that happens—it’s easier for me to return it for something that will work. |
This setup is “relatively simple” because I chose a particular setup and I repeat it often. I run SharePoint in a Hyper-V VM in a single-server farm. I install Microsoft SQL Server and the domain controller role on the same VM. This means I can export the VM and import into a different Hyper-V instance, and it all just works. Because the whole setup is self-contained and doesn’t require Internet access, it’s great for demos, webinars, conference sessions, and other presentations. However, this is not the best practice for a production SharePoint installation. For example, you should not install a SharePoint production server on a domain controller.
Here are the steps for my basic SharePoint setup on a Windows 8 client machine:
1. Install Windows 8 and add the Hyper-V feature.
Once you have Windows 8 running, scroll to the top or bottom corner on the right side to open the fly-out menu, and then choose Settings | Control Panel | Programs and Features | Turn Windows features on or off. Then check the box next to Hyper-V and install it (see Figure 11-1). This will require a reboot.
Once you have Windows 8 running, scroll to the top or bottom corner on the right side to open the fly-out menu, and then choose Settings | Control Panel | Programs and Features | Turn Windows features on or off. Then check the box next to Hyper-V and install it (see Figure 11-1). This will require a reboot.
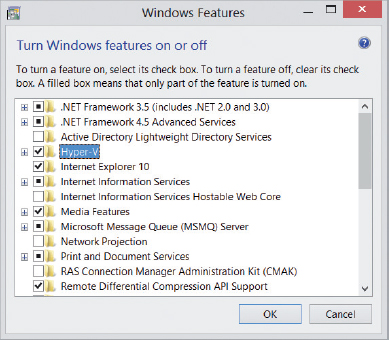
FIGURE 11-1 Installing the Hyper-V feature
2. Create a new virtual hard disk (VHD) in Hyper-V.
I’m choosing Windows Server 2012, so I’ve downloaded that ISO file from MSDN and selected it as the OS when I created the new VM in the Hyper-V Manager (see Figure 11-2). I’m going with a 50GB VM with 8GB of RAM (but I can always increase these numbers later). If you don’t need Office and/or Visual Studio, you may not need 50GB of space.
I’m choosing Windows Server 2012, so I’ve downloaded that ISO file from MSDN and selected it as the OS when I created the new VM in the Hyper-V Manager (see Figure 11-2). I’m going with a 50GB VM with 8GB of RAM (but I can always increase these numbers later). If you don’t need Office and/or Visual Studio, you may not need 50GB of space.
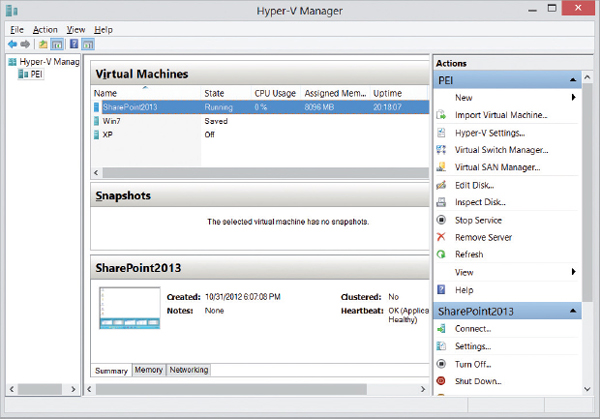
FIGURE 11-2 The Hyper-V Manager
| The initial image file will be less than 10GB. After installing SharePoint Server, the VHD file will be roughly 19GB, and about 20GB of the 50GB will be free. |
3. Install Windows Server 2012 and name your VM.
Changing the machine name after installing SharePoint has historically been tricky, so pick a name you want to use right from the start. I’m installing Windows Server 2012 Datacenter Edition with the graphical user interface (GUI). Remember to activate Windows after you install it. No one likes a VM with an OS that hasn’t been activated. After you’ve installed the O/S, run Windows Update.
Changing the machine name after installing SharePoint has historically been tricky, so pick a name you want to use right from the start. I’m installing Windows Server 2012 Datacenter Edition with the graphical user interface (GUI). Remember to activate Windows after you install it. No one likes a VM with an OS that hasn’t been activated. After you’ve installed the O/S, run Windows Update.
| If you choose Windows Server 2008 as your OS, it will take a while to update, and many reboots will be required. The last time I installed it, there were 123 Windows Server 2008 updates. |
4. Add the web server and Active Directory (AD) Domain Services roles.
I add the Wireless LAN Services feature because I like to be able to use my VMs on my laptop, which I obviously use a lot on wireless connections. Once you’ve installed AD, you’ll have the option of promoting the server to a domain controller. After that is finished, create the domain accounts you’ll need. I always add one for myself and another to use as the SharePoint administrator account.
I add the Wireless LAN Services feature because I like to be able to use my VMs on my laptop, which I obviously use a lot on wireless connections. Once you’ve installed AD, you’ll have the option of promoting the server to a domain controller. After that is finished, create the domain accounts you’ll need. I always add one for myself and another to use as the SharePoint administrator account.
5. Install Microsoft SQL Server.
I install Microsoft SQL Server as a stand-alone server (default instance). It’s a simple installation process. I install the engine (obviously) with the client and management tools. If I need more, I’ll add it later. SQL Server is the database that powers SharePoint. For example, all of the content within SharePoint is stored, by default, inside SQL Server. A different SQL Server database is also used to store most of the configuration information.
I install Microsoft SQL Server as a stand-alone server (default instance). It’s a simple installation process. I install the engine (obviously) with the client and management tools. If I need more, I’ll add it later. SQL Server is the database that powers SharePoint. For example, all of the content within SharePoint is stored, by default, inside SQL Server. A different SQL Server database is also used to store most of the configuration information.
| I often export the VM and save a copy at this point so that I have a base image of the OS with SQL Server. Since both of them have been released recently, that’s what I did this time. You can also create a snapshot, but I would rather just export a reusable copy than increase the disk space needs of my base image. |
6. Run the SharePoint 2013 prerequisite installer.
Download the SharePoint Server 2013 ISO image from MSDN and launch the default.hta file (see Figure 11-3). The setup file will run the product installation, so don’t run that first. You want to first run the prerequisite installer. If you don’t have access to SharePoint Server, you can download the free version available from SharePoint Foundation at www.microsoft.com/en-us/download/details.aspx?id=35488.
Download the SharePoint Server 2013 ISO image from MSDN and launch the default.hta file (see Figure 11-3). The setup file will run the product installation, so don’t run that first. You want to first run the prerequisite installer. If you don’t have access to SharePoint Server, you can download the free version available from SharePoint Foundation at www.microsoft.com/en-us/download/details.aspx?id=35488.

FIGURE 11-3 The SharePoint install splash screen
7. Install SharePoint 2013.
The actual product installer doesn’t really ask any questions—that’s saved for the two configuration wizards (see Figure 11-4).
The actual product installer doesn’t really ask any questions—that’s saved for the two configuration wizards (see Figure 11-4).
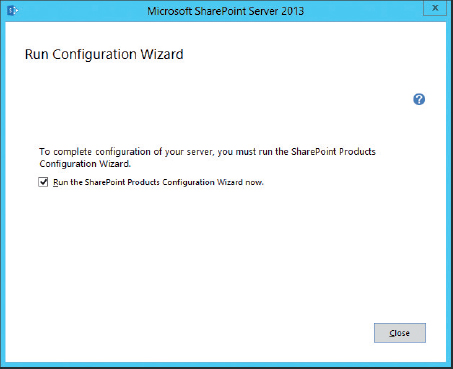
FIGURE 11-4 Choosing to run the SharePoint Configuration Wizard
8. Run the SharePoint 2013 Configuration Wizard.
This wizard asks a lot of questions, and you can find plenty of posts on that topic. One key point is that you likely do want to run the Configuration Wizard at the end of the installation (see Figure 11-5). There are few times that you wouldn’t want this selected, such as if you are planning to manually set up SharePoint by using PowerShell.
This wizard asks a lot of questions, and you can find plenty of posts on that topic. One key point is that you likely do want to run the Configuration Wizard at the end of the installation (see Figure 11-5). There are few times that you wouldn’t want this selected, such as if you are planning to manually set up SharePoint by using PowerShell.
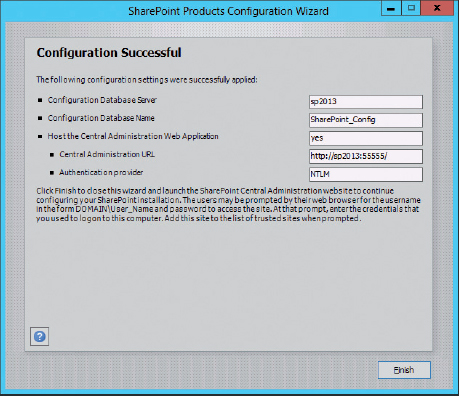
FIGURE 11-5 The confirmation screen in the SharePoint Configuration Wizard
9. Run the Farm Configuration Wizard.
After running the SharePoint Configuration Wizard, you’ll be asked to run the Farm Configuration Wizard. This step includes creating a root site collection and choosing which services will run on the server (see Figure 11-6).
After running the SharePoint Configuration Wizard, you’ll be asked to run the Farm Configuration Wizard. This step includes creating a root site collection and choosing which services will run on the server (see Figure 11-6).
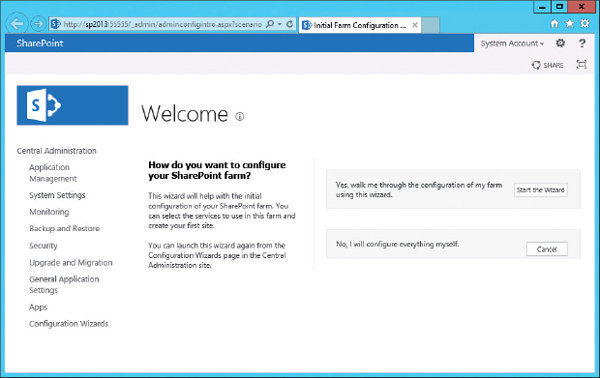
FIGURE 11-6 The SharePoint Farm Configuration Wizard
That’s it—you’re finished! Now you have a SharePoint 2013 image on Windows 8, and that’s so handy.
Using SharePoint Central Administration
As with the rest of SharePoint, the main interface for SharePoint administration is web-based. This means that you can bookmark the URL on other machines and access it remotely, if the security settings allow remote connections.
To open SharePoint Central Administration (commonly referred to as “central admin”) on your SharePoint server, go to the app search bar (or the Start menu on older versions of Windows) and type in SharePoint. One of the results will be SharePoint 2013 Central Administration. When you choose to launch it, central admin will open in your favorite browser (see Figure 11-7).
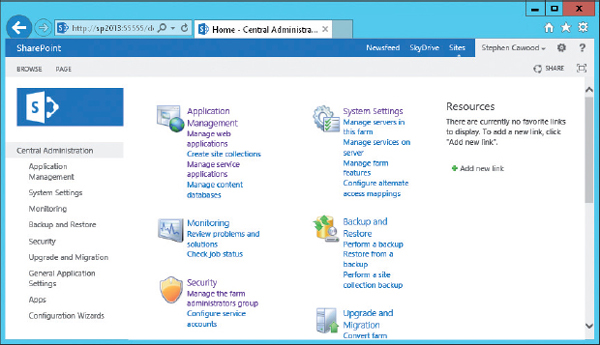
FIGURE 11-7 SharePoint Central Administration opens in your browser.
From the administration interface, you can configure many settings. Everything from SharePoint security settings, web application settings, and various SharePoint services can be managed from within central admin. Along with the technical changes you can make to your SharePoint environment, you can also configure options to quickly improve the experience for your end users. One such example is changing the maximum upload size for documents. Here, to give you an idea of how central admin works, we’ll walk through making that change. If you’re interested in diving into the depths of SharePoint administration, pick up a good reference and start reading. For example, Professional SharePoint 2013 Administration by Shane Young, Steve Caravajal, and Todd Klindt.
Real-World Example: Changing the Document Size Upload Setting
The document size upload setting is meant as a precaution against unrestrained disk bloat on SharePoint servers. However, it can be frustrating to users who routinely work with files that exceed the default limit of 250MB.
To find the upload setting, open Central Administration, and then choose Application Management from the main screen. Click Manage Web Applications under the Application Management section.
Next, click the site collection you wish to modify, and open the drop-down menu under the General Settings link in the ribbon. From the drop-down menu, choose General Settings (see Figure 11-8) and then scroll down the long page until you find the Maximum Upload Size setting (see Figure 11-9). You can change this setting to match the requirements of your end users. By most standards, 250MB is a large file, but it might be the case that you have larger files that you would like to store in SharePoint.
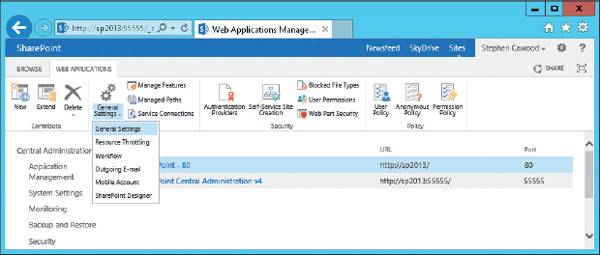
FIGURE 11-8 The ribbon options for Web Application settings

FIGURE 11-9 Changing the Maximum Upload Size setting
Managed Metadata Administration
If you need to administer SharePoint taxonomy, the first step is to learn how to use SharePoint term stores and research the details for creating a SharePoint taxonomy hierarchy. You’ll also want to read Microsoft’s best practices and make use of the managed metadata planning data sheets. To ensure that you end up with the best possible taxonomy for your organization, you’ll likely want to collaborate with some business users so that you can determine the best possible terms, term sets, and groups.
After you have set up your term store and decided how your taxonomy will be organized, you’ll need to set the permissions on your term store and enable various contents for tagging.
Remember that there are two types of tagging: managed keywords and managed metadata. Managed keywords are used for informal “folksonomy” style tagging, and managed terms are used for centrally controlled and delegated hierarchical term structures.
Enabling Managed Metadata on Your Server
In the SharePoint Enterprise Managed Metadata (EMM) features, all taxonomy data is stored within a SQL Server database called the term store. Creating a managed service application creates a term store that you can use to build your taxonomy hierarchy.
Here are the steps to enable managed term tagging on a SharePoint list or library:
1. Add an administrator to your term store.
2. Create some terms.
3. Add a column of type Managed Metadata to the list or library.
SharePoint provides the Term Store Management Tool for working with managed metadata. To open the Term Store Management Tool, select either of these options:
• Central Administration | Application Management | Manage Service Applications Managed Metadata Service
• Site Settings | Site Administration | Term Store Management
Both of these options open the same Term Store Management Tool interface (see Figure 11-10).

FIGURE 11-10 Opening the Term Store Management Tool in Site Settings
When you first go to the Term Store Management Tool, you’ll find that you don’t have any options to create or manage terms. This is because you must be in the administrators group for the managed metadata service.
When the term store page is open, you can use the SharePoint People Picker to add administrators in the Term Store Administrators section (see Figure 11-11). Here’s where you can add yourself to the administrators group for the managed metadata service.

FIGURE 11-11 Adding an administrator to the term store
After you add yourself and save the changes, you’ll be able to create groups, term sets, and terms (see Figure 11-12).
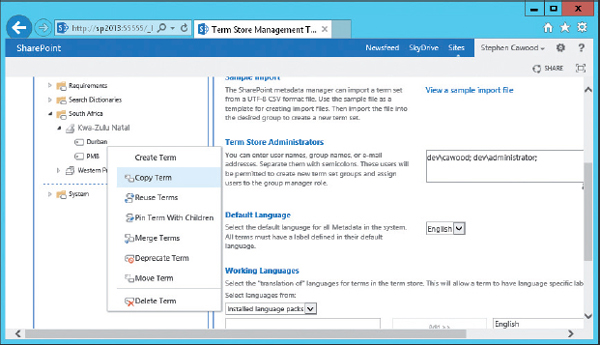
FIGURE 11-12 Once you add yourself as an administrator, you can start to use the term store.
To use managed terms, you’ll need to add a new column to your lists and libraries. This column will store the managed term data. To add the column, go to the list you want to enable, choose the Library tab from the ribbon, and then choose Library Settings from the Settings area. On the Library Settings page, scroll down to the Columns section and choose Create Column (see Figure 11-13).
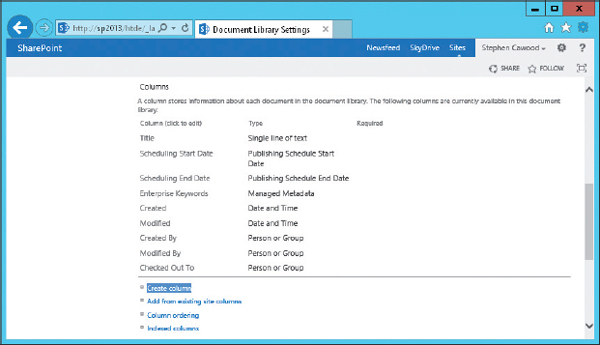
FIGURE 11-13 Create Column is available in the Columns section.
When the Create Column dialog opens, choose the Managed Metadata column type and give the column a name (see Figure 11-14). You’ll also be able to set column options, such as whether you want to allow multiple values with this managed metadata column.

FIGURE 11-14 Use the Managed Metadata column type for managed terms.
You will also have the option of filtering the available taxonomy tree down to a particular term set (see Figure 11-15).

FIGURE 11-15 Filtering the column to a term set
After adding this column, when you edit the properties of a document in the document library, you will see a new option to choose managed terms to put into the new managed metadata field. You have two options for adding terms:
• Start typing in the field, which prompts SharePoint to suggest tags that match the characters you have typed (see Figure 11-16).

FIGURE 11-16 After adding the managed metadata column, you can add terms.
• Click the little tags icon on the right of the field, which enables you to browse your term store.
Understanding the SharePoint Taxonomy Hierarchy
If you’re wondering how to organize your SharePoint EMM, you should start by reading the TechNet article “Plan terms and term sets in SharePoint Server 2013” (http://technet.microsoft.com/en-us/library/ee519604(v=office.15).aspx). This section highlights some of the key points of that article and also adds a few points from other sources.
While the TechNet article reminds you that you could simply allow your users to add keywords, and then use their input to create your taxonomy—promoting keywords to managed terms as necessary—it seems likely that most organizations will want to start with an organized metadata hierarchy.
| Unlike managed terms, managed keywords are not stored in a hierarchical fashion. |
SharePoint EMM managed terms are organized into a hierarchy. The objects within this hierarchy are term stores, groups, term sets, and terms. These are the rules for the taxonomy hierarchy:
• When a managed metadata service is created, a term store will be created. Once you have a term store, you can create a group. A group is a security boundary.
• Once you have a group, you can create a term set. A term set must be the child of a single parent group.
• Under a term set, terms can be created.
• A term can be added as a child of another term.
• Terms can be nested to seven levels.
| The previously referenced TechNet article “Plan terms and term sets in SharePoint Server 2013” clearly states that “You can nest terms to a maximum of seven levels deep.” However, SharePoint Server does not enforce this constraint. The best advice is to stick to seven levels, even though it’s possible to have more. |
One of the key points of the TechNet article about planning your terms and term sets is that a group is a security boundary. A group contributor can manage the term sets in the groups and create new term sets. All users who have access to a term set under a group can see all of the other term sets—even if they don’t have rights to manage the other term sets. Therefore, you should organize your term sets into groups based on the groups of users who will manage them. For this reason, your taxonomy may correlate to your organizational structure. Take a look at the example shown in Figure 11-17, which has the following hierarchy:

FIGURE 11-17 An example of a SharePoint EMM hierarchy
• Term store The term store is simply titled Taxonomy.
 | You can have multiple term stores. Each term store is stored in a separate SQL Server database. |
• Groups Under the term store are two groups: Africa and North America. The idea is that these could be significant geographical locations to this particular fictional organization. Remember that the groups are a security boundary, so the users assigned to the Africa group don’t have to have any access to the North America group. However, if users are given rights to a term set under one of the groups, they will be able to see the names of all the term sets under that group.
• Term sets Inside the Africa group, there are two term sets: South Africa and Egypt.
• Terms At the top level, the South Africa term set contains the terms Cape Town and Johannesburg. In this case, the Cape Town term contains the child term Newlands (a neighborhood in Cape Town), and that term contains the child term Ravensberg Avenue.
When you’re creating your managed terms, you’re free to identify synonyms, and you can also specify which is the preferred term. For example, you can set up a term so that when a user types in “Joburg,” she will be asked to assign the term “Johannesburg.”
| You can specify a custom sort order for terms, so it isn’t necessary to show them in alphabetical order. |
Term sets can be open or closed. Open sets allow all users to add terms. Terms can be added to closed sets only by users who are contributors to the group.
As you’ve seen, in addition to terms, SharePoint EMM contains keywords. Keywords aren’t restricted, and that’s why they can be used informally to create folksonomy.
If you’ve been tasked with creating the taxonomy for your EMM hierarchy, the points outlined in this section are important, but I strongly recommend that you also take advantage of the articles and the planning worksheets available on TechNet. Setting up a taxonomy is a potentially complex task, and a lack of proper planning or a poorly designed taxonomy could be worse than not having one at all.
Promoting a Managed Keyword to a Managed Term
One philosophy for building out a taxonomy hierarchy is to let the users decide which terms are important. In SharePoint, there are two ways to achieve this:
• You can allow “fill-in” keywords in your term sets.
• You can allow users to tag with managed keywords, and then you can choose to promote some (or all) of them to managed terms.
To change a managed keyword to a managed term, you simply open the Term Store Management Tool (from Central Administration or Site Settings) and use the Move option to move the keyword into the term hierarchy. To access the Move action, right-click the term that you would like to move (see Figure 11-18).
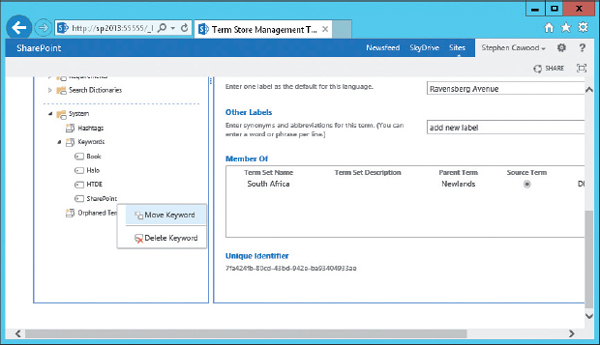
FIGURE 11-18 Moving a keyword to the term store will convert it to a managed term.
| It is not possible to move a managed term to the keyword store. In other words, you can promote a managed keyword to a managed term, but you can’t demote a managed term to a keyword. |
Creating Your Own Term Store
If you want to create your own term store, you’ll need to follow the steps provided in this section to create a new managed metadata service. Generally, this won’t be necessary, because one term store will be enough for most organizations.
First, open SharePoint Central Administration and select Manage Service Applications from the Application Management section. At this point, the Service Applications tab should be selected at the top of the page. Next, click the drop-down arrow under New, and then click Managed Metadata Service (see Figure 11-19). This opens the Create New Managed Metadata Service dialog.

FIGURE 11-19 Creating a new managed metadata service
The dialog contains the following fields:
• Name The name of your new managed metadata service.
• Database Server The name of your database server.
• Database Name The name of the database you want to use on the selected server. If the database does not exist, it will be created.
• Database authentication The recommended option is Windows authentication, but SQL authentication is also available.
• Failover Database Server If you’re using a failover database server, you can enter its name here.
• Application Pool You can either create a new pool or choose an existing one from the drop-down menu.
| Ensure that the selected application pool is actually running before you try to use your term store. |
• Content Type Hub From Microsoft: If you want the managed metadata service to provide access to a content type library as well as to a term store, type the URL of the site collection that contains the content type library in the Content Type hub box. The service will share the content type library at the root of the site collection.
From the same area of Central Administration, you have options to perform numerous other operations on your term store. For example, you can delete a term store, modify the term store permissions, add term store administrators, and more (see Figure 11-20).

FIGURE 11-20 The ribbon offers more term store management options.
Activating SharePoint Features
SharePoint ships with a number of useful site features. These include the Content Organizer, which allows you to define an automated process for filing your content; the Getting Started feature, which enables the introductory tiles you see by default on the home page of a new team site; and the SharePoint Server Publishing feature, which allows you to create sites with all of the publishing functionality available in SharePoint.
These are just a few examples of the features that come out of the box with SharePoint. However, they are not all activated on every site template by default—that simply wouldn’t make sense. If you find that you want to use functionality provided by a feature that has not been activated, you can go into the Site Settings page and activate it yourself.
In this example, you’ll learn how to activate the publishing feature. The interesting thing about publishing is that it must first be enabled at the site-collection level before it is possible to activate it at the site level. This isn’t true for all features, but it’s important to know that some features require a two-step activation.
The first thing you’ll need to do is activate the feature at the site-collection level. To do this, go to the Site Settings page for your site and then choose the Go to the top level site settings link from the Site Collection Administration category at the bottom of the page (this appears if you’re not at the root of the site collection). Once there, choose the Manage site collection features option from the Site Collection Administration category. To enable the feature, scroll down to the SharePoint Server Publishing Infrastructure feature and simply click the Activate button (see Figure 11-21).

FIGURE 11-21 Enabling SharePoint Server Publishing
Once you have successfully enabled publishing at the site-collection level, you can return to the Site Settings page for your site in that site collection and choose to enable SharePoint Server Publishing for the site. You’ll also find it under the Manage site features option from the Site Actions category. After activating this feature, the publishing site templates will appear in the list of available templates for your site (see Figure 11-22).

FIGURE 11-22 The publishing site templates
Introduction to PowerShell
PowerShell is a relatively new command-line interface in Windows. PowerShell has become incredibly popular with administrators, as it allows them to perform many tasks quickly and in a repeatable—scriptable—fashion. Anyone interested in SharePoint administration as a career will need to learn the ins and outs of PowerShell. To the average user, however, PowerShell is not a requirement to get the most out of SharePoint.
The usefulness of PowerShell for SharePoint administration is described in the Microsoft TechNet article “Use Windows PowerShell to administer SharePoint 2013” (http://technet.microsoft.com/en-us/library/ee806878.aspx#section2), as follows:
After you install SharePoint 2013, applicable Windows PowerShell cmdlets are available in the SharePoint 2013 Management Shell. You can manage most aspects of SharePoint 2013 in the SharePoint Management Shell. You can create new site collections, web applications, user accounts, service applications, proxies, and more. Commands that you type in the SharePoint Management Shell return SharePoint objects that are based on the Microsoft .NET Framework. You can apply these objects as input to subsequent commands or store the objects in local variables for later use.
To open the SharePoint PowerShell management console, navigate to the Start menu, or if you’re using Windows Server 2012, open the app search box and type SharePoint. Once you have the list open, click the SharePoint Management Shell (see Figure 11-23).
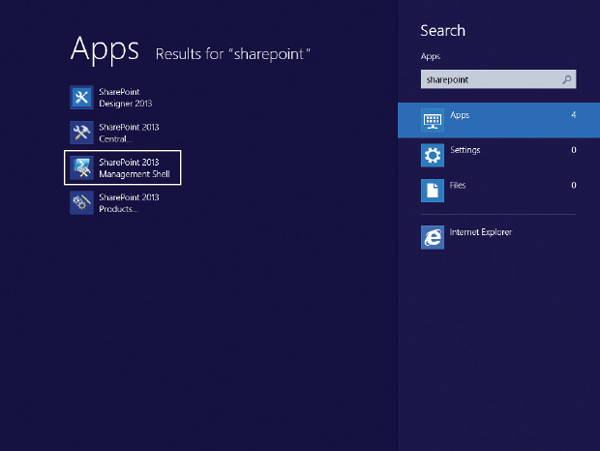
FIGURE 11-23 Launching the SharePoint PowerShell management console
Unless you’re actually logged in as Administrator, it’s likely that you’ll need to run the management console under the administrator account. To do this, pin the console to the task menu, close it, and then open it again using the Run as Administrator option. Alternatively, you can right-click the icon in the Start menu, and it will present you with the same Run as Administrator option.
Once you have the SharePoint PowerShell management console running with sufficient privileges, you can try some commands. The simplest (read: safest) example is a read-only operation. For example, the command
get-spsite will return a list of all the site collections on the server (see Figure 11-24). Another read-only command you can try is get-spwebtemplate, which returns all of the globally installed site templates.
FIGURE 11-24 Running get-spsite in PowerShell
| You might find it odd that get-spsite returns the list of site collections instead of a list of sites. This is because SharePoint site collections were originally called “sites,” and subsites were originally known as “webs.” This naming has continued in both the SharePoint administration and SharePoint development context. So if you hear SharePoint administrators referring to how many top-level “sites” there are in a SharePoint farm, it’s possible that they are referring to site collections. |
If you would like to learn more about using PowerShell to administer SharePoint, take a look at the Windows PowerShell Command Builder. It’s a handy web application that allows you to build PowerShell commands (see Figure 11-25). To get going, you can download the Windows PowerShell Command Builder Getting Started Guide, available from http://www.microsoft.com/en-ca/download/details.aspx?id=27588.

FIGURE 11-25 Windows PowerShell for SharePoint Command Builder
Summary
The topics in this chapter were chosen to give you a broad overview of SharePoint administration tasks. As with SharePoint development, SharePoint administration is a giant topic.
You may never need to install SharePoint, use SharePoint Central Administration, or use PowerShell to administer SharePoint, but at least now you have some understanding of what those tasks entail.
..................Content has been hidden....................
You can't read the all page of ebook, please click here login for view all page.