
5
Tagging and Taxonomy
HOW TO…
Enterprise Metadata Management (EMM), or SharePoint taxonomy, is a relatively new feature. It was added in SharePoint 2010—and even later than that for Office 365—so there is still a lot of talk about how the functionality should be used.
What’s all the fuss about EMM? Why is taxonomy arguably the most important feature added in SharePoint 2010? Hasn’t SharePoint always had metadata? As you’ll see in this chapter, the new EMM functionality enables a number of features, including better social computing capabilities.
 | In SharePoint Central Administration, the taxonomy service is called the Enterprise Metadata Service, so some people refer to SharePoint taxonomy as EMS or MMS, for Managed Metadata Service. |
Facebook and Twitter have propelled social computing into mainstream acceptance, and it’s not surprising that many businesses would like to be able to use social computing to accelerate collaboration and enhance knowledge management within their staff. With many social computing features already available in SharePoint and more coming with each release, a relevant question to consider is that posed by Edward Cone in the title of his 2007 article for CIO Insight magazine, “Will Microsoft Become Facebook for the Enterprise?” (www.cioinsight.com/c/a/Past-News/Will-Microsoft-Become-Facebook-for-the-Enterprise/). This chapter will give you a sense of why the question was asked, and as you’ll see, SharePoint is well on the way.
| SharePoint personal sites (previously called My Sites), which were offered in SharePoint Portal Server 2003, were available before Facebook was launched in 2004. |
Two types of taxonomy are available in SharePoint Server:
• Managed This is a centrally managed and controlled tagging system. The benefit is that the tags can be guaranteed to fit into a rigid taxonomy. However, this type of system needs to be properly planned and built before users can start applying tags.
• Social tagging (aka folksonomy) This is a loose system that can lead to varied results. On the positive side, people are free to use a taxonomy that makes sense to them, and because people define their own terms, they may be able to find items easier. However, issues are likely to arise where slightly different terms are used to tag items that really should all have the same tags. For example, some people might use the tag EU to refer to the European Union, but others could use the tag Europe.
This chapter discusses both types of taxonomy and how they are used in SharePoint Server.
Social Tagging
One aspect of social computing that SharePoint lacked in the past is social tagging. SharePoint Server 2013 comes with a few improvements in this area. The first of these that you might notice are the Follow and Tags & Notes options that appear in the ribbon for document libraries and in other contexts. These options allow you to bubble up content that is interesting in some way, as well as classify it for easier retrieval down the line.
In Chapter 4, you saw how you can create discussion boards to carry on conversations with other SharePoint users. Now suppose that you’ve come across an interesting thread, and you would like to not only share it with your coworkers, but also make it easier for you to find in the future.
Follow
The first option for SharePoint social tagging is the simple-to-use Follow option. All you need to do is go to any SharePoint item that you would like to tag, select it from the list, and follow it. For example, when you’re looking at a document library, select an item, click the ellipse link, and then click Follow from the hover card options—it’s that simple (see Figure 5-1).

FIGURE 5-1 Using the Follow tag
Once you’re following something, you will be able to find it more easily, and you’ll see activity for that item in your newsfeed.
Ratings
There may be times when you would like to gather feedback about which documents are the most useful or the best suited for a particular purpose. SharePoint ratings can help you gather this data.
If you would like to allow users to assign a value to items in a list, you can enable the ratings option. To turn ratings on for a list, go to the list settings, and under General Settings, click Rating Settings. Once you have navigated to the Rating Settings page, you can simply click the radio buttons to enable or disable the rating option. You can also choose between Star Ratings, which allow users to give the item a value from one to five stars, or you can use Likes. Likes work similar to Facebook likes in that users can choose to like something to give it an “up vote,” and therefore show that they prefer that item to other choices.
Whether you use likes or stars is up to you. One way to differentiate the two options is to use stars as a measure of quality and use likes when you simply need an A/B choice or you want to know which items are more popular.
About Me and Newsfeed
When you have tagged something with the Follow option, the action will appear in the newsfeed for your profile (if this option is enabled). In this way, you can share your choices, and your social network will benefit from your tagging activities.
You can also add information to your About Me profile page, both to make your SharePoint experience more personal and to help other people in your organization figure out your expertise and interests. Microsoft uses this information internally to allow employees to track down subject matter experts when they have questions. For example, someone with a SharePoint question can use the profile information to find a SharePoint expert. The profile also includes an organization browser so that you can see who works on specific teams.
Other actions, such as adding notes, can also appear in your newsfeed. To view what you’ve tagged and see your newsfeed, go to the top right of a SharePoint web page and click the Newsfeed link. To view your profile, go to the same area and expand the drop-down menu under your username. From there, choose About Me to view or edit your profile page (see Figure 5-2).
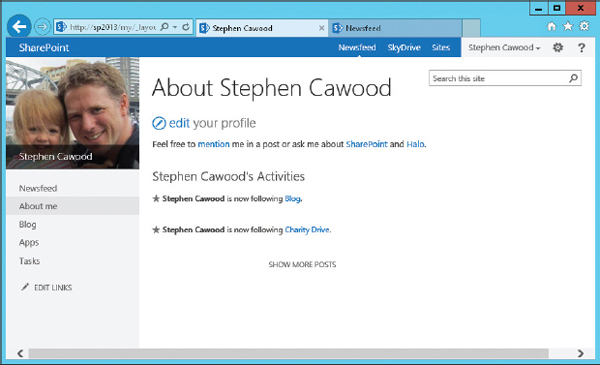
FIGURE 5-2 The SharePoint About Me page
Tags and Notes
Similar to choosing the Follow tag, you can also make up your own tags and apply those to SharePoint items. These types of tags aren’t predetermined, so you can make up tags for whatever you need. This open taxonomy is referred to as a folksonomy, and you’ll learn more about it in the “Managed Keywords” section later in this chapter. For now, you can think of Tags & Notes as another open taxonomy option.
To apply your own custom tags to an item, select the item, and then click Tags & Notes on the ribbon (in the File tab) to open the dialog shown in Figure 5-3. You can then start typing keywords to tag the item. After you have tagged some things, go back to your profile page and check what appears in your newsfeed and under the Tags & Notes section. You’ll notice that there are actually two options for tags, Public and Private, so that you can choose whether you want your tags to be publicly visible. Another interesting feature is that you can use the Note Board to write about links that are external to SharePoint.
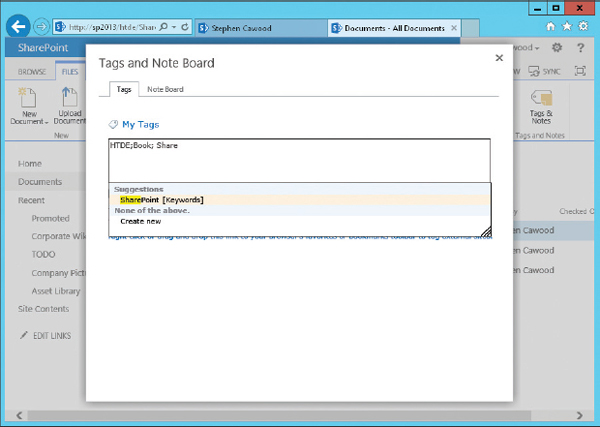
FIGURE 5-3 Tagging an item with a personal tag
As with tags, you can add notes by selecting your target item and choosing Tags & Notes. When the dialog opens, click the Note Board tab to enter your notes (see Figure 5-4). Notes allow you to store more information about an item than you can with tags. Instead of a word or phrase, you’ll be able to write up to 250 characters and store that information with the item. You may want to do this to keep track of your thoughts, or you may want to keep track of related information by pasting in a link. What you do with notes is up to you.
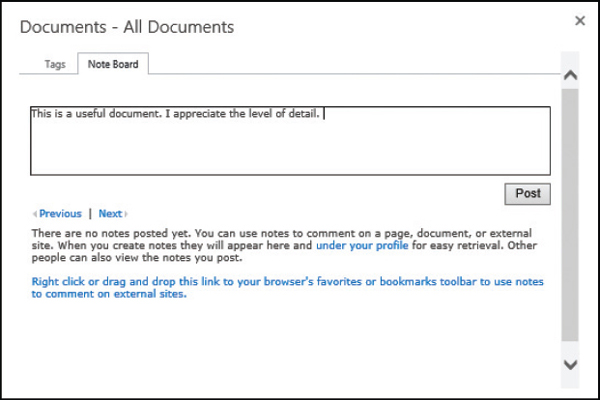
FIGURE 5-4 Adding notes to a SharePoint item
As previously mentioned, you have the option of making your notes public or private. If you make them private, you will be able to view them in your profile, but no one else will be able to read them. If you make them public, they will appear in your newsfeed, and everyone will be able to benefit from your insights.
| Personal sites and profiles are SharePoint Server features. They are not available in SharePoint Foundation. |
Enterprise Managed Metadata
The Microsoft TechNet Library article “Overview of managed metadata in SharePoint Server 2013” (http://technet.microsoft.com/en-us/library/ee424402.aspx) defines managed metadata as follows: “Managed metadata is a hierarchical collection of centrally managed terms that you can define, and then use as attributes for items in Microsoft SharePoint Server 2013.” Managed terms and keywords can be used to enhance or enable a number of features within SharePoint. For example, using the taxonomy created by managed terms, users can have a more powerful search experience and navigation can be partly based on metadata terms.
SharePoint Taxonomy
While it’s true that SharePoint has always provided the option to associate metadata with the data stored in SharePoint, before managed metadata, organizations using SharePoint would need to either build their own taxonomy solution or rely on business rules for how their users should add metadata. This meant that different users could tag items with slightly different terms, thereby eliminating most of the value of taxonomy.
Technical constraints also prevented creation of a custom solution. For example, the logical place to store terms would be in a list, but lists couldn’t be shared across site collection boundaries, so the taxonomy would need to be duplicated if you wanted to share terms. There was also no concept of hierarchical metadata, and no way to share a collection of terms with delegated permissions.
All of these issues were resolved in SharePoint Server 2010. If you want to understand the impact of the changes, SharePoint MVP Chris O’Brien (www.sharepointnutsandbolts.com) wrote a whole post, “Managed Metadata in SharePoint 2010—some notes on the why,” about why SharePoint taxonomy is important. Also, the Microsoft TechNet Library article quoted at the beginning of this section includes a “Benefits of Using Managed Metadata” section, which lists and describes the following benefits:
More consistent use of terminology
Managed metadata makes it easier to use terms and enterprise keywords more consistently. You can predefine terms, and allow only authorized users to add new terms. You can also prevent users from adding their own enterprise keywords to items, and require them to use existing enterprise keywords. Managed metadata also provides greater accuracy by presenting only a list of correct terms from which users can select values. Because enterprise keywords are also a type of managed metadata, even the enterprise keywords that users apply to items can be more consistent.
Because metadata is used more consistently, you can have more confidence that it is correct. When you use metadata to automate business processes—for example, putting documents in different files in the record center based on the value of their department attribute—you can be confident that the metadata was created by authorized users, and that the value of the department attribute is always one of the valid values.
Better search results
A simple search can provide more relevant results if items have consistent attributes.
As users apply managed terms and enterprise keywords to items, they are guided to terms that have already been used. In some cases, users might not even be able to enter a new value. Because users are focused on a specific set of terms, those terms—and not synonyms—are more likely to be applied to items. Searching for a managed term or an enterprise keyword is therefore likely to retrieve more relevant results.
Dynamic
In earlier versions of SharePoint Server, to restrict the value of an attribute to being one of a set of values, you would have created a column whose type is “choice,” and then provided a list of valid values. When you needed to add a new value to [the] set of choices, you would have to change every column that used the same set of values.
By using managed metadata, you can separate the set of valid values from the columns whose value must be one of the set of valid values. When you have to add a new value, you add a term to the term set, and all columns that map to that term set would use the updated set of choices.
Using terms can help you keep SharePoint items in sync with the business as the business changes. For example, assume that your company’s new product had a code name early in its development, and was given an official name shortly before the product launched. You included a term for the code name in the “product” term set, and users were identifying all documents related to the product by using the term. When the product name changed, you could edit the term and change its name to the product’s official name. The term is still applied to the same items, but its name is now updated.
To borrow a joke from Dan Kogan, Microsoft SharePoint Program Manager, delivered during his SharePoint Conference 2009 talk, “When we talk about terms, we need to first define our terms.” The following definitions are adapted from the same TechNet Library article about managed metadata:
• Term A word or phrase that can be associated with an item in SharePoint Server 2013
• Term set A collection of related terms
| According to the MSDN article “Managed metadata and navigation in SharePoint 2013” (http://msdn.microsoft.com/en-us/library/jj163949.aspx#SP15_ ManagedMetadataAndNav_ManagedNav), “If you want to make your term set available to other site collections connected to the managed metadata service, create a global term set. If you want to create a private term set that is available only to a specific site collection when it is stored in the managed metadata service, create a local term set.” |
• Managed terms Terms that can be created only by users with the appropriate permissions, and are often organized into a hierarchy. Managed terms are usually predefined.
• Enterprise keywords Words or phrases that have been added to SharePoint Server items. All managed keywords (also called enterprise keywords) are part of a single, non-hierarchical term set called the keyword set.
• Term store A database that stores both managed terms and managed keywords. The Term Store Management Tool is available in Central Administration (and Site Settings). This tool manages terms centrally for the whole farm and can be used to create, copy, reuse, move, duplicate (for polyhierarchy), deprecate, delete, and merge terms (see Figure 5-5). The Term Store Management Tool is also used to manage permissions on term stores.
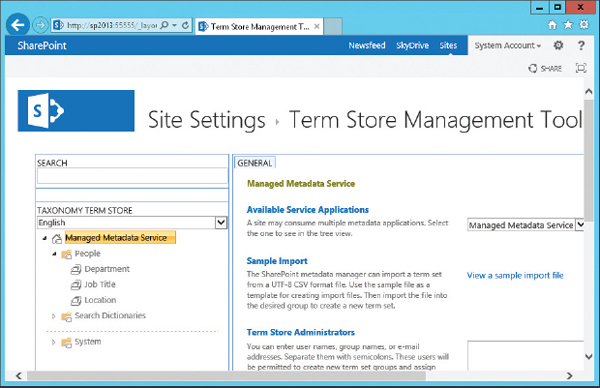
FIGURE 5-5 The Term Store Management Tool
| A polyhierarchy-enabled tree can include leaves (nodes) that have more than one branch (parent node). In SharePoint Server, you can create a polyhierarchical structure with the Reuse Terms action in the Term Store Management Tool. For example, imagine that you have a taxonomy of people terms, and the term sets define teams to which they belong. A person could be on more than one team, and therefore, you might want to reuse terms rather than copy them (and potentially have them become out of sync if edits occur down the line). |
Also, here’s another important definition that isn’t clear in the article:
• Group In the term store, all term sets are created within groups. In other words, group is the parent container for term sets. Groups can be used to define security boundaries.
A Taxonomy Primer
Before you set out to use the SharePoint EMM functionality, it’s important to have an understanding of taxonomy at a higher level. In case you aren’t a library scientist or a taxonomist, this section offers a quick introduction to some taxonomy concepts. Taxonomy relationships are commonly divided into three types:
• Equivalent (synonyms: “LOL” is equivalent to “laughing out loud”)
• Hierarchical (parent/child: “sports equipment” is the parent node of “ball”)
• Associative (concept/concept: “bouncy things” is related to “ball”)
SharePoint provides SharePoint users, administrators, and developers with the UI and application programming interface (API) required for the first two types of relationships. This means that faculties such as centrally managed terms, folksonomy, and Tag Clouds (social tagging) are enabled. The third type—which SharePoint does not offer—is associative relationships. Let’s quickly review each type.
Equivalent Terms
SharePoint taxonomy allows synonyms and preferred terms. Synonyms allow a central understanding that LOL is the same as “laughing out loud,” and preferred terms specify which of the two should be used.
The other side of the equivalence coin is dealing with words with more than one meaning. To help disambiguate terms, SharePoint term descriptions are displayed in a tooltip so that users can differentiate between G-Force (the movie featuring a specially trained squad of guinea pigs) and G-Force from Battle of the Planets (a cartoon from the 1980s).
Another aspect of equivalency is multilingual considerations. If you are tagging in different languages, there’s a good chance that you’ll want to create a relationship between words that actually mean the same thing.
Hierarchical Terms
A central repository of terms enables consistency across users. Providing a hierarchy allows for information architecture and organization. With the SharePoint Term Store Management Tool, users with sufficient permissions will be able to perform many operations on terms in the hierarchy. The hierarchy has a term store at the top, then a group, then term sets, and, finally, managed terms.
Associative Terms
Associative terms are used to create ontologies. There are endless possibilities for these types of relationships. For example, you could have a hierarchy of terms that includes the terms “ball” and “bat” as children of the term “sports equipment.” An ontology would allow you to also create a relationship between “bouncy things” and “ball” because they are conceptually related.
| Why didn’t the SharePoint team add ontologies? That’s a reasonable question, but the fact is that tackling such a specialized function simply might not have been worth the effort when the team was already trying to build an ambitious feature. Also, I’ve heard people wonder aloud whether anyone but a library scientist or a taxonomist will complain. |
Enterprise Keywords
The SharePoint EMM system has two types of tags: enterprise keywords (sometimes called managed keywords) and managed terms. You have already seen managed keywords in action in the “Social Tagging” section earlier in this chapter. Now you’ll see how those tags fit in with the overall taxonomy strategy in SharePoint. This section shows examples of how users can take advantage of the various features that each type of tagging enables. Managed terms are covered in the next section.
Enterprise keywords (or just keywords) are used for user-focused tagging. Users decide which keywords they want to add to the system and what needs to be tagged. This type of open tagging is called a folksonomy because it’s created by people instead of laid out by the organization. In this way, keywords are used to informally tag content within SharePoint.
| Unlike managed terms, enterprise keywords do not have a hierarchical structure. |
You’ve already seen one way to add keywords to a SharePoint item by using the Tags & Notes dialog. Another way to add keywords is to edit the properties of an item. In Chapter 11, you’ll see how this is done in an example of adding an enterprise keyword to a document in a document library.
Enabling Keywords
If keywords have not been enabled for the document library, you need to click the Library tab in the ribbon, and then click Library Settings. Once you are at the Document Library Settings page, look for the Enterprise Metadata and Keywords Settings link under the Permissions and Management settings category. Click the link, and you’ll be offered the choice to enable enterprise keywords (see Figure 5-6).
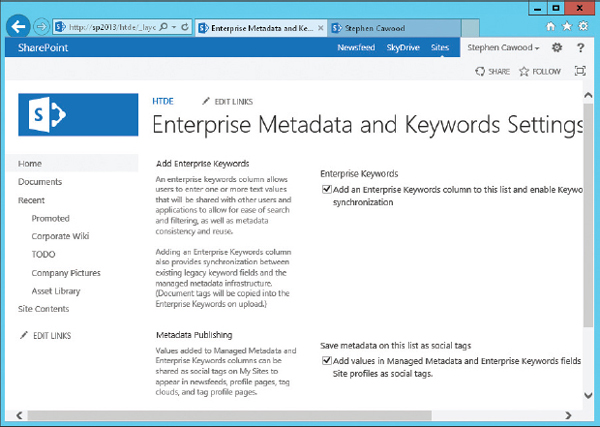
FIGURE 5-6 Enabling keywords for a document library
In this dialog, you also are given the option to add the keywords and terms that are associated with the items in this library to personal site profiles. If you select this option, that data will appear in Tag Cloud web parts and on profile pages. To add a managed term to a document, select the document in the document library, and then select Edit Properties from the drop-down menu (see Figure 5-7).
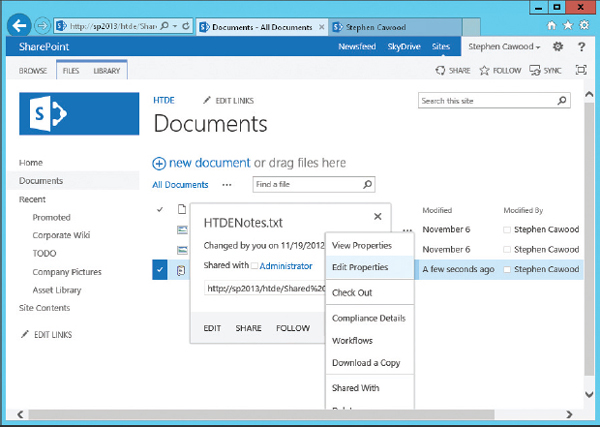
FIGURE 5-7 Selecting to edit a document’s properties
Once you have the edit document properties dialog open, find the Enterprise Keywords field and start typing either an existing keyword (in which case, you will be prompted with suggestions as you type) or a new keyword (see Figure 5-8).
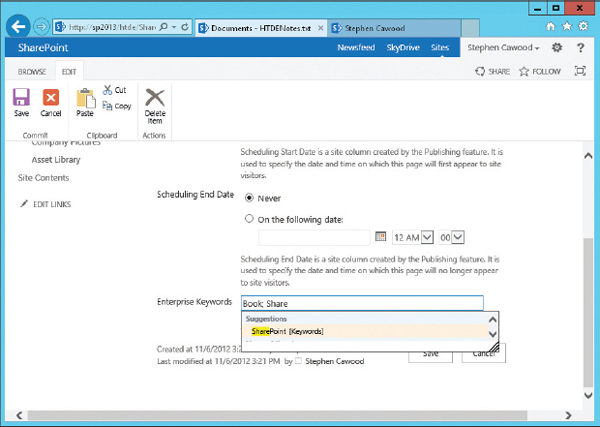
FIGURE 5-8 Adding a keyword to a document
Managed keywords can also be promoted to managed terms using the Term Store Management Tool, as discussed in Chapter 11.
Using the Tag Cloud Web Part
Once you’ve begun tagging things, you’ll probably want to be able to use that data in convenient ways. The Tag Cloud web part is a quick way to view the folksonomy being created on your SharePoint server.
If you have sufficient permissions to create a web part page and add web parts, you’ll be able to add the Tag Cloud web part to web part pages. To add the web part, click the Edit Page button on the ribbon or the Edit icon in the top right, click the Insert tab, and then click Web Part. From the add web part page, select Tag Cloud from the Social Collaboration web part category (see Figure 5-9), and then click Add.

FIGURE 5-9 Choosing to add the Tag Cloud web part to a page
After you add the web part, you will immediately see it appear on the page (see Figure 5-10).
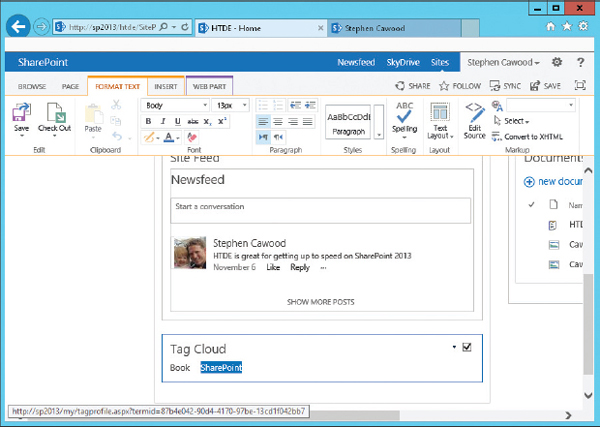
FIGURE 5-10 A Tag Cloud web part in edit page mode
The relative sizes of the terms indicate how popular they are on the server. In the example in Figure 5-11, the “SharePoint” term has been added more than the others.
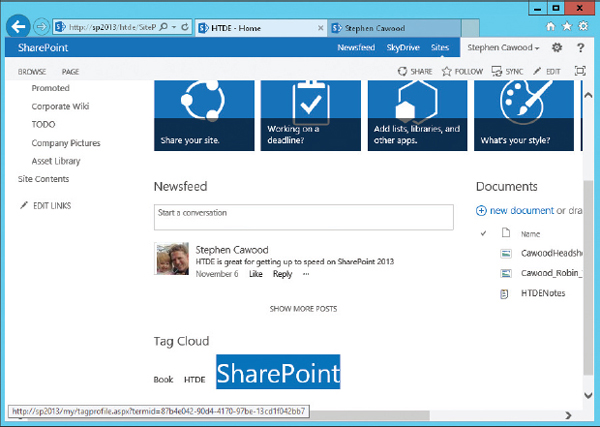
FIGURE 5-11 The Tag Cloud web part in action
If you choose to edit the web part, you will find a number of options in the Tag Cloud settings. For example, you can choose to show only your tags or to show tags from all users.
 | Many features can be deactivated at the site collection level. If you find that you’re not offered the Tag Cloud web part or some other out-of-the-box web part, ask your SharePoint administrator to investigate. Also, we noted earlier, these features aren’t available in SharePoint Foundation. |
Managed Terms
Managed terms are the other type of tags in SharePoint EMM. Unlike managed keywords, managed terms are placed in a controlled central repository. This enables consistency across users, provides hierarchical organization, and allows for strict information architecture. In the SharePoint Term Store Management Tool, users with sufficient permissions are able to perform many operations on terms in the hierarchy. However, most users will simply use the terms from the central store.
As with keywords, terms can be added to many types of content within SharePoint. The following example will show you how to add a term to a document within a document library that has already been enabled for tagging with terms.
| To enable this functionality, someone with sufficient rights must first add a managed metadata column to the document library. It’s important to remember that the column could have any name—managed metadata is the type of data it will contain, not the name required for the column. |
To add a managed term to a document, first select the document in the document library, click the ellipses icon, and then select Edit Properties from the drop-down menu. In the edit document properties dialog, find the Managed Metadata field and either start typing a term or click Browse for a valid choice icon on the right. This will open the Select Managed Metadata dialog (see Figure 5-12).
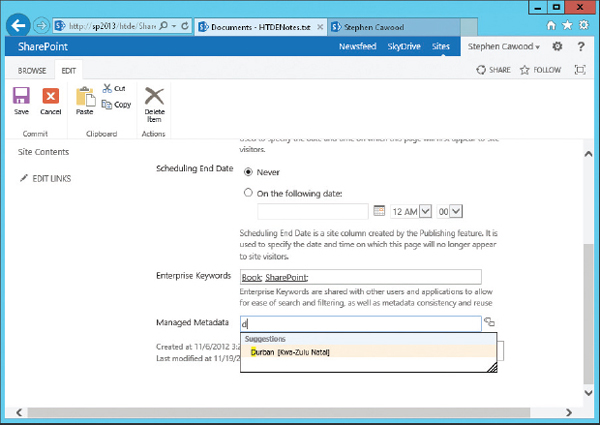
FIGURE 5-12 Browsing for a term to add to a document
| Terms can be labeled with a description that helps users figure out which term to use. |
Filtering Lists Using Taxonomy
It can be difficult to convince people that SharePoint taxonomy is a cool and exciting addition to the platform. The problem is that taxonomy is infrastructure—it’s an enabling technology, or a means to an end. The real value is the features that are built on this infrastructure. Filtering lists via managed metadata is one of the out-of-the-box features that are powered by managed metadata.
Managed metadata can be used to help manage, organize, and present items within SharePoint. If you go to a list that has a managed metadata column, you’ll be able to filter the view by simply selecting one of the terms being used in the list (see Figure 5-13). This enables the end user to instantly filter lists without needing to create a custom view. Once you apply the filter, the column heading will show a funnel icon to indicate that you’re not seeing the full list.
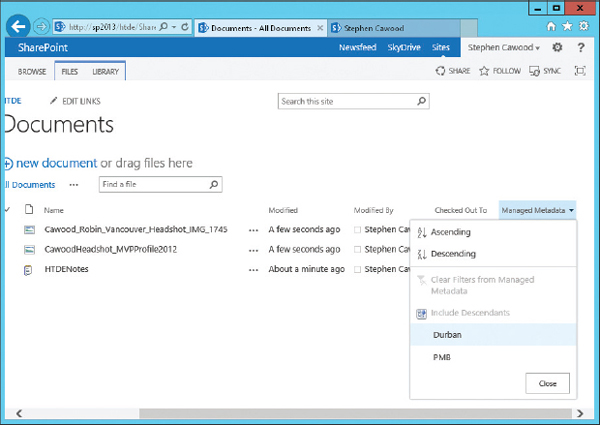
FIGURE 5-13 Filtering a document library using the managed metadata term “Durban”
This feature is extremely powerful because it eliminates (in most cases) the need to organize items into folders. Not using folders allows users to find what they’re looking for without navigating through a potentially complicated hierarchy. This is similar to the move toward using search to find files on your computer, rather than asking you to remember which directory contains each item.
How Is SharePoint Taxonomy Used in the Real World?
Obviously, the most popular end-user application of EMM will be building a taxonomy to fulfill business needs and social tagging. If enterprise keyword tagging and managed term tagging are enabled, users will be able to tag their list items, documents, and so forth with open keywords or centrally managed terms. This end-user associated metadata will then be used to classify, organize, find, and share information within SharePoint. By tagging external pages, users have a way to add links to their favorite browser’s bookmarks.
However, another aspect of the new managed metadata functionality is how it can be used for enhanced navigation and searches. For example, terms can be used to enable more advanced parametric search features, filtering, and targeted search. For sure, customers and partners will find interesting ways to use the taxonomy framework.
In terms of navigation, the ability to alter the way you navigate your data based on tags is also referred to as faceted navigation. When I was working on Microsoft Office SharePoint Server 2007 navigation, faceted navigation was nicknamed, “navigation goggles,” the idea being that you could choose different types of navigation the same way you can shift between song view, albums, or artists on many MP3 players.
The Term Store Management Tool available in Central Administration (and Site Settings) enables administrators to manage a central vocabulary of terms for the whole farm. Operations that administrators can perform on the term hierarchy include copying, reusing, moving, duplicating, deprecating, and merging. Furthermore, having a managed repository enforces consistency across users.
The SharePoint EMM functionality is exciting and provides options for centrally managed taxonomies, as well as social tagging and improved search. Through managed metadata, SharePoint users gain access to functionality such as folksonomy, Tag Clouds, list filtering, metadata-driven navigation, and more powerful search options.
Summary
Tagging and taxonomy are fundamental features in SharePoint. This chapter introduced the topics with a look at how tagging can make SharePoint more social, and Managed Metadata enables use cases, such as creating a folksonomy and metadata filtering.
..................Content has been hidden....................
You can't read the all page of ebook, please click here login for view all page.