Chapter 6
Taking Photos and Videos
QuickSteps to…
The iPhone is truly a multimedia device. In the next chapter you will see how well it handles literature and music. In this chapter you’ll see how it does an equally good job with photos and videos. In addition, you can use it to take and edit photos and videos. We’ll look at how to take, edit, and view them on the iPhone as well as how to use FaceTime.
USE THE IPHONE AS A CAMERA
The iPhone has two cameras: the iSight camera on the back and the FaceTime camera on the front. The iSight camera on the iPhone 6 and 6 Plus provides an 8MP (megapixel) stabilized (optical stabilization on the 6 Plus) image with automatic face detection and exposure control, both burst and timer modes, and geotagging to add your current location to a photo. The FaceTime camera provides a 1.2MP stabilized image with many of the same other features. The iPhone provides an excellent alternative to small point-and-shoot cameras.
 Take Photos
I bet you have already figured out how to take a picture with your iPhone. Regardless, here are the steps:
1. From the Home screen, tap Camera. An image of what the camera is looking at will be displayed.
2. Press the shutter button in the middle of the bottom of the screen. That is all there is to it. Your picture will appear at the end of the Camera Roll album.
![]()
TIP If you are in a hurry to take a picture, you don’t have to unlock your iPhone first; simply swipe up on the camera icon in the lower-right corner of the lock screen to open the Camera app and immediately take a picture.
After taking a couple of pictures with just these two steps, you are going to want to change the focus, zoom in or out, and jump to Photos and jump back to Camera.
Change Focus and Exposure
The iPhone’s cameras have automatic focus and exposure capability. By default, they aim that capability at the center of the image on the screen. They also provide face detection and balance the exposure across up to ten faces. In Camera, when you hold the iPhone still while preparing to take a picture, a yellow square briefly appears on the image showing where the focus is aimed and using a normal or “medium” exposure. As you move the iPhone and change the image, Camera will refocus and the yellow square will briefly reappear to show you what it is focusing on. At any time you can touch the screen to tell the iPhone to focus and set the exposure on that spot. You’ll see a smaller yellow square with a sunburst or brightness setting appear where you touched the screen, and face detection will be turned off. You can drag the sunburst up for longer exposure, or down for shorter exposure.

Zoom In or Out
Camera has the standard iPhone zoom capability, where you can zoom in (enlarge the image) by spreading two fingers apart on the screen and zoom out (reduce the image) by bringing two fingers together (pinching) on the screen. When you start to use your fingers to zoom in or out, a slider control appears at the bottom of the screen. You can drag the slider in either direction to accomplish the zooming.

Jump to Photos
As you are taking pictures, you will probably want to quickly look at your latest picture to see if you got what you wanted. You can do that by tapping the thumbnail image of your last snapshot in the lower-left corner. That takes you to the full-screen image of your last photo. Use your finger to scroll from left to right to see previous photos. You can also use any of the Camera Roll controls you learned about earlier in this chapter. If the controls disappear, tap the screen to redisplay them. When you are ready to return to the Camera app, tap Done in the upper-right corner.
Use Photo Options
The iPhone provides a number of options for you to use while taking a picture. These include the use of a grid for alignment, a flash in low-light situations, a self-timer to allow you to jump into the photo, and the ability to switch between the front and back cameras.
Use a Grid
As you try to compose a picture, it is sometimes hard to align the object you are photographing within the frame of the picture. To help with that, Camera allows you to turn on a grid that you can use for aligning objects on the screen, as you saw earlier. Turn on or off the grid by tapping Settings | Photos & Camera | Grid, as described earlier in the chapter. The grid appears on the screen but will not show up in the photo.
Use the Flash
The iSight camera on the back of the iPhone has a True Tone flash next to it that can be used to add light to your pictures and provide very close to real-life color balance. Control when the flash is used by tapping the lightning bolt icon in the upper-left corner of the screen. This gives you the options of turning the flash on or off, or putting it into automatic mode where the camera senses the need for the flash.
![]()
![]()
TIP You can use the camera flash as a flashlight when it is dark by turning it on in the Control Center, which you can open by swiping up from the bottom of the iPhone next to the Home button. See the discussion of the Control Center in Chapter 5.
Use the Self-Timer
The self-timer allows you to set up the iPhone camera and then jump into the picture for a “selfie.” Set the self-timer by tapping the timer icon in the upper-center-right of the screen and selecting 3S (for three seconds) or 10S (for 10 seconds). Then, when everything is set, tap the shutter button. The iPhone will count down the appropriate number of seconds and then trip the shutter.
![]()
Switch from Back to Front
The iPhone has two cameras: one on the back with a higher resolution that is meant for taking the majority of pictures and videos, and one on the front that is primarily for FaceTime conversations or selfies. You can switch between the two by tapping the camera and circular arrows icon in the upper-right corner.
![]()
![]()
TIP You can find tripods, tripod heads, Bluetooth remote shutter activators, and lens accessories that fit or work with your iPhone at most camera and photography outlets, including Amazon.com.
Take Alternative Types of Photos
In addition to normal photographs, the iPhone can take square, panoramic, HDR (High Dynamic Range), and burst mode photos, as well as apply filters to a photo as you take it.
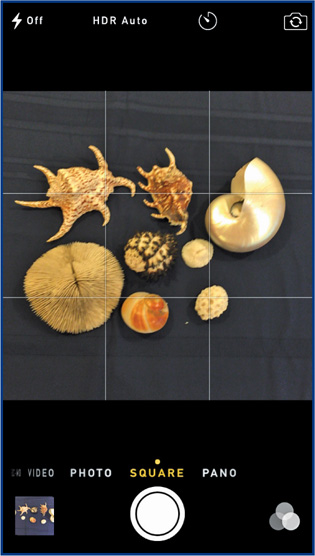
Take a Square Photo
The normal photo taken by the iPhone is rectangular. iOS gives you the option to make the photo square. In the command bar on the bottom, tap Square or drag it to the yellow dot. You will see the elongated sides shorten to form a square. Tap the shutter to take a square photo.

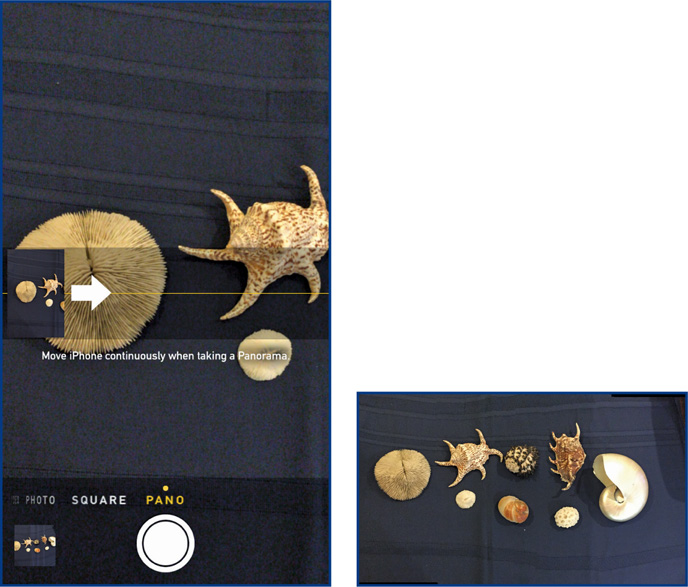
Take a Panoramic Photo
The iPhone with iOS 8 lets you automatically take a series of pictures and stitch them together to create a panoramic picture. In the command bar on the bottom, tap Pano or drag it to the yellow dot. You will see an arrow appear, showing the direction to move the camera to capture a panoramic image. Tap the shutter button and move the iPhone in the direction of the arrow. Tap the shutter button again to complete the capture.
Take an HDR Photo Series
HDR, when it is active, takes three shots, one each at long, short, and normal exposure, and then blends the best parts into a single picture. HDR is particularly useful in situations with extreme contrast and wide variations in lighting. In the top of the screen, tap HDR and select On, Off, or Auto. In Settings, you can choose to keep a normal photo in addition to an HDR one. See “Review Photos & Camera Settings,” later in the chapter.
![]()
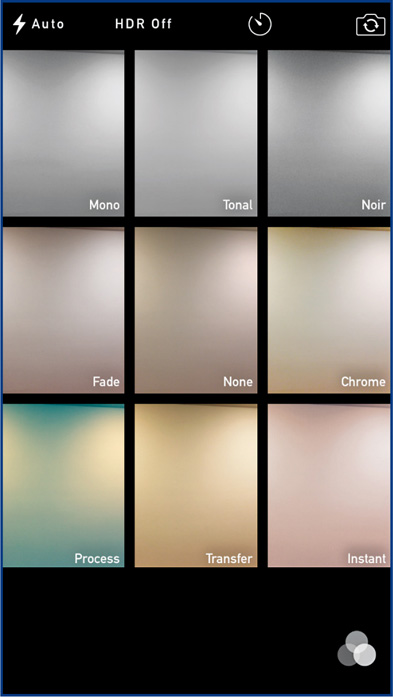
Apply Filters
You can apply various color and monochromatic filters to a photo. Tap the Filter icon in the lower-right corner and tap one of the eight filters displayed. Tap the Filter icon again to remove the filter choices. Alternatively, you can tap None in the center to not have a filter apply. If you want a filter on a picture already taken, you can edit it and apply a filter then. See “Edit Photos,” later in this chapter.
![]()
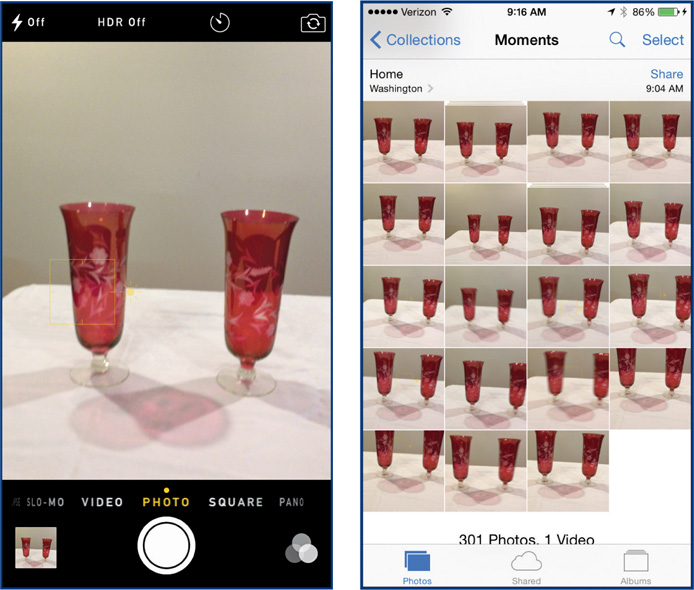
Use Burst Mode
Burst mode allows you to take a quick series of photos and then choose the best one. Touch and hold the shutter button to take a burst of photos. You’ll see the counter quickly telling you how many you have taken. To select the photo you want to keep in the burst you have taken, tap the thumbnail in the lower-left corner and tap Select in the bottom-middle area. The burst photo set will be shown at the bottom of the screen with one of the sets displayed on the screen. In the set at the bottom, the ones that the iPhone believes to be the best will have a gray dot beneath them and the current one displayed will have a triangle above it. Select a photo you want to keep by tapping the circle in the lower-right corner of the photo displayed on the screen. When you have selected the burst photos you want to keep, tap Done. Then you can delete the remainder of the burst set by displaying it and tapping the delete (trash can) icon.
![]() QuickFacts
QuickFacts
Moving iPhone Photos to Your Computer
As you take pictures or otherwise collect them on your iPhone, you likely will want them also on your computer. You may be able to do this via iCloud, depending on your use of it, but you can also do this by simply plugging your iPhone into your computer.
Move to a PC
When you plug your iPhone into a PC computer, an AutoPlay message pops up, giving you several options about what to do with your iPhone information. All are good options, but I like to control where information is put on my computer, so I choose Open Device To View Files because the other options don’t give you the same degree of control. From there, follow these steps:
1. On a PC, in the AutoPlay dialog box, click Open Device To View Files. This opens the Windows Explorer (File Explorer on Windows 8) displaying the internal storage of your iPhone.
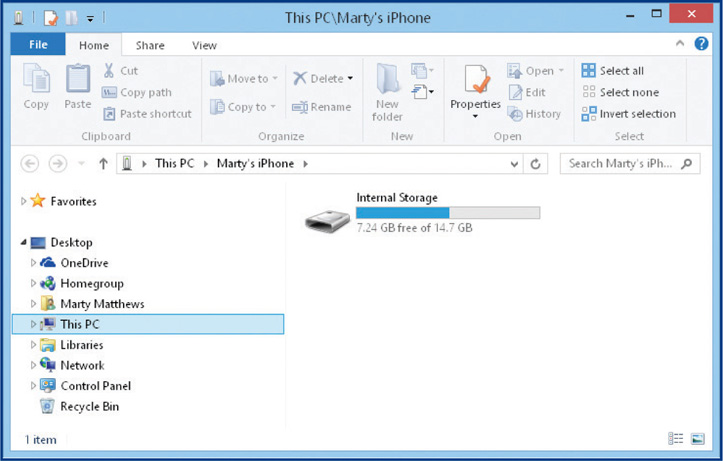
2. To drill down to your photos, double-click Internal Storage to open it. Double-click the DCIM file folder to open it, and then double-click the final file folder. This opens the Camera Roll album on your iPhone, displaying the photos it contains, as you see in Figure 6-1.

Figure 6-1: Getting photos from your iPhone is just like getting pictures from another folder on your computer.
3. Use the File (Windows) Explorer as you normally would to move the iPhone’s photos on the right to folders on your computer on the left.
Move to a Mac
On a Mac, when you plug your iPhone into the computer, iTunes may open it if that is your default setting. Close iTunes, open iPhoto, click your iPhone, click the photos you want to import onto your Mac, and click Import Selected, as shown in Figure 6-2. Click either Delete Originals or Keep Originals. Use the Finder as you normally would to move the iPhone’s photos to where you want them.
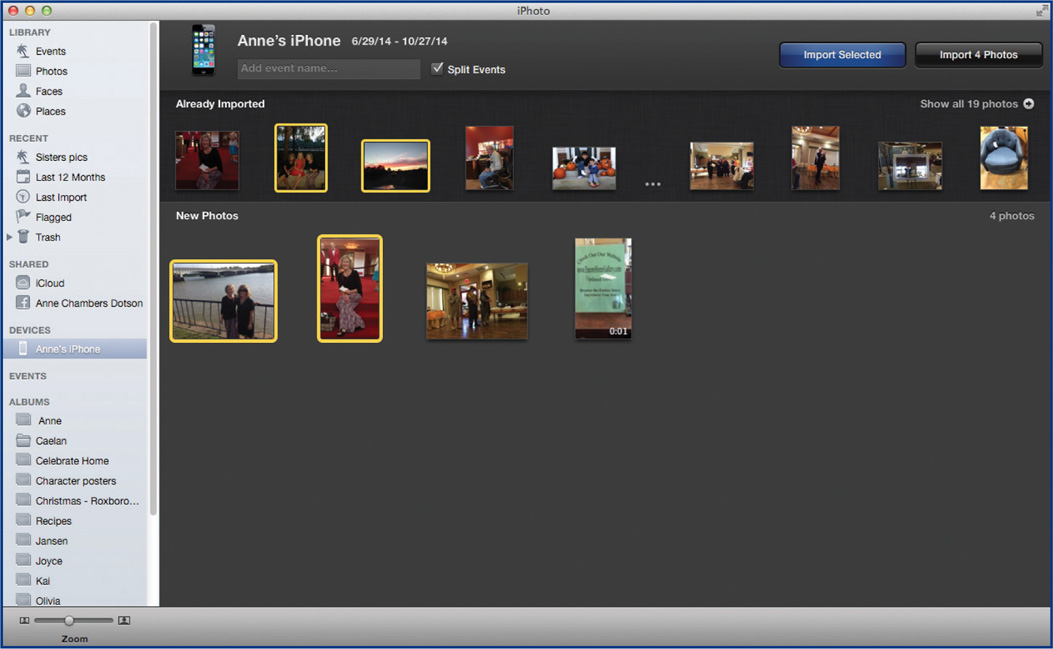
Figure 6-2: On a Mac, you need to use iPhoto to initially get photos off the iPhone.
WORK WITH PHOTOS
There are many reasons why you would want photos on your iPhone: from the simple fact that you like them or want them for the wallpaper on the Home screen, to using them to illustrate points in a document, to display them in a photo essay, or to send to a friend. Whatever the reason, the iPhone makes it easy to acquire, take, edit, store, and use photos. All of these actions are discussed in this section.
Use the Photos App
On the iPhone’s Home screen, tap Photos. A screen of photos should open, as you see on my iPhone next.

Organize Your Photos
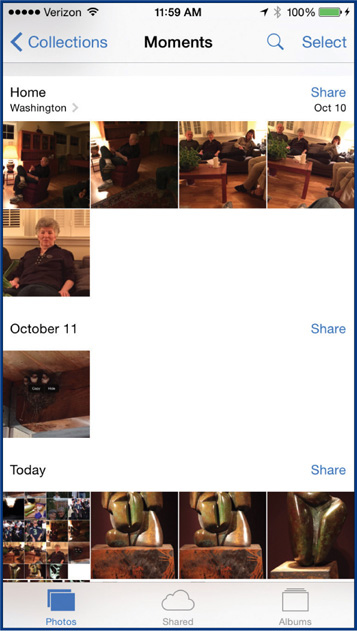
The Photos app provides three primary ways of looking at (or views of) your photos, each of which has further categorization:
• Photos Takes all your photos and automatically organizes them into Moments (by date and time), Collections (by location for more recent photos with geocoding), and Years.
• Shared If you have set up an iCloud account, Shared displays Shared Streams that contain photos you share with the other devices that are on your iCloud account or are shared with specific people. We’ll talk about this later in this chapter in the QuickFacts “Using Photo Stream.”
• Albums Organizes your photos into groupings called “albums” that you create. For the photos you brought across from your computer, each album is a folder that you had on your computer, as you saw earlier in Figure 6-2. The album named Camera Roll appears when you take pictures with your iPhone’s camera or take screen captures. See discussions later in this chapter on taking pictures and capturing screens.
![]()
TIP Screen captures, or screenshots, are images of what is currently on the iPhone’s screen. All of the iPhone screen images in this book are screenshots from my iPhone. You take a screenshot by pressing and holding the On/Off-Sleep/Wake button while pressing the Home button. The screen will go blank for a fraction of a second, and you will hear a “click” sound. The images will go into the Camera Roll album and, if enabled, into your Photo Stream.
Access Your Photos
You can access with your photographs in either the Albums or Photos view. The objective, though, is to get to an individual picture. Here, we’ll start with Albums.
1. In the Photos app, if it isn’t already selected, tap Albums at the bottom-right area of the Photos screen.
2. Tap an album to open it and see and select the photos.

3. Tap a photo to enlarge it. (The photos of sculptures on this page are courtesy of Hank Nelson, Cloudstone Sculpture.)
4. Drag the photo to the left or right to view other photos.
5. Tap a photo to redisplay the controls at the top and bottom.
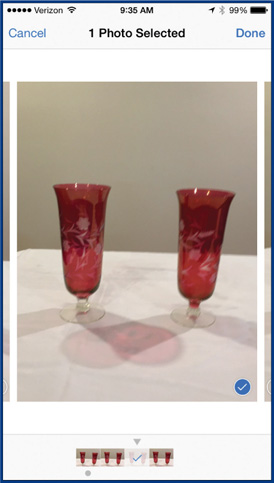
6. Tap the Share icon, select any additional photos in the album by tapping the circle at the bottom of a photo, and tap one of the actions to take with the selected photo(s).
![]()
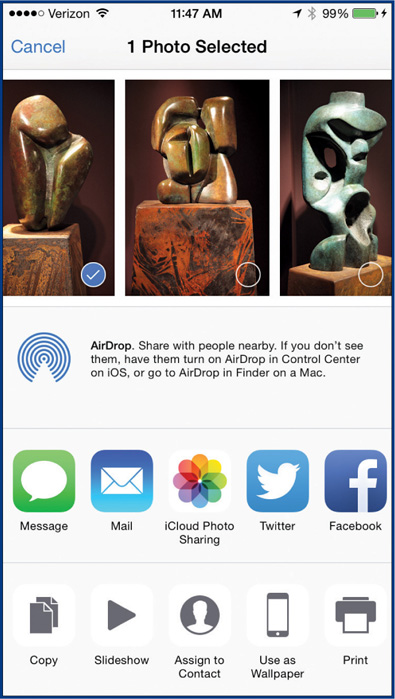
7. When you are ready, tap Cancel in the upper-left corner, if you are still in the Share screen, then tap the left arrow in the upper-left corner to close the photo and return to the display of the album’s photos. There, you can select another photo or tap Albums to return to the album screen. If you actually share a photo in this process, you are returned to the album you were working with.
Work with Albums
As you read earlier, folders on a PC or albums on a Mac that you downloaded from your computer become albums on the iPhone. After you have taken pictures or captured screens, the iPhone creates an album for these items called “Camera Roll.” In addition, you can create as many albums as you like. Here’s how:
1. To add another album from the album screen, tap the plus sign in the upper-left corner, type an album name, and tap Save. In the Photos screen that opens, tap the photos you want to add to the new album. Tap Done when you are ready.

2. Tap Edit on the far upper-right of the Albums screen. Here you can perform the following actions:

• Move an album by dragging the grip strip on the right to where you want the album.
• Delete an album that you have created on the iPhone (you can’t delete an album that you brought over from your computer) by tapping the Do Not Enter icon (a red circle with a white dash in the middle) on the left and then tapping Delete.

• Rename an album that you have created on the iPhone by tapping the name and using the onscreen keyboard to make the changes you want.
![]()
NOTE You can only rename and delete albums that you create on the iPhone.
3. Tap Done when you have completed editing albums.
4. Tap Photos to open a screen of your photos and, if needed, go to the Moments display. Tap Select and then tap the photos you want to share, delete, or add to other albums.
• Tap the Share icon to open the Share menu, where you can attach a photo to a message or email; send it to iCloud, Twitter, Facebook, Pinterest, or Flickr; and copy, print, or perform other actions on it.
• Tap Add To to add selected photos to albums that were created on the iPhone. You can’t add to albums that you brought over from folders on your computer.
• Tap Delete (the trash can) to delete selected images you have taken or copied on your iPhone that don’t also exist on your computer or another device. Tap Delete Photo to complete the process.
• Tap Cancel to stop any operation you have started.
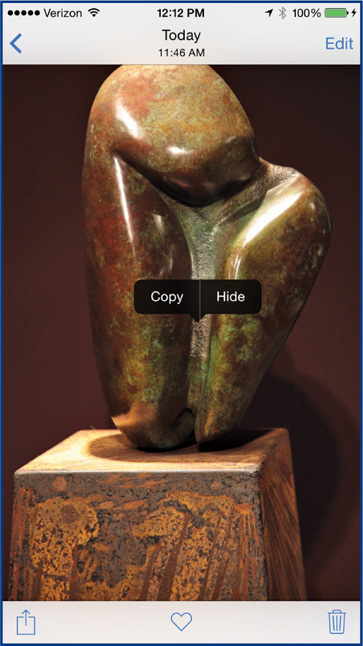
5. Copy a photo by pressing and holding it until the Copy, Hide menu appears. Tap Copy and open an album you created on the iPhone. Then either press and hold an existing photo and then tap Paste to paste the copy to the left of the existing photo, or press and hold a blank area of the album and tap Paste to paste the copy to right of the last existing photo. (The photos of sculptures in the next several examples are courtesy of Hank Nelson, Cloudstone Sculpture.)
Edit Photos
With a single photo displayed, tap Edit on the upper-right corner to perform a number of operations:

• Tap Red-Eye and tap each eye for which you want to remove red-eye.
![]()
• Tap Enhance to apply an automatic enhancement, generally brightening.
![]()
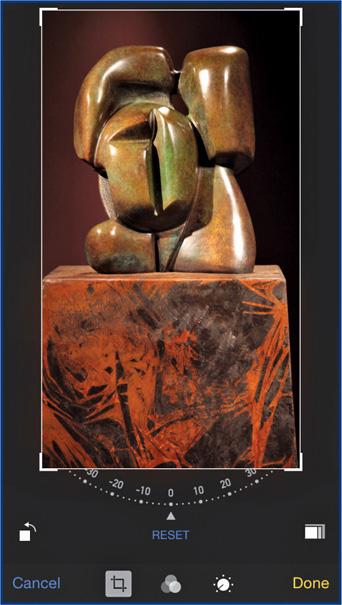
• Tap Crop to open the crop, rotate, and aspect ratio screen. Drag the corners in toward the center to crop the photo on two sides. Tap the rotate icon on the left to rotate the image by 45 degrees, or drag the protractor to any degree of rotation desired. Tap the aspect ratio icon on the right and select a different ratio. Tap Reset to return to the original image and tap Done when you are finished.
![]()
• Tap Filters to apply one of eight filters, which you can choose from the option displayed across the bottom of the screen.
![]()
• Tap Color Dial at the bottom right, and select various degrees of light, color, and black and white.
![]()

• Tap Cancel to stop whatever editing function is currently underway.
Set Up a Slideshow
A slideshow displays the photos in the current album, one after the other. From the Album view, select a photo, tap the Share icon, and tap Slideshow to create one. The Slideshow Options menu will open. See “Review Photos & Camera Settings,” later in this chapter.

• Tap Transitions and review the various transitions available. Try several to see which one you like and then use it.
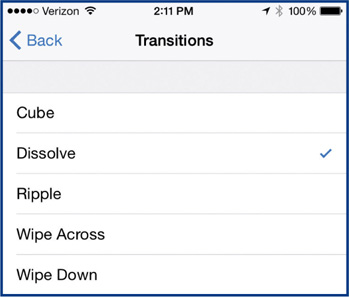
• If desired, tap the Play Music on/off switch, tap Music, and then select the piece you want to play in the background.
• Tap Start Slideshow to start your new slideshow.
Using Photo Stream
Photo Stream is a component of iCloud that allows you to share recent photos that you have taken on your iPhone with other devices that share your iCloud account. Of course, you must have set up and enabled an iCloud account, as described in Chapter 1. Also, Photo Stream must be enabled in Settings, as described in “Review Photos & Camera Settings,” later in this chapter.
Photos you take with Camera or screenshots (see the Tip earlier in this chapter near the “Access Your Photos” section) you capture on your iPhone go into the Camera Roll album. They are automatically uploaded to your Photo Stream on iCloud, if it is enabled, after you leave Camera. The photos can then be viewed on all the devices that share your iCloud account, including PC and Mac computers. On your iPhone you will also see photos taken or captured on your other iCloud-enabled devices. You can keep up to 1,000 photos on your Photo Stream, and they won’t count against your total iCloud storage.
It’s easy to manage your Photo Stream:
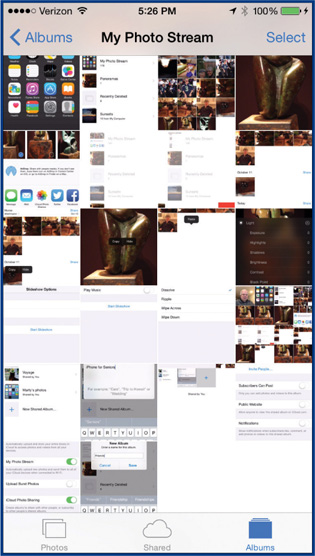
1. From the Home screen, tap Photos (if necessary), return to Albums, tap My Photo Stream, and tap Select on the top right.
2. Tap the photo(s) you want to share, delete, or save to your iPhone.
3. Tap the Share icon in the bottom-left corner to open the Share menu and add the photo(s) to a message, an email, iCloud Photo Sharing (see the next section), or Facebook (or that you want to copy, print, or perform other actions on), as you have seen earlier in this chapter.
4. Tap Add To to save the selected photo(s) to an existing album that you have created or to a new album.
5. Tap Delete (the trash can) to remove the selected photo(s) from your Photo Stream on your iPhone. This does not delete the original photo(s).
iCloud Photo Sharing
iCloud Photo Sharing is a separate album you share with other people not on your iCloud account but who have iOS 6 or later or OS X Mountain Lion or later devices (recent iPhone, iPad, and iPod touch devices as well as Macs). Here’s how to create an iCloud Photo Sharing album:

1. In Settings | Photos & Cameras, turn on iCloud Photo Sharing, if it isn’t already on (see “Review Photos & Camera Settings,” later in this chapter).
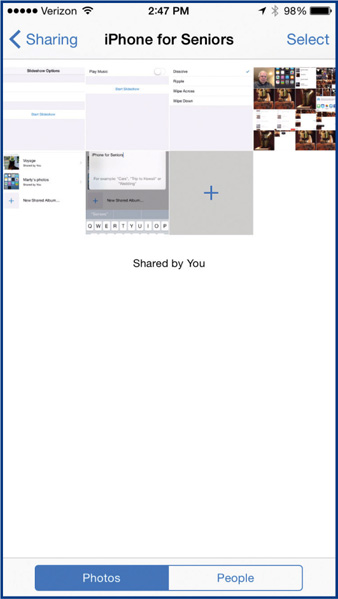
2. From most Photos screens, tap Shared at the bottom of the screen to open iCloud Photo Sharing.
3. Tap the plus sign in the upper-left corner to open and name a new stream you are creating.
4. Tap Next and enter the email address of someone you want to share your new stream with. Tap the plus sign in a circle to enter additional email addresses to share your stream with more people.
5. When you are ready, tap Create.
6. Tap the new stream and tap the plus sign to open Photos. Tap the photos you want to include in your new photo stream, tap Done, and tap Post. The new folder will open and display the selected photos.
7. Tap People at the bottom of the screen to invite additional people and decide how you want to manage the photo stream.
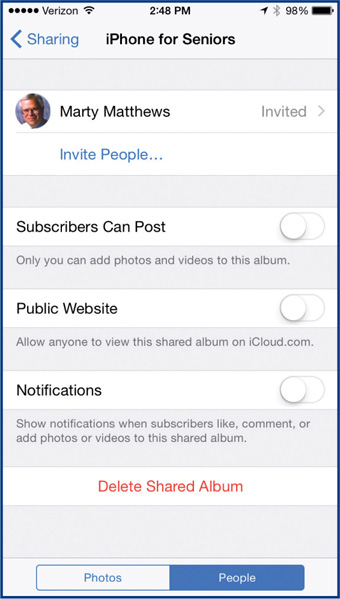
The people you have invited will receive an email message asking if they want to subscribe to your photo stream.

Review Photos & Camera Settings
The following settings are available for Photos; from the Home screen, tap Settings | Photos & Camera:
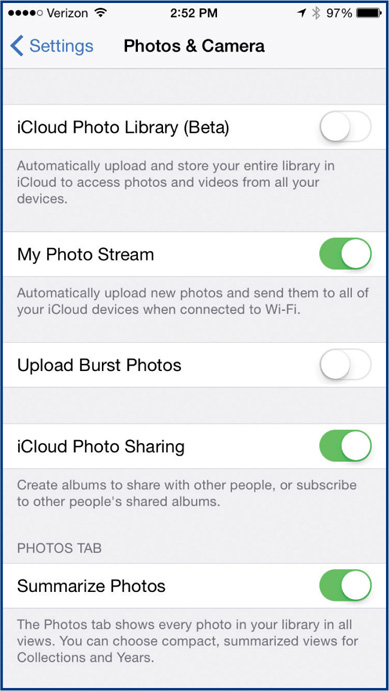
• iCloud Photo Library allows you to turn on or off the automatic uploading of your entire photo library to iCloud so you can access this library on any iOS device using your iCloud ID and password.
• My Photo Stream allows you to turn on or off the basic Photo Stream capability. See the “Using Photo Stream” QuickFacts.
• Upload Burst Photos allows you to turn on or off a fast sequence of photos that can be up to 10 frames per second.
• iCloud Photo Sharing allows you to turn on or off the Shared Photo Stream capability. See the “Using Photo Stream” QuickFacts.
• Summarize Photos allows you to choose a compact summarized view for Collections and Years.
• Play Each Slide For allows you to set the number of seconds (from 2 to 20) for which each slide plays in a slideshow.
• Repeat allows you to turn on or off the playing of a slideshow.
• Shuffle allows you to turn on or off the random mixing of slides in a slideshow.
• Grid allows you to turn on or off a grid for better aligning a photo. This does not show in the final picture.
• Record Video At 60 FPS allows you to turn on or off the ability to take high-speed video at 60 fps (frames per second).
• Keep Normal Photo saves a normal photo when an HDR (High Dynamic Range) series of photos is taken that blends the best parts of three separate exposures.
WORK WITH VIDEOS
Your iPhone provides an excellent way to record, edit, and even watch videos. The iPhones 6 and 6 Plus allow you to record 1,080-pixel high-definition (HD) video at either 30 fps or 60 fps. You can also record slow-motion video at either 120 fps or 240 fps, as well as time-lapse video. This makes the iPhone a good video-recording device. With the iPhone’s cameras, you can record videos in much the same way as you take a photo, do some limited editing with the default apps, and download apps for more comprehensive video editing. You can also download movies and TV shows and watch them on the iPhone. Although the iPhone has a small screen, if you are the only one watching it and you use the EarPods to listen, it is not a bad experience, especially on an airplane.
Download Videos
There is an almost unlimited number of videos you can view on your iPhone. This includes movies, TV shows, music and personal videos, and video podcasts. You can download videos from iTunes and many additional sources on the Internet. When you download a video, you may have it permanently, although in the cases of rentals and library loans, what you downloaded will disappear after a set time. You can also stream a video, which means that it is sent to you in small bites as you view it. Streaming, though, requires that you have a faster, stable Internet connection. Look at what is available and how to use videos from the iTunes Store and then look at what else is available.
![]()
CAUTION! Full-length movies are large files in the range of 3GB to 4GB. They take a good amount of time to download; require stable, fast Internet and Wi-Fi connections; and if you use cellular, they will take a fair bite out of your data plan. They can also use up the iPhone’s memory pretty fast.
Download from iTunes
Using iTunes on your iPhone to get videos is similar to using it to get books and music, although it takes a lot longer.
1. From the Home screen, tap the iTunes Store icon and on the bottom menu bar toward the left, tap Movies to see a number of movies displayed.
2. See additional videos within an individual category, generally listed in a row, by swiping it to the left. See additional categories by swiping up.
3. Tap a video to see additional information and view trailers of it. Tap a trailer to view it.
![]()
TIP For many movies on iTunes, you can choose to rent or buy them. If you buy a movie, you can permanently keep it and watch it as many times as you wish. If you rent a movie, you have 30 days to begin watching it and then 24 hours to finish watching it (in the USA; 48 hours elsewhere) from the time you click Play.
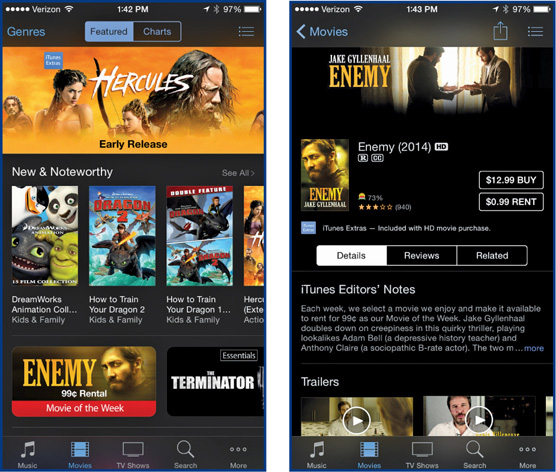
4. Tap either the Buy price or the Rent price (if it is available) and then select HD (high definition and a large file size) or SD (standard definition and a much smaller file size). Tap Buy Movie (or Buy Video) or Rent Movie, enter your Apple ID password, possibly verify your credit card, and then tap OK to complete the process. You will see the downloading icon where the amount was. If you tap Downloads in the lower-right corner, you will see the progress of the downloading.
![]()
5. Tap outside of the information box to close the added information.
6. When the downloading has finished, press Home, tap Videos, and tap your video to play it. If you rented a video, you will be told the number of days you have left.

Make Videos
The iPhone’s cameras make videos as well as photos, and you make a video very much like you do a photo. Normal video is taken at 30 fps, but in Settings | Photo & Camera, you can change this to 60 fps (see “Review Photos & Camera Settings,” earlier in this chapter).
1. On the Home screen, tap Camera and then tap or drag the Video option over to the yellow mark on the screen.
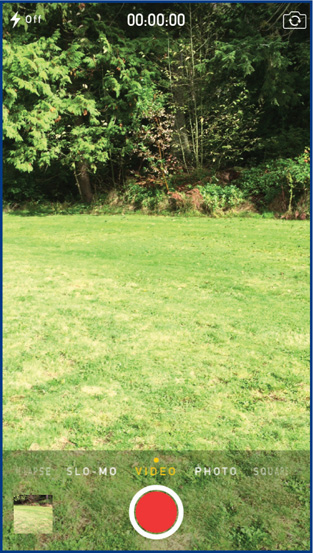
2. Aim the camera where you want to begin the video capture, press the red button at the bottom center, and then pan the iPhone (move it from left to right or from right to left) to capture what you want in the video. A timer at the top of the screen shows you how long you have been shooting.
![]()
TIP While you are shooting a video, you can take a still photograph by pressing the shutter button in the bottom-left corner.
3. When you are done capturing, press the red square button that has replaced the red round button in the bottom center. You can then view what you just shot by tapping the thumbnail of your video at the bottom right.

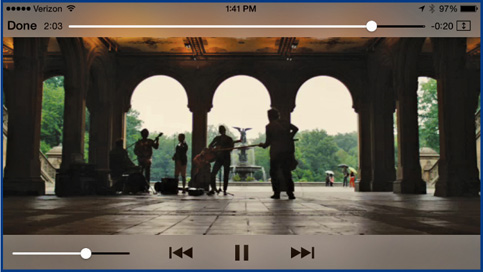
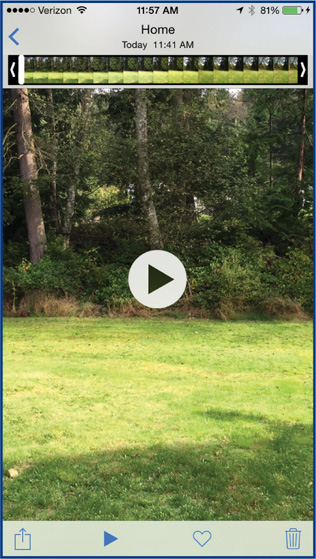
4. Tap the triangle in the middle of the screen to play the video. Videos you produce are kept in Photos, not in Videos, but in the Videos album.
5. You can start playing a video at any place during its duration by tapping in the sequence of frames at the top of the screen, or you can drag a finger across the frames to quickly or slowly view the video.
![]()
TIP You can take a screenshot of a particular frame in the video and in this way you can identify the best photo in the sequence of action.
Edit and Share Videos
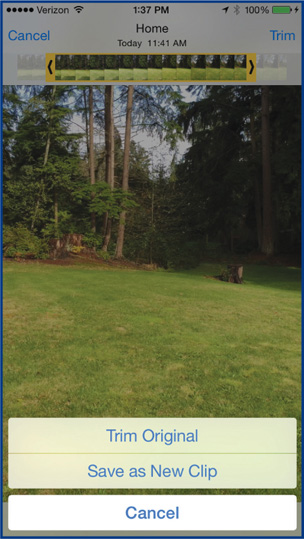
As you take videos, you may notice that you have frames at either the beginning or end of the video that you want to remove. The iPhone provides a simple video editor that lets you trim frames from either end of a video clip, but not remove frames from the middle of it. You can also delete a video or share it with others in various ways.
1. From the Home screen, tap Photos, tap Albums (if needed), tap Videos or the album you are using for your videos, and tap the video you want to work with. It will open and have the features you saw at the end of the last section. If you don’t see the series of frames at the top of the screen, tap the video.
2. To trim an end off the selected video, tap either end of the series of frames so it becomes enclosed in a yellow border. Drag toward the middle from either end until the frames you want to trim have become dim. Tap Trim in the upper-right corner and then tap either Trim Original, so you only have a clip without the frames you trimmed, or Save As New Clip, to create a new clip without the trimmed frames and still have the original clip with the frames.
3. To delete the entire video, tap the recycle bin in the lower-right corner and then tap Delete Video.
4. To share a video with other people, tap the Share icon in the lower-left corner of the screen and then tap the method (Message or Mail) or service (YouTube, Facebook, or Vimeo) you want to use. Note that YouTube and Vimeo are unique to videos. In both cases, you must have an existing account to upload videos.
![]()
TIP Apple offers for free a very capable video-editing app called iMovie, which you can download and use from the App Store.
![]()
Take Time-Lapse and Slow-Motion Video
The iPhone 6 and 6 Plus offer both time-lapse and slow-motion video. In Camera, tap Time-Lapse and then tap the shutter button. The iPhone will take a still photo about every seven seconds, until you tap the shutter again. It will then put the still photos together into a video that you can edit as such. For slow-motion, in Camera tap Slo-Mo at the bottom of the screen and then tap the speed, either 120 fps or 240 fps. Tap the shutter to start the video and then tap it again when you are done. If you select the slow-motion video in Photos, you will see a time bar beneath the video frames. You can drag the two black vertical bars, representing the start and end of the slow-motion segment, anywhere within the time bar to indicate the part you want in slow motion.

USE FACETIME
FaceTime makes the iPhone (or an iPad or iPod touch) into a video phone, where you can contact someone and have a face-to-face conversation with them—in other words, a video chat. To use FaceTime, you need to have an Apple ID and either a Wi-Fi or cellular connection to the Internet. Note, however, that in using a cellular service for FaceTime you may incur data charges.
Here’s how to make a FaceTime call:
1. Tap the FaceTime icon on the Home screen. The FaceTime screen will appear with some of your contacts.
2. Tap the person in your contact list that you want to call. An intermediate screen will appear showing who you are calling and giving you controls to switch the front and back camera, disconnect the call (hang up), and mute the call.
3. When the other person answers, they will appear on your screen with your picture inset in a corner. You can begin talking as you normally would. The iPhone’s microphone is pretty good, and you shouldn’t have to lean in.
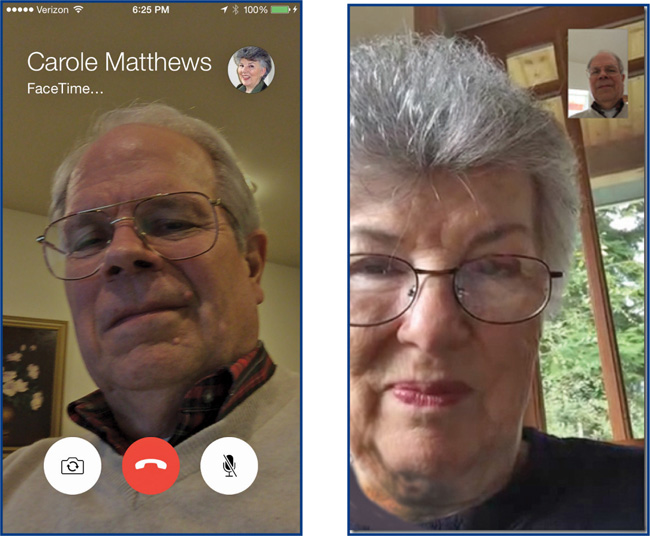
4. Drag the small image of you to any of the four corners.
5. When you are done with the call, tap the screen and then tap Disconnect (the red dot with a handset).
6. You can show the person you are talking to what you are looking at by tapping the switch camera icon, on the left, to activate the other camera in the iPhone and then aiming the iPhone at what you want to show.
7. You can also mute the iPhone’s microphone—if, for example, you want to take a call on another phone—by tapping the mute icon.
8. If you want to resume a FaceTime call, tap Recents and then tap the call you want to resume.