Chapter 9
Socializing and Playing Games
You have seen the iPhone’s practical and entertaining sides; in this chapter you’ll see its socializing and fun sides: interacting with your family and friends, and playing games. This chapter shows you how to get connected and use Twitter and Facebook, as well as find, download, and use a few of the many games available on the iPhone, some of which are multiplayer games where you can interact with your friends.
FOLLOW TWITTER
Twitter is a social networking service on the Internet that allows you to post very small messages, called “Tweets,” of no more than 140 characters. You can choose to follow this stream of messages, or Tweets, on any topic and from any individual. You can also choose to add your own Tweets, which anyone can read. You can read the public postings of anyone else and sign up to follow anyone.
 Enable and Explore Twitter
You must register with Twitter before you can use it. You can access Twitter from Safari at Twitter.com, or you can download for free the Twitter app from the App Store. The app is tailored to your iPhone, so begin by downloading the app and then registering with Twitter. Next, locate some information and contributors you want to follow. Finally, you can post Tweets of your own and build a following.
Download and Register with Twitter
Use the following steps to download and register with Twitter:
1. From the Home screen, tap the App Store | Search. Clear the Search box if needed. Type twitter and then tap Twitter in the search results.
2. Tap Free | Install, use Touch ID or enter your Apple ID password, and tap OK. The Twitter app will be downloaded. Tap Open to display Twitter. If you want, tap Allow to allow Twitter to use your current location.
3. If you don’t have an existing Twitter account, tap Sign Up and enter the requested information. Otherwise, enter the email address and password for your existing Twitter account. Tap Don’t Allow or OK to allow notifications.
4. You are asked if you want to follow your friends. Tap OK, if you wish, to allow access to your contacts. A list of people, including some of your contacts who are on Twitter, will be displayed. Tap the check box on the right for each person you want to follow, or tap Select All to do that.
5. Tap Next or, if you selected some people, tap Follow to display a list of your contacts who are not on Twitter and whom you can invite to join Twitter and follow you. Tap Invite to display a list of people who your friends are following and are suggested as people you might want to follow. Tap the check box for each one you want to follow, or tap Select All to do that and then tap Follow.

6. You are asked if you want to add your photo to your Twitter account, and you are given the option of taking a photo with the iPhone or choosing an existing photo. If you choose the latter, you are asked if you want to allow Twitter access to your photos. Tap OK or Don’t Allow (if you choose Don’t Allow, you will need to take a photo and insert it, unless you choose not to have a photo on Twitter). Select the photo you want, move and scale it, and tap Use | Finish.
Search for Tweets
In setting up Twitter, you’ve added the people in your contacts list who you want to follow, but it is likely that you want to follow others in areas that you are interested in. I’m interested in the Apple Watch and what people are saying about it. Also, I like to cook, so I am interested in new and unique recipes. I can search on both of these topics to see who is Tweeting about them.
1. Tap the Search icon, type what you want to search for, and then tap the result you want to explore. In my case, I type and then tap Apple Watch to get this screen:

2. Scroll down the Tweets until you see one you might want to follow and then tap it. The selected Tweet will expand.
3. Tap the Follow icon if you want to follow this Tweeter or subject.
![]()
4. Repeat the first three steps for as many subjects as you want to follow.
![]()
TIP Some subjects, such as my interest in cooking, can provide a great many Tweeters to follow, many of whom do a lot of Tweeting.
Explore What Else Is Happening
After you have selected several people and organizations that you want to follow, tap the left arrow in the upper-left corner. This opens the Home page, which displays the Tweets of those you are following.

In addition to the Home page, there are two more pages titled “Discover” and “Activity.” The Discover page shows you what is trending, both in general and with those you are following. The Activity page displays the Tweets of people and organizations being followed by those you are following.

1. With the iPhone in portrait orientation and Twitter’s Home page displayed, swipe the page from right to left to display the Discover page and swipe again to display the Activity page.
2. On either page, scroll down to see additional Tweets. Tap one of the Tweets to explore it further. It may lead you to a website, and that may lead you to other sites.
3. When you have explored a path as far as you want, return to Twitter by tapping the X in the upper-left corner.
4. Beneath each of the Tweets on the Home, Discover, and Activity pages is a set of four icons (three on the Home page and one for Tweets from those you are already following), as shown here:

• Reply Used to send a Tweet to the person or organization that posted the Tweet you are replying to.
• Retweet Used to repost the Tweet under your name; tap Retweet a second time to undo it.
• Favorite Used to state that the Tweet is one of your favorites.
• Follow Used to add the Tweeter to those you follow.
Post Tweets and Build a Following
Although reading the Tweets of others can be interesting and worthwhile, there is an equally compelling use of Twitter: to state your thoughts and comments by posting your own Tweets, with and without photos, by replying to the Tweets of others, and by retweeting what others have posted.
Post a Tweet
Posting Tweets is no harder than posting a text message, except that you are limited to 140 characters, and, of course, you must figure out what to say in that number of characters. Here are the steps to follow:
1. On any Twitter page, tap the Tweet icon in the upper-right corner to open the new Tweet message area.
![]()
2. Type whatever you want to say in the message area. Notice the number in the upper right, which starts at 140 and decreases as you type, telling you the number of characters you have left.
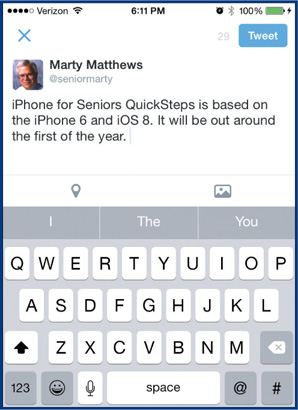
3. When you are ready, tap Tweet in the upper-right corner to post on Twitter.
4. If you are not already there, tap the Twitter Home screen (“Timelines” in the bottom-left corner) and you will see what you posted.

Tweet with Photos and Add Your Location
You may have noticed two icons in the lower-left corner of the New Tweet dialog box. These allow you to add a photo to your Tweet and to add your location. Here’s how:
1. Create and enter a new Tweet, as described previously.
2. Tap the Photo icon in the lower-right corner.
![]()
3. Tap the Location icon to be asked if you want to add your current location to your Tweets. Tap Enable to do that, or tap Cancel to not add your location.
![]()
4. When the Tweet is ready, tap Tweet to send it.

Tailor Twitter Settings
You can change Twitter settings in both the iPhone’s settings and in Twitter.
1. From the iPhone’s Home screen, tap Settings | Twitter. Tap your account to change your password and/or description. Tap Find Me By Email to allow people to search Twitter and find you using your email address.
2. Also in iPhone Settings you can add another Twitter account, either existing or new. You can also update your possible Twitter followings based on changes to your contacts as well as allow Twitter to use your Apple account so that you sign in to Twitter when you sign in to your iPhone.

3. While in iPhone Settings, tap Notifications | Twitter and choose the notification settings for Tweets that are correct for you. Return to the iPhone Home screen when you are finished.
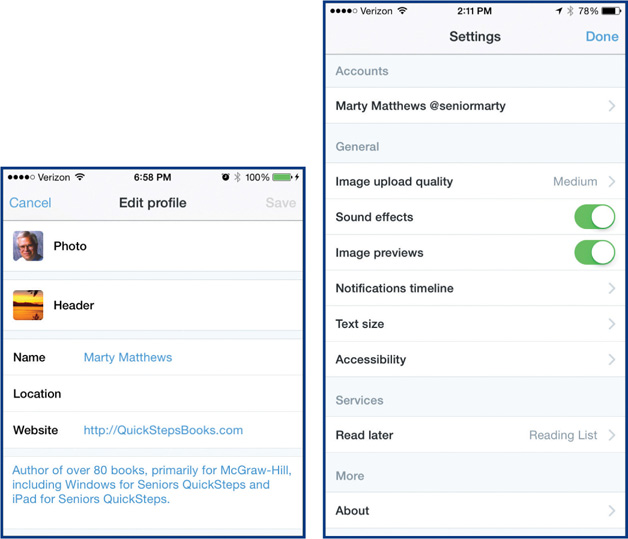
4. Tap Twitter | Me and tap Edit Profile in the upper right to change your photo, header image, name, location, website, and bio. Tap Save when you are ready.
![]()
5. Tap the gear icon and then Settings to change your account, image upload quality, sound effects, image previews, notifications timeline, text size, and accessibility. Tap Done when you are ready.
EXPLORE FACEBOOK
Facebook allows people 13 and older to connect with their friends and share comments, pictures, and videos. To do that, each user, after registering, creates their own web page and identifies the friends they want to share with. You can limit sharing to just your friends, or have a public page that anyone can view. You can send invitations to people to be your Facebook friends, and you will likely receive invitations from others to be their friends. Making full use of Facebook is a book-length subject, and my wife, Carole Matthews, has written one—Facebook for Seniors QuickSteps—published by McGraw-Hill Education.
Start Using Facebook
As with Twitter, you can use Facebook either through Safari or with the app, which you can download for free from the App Store. Also, as with Twitter, I recommend using the app. Once you get Facebook open, even if it is for the first time, you can immediately start using it by posting comments, photos, and videos. You will want to add friends who can see and respond to what you have posted.
Download and Register with Facebook
Use the following steps to download and register with Facebook:
1. From the Home screen, tap the App Store. Clear the Search box, type facebook, and then tap Facebook in the search results.
2. Tap Free | Install, enter your Apple ID password, and tap OK. The Facebook app will be downloaded. Tap Open to display Facebook.
3. If you don’t have an existing Facebook account, tap Sign Up For Facebook and enter the requested information, choose a picture of you to use (you have to give Facebook permission to use your photos), and tap Get Started. Choose to find friends by allowing Facebook to use your contacts list. Finally, confirm your email address to Facebook. Otherwise, enter the email address and password for your existing Facebook account. Facebook will open.
Use Facebook
If you have an existing Facebook account, your current Facebook page will open; otherwise, you are asked where you want to start.

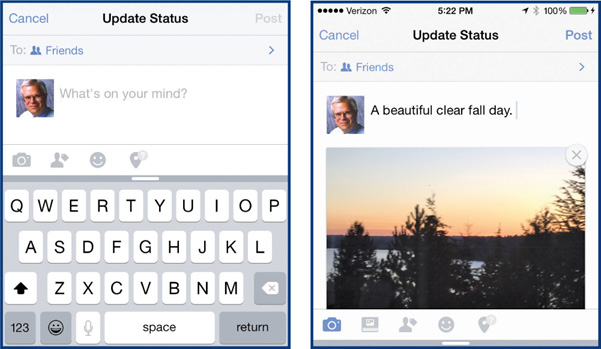
1. Tap Status in the upper-left corner. Select whether you want your status to go to just your friends, everybody (“public”), or just selected friends, and then enter what’s on your mind or comment that you would like to share with others. When you have completed entering the comment, tap Post. Your status or comment will appear on your page.
2. Tap the Photo icon in the lower-left corner to add one. Tap either the Camera icon in the upper-left corner and take a photo as you normally would, or choose from the Camera Roll a photo you want, and then tap Post.
3. Tap Check In in the upper-right corner. Facebook will ask if it can turn on Location Services. If that is acceptable to you, from the iPhone’s Home screen, tap Settings | Facebook | Settings | Location | While Using The App. If you allow the use of your current location, Facebook will display a list of Facebook pages that are close to you.
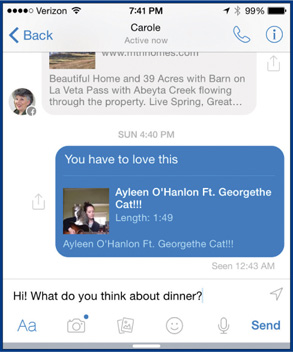
4. Tap the Message icon (the silhouette and three bars) in the upper-left corner to open the list of your friends to whom you can send individual messages. To send a message, tap the friend’s name, tap in the text box at the bottom of the screen, type a message, and tap Send.
Add and Contact Friends
At the bottom of the Facebook screen are five icons for five areas of Facebook. The Facebook discussion so far has dealt with the default News Feed area. This is where posts that you receive are displayed. The second area is Requests, which shows you the friend requests you have received, people you may know (generally friends of friends) and whom you may request to be your Facebook friend, and allows you to expand the people you may know and search for others.
You need to start out with a few friends on Facebook. With that start, the number of your friends will quickly grow as you get suggestions to add friends of friends. Also, others will request that you be their friend as they learn you are on Facebook.
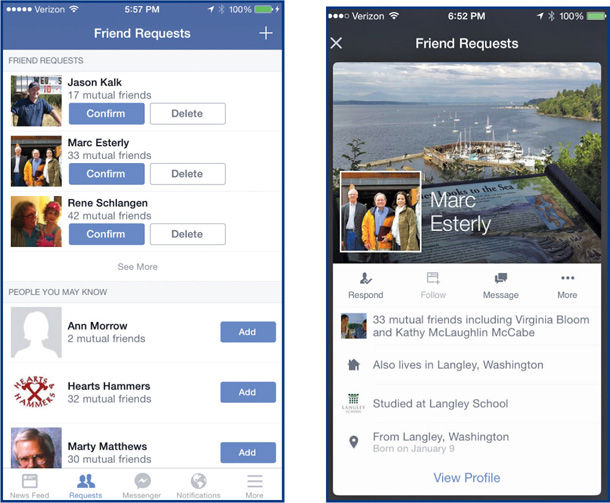
1. Tap Requests at the bottom of the Facebook screen and review the friend requests at the top of the screen. Tap Confirm for those you want to be your friend, and tap Delete for others.
2. For all the people on the Friend Requests page, tap the person’s photograph to open the person’s Facebook page. From an individual’s page you may tap pictures to enlarge them, tap View Profile at the bottom center to see more about the person, and swipe from right to left to see other friend requests.
3. From the summary Friends Request page, tap the plus sign in the upper-right corner to open the Find Friends page. Here, you can see several ways to add friends. If you are just starting out, you will probably not see any people under Suggestions or Requests.

4. Tap Search | Name Or Email and type a friend’s name or email address (an email address is preferred because if you enter a name, you must search through all the people on Facebook with the same name—which is probably a lot). Finally, tap Search.
5. When you see a friend you would like to add, tap that friend’s name to open their page and then tap Add Friend. You will see the label “Add Friend” change to “Undo.” Under the name you will see “Request Sent.”
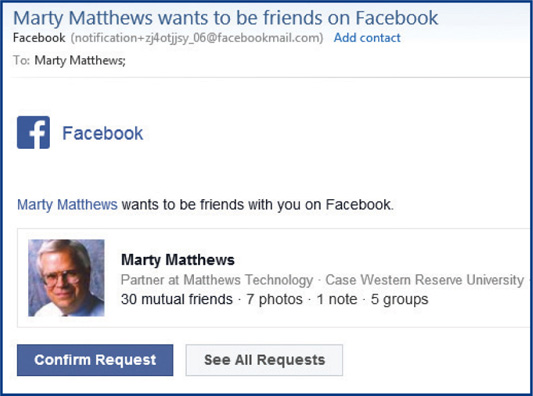
6. If needed, tap the return arrow in the upper-left corner to return to the Find Friends page and then tap Contacts to see who on your contacts page is on Facebook. Tap Get Started and then OK to proceed. A list of people from your address book and on Facebook will appear. Tap Add Friend opposite the people you want to be your friends. They will receive a notice like this:
7. You can then tap Skip and look at everybody else in your address book. Tap Invite to invite them to create a Facebook page and be your friend. Tap Done when you are ready.
8. Tap Browse to search for people from organizations and institutions you are affiliated with.
9. After adding several requests for friends, tap Suggestions. You will see that you now have a number of suggestions based on the requests you have made and who their friends are. Tap the Add Friend icon on the right of the people you want to be your friends.
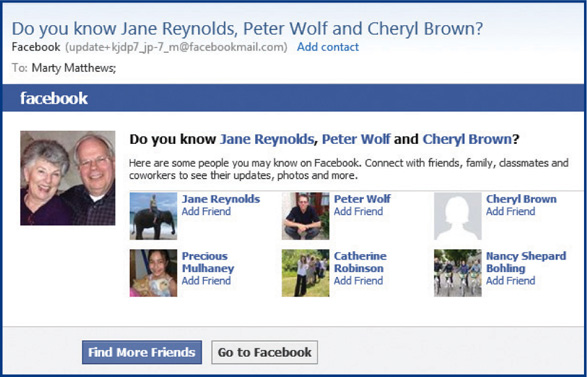
10. After your friends have had a chance to see their email and respond, you will see them in the right column on your News Feed page. If you tap the Notification icon in the bottom of the page, you will see the friends who accepted your requests.
![]()
NOTE When you start using Facebook, be prepared to receive a lot of suggestions and requests for friends.
Manage Your Facebook Account
Facebook can disseminate a lot of information about you, and it is important that you use the controls that Facebook provides to place the limitations you want on who can see what. There are two lists of settings you can work with to have Facebook behave the way you want: the iPhone’s settings and Facebook’s settings.
Review iPhone’s Facebook Settings
The iPhone’s Facebook settings have to do with whether apps can use your Facebook account and whether Facebook can use other iPhone apps.
1. On the iPhone Home page, tap Settings | Facebook | Settings. Review the apps that Facebook can access. The default is all those listed. Tap any you don’t want accessed.
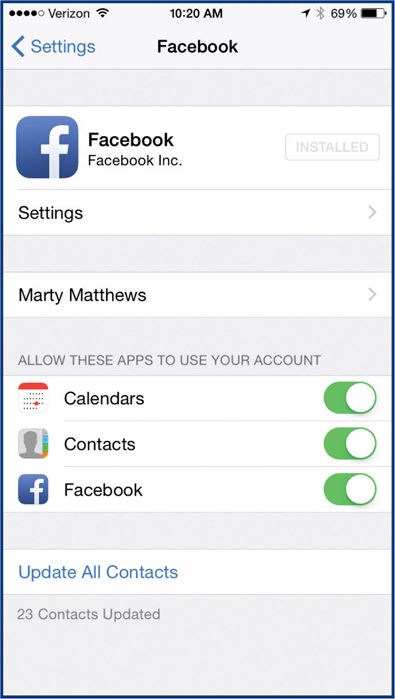
2. Tap Facebook in the top-left corner and tap your name. Here, you can enter your password and delete your Facebook account from your iPhone (it does not delete your Facebook account).
3. In the list of apps that can use your Facebook account, which are all selected by default, select the ones you do not want to use it.
4. If you want Facebook to have temporary access to the email addresses and phone numbers of your contacts, tap Update All Contacts.
Adjust Facebook’s Own Settings
Facebook has several different places where there are settings, and they duplicate each other in some cases. Here, I’ll try to point out some of the more important ones, but it is worthwhile for you to review them. There are far more than can be listed here.
1. In Facebook, tap More (the three bars in the lower-right corner).
2. Drag or scroll the list of options up until you see the primary heading Settings and tap Privacy Shortcuts to open what is probably the most important of Facebook Settings.
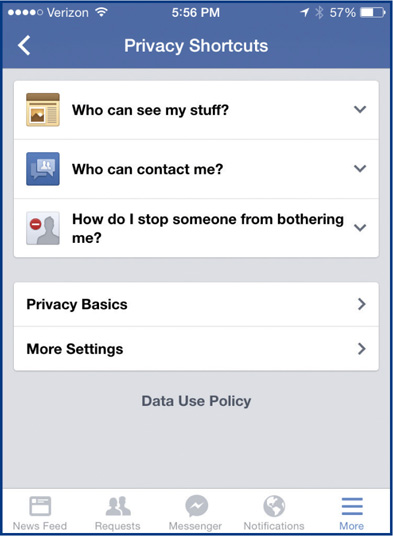
3. Tap Who Can See My Stuff | Who Can See My Future Posts, choose the category of friends to do this, and tap the return arrow in the upper-left corner.
4. Tap Where Do I Review…, review your Activity Log and see who saw the items you posted and liked, and tap the return arrow in the upper-left corner.
5. Tap Who Can Contact Me and then under Whose Messages Do I Want Filtered, choose the level of filtering you want.
6. Tap Who Can Send Me Friend Requests, choose the option you want, and tap the return arrow in the upper-left corner.
7. Tap How Do I Stop Someone…, enter the name of the person to be stopped, and tap the return arrow in the upper-left corner to return to the overall Facebook settings page.
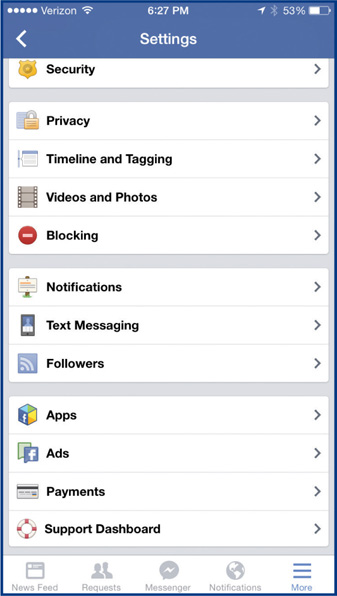
8. Scroll down and tap Settings under the Settings heading. Tap each of the 13 categories, review the options, make the changes that are correct for you, and tap the return arrow in the upper-left corner.
![]()
CAUTION! Consider carefully the information you put on Facebook and the degree to which you allow others to view your information. Even though you put limits on who can see your information, a good assumption is that anything you put on Facebook is public information. In your exploring Facebook, use common sense to protect yourself, as discussed in the “Protecting Your Online Identity” QuickFacts.
![]() QuickFacts
QuickFacts
Protecting Your Online Identity
It is a wonderful thing to be able to find and exchange information with people with similar interests. Social networking facilitates these communications so that we connect with broader webs of people, as well as with people we simply do not know. In today’s world, though, it is wise to be “street smart” when it comes to the streets of the Internet. Here are a few hard-and-fast rules for keeping your identity to yourself and your information private:
• Make sure your password is reasonably difficult to figure out and protect your passwords by not sharing them and by changing them often.
• Be wise about the information you put on the Internet and by not putting on highly personal information.
• Don’t click links from unknown persons or organizations. These can be programmed to gather information from you or your computer. Check the actual URL of people soliciting your information and make sure they are who you think they are.
Social networking can be fun and a great way to meet people and interact with them. Just keep in mind that you want to be “street smart” while you are having that great time.
By looking at only Twitter and Facebook, I have only touched on social networking apps—although they are far and away the most popular ones, especially for seniors. If you are interested in business and job networking, I recommend looking at LinkedIn, and if you want to share a common interest, I recommend Pinterest as an iPhone app. Talk to your friends and associates about what they are using and possibly try out other social networking apps.
PLAY GAMES
Almost everybody likes to play games. The iPhone App Store offers a large number of them you can directly play, and the iPhone’s Game Center allows you to compete with others in multiplayer games and to keep track of how you are doing. The Game Center is separate from individual games themselves, so we’ll discuss them first.
Download and Play Games
Many iPhone games are free, or at least start out free, and many more cost something (from 99 cents on up). Just to find a game you want is a major undertaking, and to make sure it is well thought of and fun to play takes research. There are many different types of games, such as action games, board games, card games, and many others. You can limit yourself to free games, knowing that many “free” games get you hooked during free play and then have various ways to get you to pay something. Although we’ll discuss several games here, I suggest that you do some initial research by typing best iPhone games or best free iPhone games into Google or Bing and reading through the reviews. If you are looking for a particular type of game, enter best card games on iPhone, for example.
Back on your iPhone, open the App Store and perform searches on games in general, free games, and then on particular types of games. In what follows I’ll describe two games I think are fun to play and well crafted as examples of the many types available.
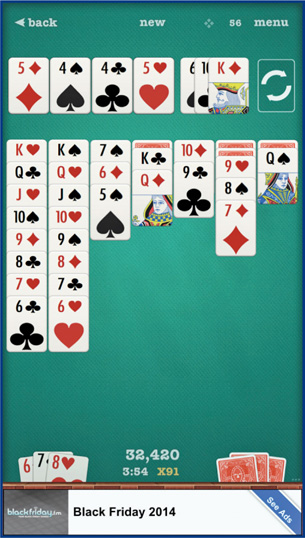
Solitaire
The card game Solitaire has been on the iPhone since the beginning. If you perform an iPhone App Store search on Solitaire, you will see a number of games. One that I like is the free version by Finger Arts. It does have ads, but they appear at the bottom of the screen.
You can choose the look of the cards by tapping that option at the lower left and make other settings by tapping Options on the right. You can also jump right in and begin playing by clicking Play and then choosing a difficulty and the number of cards to draw. At that point, you can tap the card deck on the upper right to begin play.
Mahjong
Mahjong is an ancient Chinese game where you try to use up all the tiles by matching them. You tap first one tile and then a matching tile and the two disappear, allowing you to see and work with other tiles. The 1001 Ultimate Mahjong version of this game is free, but has some in-app purchases you can make. The free version of the game without additions plays well.
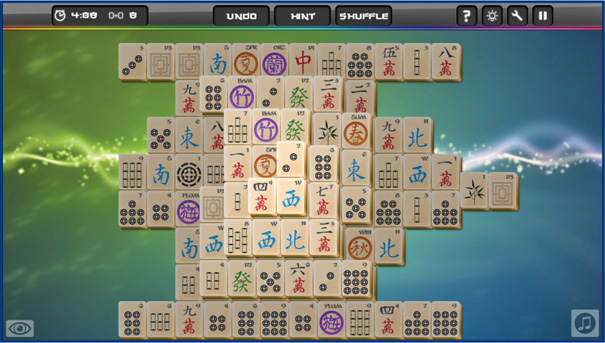
When the game first opens, you are asked to choose from many different initial layouts of the tiles. You also can tap Options and choose from a number of tile sets, backgrounds, and themes, as well as set the volume. Upon choosing a layout, the game is created. Work from the top down and the edges in. It is truly addictive.
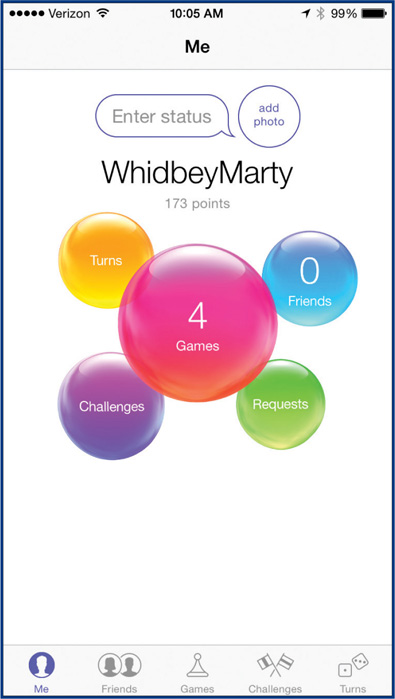
Explore the Game Center
The Game Center is not where you go to play games. You play games by starting them from the Home screen. Game Center is where you keep track of how well you are doing and, most importantly, where you connect with others who play the same games as you and challenge them to play against you. The Game Center helps you connect with other players, keeps track of the accomplishments of you and your opponents, and tells you about other multiplayer games.