The client and server examples in Chapter 2 demonstrate the basic model for programming with sockets in Java. The next step is to apply these concepts in various programming models, such as multitasking, nonblocking I/O, and broadcasting.
Our basic TCP echo server from Chapter 2 handles one client at a time. If a client connects while another is already being serviced, the server will not echo the new client’s data until it has finished with the current client, although the new client will be able to send data as soon as it connects. This type of server is known as an iterative server. Iterative servers handle clients sequentially, finishing with one client before servicing the next. They work best for applications where each client requires a small, bounded amount of server connection time; however, if the time to handle a client can be long, the wait experienced by subsequent clients may be unacceptable.
To demonstrate the problem, add a 10-second sleep using Thread.sleep() after the Socket constructor call in TCPEchoClient.java and experiment with several clients simultaneously accessing the TCP echo server. Here the sleep call simulates an operation that takes significant time, such as slow file or network I/O. Note that a new client must wait for all already-connected clients to complete before it gets service.
What we need is some way for each connection to proceed independently, without interfering with other connections. Java threads provide exactly that: a convenient mechanism allowing servers to handle many clients simultaneously. Using threads, a single application can work on several tasks concurrently, as if multiple copies of the Java Virtual Machine were running. (In reality, a single copy of the JVM is shared or multiplexed among the different threads.) In our echo server, we can give responsibility for each client to an independently executing thread. All of the examples we have seen so far consist of a single thread, which simply executes the main() method.
In this section we describe two approaches to coding concurrent servers, namely, thread-per-client, where a new thread is spawned to handle each client connection, and thread pool, where connections are assigned to a prespawned set of threads. We shall also describe the built-in Java facilities that simplify the use of these strategies for multithreaded servers.
Java provides two approaches for performing a task in a new thread: 1) defining a subclass of the Thread class with a run() method that performs the task, and instantiating it; or 2) defining a class that implements the Runnable interface with a run() method that performs the task, and passing an instance of that class to the Thread constructor. In either case, the new thread does not begin execution until its start() method is invoked. The first approach can only be used for classes that do not already extend some other class; therefore, we stick with the second approach, which is always applicable. The Runnable interface contains a single method prototype:
     interface Runnable {
       void run();
     }
When the start() method of an instance of Thread is invoked, the JVM causes the instance’s run() method to be executed in a new thread, concurrently with all others. Meanwhile, the original thread returns from its call to start() and continues its execution independently. (Note that directly calling run() does not create a new thread; instead, the run() method is simply executed in the caller’s thread, just like any other method call.) The statements of each thread’s run() method are interleaved in a nondeterministic fashion, so in general it is not possible to predict precisely the order in which things will happen in different threads.
In the following example, ThreadExample.java implements the Runnable interface with a run() method that repeatedly prints a greeting to the system output stream.
ThreadExample.java
 0  import java.util.concurrent.TimeUnit;
 1
 2  public class ThreadExample implements Runnable {
 3
 4    private String greeting; // Message to print to console

 5
 6    public ThreadExample(String greeting) {
 7      this.greeting = greeting;
 8    }
 9
10   public void run() {
11     while (true) {
12       System.out.println(Thread.currentThread().getName() + ":   " + greeting);
13       try {
14        // Sleep 0 to 100 milliseconds
15        TimeUnit.MILLISECONDS.sleep(((long) Math.random() * 100));
16       } catch (InterruptedException e) {
17       } // Should not happen
18     }
19   }
20
21   public static void main(String[] args) {
22     new Thread(new ThreadExample("Hello")).start();
23     new Thread(new ThreadExample("Aloha")).start();
24     new Thread(new ThreadExample("Ciao")).start();
25   }
26 }Declaration of implementation of the Runnable interface: line 2
Since
ThreadExampleimplements theRunnableinterface, it can be passed to the constructor ofThread. IfThreadExamplefails to provide arun()method, the compiler will complain.Member variables and constructor: lines 4–8
Each instance of
ThreadExamplecontains its own greeting string.run(): lines 10–19Loop forever performing:
Print the thread name and instance greeting: line 12
The static method
Thread.currentThread()returns a reference to the thread from which it is called, andgetName()returns a string containing the name of that thread.Suspend thread: lines 13–17
After printing its instance’s greeting message, each thread sleeps for a random amount of time (between 0 and 100 milliseconds) by calling the static method
Thread.sleep(), which takes the number of milliseconds to sleep as a parameter.Math.random()returns a randomdoublebetween 0.0 and 1.0.Thread.sleep()can be interrupted by another thread, in which case anInterruptedExceptionis thrown. Our example does not include an interrupt call, so the exception will not happen in this application.
Each of the three statements in
main()does the following: 1) creates a new instance ofThreadExamplewith a different greeting string, 2) passes this new instance to the constructor ofThread, and 3) calls the newThreadinstance’sstart()method. Each thread independently executes therun()method ofThreadExample, while the main thread terminates. Note that the JVM does not terminate until all nondaemon (seeThreadAPI) threads terminate.
Upon execution, an interleaving of the three greeting messages is printed to the console. The exact interleaving of the numbers depends upon various factors that in general are not observable. Threads are perfect for implementing servers like our example, in which each client’s processing is independent of that provided to every other client. However, it is a different story when client processing involves updating information that is shared across threads on the server. In that case, great care must be taken to ensure that different threads are properly synchronized with respect to the shared data; otherwise, the shared information can get into an inconsistent state, and moreover, the problem can be very difficult to trace. A full treatment of techniques and facilities for concurrency would require a book of its own. The book by Goetz et al. [9], for example, is excellent.
Since the multitasking server approaches we are going to describe are independent of the particular client-server protocol, we want to be able to use the same protocol implementation for both. The code for the echo protocol is given in the class EchoProtocol. This class encapsulates the per-client processing in the static method handleEchoClient(). This code is almost identical to the connection-handling portion of TCPEchoServer.java, except that a logging capability (described shortly) has been added; the method takes references to the client Socket and the Logger instance as arguments.
The class implements Runnable (the run() method simply invokes handle EchoClient() with the instance’s Socket and Logger references), so we can create a thread that independently executes run(). Alternatively, the server-side protocol processing can be invoked by calling the static method directly (passing it the Socket and Logger references).
EchoProtocol.java
 0  import java.io.IOException;
 1  import java.io.InputStream;
 2  import java.io.OutputStream;
 3  import java.net.Socket;
 4  import java.util.logging.Level;
 5  import java.util.logging.Logger;
 6
 7  public class EchoProtocol implements Runnable {
 8    private static final int BUFSIZE = 32; // Size (in bytes) of I/O buffer

 9    private Socket clntSock;               // Socket connect to client
10    private Logger logger;                 // Server logger
11
12    public EchoProtocol(Socket clntSock, Logger logger) {
13      this.clntSock = clntSock;
14      this.logger = logger;
15    }
16
17    public static void handleEchoClient(Socket clntSock, Logger logger) {
18      try {
19        // Get the input and output I/O streams from socket
20        InputStream in = clntSock.getInputStream();
21        OutputStream out = clntSock.getOutputStream();
22
23        int recvMsgSize; // Size of received message
24        int totalBytesEchoed = 0; // Bytes received from client
25        byte[] echoBuffer = new byte[BUFSIZE]; // Receive Buffer
26        // Receive until client closes connection, indicated by -1
27        while ((recvMsgSize = in.read(echoBuffer)) != -1) {
28           out.write(echoBuffer, 0, recvMsgSize);
29           totalBytesEchoed += recvMsgSize;
30        }
31
32        logger.info("Client " + clntSock.getRemoteSocketAddress() + ", echoed "
33             + totalBytesEchoed + " bytes.");
34
35      } catch (IOException ex) {
36        logger.log(Level.WARNING, "Exception in echo protocol", ex);
37      } finally {
38        try {
39          clntSock.close();
40        } catch (IOException e) {
41        }
42      }
43    }
44
45    public void run() {
46      handleEchoClient(clntSock, logger);
47    }
48  }
EchoProtocol.java
Declaration of implementation of the Runnable interface: line 7
Member variables and constructor: lines 8–15
Each instance of
EchoProtocolcontains a socket for the connection and a reference to the logger instance.handleEchoClient(): lines 17–43Implement the echo protocol:
Get the input/output streams from the socket: lines 20–21
Receive and echo: lines 25–30
Loop until the connection is closed (as indicated by
read()returning −1), writing whatever is received back immediately.Record the connection details in the log: lines 32–33
Record the
SocketAddressof the remote end along with the number of bytes echoed.Handle exceptions: line 36
Log any exceptions.
Your server is up and running with thousands of clients per minute. Now a user reports a problem. How do you determine what happened? Is the problem at your server? Perhaps the client is violating the protocol. To deal with this scenario, most servers log their activities. This practice is so common that Java now includes built-in logging facilities in the java.util.logging package. We provide a very basic introduction to logging here; however, be aware that there are many more features to enterprise-level logging.
We begin with the Logger class, which represents a logging facility that may be local or remote. Through an instance of this class, we can record the various server activities as shown in EchoProtocol. You may use several loggers in your server, each serving a different purpose and potentially behaving in a different way. For example, you may have separate loggers for operations, security, and error messages. In Java each logger is identified by a globally unique name. To get an instance of Logger, call the static factory method Logger.getLogger() as follows:
Logger logger = Logger.getLogger("practical");This fetches the logger named “practical”. If a logger by that name does not exist, a new logger is created; otherwise, the existing logger instance is returned. No matter how many times you get the “practical” logger in your program, the same instance is returned.
Now that you have logging, what should you log? Well, it depends on what you are doing. If the server is operating normally, you may not want to log every single step the server takes because logging consumes resources such as space for storing log entries and server processor time for writing each entry. On the other hand, if you are trying to debug, you may want to log each and every step. To deal with this, logging typically includes the notion of the level, or severity, of log entries. The Level class encapsulates the notion of the importance of messages. Each instance of Logger has a current level, and each message logged has an associated level; messages with levels below the instance’s current level are discarded (i.e., not logged). Each level has an associated integer value, so that levels are comparable and can be ordered. Seven system-recognized instances of Level are defined; other, user-specific, levels can be created, but there is rarely any need to do so. The built-in levels (defined as static fields of the class Level) are: SEVERE, WARNING, INFO, CONFIG, FINE, FINER, and FINEST.
So when you log, where do the messages go? The logger sends messages to one or more Handlers, which “handle” publishing the messages. By default, a logger has a single ConsoleHandler that prints messages to System.err. You can change the handler or add additional handlers to a logger (e.g., FileHandler). Note that like a logger, a handler has a minimum log level, so for a message to be published its level must be above both the logger and handlers’ threshold. Loggers and handlers are highly configurable, including their minimum level.
An important characteristic of Logger for our purposes is that it is thread-safe —that is, its methods can be called from different threads running concurrently without requiring additional synchronization among the callers. Without this feature, different messages logged by different threads might end up being interleaved in the log!
Example . Logger: Finding/Creating
static Logger getLogger(String name)
static Logger getLogger(String name, String resourceBundleName)
The static factory methods return the named Logger, creating it if necessary.
Once we have the logger, we need to ... well ... log. Logger provides fine-grained logging facilities that differentiate between the level and even context (method call, exception, etc.) of the message.
Example . Logger: Logging a message
void severe(String msg)
void warning(String msg)
void info(String msg)
void config(String msg)
void fine(String msg)
void finer(String msg)
void finest(String msg)

void entering(String sourceClass, String sourceMethod)
void entering(String sourceClass, String sourceMethod, Object param)
void entering(String sourceClass, String sourceMethod, Object[] params)
void exiting(String sourceClass, String sourceMethod)
void exiting(String sourceClass, String sourceMethod, Object result)
void throwing(String sourceClass, String sourceMethod, Throwable thrown)

void log(Level level, String msg)
void log(Level level, String msg, Throwable thrown)
The severe(), warning(), etc. methods log the given message at the level specified by the method name. The entering() and exiting() methods log entering and exiting the given method from the given class. Note that you may optionally specify additional information such as parameters and return values. The throwing() method logs an exception thrown in a specific method. The log() methods provide a generic logging method where level, message, and (optionally) exception can be logged. Note that many other logging methods exist; we are only noting the major types here.
We may want to customize our logger by setting the minimum logging level or the handlers for logging messages.
Example . Logger: Setting/Getting the level and handlers
Handler[] getHandlers()
void addHandler(Handler handler)
void removeHandler(Handler handler)

Level getLevel()
void setLevel(Level newLevel)
boolean isLoggable(Level level)
The getHandlers() method returns an array of all handlers associated with the logger. The addHandler() and removeHandler() methods allow addition/removal of handlers to/from the logger. The getLevel() and setLevel() methods get/set the minimum logging level. The isLoggable() method returns true if the given level will be logged by the logger.
We are now ready to introduce some different approaches to concurrent servers.
In a thread-per-client server, a new thread is created to handle each connection. The server executes a loop that runs forever, listening for connections on a specified port and repeatedly accepting an incoming connection from a client and then spawning a new thread to handle that connection.
TCPEchoServerThread.java implements the thread-per-client architecture. It is very similar to the iterative server, using a single loop to receive and process client requests. The main difference is that it creates a thread to handle the connection instead of handling it directly. (This is possible because EchoProtocol implements the Runnable interface.) Thus, when several clients connect at approximately the same time, later ones do not have to wait for the server to finish with the earlier ones before they get service. Instead, they all appear to receive service (albeit at a somewhat slower rate) at the same time.
TCPEchoServerThread.java
 0  import java.io.IOException;
 1  import java.net.ServerSocket;
 2  import java.net.Socket;
 3  import java.util.logging.Logger;
 4
 5  public class TCPEchoServerThread {
 6
 7    public static void main(String[] args) throws IOException {
 8
 9      if (args.length != 1) { // Test for correct # of args
10       throw new IllegalArgumentException("Parameter(s): <Port>");
11     }
12
13     int echoServPort = Integer.parseInt(args[0]); // Server port
14
15     // Create a server socket to accept client connection requests
16     ServerSocket servSock = new ServerSocket(echoServPort);
17
18     Logger logger = Logger.getLogger("practical");
19
20     // Run forever, accepting and spawning a thread for each connection
21     while (true) {
22       Socket clntSock = servSock.accept(); // Block waiting for connection
23       // Spawn thread to handle new connection
24       Thread thread = new Thread(new EchoProtocol(clntSock, logger));
25       thread.start();
26       logger.info("Created and started Thread " + thread.getName());
27     }
28     /* NOT REACHED */
29   }
30  }
TCPEchoServerThread.java
Parameter parsing and server socket/logger creation: lines 9–18
Loop forever, handling incoming connections: lines 21–27
Accept an incoming connection: line 22
Create a new instance of
Threadto handle the new connection: line 24Since
EchoProtocolimplements theRunnableinterface, we can give our new instance to theThreadconstructor, and the new thread will execute therun()method ofEchoProtocol(which callshandleEchoClient()) whenstart()is invoked.Start the new thread for the connection and log it: lines 25–26
The
getName()method ofThreadreturns aStringcontaining a name for the new thread.
Every new thread consumes system resources: spawning a thread takes CPU cycles and each thread has its own data structures (e.g., stacks) that consume system memory. In addition, when one thread blocks, the JVM saves its state, selects another thread to run, and restores the state of the chosen thread in what is called a context switch. As the number of threads increases, more and more system resources are consumed by thread overhead. Eventually, the system is spending more time dealing with context switching and thread management than with servicing connections. At that point, adding an additional thread may actually increase client service time.
We can avoid this problem by limiting the total number of threads and reusing threads. Instead of spawning a new thread for each connection, the server creates a thread pool on start-up by spawning a fixed number of threads. When a new client connection arrives at the server, it is assigned to a thread from the pool. When the thread finishes with the client, it returns to the pool, ready to handle another request. Connection requests that arrive when all threads in the pool are busy are queued to be serviced by the next available thread.
Like the thread-per-client server, a thread-pool server begins by creating a ServerSocket. Then it spawns N threads, each of which loops forever, accepting connections from the (shared) ServerSocket instance. When multiple threads simultaneously call accept() on the same Server-Socket instance, they all block until a connection is established. Then the system selects one thread, and the Socket instance for the new connection is returned only in that thread. The other threads remain blocked until the next connection is established and another lucky winner is chosen.
Since each thread in the pool loops forever, processing connections one by one, a thread-pool server is really like a set of iterative servers. Unlike the thread-per-client server, a thread-pool thread does not terminate when it finishes with a client. Instead, it starts over again, blocking on accept(). An example of the thread-pool paradigm is shown in TCPEchoServerPool.java.
TCPEchoServerPool.java
 0  import java.io.IOException;
 1  import java.net.ServerSocket;
 2  import java.net.Socket;
 3  import java.util.logging.Level;
 4  import java.util.logging.Logger;
 5

 6  public class TCPEchoServerPool {
 7
 8    public static void main(String[] args) throws IOException {
 9
10      if (args.length != 2) { // Test for correct # of args
11        throw new IllegalArgumentException("Parameter(s): <Port> <Threads>");
12      }
13
14      int echoServPort = Integer.parseInt(args[0]); // Server port
15      int threadPoolSize = Integer.parseInt(args[1]);
16
17      // Create a server socket to accept client connection requests
18      final ServerSocket servSock = new ServerSocket(echoServPort);
19
20      final Logger logger = Logger.getLogger("practical");
21
22      // Spawn a fixed number of threads to service clients
23      for (int i = 0; i <  threadPoolSize; i++) {
24        Thread thread = new Thread() {
25          public void run() {
26            while (true) {
27              try {
28                Socket clntSock = servSock.accept(); // Wait for a connection
29                EchoProtocol.handleEchoClient(clntSock, logger); // Handle it
30              } catch (IOException ex) {
31                logger.log(Level.WARNING, "Client accept failed", ex);
32              }
33            }
34          }
35        };
36        thread.start();
37        logger.info("Created and started Thread = " +  thread.getName());
38      }
39    }
40 }Setup: lines 10–20
The port number to listen on and the number of threads are both passed as arguments to
main(). After parsing them we create theServerSocketandLoggerinstances. Note that both have to be declaredfinal, because they are referenced inside the anonymous class instance created below.Create and start threadPoolSize new threads: lines 23–38
For each loop iteration, an instance of an anonymous class that extends
Threadis created. When thestart()method of this instance is called, the thread executes therun()method of this anonymous class. Therun()method loops forever, accepting a connection and then giving it toEchoProtocolfor service.Accept an incoming connection: line 28
Since there are N different threads executing the same loop, up to N threads can be blocked on servSock’s
accept(), waiting for an incoming connection. The system ensures that only one thread gets aSocketfor any particular connection. If no threads are blocked onaccept()when a client connection is established (that is, if they are all busy servicing other connections), the new connection is queued by the system until the next call toaccept()(see Section 6.4.1).Pass the client socket to
EchoProtocol.handleEchoClient: line 29The
handleEchoClient()method encapsulates knowledge of the protocol details. It logs the connection when it finishes, as well as any exceptions encountered along the way.Handle exception from
accept(): line 31
Since threads are reused, the thread-pool solution only pays the overhead of thread creation N times, irrespective of the total number of client connections. Since we control the maximum number of simultaneously executing threads, we can control scheduling and resource overhead. Of course, if we spawn too few threads, we can still have clients waiting a long time for service; therefore, the size of the thread pool needs to be tuned to the load, so that client connection time is minimized. The ideal would be a dispatching facility that expands the thread pool (up to a limit) when the load increases, and shrinks it to minimize overhead during times when the load is light. It turns out that Java has just such a facility; we describe it in the next section.
In the previous subsections, we have seen that encapsulating the details of the client-server protocol (as in EchoProtocol.java) lets us use different “dispatching” methods with the same protocol implementation (e.g., TCPEchoServerThread.java and TCPEchoServerThreadPool.java). In fact the same thing is true for the dispatching methods themselves. The interface Executor (part of the java.util.concurrent package) represents an object that executes Runnable instances according to some strategy, which may include details about queueing and scheduling, or how jobs are selected for execution. The Executor interface specifies a single method:
    interface Executor {
      void execute(Runnable task);
    }
Java provides a number of built-in implementations of Executor that are convenient and simple to use, and others that are extensively configurable. Some of these offer handling for messy details like thread maintenance. For example, if a thread stops because of an uncaught exception or other failure, they automatically spawn a new thread to replace it.
The ExecutorService interface extends Executor to provide a more sophisticated facility that allows a service to be shut down, either gracefully or abruptly. ExecutorService also allows for tasks to return a result, through the Callable interface, which is like Runnable, only with a return value.
Instances of ExecutorService can be obtained by calling various static factory methods of the convenience class Executors. The program TCPEchoServerExecutor.java illustrates the use of the basic Executor facilities.
TCPEchoServerExecutor.java
 0  import java.io.IOException;
 1  import java.net.ServerSocket;
 2  import java.net.Socket;
 3  import java.util.concurrent.Executor;
 4  import java.util.concurrent.Executors;
 5  import java.util.logging.Logger;
 6
 7  public class TCPEchoServerExecutor {
 8
 9    public static void main(String[] args) throws IOException {
10
11      if (args.length != 1) { // Test for correct # of args
12        throw new IllegalArgumentException("Parameter(s): <Port>");
13      }
14
15      int echoServPort = Integer.parseInt(args[0]); // Server port
16
17      // Create a server socket to accept client connection requests
18      ServerSocket servSock = new ServerSocket(echoServPort);
19
20      Logger logger = Logger.getLogger("practical");
21
22      Executor service = Executors.newCachedThreadPool();  // Dispatch svc
23
24      // Run forever, accepting and spawning a thread for each connection
25      while (true) {
26        Socket clntSock = servSock.accept(); // Block waiting for connection
27        service.execute(new EchoProtocol(clntSock, logger));
28      }
29      /* NOT REACHED */
30    }
31  }
TCPEchoServerExecutor.java
The port is the only argument. We create the
ServerSocketandLoggerinstances as before; they need not be declaredfinalhere, because we do not need an anonymousThreadsubclass.Get an
Executor: line 22The static factory method
newCachedThreadPool()of classExecutorscreates an instance ofExecutorService. When itsexecute()method is invoked with aRunnableinstance, the executor service creates a new thread to handle the task if necessary. However, it first tries to reuse an existing thread. When a thread has been idle for at least 60 seconds, it is removed from the pool. This is almost always going to be more efficient than either of the last twoTCPEchoServer*examples.Loop forever, accepting connections and executing them: lines 25–28
When a new connection arrives, a new
EchoProtocolinstance is created and passed to theexecute()method of service, which either hands it off to an already-existing thread or creates a new thread to handle it. Note that in the steady state, the cached thread poolExecutorservice ends up having about the right number of threads, so that each thread stays busy and creation/destruction of threads is rare.
Once we have a server designed to use Executor for dispatching clients, we can change dispatching strategies simply by changing the kind of Executor we instantiate. For example, if we wanted to use a fixed-size thread pool as in our TCPEchoServerPool.java example, it is a matter of changing one line associated with setting the dispatch service:
Executor service = Executors.newFixedThreadPool(threadPoolSize);
We could switch to a single thread to execute all connections either by specifying a pool size of 1, or by the following call:
Executor service = Executors.newSingleThreadExecutor();
In the Executor approach, if the single “worker” thread dies because of some failure, the Executor will replace it with a new thread. Also, tasks are queued inside the Executor, instead of being queued inside the networking system, as they were in our original server. Note that we’ve only scratched the surface of Java’s concurrency package.
Socket I/O calls may block for several reasons. Data input methods read() and receive() block if data is not available. A write() on a TCP socket may block if there is not sufficient space to buffer the transmitted data. The accept() method of ServerSocket() and the Socket constructor both block until a connection has been established (see Section 6.4). Meanwhile, long round-trip times, high error rate connections, and slow (or deceased) servers may cause connection establishment to take a long time. In all of these cases, the method returns only after the request has been satisfied. Of course, a blocked method call halts progress of the application (and makes the thread that is running it useless).
What about a program that has other tasks to perform while waiting for call completion (e.g., updating the “busy” cursor or responding to user requests)? These programs may have no time to wait on a blocked method call. What about lost UDP datagrams? If we block waiting to receive a datagram and it is lost, we could block indefinitely. Here we explore the various blocking methods and approaches for limiting blocking behavior. In Chapter 5 we’ll encounter the more powerful nonblocking facilities available through the NIO package.
For these methods, we can set a bound on the maximum time (in milliseconds) to block, using the setSoTimeout() method of Socket, ServerSocket, and DatagramSocket. If the specified time elapses before the method returns, an InterruptedIOException is thrown. For Socket instances, we can also use the available() method of the socket’s InputStream to check for available data before calling read().
The Socket constructor attempts to establish a connection to the host and port supplied as arguments, blocking until either the connection is established or a system-imposed timeout occurs. Unfortunately, the system-imposed timeout is long, and Java does not provide any means of shortening it. To fix this, call the parameterless constructor for Socket, which returns an unconnected instance. To establish a connection, call the connect() method on the newly constructed socket and specify both a remote endpoint and timeout (milliseconds).
A write() call blocks until the last byte written is copied into the TCP implementation’s local buffer; if the available buffer space is smaller than the size of the write, some data must be successfully transferred to the other end of the connection before the call to write() will return (see Section 6.1 for details). Thus, the amount of time that a write() may block is ultimately controlled by the receiving application. Unfortunately, Java currently does not provide any way to cause a write() to time out, nor can it be interrupted by another thread. Therefore, any protocol that sends a large enough amount of data over a Socket instance can block for an unbounded amount of time. (See Section 6.2 for a discussion of the potentially disastrous consequences of this.)
Suppose we want to implement the Echo protocol with a limit on the amount of time taken to service each client. That is, we define a target, TIMELIMIT, and implement the protocol in such a way that after TIMELIMIT milliseconds, the protocol instance is terminated. The protocol instance keeps track of the amount of time remaining, and uses setSoTimeout() to ensure that no read() call blocks for longer than that time. Since there is no way to bound the duration of a write() call, we cannot really guarantee that the time limit will hold. Nevertheless, Time-limitEchoProtocol.java implements this approach; to use it with TCPEchoServerExecutor.java, simply change the second line of the body of the while loop to:
service.execute(new TimeLimitEchoProtocol(clntSock, logger));
Again, Chapter 5 will cover more powerful mechanisms that can limit the time that threads can block—on all I/O calls, including writes—using the facilities of the NIO package.
TimeLimitEchoProtocol.java
 0  import java.io.IOException;
 1  import java.io.InputStream;
 2  import java.io.OutputStream;
 3  import java.net.Socket;
 4  import java.util.logging.Level;
 5  import java.util.logging.Logger;
 6
 7  class TimelimitEchoProtocol implements Runnable {
 8    private static final int BUFSIZE = 32;  // Size (bytes) of buffer
 9    private static final String TIMELIMIT = "10000";   // Default limit (ms)
10    private static final String TIMELIMITPROP = "Timelimit";   // Property
11
12    private static int timelimit;
13    private Socket clntSock;
14    private Logger logger;
15
16    public TimelimitEchoProtocol(Socket clntSock, Logger logger) {
17      this.clntSock = clntSock;
18      this.logger = logger;
19      // Get the time limit from the System properties or take the default
20      timelimit = Integer.parseInt(System.getProperty(TIMELIMITPROP,TIMELIMIT));
21    }
22
23    public static void handleEchoClient(Socket clntSock, Logger logger) {
24
25      try {
26        // Get the input and output I/O streams from socket
27        InputStream in = clntSock.getInputStream();
28        OutputStream out = clntSock.getOutputStream();
29        int recvMsgSize;                        // Size of received message
30        int totalBytesEchoed = 0;               // Bytes received from client
31        byte[] echoBuffer = new byte[BUFSIZE];  // Receive buffer
32        long endTime = System.currentTimeMillis() + timelimit;
33        int timeBoundMillis = timelimit;

34
35         clntSock.setSoTimeout(timeBoundMillis);
36         // Receive until client closes connection, indicated by -1
37         while ((timeBoundMillis > 0) &&      // catch zero values
38                ((recvMsgSize = in.read(echoBuffer)) != -1)) {
39           out.write(echoBuffer, 0, recvMsgSize);
40           totalBytesEchoed += recvMsgSize;
41           timeBoundMillis = (int) (endTime - System.currentTimeMillis()) ;
42           clntSock.setSoTimeout(timeBoundMillis);
43         }
44         logger.info("Client " + clntSock.getRemoteSocketAddress() +
45                     ", echoed " + totalBytesEchoed + " bytes.");
46       } catch (IOException ex) {
47         logger.log(Level.WARNING, "Exception in echo protocol", ex);
48       }
49     }
50
51     public void run() {
52       handleEchoClient(this.clntSock, this.logger);
53     }
54 }The TimelimitEchoProtocol class is similar to the EchoProtocol class, except that it attempts to bound the total time an echo connection can exist to 10 seconds. At the time the handleEchoClient() method is invoked, a deadline is computed using the current time and the time bound. After each read(), the time between the current time and the deadline is computed, and the socket timeout is set to the remaining time.
So far all of our sockets have dealt with communication between exactly two entities, usually a server and a client. Such one-to-one communication is sometimes called unicast. Some information is of interest to multiple recipients. In such cases, we could unicast a copy of the data to each recipient, but this may be very inefficient. Unicasting multiple copies over a single network connection wastes bandwidth by sending the same information multiple times. In fact, if we want to send data at a fixed rate, the bandwidth of our network connection defines a hard limit on the number of receivers we can support. For example, if our video server sends 1Mbps streams and its network connection is only 3Mbps (a healthy connection rate), we can only support three simultaneous users.
Fortunately, networks provide a way to use bandwidth more efficiently. Instead of making the sender responsible for duplicating packets, we can give this job to the network. In our video server example, we send a single copy of the stream across the server’s connection to the network, which then duplicates the data only when appropriate. With this model of duplication, the server uses only 1Mbps across its connection to the network, irrespective of the number of clients.
There are two types of one-to-many service: broadcast and multicast. With broadcast, all hosts on the (local) network receive a copy of the message. With multicast, the message is sent to a multicast address, and the network delivers it only to those hosts that have indicated that they want to receive messages sent to that address. In general, only UDP sockets are allowed to broadcast or multicast.
Broadcasting UDP datagrams is similar to unicasting datagrams, except that a broadcast address is used instead of a regular (unicast) IP address. Note that IPv6 does not explicitly provide broadcast addresses; however, there is a special all-nodes, link-local-scope multicast address, FFO2::1, that multicasts to all nodes on a link. The IPv4 local broadcast address (255.255.255.255) sends the message to every host on the same broadcast network. Local broadcast messages are never forwarded by routers. A host on an Ethernet network can send a message to all other hosts on that same Ethernet, but the message will not be forwarded by a router. IPv4 also specifies directed broadcast addresses, which allow broadcasts to all hosts on a specified network; however, since most Internet routers do not forward directed broadcasts, we do not deal with them here.
There is no networkwide broadcast address that can be used to send a message to all hosts. To see why, consider the impact of a broadcast to every host on the Internet. Sending a single datagram would result in a very, very large number of packet duplications by the routers, and bandwidth would be consumed on each and every network. The consequences of misuse (malicious or accidental) are too great, so the designers of IP left such an Internetwide broadcast facility out on purpose.
Even so, local broadcast can be very useful. Often, it is used in state exchange for network games where the players are all on the same local (broadcast) network. In Java, the code for unicasting and broadcasting is the same. To play with broadcasting applications, we can simply use our VoteClientUDP.java with a broadcast destination address. There is one problem. Can you find it? Hint: You cannot use connect with broadcast. Run VoteServerUDP.java as you did before (except that you can run several receivers at one time). Caveat: Some operating systems do not give regular users permission to broadcast, in which case this will not work.
As with broadcast, one of the main differences between multicast and unicast is the form of the address. A multicast address identifies a set of receivers. The designers of IP allocated a range of the address space dedicated to multicast, specifically 224.0.0.0 to 239.255.255.255 for IPv4 and any address starting with FF for IPv6. With the exception of a few reserved multicast addresses, a sender can send datagrams addressed to any address in this range. In Java, multicast applications generally communicate using an instance of MulticastSocket, a subclass of DatagramSocket. It is important to understand that a MulticastSocket is actually a UDP socket (DatagramSocket), with some extra multicast-specific attributes that can be controlled. Our next examples implement a multicast sender and receiver of vote messages.
VoteMulticastSender.java
 0  import java.io.IOException;
 1  import java.net.DatagramPacket;
 2  import java.net.InetAddress;
 3  import java.net.MulticastSocket;
 4
 5  public class VoteMulticastSender {
 6
 7    public static final int CANDIDATEID = 475;
 8
 9    public static void main(String args[]) throws IOException {
10
11      if ((args.length < 2) || (args.length > 3)) { // Test # of args
12        throw new IllegalArgumentException("Parameter(s): <Multicast Addr> <Port> [<TTL>]");
13      }
14
15      InetAddress destAddr = InetAddress.getByName(args[0]); // Destination
16      if (!destAddr.isMulticastAddress()) { // Test if multicast address
17        throw new IllegalArgumentException("Not a multicast address");
18      }
19
20      int destPort = Integer.parseInt(args[1]); // Destination port
21      int TTL = (args.length == 3) ? Integer.parseInt(args[2]) : 1; // Set TTL
22
23      MulticastSocket sock = new MulticastSocket();
24      sock.setTimeToLive(TTL); // Set TTL for all datagrams
25
26      VoteMsgCoder coder = new VoteMsgTextCoder();
27
28      VoteMsg vote = new VoteMsg(true, true, CANDIDATEID, 1000001L);
29
30      // Create and send a datagram
31      byte[] msg = coder.toWire(vote);
32      DatagramPacket message = new DatagramPacket(msg, msg.length, destAddr, destPort);
33      System.out.println("Sending Text-Encoded Request (" + msg.length + " bytes): ");

34      System.out.println(vote);
35      sock.send(message);
36
37      sock.close();
38    }
39 }The only significant differences between our unicast and multicast senders are that 1) we verify that the given address is multicast, and 2) we set the initial Time To Live (TTL) value for the multicast datagram. Every IP datagram contains a TTL, initialized to some default value and decremented (usually by one) by each router that forwards the packet. When the TTL reaches zero, the packet is discarded. By setting the initial value of the TTL, we limit the distance a packet can travel from the sender.[1]
Unlike broadcast, network multicast duplicates the message only to a specific set of receivers. This set of receivers, called a multicast group, is identified by a shared multicast (or group) address. Receivers need some mechanism to notify the network of their interest in receiving data sent to a particular multicast address, so that the network can forward packets to them. This notification, called joining a group, is accomplished with the joinGroup() method of MulticastSocket. Our multicast receiver joins a specified group, receives and prints a single multicast message from that group, and exits.
VoteMulticastReceiver.java
 0  import java.io.IOException;
 1  import java.net.DatagramPacket;
 2  import java.net.InetAddress;
 3  import java.net.MulticastSocket;
 4  import java.util.Arrays;
 5
 6  public class VoteMulticastReceiver {
 7
 8    public static void main(String[] args) throws IOException {
 9
10     if (args.length != 2) { // Test for correct # of args
11       throw new IllegalArgumentException("Parameter(s): <Multicast Addr> <Port>");
12     }
13
14     InetAddress address = InetAddress.getByName(args[0]); // Multicast address

15     if (!address.isMulticastAddress()) { // Test if multicast address
16       throw new IllegalArgumentException("Not a multicast address");
17     }
18
19     int port = Integer.parseInt(args[1]); // Multicast port
20     MulticastSocket sock = new MulticastSocket(port); // for receiving
21     sock.joinGroup(address); // Join the multicast group
22
23     VoteMsgTextCoder coder = new VoteMsgTextCoder();
24
25     // Receive a datagram
26     DatagramPacket packet = new DatagramPacket(new byte[VoteMsgTextCoder.MAX_WIRE_LENGTH],
27         VoteMsgTextCoder.MAX_WIRE_LENGTH);
28     sock.receive(packet);
29
30     VoteMsg vote = coder.fromWire(Arrays.copyOfRange(packet.getData(), 0, packet
31        .getLength()));
32
33     System.out.println("Received Text-Encoded Request (" + packet.getLength()
34         + " bytes): ");
35     System.out.println(vote);
36
37     sock.close();
38    }
39 }The only significant difference between our multicast and unicast receiver is that the multicast receiver must join the multicast group by supplying the desired multicast address. The book’s Web site also contains another example of a sender and receiver multicast pair. MulticastImageSender.java transmits a set of images (JPEG or GIF) specified on the command line, in three-second intervals. MulticastImageReceiver.java receives each image and displays it in a window.
Multicast datagrams can, in fact, be sent from a DatagramSocket by simply using a multicast address. However, a MulticastSocket has a few capabilities that a DatagramSocket does not, including 1) allowing specification of the datagram TTL, and 2) allowing the interface through which datagrams are sent to the group to be specified/changed (an interface is identified by its Internet address). A multicast receiver, on the other hand, must use a MulticastSocket because it needs the ability to join a group.
MulticastSocket is a subclass of DatagramSocket, so it provides all of the DatagramSocket methods. We only present methods specific to or adapted for MulticastSocket.
Example . MulticastSocket: Creation
MulticastSocket()
MulticastSocket(int localPort)
MulticastSocket(SocketAddress bindaddr)
These constructors create a multicast-capable UDP socket. If the local port is not specified, or is specified as 0, the socket is bound to any available local port. If the address is specified, the socket is restricted to receiving only on that address.
If we wish to receive any datagrams, we need to join a multicast group.
Example . MulticastSocket: Group management
void joinGroup(InetAddress groupAddress)
void joinGroup(SocketAddress mcastaddr, NetworkInterface netIf)
void leaveGroup(InetAddress groupAddress)
void leaveGroup(SocketAddress mcastaddr,  NetworkInterface netIf)
The joinGroup() and leaveGroup() methods manage multicast group membership. A socket may be a member of multiple groups simultaneously. Joining a group of which this socket is already a member or leaving a group of which this socket is not a member may generate an exception. Optionally, you may specify an interface on which to join/ leave.
Example . MulticastSocket: Setting/Getting multicast options
int getTimeToLive()
void setTimeToLive(int ttl)
boolean getLoopbackMode()
void setLoopbackMode(boolean disable)
InetAddress getInterface()
NetworkInterface getNetworkInterface()
void setInterface(InetAddress inf)
void setNetworkInterface(NetworkInterface netIf)
The getTimeToLive() and setTimeToLive() methods get and set the time-to-live for all datagrams sent on this socket. A socket with loopback mode enabled will receive the datagrams it sends. The getLoopbackMode() and setLoopbackMode() methods set the loopback mode for the multicast socket where setting the loopback mode to TRUE disables loopback. The getInterface(), setInterface(), getNetworkInterface(), setNetworkInterface() methods set the outgoing interface used in sending multicast packets. This is primarily used on hosts with multiple interfaces. The default multicast interface is platform dependent.
The decision to use broadcast or multicast depends on several factors, including the network location of receivers and the knowledge of the communicating parties. The scope of a broadcast on the Internet is restricted to a local broadcast network, placing severe restrictions on the location of the broadcast receivers. Multicast communication may include receivers anywhere in the network,[2] so multicast has the advantage that it can cover a distributed set of receivers. The disadvantage of IP multicast is that receivers must know the address of a multicast group to join. Knowledge of an address is not required to receive broadcast. In some contexts, this makes broadcast a better mechanism than multicast for discovery. All hosts can receive broadcast by default, so it is simple to ask all hosts on a single network a question like “Where’s the printer?”
UDP unicast, multicast, and broadcast are all implemented using an underlying UDP socket. The semantics of most implementations are such that a UDP datagram will be delivered to all sockets bound to the destination port of the packet. That is, a DatagramSocket or Multi-castSocket instance bound to a local port X (with local address not specified, i.e., a wild card), on a host with address Y will receive any UDP datagram destined for port X that is 1) unicast with destination address Y, 2) multicast to a group that any application on Y has joined, or 3) broadcast where it can reach host Y. A receiver can use connect() to limit the datagram source address and port. Also, a DatagramSocket can specify the local unicast address, which prevents delivery of multicast and broadcast packets. See UDPEchoClientTimeout.java for an example of destination address verification and Section 6.5 for details on datagram demultiplexing.
The TCP/IP protocol developers spent a good deal of time thinking about the default behaviors that would satisfy most applications. (If you doubt this, read RFCs 1122 and 1123, which describe in excruciating detail the recommended behaviors—based on years of experience— for implementations of the TCP/IP protocols.) For most applications, the designers did a good job; however, it is seldom the case that “one size fits all” really fits all. We have already seen an example in our UDP echo client. By default, the receive() method of DatagramSocket blocks indefinitely waiting on a datagram. In our example, we change that behavior by specifying a timeout for the receive on the UDP socket and in the TimeLimitEchoProtocol, using setSoTimeout().
If no data has been exchanged for a while, each endpoint may be wondering if the other is still around. TCP provides a keep-alive mechanism where, after a certain time of inactivity, a probe message is sent to the other endpoint. If the endpoint is alive and well, it sends an acknowledgment. After a few retries without acknowledgment, the probe sender gives up and closes the socket, eliciting an exception on the next attempted I/O operation. Note that the application only sees keep-alive working if the probes fail.
When a Socket or DatagramSocket is created, the operating system must allocate buffers to hold incoming and outgoing data. (We talk about this in much greater detail in Section 6.1.)
Example . Socket, DatagramSocket: Setting/Getting Send/Receive Buffer Size
int getReceiveBufferSize()
void setReceiveBufferSize(int size)
int getSendBufferSize()
void setSendBufferSize(int size)
The getReceiveBufferSize(), setReceiveBufferSize(), getSendBufferSize(), and setSendBufferSize() methods get and set the size (bytes) of the receive and send buffers. Note that these sizes are taken as suggestions so the actual size may not be what you specified.
You can also specify the receive buffer size on a ServerSocket; however, this actually sets the receive buffer size for new Socket instances created by accept(). Why can you only set the receive buffer size and not the send buffer? When you accept a new Socket, it can immediately begin receiving data so you need the receive buffer size set before accept() completes the connection. On the other hand, you control when you send on a newly accepted socket, which gives you time to set the send buffer size before sending.
As we’ve already seen, many I/O operations will block if they cannot complete immediately: reads block until at least 1 byte is available and accept blocks until a connection is initiated. Unfortunately, the blocking time is not bounded. We can specify a maximum blocking time for the various operations.
Example . Socket, ServerSocket, DatagramSocket: Setting/Getting I/O Timeouts
int getSoTimeout()
void setSoTimeout(int timeout)
The getSoTimeout() and setSoTimeout() methods get and set the maximum time (milliseconds) to allow read/receive and accept operations to block. A timeout of 0 means the operation never times out. If the timeout expires, an exception is thrown.
Under some circumstances, you may want to allow multiple sockets to bind to the same socket address. In the case of UDP multicast, you may have multiple applications on the same host participating in the same multicast group. For TCP, when a connection is closed, one (or both) endpoints must hang around for a while in “Time-Wait” state to vacuum up stray packets (see Section 6.4.2). Unfortunately, you may not be able to wait for the Time-Wait to expire. In both cases, you need the ability to bind to an address that’s in use. To enable this, you must allow address reuse.
TCP attempts to help you avoid sending small packets, which waste network resources. It does this by buffering data until it has more to send. While this is good for the network, your application may not be so tolerant of this buffering delay. Fortunately, you can disable this behavior.
Suppose you’ve sent a bunch of data to a slow receiver and suddenly you have some data that the receiver needs right now. If you send the data in the output stream, it gets queued up behind all of the regular data, and who knows when the receiver will see it? To deal with this TCP includes the concept of urgent data that can (theoretically) skip ahead. Such data is called out-of-band because it bypasses the normal stream.
Example . Socket: Urgent Data
void sendUrgentData(int data
boolean getOOBInline()
void setOOBInline(boolean on)
To send urgent data, call the sendUrgentData() method, which sends the least significant byte of the int parameter. To receive this byte, the receiver must enable out-of-band data by passing TRUE to setOOBInline(). The byte is received in the input stream of the receiver. Data sent before the urgent byte will precede the urgent byte in the receiver’s input stream. If reception of out-of-band data is not enabled, the urgent byte is silently discarded.
Note that Java can get little use from urgent data because urgent bytes are mixed in with regular bytes in the order of transmission. In fact, a Java receiver cannot even tell that it’s receiving urgent data.
When you call close() on a socket, it immediately returns even if the socket is buffering unsent data. The problem is that your host could then fail at a later time without sending all of the data. You may optionally ask close() to “linger,” or block, by blocking until all of the data is sent and acked or a timeout expires. See Section 6.4.2 for more details.
Example . Socket: Linger on close()
int getSoLinger()
void setSoLinger(boolean on, int linger)
If you call setSoLinger() with on set to TRUE, then a subsequent close() will block until all data is acknowledged by the remote endpoint or the specified timeout (seconds) expires. If the timeout expires, the TCP connection is forceably closed. The getSoLinger() method returns the timeout if linger is enabled and −1 otherwise.
Some operating systems require that you explicitly request permission to broadcast. You can control broadcast permissions. As you already know, DatagramSockets provide broadcast service.
Some networks offer enhanced or “premium” services to packets classified as being eligible for the service. The traffic class of a packet is indicated by a value carried in the packet as it is transmitted through the network. For example, some networks might give packets in the “gold service” class higher priority, to provide reduced delay and/or reduced loss probability. Others might use the indicated traffic class to choose a route for the packet. Beware, however, that network providers charge extra for such services, so there is no guarantee these options will actually have any effect.
TCP may not be the only protocol available to a socket. Which protocol to use depends on what’s important to your application. Java allows you to give “advice” to the implementation regarding the importance of different performance characteristics to your application. The underlying network system may use the advice to choose among different protocols that can provide equivalent stream services with different performance characteristics.
Example . Socket, ServerSocket: Specifying Protocol Preferences
void setPerformancePreferences(int connectionTime, int latency, int bandwidth)
The performance preference for the socket is expressed by three integers representing connection time, delay, and bandwith. The specific values are not important; instead, Java compares the relative values for each criterion and returns the closest-matching, available protocol. For example, if connectionTime and latency both equal 0 and bandwidth equals 1, the protocol maximizing bandwidth will be selected. Note that this method must be called before the socket is connected to be effective.
You’ve probably never given much thought to who closes a connection. In phone conversations, either side can start the process of terminating the call. It typically goes something like this:
"Well, I guess I'd better go."
"Ok. Bye."
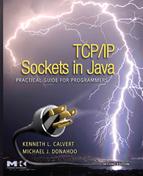
"Bye."Network protocols, on the other hand, are typically very specific about who “closes” first. In the echo protocol, Figure 4.1(a), the server dutifully echoes everything the client sends. When the client is finished, it calls close(). After the server has received and echoed all of the data sent before the client’s call to close(), its read operation returns a −1, indicating that the client is finished. The server then calls close() on its socket. The close is a critical part of the protocol because without it the server doesn’t know when the client is finished sending characters to echo. In HTTP, Figure 4.1(b), it’s the server that initiates the connection close. Here, the client sends a request (“GET”) to the server, and the server responds by sending a header (normally starting with “200 OK”), followed by the requested file. Since the client does not know the size of the file, the server must indicate the end-of-file by closing the socket.
Calling close() on a Socket terminates both directions (input and output) of data flow. (Section 6.4.2 provides a more detailed description of TCP connection termination.) Once an endpoint (client or server) closes the socket, it can no longer send or receive data. This means that close() can only be used to signal the other end when the caller is completely finished communicating. In the echo protocol, once the server receives the close from the client, it immediately closes. In effect, the client close indicates that the communication is completed. HTTP works the same way, except that the server is the terminator.
Let’s consider a different protocol. Suppose you want a compression server that takes a stream of bytes, compresses them, and sends the compressed stream back to the client. Which endpoint should close the connection? Since the stream of bytes from the client is arbitrarily long, the client needs to close the connection so that the server knows when the stream of bytes to be compressed ends. When should the client call close()? If the client calls close() on the socket immediately after it sends the last byte of data, it will not be able to receive the last bytes of compressed data. Perhaps the client could wait until it receives all of the compressed data before it closes, as the echo protocol does. Unfortunately, neither the server nor the client knows how many bytes to expect, so this will not work either. What is needed is a way to tell the other end of the connection “I am through sending,” without losing the ability to receive.
Fortunately, sockets provide a way to do this. The shutdownInput() and shutdownOutput() methods of Socket allow the I/O streams to be closed independently. After shutdownInput(), the socket’s input stream can no longer be used. Any undelivered data is silently discarded, and any attempt to read from the socket’s input stream will return −1. After shutdownOutput() is called on a Socket, no more data may be sent on the socket’s output stream. Attempts to write to the stream throw an IOException. Any data written before the call to shutdownOutput() may be read by the remote socket. After that, a read on the input stream of the remote socket will return −1. An application calling shutdownOutput can continue to read from the socket and, similarly, data can be written after calling shutdownInput.
In the compression protocol (see Figure 4.2), the client writes the bytes to be compressed, closing the output stream using shutdownOutput when finished sending, and reads the compressed byte stream from the server. The server repeatedly reads the uncompressed data and writes the compressed data until the client performs a shutdown, causing the server read to return −1, indicating an end-of-stream. The server then closes the connection and exits.

After the client calls shutdownOutput, it needs to read any remaining compressed bytes from the server.
Our compression client, CompressClient.java, implements the client side of the compression protocol. The uncompressed bytes are read from the file specified on the command line, and the compressed bytes are written to a new file. If the uncompressed filename is “data”, the compressed filename is “data.gz”. Note that this implementation works for small files, but that there is a flaw that causes deadlock for large files. (We discuss and correct this shortcoming in Section 6.2.)
CompressClient.java
  0  import java.net.Socket;
 1  import java.io.IOException;
 2  import java.io.InputStream;
 3  import java.io.OutputStream;
 4  import java.io.FileInputStream;
 5  import java.io.FileOutputStream;
 6
 7  /* WARNING: this code can deadlock if a large file (more than a few
 8   * 10's of thousands of bytes) is sent.
 9   */
10
11   public class CompressClient {
12
13     public static final int BUFSIZE = 256;   // Size of read buffer
14
15     public static void main(String[] args) throws IOException {
16
17       if (args.length != 3) { // Test for correct # of args
18         throw new IllegalArgumentException("Parameter(s): <Server> <Port> <File>");
19       }
20
21       String server = args[0];              // Server name or IP address
22       int port = Integer.parseInt(args[1]); // Server port
23       String filename = args[2];            // File to read data from
24
25       // Open input and output file (named input.gz)
26       FileInputStream fileIn = new FileInputStream(filename);
27       FileOutputStream fileOut = new FileOutputStream(filename + ".gz");
28
29       // Create socket connected to server on specified port
30       Socket sock = new Socket(server, port);
31
32       // Send uncompressed byte stream to server

33       sendBytes(sock, fileIn);
34
35       // Receive compressed byte stream from server
36       InputStream sockIn = sock.getInputStream();
37       int bytesRead;                      // Number of bytes read
38       byte[] buffer = new byte[BUFSIZE];  // Byte buffer
39       while ((bytesRead = sockIn.read(buffer)) != -1) {
40         fileOut.write(buffer, 0, bytesRead);
41         System.out.print("R");     // Reading progress indicator
42       }
43       System.out.println();        // End progress indicator line
44
45       sock.close();       // Close the socket and its streams
46       fileIn.close();     // Close file streams
47       fileOut.close();
48     }
49
50       private static void sendBytes(Socket sock, InputStream fileIn)
51           throws IOException {
52         OutputStream sockOut = sock.getOutputStream();
53         int bytesRead;                      // Number of bytes read
54         byte[] buffer = new byte[BUFSIZE];  // Byte buffer
55         while ((bytesRead = fileIn.read(buffer)) != -1) {
56           sockOut.write(buffer, 0, bytesRead);
57           System.out.print("W");     // Writing progress indicator
58       }
59       sock.shutdownOutput();         // Finished sending
60     }
61 }Application setup and parameter parsing: lines 17–23
Create socket and open files: lines 25–30
Invoke
sendBytes()to transmit bytes: line 33Receive the compressed data stream: lines 35–42
The while loop receives the compressed data stream and writes the bytes to the output file until an end-of-stream is signaled by a −1 from
read().Close socket and file streams: lines 45–47
sendBytes(): lines 50–60Given a socket connected to a compression server and the file input stream, read all of the uncompressed bytes from the file and write them to the socket output stream.
Get socket output stream: line 52
Send uncompressed bytes to compression server: lines 55–58
The while loop reads from the input stream (in this case from a file) and repeats the bytes to the socket output stream until end-of-file, indicated by −1 from
read(). Each write is indicated by a “W” printed to the console.Shut down the socket output stream: line 59
After reading and sending all of the bytes from the input file, shut down the output stream, notifying the server that the client is finished sending. The close will cause a −1 return from
read()on the server.
To implement the compression server, we simply write a protocol for our threaded server architecture. Our protocol implementation, CompressProtocol.java, implements the server-side compression protocol using the GZIP compression algorithm. The server receives the uncompressed bytes from the client and writes them to a GZIPOutputStream, which wraps the socket’s output stream.
CompressProtocol.java
 0  import java.net.Socket;
 1  import java.io.IOException;
 2  import java.io.InputStream;
 3  import java.io.OutputStream;
 4  import java.util.zip.GZIPOutputStream;
 5  import java.util.logging.Logger;
 6  import java.util.logging.Level;
 7
 8  public class CompressProtocol implements Runnable {
 9
10    public static final int BUFSIZE = 1024;   // Size of receive buffer
11    private Socket clntSock;
12    private Logger logger;
13
14    public CompressProtocol(Socket clntSock, Logger logger) {
15      this.clntSock = clntSock;
16      this.logger = logger;
17    }
18
19    public static void handleCompressClient(Socket clntSock, Logger logger) {
20      try {
21       // Get the input and output streams from socket
22       InputStream in = clntSock.getInputStream();
23       GZIPOutputStream out = new GZIPOutputStream(clntSock.getOutputStream());
24
25       byte[] buffer = new byte[BUFSIZE];  // Allocate read/write buffer
26       int bytesRead;                      // Number of bytes read

27         // Receive until client closes connection, indicated by -1 return
28         while ((bytesRead = in.read(buffer)) != -1)
29           out.write(buffer, 0, bytesRead);
30         out.finish();      // Flush bytes from GZIPOutputStream
31
32         logger.info("Client " + clntSock.getRemoteSocketAddress() + " finished");
33       } catch (IOException ex) {
34         logger.log(Level.WARNING, "Exception in echo protocol", ex);
35       }
36
37       try {  // Close socket
38         clntSock.close();
39       } catch (IOException e) {
40         logger.info("Exception = " +    e.getMessage());
41       }
42     }
43
44     public void run() {
45       handleCompressClient(this.clntSock, this.logger);
46     }
47 }Variables and constructors: lines 10–17
handleCompressClient(): lines 19–42Given a socket connected to the compression client, read the uncompressed bytes from the client and write the compressed bytes back.
Get socket I/O streams: lines 22–23
The socket’s output stream is wrapped in a
GZIPOutputStream. The sequence of bytes written to this stream is compressed, using the GZIP algorithm, before being written to the underlying output stream.Read uncompressed and write compressed bytes: lines 28–29
The while loop reads from the socket input stream and writes to the
GZIPOutputStream, which in turn writes to the socket output stream, until the end-of-stream indication is received.Flush and close: lines 30–42
Calling
finishon theGZIPOutputStreamis necessary to flush any bytes that may be buffered by the compression algorithm.run()method: lines 44–46The
run()method simply calls thehandleCompressClient()method.
To use this protocol we simply modify TCPEchoServerExecutor.java to create an instance of CompressProtocol instead of EchoProtocol:
service.execute(new CompressProtocol(clntSock, logger));
Applets can perform network communication using TCP/IP sockets, but there are severe restrictions on how and with whom they can converse. Without such restrictions, unsuspecting Web browsers might execute malicious applets that could, for example, send fake email, attempt to hack other systems while the browser user gets the blame, and so on. These security restrictions are enforced by the Java security manager, and violations by the applet result in a SecurityException. Typically, browsers only allow applets to communicate with the host that served the applet. This means that applets are usually restricted to communicating with applications executing on that host, usually a Web server originating the applet. The list of security restrictions and general applet programming is beyond the scope of this book. It is worth noting, however, that the default security restrictions can be altered, if allowed by the browser user.
Suppose that you wanted to implement an applet that allowed users to type and save notes to themselves on their browser. Browser security restrictions prevent applets from saving data directly on the local file system, so you would need some other means besides local disk I/O to save the notes. FileClientApplet.java (available from the book’s Web site) is an applet that allows the user to type text into an editor window and, by clicking the “Save” button, copy the text over the network to a server (running on port 5000). The server, TCPFileServer.java (also on the book’s Web site), saves the data to a file. It takes a port (use 5000 to work with the applet) and the name of the file. The server must execute on the Web server that serves the applet to the browser. Note that there is nothing applet-specific about the server. FileClientApplet.html on the Web site demonstrates how to integrate the applet into a Web page.
We have discussed some of the ways Java provides access to advanced features of the sockets API, and how built-in features such as threads and executors can be used with socket programs. In addition to these facilities, Java provides several mechanisms (not discussed here) that operate on top of TCP or UDP and attempt to hide the complexity of protocol development. For example, Java Remote Method Invocation (RMI) allows Java objects on different hosts to invoke one another’s methods as if the objects all reside locally. The URL class and associated classes provide a framework for developing Web-related programs. Many other standard Java library mechanisms exist, providing an amazing range of services. These mechanisms are beyond the scope of this book; however, we encourage you to look at the book’s Web site for descriptions and code examples for some of these libraries.
[1] The rules for multicast TTL are actually not quite so simple. It is not necessarily the case that a packet with TTL = 4 can travel four hops from the sender; however, it will not travel more than four hops.
[2] At the time of writing of this book, there are severe limitations on who can receive multicast traffic on the Internet. Multicast should work if the sender and receivers are on the same LAN.