
This chapter introduces the main facilities of the “New I/O” packages. There are two important parts: the java.nio.channels package, which introduces the Selector and Channel abstractions, and the java.nio package, which introduces the Buffer abstraction. These are fairly advanced features, with a number of subtle details related to their usage. Therefore this chapter is organized a little differently than the earlier ones. In the first subsection we’ll motivate the NIO features by describing some problems that they are intended to solve—specifically, challenges that arise in building high-performance servers without them. (If you don’t care about the “why?” question, feel free to skip this section.) In Section 5.2, we present (as usual) a client for the (TCP) “echo” protocol that shows the use of SocketChannel and Buffer classes, as well as the nonblocking features of Channel, which differ from those we saw in Section 4.2. In Section 5.3, we show a server that uses the Selector, Channel, and Buffer abstractions. Then we go back and cover the details of usage of the main abstractions, each in its own section. Finally, Section 5.7 introduces the DatagramChannel class (the channelized version of DatagramSocket).
Basic Java Sockets work well for small-scale systems. But when it comes to servers that have to deal with many thousands of clients simultaneously, certain issues arise. We saw signs of this in Chapter 4: the thread-per-client approach is limited in terms of scalability because of the overhead associated with creating, maintaining, and swapping between threads. Using a thread pool saves on that kind of overhead while still allowing an implementor to take advantage of parallel hardware, but for protocols with long-lived connections, the size of the thread pool still limits the number of clients that can be handled simultaneously. Consider an instant messaging server that relays messages between clients. Clients must be continuously connected to receive messages, so the thread pool size limits the total number of clients that can be served. Increasing the thread pool size increases the thread-handling overhead without improving performance, because most of the time clients are idle.
If this were all there is to it, NIO might not be needed. Unfortunately, there are other, more subtle challenges involved with using threads for scalability. One is that the programmer has very little control over which threads receive service when. You can set a Thread instance’s priority (higher-priority threads get preference over lower-priority ones), but ultimately the priority is just “advice”—which thread is chosen to run next is entirely up to the implementation.[1] Thus, if a programmer wants to ensure that certain connections get served before others, or impose a specific order of service, threads may make it harder to do that.
But the most important issue with threads is probably one we haven’t encountered yet. That’s because in our “echo service” examples, each client served is completely independent of all others; clients do not interact with each other or affect the state of the server. However, some (most) servers have some information—what we call “state”—that needs to be accessed or modified by different clients at the same time. Think of a service that allows citizens to reserve parking spaces for one-hour blocks in a big city, for example. The schedule of who gets which space for which time blocks must be kept consistent; the server may also need to ensure that the same user does not reserve more than one space at a time. These constraints require that some state information (i.e., the schedule) be shared across all clients. This in turn requires that access to that state be carefully synchronized through the use of locks or other mutual exclusion mechanisms. Otherwise, since the scheduler can interleave program steps from different threads more or less arbitrarily, different threads that are trying to update the schedule concurrently might overwrite each other’s changes.
The need to synchronize access to shared state makes it significantly harder to think about both correctness and performance of a threaded server. The reasons for this added complexity are beyond the scope of this book, but suffice it to say that the use of the required synchronization mechanisms adds still more scheduling and context-switching overhead, over which the programmer has essentially no control.
Because of these complications, some programmers prefer to stick with a single-threaded approach, in which the server has only one thread, which deals with all clients—not sequentially, but all at once. Such a server cannot afford to block on an I/O operation with any one client, and must use nonblocking I/O exclusively. Recall that with nonblocking I/O, we specify the maximum amount of time that a call to an I/O method may block (including zero). We saw an example of this in Chapter 4, where we set a timeout on the accept operation (via the setSoTimeout() method of ServerSocket). When we call accept() on that ServerSocket instance, if a new connection is pending, accept() returns immediately; otherwise it blocks until either a connection comes in or the timer expires, whichever comes first. This allows a single thread to handle multiple connections. Unfortunately, the approach requires that we constantly poll all sources of I/O, and that kind of “busy waiting” approach again introduces a lot of overhead from cycling through connections just to find out that they have nothing to do.
What we need is a way to poll a set of clients all at once, to find out which ones need service. That is exactly the point of the Selector and Channel abstractions introduced in NIO. A Channel instance represents a “pollable” I/O target such as a socket (or a file, or a device). Channels can register an instance of class Selector. The select() method of Selector allows you to ask “Among the set of channels, which ones are currently ready to be serviced (i.e., accepted, read, or written)?” There are numerous details to be covered later, but that’s the basic motivation for Selector and Channel, both of which are part of the java.nio.channels package.
The other major feature introduced in NIO is the Buffer class. Just as selectors and channels give greater control and predictability of the overhead involved with handling many clients at once, Buffer enables more efficient, predictable I/O than is possible with the Stream abstraction. The nice thing about the stream abstraction is that it hides the finiteness of the underlying buffering, providing the illusion of an arbitrary-length container. The bad thing is that implementing that illusion may require either lots of memory allocation or lots of context-switching, or both. As with threads, this overhead is buried in the implementation, and is therefore not controllable or predictable. That approach makes it easy to write programs, but harder to tune their performance. Unfortunately, if you use the Java Socket abstraction, streams are all you’ve got.
That’s why channels are designed around the use of Buffer instances to pass data around. The Buffer abstraction represents a finite-capacity container for data—essentially, an array with associated pointers indicating where to put data in, and where to read data out. There are two main advantages to using Buffer. First, the overhead associated with reading from and writing to the buffer is exposed to the programmer. For example, if you want to put data into a buffer but there’s not enough room, you have to do something to make more room (i.e., get some data out, or move data that’s already there to make more room, or create a new instance). This represents extra work, but you (the programmer) control how, whether, and when it happens. A smart programmer, who knows the application requirements well, can often reduce overhead by tweaking these choices. Second, some specialized flavors of Buffer map operations on the Java object directly to operations on resources of the underlying platform (for example, to buffers in the operating system). This saves some copying of data between different address spaces—an expensive operation on modern architectures.
As we said above, a Channel instance represents a connection to a device through which we can perform I/O. In fact the basic ideas are very similar to what we’ve already seen with plain sockets. For TCP, use the ServerSocketChannel and SocketChannel. There are other types of channels for other devices (e.g., FileChannel), and most of what we say here applies to them as well, although we do not mention them further. One difference between channels and sockets is that typically one obtains a channel instance by calling a static factory method:
   SocketChannel clntChan = SocketChannel.open();
   ServerSocketChannel servChan = ServerSocketChannel.open();
Channels do not use streams; instead, they send/receive data from/to buffers. An instance of Buffer or any of its subclasses can be viewed as a fixed-length sequence of elements of a single primitive Java type. Unlike streams, buffers have fixed, finite capacity, and internal (but accessible) state that keeps track of how much data has been put in or taken out; they behave something like queues with finite capacity. The Buffer class is abstract; you get a buffer by creating an instance of one of its subtypes, each of which is designed to hold one of the primitive Java types (with the exception of boolean). Thus each instance is a FloatBuffer, or an IntBuffer, or a ByteBuffer, etc. (The ByteBuffer is the most flexible of these and will be used in most of our examples.) As with channels, constructors are not typically used to create buffer instances; instead they are created either by calling allocate(), specifying a capacity:
ByteBuffer buffer = ByteBuffer.allocate(CAPACITY);
or by wrapping an existing array:
ByteBuffer buffer = ByteBuffer.wrap(byteArray);
Part of the power of NIO comes from the fact that channels can be made nonblocking. Recall that some socket operations can block indefinitely. For example, a call to accept() can block waiting for a client to connect; a call to read() can block until data arrives from the other end of a connection. In general, I/O calls that make/accept a connection or read/write data can block indefinitely until something happens in the underlying network implementations. A slow, lossy, or just plain broken network can cause an arbitrary delay. Unfortunately, in general we don’t know if a method call will block before we make it. An important feature of the NIO channel abstraction is that we can make a channel nonblocking by configuring its blocking behavior:
clntChan.configureBlocking(false);
Calls to methods on a nonblocking channel always return immediately. The return value of such a call indicates the extent to which the requested operation was achieved. For example, a call to accept() on a nonblocking ServerSocketChannel returns the client SocketChannel if a connection is pending and null otherwise.
Let’s construct a nonblocking TCP echo client. The I/O operations that may block include connecting, reading, and writing. With a nonblocking channel, these operations return immediately. We must repeatedly call these operations until we have successfully completed all I/O.
TCPEchoClientNonblocking.java
 0 import java.net.InetSocketAddress;
 1 import java.net.SocketException;
 2 import java.nio.ByteBuffer;
 3 import java.nio.channels.SocketChannel;
 4
 5 public class TCPEchoClientNonblocking {
 6
 7   public static void main(String args[]) throws Exception {
 8
 9     if ((args.length < 2) || (args.length > 3)) // Test for correct # of args
10       throw new IllegalArgumentException("Parameter(s): <Server> <Word> [<Port>]");
11
12    String server = args[0]; // Server name or IP address
13    // Convert input String to bytes using the default charset
14    byte[] argument = args[1].getBytes();
15
16    int servPort = (args.length == 3) ? Integer.parseInt(args[2]) : 7;
17
18    // Create channel and set to nonblocking
19    SocketChannel clntChan = SocketChannel.open();
20    clntChan.configureBlocking(false);
21
22    // Initiate connection to server and repeatedly poll until complete
23    if (!clntChan.connect(new InetSocketAddress(server, servPort))) {
24      while (!clntChan.finishConnect()) {
25        System.out.print(".");   // Do something else
26      }
27    }
28    ByteBuffer writeBuf = ByteBuffer.wrap(argument);
29    ByteBuffer readBuf = ByteBuffer.allocate(argument.length);
30    int totalBytesRcvd = 0; // Total bytes received so far
31    int bytesRcvd; // Bytes received in last read
32    while (totalBytesRcvd < argument.length) {
33      if (writeBuf.hasRemaining()) {
34      clntChan.write(writeBuf);
35   }
36   if ((bytesRcvd = clntChan.read(readBuf)) == -1) {
37     throw new SocketException("Connection closed prematurely");
38   }
39   totalBytesRcvd += bytesRcvd;
40   System.out.print(".");     // Do something else
41  }
42
43  System.out.println("Received: " +   // convert to String per default charset
44       new String(readBuf.array(), 0, totalBytesRcvd));
45  clntChan.close();
46  }
47 }Get and convert arguments: lines 9–16
Create nonblocking.
SocketChannel: lines 19–20Connect to server: lines 23–27
Because the socket is nonblocking, the call to
connect()may return before the connection is established; the method returns TRUE if the connection completes before it returns, FALSE otherwise. In the latter case, any attempt to send/receive will throw aNotYetConnectedException, so we “poll” the status continually by callingfinishConnect(), which returns FALSE until the connection completes. The print operation demonstrates that we can perform other tasks while waiting for the connection to complete. Such a busy wait is generally wasteful; we do it here to illustrate the use of the methods.Create read/write buffers: lines 28–29
We create the
ByteBufferinstances we’ll use for writing and reading by wrapping the byte[ ] containing the string we want to send, and allocating a new instance the same size as that array, respectively.Loop until we have sent and received all the bytes: lines 32–41
Call
write()as long as the output buffer has anything left in it. The call toread()does not block but rather returns 0 when no data is available to return. Again, the print operation demonstrates that we can perform other tasks while waiting for the communication to complete.Print the received data: lines 43–44
Close the channel: line 45
Like sockets, channels should be closed when they are no longer needed.
As noted in the first section of this chapter, the Selector class allows us to avoid the wasteful “busy waiting” approach we saw in the nonblocking client. Consider an Instant Messaging server, for example. Thousands of clients may be connected, but only a few (possibly none) have messages waiting to be read and relayed at any time. We need a way to block just until at least one channel is ready for I/O, and to tell which channels are ready. NIO selectors do all of this. An instance of Selector can simultaneously check (and wait, if desired) for I/O opportunities on a set of channels. In technical terms, a selector is a multiplexor because a single selector can manage I/O on multiple channels.
To use a selector, create it (using the static factory method open()) and register it with the channels that you wish to monitor (note that this is done via a method of the channel, not the selector). Finally, call the selector’s select() method, which blocks until one or more channels are ready for I/O or a timeout expires. When select() returns, it tells you the number of channels ready for I/O. Now, in a single thread, we can check for ready I/O on several channels by calling select(). If no I/O becomes ready after a certain amount of time, select() returns 0 and allows us to continue on with other tasks.
Let’s look at an example. Suppose we want to implement an echo server using channels and a selector without using multiple threads or busy waiting. To make it easier to use this basic server pattern with different protocols, we have factored out the protocol-specific details of how each type of I/O (accepting, reading, and writing) is handled through the channel. TCPProtocol defines the interface between the generic TCPSelectorServer.java and the specific protocol. It includes three methods, one for each form of I/O; the server simply invokes the appropriate method once a channel becomes ready.
TCPProtocol.java
0  import java.nio.channels.SelectionKey;
1  import java.io.IOException;
2
3  public interface TCPProtocol {
4    void handleAccept(SelectionKey key) throws IOException;
5    void handleRead(SelectionKey key) throws IOException;
6    void handleWrite(SelectionKey key) throws IOException;
7  }
TCPProtocol.java
Now for the server. We create a selector and register it with a ServerSocketChannel for each socket on which the server listens for incoming client connections. Then we loop forever, invoking select(), and calling the appropriate handler routine for whatever type of I/O is appropriate.
TCPServerSelector.java
 0 import java.io.IOException;
 1 import java.net.InetSocketAddress;
 2 import java.nio.channels.SelectionKey;
 3 import java.nio.channels.Selector;
 4 import java.nio.channels.ServerSocketChannel;
 5 import java.util.Iterator;
 6
 7 public class TCPServerSelector {
 8
 9   private static final int BUFSIZE = 256;   // Buffer size (bytes)
10   private static final int TIMEOUT = 3000;  // Wait timeout (milliseconds)
11
12   public static void main(String[] args) throws IOException {
13
14     if (args.length < 1) { // Test for correct # of args
15       throw new IllegalArgumentException("Parameter(s): <Port> ...");
16     }
17
18     // Create a selector to multiplex listening sockets and connections
19     Selector selector = Selector.open();
20
21    // Create listening socket channel for each port and register selector
22    for (String arg : args) {
23      ServerSocketChannel listnChannel = ServerSocketChannel.open();
24      listnChannel.socket().bind(new InetSocketAddress(Integer.parseInt(arg)));
25      listnChannel.configureBlocking(false); // must be nonblocking to register
26      // Register selector with channel. The returned key is ignored
27      listnChannel.register(selector, SelectionKey.OP_ACCEPT);
28   }
29
30   // Create a handler that will implement the protocol
31   TCPProtocol protocol = new EchoSelectorProtocol(BUFSIZE);
32
33   while (true) { // Run forever, processing available I/O operations
34     // Wait for some channel to be ready (or timeout)
35     if (selector.select(TIMEOUT) == 0) { // returns # of ready chans
36       System.out.print(".");
37       continue;
38     }
39

40      // Get iterator on set of keys with I/O to process
41      Iterator<SelectionKey> keyIter = selector.selectedKeys().iterator();
42      while (keyIter.hasNext()) {
43        SelectionKey key = keyIter.next(); // Key is bit mask
44        // Server socket channel has pending connection requests?
45        if (key.isAcceptable()) {
46          protocol.handleAccept(key);
47        }
48        // Client socket channel has pending data?
49        if (key.isReadable()) {
50          protocol.handleRead(key);
51        }
52        // Client socket channel is available for writing and
53        // key is valid (i.e., channel not closed)?
54        if (key.isValid() && key.isWritable()) {
55         protocol.handleWrite(key);
56       }
57       keyIter.remove(); // remove from set of selected keys
58      }
59    }
60  }
61}Setup: lines 14–19
Verify at least one argument, create a
Selectorinstance.Create a ServerSocketChannel for each port: lines 22–28
Create a ServerSocketChannel: line 23
Make it listen on the given port: line 24
We have to fetch the underlying
ServerSocketand invoke itsbind()method on the port given as argument. Any argument other than a number in the appropriate range will result in anIOException.Make it nonblocking: line 25
Only nonblocking channels can register selectors, so we configure the blocking state appropriately.
Register selector with channel: line 27
We indicate our interest in the “accept” operation during registration.
Create protocol handler: line 31
To get access to the handler methods for the Echo protocol, we create an instance of the
EchoSelectorProtocol, which exports the required methods.Loop forever, waiting for I/O, invoking handler: lines 33–59
This version of the
select()method blocks until some channel becomes ready or until the timeout expires. It returns the number of ready channels; zero indicates that the timeout expired, in which case we print a dot to mark the passage of time and iterate.Get selected key set: line 41
The
selectedKeys()method returns aSet, for which we get anIterator. The set contains theSelectionKey(created at registration time) of each channel that is ready for one of the I/O operations of interest (specified at registration time).Iterate over keys, checking ready operations: lines 42–58
For each key, we check whether it is ready for
accept(), readable, and/or writable, invoking the appropriate handler method to perform the indicated operation in each case.Remove the key from the set: line 57
The
select()operation only adds to the set of selected keys associated with aSelector. Therefore if we do not remove each key as we process it, it will remain in the set across the next call toselect(), and a useless operation may be invoked on it.
TCPServerSelector is protocol agnostic for the most part; only the single line of code assigning the value of protocol is protocol-specific. All protocol details are contained in the implementation of the TCPProtocol interface. EchoSelectorProtocol provides an implementation of the handlers for the Echo protocol. You could easily write your own protocol handlers for other protocols or performance improvements on our Echo protocol handler implementation.
EchoSelectorProtocol.java
 0 import java.nio.channels.SelectionKey;
 1 import java.nio.channels.SocketChannel;
 2 import java.nio.channels.ServerSocketChannel;
 3 import java.nio.ByteBuffer;
 4 import java.io.IOException;
 5
 6 public class EchoSelectorProtocol implements TCPProtocol {
 7
 8   private int bufSize; // Size of I/O buffer
 9
10   public EchoSelectorProtocol(int bufSize) {
11     this.bufSize = bufSize;
12   }
13
14   public void handleAccept(SelectionKey key) throws IOException {
15     SocketChannel clntChan = ((ServerSocketChannel) key.channel()).accept();
16     clntChan.configureBlocking(false); // Must be nonblocking to register
17     // Register the selector with new channel for read and attach byte buffer

18        clntChan.register(key.selector(), SelectionKey.OP_READ, ByteBuffer.allocate(bufSize));
19
20  }
21
22  public void handleRead(SelectionKey key) throws IOException {
23    // Client socket channel has pending data
24    SocketChannel clntChan = (SocketChannel) key.channel();
25    ByteBuffer buf = (ByteBuffer) key.attachment();
26    long bytesRead = clntChan.read(buf);
27    if (bytesRead == -1) { // Did the other end close?
28      clntChan.close();
29    } else if (bytesRead > 0) {
30      // Indicate via key that reading/writing are both of interest now.
31      key.interestOps(SelectionKey.OP_READ | SelectionKey.OP_WRITE);
32    }
33  }
34
35  public void handleWrite(SelectionKey key) throws IOException {
36   /*
37    * Channel is available for writing, and key is valid (i.e., client channel
38    * not closed).
39    */
40    // Retrieve data read earlier
41    ByteBuffer buf = (ByteBuffer) key.attachment();
42    buf.flip(); // Prepare buffer for writing
43    SocketChannel clntChan = (SocketChannel) key.channel();
44    clntChan.write(buf);
45    if (!buf.hasRemaining()) { // Buffer completely written?
46      // Nothing left, so no longer interested in writes
47      key.interestOps(SelectionKey.OP_READ);
48    }
49    buf.compact(); // Make room for more data to be read in
50  }
51
52 }Declaration of implementation of the.
TCPProtocolinterface: line 6Member variables and constructor: lines 8–12
Each instance contains the size of buffer to be created for each client channel.
handleAccept():lines 14–20Get channel from key and accept connection: line 15
The
channel()method returns theChannelthat created the key at registration time. (We know it’s aServerSocketChannelbecause that’s the only kind we registered with that supports the “accept” operation.) Theaccept()method returns aSocketChannelfor the incoming connection.Make nonblocking: line 16
Again, we cannot register with a blocking channel.
Register selector with channel: lines 18–19
As with the channel, we can retrieve the
Selectorassociated with theSelectionKeyvia itsselector()method. We create a newByteBufferof the required size, and pass it as argument toregister(). It will be associated as an attachment to theSelectionKeyinstance returned by theregister()method. (We ignore the returned key now, but will access it through the selected keys set if the channel becomes ready for I/O.)
handleRead():lines 22–33Get channel associated with key: line 24
We know this is a
SocketChannelbecause it supports reading.Get buffer associated with key: line 25
When the connection was associated, a
ByteBufferwas attached to thisSelectionKeyinstance.Read from the channel: line 27
Check for end of stream and close channel: lines 27–28
If the
read()returns − 1, we know the underlying connection closed, and close the channel in that case. Closing the channel removes its associated key from the selector’s various sets.If data received, indicate interest in writing: lines 29–31
Note that we are still interested in reading, although there may not be any room left in the buffer.
handleWrite():lines 35–50Retrieve buffer containing received data: line 41
The
ByteBufferattached to the givenSelectionKeycontains data read earlier from the channel.Prepare buffer for writing: line 42
The
Buffer’s internal state indicates where to put data next, and how much space is left. Theflip()operation modifies the state so it indicates from where to get data for thewrite()operation, and how much data is left. (This is explained in detail in the next section.) The effect is that the write operation will start consuming the data produced by the earlier read.Get channel: line 43
Write to channel: line 44
If buffer empty, lose interest in writing: lines 45–48
If there is no received data left in the buffer, we modify the interest set associated with the key so that it indicates only read is of interest.
If there is data remaining in the buffer, this operation moves it to the front of the buffer so more data can be read on the next iteration (semantics of this operation are covered in more detail in Section 5.4.5). In any case, the operation resets the state so the buffer is again ready for reading. Note that the buffer associated with a channel is always set up for reading except when control is inside the
handleWrite()method.
We are now ready to delve into the details of the three main NIO abstractions.
As you’ve already seen, in NIO data is read into and written from buffers. Channels read data into buffers. We then access the data through the buffer. To write data, we first fill the buffer with data in the order we wish to send it. Basically, a buffer is just a list where all of the elements are a single primitive type (typically bytes). A buffer is fixed-length; it cannot expand like some other classes (e.g., List, StringBuffer, etc). Note that ByteBuffer is commonly used because 1) it provides methods for reading and writing other types, and 2) the channel read/write methods accept only ByteBuffers. So what good are IntBuffer, DoubleBuffer, and the others? Stay tuned! The answer will be revealed in Section 5.4.6.
A buffer goes beyond just storing a list of elements. It has internal state that keeps track of the current position when reading data from or writing data to the buffer, as well as the end of valid data for reading, etc. To do this, each buffer maintains four indices into its list of elements; they are shown in Table 5.1. (We’ll see shortly how the indices are modified by the various buffer methods.)
Table 5.1. Buffer Internal State
Index | Description | Accessor/Mutator/Usage |
|---|---|---|
capacity | Number of elements in buffer (Immutable) |
|
position | Next element to read/write |
|
(numbered from 0) |
| |
limit | First unreadable/unwritable element |
|
| ||
mark | User-chosen prev. value of position, or 0 |
|
|
The distance between the position and limit tells us the number of bytes available for getting/putting. Java provides two convenience methods for evaluating this distance.
Example . ByteBuffer: Remaining Bytes
boolean hasRemaining()
int remaining()
hasRemaining() returns TRUE if at least one element is available, and remaining() returns the number of elements available.
The following relationships among these variables are maintained as an invariant:
0 ≤ mark ≤ position ≤ limit ≤ capacity
The mark value “remembers” a position so you can come back to it later; the reset() method returns the position to the value it had when mark() was last called (unless doing so would violate the above invariant).
Typically, we create buffers either by allocation or by wrapping an array of primitives. The static factory methods for creating a ByteBuffer are shown in Table 5.2, along with the initial values of capacity, position, and limit for the returned instance. The initial value of mark is undefined for all newly created Buffer instances; attempts to reset() the position before calling mark() result in an InvalidMarkException.
Table 5.2. ByteBuffer Creation Methods
Method | Capacity | Position | Limit |
|---|---|---|---|
| capacity | 0 | capacity |
| capacity | 0 | capacity |
| array.length | 0 | array.length |
| array.length | offset | offset + length |
To allocate a fresh instance, we simply call the static allocate() method for the type of buffer we want, specifying the number of elements:
   ByteBuffer byteBuf = ByteBuffer.allocate(20);
   DoubleBuffer dblBuf = DoubleBuffer.allocate(5);
Here byteBuf holds 20 bytes, and dblBuf holds 5 Java doubles. These buffers are fixed-size so they can never be expanded or contracted. If you find that the buffer you just allocated is too short, your only option is to allocate a new, correctly sized buffer.
We can also create a buffer from an existing array by calling the static wrap() method and passing the array to be wrapped
   byteArray[] = new byte[BUFFERSIZE];
   // ...Fill array...
   ByteBuffer byteWrap = ByteBuffer.wrap(byteArray);
   ByteBuffer subByteWrap = ByteBuffer.wrap(byteArray, 3, 3);
A buffer created by wrapping contains the data from the wrapped array. In fact, wrap() simply creates a buffer with a reference to the wrapped array, called the backing array. Any change to the data in the backing array changes the data in the buffer and vice versa. If we specify an offset and length to wrap(), the buffer is backed by the entire array with position and limit initially set to offset and offset + length. The elements preceding the offset and following the length are still accessible via the buffer.
Creation of a buffer by allocation isn’t really so different from wrapping. The only real difference is that allocate() creates its own backing array. You can get a reference to this backing array by calling array() on the buffer. You can even get the offset into the backing array of the first element used by the buffer by calling arrayOffset(). A buffer created with wrap() with a nonzero offset still has an array offset of 0.
So far, all of our buffers store data in Java-allocated backing arrays. Typically, the underlying platform (operating system) cannot use these buffers to perform I/O. Instead the OS must use its own buffers for I/O and copy the results to/from the buffer’s backing array. Such copying can get expensive, especially if there are many reads and writes requiring copying. Java NIO provides direct buffers as a way around this problem. With a direct buffer, Java allocates the backing store of the buffer from storage that the platform can use for I/O directly, so copying is unnecessary. Such low-level, native I/O generally operates at the byte level, so only ByteBuffers can be directly allocated.
ByteBuffer byteBufDirect = ByteBuffer.allocateDirect(BUFFERSIZE);
You can test whether a buffer is direct by calling isDirect(). Since a direct buffer does not have a backing array, calling array() or arrayOffset() on a direct buffer will throw an UnsupportedOperationException. There are a few caveats to remember when considering whether to use direct buffers. Calling allocateDirect() doesn’t guarantee you are allocated a direct buffer—your platform or JVM may not support this operation, so you have to call isDirect() after attempting to allocate. Also, allocation and deallocation of a direct buffer is typically more expensive than for nondirect buffers, because the backing store of a direct buffer typically lives outside the JVM, requiring interaction with the operating system for management. Consequently, you should only allocate direct buffers when they will be used for a long time, over many I/O operations. In fact, it is a good idea to use direct buffers only if they provide a measurable increase in performance over nondirect buffers.
Once you have a buffer, it’s time to use it to hold data. As “containers” for data, buffers are used for both input and output; this is different from streams, which transfer data in only one direction. We place data into a buffer using put(), and retrieve data from a buffer using get(). A channel read() implicitly calls put(), and a channel write() implicitly calls get() on the given buffer. Below we present the get() and put() methods for ByteBuffer; however, the other buffer types have similar methods.
Example . ByteBuffer: Getting and putting bytes
Relative:
byte get()
ByteBuffer get(byte[] dst)
ByteBuffer get(byte[] dst, int offset, int length)
ByteBuffer put(byte b)
ByteBuffer put(byte[] src)
ByteBuffer put(byte[] src, int offset, int length)
ByteBuffer put(ByteBuffer src)
Absolute:
byte get(int index)
ByteBuffer put(int index, byte b)
There are two types of get() and put(): relative and absolute. The relative variants get/put data from/to the “next” location in the buffer according to the value of position, and then increment position by an appropriate amount (that is, by one for the singlebyte form, by array.length for the array form, and by length for the array/offset/length form). Thus, each call to put() appends after elements already contained in the buffer, and each call to get() retrieves the next element from the buffer. However, if doing so would cause position to go past limit, a get() throws a BufferUnderflowException, while a put() throws a BufferOverflowException. For example, if the destination array passed to get() is longer than the available remaining elements in the buffer, get() throws BufferUnderflowException; partial gets/puts are not allowed. The absolute variants of get() and put() take a specific index for getting and putting data;the absolute forms do not modify position. They do, however, throw IndexOutOfBoundsException if the given index exceeds limit.
The class ByteBuffer provides additional methods for relative and absolute get/put of other types besides bytes; in this way, it’s like a DataOutputStream.
Example . ByteBuffer: Getting and putting Java multibyte primitives
〈type〉 get〈Type〉()
〈type〉 get〈Type〉(int index)
ByteBuffer put 〈Type〉(〈type〉 value)
ByteBuffer put〈Type〉(int index,〈type〉 value)
where "〈Type〉" stands for one of Char, Double, Int, Long, Short
and "〈type〉" stands for one of char, double, int, long, short
Each call to a relative put() or get() advances the value of position by the length of the particular parameter type: 2 for short, 4 for int, etc. However, if doing so would cause position to exceed limit, a BufferUnderflowException (get) or BufferOverflowException (put) is thrown: partial gets and puts are not allowed. In the case of under/overflow, position does not change.
You may have noticed that many get/put methods return a ByteBuffer. In fact, they return the same instance of ByteBuffer that was passed as an argument. This allows call chaining, where the result of the first call is used to make a subsequent call. For example, we can put the integers 1 and 2 in the ByteBuffer instance myBuffer as follows:
myBuffer.putInt(1).putInt(2);
Recall from Chapter 3 that multibyte values have a byte order, namely big- or little-endian. By default Java uses big-endian. You can get and set the order in which multibyte values are written to a byte buffer, using the built-in instances ByteOrder.BIG_ENDIAN and ByteOrder.LITTLE_ENDIAN.
Example . ByteBuffer: Byte ordering in buffer
ByteOrder order()
ByteBuffer order(ByteOrder order)
The first method returns the buffer’s current byte order, as one of the constants of the ByteOrder class. The second allows you to set the byte order used to write multibyte quantities.
Let’s look at an example using byte order:
   ByteBuffer buffer = ByteBuffer.allocate(4);
   buffer.putShort((short) 1);
   buffer.order(ByteOrder.LITTLE_ENDIAN);
   buffer.putShort((short) 1);
   // Predict the byte values for buffer and test your prediction
With all of this talk about byte ordering, you may be wondering about the byte order of your processor. ByteOrder defines a method to answer your question:
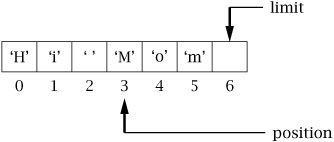
Before using a buffer for input or output, we need to make sure the buffer is correctly prepared with position and limit set to the proper values. Consider a CharBuffer created with capacity seven, which has been populated by successive calls to put() or read():
If we now want to use this buffer to do a channel write, since write() will start getting data at position, and stop at limit, we need to set limit to the current value of position, and set position to 0.
We could handle this ourselves, but fortunately Java provides some convenience methods to do the work for us; they are shown in Table 5.3.
Table 5.3. Instance Methods of ByteBuffer
Resulting Value of | ||||
|---|---|---|---|---|
| Prepares Buffer for | Position | Limit | Mark |
|
| 0 | capacity | undefined |
|
| 0 | position | undefined |
|
| 0 | unchanged | undefined |
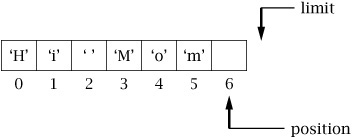
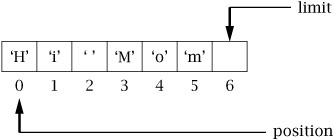
Note that these methods do not change the buffer’s data, only its indices. The clear() method prepares the buffer to accept new data from a buffer put or channel read by setting position to zero and limit to capacity. Continuing the example above, after clear() the situation looks like this:
Subsequent calls to put()/read() fill the buffer, starting from the first element and filling up to the limit, which is set to the capacity.
   // Start with buffer in unknown state
   buffer.clear();        // Prepare buffer for input, ignoring existing state
   channel.read(buffer);  // Read new data into buffer, starting at first element
Despite its name, clear() doesn’t actually change the buffer’s data; it simply resets the buffer’s main index values. Consider a buffer recently populated with data (say, 3 characters) from put() and/or read(). The position value indicates the first element that does not contain valid data:

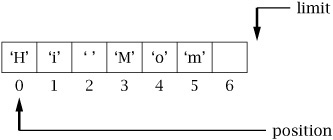
The flip() method prepares for data transfer out of the buffer, by setting limit to the current position and position to zero:
Subsequent calls to get()/write() retrieve data from the buffer starting from the first element and proceeding up to the limit. Here is an example of flip()’s usage:
// ... put data in buffer with put() or read() ...
buffer.flip(); // Set position to 0, limit to old position
while (buffer.hasRemaining()) // Write buffer data from the first element up to limit
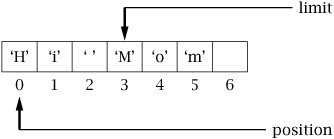
channel.write(buffer);Suppose you’ve written some or all of the data from a buffer and you’d like to go back to the beginning of the buffer to write the same information again (for example, you want to send it on another channel). The rewind() method sets position to zero and invalidates the mark. It’s similar to flip() except limit remains unchanged. When might you use this? Well, you might want to write everything you send over the network to a logger:
   // Start with buffer ready for writing
   while (buffer.hasRemaining())  // Write all data to network
     networkChannel.write(buffer);
   buffer.rewind();               // Reset buffer to write again
   while (buffer.hasRemaining())  // Write all data to logger
loggerChannel.write(buffer);The compact() operation copies the elements between position and limit to the start of the buffer, to make room for subsequent put()/read() calls. The value of position is set to the length of the copied data, the value of limit is set to the capacity, and mark becomes undefined. Consider the following buffer state before compact() is called:
Here is the situation after compact():

Why use this operation? Suppose you have a buffer for writing data. Recall that a nonblocking call to write() only uses the data it can send without blocking; therefore, write() will not necessarily send all elements of the buffer. Now you need to read() new data into the buffer, after the unwritten data. One way to handle this is to simply set position = limit and limit = capacity. Of course, you’ll need to reset these values later, after reading but before you call write() again. The problem is that eventually the buffer will run out of space; in the figures above, there would only be room for one more byte. Moreover, any space at the beginning of the buffer is wasted. This is exactly the problem compact() is designed to solve. By calling compact() after the write() but before the read() that will add more data, we move all the “left over” data to the start of the buffer, freeing up the maximum space for new data.
   // Start with buffer ready for reading
   while (channel.read(buffer) != -1) {
     buffer.flip();
     channel.write(buffer);
     buffer.compact();
   }
   while (buffer.hasRemaining())
     channel.write(buffer);
Note, however, that as we mentioned at the beginning of the chapter, copying data is a rather expensive operation, so compact() should be used sparingly.
NIO provides several ways of creating a new buffer that shares content with a given buffer, but differs on the processing of the elements. Basically, the new buffer has its own independent state variables (position, limit, capacity, and mark) but shares the backing storage with the original buffer. Any changes to the new buffer are shared with the original. Think of this as an alternate perspective on the same data. Table 5.4 lists the relevant methods.
Table 5.4. Methods for Creating Different Perspectives on a Buffer
New Buffer’s Initial Value of | ||||
|---|---|---|---|---|
Method | Capacity | Position | Limit | Mark |
| capacity | position | limit | mark |
|
| 0 |
| undefined |
| capacity | position | limit | mark |
|
| 0 |
| undefined |
|
| 0 |
| undefined |
|
| 0 |
| undefined |
|
| 0 |
| undefined |
|
| 0 |
| undefined |
|
| 0 |
| undefined |
The duplicate() method creates a new buffer that shares the content of the original buffer. The new buffer’s position, limit, mark, and capacity initially match the original buffer’s index values; however, the values are independent. Since the content is shared, changes to the original buffer or any duplicates will be visible to all. Let’s return to our example above where you want to write everything you send over the network to a logger.
   // Start with buffer ready for writing
   ByteBuffer logBuffer = buffer.duplicate();
   while (buffer.hasRemaining())     // Write all data to network
     networkChannel.write(buffer);
   while (logBuffer.hasRemaining())     // Write all data to logger
     loggerChannel.write(buffer);
Note that with buffer duplication, writing to the network and log could be done in parallel using different threads.
The slice() method creates a new buffer that shares some subsequence of the original buffer. The new buffer’s position is zero, and its limit and capacity are both equal to the difference between the limit and position of the original buffer. slice() sets the new buffer’s array offset to the original buffer’s position; however, calling array() on the new buffer still returns the entire array.
Channel reads and writes take only ByteBuffers; however, we may be interested in communicating using other primitive types. A ByteBuffer can create a separate “view buffer” that interprets its contents as some other primitive type (e.g., CharBuffer). Data of the new type can then be read from (and written to, although that is an optional operation) this buffer. The new buffer shares the backing storage of the original ByteBuffer; therefore, changes to either buffer are seen in both new and original buffers. A newly created view buffer has its position set to zero, and its contents start at the original buffer’s position. This is very similar to the slice() operation; however, since the view buffer operates over multibyte elements, the capacity and limit of the new buffer is the remaining number of bytes divided by the number of bytes in the corresponding primitive type (e.g., divide by 8 when creating a DoubleBuffer).
Let’s look at an example. Suppose you have received (via some Channel) a message that consists of a single byte, followed by a number of two-byte integers (i.e., shorts), in big-endian order. Because the message arrives over a Channel, it’s in a ByteBuffer, buf. The first byte of the message contains the number of two-byte integers that make up the rest of the message. You might call buf.getShort() the number of times indicated by the first byte. Or you can get all the integers at once, like this:
   // ...get message by calling channel.read(buf) ...
   int numShorts = (int)buf.get();
   if (numShorts < 0) {
      throw new SomeException()
   } else {
      short[] shortArray = new short[numShorts];
      ShortBuffer sbuf = buf.asShortBuffer();
      sbuf.get(shortArray); // note: will throw if header was incorrect!
   }
The asReadOnlyBuffer() method works just like duplicate() except that all mutator methods on the new buffer will always throw a ReadOnlyBufferException. This includes all forms of put(), compact(), etc. Even calls to array() and arrayOffset() for a nondirect buffer throw this exception. Of course, changes to the non-read-only buffer that generated this read-only buffer will still be shared. Like a buffer created with duplicate(), read-only buffers have independent buffer state variables. You can use the isReadOnly() method to test if a buffer is read-only. If a buffer is already read-only, calling duplicate() or slice() will create a read-only buffer.
Recall from Chapter 3 that characters are encoded as sequences of bytes, and that there are various mappings (called charsets) between sets of characters and byte sequences. Another use of NIO buffers is to convert among various charsets. To use this facility, you need to know about two additional classes in the java.nio.charset package (we have already encountered Charset in Chapter 3): CharsetEncoder and CharsetDecoder.
To encode, use a Charset instance to create an encoder and call encode:
   Charset charSet = Charset.forName("US-ASCII");
   CharsetEncoder encoder = charSet.newEncoder();
   ByteBuffer buffer = encoder.encode(CharBuffer.wrap("Hi mom"));
To decode, use the Charset instance to create a decoder and call decode:
   CharsetDecoder decoder = charSet.newDecoder();
   CharBuffer cBuf = decoder.decode(buffer);
While this approach certainly works, it can be inefficient when coding multiple times. For example, each call to encode/decode creates a new Byte/CharBuffer. Other inefficiencies crop up relating to coder creation and operation.
   encoder.reset();
   if (encoder.encode(CharBuffer.wrap("Hi "),buffer,false) == CoderResult.OVERFLOW) {
      // ... deal with lack of space in buffer ...
   }
   if (encoder.encode(CharBuffer.wrap("Mom"),buffer,true) == CoderResult.OVERFLOW) {
      // ... ditto ...
   }
   encoder.flush(buffer);
The encode() method converts the given CharBuffer into a byte sequence and writes the bytes to the given buffer. If the buffer is too small, encode() returns a CoderResult.OVERFLOW. If the input is completely consumed and the encoder is ready for more, CoderResult.UNDERFLOW is returned; otherwise the input is malformed in some way, and a CoderResult object is returned that indicates the nature and location of the problem. We set the final boolean parameter to TRUE only when we have reached the end of input to the encoder. flush() pushes any buffered encoder state to the buffer. Note that it is not strictly necessary to call reset(), which sets up the encoder’s internal state so it can encode again, on a freshly created encoder.
Stream channels come in two varieties: SocketChannel and ServerSocketChannel. Like its Socket counterpart, a SocketChannel is a communication channel for connected endpoints.
Example . SocketChannel: Creating, connecting, and closing
static SocketChannel open(SocketAddress remote)
static SocketChannel open()
boolean connect(SocketAddress remote)
boolean isConnected()
void close()
boolean isOpen()
Socket socket()
A SocketChannel is created by calling the open() factory method. The first form of open() takes a SocketAddress (see Chapter 2) and returns a SocketChannel connected to the specified server; note that this method may block for an indefinite period. The parameterless form of open() creates an unconnected SocketChannel, which may be connected to an endpoint with the connect() method. When you are finished with a SocketChannel, call the close() method. One important point is that each instance of SocketChannel “wraps” a basic Java Socket, which you may access using the socket() method. This will allow you to call basic Socket methods to bind, set socket options, etc. See TCPEchoClientNonblocking.java (pages 113–114) for an example of SocketChannel creation, connection, and closing.
After you create and connect your SocketChannel, you perform I/O with the channel’s read and write methods.
Example . SocketChannel: Reading and writing
int read(ByteBuffer dst)
long read(ByteBuffer[] dsts)
long read(ByteBuffer[] dsts, int offset, int length)
int write(ByteBuffer src)
long write(ByteBuffer[] srcs)
long write(ByteBuffer[] srcs, int offset, int length)
The most basic form of read takes a single ByteBuffer and reads up to the number of bytes remaining in the buffer. The other form of read takes an array of ByteBuffers and reads up to the number of bytes remaining in all of the buffers by filling each buffer in array order. This is called a scattering read because it scatters the incoming bytes over multiple buffers. It’s important to note that the scattering read isn’t obligated to fill all the buffer(s); the total amount of buffer space is simply an upper bound.
The most basic form of write takes a single ByteBuffer and attempts to write the bytes remaining in the buffer to the channel. The other form of write takes an array of ByteBuffers and attempts to write the bytes remaining in all buffers. This is called a gathering write because it gathers up bytes from multiple buffers to send together. See TCPEchoClientNonblocking.java (pages 113–114) and TCPServerSelector.java (pages 116–117) for examples of using read and write.
Like its ServerSocket counterpart, a ServerSocketChannel is a channel for listening for client connections.
Example . ServerSocketChannel: Creating, accepting, and closing
static ServerSocketChannel open()
ServerSocket socket()
SocketChannel accept()
void close()
boolean isOpen()
A ServerSocketChannel is created by calling the open() factory method. Each instance wraps an instance of ServerSocket, which you can access using the socket() method. As illustrated in the earlier examples, you must access the underlying ServerSocket instance to bind it to a desired port, set any socket options, etc. After creating and binding, you are ready to accept client connections by calling the accept() method, which returns the new, connected SocketChannel. When you are finished with a ServerSocketChannel, call the close() method. See TCPServerSelector.java (pages 116–117) for an example of using ServerSocket.
As we’ve already mentioned, blocking channels provide little advantage over regular sockets, except that they can (must) be used with Buffers. You will therefore almost always be setting your channels to be nonblocking.
Example . SocketChannel, Server SocketChannel: Setting blocking behavior
SelectableChannel configureBlocking(boolean block)
boolean isBlocking()
To set a SocketChannel or ServerSocketChannel to nonblocking, call configureBlocking(false). The configureBlocking() method returns a SelectableChannel, the superclass of both Sock-etChannel and ServerSocketChannel.
Consider setting up a connection for a SocketChannel. If you give the open() factory method of SocketChannel a remote address, the call blocks until the connection completes. To avoid this, use the parameterless version of open(), configure the channel to be nonblocking, and call connect(), specifying the remote endpoint address. If the connection can be made without blocking, connect() returns TRUE; otherwise, you need some way to determine when the socket becomes connected.
Example . SocketChannel: Testing connectivity
boolean finishConnect()
boolean isConnected()
boolean isConnectionPending()
With a nonblocking SocketChannel, once a connection has been initiated, the underlying socket may be neither connected nor disconnected; instead, a connection is “in progress.” Because of the way the underlying protocol mechanisms work (see Chapter 6), the socket may persist in this state for an indefinite time. The finishConnect() method provides a way to check the status of an in-progress connection attempt on a nonblocking socket, or to block until the connection is completed, for a blocking socket. For example, you might configure the channel to be nonblocking, initiate a connection via connect(), do some other work, configure the channel back to blocking, then call finishConnect() to wait until the connection completes. Or you can leave the channel nonblocking and call finishConnect() repeatedly, as in TCPEchoClientNonblocking.java.
The isConnected() method allows you to determine whether the socket is connected so you can avoid having a NotYetConnectedException thrown (say, by read() or write()). You can use isConnectionPending() to check whether a connection has been initiated on this channel. You want to know this because finishConnect() throws NoConnectionPendingException if invoked when one hasn’t been.
The example TCPEchoServerSelector shows the basics of using Selector. Here we consider some of the details.
Example . Selector: Creating and closing
static Selector open()
boolean isOpen()
void close()
You create a selector by calling the open() factory method. A selector is either “open” or “closed”; it is created open, and stays that way until you tell the system you are finished with it by invoking its close() method. You can tell whether a selector has been closed yet by calling isOpen().
As we have seen, each selector has an associated set of channels which it monitors for specific I/O “operations of interest” to that channel. The association between a Selector and a Channel is represented by an instance of SelectionKey. (Note that a Channel instance can register more than one Selector instance, and so can have more than one associated instance of SelectionKey.) The SelectionKey maintains information about the kinds of operations that are of interest for a channel in a bitmap, which is just an int in which individual bits have assigned meanings.
The possible operations of interest are defined by constants of the SelectionKey class; each such constant is a bitmask (see Section 3.1.3) with exactly one bit set.
Example . SelectionKey: Interest sets
static int OP_ ACCEPT
static int OP_CONNECT
static int OP_READ
static int OP_WRITE
int interestOps()
SelectionKey interestOps(int ops)
We specify an operation set with a bit vector created by OR-ing together the appropriate constants out of OP_ ACCEPT, OP_CONNECT, OP_READ, and OP_WRITE. For example, an operation set containing read and write is specified by the expression (OP_READ| OP_WRITE). The interestOps() method with no parameters returns a bitmap in which each bit set indicates an operation for which the channel will be monitored. The other method takes such a bitmap to indicate which operations should be monitored. Caveat: Any change to the interest set associated with a key (channel) does not take effect until the associated selector’s select() method is next invoked.
Example . SocketChannel, Server SocketChannel: Registering Selectors
SelectionKey register(Selector sel, int ops)
SelectionKey register(Selector sel, int ops, Object attachment)
int validOps()
boolean isRegistered()
SelectionKey keyFor(Selector sel)
A channel is registered with a selector by calling the channel’s register() method. At registration time we specify the initial interest set by means of a bitmap stored in an int (see “SelectionKey: Interest sets” above); register() returns a SelectionKey instance that represents the association between this channel and the given selector. The validOps() method returns a bitmap indicating the set of valid I/O operations for this channel. For a ServerSocketChannel, accept is the only valid operation, while for a SocketChannel, read, write, and connect are valid. For a DatagramChannel() (Section 5.7) only read and write are valid. A channel may only be registered once with a selector, so subsequent calls to register() simply update the operation interest set of the key. You can find out if a channel is registered with any selector by calling the isRegistered() method. The keyFor() method returns the same SelectionKey that was returned when register() was first called, or if the channel is not registered with the given selector.
The following code registers a channel for both reading and writing:
SelectionKey key = clientChannel.register(selector,
                    SelectionKey.OP_READ | SelectionKey.OP_WRITE);
Figure 5.1 shows a selector with a key set containing keys representing seven registered channels: two server channels on ports 4000 and 4001, and five client channels created from the server channels.

Example . SelectionKey: Retrieving and canceling
Selector selector()
SelectableChannel channel()
void cancel()
The Selector and Channel instances with which a key is associated are returned by its selector() and channel() methods, respectively. The cancel() method invalidates the key (permanently) and places it in the selector’s canceled set (Figure 5.1). The key will be removed from all key sets of the selector on the next call to select(), and the associated channel will no longer be monitored (unless it is re-registered).
With our channels registered with the selector and the associated keys specifying the set of I/O operations of interest, we just need to sit back and wait for I/O. We do this using the selector.
Example . Selector: Waiting for channels to be ready
int select()
int select(long timeout)
int selectNow()
Selector wakeup()
The select() methods all return a count of how many registered channels are ready for I/O operations in their interest set to be performed. (For example, a channel with OP_READ in the interest set has data ready to be read, or a channel with OP_ACCEPT has a connection ready to accept.) The three methods differ only in their blocking behavior. The parameterless method blocks until at least one registered channel has at least one operation in its interest set ready, or another thread invokes this selector’s wakeup() method (in which case it may return 0). The form that takes a timeout parameter blocks until at least one channel is ready, or until the indicated (positive) number of milliseconds has elapsed, or another thread calls wakeup(). The selectNow() is a nonblocking version: it always returns immediately; if no channels are ready, it returns 0. The wakeup() method causes any invocation of one of the select methods that is currently blocked (i.e., in another thread) to return immediately, or, if none is currently blocked, the next invocation of any of the three select methods will return immediately.
After selection, we need to know which channels have ready I/O of interest. Each selector maintains a selected-key set containing the keys from the key set whose associated channels have impending I/O of interest. We access the selected-key set by calling the selectedKeys() method of the selector, which returns a set of SelectionKeys. We can then iterate over this set of keys, handling pending I/O for each:
   Iterator<SelectionKey> keyIter = selector.selectedKeys().iterator();
   while (keyIter.hasNext()) {
     SelectionKey key = keyIter.next();
     // ...Handle I/O for key's channel...
     keyIter.remove();
   }
The selector in Figure 5.1 has two keys in its selected-key set: K2 and K5.
Example . Selector: Getting key sets
Set<SelectionKey> keys()
Set<SelectionKey> selectedKeys()
These methods return the selector’s different key sets. The keys() method returns all currently registered keys. The returned key set is immutable: any attempt to directly modify it (e.g., by calling its remove() method) will result in an UnsupportedOperation-Exception. The selectedKeys() method returns those keys that were “selected” as having ready I/O operations during the last call to select(). Caveat: The set returned by selectedKeys() is mutable, and in fact must be emptied “manually” between calls to select(). In other words, the select methods only add keys to the selected key set; they do not create a new set.
The selected-key set tells us which channels have available I/O. For each of these channels, we need to know the specific ready I/O operations. In addition to the interest set, each key also maintains a set of pending I/O operations called its ready set.
Example . SelectionKey: Find ready I/O operations
int readyOps()
boolean isAcceptable()
boolean isConnectable()
boolean isReadable()
boolean isValid()
boolean isWritable()
We can determine which operations in the interest set are available for a given key by using either the readyOps() method or the other predicate methods. readyOps() returns the entire ready set as a bitmap. The other methods allow each operation to be tested individually.
For example, to see if the channel associated with a key has a read pending we can either use:
(key.readyOps() & SelectionKey.OP_READ) != 0
or
key.isReadable()
The keys in a selector’s selected-key set and the operations in each key’s ready set are determined by select(). Over time, this information can become stale. Some other thread may handle the ready I/O. Also, keys don’t live forever. A key becomes invalid when its associated channel or selector is closed. A key may be explicitly invalidated by calling its cancel() method. You can test the validity of a key by calling its isValid() method. Invalid keys are added to the cancelled-key set of the selector and removed from its key set at the next invocation of any form of select(), or close(). (Of course, removing a key from the key set means that its associated channel will no longer be monitored.)
When a channel is ready for I/O, we often need additional information to process the request. For example, with our Echo protocol, when a client channel is ready to write, we need data. Of course, the data we need to write was collected earlier by reading it from the same channel, but where do we store it until it can be written? Another example is the framing procedure from Chapter 3. If a message arrives a few bytes at a time, we may need to store the parts received so far until we have the complete message. In both cases, we need to associate state information with each channel. Well, we’re in luck! SelectionKeys make storing per-channel state easy with attachments.
Example . SelectionKey: Find ready I/O operations
Object attach(Object ob)
Object attachment()
Each key can have one attachment, which can be any object. An attachment can be associated when the channel’s register() method is first called, or added directly to the key later, with the attach() method. A key’s attachment can be accessed using the SelectionKey’s attachment() method.
To summarize, here are the steps in using a Selector:
Create a selector instance.
Register it with various channels, specifying I/O operations of interest for each channel.
Repeatedly:
Call one of the select methods.
Get the list of selected keys.
For each key in the selected-keys set,
Fetch the channel and (if applicable) attachment from the key
Determine which operations are ready and perform them. If an accept operation, set the accepted channel to nonblocking and register it with the selector
Modify the key’s operation interest set if needed
Remove the key from the selected-keys set
If selectors tell you when I/O is ready, do you still need nonblocking I/O? Yes. A channel’s key in the selected-keys set doesn’t guarantee nonblocking I/O because key set information can become stale after select(). In addition, a blocking write blocks until all bytes are written; however, an OP_WRITE in the ready set only indicates that at least one byte can be written. In fact, you cannot register a channel with a selector unless it is in nonblocking mode: the register() method of SelectableChannel throws an IllegalBlockingModeException if invoked when the channel is in blocking mode.
Java NIO provides datagram (UDP) channels with the DatagramChannel class. As with the other forms of SelectableChannel we’ve seen, a DatagramChannel adds selection and nonblocking behavior and Buffer-based I/O to the capabilities of a DatagramSocket.
Example . DatagramChannel: Creating, connecting, and closing
static DatagramChannel open()
boolean isOpen()
DatagramSocket socket() void close()
A DatagramChannel is created by calling the open() factory method, which creates an unbound DatagramChannel. The DatagramChannel is simply a wrapper around a basic DatagramSocket. You may directly access the particular DatagramSocket instance using the socket() method. This will allow you to call basic DatagramSocket methods to bind, set socket options, etc. When you are finished with a DatagramChannel, call the close() method.
Once you create a DatagramChannel, sending and receiving is fairly straightforward.
Example . DatagramChannel: Sending and receiving
int send(ByteBuffer src, SocketAddress target)
SocketAddress receive(ByteBuffer dst)
The send() method constructs a datagram containing the data from the given ByteBuffer and transmits it to the SocketAddress specifying the destination. The receive() method prepares to accept a datagram into the specified buffer and return the address of the sender. Caveat: If the buffer’s remaining space is smaller than the datagram, any excess bytes are silently discarded.
The following code segment creates a DatagramChannel and sends the UTF-16 encoded string “Hello” to a UDP server running on the same host on port 5000.
   DatagramChannel channel = DatagramChannel.open();
   ByteBuffer buffer = ByteBuffer.wrap("Hello".getBytes("UTF-16"));
   channel.send(buffer, new InetSocketAddress("localhost", 5000));
The following code segment creates a DatagramChannel, binds the underlying socket to port 5000, receives a datagram with a maximum of 20 bytes, and converts the bytes to a string using UTF-16 encoding.
   DatagramChannel channel = DatagramChannel.open();
   channel.socket().bind(new InetSocketAddress(5000));
   ByteBuffer buffer = ByteBuffer.allocateDirect(20);
   SocketAddress address = channel.receive(buffer);
   buffer.flip();
   String received = Charset.forName("UTF-16").newDecoder().decode(buffer).toString();
In the send() example above, we don’t explicitly bind to a local port so a random port is chosen for us when send() is called. The corresponding receive() method returns a SocketAddress, which includes the port.
If we’re always going to send to and receive from the same remote endpoint, we can optionally call the connect() method and specify the SocketAddress of a remote endpoint.
Example . DatagramChannel: Connecting DatagramChannels
DatagramChannel connect(SocketAddress remote)
DatagramChannel disconnect()
boolean isConnected()
int read(ByteBuffer dst)
long read(ByteBuffer[] dsts)
long read(ByteBuffer[] dsts, int offset, int length)
int write(ByteBuffer src)
long write(ByteBuffer[] srcs)
long write(ByteBuffer[] srcs, int offset, int length)
These methods restrict us to only sending to and receiving from the specified address. Why do this? One reason is that after connect(), instead of receive() and send(), we can use read() and write(), which don’t need to deal with remote addresses. The read() and write() methods receive and send a single datagram. The scattering read, which takes an array of ByteBuffers, only receives a single datagram, filling in the buffers in order. The gathering write transmits a single datagram created by concatenating the bytes from all of the array buffers. Caveat: The largest datagram that can be sent today is 65,507 bytes; attempts to send more will be silently truncated.
Another advantage of connect() is that a connected datagram channel may only receive datagrams from the specified endpoint so we don’t have to test for spurious reception. Note that connect() for a DatagramChannel does nothing more than restrict send and receive endpoints; no packets are exchanged as they are for connect() on a SocketChannel, and there is no need to wait or test for the connection to be completed, as there is with a SocketChannel. (See Chapter 6.)
So far, DatagramChannels look a lot like DatagramSockets. The major difference between datagram channels and sockets is the ability of a channel to perform nonblocking I/O operations and use selectors. Selector creation, channel registration, selection, etc., work almost identically to the SocketChannel. One difference is that you cannot register for connect I/O operations, but you wouldn’t want to, since a DatagramChannel’s connect() never blocks anyway.
Example . DatagramChannel: Setting blocking behavior and using selectors
SelectableChannel configureBlocking(boolean block)
boolean isBlocking()
SelectionKey register(Selector sel, int ops)
SelectionKey register(Selector sel, int ops, Object attachment)
boolean isRegistered()
int validOps()
SelectionKey keyFor(Selector sel)
These methods have the same behavior as for SocketChannel and ServerSocketChannel.
Let’s rewrite our DatagramSocket UDP echo server from Chapter 4 using DatagramChannel. The server listens on the specified port and simply echoes back any datagram it receives. The main difference is that this server doesn’t block on send() and receive().
UDPEchoServerSelector.java
 0 import java.io.IOException;
 1 import java.net.InetSocketAddress;
 2 import java.net.SocketAddress;

 3 import java.nio.ByteBuffer;
 4 import java.nio.channels.DatagramChannel;
 5 import java.nio.channels.SelectionKey;
 6 import java.nio.channels.Selector;
 7 import java.util.Iterator;
 8
 9 public class UDPEchoServerSelector {
10
11   private static final int TIMEOUT = 3000; // Wait timeout (milliseconds)
12
13   private static final int ECHOMAX = 255; // Maximum size of echo datagram
14
15   public static void main(String[] args) throws IOException {
16
17     if (args.length != 1) // Test for correct argument list
18       throw new IllegalArgumentException("Parameter(s): <Port>");
19
20     int servPort = Integer.parseInt(args[0]);
21
22     // Create a selector to multiplex client connections.
23     Selector selector = Selector.open();
24
25     DatagramChannel channel = DatagramChannel.open();
26     channel.configureBlocking(false);
27     channel.socket().bind(new InetSocketAddress(servPort));
28     channel.register(selector, SelectionKey.OP_READ, new ClientRecord());
29
30     while (true) { // Run forever, receiving and echoing datagrams
31       // Wait for task or until timeout expires
32       if (selector.select(TIMEOUT) == 0) {
33         System.out.print(".");
34         continue;
35       }
36
37       // Get iterator on set of keys with I/O to process
38       Iterator<SelectionKey> keyIter = selector.selectedKeys().iterator();
39       while (keyIter.hasNext()) {
40         SelectionKey key = keyIter.next(); // Key is bit mask
41
42          // Client socket channel has pending data?
43          if (key.isReadable())
44            handleRead(key);
45
46         // Client socket channel is available for writing and
47         // key is valid (i.e., channel not closed).

48            if (key.isValid() && key.isWritable())
49              handleWrite(key);
50
51            keyIter.remove();
52          }
53        }
54      }
55
56      public static void handleRead(SelectionKey key) throws IOException {
57        DatagramChannel channel = (DatagramChannel) key.channel();
58        ClientRecord clntRec = (ClientRecord) key.attachment();
59        clntRec.buffer.clear();       // Prepare buffer for receiving
60        clntRec.clientAddress = channel.receive(clntRec.buffer);
61        if (clntRec.clientAddress != null) {   // Did we receive something?
62           // Register write with the selector
63           key.interestOps(SelectionKey.OP_WRITE);
64        }
65      }
66
67      public static void handleWrite(SelectionKey key) throws IOException {
68        DatagramChannel channel = (DatagramChannel) key.channel();
69        ClientRecord clntRec = (ClientRecord) key.attachment();
70        clntRec.buffer.flip(); // Prepare buffer for sending
71        int bytesSent = channel.send(clntRec.buffer, clntRec.clientAddress);
72        if (bytesSent != 0) { // Buffer completely written?
73           // No longer interested in writes
74           key.interestOps(SelectionKey.OP_READ);
75        }
76     }
77
78     static class ClientRecord {
79       public SocketAddress clientAddress;
80       public ByteBuffer buffer = ByteBuffer.allocate(ECHOMAX);
81     }
82   }
UDPEchoServerSelector.java
1. | Modify |
2. | Write an echo client that uses |
[1] One of the “official” reference books on Java says it this way: “There are no guarantees, only a general expectation that preference is typically given to running higher-priority threads.... Do not rely on thread priority for algorithm correctness” [1], pages 358–359.