
3.6 Slideware for Drawing
exploiting commonly available digital presentation tools for sketch drawing
Paper and pen are fantastic sketching tools. They are cheap, portable, and always on. Best yet, you and your colleagues have years of training (since childhood) and experience using a pencil.
However, digital tools have powers that paper and pencil lack. In particular, you can easily modify sketches made with digital drawing tools, make multiple copies, print them repeatedly, use them as templates, and – as we will see in later chapters – create interactive sequences via animations and linking if the tool allows it. As well, if your pencil drawing skills are poor, the digital drawing tool will likely help you produce better looking sketches (if warranted).
In contrast to a paper sketchbook, you will incur some costs when using a digital drawing tool over pen and paper. It will take you time to turn it on, which may inhibit you from capturing ideas on the fly. Unless you have a pen-based computer or equivalent, doing freehand sketching with a mouse is painful. You will have to learn how to use (and remember) the tool’s advanced features. You will have to manage your sketches as files rather than as a sequence of pages. You will find it harder to review your sketches, as you now have to find, open, and close these files.
There are many digital drawing tools on the market, and some are even specialized for sketching. In this chapter, we deliberately concentrate on slideware, i.e., software used to make slide presentations. We use this software because they have valuable sketching features above and beyond their digital drawing capabilities, and because almost everyone already has one installed on his or her computer and knows how to use it.
Sketching in Slideware
Software for creating presentations is fairly ubiquitous, with the two most commonly available ones at the time of writing being Microsoft PowerPoint and Apple’s Keynote. They have powerful drawing and manipulation tools, as well as access to stock images. We will concentrate on these drawing features in this chapter. In addition, these tools also let you do play sequences as slide shows, and allow for animations and hyperlinking; we will discuss the power of those functions in later chapters.
We will primarily use Microsoft’s PowerPoint, illustrated below, as our example slideware tool; other presentation systems are similar. We will just quickly review PowerPoint’s basic drawing building blocks, where you draw by creating, moving, copying and manipulating the objects and their properties. You probably know how to do this already. The main point of this chapter, as we will see, is to contrast the powers and weaknesses of using a digital vs. paper-based tool.

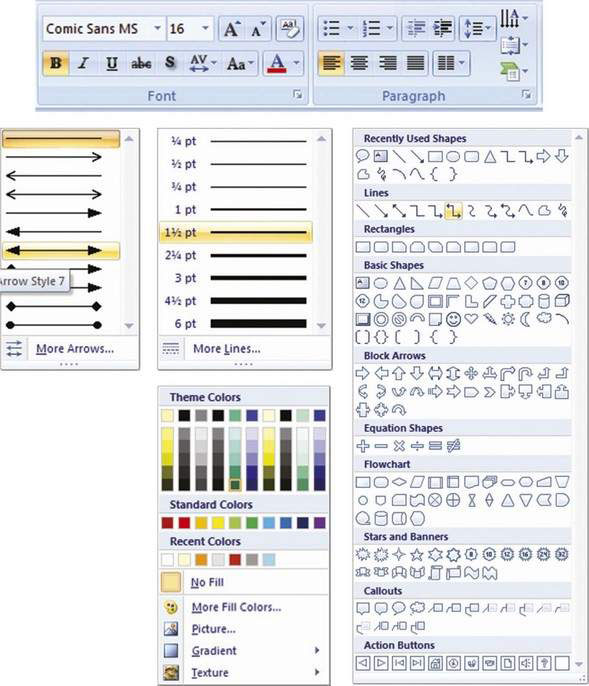
Slideware packages usually have a large variety of pre-defined shapes with many adjustable properties. They also usually include many custom shapes and variations. For example, the PowerPoint shapes palette, shown at the right below, illustrates the rich set of pre-defined drawing shapes. The line sub-palette included in the shapes palette shows the various types of lines available: straight lines, lines with arrows, lines with corners, curves, splines, and even free-form drawing lines. Properties of already drawn lines can be further altered, for example by changing the thickness (middle figure) and / or switched into one of the many forms of arrows (left), or by changing the color, gradient or even texture (bottom left). Basic shapes range from different styles of rectangles, textboxes, circles, different triangles, parallelograms, different kinds of braces, and others. More custom shapes include happy faces, lightning bolts, flowchart symbols, various block arrows, and buttons. There are even various forms of callouts, which are excellent for annotating a drawing. Properties of these shapes can be altered at will, e.g., how it is filled or outlined (bottom palette). Of course, presentation packages also include myriad options for text, including font type, size, alignment, color, indentation, character and line spacing, and others (top palettes).
Digital vs Paper-Based Sketching
To get into the spirit of things, try the following. Time yourself. First, using paper and pencil, quickly reproduce a rough sketch of the shopping system on the right. How long did it take you?

Next, as quickly as possible, try to reconstruct your own version of this same shopping system as a single slide in your own slideware software. How long did that take you?
The version I created, done in PowerPoint, is on the left below. It didn’t take that long to do, although it did take me longer than the pencil version. But unlike the pencil sketch, it just looks wrong. This is largely because many of the interface elements are not sketch-like, e.g., their nicely shaped boxes, typed text, and straight lines and corners jar with their sketch-like aspects, including irregular lines, sloppy alignment, low fidelity sketches (the face and the stroller), the differences between sizing, and the poor spatial layout.
Now try redoing the sketch on the left, but instead try to make it look reasonably ‘right’. My version is shown below on the right.

This did take quite a bit longer. I now paid attention to alignment, fonts, color, shading, the placement of graphics, spatial layouts, and proportion. While not perfect, that is why it looks reasonable.
What should be apparent right away is that this 2nd version produces what looks like a high fidelity screen shot. Yet the information contained is more or less identical. While its good looks can be a benefit (especially in later stages of the design funnel), it introduces a problem if done in early stages. To make this 2nd version look good, I had to spend more time deciding on issues such as text size, alignment, the look of the buttons, spatial layout, and so on, which have little to do – and indeed can interfere – with capturing the basic design idea as a quick sketch.
Digital Collaboration
Chapter 3.5 already talked about collaborative sketching in detail; for now, what is important to remember is that collaborative sketching on a computer with software is quite different from collaborative sketching with paper and pencil.
Repeat the above exercise, except this time work with another person to (a) create a pencil sketch over a large sheet of paper while seated at a table, and then (b) create the digital sketch while seated in front of a workstation. You will notice that the dynamics will have changed, as in the two figures below that differ only in the sketching technology used. With the computer, one of you may know the software a bit better, and will thus become the ‘scribe’, perhaps with the other person offering suggestions and directions as you sketch. You may also get in each other’s way (especially if three or more people are involved), as seating multiple people in front of the small display becomes crowded. The single mouse and keyboard disallows simultaneous interaction, and forces turn-taking behavior instead (e.g., one person being ‘in charge’ at a time). You’ll also find much of the time is spent choosing and navigating to your interface controls rather than sketching, which will inhibit how you all talk about the sketch as you do it. Participants may also feel somewhat disengaged if the other is doing all the actions.

You Now Know
Commonly available slideware applications contain powerful drawing capabilites that allow you to create digital sketches. While going digital provides many powers, it comes at a cost to the look of the sketches you create, the time you spend on them, and how it could inhibit collaborative sketching activities.