3.8 Templates
pre-draw the constant, non-changeable parts of your sketch as a template that you can use and reuse
In some situations, you will be responsible for modifying only a portion of an existing visual interface. Certain portions may be pre-determined and fixed, either because of the shape of the hardware product (e.g., a cell phone body, buttons and screen size), the application hosting the system (e.g., a web browser frame), a window that contains pre-existing controls and information (e.g., an application), or a layout/style sheet that dictates how the contents of a window must conform to a certain layout (e.g., dialog boxes, particular web pages).
You can, of course draw out those fixed parts repeatedly for each sketch, but that quickly becomes tedious. Or you can leave those fixed parts out, but then your sketch may lack context. An alternative is to create a template, an image that captures the fixed parts of the system that you can easily copy, while leaving drawing space for your own creative endeavors atop this image.
Appropriating Photos
In this example, we will create a template of a particular cell phone body. We will leave the cell screen blank as a sketching surface.
1. Find a source image of the desired cell phone. You could take a photo of an existing cell phone. Or as done here, you could search for the image on the web. Alternately, you can find it in a print magazine or flyer, and scan it in.
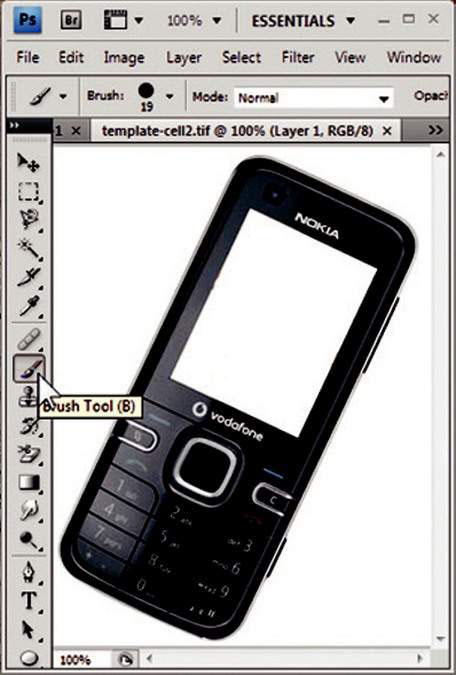
2. Copy the image into an image or bitmap editor of your choice. The example to the left shows the cell phone image imported into Adobe Photoshop.

Drawing with a mouse can be difficult. Instead, you may want to consider buying a pen-based tablet; these are much easier to draw with. There is a variety of modestly priced ones on the market.
If you have to use a mouse, zoom into the photo. Its larger size will make tracing easier to do. Still, it’s hard to draw long curvy lines accurately. Instead, draw with short strokes, piece by piece. When continuing the stroke, always begin at the end point of the previous stroke so the result is a continuous line.
Drawing in short strokes also means undo will work better when you do make a mistake.
3. White out the screen area, which you will use as your sketching area. In the example on the left, I set Photoshop’s paint brush tool to white and painted out the existing screen image.
4. Using your bitmap editor, sketch your ideas atop copies of this image (as done on the left). Alternately, print out paper copies of the images and sketch atop them with pencil.

Tracing
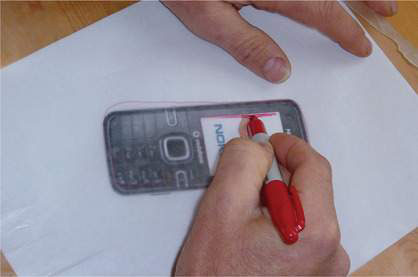
The above technique is simple, but does lead to a perhaps strange juxtaposition of a highly detailed photo and crude sketch. To keep everything at the same sketch fidelity, and perhaps to mute unneeded details, you can create a sketch of the image – the cell phone – and use that as a template. You can do this quickly by tracing. Here is one convenient way to do this in software.
1. Load the image into a bitmap editor that lets you create layers. Create a new layer (how you do this depends on your software), and trace over the parts of the image you want to keep. You don’t have to trace everything, nor do you need to capture it in full fidelity. In the figure to the right, the letters associated with the keys were left off, and scribble text was used instead of logos.

2. Remove, cut or hide the photo layer, leaving only the trace. In Photoshop, you can do this by selecting the layer containing the original image and turning its visibility off, as done below in Layer 1.

3. As before, you can sketch your ideas atop copies of this template.

More on Layers
Editors that allow layering will let you create and experiment with a multitude of sketches, where each sketch variation is saved as a new layer. This way, you can switch between layers (and between ideas) simply by changing that layer’s visibility. You can also build up your single sketch as a series of layers. The examples below show how this is done in Photoshop.
Using slideware like PowerPoint, you can use slides as a (sort of) replacement for layers.
For example, put the image onto the first slide, and make a copy of that slide as a 2nd slide. Using PowerPoint’s drawing tools (see Chapter 3.6), sketch over the phone. Group the marks to make a single drawing. Then delete the image off the second slide, leaving just the template. Copy that as new slides, where you can then sketch over those as with layers.
By mixing and matching slides and visuals, you can reuse the various pictorial and sketching elements.
1. Create layers as shown. The first four images show different layers, including the original image (layer titled Cell phone photo), the sketched over template (layer Template), and two different sketches of the screen contents (layers Buy/ Sell by cursor, and Buy/Sell by numbers). The visibility of layers was adjusted to hide and reveal particular layers.

2. Compose the layers together to achieve different sketches. In Photoshop, this is done by adjusting the layer visibility. These images both use two composite layers. Both make the Template layer visible (to show the sketched phone). The first makes the Buy/Sell by numbers layer visible, while the second uses the Buy/Sell by cursor layer. While we don’t show this, you can use the phone image instead of the sketched template simply by making the Cell phone photo layer visible and the Template layer invisible.

Back to Paper
While software may help you create templates, it is not crucial. And as usual, drawing with pen or pencil is often faster and more convenient than drawing in software.

Another Example: a Web Page Template
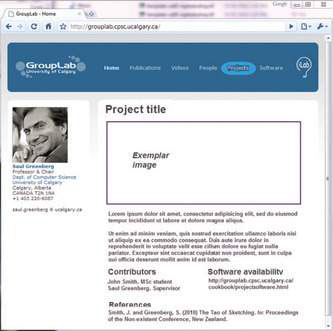
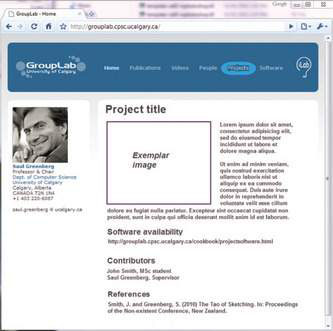
The next example shows – in abbreviated form – how the same technique is used to create a template for a web page. In this case, the designer is sketching out the general style of ‘Project’ pages, a new sub-site within Saul Greenberg’s Grouplab web site. The style guide for this web site determined a fixed look and feel that all pages should conform to. The banner on top is always the same (although the highlights may differ), as is the sidebar. These are the steps the designer did, which you can repeat on this site or your own preferred web site.
1. Using a screen-grabbing tool, grab the source image.

2. In an image editor, white out the area that you will use as your sketching canvas. You can also modify the visuals of the template using the editing tools (e.g., the location of the blue highlight was changed to be over the Projects tab).

3. Using that as your template, sketch out your ideas. The two at the bottom are two variations of layout ideas for a project page. In this case, we used the image editor tools to create the layouts.