
3.9 Photo Traces
create collections of sketch outlines that form the basis of composed sketches
In Chapter 3.8, we showed you how you can trace technologies – such as a cell phone – and use that as a template to frame your interface. However, you can use traces more generally to capture any real-world entity, and then use (and re-use) that as part of your sketches. This includes objects such as tables where we do our work, people doing different activities or in different poses, postures of hands, and even a physical environment such as a room. The idea is simple: take a good photo; trace over that photo to create a photo trace, save that trace as a sketch element, then copy and use that sketch element in your sketches. This is a powerful method, as people with no drawing skills can produce fairly good photo traces of complex things.
Digital drawing editor that lets you:
Adobe Photoshop and Adobe Illustrator are two examples of such editors, but there are many others available that you can use.
Creating a Photo Trace
For this example, imagine that you need to sketch out some ideas for a large vertical or horizontal display that recognizes people’s hand gestures. To do this, you will create a series of sketch elements that show a person’s hand in different postures.

1. Decide on the hand posture(s) you want. Using a tripod, adjust the camera’s viewing angle of the scene (see Tips sidebar). Then take your photos of the hand postures you would like to sketch.
Select an appropriate perspective for shooting the photographs: from above, at an angle, or from the side. The best perspective will depend on how you want to use your sketch elements. To achieve a consistent collection of sketch elements, we take all the photos from the same perspective view by mounting the camera on a tripod.
Most drawing systems have a very thin stroke thickness by default (e.g., 1 pixel).
Instead, draw with a thicker stroke. You will find it easier to (a) see your trace, and (b) produce a rough sketch quickly. A thicker stroke will also make your sketch appear more sketchlike, i.e., like a cartoon.
Most editors will let you adjust your stroke thickness afterwards, which will let you fine tune your trace’s appearance.
2. Import the first photo of a hand posture into your digital drawing editor. Set the opacity of this photo to 50%, which makes it easier to draw the trace outline. Also, set the stoke thickness to a modestly thick stroke (see Tips sidebar).
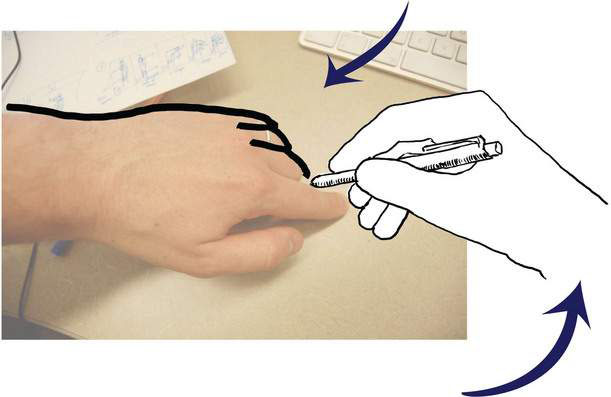
3. Draw a stroke path along the outline of the hand. It is not necessary to be too accurate with this – the idea is to capture the basic shape outline of the hand as can be seen in the picture above.
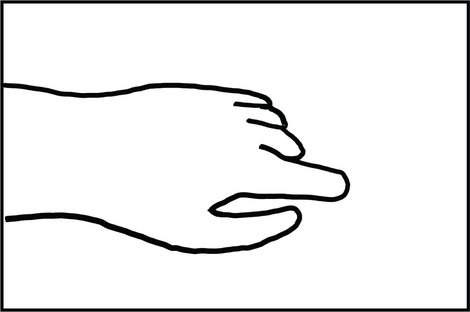
4. Remove the original photo from the background (or hide it if its a layer, as in Chapter 3.8). What remains on the drawing page is the outline of the hand posture that you can fine tune (e.g., to scale, to rotate, to re-adjust stroke thickness) and save for later use.

5. Repeat steps 1 to 4 for any other hand postures you would like to add to your collection.
Using the Photo Traces
Example 1: Sequence of Hand Postures
1. Now imagine that you need to sketch out a particular gesture that a horizontal display – a digital table – will understand. To do this, select the appropriate hand sketches to create a time series that shows a person’s hand in different postures over time. Our example uses an open palm forming into a fist.
2. In our solution, we rotate our drawings to present a top-down view of the postures we want. We then compose four of the single hand posture outlines into a single sketch to create a sequence: from straight hand, to an L-shape posture, C-shape posture, and the fist.

3. We then add additional parts of the sequence sketch. In this version of our sketch, arrows now indicate how the orientation of parts of the hand relative to one another are tracked to recognize postures on an interactive tabletop, as viewed from above.

Example 2: Using a Single Sketch Element for Two Different Sketches
The two examples below are part of a series of sketches illustrating possible forms of gestural interactions above an interactive tabletop surface, where the surface recognizes objects in the person’s hand. We again begin with a simple outline of a hand posture, but here we use only a single hand sketch to illustrate two different situations. The key idea is that we simplified constructing these sketches by reusing that single hand outline and drawing around it.
1. Using photo traces, create an outline a grabbing/holding posture of a hand. This posture is reused in all sketches in this example.

2. Copy the hand posture outline into two different drawings, and adjust the size and position.
3. Sketch the physical objects the hand is holding; e.g., a little cube or box.

4. Next, sketch parts of the interactive tabletop surface. These are straight lines for the outline of the table, and a cross-hatched shadow at the side of the table.

5. Draw other objects on the table, or visualizations displayed on the tabletop surface (e.g., virtual shadows).

6. For the final sketches, add any annotations to the sketch, such as arrows indicating movements and gestures. Using a different color for these annotations can clarify the fact that these are not part of the actual drawing itself, but meta annotations.

7. These two sketches were part of a larger collection of images we had developed to illustrate how a person might interact with digital content on an interactive tabletop by performing gestures above the surface (see Marquardt et. al, 2011). Below are further samples of this collection of sketches; all of them using the photo trace technique as a starting point for generating the outlines of hands. We used the same technique to generate the various devices and objects below, e.g., the cell phone, the tablet, and the transparent acrylic sheet. For practice, try using photo traces to reproduce some of these sketches.

Example 3: Several Photo Traces Used in this Book
Most first pages introducing each section of this book used photo traces as a starting point. Below are the original photos we took on the left side, and the photo trace sketches we made on the right. Notice how we added features to the sketch that are not in the original photo (e.g., the images in the flipbook, or the details of notes on the poster wall).

Sketch a user interface running on a tablet computer to exchange digital data (e.g., photos) between the computers of two people. Use photo traces to sketch the tablets and how people hold them. Our solution is below, but try to create your own.
1. Take photo of person holding a tablet computer.

2. Create a photo trace with the techniques described earlier.

3. Duplicate this photo trace sketch to use it as a basis for your various interface sketches. You can also use additional photo traces for this sketch.
Two Variations of a Possible User Interface Sketch:
A. The person selects a photo and the person to receive it, and clicks send.

We use a second photo trace of a person’s hand and index finger.
B. The person selects a photo thumbnail. He bumps the tablet against the other tablet to initiate the transfer.

For the second tablet computer, we flipped our previous sketch horizontally. Look closely at them – they are the same. Only the content on each tablet is different.