
5.4 Keyframes and Tweening
creating more complex animations
A few chapters back, we illustrated how you could use motion paths within PowerPoint to create a simple motion path that moves an object around a screen. However, most presentation tools are not really designed to support the more complex animated sketches you may want to create. This is where a tool designed for multimedia animation creation – such as Adobe Flash – can help. While this means extra cost for the software and time to learn it, many advantages accrue.
• You will be able to create complex animations of highly interactive scenarios reasonably quickly.
• You will be able to articulate fine details of how the interaction unfolds over time.
• Most systems let you quickly render animations as stand-alone videos.
• The result can be far more professional looking and detailed, to the point that your system may appear ‘real’.
It is beyond the scope of this book to teach you how to use a multimedia animation tool, especially because each tool will have its own set of features and idiosyncratic interface for creating animations. However, almost all will include two fundamental capabilities: keyframes and inbetweening (also known as tweening).
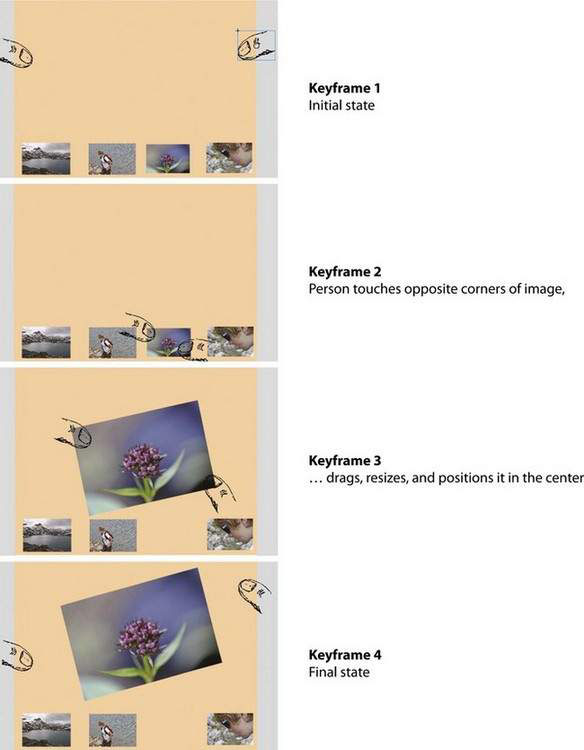
We’ll provide and illustrate several definitions by animating an imagined photo viewer that runs on a touch-sensitive digital table. Similar to photo apps on smart phones, the idea is that a person can select and enlarge a photo with two fingers as he brings it into the table’s center.
Some Definitions
Keyframe: An important frame that defines the start and/or end frame in a particular animation sequence. Each keyframe contains objects as well as the current properties of that object, such as an object’s position, size, orientation, color, and so on. These properties can vary across keyframes.
Animation properties: Any property of an animation that can be specified as differences between keyframes, where that property can be animated over time. Typical properties include basic object transformations (scale, rotation, movement), advanced transformation (object skewing, transforming one shape into a completely different shape), visual properties (color transforms, fading, transparency), and more.
For example (and similar to a storyboard), we define four keyframes to illustrate a person placing and resizing an image onto the table via a set of thumbnails. Our ‘objects’ are the two fingers and the four photos. While each keyframe contains the same objects, the animation properties of some of them – the finger’s position, the image size and orientation – change across the keyframes.
In-betweening (or tweening): the process of generating the set of frames between two keyframes. The properties of each object are animated so it smoothly transforms itself from its state in the first keyframe to its state in the next keyframe.
For example, let’s say we wanted to tween between keyframes 2 and 3 above. We want an animation of about 1.5 seconds at (say) 4 frames per second. This means we would have to generate an additional 4 in-between frames. To make this animation work across these four frames:
• the left finger would incrementally move to a new position,
• the right finger would incrementally move to a new position and change its orientation to point upward,
• the image would incrementally move to a new position, would increase in size, and would change its orientation to tilt somewhat upward.
The four tweened frames plus the two bracketing keyframes could look something like this:

Motion path (introduced earlier, but which should now be clearer): the path followed by an animated object as it changes its position as specified by the keyframes.
The moving left finger is an example, where it moves across a linear path defined by its start and end position.
Example: Adobe Flash
Let’s create the above animation in Adobe Flash CS4. What is shown below is not necessarily the best way to do it, nor are all details provided. However, it suffices to illustrate the basic idea.
1. Create a stage (the backdrop for your animation) and populate it with your visual elements
I opened a stage – the area containing the animation – where I set it to run at 12 frames per second. I found clipart of a finger on the web, and I grabbed 4 personal photos. I imported all these into Flash (making two copies of the finger). I then resized and placed them on the stage. Using each item’s context menu, I converted them into symbols, a type of object that Flash knows how to animate. We now have keyframe 1.

As seen in the image above, this process is somewhat similar (so far) to how we would lay out objects in slideware or drawing application. The key difference is the appearance of the timeline at the bottom of the window, which allows objects on particular layers to be animated over time. We are currently looking at frame 1, where 37 frames (∼3 seconds) are visible in the timeline. The first frame is always a keyframe, as indicated by the black circle in the ‘1’ square on the timeline.
2. Create tweened frames filling up 1 second of the animation
In Adobe Flash, you can create a per-symbol frame for each object you want to animate by creating a Motion Tween for it. This is done via each symbol’s context menu, as shown here. As you do this, the timeline will add a layer for each symbol in the timeline, and extend the timeline to include 1 second (12 frames) of animation. If you run the animation, though, you won’t see anything happening as all symbols are in the same place.

You can change the motion path your object takes as it is tweened using its spline path
Each point on the spline path represents the object’s position in a particular frame. (this is why there are 12 points, as there are 12 frames).
You can edit and move these particular points to new positions to change the shape of the object’s path across frames. For example, you can make it move along a curve instead of a line.
Other packages
You may be using other animation software, or even a different version of Adobe Flash. Thus the instructions here will likely not match. Don’t fret. The point is to understand the idea of keyframes and tweening. You can always look up how to do it in your particular software’s tutorial guide.
3. Move the frame indicator to the 12th frame, i.e., 1 second into the animation
This is where you will create keyframe 2.

4. Drag the symbols to their new position
Drag the two fingers to just touching the 3rd photo, i.e., as in the 2nd keyframe illustrated earlier. When we do this, Adobe Flash automatically turns that 12th frame into a keyframe on the particular layers holding the two fingers, as indicated by the black circles in the 2nd and 3rd layer. It then automatically generates all frames between those two keyframes. In each frame, it also illustrates each symbol’s spline path, which is the path the tweened symbol takes as it moves between the keyframes (see Tip).

5. Move the frame indicator to see the tweened frames, or play the animation
The image shows the animation generated at frame number 6. Alternately, the animation can be played where it will run this 1-second animation at 12 frames / second.

6. Add more frames to the timeline
Currently, we only have 12 frames. Add two more seconds to it by dragging over cells 13-36. Then raise the timeline’s context menu, and select ‘Insert Frame’.

Moving to frame 24 and similar to Step 4, reposition the fingers and the picture. Also change the orientation of the right finger and the image, and resize the image as needed. As before, the tweened frames will be automatically created.
However, you will now see a problem: the photo will start animating from the 2nd frame on, which is not what we wanted. This is because no keyframe exists at frame 12 for the photo on layer 5. To correct this, move the frame indicator to frame 12, raise the context menu on layer 5, and select ‘Insert Keyframe’. Because the position of the image between frames 1 and 12 is unchanged, the tweening to Frame 24 will now begin on frame 13.

Moving to frame 36, reposition the fingers to the side of the table. This repeats what you’ve seen before, so we won’t bother showing you what this looks like. Your animation is now complete!
You Try
The above example illustrates one of the most rudimentary things you can do with a good animation package. Learn and experiment with the animation package of your choosing to try to replicate what we just did.
A good way to learn and exercise your skills at creating multimedia animations is to try to mimic a short highly interactive sequence of your choosing in some existing software system. Start with something simple, such as an animation that repositions objects, as in the photo editor above. Then move on to more challenging sequences, as these will push you into discovering advanced capabilities in your animation system. And if you are up for the challenge, you can learn how to script (or program) your animations for even more power.
Don’t get caught up
Techniques such as keyframes, tweening, and others that you will learn as you become familiar with your animation package are just other tools in your sketching toolkit. While animations can be fun to create and awesome to view, they don’t suit every occasion, nor are they always necessary. Be judicious.