5.5 Linear Video
using a movie to illustrate an interaction sequence with paper
A sketch can be brought to life by creating a movie showing a continuous interaction sequence. In contrast to storyboards, where people have to imagine what happens in the transitions, movies can show those transitions while voice-overs can explain what is going on as actions are being done. Such sketches can be quite compelling, for if done well they can tell a complete story of a particular interaction sequence.
Creating a movie of an interaction sequence – a linear video – is surprisingly easy. Aside from some office supplies (see Chapter 3.7), the only specialized equipment you will need is a video camera (a home video camera should be fine), a tripod, and basic video-editing software.
Preparation
In this example, we create a movie by recording and then editing a person ‘interacting’ with a paper-based interface. Our example is simple: it uses four Post-It Notes, each representing a different screen with different interface controls as shown in step 4. Our story will show what happens when a person presses the various buttons on the first screen.
1. For this example, you will need four sticky notes, such as 3M’s Post-It notes. On each sheet, draw what is shown below in notes 1, 2, and 3, and the additional ‘register’ post-it shown in Step 2.

Registration
Make sure all the sticky notes are perfectly aligned atop each other.
See Chapter 5.1 for more information on registering images.

2. All sticky notes will have to be registered so the notes are perfectly aligned on top of one another (see the registration problem in Chapter 5.1). To do this, securely tape the ‘register’ sticky note on a flat horizontal surface, table or floor. All other sticky notes will then be placed atop this.

3. Set up the camera and tripod so that the camera is aiming directly at the sticky note. Adjust the zoom and focus on the camera as needed.

4. If you move the camera or accidentally bump it while shooting your scenes, you will have problems with image registering: the camera will be recording from a different angle. To help fix this, mark the tripod’s location (e.g., by tape). You can then reposition the camera back to its original location.
Recording The Movie
1. You will be recording actions that you want in your movie (e.g., a person pressing a button, as in the first film strip image below), and actions that you will edit out later (e.g., you remove a sticky note to show a different screen, as in the 2nd image below).
After the whole video is recorded, you will use a video editor software to remove the “move screen” sections, shown below crossed with an ‘x’. Then replace the edited part with a fade or dissolve transition in between.

2. Place each sticky note on top of the ‘register’ sticky in the order that you expect to use them. Practice the actions you are going to do.
3. Now press record and leave it on until the whole interaction is complete. The film strip image below shows the order of sequence in which the interaction occurs, as well as what should be deleted. Edit out those segments. You are done!

Variations: Paper and Transparency
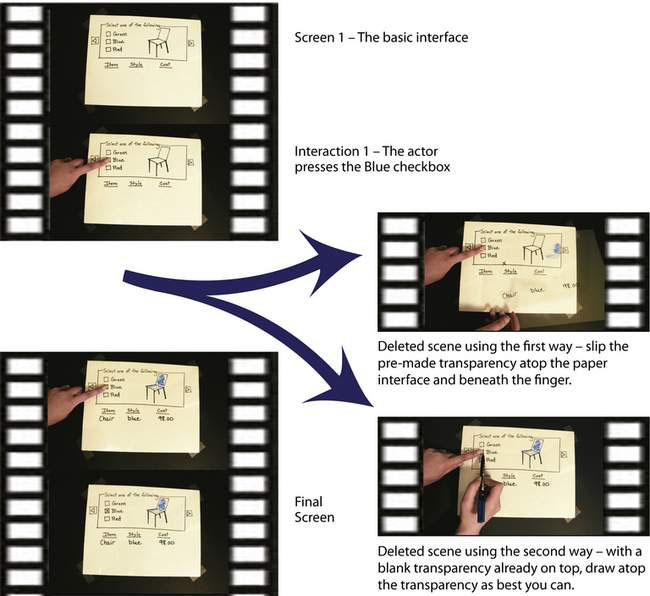
We can use a variation of this sketching technique to create a video sequence showing a person interacting with a screen where only the appearance of some of its graphical elements changes. Our next example uses paper instead of sticky notes (because the screen is larger) and transparencies. To illustrate, we sketch an interface where a person uses checkboxes to interactively view different colors of a chair she is thinking of buying and to see the cost of that particular item.
Using a similar technique you just learned, prepare the interface shown in step 1. You will need only a single piece of paper showing the basic interface. There are two ways to prepare and create the rest of this video:
Our first way pre-makes all the transparencies before you start recording.
1. Draw on one single piece of paper showing the basic interface.


3. On the transparency, draw the changes that would occur after an interaction. In this example, draw in the X in the Blue checkbox, color in the chair, and add “Chair” under Item, “Blue” under Style, and “98.00” under Cost.

The image on the right shows what the transparency would look like by itself.
Our second way places multiple blank transparencies atop the first screen, after which you start recording. This approach allows you to draw while recording. Once you are done with one drawing, the transparency can be lifted off, leaving another blank transparency underneath.

The film strip images below show the sequence of interaction to be recorded. When you edit out your drawing actions (and by replacing it with a dissolve), it will give the illusion that the interface changed as a person did his action.