
Chapter 2 Organizing Your Project
Talent wins games, but teamwork and intelligence wins championships.
—Michael Jordan
Through the years, we’ve been called in to clean up some horrendous messes. The scenario is almost always the same. It’s the last minute, major deadlines are about to be missed, and the stress level is through the roof. We often find that the project’s aesthetics aren’t that bad. However, the project’s organization usually resembles a car crash.
Creative artists often mistake organization for a lack of creativity. A guiding tenet we always follow is that our projects should be able to be handed off. We’re not saying you should make yourself expendable, but don’t hold your projects hostage either. Another designer should be able to step in and help out. Otherwise, you’ll never be able to take a day off, go on vacation, or even just relax. A little organization goes a long way.
We’re not going to force you to clean your desk, but trust us here and open your mind to a little bit of organizational technique.
It’s All About Media Management
We know you thought about skipping this chapter. After all, you’ve gotten this far in your professional career without an organizational strategy. And getting organized does sound pretty boring. You didn’t get into this business because you like mundane tasks like setting up folder structures and renaming files. We understand and know that it’s tempting to jump to the next chapter.
But don’t.
The most experienced pros know that organizing media and assets is crucial (Figure 2.1). You can work faster because you’ll be able to find your source footage quickly. You can even save time by avoiding unnecessary rendering. These are big claims, we know, but setting up your projects right will pay off in the end.
Figure 2.1 An organized project will speed up your design process.
Common Media Folder
When working with your full Adobe toolset, you’ll be sharing a lot of media assets. Toss in files from outside applications and you can quickly become overwhelmed by all your project sources. The best approach we’ve found is to create a Common Media Folder. When properly used, this folder can help you keep all your project files organized.
Here are the top five reasons to use a Common Media Folder:
1. You’ll spend less time searching for files.
2. You’ll have an easier time backing up and archiving projects.
3. You’ll avoid “version control” errors.
4. You’ll have an easier time switching between software applications.
5. You’ll spend less money on hard drives.
 Tip
Tip
If you work with a workgroup or team of designers, consider opting for a shared drive system. For example, Rich uses the Drobo FS at his shop. This system lets multiple artists access a pool of shared footage and graphic assets. It also makes it effortless to keep track of multiple versions and to back up the project upon completion.
Setting Up the Common Media Folder
How you set up a Common Media Folder for your motion graphics workflow is a personal (or perhaps group) decision. We do offer a starting point, however. On this book’s DVD you’ll find a starter template for the Common Media Folder shown in Figure 2.2 in the Chapter_02_Media folder.
Figure 2.2 Feel free to customize the Common Media Folder to match your needs.

The Common Media Folder contains eight folders, which in turn contain various subfolders for specific tasks. Although this may seem a bit divisive, keeping media organized often means splitting it into isolated and manageable chunks. Here is the folder structure we usually create:
• 01 Capture Scratch. This folder is where you store your Premiere Pro capture folders. All other imported footage from card or disk-based sources should also go here.
• 02 Project Files. You should save all your projects to this folder. Additionally, you should periodically back up this folder to another location. If data loss occurs, a project can be restored in large part due to a backed-up project file.
• 03 Graphic Sources. This folder contains all graphic source files (such as logos, fonts, and layered Photoshop files). It should not contain renders or exports. This clean structure makes it simple to enforce version control to avoid errors from minor revisions.
• 04 Graphic Renders. All rendered graphic files should end up in the correct directory in this folder. This makes it easy to track which files should get handed off to video editors, Web developers, or clients.
• 05 Audio Sources. Place all your audio files here. This includes music scoring projects as well as those files you create when you use Adobe Soundbooth. Keeping audio in one location allows you to track sources, especially since files like stock music and scores lack timecode for recapture.
• 06 Stock Footage. We like to put all our stock footage in one folder. This generally refers to two categories: commercially available footage and archived footage that is imported from other projects. Keeping stock elements separate makes expense tracking painless and can simplify archiving at project closeout.
• 07 Final Exported Files. We’re proponents of keeping all your final exports in one place. This folder can help organize self-contained QuickTime movies as well as any additional compressions you create with the Adobe Media Encoder. Future deliverables to the client are a snap if you keep these exports readily accessible.
• 08 Production Paperwork. You’ll want to customize this folder so it contains the most important production paperwork. Having essential details like script, storyboard, and budget handy will increase the likelihood of a project’s success. We also keep client-provided assets like style guides and white papers accessible for future reference.
Customizing the Common Media Folder
Although we’ve given you a suggested folder structure, be sure to create your own template. Going forward, you can create a duplicate copy for each new project. Here are a few practical words on how to use this folder:
• If the contents of the folder don’t match your needs, make adjustments and create a new master folder.
• Keep a Zip archive on your drive and unzip a fresh version for each project.
• Rename the folder with your current project name followed by _CMF, for example, FOX_Open_CMF.
Tip
When you’re happy with your folder structure, create a Zipped copy. Duplicate the folder, and then zip the entire bundle with a compression utility. The archive will be easier to transport.
Targeting the Common Media Folder
An organized folder is useless if you don’t direct your Creative Suite projects to it. For most applications this is simple. When you save your project files, target the correct folder on a hard drive (Figure 2.3). When rendering in After Effects, be sure to specify the right folder.
Figure 2.3 Using a Common Media Folder will cut down on wasted hard drive space.

With Premiere Pro, saving to the Common Media Folder gets a little tougher. Premiere Pro has its own way of setting up folders for preview files, caches, and the like. The best way to direct files to the correct folders is to establish the setup when you make the Premiere Pro project file. Here’s how:
1. Choose File < New < New Project or click the New Project button in the Welcome screen.
2. Click the Browse button to choose a location. Navigate to the Common Media Folder < 02 Project Files < 02 Premiere Pro Projects folder and click Choose to identify where to save the file.
3. Name the project in the field labeled Name.
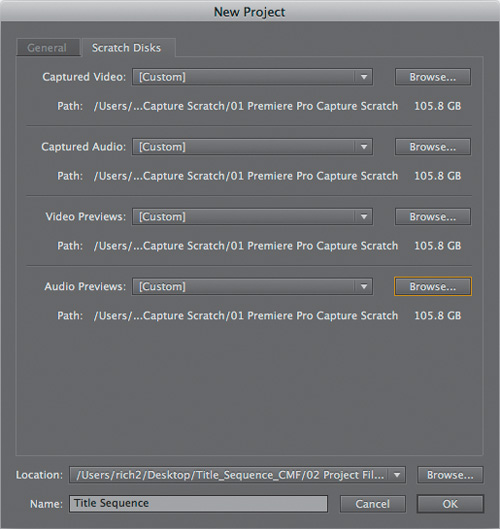
4. Click the Scratch Disks tab to set all of the capture folders (Figure 2.4).
Figure 2.4 Make sure that all your Scratch Disk settings are properly assigned to avoid future problems.
5. Click the first Browse button. Navigate to the Common Media Folder < 01 Capture Scratch < 01 Premiere Pro Capture Scratch and click Choose.
6. Click the next Browse button. The same location you set in step 5 is automatically selected, so click Choose to target it.
7. Repeat this procedure for the next two categories, Video Previews and Audio Previews.
8. Click OK. A new dialog box opens for sequence settings.
9. Choose the correct sequence preset that most closely matches your primary footage source (or delivery format). Name the sequence and click OK.
You are now ready to capture media files. Choose either File < Capture for tape-based sources or File < Import for tapeless sources. Remember that when using tapeless sources, you’ll want to manually transfer the files to your 01 Premiere Pro Capture Scratch folder on your media drive.
File and Folder Naming
Clarity when naming files and folders is crucial. By assigning unique names to your files, they will be easier to find. You’ll also be able to browse through folders and the Project panel and locate your key sources. However, it’s possible to create problems in a cross-platform world. Here are some naming suggestions:
• Always name files with a descriptive name. Often, stock photos and camera-generated media are named using only a number or a series of nonsensical characters. It’s possible to confuse sources or even end up with duplicate names. Assign a new name and simply paste the old name into the file’s metadata (this can quickly be done with Adobe Bridge).
• As you revise files, consider the use of version numbers for your source files. We’ve seen instances of shared sources and major problems when one user made modifications to a graphic source.
• Be careful not to use illegal characters (Figure 2.5). The Mac OS allows you to use characters that can confuse a Windows machine. Projects in After Effects can be used across platforms, so be careful using any of the characters in Table 2.1 in a file or folder name.
Figure 2.5 If you use illegal characters, you’ll get error messages and problem files.
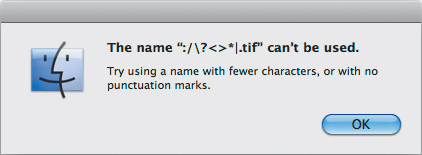
Table 2.1 Illegal Filename Characters

In your quest for organization, it’s possible to become too organized. If you use too many folders and subfolders, the file path can get too long. Keep filenames and folder names short. This problem usually raises its head when you go to collect files or move them to a new folder.
Working with Layered Sources
When you’re working with Photoshop or Illustrator, take the time to clean up any layered files (Figure 2.6). Sure, you can see great thumbnails in the Layers panel in either graphic application. But when you get to After Effects, you are out of luck. If you get sloppy with your source material, you’ll go batty trying to stay organized and might even run into media management issues.
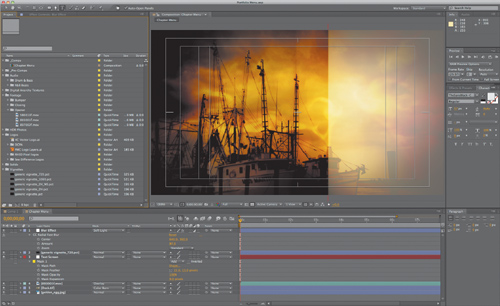
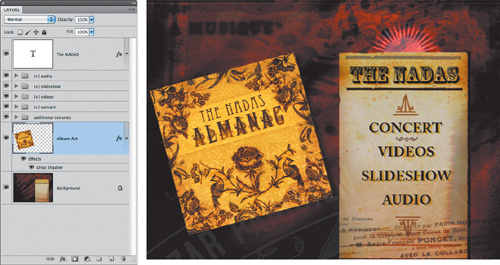
Figure 2.6 This menu designed in Photoshop for Adobe Encore uses layers. These layers will assist in the authoring process when you create buttons. Album cover courtesy Authentic Records (www.thenadas.com)
When you’re working with layers:
• Always use unique and descriptive names for each layer in a layered graphic.
• Don’t make layer names too long, or you might get file path errors. Long names are also difficult to see in the Timeline.
• Avoid using illegal characters in layer names as well, or you’ll have compatibility issues.
• Try to arrange the stacking order of layers so they match the order you’ll need in After Effects.
• Use Layer Groups in Photoshop and Illustrator. They will import as precompositions in After Effects.
• Make sure you save Photoshop and Illustrator files in the RGB color mode. In Photoshop, be sure to preserve your layers when converting modes.
 Notes
Notes
If you need to replace a merged footage item with a layered source, you can do so in two ways. To change an item for all instances, select it in the Project panel and choose File < Replace Footage < With Layered Comp. If you only want to modify how the footage behaves in a single composition, select the layer in the Timeline panel, and choose Layer < Convert To Layered Comp. Be patient. This process can take a little time to complete.
Once you import a layered source in After Effects, you’ll face an important choice on how layers are handled. You’ll need to decide if you want layers to be cropped to their source content or to the edge of the document’s boundaries (Figure 2.7).
Figure 2.7 Be sure to specify how you want your layer file imported using the Import As menu.

If you want to import footage with layers intact (Figure 2.8), choose one of these options from the Import As menu:
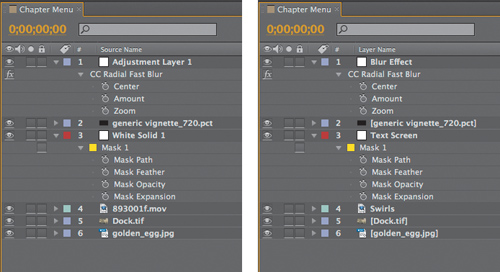
Figure 2.8 After Effects respects the grouping and layer names of the Photoshop file. Being organized in Photoshop means being organized in After Effects.

• Composition. This brings each layer in at the size of its source composition. All layer anchor points are at the same point. This option works best if you’re applying effects that may extend beyond the border of the layer. Most filters can render beyond a layer’s crop, but a few old and third-party filters cannot.
• Composition - Retain Layer Sizes. This option (formerly called Cropped Layers) imports each layer with its dimensions set to a clean crop around the layer’s content. The anchor point is set at the center of the cropped graphics object rather than at the center of the composition frame. This option can be useful for animating a multilayered document when the layers are interdependent. This is the easiest way to animate when you’ll be rotating, scaling, or animating from the anchor point of a layer.
Tip
If you’re not happy with a layer’s anchor point, you can change it. The Pan Behind tool (Y) lets you reposition a layer’s anchor point by dragging in the Composition or Footage panel. The anchor point moves, but the layer’s visible position remains the same.
Fitting a Layer to Your Composition
As you work with layered graphics, you’ll quickly discover they’re rarely the right size. You might need to scale a vector object full screen. Or, you might want to make a large photo fit your composition. You can remove all the guesswork by using three different stretch commands in After Effects (Figure 2.9).
Figure 2.9 The original layer (A) does not fill the composition. The stretch command (B) fills the entire canvas but distorts the image. The stretch to fit horizontally command (C) scales the image until the width matches that of the composition. The stretch to fit vertically command (D) scales the image until it matches the height of the composition. The last two methods can produce a gap, depending on the aspect ratio of the original image.

• To stretch a layer to fit, press Command+Option+F (Ctrl+Alt+F) to scale a layer to fill the entire frame. Note that this option doesn’t preserve the footage’s original aspect ratio.
• To stretch a layer to fit horizontally, press Command+Option+Shift+H (Ctrl+Alt+Shift+H). The footage will scale horizontally to the border of the composition. The aspect ratio of the footage is preserved, and you’ll likely have an empty area above and below the image.
• To stretch a layer to fit vertically, press Command+Option+Shift+G (Ctrl+Alt+Shift+G). The footage will scale vertically to the border of the composition. The aspect ratio of the footage is preserved, and you’ll likely have an empty area to the left and right of the image.
Organizing Files with Adobe Bridge
![]()
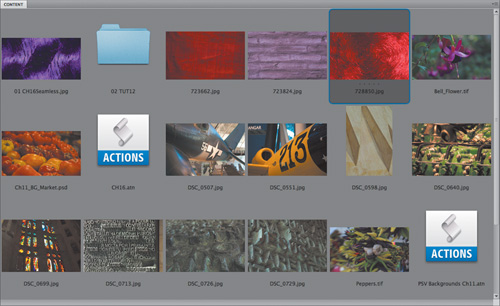
Included with Creative Suite is Adobe Bridge. This application is perhaps the most overlooked tool in the entire suite. Bridge is a media management application that allows for visual organization (Figure 2.10). With Bridge, you can quickly browse photos, video, audio, and graphic files. Bridge offers all sorts of capabilities from sorting and ranking to output and conversion.
Figure 2.10 Bridge supports several file types, making browsing visually easier.

Tip
Bridge is very useful when designing in After Effects. You can use it to examine After Effects presets by choosing Browse Presets from the Effects & Presets panel submenu.
Here are some reasons to use Bridge:
• Import images from camera memory cards.
• Rank images using 1–5 stars as well as qualitative rankings like Select and Review.
• Sort files based on metadata, rankings, and keywords.
• Rename files individually or in batches.
• Process raw files with Camera Raw Develop settings.
• Invoke Automation commands for Photoshop and Illustrator, such as Photomerge, Lens Correction, and Live Trace.
• Create contact sheets and websites for clients to review project assets.
Keeping an After Effects Project Tidy
Up until this point, we’ve focused on ways to keep your After Effects project organized using external factors. Truth be told, there’s a lot you can do within After Effects. We’re continuously amazed at how bloated some projects become. This is due to designers just dragging in every file under the sun and never taking the time to occasionally sort or purge. Think of how your kitchen would get if you never bothered to throw anything away. After Effects offers several easy to use commands that can keep your project streamlined for success.
Importing Folders
A best practice we try to follow is to match the folder structure of our After Effects project to the structure of our media folder on the hard drive. This simplified approach makes media management and version control tasks pretty straightforward, because your project can serve as a virtual map. It also makes reconnecting to media files easier if you ever need to.
So, how do you pull this off? It used to be much harder. In older versions of After Effects you needed to select the folder at the Finder or desktop level and then hold down the Option (Alt) key as you dragged it into the Projects panel. These days it’s much simpler. Just choose File < Import < File, select a folder, and click Open.
After Effects imports the folder and preserves any nested folders within. There is no limit to the number of folders you can import, but it is possible to reach a limit based on the length of the folder names. As we discussed earlier, there is a limit to the character count used for file paths. This limit varies by operating system. Typically, the limit is set to 255 characters for modern versions of both Mac and Windows operating systems. The secret is to use descriptive but short filenames.
Tip
Need to import multiple files at once? Not a problem; just choose File < Import < Multiple Files or press Command+Option+I (Ctrl+Alt+I). You can import them as footage or compositions. When you are done importing, click Done in the Import dialog box.
Internal Folder Organization
Once you have folders in After Effects, be sure to use them. After Effects provides several useful shortcuts for organizing files. The goal is to use folders in the Project panel in the same way you would a filing cabinet drawer. Keep paring things down into small enough categories so they’re easy to find and locate. Remember that it’s easy to use a series of nested folders as well (Figure 2.11).
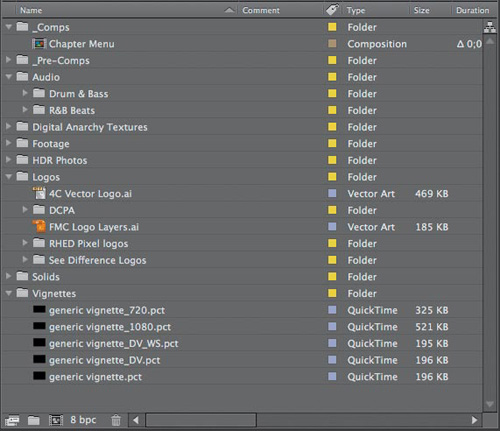
Figure 2.11 Using nested folders is a great way to keep a complex project organized.
Here is how you can add, use, and remove folders in an After Effects project:
• To add an empty folder to your Project panel, click the Create a New Folder button at the bottom of the Project panel or press Command+Option+Shift+N (Ctrl+Alt+Shift+N).
• Select a target folder, and then invoke the Import command by pressing Command+I (Ctrl+I). The new files will be added to the selected folder.
• Select multiple items in an existing folder in the Project panel by Command-clicking (Ctrl-clicking). Then drag them onto the Create a New Folder button. All the items will be moved into a new folder nested within the original.
• Select multiple items in folders at different levels in the Project panel. When you drag them onto the Create a New Folder button, a new folder will be added at the same level as the highest folder you selected.
• To delete files and folders from the Project panel, select them and press the Delete key. To avoid the warning dialog box, select the files and press Command+Delete (Ctrl+Delete).
Renaming Assets
One of the least standard procedures in After Effects is naming compositions, footage, layers, and folders. Although you’re prompted to name them on creation, modifying them after the fact can seem a little tricky. Unlike with your operating system, double-clicking the name doesn’t seem to do anything. Sure, you can right-click an item and choose Rename. But the fastest way to rename an item is to highlight it, and then press Return (Enter) to modify its name (Figure 2.12).
Figure 2.12 Renaming layers in the Timeline panel can make it much faster to navigate.
In the rush to design, many forget that every Timeline layer has two names. By default, the Timeline panel shows you the name of a source. That’s very useful until you start using the same source footage as a fill and matte, or start splitting a long clip into multiple segments. With the layer highlighted you can press the Return (Enter) key and assign a new descriptive name. This name is only displayed to make your job less complicated and won’t affect media files or project links. You can toggle between the two names by clicking the Layer Name/Source Name column head in the Timeline.
Swapping Assets
During your design process, you might need to replace footage. This might be due to a new asset becoming available or just a change in the desired design. After Effects offers two ways to replace footage: a global replacement or a localized swap:
• Global. Select an item in the Project panel and choose File < Replace Footage or press Command+H (Ctrl+H). You can then navigate to the desired replacement and click the Open button. For best results, choose an item that is identical in frame size and frame rate.
• Local. If you just want to swap out an item in a single composition, it’s simple. Select the footage you want to replace in the Timeline. Then select the file you’d rather use in the Project panel. Hold down the Option (Alt) key and drag the preferred file onto the selected file in the Timeline. Alternatively, select the files and press Command+Option+/ (Ctrl+Alt+/). The new footage will swap places with the targeted layer. Any effects, masks, or keyframes applied to the original will be applied to the swapped content.
Placeholders and Proxies
Sometimes you’ll need to start designing even though footage might be missing. You might also find that you want to speed up a project. In both cases you can work with substitute items, either a placeholder or a proxy. The best news is that any masks, attributes, expressions, effects, or keyframes that are applied to the layer are retained after you replace the placeholder or proxy with the final footage item.
Tip
A placeholder can be truly useful to streamline the render process. For example, you can design an animated background. When you’re happy with it, add it to the render queue. Drag the Output Module heading for a queued item from the Render Queue panel to the Project panel.
After Effects will create a placeholder for the composition and set the composition to use the Post-Render Action option for the item to Import & Replace Usage. You can then use the placeholder in other compositions.
When you render the first composition (the one the placeholder was based on), the new file will be brought back into After Effects and will update all other compositions (even if you’re in the middle of a render).
Placeholder
A placeholder is shown as color bars (just like when a piece of footage goes missing in a project) (Figure 2.13). After Effects can generate placeholders internally without having the footage present. You should use a placeholder when you don’t have access to the file you want to animate. For best results, be sure to set the placeholder so it’s the same size, duration, and frame rate as the actual footage it’s standing in for.
Figure 2.13 To replace a placeholder, simply double-click on the color bars in the Project panel.

1. Choose either File < Import < Placeholder to create a new placeholder or select an existing file and choose File < Replace Footage < Placeholder.
2. In the New Placeholder dialog box, specify the placeholder’s name, size, frame rate, and duration.
3. Click OK.
When the file becomes available, just double-click the placeholder in the Project panel and navigate to its replacement using the standard file services dialog box.
Proxy
A proxy is essentially a stand-in for an existing piece of footage. The most common uses for a proxy are to replace a high-resolution file with a lower-resolution file or substitute a still frame for a movie (Figure 2.14). This is a great way to speed up the previewing or rendering of test movies.
Figure 2.14 An empty box indicates that the full-resolution image is in use (left). A filled box indicates that the proxy is active (right).

To best use a proxy, you’ll want it to be exponentially smaller than the original (such as half or quarter the size). For example, you might temporarily replace a piece of footage that is 1280x720 with footage that’s 640x360 (this is 50% of the original size and will result in a four times speed boost when previewing). After Effects automatically scales the proxy item to the same size and duration as the actual footage. This adjustment happens internally, so any transformations you apply in the composition will still be accurate when the proxy is replaced with the original footage.
1. Select a footage item or composition in the Project or Timeline panel.
2. Choose one of the following commands:
• File < Create Proxy < Still to create a still image proxy.
• File < Create Proxy < Movie to create a moving image proxy.
3. Switch to the Render Queue panel.
4. Locate the Proxy composition and specify an output destination for the proxy. It’s a good idea to target your project folder.
5. Change the Render Settings and set the Resolution output to Half or Quarter.
6. Close the Render Settings window and click Render to create the proxy.
Notes
If you want to create a still image proxy for a footage item, you’ll need to set a poster frame. Open the footage in the Footage panel and drag the current time indicator to the desired frame. When you invoke the Create Proxy < Still command, that is the frame that will be used.
Once the proxy is created, you’ll see it indicated in the Project panel. After Effects marks the footage name to indicate whether the actual footage item or its proxy is currently in use:
• A filled box next to an item’s name indicates that the proxy is in use. The name of the proxy file is also in bold at the top of the Project panel.
• An empty box indicates that the original footage item is in use, even though a proxy exists. The name of the original file is also in bold at the top of the Project panel.
Tip
If you want to save your project but save it as a new version, there’s an easy way. The Incremental Save command saves the project using the project name and an incremented numeric identifier (choose File < Increment and Save). For example, rastervector01.aep would become rastervector02.aep. The previous version stores the data from the last time the file was saved; the new version captures the current state of the project.
Removing Unused Footage
As you design in After Effects, you’ll likely import several assets. Often, you’ll experiment with different footage until you find the right design. All that extra footage can bog down your project. It means more items to load and more media to manage if you want to bundle up the project. Fortunately, After Effects makes it effortless to remove unused assets (Figure 2.15).
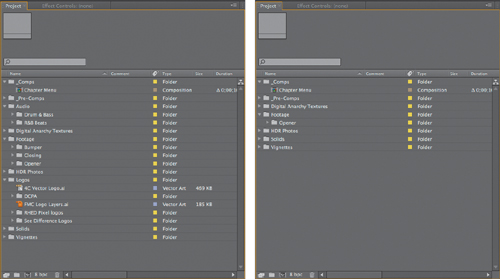
Figure 2.15 Removing unused footage from a project makes it easier to manage. You should run the Remove Unused Footage command when you know you no longer need items that are not a part of a composition (such as when you intend to back up a project).
1. Save your project to capture its current state. You may want to perform a Save As or Incremental Save command in case you change your mind.
2. Choose File < Remove Unused Footage to remove all references to any unused footage in the project. The media on your source drives is unaffected.
While designing, you might also have brought a footage item into the project more than once. Fortunately, this is a quick fix.
3. Choose File < Consolidate All Footage to remove duplicate footage items from the project. After Effects only consolidates footage items that use the same Interpret Footage settings. The removed items are updated to refer to the remaining copy.
4. Save the project to capture its current state.
Reducing a Project
Another scenario you may face is the need to split a large project. You might want to split off part of a project for a second designer to work on. You might also need to speed up a project by splitting it into smaller parts. This is a possible workaround if a project is so large that you’re getting RAM errors (of course you could always add more RAM).
The Reduce Project command is a quick fix:
1. If you only want to keep certain compositions or footage within a project, select them in the Project panel.
2. Choose File < Reduce Project.
All unselected compositions and files not used in those compositions will be removed.
3. Save the project to capture its current state. You may want to use the Save As command to preserve the original project.
Notes
The Collect Files command cannot gather fonts, plug-ins, or codecs. The command will generate a useful report that identifies the files, effects, and fonts necessary to recreate the project and render the compositions.
Collecting Files
As you wrap up a project (or reach a critical handoff) it may be time to collect your files. This process is nondestructive in that all collected files are merely copied to a specified destination. This is the simplest way to gather your assets for an archive or a handoff to a team member. Collecting your files can also speed up rendering, especially if files are spread across a network.
1. Choose File < Collect Files (Figure 2.16).
Figure 2.16 Be sure to examine all the options in the Collect Files window for precise media management.

The Collect Files window opens with options on how to gather source files.
2. Choose an option from the Collect Source Files menu:
• All. Collects all footage files in the Project panel. This includes unused footage and proxies. This option works best if you’ve already used the Reduce Project command.
• For All Comps. Collects all footage files and proxies that are used within any composition in the project. This essentially runs the Remove Unused Footage command first.
• For Selected Comps. Collects all footage files and proxies used in the currently selected compositions in the Project panel. This essentially runs the Reduce Project command first.
• For Queued Comps. Collects all footage files and proxies used by any compositions with a Queued status in the Render Queue panel. This is a useful way of collecting files for rendering on another machine or speeding up rendering of a project that has files dispersed across several drives.
• None (Project Only). Copies the project to a new location without gathering any of the source footage.
Tip
Several additional options are in the Collect Files window. Which ones you can use changes based on the option chosen in the Collect Source Files menu. These include options for handling proxies and targeting a new destination for rendering. You can even target a watch folder if you’re using multiple machines to render.
3. Click the Comments button to enter custom notes to the generated report. This can include information about the project, contact information for the lead designer, or copyright information about source files.
You now need to target a drive to store the footage. Be sure the targeted drive has enough space. You can see a size estimate at the bottom of the Collect Files window.
4. Click the Collect button to start the process. Specify a location, name the new folder, and click Save. The folder structure of your project is replicated, and all items (if specified) are copied to the target folder.
Depending on the size of your project and speed of your drive connections, this command can take awhile.
After you run the Collect Files command, be aware that you will still be working in the original project (not the collected one). Be sure to switch projects if that is what motivated you to run the Collect Files command. Close the current project and switch to the new project.