
Chapter 8 Designing and Working in 3D

There is a fifth dimension, beyond that which is known to man. It is a dimension as vast as space and as timeless as infinity. It is the middle ground between light and shadow, between science and superstition.
—Rod Serling
The use of three-dimensional artwork is increasing dramatically. Although it’s not the right choice for every project, it is a flexible option that can significantly extend your design palette. More choices mean more ways to bring an idea to life.
Adobe offers many different ways to design and work in 3D, which you’re about to explore. You’ll find tools for creating three-dimensional design elements in both Adobe Illustrator and Adobe Photoshop. You’ll also find 3D cameras and lights in both Photoshop and After Effects (with differences between them). It’s important to explore all the tools at your disposal, as well as learn in which situations they work best.

Courtesy National Foundation for Credit Counseling
At the end of this chapter you’ll also find additional tips to help you get quicker results with 3D cameras in After Effects. Working in three dimensions is a big leap for many designers, but the flexibility you’ll gain and the results generated are worth the extra effort.
Understanding Perspective
Before we explore design techniques, let’s take a moment to review the three dimensions you’ll be working with. Things can get a little tricky because you have many options. For example, you can create artwork in Adobe Illustrator that looks three dimensional, but your view is locked. If you were to move the camera, you’d quickly see that the object is flat and lacks depth.
On the other hand, you can create true 3D models in Photoshop, and then import them into After Effects. Once there you can treat them as stationary objects or rotate your 3D camera for a new view. Of course, After Effects also lets you promote 2D (flat layers) and revolve them in 3D space as well (Figure 8.1).
Figure 8.1 This scene was quickly built using only a few static graphics. By stacking the layers in 3D space and using advanced options like Depth of Field and Casts Shadows, you can enhance the perspective effects.

Why so many options? Different situations have distinct needs and various tools have specific features.
Working in 2D
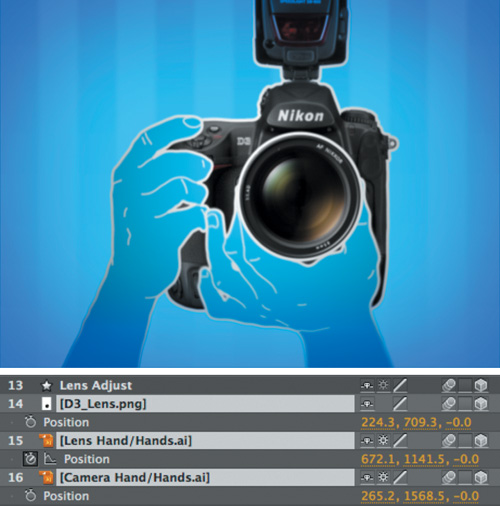
When designing in two dimensions, objects have width and height. We realize that pretty much describes every graphic, and that’s our point. Whether you’re working in After Effects, Photoshop, or Illustrator, 2D is very easy to understand. If you want something to appear in front of another object, drag its layer above the other in the Timeline or Layers panel.
You’ll also find that working in two dimensions is much faster than any other method. Typically, any effects you apply will render quicker than those in 3D space. We usually try to block out our elements and get timings right (or sync to music) while working in two dimensions (Figure 8.2) before we add the complexity of the z-axis.
Figure 8.2 Changing the stacking order of the layers changes their appearance. In this case the differences are influenced by stacking order and use of blending modes.

Working in 2.5D
The most common workflow you’ll encounter in After Effects is what many refer to as 2.5D or pseudo-3D. Working this way normally involves using flat objects that can be revolved around the x-, y-, or z-axes. Another way of thinking of this concept is as “postcards in space” (a term popularized by Trish and Chris Meyer).
 Tip
Tip
If you lose track of your surroundings when working in 3D, After Effects can help get you oriented. You can reset your custom view or camera by choosing View < Look at All Layers or View < Look at Selected Layers. You can also choose Layer < Transform < Center In View to move an imported object into viewable space.
To convert an object to 3D, you just click the 3D switch in the Timeline panel. This will add a third value to the Anchor Point, Position, and Rotation properties as well as introduce a new property called Orientation (which is used for posing an object in 3D space, not animating) (Figure 8.3).
Figure 8.3 The Orientation property helped position the sky layer correctly to create a perspective effect. Once angled, the Anchor Point property was keyframed to simulate the effect of clouds rushing by the scene.

Many designers working in 2.5D can get by without ever adding an actual 3D camera to their scene and instead work only with the composition default view. Although this is certainly possible, the use of cameras offers much greater control (even if it’s just for framing and depth of field).
Working in 3D
When it comes to 3D content in After Effects, you face two real choices. The one you choose will be determined by your specific needs as well as the tools you have access to.
One option is to create or import 3D content into Photoshop and then bring that content into After Effects using the Live Photoshop 3D option. Photoshop has quite a few capabilities when you’re working with 3D layers. Each 3D layer acts as a container for all the properties associated with the model on that layer. This means the lights, textures, and model are all on a single layer. This workflow allows you to import only static models (no bending, walking, running, etc.), but you can rotate a 3D camera around them in After Effects (Figure 8.4).
Figure 8.4 This simple scene was built using a 3D model and creating three surfaces in Photoshop. Once imported into After Effects, the Orientation and Position properties were used to pose the objects in 3D space.

If you are creating complex 3D models or animating those models, chances are you’re working with a dedicated 3D application. After Effects can import advanced channel information for most 3D rendered formats. You can also import baked camera data in many formats.
 Notes
Notes
For more information on importing and using 3D files from other applications, see the online help article at http://tinyurl.com/aeother3d.
When you import 3D files from a 3D application, you can access additional information. Just apply any of the 3D Channel effects, and then open the Info panel (Window < Info). You’ll see important information displayed to help you navigate and work with the files.
Rendering 3D Content in Other Applications
After Effects can import useful data from the most popular 3D modeling and animation programs. However, you need to specify that you want to export that data in the first place.
In the 3D application, you can export your scene as a PIC, RLA, RPF, OpenEXR, or an EI image sequence. Make sure you select the option to include additional pixel information (such as z-space information), cameras, and IDs. If included, After Effects can interpret this data to make effects, cameras, and lights more useful (Figure 8.5).
Figure 8.5 When rendering in your 3D application, you can choose to include advanced data with the files. Here, Cinema 4D includes information that can translate to After Effects through the RPF file format.

Depending on the format you use, this extra data will be stored with the files or as a sidecar data file. The Softimage PIC format will include a ZPIC file. The Electric Image format uses EIZ files. You won’t import these sidecar files, but make sure they are in the same folder as their associated image sequences so After Effects can connect the data.
Isolating Effects for 3D Content with ID Mattes
Thanks to the additional 3D data that can be included with 3D rendered files, After Effects can isolate prerendered 3D objects in your scene to apply the effects. This can be a useful way to isolate color or tonal corrections, or to stylize elements with glows or noise.
The key to isolating objects is the use of the ID Matte effect (Effects < 3D Channel < ID Matte).
1. Apply the ID Matte effect to the desired layer, and then disable the effect. Leave the effect selected in the Effect Controls panel.
2. Select the actual item you want so the mouse cursor is over the desired subject. With the mouse pointer, click on the object in the Composition panel (Figure 8.6).
Figure 8.6 Make sure the ID matte is disabled initially. You can use it to identify the ID number for each object.

3. Look in the Info panel to determine the object’s ID number.
4. Change the ID Selection parameter (in the ID Matte effect) to match the ID number in the Info panel.
5. Apply any desired effects to the matted layer.
6. Place a copy of the original layer below and remove the ID Matte effect as well as any unwanted effects. The two layers should composite together cleanly. You can also use multiple copies of the footage layer and the ID Matte effect to isolate each object with an ID (Figure 8.7).
Figure 8.7 With the ID Matte effect, a desired object can be matted so only it remains and everything else is hidden. In this case multiple copies were used, and color was adjusted on each layer.

Stacking Order Matters
Designing can get tricky when you start to layer 2D and 3D layers in the same composition. As a designer, you need to understand how After Effects interprets layers so you can build your compositions correctly. Here are a few guidelines:
Tip
If you want to keep a logo bug or other element on top of your 3D layers at all times, it’s easy. Just place the element on the topmost layer in After Effects and don’t enable the 3D switch. You can also do the same for a background layer that you want behind all your 3D layers. Just put a standard 2D layer at the very bottom of the layer stack in the Timeline panel.
• When working in 2D, the highest layer in the Timeline panel is in front of all the other layers. The lowest layer is behind them.
• 3D layers are stacked based on their z-position value (assuming the camera is pointing at their fronts). This means that the object closest to the active camera is in front of the other layers. This is true even if the layer is at the bottom of the layer stacking order in the Timeline panel.
• Track mattes must always be immediately on top of the layer they are matting. This is true for both 2D and 3D layers.
• Layer blending modes still follow the stacking order in the Timeline panel.
• 2D layers mixed with 3D layers are ordered by their spot in the layer stack in the Timeline panel. Mixing 2D layers in between 3D layers prevents layers on either side from interacting with each other.
• If two or more 3D layers have overlapping z-position values, After Effects uses their layer stacking order in the Timeline panel to determine the top position (Figure 8.8).
Figure 8.8 These three layers are in 3D space with the same z-position. In this situation, stacking order takes over to assign visual precedence.
Adding Depth in Illustrator
If you’re working with vector artwork in Illustrator, you have three Illustrator effects that you can use to add depth. These effects are live, meaning that you can continue to refine the shape, stroke, or fill of the object as you design. You can also use the After Effects Edit Original command by pressing Command+E (Ctrl+E) to update Illustrator files seamlessly in an After Effects composition. The three Illustrator effects include:
Notes
Extrude & Bevel and Revolve are both useful for After Effects designers. The Rotate command should be avoided because it adds no functionality that can’t be gained by promoting a vector object to 3D in After Effects and using the Orientation property.
You can copy and paste a vector shape from Illustrator to Photoshop. You can also export an Illustrator file as a layered Photoshop file. Either method allows you to convert your vector file into a true 3D object with the Photoshop Repoussé command that we’ll explore later in the chapter.
• Extrude & Bevel. Creates beveled edges and 3D depth.
• Revolve. Acts like a lathe and sweeps the object in an arc to make a 3D shape.
• Rotate. Rotates the object in 3D space.
Extrude & Bevel Command
The Extrude & Bevel command in Illustrator is really two complementary effects that can be used together or independently. Extruding an object adds depth by extending the object along its z-axis. For example, extruding a square becomes a cube.
Notes
If you’d like to apply artwork to the surface of your 3D object, you can use the Map Art button. For more details see http://tinyurl.com/ aimapart.
While you’re extruding an object, you can also decide to apply a beveled edge. The edge can have a thickness that adds or subtracts from the depth of extrusion.
Here’s how to extrude an object:
1. Select an object in Illustrator (Figure 8.9).
Figure 8.9 This star was created with the Star tool in Illustrator. The shapes are very customizable.

2. Choose Effect < 3D < Extrude & Bevel. Select the Preview check box so you can see the effect update as you make changes.
3. Use the Position controls to pose the object in 3D space. Dragging the cube is the easiest way to move the object. You can also choose from several preset views using the Position Preset menu.
4. Use the Extrude & Bevel settings to control the object’s depth and bevel (Figure 8.10):
Figure 8.10 Illustrator offers multiple bevel presets as well as precise control to adjust the Extrude & Bevel effect.
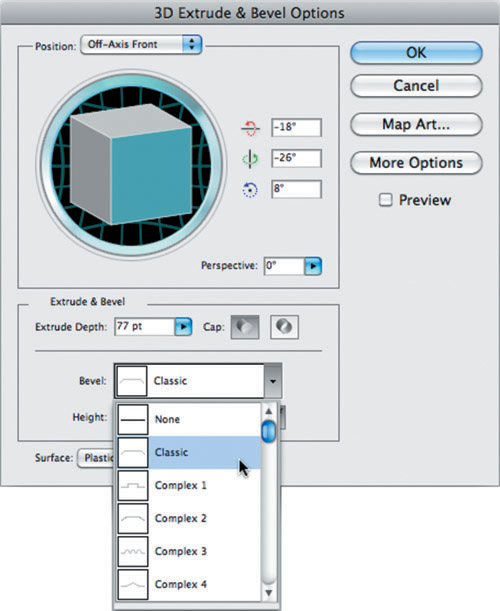
• Extrude Depth. Use the Extrude Depth control to set the depth of the object (up to 2,000 pixels).
• Cap. Use the Cap setting to determine if the extruded object appears hollow or solid.
• Bevel. Choose a Bevel preset to change the shape of the bevel.
Tip
To update a 3D effect after it’s been applied, select the object first. Then open the Appearance panel and double-click the effect you’d like to modify.
• Height. Set a Height for the bevel between 1 and 100. If you go with a bevel that is too high, you may see intersection errors (they look like unwanted spikes).
• Bevel Extent. Set the Bevel Extent to In or Out. In carves the bevel into the original shape; Out adds the bevel to the outside of the original shape (Figure 8.11).
Figure 8.11 Different bevel effects were created using the Bevel Extent and the Cap settings.

5. Use the Surface preset list to control how the surface is shaded to simulate lighting. If you’d like greater control, click the More Options button.
6. Click OK to apply the effect.
Revolve Command
The Revolve command can take a vector line and sweep its path around in an arc. This can be used to create a 3D object. For best results, draw your line so its curve is pointing to the right (the lines are anchored on the left edge). Once the object is created, you can reposition it with the same Position controls found in the Extrude & Bevel effect. Follow these steps to use the Revolve command:
Notes
By default, Illustrator revolves objects around the left edge. You can change this to the right edge using the From menu.
Tip
You can use the Offset slider to expand the path to create a ring-shaped object.
1. Select an object or line in Illustrator (Figure 8.12).
Figure 8.12 A line or a shape is all you need to create a 3D object. By default, the extrusion will rotate around the left edge, so position the vector object accordingly.

2. Choose Effect < 3D < Revolve. Select the Preview check box so you can see the effect update as you make changes (Figure 8.13).
Figure 8.13 With the Preview check box selected, changes will update so you can experiment more easily. For complex objects, the screen may take a moment to redraw.

3. If your object has a fill, you can use the Cap option to make it appear solid or hollow.
4. Use the Angle property to set the number of degrees to revolve the path. Although you can use any number between 0 and 360, we typically start with 360 degrees (Figure 8.14).
Figure 8.14 This 3D shape was quick to create with the Revolve command.

 Close-Up: Fun Effects with Revolve
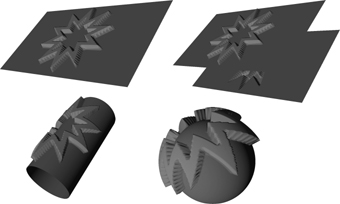
If you experiment with the Revolve command, some pretty cool options are possible. Try using a dashed line and creating an irregular path. In this case a basket shape is possible, and you can create abstract 3D objects for motion graphics work. Technique adapted from RC Concepcion.

Using 3D Objects in Photoshop
The Photoshop 3D engine is very flexible. It allows you to transform layers three dimensionally. More important, it lets you create new 3D elements, including primitive shapes (such as cones or spheres). Complex elements can be created using grayscale meshes or by using the Repoussé command for text or selections.
Tip
To make 3D tasks easier in Photoshop, choose Window < Workspace < 3D. This rearranges panels so that all the 3D tools are easy to access.
Notes
Photoshop 3D objects can be quite resource intensive. Start simple and only work with one or two 3D objects (otherwise instability can occur). The most important device to have is a solid video card because the GPU is critical to smooth performance. Start small until you figure out what your system can handle.
You can even import models from most 3D applications. The use of 3D objects can greatly expand your design alternatives, because models can be sized and rotated freely. If the model contains textures, those can come in as well and are fully editable.
The best part of Photoshop 3D? That’s easy—how well it works with After Effects. We’ll explore the complete workflow in this section and the next.
Creating 3D Layers
Photoshop offers four categories of tools that allow you to create 3D primitives or shapes. These objects can be positioned, lit, and surfaced. The tools include:
• 3D Postcards. These layers are virtually identical to promoting a layer to 3D in After Effects.
• 3D Shapes. Photoshop provides access to 12 shapes, including several useful primitives that can be stretched or modified.
• Grayscale Meshes. This tool allows you to create very elaborate, custom 3D models from grayscale textures.
• Repoussé. The Repoussé command lets you extrude text or selected elements into 3D models.
3D Postcard
Any layer in Photoshop can be converted into a 3D Postcard (Figure 8.15) by selecting a layer and choosing 3D < New 3D Postcard From Layer. A 3D Postcard works well when you add a floor or wall to catch reflections or shadows. Typically, however, we choose to perform this task in After Effects with a new solid.
Figure 8.15 3D Postcards can be rotated and positioned in 3D space in Photoshop Extended.

What we find more useful is the ability to gain After Effects–style transformation controls when using 3D Postcards in Photoshop (Figure 8.15). When we are storyboarding animations, these controls are much more flexible than trying to fake transformations using the Free Transform and Perspective commands.
3D Shapes
If you want to create basic 3D objects, Photoshop has a flexible 3D engine with preset shapes. There are 12 shapes to choose from, including single-mesh objects like a Donut or Sphere, as well as multiple mesh objects such as a Cone, Cube, Cylinder, Soda Can (Figure 8.16), or Wine Bottle.
Figure 8.16 New textures can be wrapped to the surface of objects. This includes both photos and video layers.

Notes
Some of the shape presets, like Soda Can and Wine Bottle, are for graphic designers who are trying to produce product advertisements. This of course does not explain the Cowboy Hat preset.
To create a new 3D object, select the texture, photo, or video layer you want to use and choose 3D < New Shape From Layer. Then select a shape from the menu. Several of the 3D models contain multiple meshes (such as the Cube). You can decide to open a model’s surfaces independently by double-clicking a mesh in the 3D panel. Once open, you can assign new textures to your model.
Tip
You can add your own custom shapes to the Shape menu. Each shape is merely a Collada (.dae) 3D model file. To add more shapes, place the Collada model file in the PresetsMeshes folder in the Photoshop application folder.
Grayscale Meshes
An interesting way to create custom 3D models is to use grayscale meshes (Figure 8.17). By starting with a layer filled with 50% gray (Figure 8.18), you can define what happens to the model. Using darker colors will create a recessed area. Using brighter colors will create higher areas. The command is invoked by selecting a grayscale layer and choosing 3D < New Mesh from Grayscale.
Figure 8.17 Using darker or lighter shades will influence the direction of the extrusion.

Figure 8.18 A quick way to access 50% gray is to press Shift+Delete to open the Fill dialog box.

Notes
If you use a colored image, the green channel will be used for the mesh. If you’re using a grayscale file, be sure to preprocess the layer with a Levels adjustment.
The grayscale layer that created the depth map remains editable. You can double-click it in the 3D panel to open and edit it.
This mesh can then be applied to a shape in Photoshop (Figure 8.19):
Figure 8.19 Photoshop offers four different 3D shapes based on meshes.
• Plane. Applies the depth map data to a planar surface.
• Two-Sided Plane. Creates two planes mirrored along a central axis. The depth map data applies to both planes.
• Cylinder. Applies depth map data outward from the center of a vertical axis.
• Sphere. Applies depth map data radially outward from a center point.
Close-Up: Mesh with Curves
To produce a mesh with curves, blur the texture first to create a softer gray area. If you want harder angles, use a high-contrast mesh.

Repoussé
A new addition to Photoshop CS5 Extended is the Repoussé command. The command can be used to create a 3D model from a 2D object (like shape layers or text). Making a selection first can also isolate the effect. The target pixels can be extruded, inflated, and repositioned in 3D space. The resulting 3D model can be easily imported into After Effects for animation or compositing.
Close-Up: Paint Directly on Your Models
Whether you’re working with a model you created or an imported 3D model, you can paint directly on it without having to unwrap its texture. This can be useful because it helps you understand how the paint strokes will affect the texture map of a particular model. This is also a great way to use dark tones to add shading. Use the 3D Rotate tool (K) and change your angle of view using the Position menu to make it easier to paint each side.
Creating 3D Text
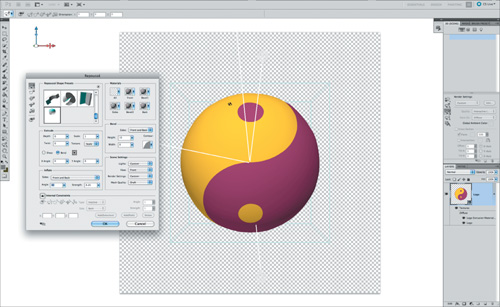
One way to use the Repoussé effect is on a text layer. The command will convert the text from vector to pixels. However, you will no longer be able to edit the text. Be sure to adjust font properties such as kerning and color before running the command. We recommend avoiding white or black because it’s difficult to see the properties of the effect. To use the Repoussé command, select a text layer and choose 3D < Repoussé < Text Layer. A dialog box opens prompting you to rasterize the text layer; click Yes.
The Repoussé window opens, offering several controls. The point of the Repoussé effect is to add to the perception of depth. To do this, perspective and edges are applied to the flat text (Figure 8.20).
Figure 8.20 The Repoussé window offers several controls. We recommend starting with the left column and working top to bottom as you make adjustments.

Tip
Do you need to kern quickly? You can easily adjust the space between pairs of letters right from the keyboard. With an active text layer, place the I-beam cursor between two letters. You can then hold down the Option (Alt) key and use the left and right arrows to tighten or loosen kerning. You may want to track the overall text looser to leave room for the beveled edge.
You can use several controls to adjust the appearance of the 3D model. As you adjust each, the model needs to redraw. Depending on your graphics card, this process may take a few moments. Be sure to let the screen redraw before you adjust the next property. You can then better judge the modification (Figure 8.21).
Figure 8.21 To make extrusion easier, Photoshop offers several preset starting points. Experiment with each to find a good starting point, but then customize them to avoid a “canned” look.

The Extrude controls extend the shape into 3D space:
Tip
Photoshop offers additional controls for 3D viewing. In the bottom-left corner of the Repoussé window is an icon that provides access to options like 3D Ground Plane or 3D Lights. This is the easiest way to control shadows and reflections.
• Depth. Controls the length of the extrusion; the bigger the numbers, the greater the depth.
• Scale. Controls the width of the extrusion. Higher numbers equal greater width.
• Twist. Can turn the extrusion (like a corkscrew).
• Bend or Shear. Choose Bend for a curved extrusion or Shear for a straight one.
• X and Y Angle. Controls the horizontal and vertical tilt.
• Change the Bend or Shear. Modify the Bend or Shear origin by clicking a point on the reference icon.
The Inflate controls expand or collapse the text:
• Angle. Use a positive Angle setting to expand the object or a negative setting to collapse the object.
• Strength. Controls the level of inflation for the object.
The Scene Settings offer several controls over lights and camera views:
• Lights. Offers several presets for how the model is lit.
• View. Offers preset camera angles. These are useful to reset your view to a default angle.
• Render Settings. Control how object surfaces look and at what quality they render.
• Mesh Quality Settings. Increase the density of the mesh, which can dramatically improve appearance. However, the quality can increase the processing time of the effect. A good video card can improve performance.
Notes
The Internal Constraints controls let you adjust the resolution of the mesh. The controls enable you to specify settings for particular areas such as inflation or curves. These controls can be a little tricky, but experimentation is the best way to learn. Using the Internal Constraints controls is the most efficient way to refine a model and remove “spikes” or unwanted detail.
Although you can’t edit the materials directly in the Repoussé interface, you can after applying the effect. In the 3D panel you can see the meshes and depth maps used. You can also double-click these items in the Layers panel to edit them.
The Materials controls let you assign color and texture to the sides of the model. You can apply a global texture to all faces or assign unique textures to the front, sides, back, and beveled edges (Figure 8.22).
Figure 8.22 Be sure to visit Photoshop.com for a wide range of free 3D materials for use with the Repoussé command.

When you’re satisfied, click OK to apply the Repoussé effect (Figure 8.23). If you ever need to, you can return to the Repoussé window by selecting the object and choosing 3D < Repoussé < Edit In Repoussé.
Figure 8.23 The generated model has true depth that can interact with the After Effects camera system.

Extruding a Selection
In addition to text layers, you can use the Repoussé command on a selected area. Create a layered file or export a layered file from Illustrator as a Photoshop document (File < Export). To load a selection, hold down the Command (Ctrl) key, click the thumbnail icon in the Layers panel, and then choose 3D < Repoussé < Current Selection (Figure 8.24).
Figure 8.24 Using an active selection, any object can be beveled or extruded.
The Repoussé window opens displaying the controls we explored earlier. A useful option as you adjust objects is to use the View menu to choose a camera angle. Use properties like Inflate and Bevel to create a new effect. When you’re satisfied, you can click the menu next to the preset controls to make your own presets.
3D File Formats
Photoshop Extended is an essential part of the pipeline to move 3D models into an After Effects project. Photoshop recognizes a wide range of file types and provides broad support for most manufacturers.
Photoshop supports several common 3D formats, including:
• 3DS (3D Studio)
• DAE (Digital Asset Exchange, COLLADA)
• KMZ (Google Earth)
• OBJ (common 3D object format)
• U3D (Universal 3D)
Importing 3D Models
Most 3D applications can save to one of the supported file formats that Photoshop recognizes. Even if you aren’t proficient in 3D, you can easily find high-quality models to use. To add a model to an existing Photoshop document, choose 3D < New 3D Layer from File (Figure 8.25). Keep in mind that not all models you find online will be perfectly built, so if a model doesn’t behave as expected, simply try another or edit it in a 3D modeling application.
Figure 8.25 3D models can be easily resized using the 3D Object Scale tool in the Tools panel.

Once you’ve imported a model, you can adjust the textures on its surface. Simply double-click any of the textures listed in the Layers panel. A Photoshop file opens that represents the texture layer (Figure 8.26). Add the desired texture or video layer by choosing File < Place. Close and save the texture document, and the 3D model will update (Figure 8.27).
Figure 8.26 The benefit of the Place command is that the new texture is added as a Smart Object. This gives you additional flexibility to scale or transform the texture.

Figure 8.27 To complete the model, you’ll need to adjust its position and lighting. We’ll explore both in the “Adjusting 3D Elements” and “Adjusting Photoshop Lighting” sections.

Close-Up: The Hunt for Models
You can find usable 3D models for Photoshop in several places. Here are a few suggestions:
• You’ll find a collection of models at www.photoshop.com/products/photoshop/3d/.
• On the Photoshop Extended install disc or disk image, you’ll find a folder called 3D models inside the Extras folder.
• For several free 3D models, look at www.artist-3d.com.
• Google offers a 3D Warehouse in support of SketchUp and Google Earth (sketchup.google.com/3dwarehouse). The Google Earth formats often work well in Photoshop Extended too.
• Look at Archive 3D for an extensive collection of free models (www.archive3d.net).
• A great website for both free and for-sale 3D models is TurboSquid (www.turbosquid.com).
Adjusting 3D Elements
When you’re working with 3D models, you have an important choice to make. You can choose to import them as is and rely on After Effects for its camera system. We choose this method when we’re happy with how the model looks on first import and want to move quickly to animation.
Often, however, we need to create preview panels or storyboards using Photoshop. In this case we turn to the Photoshop camera system to pose the model as desired. This effort transfers to After Effects because you can choose to use the Photoshop or After Effects camera in your composition. Photoshop offers several tools that are accessible through the Tools panel and Options bar (Figures 8.28, 8.29, and 8.30).
Figure 8.28 The Object Rotate tool.
![]()
A Return to initial object position. Restores the object to its default position as stored in the original file.
B Rotate. Lets you freely rotate the object within the scene. Drag up or down to rotate the model around its x-axis. Drag side to side to rotate it around its y-axis. Hold down Option (Alt) as you drag to roll the model.
C Roll. Constrains the rotation to a single axis.
D Pan. Lets you move an object horizontally or vertically in the scene.
E Slide. Moves an object along the x-axis and z-axis.
F Scale. Scales an object in place. Drag up or down to scale the model larger or smaller. Hold down Option (Alt) as you drag to scale in the z direction.
G Position menu. Choose from preset object positions.
H Save current position. Store the current position as a preset.
I Delete current position. Remove the current position as a preset.
J Position coordinates. Examine object position coordinates numerically.
Figure 8.29 The Camera Rotate tool gives you different results if you have multiple 3D objects. Otherwise, it performs similarly to the Object Rotate tool.
![]()
A Return to initial camera position. Restores the camera to its default position.
B Rotate. Drag to orbit the camera in the x or y direction.
C Roll. Rolls the camera along a single axis.
D Pan. Pans the camera left or right in the scene.
E Walk. Moves the camera closer to or farther away from the object.
F Zoom. Zooms the camera in on the object.
G View menu. Lets you switch between stored camera views.
H Save current camera view. Creates a new view from the current position.
I Delete current camera view. Deletes a selected view.
J Camera position coordinates. Examine camera position coordinates numerically.
Figure 8.30 The Zoom controls.
![]()
A Perspective Camera. Shows the camera as parallel lines, which converge to vanishing points.
B Orthographic Camera. Shows the camera as parallel lines without convergence. It also displays the 3D model in accurate scale without any perspective distortion.
C Standard Field of View. You can drag to change the field of view of the 3D camera (the Maximum field of view is 180).
D DOF. Lets you set the depth of field. Distance determines how far a plane exists for what’s in focus from the camera. Elements that fall outside of the plane will begin to blur.
Close-Up: Boost Your Memory
Working with 3D objects, cameras, and lights can become very memory intensive. You’ll find that both RAM and CPU can get maxed if your system is a little lean.
To help you properly distribute system resources, Photoshop offers 3D preferences. You can assign how much VRAM is dedicated to Photoshop’s 3D engine (which can boost performance for complex projects).
You can also set limits with the 3D preferences in regard to the Ray Tracing engine. Raising the threshold will produce higher-quality renders (but will also boost render times). If you’re working on a tough deadline, you can temporarily lower quality to speed up the design process as well.
Adjusting Photoshop Lighting
When you create a 3D model, Photoshop will light the scene using two infinite lights. These illuminate the scene evenly from one direction with equal brightness. This style of lighting is flat and simple, which is a great starting point. If you import a 3D model, it can bring its own lights along with it.
In both cases, you’ll likely want to tweak the lights. At the bottom of the 3D panel, click the Toggle Misc 3D Extras button and choose Show All. Make sure that you’re using the Application frame (Window < Application Frame). This makes it much easier to see the actual lights (Figure 8.31).
Figure 8.31 Photoshop uses unique icons for each light type, which makes the icons easier to identify and manipulate.

You can select any of the lights in the 3D panel and use the Light Type menu to change its type. Additionally, you can add new lights as needed to enhance the scene. Controls in the 3D window are contextual and will change based on the style of light you’ve chosen. Adjust the lights with the lighting controls so you are happy with them (Figures 8.32 and 8.33).
Figure 8.32 You can click the select tools to adjust lights from the 3D panel. There are three tools for adjusting rotation, panning, and position.
Figure 8.33 A selected light changes color to make it easier to see.

Notes
For future changes, we recommend storing your 3D model files in the same folder as your layered Photoshop document. This will make updates much easier when you need to jump back and forth between Photoshop and After Effects.
If you forget to import with the Live Photoshop 3D option, you can convert the layer later. Select the layer and choose Layer < Convert To Live Photoshop 3D.
Importing 3D Objects into After Effects
Importing 3D content into After Effects uses Photoshop as a portal. Once you’ve placed the 3D object as a 3D layer or created a new 3D layer with a shape or mesh, the groundwork is set. Simply adjust the lighting and textures, and then save your file.
When you’re ready to import, switch to After Effects, choose File < Import, select the layered PSD file, and click OK. A new window opens asking you to confirm how to load the PSD file. Choose one of the two As Composition methods. Be sure to select the check box next to Live Photoshop 3D (Figure 8.34). Click OK to complete the import.
Figure 8.34 Be sure to import with the Live Photoshop 3D check box selected.

When the import is complete, you can open the precomposition for the 3D object. Inside you’ll find an After Effects 3D camera as well as the 3D object and a control layer that contains an instance of the Live Photoshop 3D effect.
The live Photoshop 3D layer in After Effects uses several expressions to control the file. These are attached to a null layer, which is used to control the live Photoshop 3D layer. Use this null layer rather than directly manipulating the live Photoshop 3D layer’s Transform properties.
The Live Photoshop 3D effect recognizes any animation of the composition camera in After Effects. You can also force After Effects to use the animation of the 3D object or camera from the PSD file (although we find the cameras in After Effects to be more robust). Choose Use Photoshop Transform or Use Photoshop Camera in the effect properties in the Effect Controls panel for the Live Photoshop 3D effect if you want to override After Effects. It is generally better to animate the After Effects camera, but the object may be slightly repositioned within the frame.
Notes
If you want to modify the texture or lights for a 3D object, you must return to Photoshop. Select the 3D object and then choose Edit < Edit Original. If you want to change the model itself, you’ll need to use a 3D authoring program, not Photoshop or After Effects.
It’s important to understand how lights are processed between Photoshop and After Effects. By default, the lights you add to Photoshop are essentially baked into the file. Initially, After Effects lights won’t work on a Photoshop 3D object. If you adjust properties for Photoshop, they will update in After Effects.
Once in After Effects, you can promote the imported Photoshop file to a 3D layer with the Timeline switch. In this case, the lights you add in After Effects can be used to create new shadows. Additionally, you can add new Ambient light to affect the color and overall lighting levels, or add new spot lights for directional lighting (Figure 8.35).
Figure 8.35 Switching an imported 3D model to be a 3D layer will alter its position. However, it will react to 3D lights and camera options like depth of field.

It’s necessary to understand how the two lighting systems combine. You need to first get your base lighting right in Photoshop so the model has adequate lighting. Typically, we favor flat lighting in Photoshop. Once you move into After Effects, you can enhance the model by adding to that lighting (as long as the layer has been promoted to 3D). The two systems can either complement or contradict; it’s up to you to manage the interaction.
Notes
Working with 3D sources can start to hog RAM a bit. By lowering the resolution of the Composition panel, you can dramatically speed up the previews and redraw time. Switching from Full Resolution to Half Resolution speeds up previews by four times. In fact, previewing at half quality with the Composition panel set to 50 percent often provides a perfectly acceptable preview for most tasks (keying, particles, and glows being the exceptions).
Power Techniques for 3D in After Effects
The use of 3D space is one of our favorite features in After Effects (Figure 8.36). Whether it’s designing title sequences, compositing shots, or creating complex effects, 3D is essential. It can also get a little confusing and intimidating from time to time. To help supercharge your workflow, we offer some practical advice. You may know a few of these tips already (which means you’re smart and good looking), but a few new ones are worth the read.
Figure 8.36 3D Layers are much easier to use when you change your viewpoint.

Multiple Views
Imagine a real-world set. A top Director of Photography is on set, but he never takes his eyes away from the viewfinder. It kind of makes it hard to direct—and even harder to light the scene. In the real world, it’s important to look through the viewfinder as well as poke your head up and look around the set.
The same holds true when you’re working in 3D space in After Effects. You can have multiple viewers open at once (Figure 8.37) and click the View Layout button at the bottom of the Composition panel. From the panel, you can choose between multiple 2 View and 4 View layouts.
Figure 8.37 After Effects offers several view presets. Each can be fully customized.

If you prefer working with separate floating windows, After Effects can accommodate. With the Composition panel active, choose View < New View. A new tab appears in the Composition panel. You can drag the tab away until it becomes a second, floating Composition panel in a separate window.
In both cases you can set separate angles for each window or view. We’re big fans of the Custom View 1, Top, and Custom View 3 presets.
Tip
When you have your windows arranged the way you like, you can choose Window < Workspace < New Workspace to save the current setup.
To switch preview resolution quickly, try the following shortcuts:
• For Full Resolution, press Command+J (Ctrl+J).
• For Half Resolution, press Command+Shift+J (Ctrl+Shift+J).
• For Quarter Resolution, press Command+Option+Shift+J (Ctrl+Alt+Shift+J).
• You can also leave the preview resolution set to Auto so it will match the Composition panel settings.
Camera Controls
When you use 3D cameras in After Effects, there are a ton of choices to make. For example, you can choose advanced controls for geometric position, lens options, depth of field, and more. It can get pretty tricky. Sure, if you are a full-blown Director of Photography or a total 3D animation guru, you’ll know your way around. But for the rest, the following sections contain some practical tips to make your workflow more efficient.
Simplified Camera Presets
When you create a camera, you’re presented with an intense dialog box (Figure 8.38). Chances are it won’t all make sense; that’s why there are presets. These are great starting points and quickly let you explore the most relevant camera options.
Figure 8.38 The camera presets are useful starting points to mimic traditional film and video cameras.

Here’s a simple guide to what presets offer:
• Lower numbers (15mm, 20mm, 24mm) produce wide-angle lenses. They will take in more of the view but can become distorted at the edges.
• Higher numbers (80mm, 135mm, 200mm) will give you a narrow angle of view.
• A 50mm lens is a good default for a “normal” camera look. A 35mm lens is OK too.
Close-Up: Pose Your Subject
If you want to quickly pose layers in the Composition panel, there’s a tool that works quite well. Press W to switch to the Rotation tool (V switches back to the Selection tool). Then in the Set menu you can choose to adjust Rotation or Orientation.
Which one should you choose?
• Orientation is best for posing an object (setting its desired, static position). If you keyframe Orientation, it always takes the shortest path between two angles. For example, if you had a keyframe at 0 degrees and the second at 270 degrees, it would rotate only 90 degrees counterclockwise to get there.
• Rotation is the best choice when animating a spin. The Rotation property remembers the direction of the turn and can even store multiple revolutions.
Active Cameras Switching
Many don’t realize that they have the ability to add multiple cameras to a 3D composition. This makes experimentation effortless because you can try out different camera moves without throwing the previous move away (Figure 8.39). As you design, you can look through any camera you want using the options in the 3D View menu.
Figure 8.39 You can trim the layer handles for the camera to control when a camera becomes active.

Tip
Are you trying to move a layer in Z space? Dragging the scrubbable text doesn’t move very fast. If you need to gear up, hold down the Shift key as you drag.
The gotcha is that only the active camera will render. Which one’s active? The answer is that it depends:
• If you have two overlapping cameras, the one on top of the layer stack takes precedence.
• If you want to edit between cameras, you can adjust the In and Out points in the Timeline. Then sequence the camera layers so you can cut between them.
Effect Cameras
Many effects (such as Shatter) have their own built-in 3D systems. This means by default that the effect has its own camera to use. This is because the effects are often used to quickly add 3D depth within 2D compositions.
You aren’t limited here, however. You can choose to override the effects 3D system and use the one you’ve built instead. Just select the Use Comp Camera or Use Comp Lights option in the effect’s property list.
Notes
When using effects that have a 3D camera system, they typically remain as 2D layers. The 3D happens within the effect, not to the actual layer. Don’t enable the 3D switch for the layer with the effect applied to it (e.g., the Card Dance layer).
Depth of Field
One of the main reasons to use 3D cameras is to be able to access the Depth of Field option. When turned on, objects that are too close or too far away from the camera appear out of focus. This behavior mimics how a real camera would behave.
Depth of Field is off by default because it adds complexity and render time. You can enable it in either the Camera Settings dialog box (Figure 8.40) or the Timeline panel. You can adjust its behavior by modifying properties like F-Stop, Aperture, and Blur Level.
Figure 8.40 Using Depth of Field adds to render and preview time. We often leave it off until we near the end of our animation tasks.

Tip
By keyframing the Focus Distance property, you can create rack focus effects between objects.
Setting focus is pretty straightforward. Simply adjust the Focus Distance property. If you don’t want to guess the distance, use a 2 or 4 View preset. When you look through any of the views that show you the camera, you get a bounding box that indicates Focus Distance. Drag the sliders until this frame surrounds your subject (Figure 8.41). Depending on the amount of blurring you’ve allowed, you may have some wiggle room before focus falls off.
Figure 8.41 The bounding box for Focus Distance determines what is in and out of focus. Camera settings like Aperture and Blur Level will also influence depth of field.

Control a Camera with a Null
If you’re trying to create a rotating camera, it can get a little complicated to build smooth sweeping effects. Think of it as the difference between trying to hold a camera while walk in a smooth arc versus putting the camera on a dolly and using a curved track.
The easiest way to do this is with a null object and parenting (Figure 8.42). Null objects are invisible layers that don’t render or show visible properties.
Figure 8.42 A null object is used to orbit the camera around the imported 3D text created in Photoshop.

1. Create a null object by choosing Layer < New < Null Object.
2. Switch the null object’s 3D switch.
3. Position the null at the center (or vortex) of your rotation.
4. Use the Parent column and pick whip in the Timeline to connect the camera and the null object.
5. Animate the null object by rotating to create your arcs. If you want to create a spiral, add keyframes to the camera’s z-position so it moves closer to the null.
Tip
Lights can be parented just like other objects. We sometimes like to attach a light to the camera, so as it moves, the light goes with it (this works well for certain styles of shooting, such as perspective shots). You can also parent lights to a null object to make it easier to apply global positioning adjustments to all the lights at the same time.
Lighting Strategies
If you talk to Directors of Photography, they’ll quickly tell you that lighting is a key ingredient to good cinematography. Lights create perspective, they control depth of field, and they can dramatically impact emotional qualities of your shot. They also add to the number of details that you’ll need to keep track of. Here are a few practical techniques to get better lighting results.
Making Shadows
One aspect of lighting that is confusing to folks is that lights don’t appear to cast shadows by default. Because shadows add complexity and render time, you’ll need to enable them.
You’ll first want to select the Casts Shadows option in the Light Settings dialog box (Figure 8.43). If you forget to do this, just select the light layer and choose Layer < Light Properties. Of course, you still won’t see any shadows.
Figure 8.43 You can double-click a light in the Timeline to open its settings box.

Notes
Limit shadows to only the layers you want. Turning on Casts Shadows unnecessarily will just increase render time.
Although layers are set up to receive shadows automatically, you need to specify which layers can cast shadows. If you stop and think about it, the mess you’d have if all layers made shadows would be quite time-consuming.
Select all your 3D layers that you want shadows applied to, and then twirl open the layer properties so you can access Material Options. Click the Off switch next to Casts Shadows to change it to On (Figure 8.44).
Figure 8.44 You’ll need to set which layers cast shadows and which layers accept shadows using the Material Options for each 3D layer.

Tip
If you don’t want a layer to accept shadows (such as a background layer or other subject), you have that control. Under Material Options for a layer, you’ll find a property called Accepts Shadows.
Controlling Light Transmission
Some of your 3D layers should be treated as being partially opaque. Perhaps the surface is glass or plastic, and you’d like to let some light pass through. The most basic example to visualize is a stained glass window. In this case, light should move through the layer and create shadows and colored light.
Start by enabling shadows for the light layer. You can then open the desired layer’s Material Options. Enable Casts Shadows and adjust the Light Transmission property to 100% (Figure 8.45).
Figure 8.45 The default shadow (left). Changing Light Transmission to 100% (center). Adjust the Shadow Darkness and Shadow Diffusion properties for the Spotlight (right).

Often Overlooked Material Controls
In the rush to design, many motion graphics artists skip the advanced controls in the Material Options category. These are essential because they refine how a 3D light interacts with your 3D layer. The properties that affect appearance the most are Diffuse, Specular, Shininess, and Metal (Figure 8.46).
Figure 8.46 The only changes made to this scene were modifications to the Material Options. No other light settings were modified. The Material Options are indispensable controls that are often overlooked.

Tip
When you’re first exploring Material Options, try lowering or raising their values one property at a time.
To use the advanced Material Options:
1. Drop all the Material Options values to 0% to remove the effect of the lights.
2. Slowly increase the Specular value. This will add a hot spot to your layer (it may get quite blown out). The Specular value controls how reflective the layer is. The higher the number, the brighter the reflection.
3. Raise the Shininess property, which will cause the light to show specular highlights. The higher the number, the smaller the highlight.
4. Use the Diffuse property to soften the results generated by the Specular and Shininess properties. This will soften the transition between lights and darks.
5. Raising the Metal property will lower the color distinction between the darker areas and the highlight, but the highlight will still be brighter. The Metal property also affects how much the layer’s color influences the color of the reflection.