
Chapter 9 Designing with Audio

To me, movies and music go hand in hand. When I’m writing a script, one of the first things I do is find the music I’m going to play for the opening sequence.
—Quentin Tarantino
Creating motion graphics without audio is like cooking food without seasoning—pretty blah. Whether audio is used to inspire creativity in the studio or reinforce an emotion in your composition, it’s an integral part to the creation and evolution of a project. Music crosses the bounds of language into a more guttural form of communication. There’s something about sound that really changes how you think and process information.
In this chapter, we’ll not only explore how to work with audio in Adobe After Effects, but also how to integrate Adobe Soundbooth into your everyday audio workflow. Sure, we’ll look at the basics like adding markers and optimal file formats. But we’ll also dig a little deeper into some of the other challenges like finding new audio sources, using audio to generate animated graphic elements, and working with audio seamlessly across multiple applications.
Using Audio Sources
Rarely do motion graphics end up being played back without music. Yet music often gets overlooked or shortchanged during the design process (and instead gets slapped on at the end). Finding affordable, high-quality, and legal sources for music can sometimes be a challenge. Fortunately, Soundbooth has a variety of royalty-free music scores and audio effects that can be edited and mixed to match the style of your video.
 Close-Up: Finding Sources for Music
If you’re looking for another place to find royalty-free or public-domain licensed music, you might want to check out http://freemusicarchive.org. It’s a wonderfully forward-thinking site directed by WFMU-FM with the digital creative in mind. If you’re looking for music for motion graphics or even samples cleared for remix and distribution, there are a variety of music licenses available. New artists and old, this site seems to have a little of everything available for download. Be sure to look at the terms of use for each song you want to use.
File Formats
Adobe Creative Suite 5 supports five different audio formats, three uncompressed and two compressed. We recommend sticking with one of the uncompressed lossless formats before working with compressed lossy formats. You should also check out the Adobe-specific ASND file format, which supports layered audio and multiple tracks for editing. Here are the five formats supported by CS5:
• AIFF (Audio Interchange File Format). This format is uncompressed and is the standard uncompressed audio format for Mac OS X. It has been widely adopted throughout the professional music and video industry. AIFF supports not only stereo, but can also be used for surround sound audio.
 Notes
Notes
There are two different kinds of AAC formats, protected and unprotected. The protected files have DRM (digital rights management) and cannot be copied digitally. If you have a problem importing an AAC file, look at the file information and make sure it’s not a protected AAC file.
• WAV (Windows Waveform). This format is usually uncompressed and is the standard full-quality audio format for Windows. Although they are primarily uncompressed, you can embed compressed files into a WAV file (which you should try to avoid).
• MP3 (MPEG-1 or MPEG-2 Audio Layer III ). The first most widely accepted lossy compressed audio format, MP3 rose to dominance shortly after its release in the early 1990s. MP3 was initially created by the German company Fraunhofer-Gesellshaft as part of the Moving Picture Expert Group’s creation of MPEG-1 and later MPEG-2. Many companies helped refine the standard as it grew to dominance as the compression of choice for the first portable, digital, file-based music players.
• AAC (Advanced Audio Codec). Created as the successor to MP3, AAC is a lossy compression designed along with the creation of MPEG-4. Its biggest growth in popularity came when it was chosen as the default format for iTunes. It is a widely supported format as the default format used in the iPod, Nintendo DSi, and the Sony PlayStation 3.
• ASND (Adobe Sound). An amazingly flexible format, ASND supports layered multitrack mixes and has the ability to save history snapshots of your projects as you work. These snapshots save the settings of the project at that specific point in time, giving you the ability to go back to the snapshot at any time and edit the project from that point. In addition to the time abilities, ASND files can be imported directly into Adobe After Effects, Adobe Premiere Pro, and Adobe Flash Professional.
 Tip
Tip
Do you want Adobe Media Encoder to automatically convert files as you work? Simply create a Watch Folder by choosing File < Create Watch Folder. In Preferences make sure “Start Queue Automatically when idle for: (xx) minutes” is selected. As long as Adobe Media Encoder is open, after the specified amount of time, any files in the folder will automatically be added to the queue and converted to the same settings as your last file conversion.
Sample Rates
A natural sound wave is perfectly smooth in its oscillation. Because digital audio is recorded using zeros and ones, that sound wave is recorded as a series of measurements over time; each one is known as a “sample.” The higher the sample rate, the better the quality. You want a sample rate to be about double the frequency of the sound you’re recording. It is widely accepted that the human ear can hear frequencies from 20 to 20,000 Hz. Most people can’t hear that entire range, and the range changes as people age. To be able to reproduce the full range, you want a sample rate to be in the neighborhood of at least 40,000 samples. CD sound quality is recorded at 44,100 samples (44.1 kHz), whereas a standard, digital video file uses audio recorded at 48,000 (48 kHz). We recommend working with 48 kHz audio if you’re designing for video or broadcast. If you’re going to the Web, Flash typically prefers 44.1 kHz. If film is in your future, you may find that you’ll be using higher-end audio down the road, such as 96 kHz.
Close-Up: Additional Sample Rates
After Effects CS5 has removed support for some nonstandard fractional audio sample rates in the Render Queue. It also removed the ability to set arbitrary, custom values in the Output Module settings. These settings really only caused incompatible files, so the decision was to support only standard rates.
If you need to work with other sample rates or want additional controls, you can send audio to Soundbooth. Just choose Edit < Edit In Adobe Soundbooth to open the clip in Edit view in Soundbooth.
Bit Depth
The sample rate is just one part of the equation when recording a sound wave. Bit depth controls the dynamic range, which is how closely each sample matches the amplitude of the original sound wave. The higher the value, the higher the dynamic range and the better the sound quality. CDs are 16-bit and DVDs are often 24-bit. Most video is edited at a bit depth of 16-bit, and this is fine when working in After Effects. If needed, you can work with up to 32-bit audio in After Effects.
Notes
When working in Soundbooth, it is recommended that you work with a 32-bit project and down convert upon export.
Sample Rate Conversions
As you design, you’ll often gather a variety of sources to use. You may find that you have 48 kHz material from a video camera intercut with 44.1 kHz audio from a stock music library. Don’t worry; as long as you’re importing a supported audio format, After Effects will attempt to automatically convert any audio source so the file’s sample rate matches your project sample rate.
Tip
If you’re working with a video editor for a project, double-check to make sure your project’s settings match the edit settings for the final project. Most of the time, you’ll find that video projects are 16-bit audio at a sample rate of 48 kHz.
Sample rates in After Effects are set at the project level, not the composition level. To set the sample rate of your project, choose File < Project settings; the Sample Rate menu is at the bottom under Audio Settings (Figure 9.1).
Figure 9.1 Select a sample rate in the Project settings under Audio Settings.

We find that After Effects will successfully convert the sample rates of any imported audio in most cases. The notable exceptions are compressed sources (such as MP3), which can sometimes lead to strange audio sync issues. We recommend that you convert your audio to an uncompressed format with a sample rate to match your project before you import it into After Effects, which can be done using the Adobe Media Encoder.
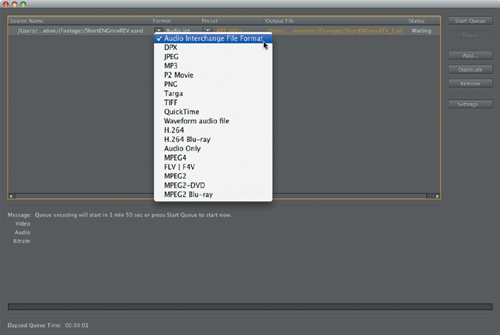
The Adobe Media Encoder is fairly intuitive. Its straightforward interface makes it easy to specify conversion settings, load multiple files, start the queue of files to render, and let it do the heavy lifting (Figure 9.2).
Figure 9.2 Drag and drop any files for conversion directly into the interface. Specify the new file format using the Format menu. To customize the conversion or see specific details about the conversion, click on the name of the preset to open the Export settings. When all the files are loaded and the settings are set, click Start Queue in the upper-right corner of the interface to start the conversions.
Creating Audio Sync Points
As you design, it’s often much easier to ensure that graphic elements are properly timed to music or narration by using sync points. An audio sync point is nothing more than a marker applied to a layer or composition (we often create an empty adjustment or a null layer to hold them all). Typically, sync points (Figure 9.3) are added to indicate where different events are supposed to occur based on cues provided in the audio track. For example, a motion graphics designer would mark where the music reaches its peak to match the big reveal of the graphics. Similarly, a character animator would add markers to indicate areas for lip sync.
Figure 9.3 Soundbooth projects and their markers will seamlessly import into After Effects and Premiere projects.
Notes
In addition to marking key points in time, markers can be used to create chapter markers and cue points to add interactivity.
Previewing Audio in After Effects
Before you preview anything in After Effects, you should check to see how you’ve set up previews to process. Choose After Effects < Preferences < Previews (File < Preferences < Previews) to specify the length of your audio previews. An audio-only preview is often preferable to a typical RAM preview because of real-time playback. When you have a complex project that a RAM preview cannot play in realtime, the video and audio can appear out of sync and can make adding markers very confusing. Audio-only previews are much easier for a system to load and ensure real-time playback.
Tip
To preview audio only within a specific range, set a work area. Position the current time indicator at the start of the desired work area and press B to set the Beginning of the work area. Move the current time indicator and press N to set the eNd of the work area. Then press Option+. on the numeric keypad (Alt +. on the keypad) to preview audio only within the work area.
To play an audio-only preview, press the decimal key (.) on your numeric keypad (Control+. on a Mac laptop). You can also load a preview by choosing Composition < Preview < Audio Preview (Here Forward).
If you don’t need a full audio preview, you can just drag the current time indicator to find a cue point. Press the Command (Ctrl) key and drag the current time indicator across the Timeline to hear the audio track. To visually observe what’s happening to the audio levels as you scrub, press Command+4 (Ctrl+4) to bring the Audio panel to the front.
Adding Markers
After Effects supports layer markers and composition markers. Both can also be added in realtime during any preview. When adding markers to music, invoke an audio-only preview, and then tap the multiply key (*) on the numeric keypad to the beat of the music. Once the audio is finished playing, all the markers just added will appear in the Timeline. Here are a few guidelines for adding markers:
Tip
To view more precise measurements in the VU meter, increase the height of the Audio panel.
Composition markers are an easy way to navigate a Timeline. To move the current time indicator directly to a composition marker, press the corresponding number on the main keyboard.
• Add a Null to hold the markers. This gives you flexibility to slide markers without affecting footage and really comes in handy when you’re working in a large composition with many layers. You can quickly move the Null up or down in the Timeline panel to maintain visibility when working with other layers.
• To apply layer markers, select a layer and press * on the numeric keypad (Control+8 on a Mac laptop).
• To apply composition markers, press Shift + 0–9 on the main keyboard.
Although we find tapping out to the music to be the easiest method, you can work other ways. If you’re not feeling the rhythm, or if you just want to visually place your markers in the Timeline, here are a few helpful Timeline tips and key commands you should know (Figure 9.4):
Figure 9.4 Using the waveform can make it easy to line up markers visually to the peaks and valleys of the audio represented in the Timeline. Drag the Time Navigator brackets to view a specific area of the Timeline.

• Press LL to view an audio waveform in the Timeline panel.
• Drag the Time Navigator brackets to zoom into a specific area of the Timeline.
• Press = or – to zoom in and out on the Timeline around the current time indicator.
• Press ; to quickly zoom all the way into one frame (at the location of the current time indicator).
• Press Shift + ; to zoom out and see the entire length of the composition. Repeat the command and the Timeline view will change back to the duration specified by the Time Navigator.
To change the placement of a marker, drag directly on the marker in the Timeline panel. You can also be precise by opening the Layer Marker dialog box and entering a specific time value into the Time field.
Tip
If you want to make markers truly useful, you can add labels to them. To edit a label, double-click the marker and type your label in the Comments field. Labels are also an easy way to communicate when moving a project between artists working in a group environment.
Adding Soundbooth to Your Workflow
As motion designers, when creating a 30-second show open, we wouldn’t think twice about moving the project back and forth between After Effects and Premiere Pro. Typically, we’d create the initial edit in Premiere Pro, taking full advantage of its real-time editing capabilities. Then we’d seamlessly move the project into After Effects using Dynamic Link. In After Effects we’d usually layer in more files created from Photoshop and Illustrator. So why not use Soundbooth when it comes time to either add or edit audio for the open? It only makes sense, and it’s easy enough to send files out to Soundbooth while using either Premiere Pro or After Effects by selecting the audio file and choosing Edit < Edit In Soundbooth. Also, if you’ve designed an audio project in Soundbooth, both Premiere Pro and After Effects will flatten and import the entire project file natively as an ASND file. No prerendering—just import and go!
Creating Graphics and Audio
Although it’s not known as a robust audio tool, After Effects has some interesting audio capabilities. In fact, it can generate tone-based sounds and create graphic elements that animate in response to sounds. All of this is made possible through the use of effects.
Audio Spectrum
Many designers want to actually see their audio on the canvas. This is especially true for those designing user-interface-style graphics or for projects where audio is a featured element. One great effect is the Audio Spectrum effect, which generates graphic lines that scale based on the frequencies present. The effect is limited to a single audio track (Figure 9.5), but you can pre-compose multiple audio tracks together if needed.
Figure 9.5 This Audio Spectrum is being generated by the ASND file in the composition. The effect is straight by default, but you can attach an Audio Spectrum to a custom path for a curve.

The overarching appearance of the spectrum generated is set under the display options (Figure 9.6). The rest of the options listed can help create highly stylized and unique versions of the spectrum. Figure 9.7 shows the most useful controls.
Figure 9.6 The three Display Options for Audio Spectrum are (A) Digital, (B) Analog lines, and (C) Analog dots.

Figure 9.7 Some highlights of the Audio Spectrum effect.

A Audio Layer. Be sure to specify the source layer for the audio.
B Start Point, End Point. The easiest way to define the position is to click the target icons and then mark the desired position in the Composition panel.
C Path. You can use a custom path to generate the shape. Only paths applied to this same layer will populate the Path menu.
D Start and end frequency. You can set the frequency range for the effect. For example, you can limit the effect to only the bass portions of a track.
E Frequency bands. Use a higher number of bands to display the frequencies for a more complex effect.
F Thickness. Set the thickness for the lines of the spectrum.
G Softness. Set how feathered the lines of the spectrum will be.
H Inside Color and Outside Color. You can control the colors used to draw the line. Combining two different colors with softness can create a neon line effect.
I Hue interpolation. For any value greater than zero, the color will rotate through the hues based on the frequencies. Change your project to a 32-bpc color space to see the colors really light up.
Audio Waveform
The Audio Waveform effect produces a more wave-like shape than the Audio Spectrum effect. The setting options for Audio Waveform are very similar to the Audio Spectrum effect. Although it doesn’t have the hue controls over the color like the Audio Spectrum effect, it does have the ability to react specifically to each channel in the stereo mix set under the waveform options. Like Audio Spectrum, Audio Waveform also has three Display Options (Figure 9.8).
Figure 9.8 Display Options for Audio Waveform are (A) Digital, (B) Analog lines, and (C) Analog dots.

Using Tone to Create Sound
Although it sounds limiting at first, After Effects can create tone by applying the Tone effect to a layer. We know the anticipation is killing you. But the effect is surprisingly versatile. Instead of searching through libraries of various sound effects, Tone can generate simple sounds by mixing up to five different frequencies (Figure 9.9).
Figure 9.9 Adjust each of the five frequencies to create distinct results.

Notes
Tone will not function if placed on a placeholder layer. Be sure to apply it to a footage layer like a solid for it to function properly. If you apply it to a footage layer, the existing sound will be replaced.
When you’re using five frequencies to create one sound effect, the noise will distort rather quickly. To avoid distortion and clipping, divide 100 (for 100%) by the number of frequencies used to generate the sound. For example, if two frequencies are being used, you shouldn’t set the level to a value higher than 50%. The biggest influence on the sound is the Waveform Options property that modifies how the frequencies are interwoven. Be sure to experiment with different methods to hear the effects.
To really get the hang of the Tone effect, we recommend exploring the animation presets in the Effects & Presets panel. The Sound Effects category offers seven presets to choose from. When you apply a Tone preset, After Effects uses conventional keyframe techniques to manipulate the duration or repetition of the sound. For instance, with the Busy preset, if you want the sound to keep repeating, just copy and paste additional keyframes of the sequence of keyframes to continue repeating. If you want the beep to slow down and make noise a little longer, select all the keyframes by clicking directly on the name of the parameter, in this case, Level.
Once the keyframes are selected, you can change the spacing of the keyframes evenly by pressing Option (Alt) on the keyboard and dragging on the first or last keyframe (Figure 9.10). The Tone effect is directly tied to the presence of the solid layer. Trimming the layer will in turn trim the sound being generated. Just be sure to add fades at the beginning and end of the audio to eliminate any popping noise at the beginning or end of the layer.
Figure 9.10 Option (Alt)-dragging keyframes will keep the spacing between the keyframes in proportion to each other, no matter if they are tightened up or spaced farther apart.
To really hear the flexibility of the effect, combine Tone with other Audio effects. Options like Reverb, Flange & Chorus, and Modulator can create very complex sounds. You can use these to create digital effects or stingers to enhance your animation.
Using Expressions with Audio
If you’ve ever used expressions in After Effects, you know they can be easy to apply with the pick whip and can often provide solutions to animation problems that can’t be solved any other way. However, many find the “math-like” scripting of expressions to be a turn-off.
But trust us; expressions are worth it and they don’t have to be hard. With expressions and audio, you can literally drive the animation of a graphic element with the attributes of an audio channel. Using a simple pick whip, you can choose the parts of the sound you want to use and drive an animation. But before you can use the pick whip, you must prepare the audio by converting the audio into keyframes.
Converting Audio to Keyframes
When you first look at the properties of an audio layer, the only selectable item is the Audio Levels property. Unless you’ve already added keyframes, that value will remain flat and constant (which won’t do much good for an animation).
To create parameters that are useful for animation, you need to convert the audio to keyframes. The easiest way to do this is with a keyframe assistant. Choose Animation < Keyframe Assistant < Convert Audio to Keyframes.
To see the results of this command, you need to view the layers in the Timeline panel. You’ll find that a new Audio Amplitude null object has been created (Figure 9.11). Select the layer and press U to expand the animated properties of the layer. As you can see, the amplitude for the Left, Right, and Both Channels were converted into keyframes.
Figure 9.11 Three sets of keyframes created by the Convert Audio to Keyframes assistant. You can now use a pick whip to have the audio affect different parts of the scene.

Now that keyframes have been created, the amplitude values can be tied to any property. Let’s make the project blur to the beat of the music (Figure 9.12).
Figure 9.12 To apply the expression, select the property and press Option+Shift+= (Alt+Shift+=). After the expression is applied, drag from the pick whip to the property you’d like to animate.

1. Open and select the Blurriness parameter of the adjustment layer.
2. Choose Animation < Add Expression.
3. Drag the pick whip to the slider under Both Channels and release it.
By dragging the pick whip to the slider for Both Channels, you’ve created an expression where the value of the keyframes in the slider for the audio amplitude is tied to the blurriness of the adjustment layer.
Shortcuts for Expressions
Expressions can get a bit cumbersome, so it’s important to become familiar with them. We find these expression shortcuts helpful:
• To quickly view any expressions applied to a layer, press EE.
• To reveal all layers that contain expressions and keyframes, press U.
• To remove an expression, Option-click (Alt-click) the stopwatch of the parameter that contains the expression.
• To enable and disable an expression, click the = in the Timeline panel to the right of the parameter name.
Finding More Expressions
We haven’t even scratched the surface of using expressions with audio. They can do much more than tie one parameter to another. Some expressions help animate cameras through 3D space or distribute layers in precise geometric patterns. If we’ve piqued your interests at all, you’ll want to check out some of the following websites that specialize in teaching and/or selling scripts for use in After Effects:
• www.tinyurl.com/aeexpressions. The online After Effects help documentation for expressions is the perfect place to better familiarize yourself with expressions. More than just a typical help menu, the site is always kept current with updates and links to other relevant tutorials, articles, and resources.
• www.motionscript.com. An excellent resource to learn more about expressions and scripting, brought to you by Dan Ebberts.
• www.aenhancers.com. A site with message boards that cover everything from basic scripting and expressions to libraries, discussions, and even a board for script requests.
• www.aescripts.com. A very comprehensive site written by several of the industry’s leading script writers. A multitude of searchable scripts are available for immediate download. The scripts cover many tasks, from placing layers in 3D space to setting up background renders. They even have an Expression toolbox designed to store and keep track of your scripts.
Using Soundbooth for Sound Design
Whenever you want to polish an animation and improve it from good to great, try adding sound design. By adding well-placed sound effects and environmental sounds, your animation will seem fuller and better timed. These sounds are often independent of the music track but can complement the music.
Soundbooth is the perfect tool for sound design because it has a little bit of everything. You’ll find a searchable library of editable sources, single file editing, robust multitrack mixing, and effects that can add depth to the sound through simulating different environments.
Resource Central
To jump start sound design in Soundbooth, we recommend a quick trip online. Resource Central is the section of Soundbooth where you can browse through a range of audio resources. To view Resource Central, make sure you’re connected to the Internet, and in the Workspace menu choose Find Sound Effects and Scores (Figure 9.13).
Figure 9.13 Use the Workspace menu in Soundbooth to quickly change and optimize the interface for specific tasks.

The Sound Effects and Scores features have very similar interfaces. So once you understand how to browse and import sources from Sound Effects (Figure 9.14), the same techniques will apply to Scores (Figure 9.15).
Figure 9.14 Search within specific categories to save time looking for the right files.

Figure 9.15 The Play button and the Download button are next to the names of the files. Click the Play button to preview the audio file; click the Download button to download the file to a shared folder on your hard drive.

After you’ve downloaded a file, drag it to the Project panel in the upper-left panel in Soundbooth to add it to your project.
Custom Scoring Motion Graphics
How would you like a collection of royalty-free music tracks? These tracks can be easily retimed or have their mix of instruments adjusted. You’ll even receive a bunch to start (and others are affordably priced). Interested? Well then check out Scores.
The Scores you’ll find in Soundbooth are amazingly flexible sources to work with. To browse through Scores, click the Scores button in the Resource Central panel.
1. As you browse through the different categories, press the Play button to preview the score.
2. When you’ve found the music you like, click the Download button to the left of the score’s name to download it (Figure 9.16).
Figure 9.16 To use a score you like, download it by clicking the Download button.

3. Once the file has been downloaded, you will see a check mark to the right of its name in the panel. Even though the file has been downloaded, it still needs to be extracted. Drag on the name of the file to move it to the Scores panel on the right to extract the score and add it to the Scores library that’s stored locally on your machine (Figure 9.17).
Figure 9.17 You must extract the file after download before it can be edited or used in a project. Drag the score to the Scores panel to extract the score into the local Scores library.

4. To edit and see the features of a score, it needs to be added to a multitrack project. Select the score and click the Add Score to Multitrack button (Figure 9.18).
Figure 9.18 If a score currently resides in your local Scores library, you can add it to a multitrack project by clicking the Add Score to Multitrack button at the bottom of the Scores panel.

5. Up to this point, you’ve just been using Soundbooth to browse through a library of sources. You couldn’t actually save a file until it was visible in the multitrack project, but now it’s ready to be saved.
After the project is saved, go back to the upper right of the interface and change the workspace to Edit Score to Video (Figure 9.19).
Figure 9.19 Switching the workspace makes it easier to edit the score by automatically bringing the most used panels forward in the workspace.

Now Soundbooth is ready to add a video track to the project. Import the file into the Files panel and drag it onto the audio tracks to add it to the project. Any additional tracks required for the footage will automatically be created (Figure 9.20). Soundbooth supports Flash Video, QuickTime, Windows Media, MPEG-4, and MPEG-2 files. Both AVI and MPEG-1 files are also supported for Windows.
Figure 9.20 This time-lapse shot of Seattle does not contain any audio.

To edit the audio to this video, you need to customize the score.
Tip
Audio can be extracted from any video file imported into Soundbooth by clicking on the yellow words Extract Audio in the upper-right corner of the video track.
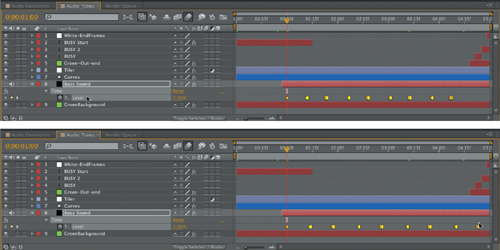
1. Select the score on Audio track 1 and select the Properties tab on the left to access the options for this score (Figure 9.21). Before you change any options, take a quick look at track one. The score has been divided into sections: an intro, an ending, and three parts. Since this clip is short, we don’t need quite that many sections.
Figure 9.21 The Outer Space score on track 1. You can edit a score’s length using the Properties panel.

2. Instead of trying to edit the parts directly in the Timeline, go back to the Properties panel, click the Variation menu, and choose the 36 Seconds variation (Figure 9.22). Now the score is just composed of the Intro, Part3, and the End (Figure 9.23).
Figure 9.22 The Variation menu contains different lengths of the same score, so if you just need music for a 30-second spot, you can avoid more involved editing by choosing the shorter variation.

Figure 9.23 Look in the Timeline to see the different sections of music that make up a score. This makes the style of music predictable and modular, so overall it’s easier to edit.

3. To quickly zoom the scale of the Timeline, click the Zoom Out Full button in the upper-right corner of the Timeline or use the keyboard shortcut () (Figure 9.24).
Figure 9.24 The Zoom Out Full button displays the entire length of the audio clips in the Timeline.

4. Press Home and the spacebar to watch the project from the beginning.
5. To edit the score to match the length of the video, select the score in the Timeline. Then in the Properties panel, change the Intro/Outro setting to None and change the duration to 00:00:33.200 (Figure 9.25).
Figure 9.25 Change the Intro/Outro setting to None to manually type in a new duration for the score.

In addition to changing the length and parts of the score using the Properties panel, you can still edit the instrumentation of the score. To view all the different options, click the Parameters menu in the Timeline and choose Show All (Figure 9.26). To better view the different variables, click the Maximize Clip button in the upper-right corner of the score layer (Figure 9.27).
Figure 9.26 Parameters in a score can show you all the editable parameters to either add or remove instruments from the score.

Figure 9.27 Use the Maximize Clip button in the upper-right corner of the score layer to optimize the view of that score on your screen.

Each score will have slightly different variables to customize. In this specific score, Synth is the variable; Intensity and the Volume are present in all scores. The following explains what the Intensity and Synth settings are actually controlling in this score:
• Intensity. Intensity controls the amount of instrumentation used in the score. As the number increases or decreases, instruments will be added to or subtracted from the score.
• Synth. Synth is a specific parameter that controls how much synthesizer gets mixed into the score. Since this is unique to this score, the other variables could be other instruments or even control over different melodies.
To adjust any of the variables, drag directly on the yellow values. As the value changes, a keyframe will automatically be added at the location of the current time indicator (Figure 9.28).
Figure 9.28 All the variables in a score can be keyframed in the Timeline. Adjusting any of the values will automatically create a keyframe where the current time indicator is placed.

Keyframes in the Intensity layer will default to adding hold keyframes instead of linear keyframes like the other layers. To gradually mix in or mix out instruments in the Intensity layer, right-click on the hold keyframes and choose Linear (Figure 9.29).
Figure 9.29 To change keyframe interpolation, right-click on the keyframe to choose Linear or Hold.

The music track is all set. To create a new mood for the animation, layer in some other sounds. Because this animation flickers a lot, some kind of rain background noise might work. As you add different tracks you can also add effects to the audio to distort it and make it sound more interesting.
To look for effects, change the workspace to Find Sound Effects and Scores in the Workspace menu.
Tip
When dragging a new audio source into a multitrack project, pay close attention to where you drop the file. If the cursor is over the middle of the track, the audio will start right there in the middle of the track. To avoid this, drag the file to the head of the track in the large gray area to the right of the Mute button.
When all the major edits are complete, shift your mind and think about how all of the sources are mixing together. Even if they don’t mix well right off the bat, adding a few different effects can sometimes do the trick. The enhancements to the rest of this project are purely subjective, so we encourage you to experiment with different filters and settings.
1. To add filters to a track, you need to send it to edit by clicking Edit in the upper-right corner of the track.
2. Whenever a track is in edit, it’s represented twice visually. The top version is the waveform; the bottom version shows the frequencies.
3. To apply an effect, click the Effects panel and then click the fx button in the lower-right corner of the panel to open the menu of effects (Figure 9.30).
Figure 9.30 To place an effect on a track while in edit, select the track and click the fx button in the lower-right corner of the Effects panel to access the effects menu and apply the effect.

4. The Convolution Reverb effect is one of the most processor-intensive effects in Soundbooth (Figure 9.31). It’s also the easiest to use to simulate different environments. Once a filter is applied, click Settings in the Effects panel to open its options. Play the track as you make adjustments to hear a preview in realtime.
Figure 9.31 Use the Convolution Reverb effect to simulate different audio environments.

5. Pitch and Timing will increase or decrease the frequency or change the length of the clip. Let’s bring the pitch down just a touch. To apply the effect, choose Processes < Pitch and Timing (Figure 9.32).
Figure 9.32 Pitch and Timing are being applied to this track to adjust the frequencies of the rain track. In this case, the frequencies decrease as the Pitch is adjusted down.

6. When you’re finished applying filters to tracks, click the Back button in the upper-left corner of the Timeline to go back to multitrack editing. Click the Loopable button to the right of the Play button, and play the project (Figure 9.33). Adjust the fades and the levels on each track to choose a mix you like (Figure 9.34).
Figure 9.33 The two-tone squares in the upper-right and left corners of an audio track control the length of any fade in or fade out on that track.

Figure 9.34 Getting the right mix is sometimes a combination of adjusting, listening, and readjusting to get the final results.

7. When you’re happy with your new mix, save your project. As soon as you save a Soundbooth project, since projects are ASND files, it’s already prepped and ready to use in the rest of the Adobe Creative Suite Production Bundle.
8. To create a single file of the entire mix, choose File < Export < Multitrack Mixdown. Saving a single mixdown is a good idea for a few reasons: to create a library of completed projects, for archiving purposes, or to send the file to others for feedback.
9. If you need to create a file from just one track, you can do that as well by right-clicking directly on the track and choosing Export Clip Mixdown.