
Chapter Seven. Flash Catalyst
If you purchased Adobe Creative Suite 5 Design Premium you probably noticed a new program among the old stalwarts like Photoshop, Illustrator, and InDesign. That new kid on the block is Adobe Flash Catalyst. Flash Catalyst is positioned as the interactive application for those who don’t want to write code. It was created for designers who are tired of handing off static artwork to developers to breathe life into their design before placing it onto the Web or into an interactive desktop environment. Although in its infancy, Flash Catalyst delivers on its promise. Want to make a box into a button? Select it and it’s a button. Need a scroll bar? Drag an object onto the project that looks like a scroll bar and, shazam! it’s a scroll bar.
#61. Flash Catalyst Basics
Flash Catalyst provides the tools to build interactive content without writing a line of code. Typical Flash Catalyst projects include interactive Web banners or ads, online portfolios, product guides or manuals, and sophisticated application interfaces (Figure 61a).
Figure 61a. Here’s an example of an interactive banner that began life in Adobe Illustrator before its finishing touches were applied in Flash Catalyst.

Among its many key features, Flash Catalyst allows you to design with familiar products like Photoshop, Illustrator, and Fireworks. Taking advantage of what you already know in these programs, Catalyst is designed with a fast learning curve that gets you up and running quickly. Content like images, video, audio, and SWF files can be imported into your project’s library and placed with pixel-point accuracy when viewed across varying operating systems and devices.
Drag-and-Drop Components
To quickly comp an idea, you can use the handy Wireframe Components panel seen in Figure 61b. This panel lets you drag and drop common page items like scroll bars or radio buttons into your layout.
Figure 61b. The Wireframe Components panel provides ten useful objects with which to build a quick wireframe of your project.
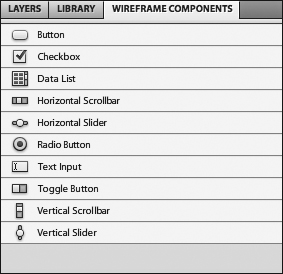
Artwork is easily transformed into interactive components, like buttons, check boxes, lists, and scroll bars. Interactive forms can be quickly created using built-in components like text entry and check boxes. Interactions defining component behavior can be added to buttons, for example, to produce smooth transitions between pages or states. Prototyping is also easy using Flash Catalyst’s collection of wireframe components (Figure 61b).
Built on Adobe’s open source Flex framework, Flash Catalyst projects contain three major ingredients: components (buttons, sliders, scroll bars), pages and states (logins, forms, info pages), and transitions. Once a project is laid out, artwork can be imported from Adobe Photoshop, Illustrator, or Fireworks with all original layers intact. Interactions are added like playing a movie, opening a URL, or playing a transition to another state. Once the designer decides the project is complete, Flash Catalyst projects are exported as SWF files that run in Adobe Flash Player for the Web or Adobe AIR on the desktop. Flash Catalyst projects (.fxp) can also be opened in Adobe Flash Builder for further development.
#62. Getting to Know the Flash Catalyst Interface
Unlike most CS5 apps, Flash Catalyst has only two workspaces, Design and Code. Pop-up menus in each workspace let you toggle between them.
The Design Workspace
The Design workspace (Figure 62a) is comprised of several key areas. The artboard is the main area, or stage, where the design is built. Above the artboard is the Breadcrumbs bar, which tracks where you are in any point within your project. Above that is the Pages/States panel, which displays a thumbnail of each page or state of a component. Pages and states can be duplicated, removed, added, or renamed this panel.
Figure 62a. Compared to other CS5 applications, Flash Catalyst has a relatively sparse interface, as seen here.

To the right of the Pages/States panel is the Heads Up Display, or HUD panel. A floating panel that can be placed anywhere, the HUD appears when objects on the artboard are selected. From its drop-down menu, selected objects are easily transformed into working components like buttons, boxes, scrolling panels, or sliders.
In the far-right column you’ll find the Tools panel, beneath which sit the Layers, Library, and Wireframe Components panels. Wireframe Components are fully functioning, pre-built generic-styled components, available to be dragged and dropped onto the artboard.
Below this group of panels are the Interactions and Properties panels. Interactions define what happens as users interact with the application. A typical interaction would be a page turn that occurs when the user clicks a defined button. Interactions can also be set up to play animations or videos, or open a Web page.
Directly below the artboard are the Timeline and Design-Time Data panels. The Timeline panel tracks the progression of an animation over time and provides controls to add transitions and effects like fades or dissolves. The Design-Time Data panel provides control over which data (images or text) appear in a prescribed data list.
The Code Workspace
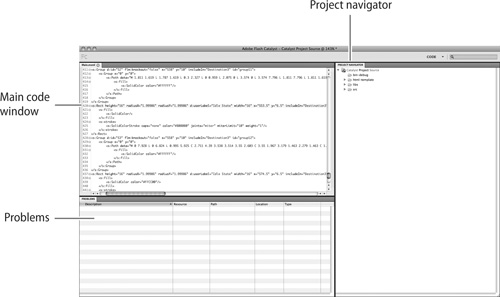
To view the underlying application code in Flash Catalyst, use the Code workspace. Like in Dreamweaver, code is generated automatically as you work in Flash Catalyst (Figure 62b). But unlike Dreamweaver, the Catalyst Code workspace is read only. All editing must be performed in Adobe Flash Builder.
Figure 62b. The Code workspace is misnamed, because you can’t actually work in it. The workspace is read only, and all editing must be done in Adobe Flash Builder.
#63. Planning a Catalyst Project
Although Flash Catalyst projects can be built from scratch by choosing File > New Project, most projects will originate as static pages in Illustrator, Fireworks, or Photoshop. Working this way is important for two reasons. First, you’ll be using tools with which you’re most comfortable. Second, with Flash Catalyst a mere 1.0 release, many of its tools are far less robust compared to those found in more mature programs like Photoshop or Illustrator. Most typesetting, for example, is better handled outside Flash Catalyst and then pasted in. The same holds true for objects that need to be aligned or distributed.
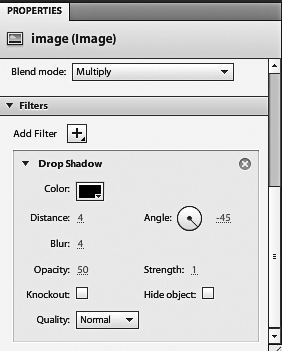
This is not to suggest that all work need be done outside of Flash Catalyst. For example, a simple effect like creating a drop shadow is better handled in Flash Catalyst than in Illustrator (Figure 63a). Adding simple text like button labels is also fine to do in Flash Catalyst.
Figure 63a. Drop Shadow is one of six basic filters that can be easily added to objects in Flash Catalyst via the Filters panel.
Whereas originating artwork inside of Flash Catalyst may sometimes seem attractive, remember that once art is created in Flash Catalyst it’s there forever. In other words, there’s no way to begin a project in Catalyst and then further edit it back in Illustrator, Photoshop, or Fireworks.
What’s most important when starting any project, regardless of where you begin, is layer organization and labeling. Without descriptive names for layers and objects, the job of assigning actions and behaviors in Flash Catalyst becomes a confusing mess.
#64. Starting in Illustrator
When designing projects in Illustrator, you must give careful consideration to the document structure. The two most common ways to create this structure in Illustrator are to import all your artwork from one artboard into a single page state, or to use multiple artboards to define separate pages and states inside of Flash Catalyst. Either way, giving your artboards and layers descriptive and unique names will simplify their use once they’re in Flash Catalyst.
Figure 64a shows an interactive city guide that was built from one artboard employing multiple layers in Illustrator. When viewers click the numbered buttons that are centered on top, images and text panels slide gracefully in and out.
Figure 64a. From left to right we see five image panels grouped end to end. The viewer can click a button at the top of the interface to switch between the various screens and text. Although it’s hard to see, there is a small text panel in the lower-right corner of the leftmost panel.
![]()
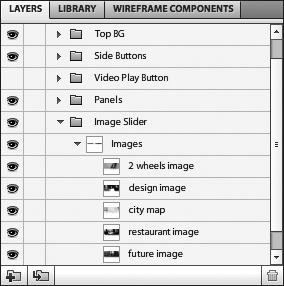
If we further examine the Layers panel of our city guide, we see how major components like buttons, panels, or images are all placed on layers (Figure 64b).
Figure 64b. In this expanded view of the Layers panel we get a good look at the way buttons, panels, and images are placed on layers.
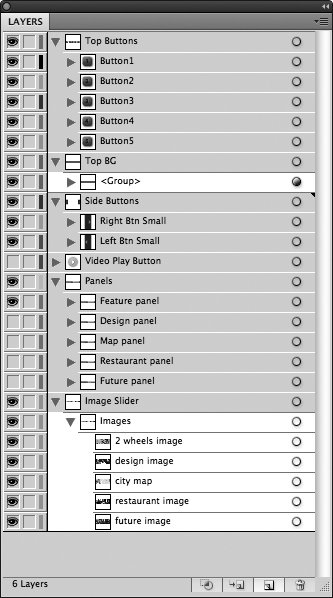
When brought into Flash Catalyst, those Illustrator layers are translated into the Flash Catalyst layers seen here in Figure 64c.
Figure 64c. If you strategically organize similar components into Illustrator layers, adding animation and interaction inside of Flash Catalyst is more efficient and less confusing.
Working with Symbols
One of Illustrator’s more powerful characteristics is its ability to leverage symbols to reduce file size and lessen complexity. That’s because a symbol need only be created once, as each additional copy is considered an instance of the original. These instances, or children, can be quickly updated therefore by simply updating the originals, or parents.
What also makes symbols appealing is how, after import into Flash Catalyst, they are automatically mapped to optimized graphics. It’s like importing an already compiled SWF rather than hundreds of independent vector paths.
So does this mean all Illustrator art should be converted to symbols? No, not really. Most simple vector artwork will gain little once converted to symbols. Conversely, complex, multi-path Illustrator objects, objects with embedded images, or objects that repeat many times are strong candidates for conversion to symbols (Figure 64d).
Figure 64d. In this 365 KB illustration, a stand of trees was created using one tree symbol and multiple instances. When those instances are expanded into individual vector objects, the file size balloons to over 1.7 MB.

As an alternative to using symbols, rasterizing complex Illustrator artwork is another good strategy to reduce file size and to simplify import into Flash Catalyst. (To do this, select Object > Rasterize.) Rasterizing artwork that links to outside image files is also a good idea, particularly when you need to hand off files to other designers. When rasterizing an object, select 72 dpi for your screen resolution and set backgrounds to transparent.
Illustrator Import Options
Once you’ve completed your project in Illustrator, it’s time to import it into Flash Catalyst. To do so locate the Create New Project From Design File section of the Welcome screen and choose From Adobe Illustrator AI File.
Alternatively, choose File > New Project from Design File, which will close any open project and allow you to navigate to another (only one project can run at a time). When the Illustrator Import Options dialog box appears, you’ll have several choices (Figure 64e).
Figure 64e. Aside from artboard size and color, Fidelity options and Other import options warrant close attention.
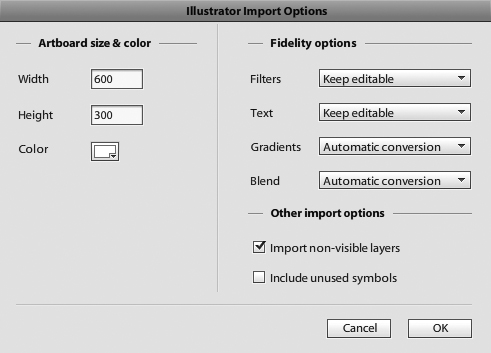
The Illustrator file converts to the FXG format automatically, and then imports into a new Flash Catalyst project. If the Illustrator file uses only one artboard, all artwork is placed in one Flash Catalyst page state. If the Illustrator file includes multiple artboards, each artboard is placed in a separate Flash Catalyst page state. Note that you can also copy and paste artwork from Illustrator into Flash Catalyst. Doing so will trigger this same Illustrator Import Options when copying and pasting. Objects that are outside the Illustrator artboard are not included when you copy and paste artwork to Flash Catalyst.
#65. Starting in Photoshop
Flash Catalyst can also work with projects that originate in Photoshop. Prior to importing your Photoshop file, give some thought to how you’ll be working inside of Flash Catalyst. Since each Photoshop pixel layer, adjustment layer, mask, shape, filter, Smart Object, and text layer is converted into separate Catalyst layers, take time to merge and minimize your project’s layers to as few as necessary. Reducing a file’s complexity before import will make a big difference once it’s imported into Flash Catalyst.
Just like when working in Illustrator, take care to descriptively name all layers to avoid confusion after import. Use layer groups to help organize your document into logical sections wherever possible. Finally, be aware that file size affects performance; optimize your graphics and make sure that image resolution is no greater than 72 pixels per inch and that all graphics are saved in the RGB color mode.
Photoshop Import Options
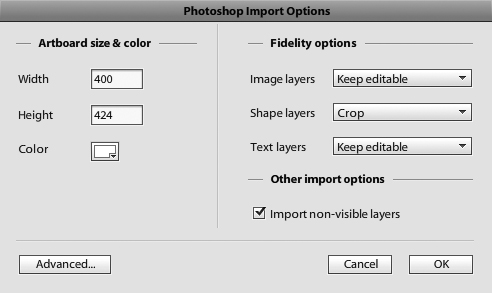
Other than the addition of the Advanced button, importing Photoshop files into Flash Catalyst is almost identical to importing files from Illustrator. Figure 65a shows us Flash Catalyst’s Photoshop Import Options dialog box, which is invoked from within Flash Catalyst by choosing File > New Project From Design File, or from the Create New Project From Design File > From Adobe Photoshop PSD File section of the Welcome screen.
Figure 65a. If you’re familiar with the Illustrator Import Options dialog box in Flash Catalyst, you’ll have no trouble with the Photoshop version. The only difference is the addition of the Advanced button.
Way back in the days of Photoshop CS2, a handy feature named Layer Comps was introduced. Simply put, Layer Comps acts as a kind of snapshot of a file at various states of layer visibility. You can click the visibility icon (the eye) in the far left column of the Layer Comps panel to quickly preview different versions of the same document.
Although Flash Catalyst can’t natively import Photoshop PSDs containing Layer Comps, clicking the Advanced button shown in Figure 65a provides access to these comps, as seen in Figure 65b.
Figure 65b. Clicking the Advanced button in the Photoshop Import Options dialog box opens Import Photoshop Document. Here you can see how layer comps can be chosen and how they can be modified upon import.
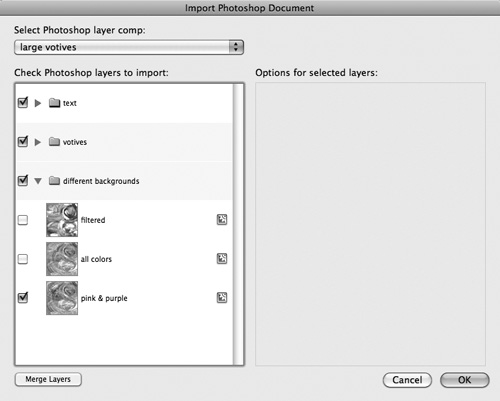
Clicking the Advanced button in the Import Photoshop Document dialog box drills down into the components of the comp, allowing you to pick and choose what to import from its various pieces. By making multiple imports, multiple page states are created for the Catalyst project.
#66. Round-Trip Editing
With round-trip editing in Flash Catalyst, artwork can be updated in its native application such as Illustrator CS5, Photoshop CS5, or Fireworks CS5. Using the Launch and Edit features in Flash Catalyst, you can open the artwork in its parent application, make your edits, and then return to Flash Catalyst.
Launch and Edit in Illustrator CS5
Illustrator CS5 can be launched from Flash Catalyst to edit vector images. Be aware that only vector objects that have not been optimized in Flash Catalyst (Modify > Optimize Vector Graphics) are eligible for round-trip editing. To do so, click and select the object and then choose Modify > Edit in Adobe Illustrator CS5. To help guide you with your task, Flash Catalyst displays a handy dialog box (Figure 66a).
Figure 66a. Flash Catalyst tells you to click Done when you’ve finished editing in Illustrator.

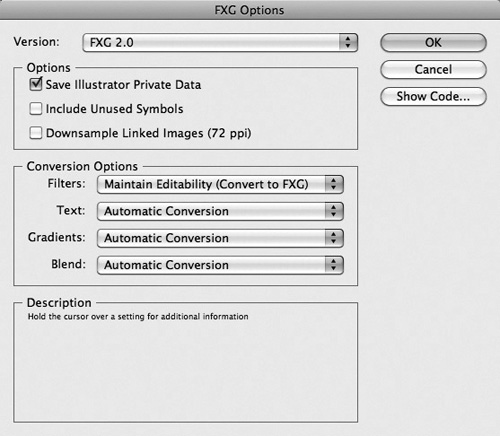
When the object opens in Illustrator you’ll see that it appears in Isolation Mode. Only the object itself will be editable. All surrounding artboard objects will be dimmed back to 80 percent opacity and locked (Figure 66b). When you finish editing, click Done or click the check icon in the upper bar to commit the changes. This invokes the FXG Options dialog box, seen in Figure 66c.
Figure 66b. The dimmed background is Illustrator’s way of reminding us we’re in Isolation Mode and that only items fully visible can be edited.
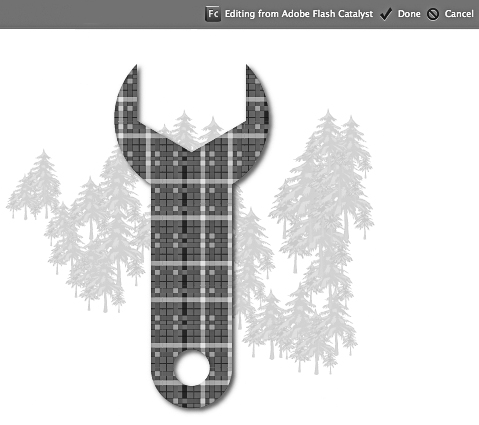
Figure 66c. Normally you can expect to accept the default FXG Options and click OK. Adobe has included a description of those options in the bottom portion of the dialog box, which is convenient if you want to change them. Clicking the Show Code button in the upper right opens the file’s code in either TextEdit (Mac OS) or NotePad (Windows).
Launch and Edit in Photoshop CS5
Like Illustrator, Photoshop CS5 can be invoked from inside Flash Catalyst when the time comes to edit bitmap images. To do so, select the object on the Flash Catalyst artboard and choose Modify > Edit in Adobe Photoshop CS5. The first time you do this you’ll be greeted by the dialog box seen in Figure 66d.
Figure 66d. Rather than let you suffer needlessly over something that doesn’t work, Flash Catalyst kindly explains that to edit your image in Photoshop CS5 you must first download and install a copy of the Photoshop CS5 FXG Extension.

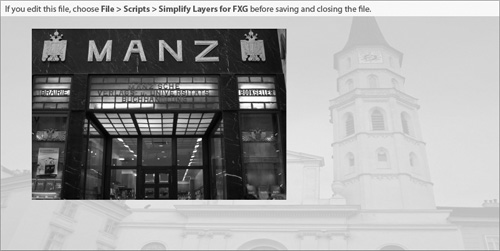
Dismiss the warning if you’ve installed the extension and prepare to head to Photoshop. Inside Photoshop you’ll be greeted not only by your image, but with a warning instructing you run the Simplify Layers for FXG script before leaving Photoshop (Figure 66e).
Figure 66e. Here we can see Adobe’s instruction to run the Simplify Layers for FXG script from the File > Scripts menu. Doing so will remove the yellow band of instructions above the image and send the updated changes back to Flash Catalyst.
Be sure to save a layered PSD copy of your edited FXG file. This way you’ll have complete control over all layers, adjustments, masks, and effects if ever you need to further tweak your image.
#67. Adding Video and Sound
Not too many years ago, having a good-looking Web site with a few nice buttons and some sliding panels was considered the height of hip. In those days video looked clunky and chugged away painfully, lurching forward and back, stopping and starting like an old movie in a dirty projector.
Today, with the ubiquity of broadband connections, Adobe Flash Player, and faster computers, high-quality audio and video are often the cornerstones of many professional sites.
Before importing video into Flash Catalyst it’s essential to know that Flash Catalyst supports only encoded FLV and F4V files. QuickTime, AVI, or other popular video formats that are not encoded won’t work.
What’s Encoding?
Encoding for Flash Catalyst is the process that converts all video footage to a format compatible with Flash Player. Those formats, or containers, are FLV and the newer F4V. In general, FLV files contain video data that’s encoded using the On2 VP6 or Sorenson Spark codec. Audio data is typically encoded using an MP3 audio codec. F4V files generally contain video data that’s encoded using the H.264 video codec and the AAC audio codec.
For a complete, and completely exhausting, discussion of this subject we suggest you check out Adobe’s Video Learning Guide for Flash, which can be found at http://www.adobe.com/devnet/flash/learning_guide/video/.
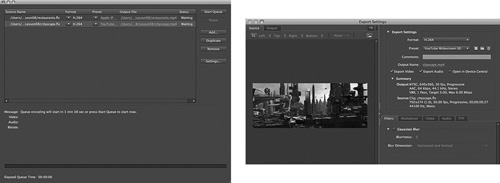
One final word on encoding: You can use Adobe Media Encoder to convert files to the FLV or F4V file formats (Figure 67a). Fortunately, Adobe Media Encoder is installed automatically when you install Flash Catalyst; it’s also bundled with After Effects, Flash Pro, and Premiere Pro.
Figure 67a. Adobe Media Encoder packs a dizzying array of settings and choices, as these screen captures suggest. On the left is the main window. To get to the window on the right, click the Settings button. From here things quickly become more complicated.
Importing Audio and Video
Once you’ve properly encoded your video, you’re ready to begin importing files into Flash Catalyst. To begin, choose File > Import > Video Files/Sound File. Navigate to your file or Shift-click to import multiple files. Once again, only FLV, F4V, and MP3 files are compatible with Flash Catalyst.
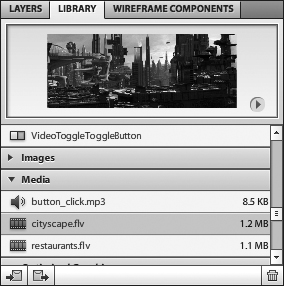
Go to the Library panel and expand the Media panel. There you’ll see your imported audio and video files (see Figure 67b). When you’re importing only one file at a time, the file will appear both on the artboard and in the Media section of the Library. When multiple files are imported at once, the files will appear in the Media panel only. You can audition a file in the Library panel. Select the file you want to see or hear and click the Play button in the lower-right corner of the Library panel to test your media.
Figure 67b. Here we see two video files and one audio file that have been imported into a Flash Catalyst project. To preview file contents, just select the file name and click the Play button in the lower-right corner of the Library panel.
Importing Audio
Importing audio files such as sound effects is a four-step process. Unlike video, audio files needn’t be encoded first, but they must be saved in the MP3 format.
- Choose File > Import > Video/Sound File. Locate an MP3 file and select Open.
- Preview the sound file in the Library panel and click Play to preview.
- Select a transition or action sequence in the Timelines panel. Or, select an interactive object in the artboard.
- In the Timelines panel, select Add Action > Sound Effect. Choose a sound file and click OK.
Flash Catalyst comes with a small collection of sound effects. These sounds can be found in the CProgram FilesAdobeAdobe Flash Catalyst CS5sound effects folder (Windows) or Applications/Adobe Flash Catalyst CS5/sound effects folder (Mac OS).
Setting Video Properties
Once you’ve imported video into your Flash Catalyst project, you’ll want to set its properties. Video properties are found in the Properties panel. Like other objects in Flash Catalyst, video can exist in various states with different attributes.
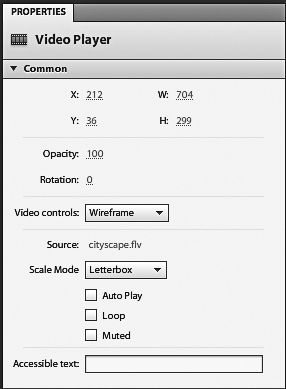
As you can see in Figure 67c, video properties include size, position, opacity, rotation, video controller style, scale mode; check boxes for Auto-Play, Loop, and Muted; and a field to insert accessible text.
Figure 67c. The Video Player section inside the Properties panel. Expanding the Common subpanel exposes controls for attributes such as size, position, opacity, rotation, and scale mode of the player.
#68. Creating and Defining Components
Every button, scroll bar, slider, check box, panel, and scrolling list you see in Flash Catalyst is a component. Once components are built, further life is added by way of interactions and action sequences. Components are created one of two ways:
- Convert static artwork into a component by using options in the Heads Up Display (HUD) or by choosing Modify > Convert Artwork To Component. You can choose from a list of built-in component types or design a custom/generic component.
- Add a wireframe component with a generic appearance from the Wireframe Components panel.
Converting Illustrator Artwork to a Component
To convert static artwork from Illustrator into a component, you must first import your artwork using File > Import Adobe Illustrator file. With the imported file selected, select the object. In this example we’re using the horizontal scroll bar shown in Figure 68a.
Figure 68a. This simple scroll bar, drawn in Illustrator using two rounded corner objects, is easy to convert into a live, functioning object inside of Flash Catalyst.

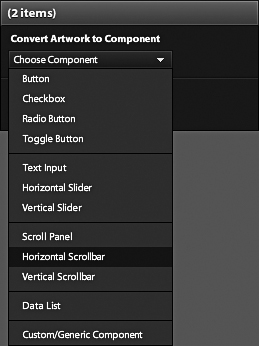
Once the object is imported into Flash Catalyst, select both the long horizontal track and the thumb slider objects. From the HUD, choose Horizontal Scroll Bar from the Choose Component drop-down menu (Figure 68b).
Figure 68b. Choosing Horizontal Scrollbar from the list of components in the Choose Component drop-down menu.
After you’ve told Flash Catalyst that the Illustrator objects are intended to serve as a horizontal scroll bar, the HUD explains what to do next (Figure 68c).
Figure 68c. Don’t you wish all software worked like this? Click on Edit Parts to continue, where you’ll be asked to identify the track and the thumb slider.
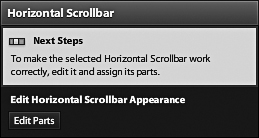
Figure 68d. Here we see the small rectangle that’s now selected and identified to Flash Catalyst as the thumb.
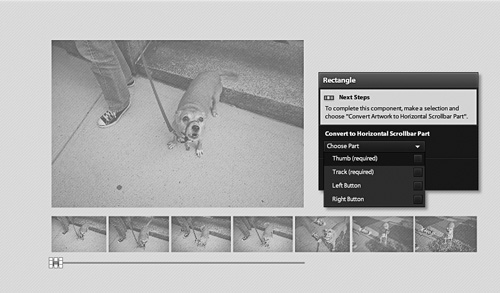
Select the long thin part and use the Chose Part menu in the HUD to identify it as the track. Do the same for the small rectangle, and identify it as the thumb.
To test your scroll bar, choose File > Run Project. Flash Catalyst will compile the project, which will open in your browser. Try sliding the thumb left and right on the track to see how it works.
Converting Wireframes to Components
One of the nicer features of Flash Catalyst is its library of wireframe components. Although basic in design and without assigned functionality, these items come in handy during the early planning phases of a Flash Catalyst project and can save you the trouble of designing objects on your own. Once a wireframe object is placed on the artboard, all that’s left is to choose its various properties.
Using wireframe components is as easy as dragging and dropping?
- Select the page or state to which you want to add the wireframe component.
- Target the layer in the Layers panel where you want to add the component.
- Drag and drop the Wireframe Component from the panel to the artboard.
- Position the component with the Select tool (black arrow).
- Set the properties of the component in the Properties panel.
#69. Creating Interactions
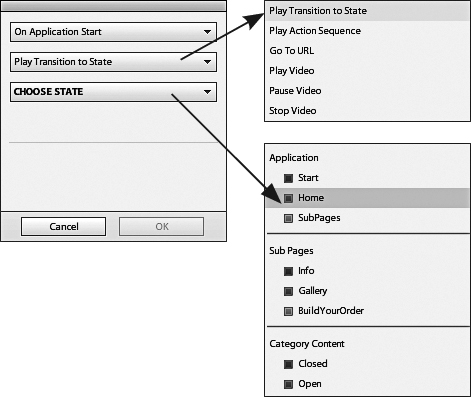
When you click a button and something happens, you’ve executed an interaction in Flash Catalyst. The program has many prebuilt interactions you can easily add to components or groups of components. For example, you could create an interaction to transition from page or component states, to play an animation or video, or to go to a Web site (Figure 69a).
Figure 69a. Interactions can be programmed to trigger a change of pages, states, or various actions or action sequences. In this figure we see an interaction that occurs the first time the user encounters the application, known as an On Application Start. From that initial interaction, the user is automatically taken to the application’s Home state.
Creating a Simple Button Interaction
Interactions are one of easiest things to create in Flash Catalyst. To create an interaction an object must first be converted into a component (see Tip 68). To add an interaction to a button component to change states, follow these steps:
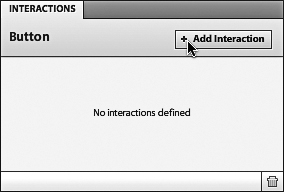
- Select the button component and click the Add Interaction button in the Interactions panel (Figure 69b).
Figure 69b. Click the plus sign (+) to add an Interaction.
- Select the On Click item.
- Select Play Transition to State.
- Select the Tour state from the Choose State pop-up menu (Figure 69c).
Figure 69c. Select the Tour state from the Choose State pop-up menu.

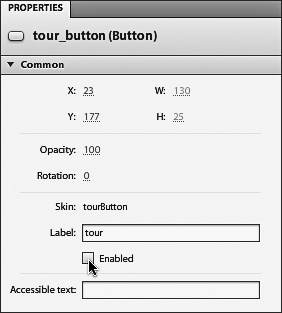
If the user is in the Tour state you’ll want the Tour button to look selected.
Select tour_button in the Tour state. Deselect the Enabled option in the Properties panel (Figure 69d).
Figure 69d. Deselect the Enabled option in the tour_button Properties panel.
Repeat the above steps for all other button states.
#70. The Flash Catalyst Timeline
The Timeline panel works similarly to timelines in other applications like Flash, After Effects, or Premiere Pro. Its job is to graphically allow you to place events over a specified period of time and to apply transition actions such as fades or rotations to those events. The timeline can also be used for controlling playback of sound and video files (Figure 70a).
Figure 70a. The Timeline panel is used to add transition effects between states or other kinds of interactions. In this figure we see a fade out and fade in effect that’s been added when transitioning from the project’s Location to Tour states.
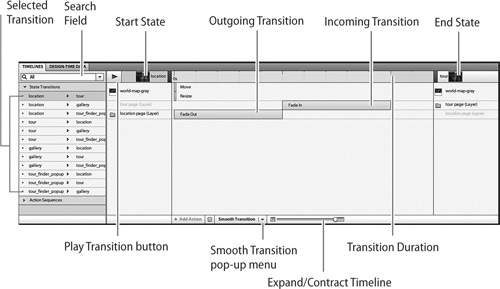
What makes the Flash Catalyst timeline different from timelines in other programs is also what makes it confusing to use: the Flash Catalyst timeline lacks any kind of scrub head or Current Time Indicator (in After Effects or Premiere parlance).
#71. Establishing Transitions
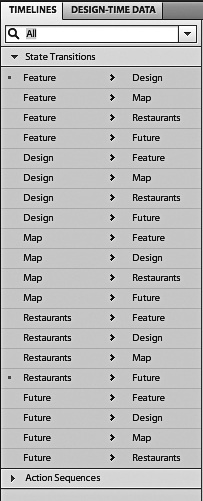
Whenever content in one state differs from content in another state, those changes are automatically added in Flash Catalyst as default transitions. Designed as placeholders, default transitions appear on the timeline as very short bars. With a default duration of zero seconds, placeholder bars can then be set to their final duration (Figure 71a).
Figure 71a. Six default transitions of zero seconds each have been automatically added to the timeline of this Flash Catalyst project.
Smoothing Transitions
If zero second transitions seem a bit fast, don’t worry: Flash Catalyst provides an easy way to change their durations via the Smooth Transition Options panel (Figure 71b) found at the base of the timeline.
Figure 71b. Click the small arrow seen at the bottom of this figure to pop up the Smooth Transitions Options panel. Clicking the words Smooth Transition applies your previous settings automatically, bypassing the pop up panel.
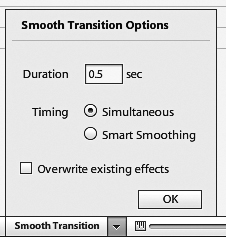
Available choices in the Smooth Transition Options panel are:
Duration sets the total transition length from start to finish.
Simultaneous applies smooth transitions to each effect equally, based on the value set in the Duration field.
Smart Smoothing adjusts the duration and delay of each effect by creating a series of staggered effects. Using a logical order of effects, Catalyst begins with objects fading out. After objects fade out, objects resize and move before fading in.
Overwrite Existing Effects applies new settings to any existing transitions.
Smooth Transition can also be applied to page states.
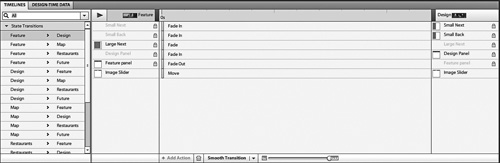
In the State Transitions column of the timeline, select all the displayed states (Figure 71c).
Figure 71c. The timeline makes quick work out of selecting and applying the same transitions to all page states in your application. Here we’ve chosen all the transitions in our project. With them all selected, applying the same transition is a snap.
Click on the words Smooth Transition at the bottom of the timeline (not the arrow).
Flash Catalyst automatically applies the last settings used to all states.
Tweaking Transitions
Applying Smooth Transitions means all your transitions are the same in every way, including when they start and stop. To give some variety to your transitions you’re going to want to stagger not only their durations but also when they start and stop.
Adjusting Duration
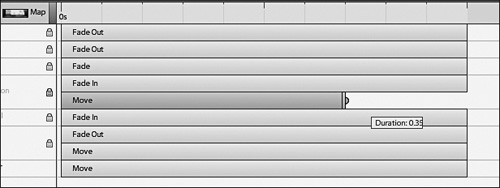
To adjust the duration of a transition, click the green bar for the transition in the timeline. Dragging the little handle on the far end will change the bar to blue to indicate it’s selected. The effect’s new duration will also be visible in the tiny box aside the bar (Figure 71d).
Figure 71d. Changing the duration of a transition in Flash Catalyst is as easy as dragging the bar handle of the transition to its desired length.
The Properties panel, typically found as part of the column of panels to the right side of your artboard, will also return the effect’s duration along with the added benefit of allowing you to set a start delay and an Easing style (Figure 71e).
Figure 71e.

Adjusting Timing
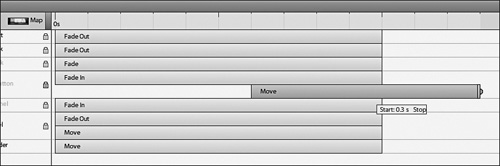
Timing is an attribute that determines when an object begins and ends its transition. Timing can be easily altered by dragging the Effect bar (not its handle) (Figure 71f) in the timeline or by adjusting the Delay value in the Properties panel.
Figure 71f.
Repeating Effects
Sometimes you’ll find it advantageous to repeat an effect for emphasis. To repeat any effect, select the effect bar in the timeline and choose Repeat in the Properties panel. There you can also set the number of times you’d like the effect to repeat (Figure 71g).
Figure 71g. If at first you don’t succeed... sometimes repeating an effect helps drive it home.

#72. Publishing a Flash Catalyst Project
Just prior to publishing your SWF project it’s always a good idea to do a little house cleaning and testing to ensure that everything goes off without a hitch.
- Delete any unused objects.
- Optimize vector graphics by using the Optimize Artwork options in the HUD or by choosing Modify > Optimize Vector Graphics.
- Switch to the Code workspace and review the Problems panel to check that there are no outstanding problems.
- Choose File > Run Project and test your application before publishing. Check to make sure that all navigation, links, and transitions are working properly.
- Save your project.
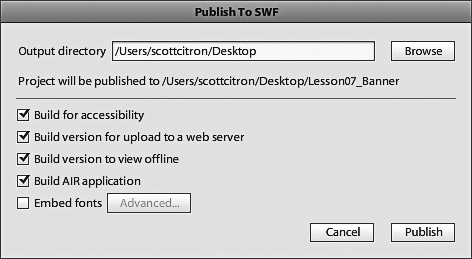
Now that you’re ready to publish, your choices are to a deploy-to-Web folder for posting to a Web server, to a run-local folder for local testing of your application, or to an AIR (Adobe Integrated Runtime) folder that creates an application that can run on your desktop (Figure 72a).
Figure 72a. The light at the end of the Flash Catalyst tunnel is this dialog box.
Regardless of whether your project eventually runs locally on your computer, on the Web, or as an AIR app, if everything works properly as expected, congratulations!