
Chapter Three. Working with Photoshop
Credit the folks at Adobe Systems for not sitting on their laurels with the release of Photoshop CS5, which marks version 12 of this venerable giant. With more than 20 years as the de facto image-editing program, Adobe has continued pushing the world’s reigning heavyweight leader. Timeless features like unsharp masking, the Clone Stamp tool, layers, and layer effects that might have become flabby and worn from lack of serious competition have improved steadily. Today, barely an image that appears in print or on screen can be found that hasn’t been touched at some point in its life by Photoshop. Whether it’s removing an unsavory color cast, restoring damaged photos, correcting perspective, or giving a model flawless skin, no other piece of software has become such an essential and ubiquitous part of society than Photoshop.
#13. Content-Aware Fill
Photoshop CS4 wowed the digital-imaging world with a remarkable feature called Content-Aware Scaling, which, for example, allows designers to stretch or shrink an image’s background without distorting the happy family in the foreground. It’s an impressive feature, albeit one we seldom use. That was in 2008, so when Photoshop CS5 introduced Content-Aware Fill, our initial response was ho-hum, but after using it for a while now, we’ve become quite impressed and use it often to almost magically remove items from images with little or no evidence they ever existed. And unlike other Photoshop features like Levels or Curves that can be found in other programs, Content-Aware Fill is a Photoshop exclusive.
Figure 13a shows a panorama of San Francisco stitched seamlessly together in Photoshop from three photographs using Photoshop’s Photomerge and Auto-Blend features. An unfortunate by-product of this stitching process is the number of pixels that must be cropped out to produce a rectangular panorama (Figure 13b).
Figure 13a. Three photos stitched together with Photomerge.

Figure 13b. When the panorama is cropped to make a rectangular image, a lot of information is lost.

Rather than cut image data out, now you can use Content-Aware Fill to add missing data in.
- Hold down Command (Ctrl), and click on the image thumbnail in the Layers panel. This will load the image as a selection.
- From the Select menu choose Modify > Contract. Contract the selection by 10 pixels and click OK.
- From the Select menu choose Inverse.
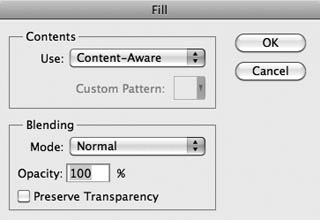
- Choose Edit > Fill > to open the Fill dialog box.
- In the Fill dialog box (Figure 13c) choose Contents > Use > Content-Aware. Click OK.
Figure 13c. The Fill dialog now includes a Content-Aware option.
After a few minutes of churning and grinding, the image will be miraculously repaired (Figure 13d).
Figure 13d. The finished panorama after applying Content-Aware Fill.

Tip
Try this easy shortcut to invoke the Fill dialog box. While holding the Shift key, tap the Delete or Backspace key.
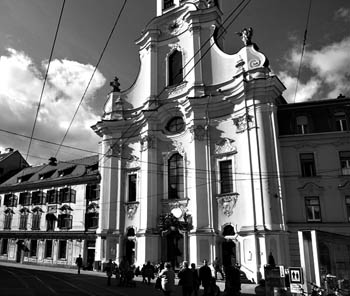
Content-Aware Fill can also be used in conjunction with the Spot Healing Brush tool ![]() . Figure 13e shows a lovely scene that’s unfortunately riddled with power lines and wires. With Content-Aware Fill and the Spot Healing Brush tool, we can salvage this image.
. Figure 13e shows a lovely scene that’s unfortunately riddled with power lines and wires. With Content-Aware Fill and the Spot Healing Brush tool, we can salvage this image.
Figure 13e. A mess of wires detracts from the subject of this photograph, an 18th-century Austrian church.
- Add a new, blank layer by clicking on the Create a New Layer icon at the base of the Layers panel. Click to target the new layer on which you’ll be working.
- Select the Spot Healing Brush Tool from the Tools panel.
- Choose Content-Aware and Sample All Layers in the Options Bar (Figure 13f).
Figure 13f. Be sure to select Content-Aware and Sample All Layers.

Figure 13g. With the wires removed, this photo of the church looks much better.

- Reduce the size of your brush to around 10–12 pixels and click once at one end of the wire you’d like to remove. Hold the Shift key and click once more at the opposite end of the same wire.
- Notice how the brush paints a straight line from end to end, before removing the wire.
- Continue this through the image to remove all the unsightly wires.
Clone Stamp to the Rescue
Although a godsend, Content-Aware Fill isn’t always perfect; it may result in smearing and other imperfections. Fortunately, these problems can usually be fixed with the Clone Stamp tool.
In Figure 13h, we’ve made a loose selection around the bicyclist, whom we want to remove with Content-Aware Fill. Figure 13i shows the result of this operation to the image. Notice the slight misalignment in the fence and wall where the Content-Aware Fill was performed. But by using the Clone Stamp tool on a new, blank layer (with sample mode set to Current & Below), we can repair these minor problems Figure 13j.
Figure 13h. A rough selection made with the Lasso tool is all you need before applying Content-Aware Fill.

Figure 13i. Depending on the weather or some other variable, you may get lucky after applying Content-Aware Fill. It is more likely, though, that your image will need a little touch-up, like here, where the fence planks fail to align horizontally.

Figure 13j. In this figure, we see how the Clone Stamp tool rescued our fence image.

#14. Manipulating Images with Puppet Warp
Borrowing a cup or two of technology from Adobe After Effects, one of Photoshop CS5’s more mind-bending new additions is Puppet Warp. By creating a mesh around a shape or area, Puppet Warp uses control points to isolate or distort parts of an image. Depending on your needs, Puppet Warp can subtly transform shapes like a woman’s waist or hair, or radically distort one’s arms or legs. Unlike the Liquify feature, Photoshop’s other major pixel-pusher, Puppet Warp avoids a complicated interface of buttons and sliders in favor of an easier approach. Users simply click to place what are known as pins on the object to be warped.
Underlying the pins is a mesh that comes in three flavors: Fewer Points, Normal, and More Points (Figure 14a). These settings control the density of points that can be placed on an image. Controlling the elasticity of the mesh is a Mode menu whose choices include Rigid, Normal, and Distort.
Figure 14a. Although Mode and Density are both set to Normal in this case, each drop-down menu allows two other choices.
![]()
While many of the Puppet Warp demos you’ll see tend to showcase the silly side of warping images and objects, Puppet Warp also has a highly useful place, among more serious transforming and distorting tools. Here, we’ll take a look at both.
We want to warp our purple cat but not its background, so we need to make a selection around the cat using the Quick Selection tool ![]() . Paint over the cat until you have a decent selection. If you go too far, hold down Option (Alt) and click to subtract from the selection (Figure 14b).
. Paint over the cat until you have a decent selection. If you go too far, hold down Option (Alt) and click to subtract from the selection (Figure 14b).
Figure 14b. Our purple cat and selection, prior to removing its background.

Once you’ve refined your selection in Refine Edge or Quick Mask, press Command-J (Ctrl-J) to move the purple cat to its own layer. We no longer need the original background layer, so feel free to drag it to the Layer trash (Figure 14c).
Figure 14c. The purple cat has now been extracted from its original background and is ready to be converted into a Smart Object.

Next, place a new background behind the cat, and drag the layer to the bottom of the layer stack. To allow changes to the warp afterward, we suggest converting the cat layer to a Smart Object. To do this, target the cat layer and choose Layer > Smart Object > Convert to Smart Object.
Click to target the layer with the purple cat and select Edit > Puppet Warp. Make sure to click the Show Mesh check box in the options bar to view the underlying grid. If you find the mesh annoying, you can always hide it later on. Click to place a range of pins similar to those in Figure 14d.
Figure 14d. The purple cat with its mesh and new background behind it.

Each pin you place acts like an anchor to hold the image in position as well as a hinge around which other pixels can pivot or bend. Selected pins are indicated by a center black dot and can be moved, rotated, or deleted (Figure 14e). Hold Option (Alt) to move outside the dot and reveal a small circle. Dragging the circle clockwise or counterclockwise lets you rotate pixels around the center point. Deselected pins (those with no dot in the center) act as control points to nail or glue corresponding pixels in place, preventing them from moving.
Figure 14e. To create the effect of the cat waving to the shadow, multiple pins were Shift-selected and then dragged upward.

Experiment with the purple cat until you’re happy with the warp effect. Be careful, because too much warping with too few pins will give away the effect by stretching your pixels. When done, commit to the change by pressing Return (Enter) or clicking the Check icon in the options bar (Figure 14f).
Figure 14f. The finished effect is enhanced by adding a drop shadow behind the cat.

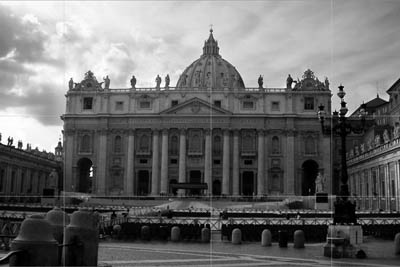
Fanciful though the cat image is, Puppet Warp is also a serious tool for fixing more conventional images. Take a look at the photo of St. Peter’s Basilica in Rome (Figure 14g). Notice how the church is distorted, due to the lens of the point-and-shoot camera. By applying a few rows of strategically placed pins over the image, we’re able to correct problems of perspective and parallax.
Figure 14g. As seen here, photos taken with small point-and-shoot cameras tend to suffer from significant lens distortion, particularly at wide angles.
Working with Pins
While in Puppet Warp mode, you’ll see two icons in the options bar ![]() . These buttons control the depth of a pin and the pixels it controls. Let’s say you want to put the purple cat’s hand behind its head instead of in front. With a pin through the hand selected, you would simply click on the right-most icon to send the pin (and the puppet hand) behind. Sometimes multiple clicks are necessary, depending on the stacking order of things, but eventually the hand will appear as if it’s behind the cat’s head. To hide the pins temporarily, type H on your keyboard.
. These buttons control the depth of a pin and the pixels it controls. Let’s say you want to put the purple cat’s hand behind its head instead of in front. With a pin through the hand selected, you would simply click on the right-most icon to send the pin (and the puppet hand) behind. Sometimes multiple clicks are necessary, depending on the stacking order of things, but eventually the hand will appear as if it’s behind the cat’s head. To hide the pins temporarily, type H on your keyboard.
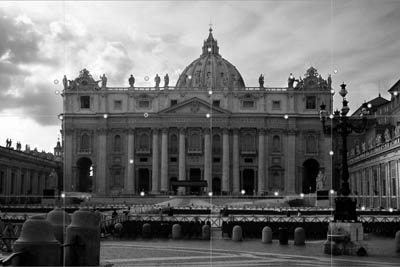
Using ruler guides helps to not only see the distortion, but also aid in correcting the problem. For this image, the Mode menu was set to Rigid, which helps prevent objects like the Basilica from flexing too much when warping, as in Figure 14h.
Figure 14h. The improved and straightened image thanks to Puppet Warp.
#15. Making Better, Faster Selections and Masks
In every new version of Photoshop there’s always one or two features that alone justify the cost of upgrading. In Photoshop CS5 one of those features is the Refine Mask tool, which makes quick work out of creating masks and silhouettes. Although introduced with Photoshop CS3, it took until the CS5 version to fully prove its worth.
See Figure 15a. This photo of thriller author Shane Briant was taken on a hazy day in New York. We’ll use Refine Edge to remove the photo’s boring background and replace it with a beautiful landscape of the San Francisco Bay Area.
Figure 15a. Replacing backgrounds is a common but unsavory task for most photographers and graphic artists because of the difficulty of doing it convincingly.

- Use either the Magic Wand or the Quick Selection tool and select the sky. Choose Select > Inverse. Don’t worry if the flyaway strands of hairs aren’t included in the selection; you’ll get those later.
- Enter Quick Mask mode by pressing Q on your keyboard. This will give you a visual representation of your selection. Any areas, nooks, or crannies that aren’t part of the selection can be added in by painting with White.
- From the Select menu choose Refine Edge (or click the Refine Edge button that appears in the Options Bar when the Magic Wand or Quick Selection tool is selected).
- Spend a moment experimenting with the various sliders inside the Refine Edge dialog. Play with the View Mode menu to find the setting that provides the most useful background color for analyzing your mask.
- Drag the Radius slider to around 60 pixels. Against a Black background this should give you a pretty good idea of the quality of your mask. Experiment by turning on and off the Smart Radius button. Does it help or not?
- Switch the background to White (press W on the keyboard) and try applying the settings seen in Figure 15b. If your selection needs improvement, try painting just outside the hair with the Refine Radius tool
 . To see what you’ve done, take a look at Figure 15c, which shows the radius that Photoshop is examining for edge transitions and detail.
Figure 15b. Select one of seven backgrounds available in the Refine Edge dialog that gives you the best view of your mask. Adjust the Radius slider (we used 20.8 pixels) so that Photoshop looks beyond our initial selection for other hard edges to include. Bump the Feather up to around 2 pixels, and increase Contrast to 8 percent. To reduce any haloing introduced by the Feather slider, enable Decontaminate Colors and set the percentage slider to around 81 percent.

Figure 15c. Clicking the Show Radius check box gives you a view like this, indicating how far outside the selection Photoshop is looking for edge transitions.

- Tap the F key to cycle through the various view modes. Make sure that the Output section menu is set to Output To: New Layer with Layer Mask. Click OK to exit the Refine Edge dialog box.
How does your mask look? Are most of the hairs visible without a discernible halo around them? If any large areas are hidden by your layer mask (like the collar, for example), Option (Alt) click on the mask thumbnail to make it visible. From there, choose any standard brush of your choice and paint with white to reveal pixels in the photo, or black to conceal visible pixels.
When you’re done, Option (Alt) click to hide the mask and take another look at your mask. If you’re still not satisfied with your work, open the Masks panel and click the Mask Edge button (Figure 15d) to reopen the Refine Edge dialog.
Figure 15d. The Masks panel provides an easy way to return to the Refine Edge or Color Range dialogs.

To place a new background behind the silhouette, select File > Place, Copy/Paste, or drag and drop. Drag the image below the image you masked and take a look. If you’re still not satisfied, click once on the layer mask thumbnail and choose the Mask Edge button in the Masks panel to return to the Refine Edge dialog. When you’re done, your image should look like ours, Figure 15e.
Figure 15e. Silhouetting, once the scourge of photographers and designers, is now actually fun thanks to Photoshop’s Refine Edge feature.

#16. Simulating HDR Photography
In support of legitimate High Dynamic Range (HDR) photography, Photoshop CS5 has made significant technical advances to aid photographers who want to work with such images. Its new HDR Pro features take a great leap forward compared to earlier releases of the software. As if this weren’t enough, Photoshop CS5 also gives a sly wink to those who are interested in producing faux HDR images, rather than the true item itself, via the HDR Toning command (Image > Adjustments > HDR Toning).
In this tip we’ll experiment with a few eye-catching faux HDR effects, plus explain how to use the HDR Toning feature to produce truly beautiful images.
Layer Limitations of HDR Toning
When working with Photoshop’s HDR Toning command, be aware that the feature works on flattened images only. This means that using HDR Toning on a layered file or even a Smart Object will result in the file being flattened.
With your flattened image selected, choose Image > Adjustments > HDR Toning. Depending on the way you work and the expectations you have for your image, you can choose to work either by freely experimenting with the presets, sliders, and curves, or taking some time to learn a bit first about how each control behaves. Although we don’t discourage users from diving in and having fun, what follows is an annotated screen capture that includes callouts explaining the parts and menus that make up the HDR Toning dialog (Figure 16a).
Figure 16a. The HDR Toning dialog is the key to this powerful effect. Our recommendation is to freely experiment with the various sliders and drop-down menus, particularly the Preset menu, until you come up with a look you like.

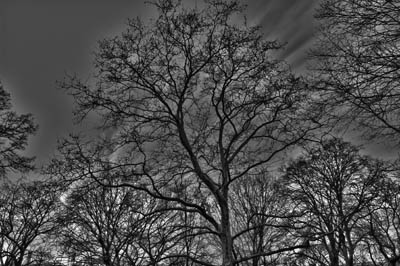
Of course, one could easily stop here, after choosing a preset or following a few minutes of wild experimentation. However, by stacking your HDR toned image with its original, you can blend the two for an interesting effect. For example, Figure 16b is the result of a layered Photoshop file composited from the original tree silhouette image on the bottom and the version we created using HDR Toning on top. To align both images, select both layers and choose Edit > Auto-Align Layers.
Figure 16b. This image is a composite of the original image and the HDR toned image. Placed together in the same Photoshop file, a Luminosity blend mode was applied to the HDR image at the top of the stack.
Once the images are layered on top of each other (Figure 16c), experiment by applying varying blend modes to the topmost image (with the Move tool selected and the layer targeted, cycle through the list of blend modes by using the keyboard shortcut Shift+plus). Luminosity was used on the top layer. Remember to also play with the layer’s opacity slider to further control the overall effect.
Figure 16c. By stacking toned images into a single document, a range of interesting effects can be achieved by combining blending modes and opacities.

Using Effects Wisely
As with most effects, when used alone they tend to call unwanted attention to themselves. A better way is to combine those effects with the original image to produce a more pleasing overall result.
To do so, first make a copy of the layer to which you intend to apply your effects. Apply your chosen effect. Afterward, stack the affected layer above the original, unaffected layer. Use the Opacity slider on the affected layer to dial in or out the final amount of the effect.
#17. Painting with Bristle Brushes
Photoshop CS5 steps into the ring with Painter, Corel’s longtime natural media champion, thanks to its new Bristle and Mixer brushes. Brush-tip properties such as shape, bristles, length, thickness, stiffness, angle, and spacing can all be controlled using simple sliders. If you have a drawing tablet like one of the many available from WACOM or other companies, you can now paint or draw in Photoshop CS5 more naturally than ever before.
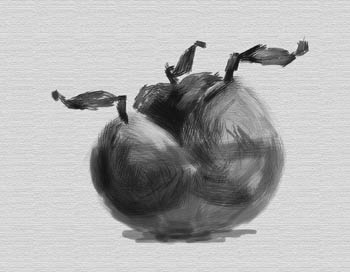
The easiest way to learn your way around the Bristle brush tool is to start by adding paint to a simple pencil sketch or outline. In our case, we’ll use the still life seen in Figure 17a, which was created in Adobe Illustrator. As we always recommend, don’t paint on the original artwork. Instead, add a new, blank layer above the sketch on which to work. This way we preserve the original in case we want to go backward or move the sketch to the top of the layer stack for creative purposes. To add a new layer, choose Layer > New > Layer or click on the Create a New Layer icon at the base of the Layers panel.
Figure 17a. This Illustrator line drawing will serve as the basis for our painting.

Tap the B key to access the brush tool (or click on it in the Tools panel), and then open the Brush panel to adjust your settings (Figure 17b). Although you can paint with any brush you choose in Photoshop, only the ten new Bristle brushes shown in Figure 17c can be controlled by the Shape menu and five sliders (bristles, length, thickness, stiffness, and angle) in the Brush dialog. Feel free to also experiment with the 11 other brush properties located in the dialog’s far-left panel.
Figure 17b. The command center for brushes in Photoshop is the Brush panel (F5).

Figure 17c. Only these ten new Bristle brushes are controlled by sliders labeled Bristles, Length, Thickness, Stiffness, and Angle.

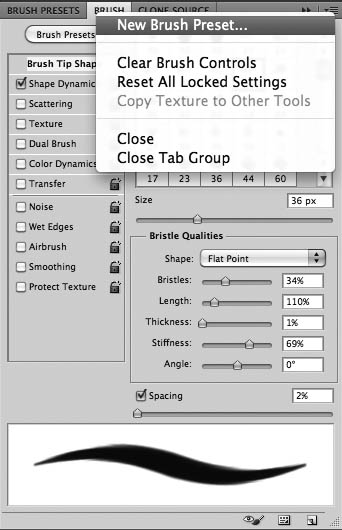
For now, let’s start by creating a brush based on the settings provided in Figure 17d. Save the brush as a preset called Fruit Brush 36 by choosing New Brush Preset from the fly-out menu in the upper corner of the Brush panel (Figure 17e).
Figure 17d. We used these settings to create our new Fruit Brush.

Figure 17e. Save a new brush preset by clicking on this dialog from the Brush panel menu.
Now we need some color. To pick up color, you have several options. Color can be added by clicking from the Swatches panel, the Color panel, the Adobe Color Picker at the base of the Tools panel, or now by invoking the heads-up-display, or HUD Color Picker (Figure 17f), by pressing Control-Option-Command/Command-Alt-Right click. Depending on your Preference settings, the HUD Color Picker can be displayed as either a strip or a wheel.
Figure 17f. The new HUD Color Picker as seen in strip mode.

Start by choosing a green, red, or brown (Bosc, anyone?) for your pear color. Choose an opacity setting of 50 percent in the options bar and begin to paint with your Fruit Brush on the blank layer. Paint loosely, and don’t worry about staying within the lines. If you’re using a tablet instead of a mouse, notice how pressing lightly with the stylus translates into thinner strokes on your painting. Once you’ve established a thin ground cover of color, stop painting.
Add a new blank layer above the one you just worked on. Change the brush color by using the HUD Color Picker and feel free to change the size or hardness of your brush. Continue painting on the new layer and notice how the colors on the two layers interact with each other. Although not a requirement, we find that breaking out the painting into several layers gives us more control in the end (Figure 17g).
Figure 17g. Here you can see how we broke apart the painting into individual layers. Although you can always paint using only one layer, working with a layered file gives you more options and control over the finished product.

Figure 17h. A completely different look can be achieved with little effort. This rich painting is the result of a flowing hand, some quick brushstrokes, and creative Blending mode decisions in Photoshop CS5.
New Brush Shortcuts
For our money, one of the best new Photoshop features is the ability to change brush sizes and hardness quickly and on the fly. With any painting tool selected, press Control + Option/Command + Alt and drag left or right to change brush size. Drag up or down to change brush hardness.
Add another blank layer and change color or brush attributes and paint again until your pears start to look well covered.
Choose a new color for the stems and create another blank layer. Pick a smaller brush or decrease the size of the tip you’re using and paint the three short stems.
Create another blank layer and paint in the leaves.
Add two more blank layers. On one layer use a pale blue or green color to paint in the glass bowl. On the other layer choose a grayish light blue or green to paint in the cast shadow beneath the bowl.
At this point, you’re basically done painting. Remember to hide the Fruit Bowl Outlines layer if you no longer want it visible. Experiment using various Photoshop filters, Layer Styles, Adjustment Layers, Graphic Styles, or Blending Modes to alter your painting or a layer or two. As long as you continue to work nondestructively (don’t forget Smart Objects!), you’ll never find yourself stuck in a creative corner.
#18. Mixer Brushes
To see how the Mixer Brush tool works, we’ll start with the photo in Figure 18a. After opening the photo, select the Mixer Brush tool from the Tool panel ![]() . Among the new options found in the Options Bar are menus to select from a variety of creative brush-blending options. Paint effects can range from dry to very wet, heavy mixes (Figure 18b). Although the Mixer Brush tool can be used to paint on a blank canvas, in this example we’re going to treat the pixels in the image as if they are wet paint.
. Among the new options found in the Options Bar are menus to select from a variety of creative brush-blending options. Paint effects can range from dry to very wet, heavy mixes (Figure 18b). Although the Mixer Brush tool can be used to paint on a blank canvas, in this example we’re going to treat the pixels in the image as if they are wet paint.
Figure 18a. This photo will serve as the basis for our painting.
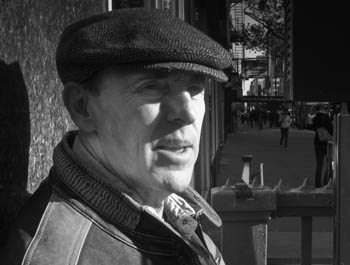
Figure 18b. Photoshop’s Options Bar when a Mixer Brush is chosen.

- With the Mixer Brush tool selected, open the Brush panel and choose a Bristle tip, such as the Round Curve (25 pixels).
- In the Layers panel, add a new blank layer on which to work. Make sure to also turn on Sample All Layers in the Options Bar.
- Begin painting. As you’ll see, Photoshop will behave as if the pixels in the photo are wet inks or paint being pushed around by the brush.
- Continue painting but feel free to experiment with differing tips, sizes, or combination presets. Don’t limit your painting to only one layer. Create as many layers as are necessary to provide you with the degree of creative flexibility you’ll need when done painting.
You can take advantage of Photoshop’s many nondestructive tools, filters, blend modes, and styles to add to your basic painting. Just because you’ve covered your canvas with paint doesn’t mean the creativity has to end there.
Figure 18c shows my finished version. Notice the dark yet sketchy outline that I applied afterward. This effect was the result of first running the Chalk & Charcoal filter (Filter > Filter Gallery;) on the original image. Afterward, I placed the filtered image at the top of my painting’s Layer stack, setting its Blending Mode to Darker Color and Opacity to 58 percent.
Figure 18c. By combining the original photo with Mixer Brush strokes layered above, the resulting image looks like a textured oil painting. Adding a top layer produced by the Chalk & Charcoal filter gives the painting another level of interest.

#19. 3D Repoussé
One of the more amazing additions to Photoshop CS5 Extended is the new Repoussé feature (based on the French word meaning “to relieve or extrude”). The Repoussé feature converts 2D RGB objects into 3D. These objects can subsequently be extruded, inflated, and repositioned in space. When an image or illustration needs a burst of 3D realism, Repouseé is a wonderful tool for the job. Repoussé can be configured from within a single dashboard of menus and sliders controlling attributes like volume, angle, materials, and lighting of objects or text.
To get started with Repoussé, have a look at Figure 19a, which will act as the background for our project.
Figure 19a. This cloud image will serve as the background for our 3D repoussé project.

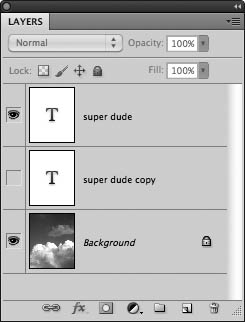
- Click anywhere inside the image with the Type tool and type “super dude,” making sure to separate the words with a return. I suggest a bold font like Impact, which we set at around 105 points (Figure 19b).
Figure 19b. Our background image with type added.

- Adjust the type’s leading and kerning to taste and then make a copy of the type layer (as a backup) using the keyboard shortcut Command-J (Ctrl-J). Afterward, hide the visibility of the copy by clicking on the eyeball icon in the left column of the Layers panel (Figure 19c).
Figure 19c. Hide the copy of the type layer as seen here.
- With the original text layer targeted, choose 3D > Repoussé > Text Layer. Disregard the warning that the type must be rasterized (that’s why we made a copy), and click Yes to continue.
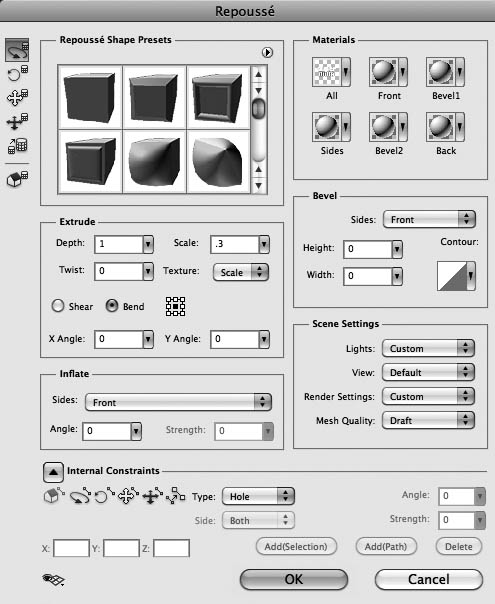
- With the Rotate the Mesh tool selected in the upper-left corner of the Repoussé dialog box (Figure 19d), use the tool to manipulate your text in 3D space. Of course, feel free to experiment with the other settings as well, paying special attention to the Extrude, Materials, and Internal Constraints settings. When you’re satisfied with your effect, click OK.
Figure 19d. Experiment with settings in the Repoussé dialog to get the 3D effect you’re looking for.
- The only thing left for now is to fade the extrusion into the clouds. For this, we’ll add a layer mask by clicking on the Add Layer Mask icon at the base of the Layers panel.
- Click to target the layer mask and choose a large, soft-edge brush set to 30 percent opacity. With black as your foreground color, paint a few deft strokes at the base of the extrusion (Figure 19e). Stop painting when it looks like your type is disappearing into the fluffy clouds, as in Figure 19f.
Figure 19e. Use a layer mask on the type layer to fade the extruded text into the clouds.

Figure 19f. The finished composition.

With the ability to extrude selections, paths, or text, Repoussé is a powerful addition to Photoshop’s existing 3D toolset, which in itself bears further experimentation and exploration.
#20. Applying Photoshop Filters to Video
With all the great video software already out there, the first time you heard about working with video in Photoshop you probably thought, “Why?” I know we did. But the deeper you dive into the subject, the more you realize just what a natural it is. If you’re currently working with video in other applications, chances are good that Photoshop is already part of your workflow, and now Photoshop has tools you can use for video that can’t be found in any other video-editing software, such as the Healing Brush tools, Content-Aware Fill, Adjustment Layers, Clone Stamp tool, Vanishing Point, and the Mixer Brush. While Photoshop isn’t a replacement for Final Cut Pro or Premiere Pro, once you see what it can do, you’ll never look at Photoshop in the same way.
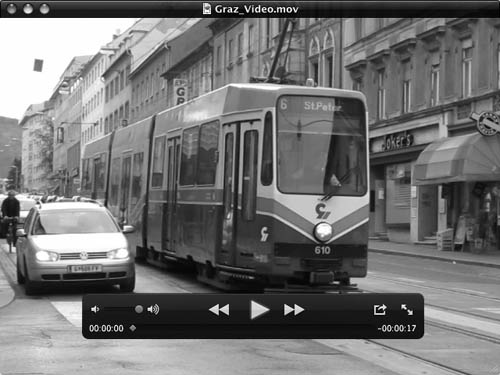
To use Photoshop filters with video, start by opening a video file in Photoshop. You do that the same way you open a still image: choose File > Open (Figure 20a).
Figure 20a. The first frame of a short video clip from a small digital camera.
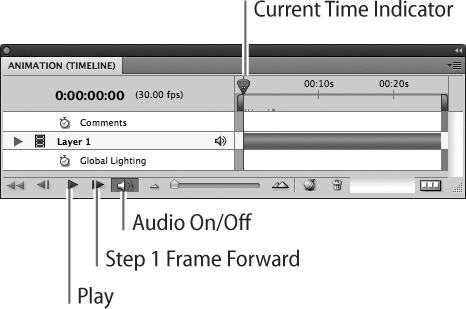
From the Window menu choose Animation. Make sure the Animation panel is displaying the Timeline, not Frames (Figure 20b). The thumbnail in the Layers panel indicates you’re now working on a video layer instead of a normal image layer.
Figure 20b. The Animation Timeline and controller.
With Layer 1 selected in the Layers panel, right-click or click the icon in the upper-right corner to reveal the panel menu. Choose Convert to Smart Object. Now duplicate Layer 1 by dragging it to the Create New Layer icon at the base of the Layers panel. Hide the Layer 1 copy, which we’ll return to later.
Once the video is converted to a Smart Object, return to the Filter menu and apply the Watercolor filter (Filter > Artistic > Watercolor). We used Brush Detail = 9, Shadow Intensity = 0, Texture = 1. Click OK to apply. Now play the video by tapping the Spacebar or the Play button. You should see the filter effect applied to the entire 17-second clip.
If the filter effect flashes on and off, take a look at the green, stubble-like bars above the Comments layer in the Timeline. These lines indicate rendering progress. When the green line turns solid, it indicates that the effect is completely rendered. Playing the clip repeatedly should help to fill in any stubbly bars and fully render the watercolor effect.
Click on the eye icon to turn on visibility of the Layer 1 copy. Make sure you see the Smart Object icon in the lower-right corner. If not, go to the panel menu and choose Convert to Smart Object. With Layer 1 copy targeted, choose Filter > Stylize > Find Edges. Set Find Edges to taste and click OK.
Last, choose Filter > Texture > Texturizer to apply a canvas texture to the video (Figure 20c). Click OK to apply, and then play back your video. Try reducing the opacity of the Layer 1 copy to around 60 percent. This allows some of the watercolor effect on Layer 1 to come through.
Figure 20c. Here we see the effect of applying the Texturizer filter’s Canvas setting to the video.

The last step in this process is to save the document as a .psd file and then export the clip to be placed into another editing system (File > Export > Render Video). This process is known as final render and can be very slow, depending on the length of your clip and the speed of your computer. The beauty of this workflow is, should you decide later on to make a creative change to your clip, you can easily do so because of the nondestructive nature of the Smart Objects you created from the original video.
#21. What’s So Smart About Smart Objects?
The concept of Smart Objects is similar to how files are handled in InDesign; placed files aren’t actually embedded in InDesign but are instead represented by proxies or previews of the file. Any time we want to edit the original placed file, we have to step outside the InDesign layout and into another application to make our changes. Once the changes are made, we save and close the document and then return to InDesign, where our link is automatically updated.
Similarly, a Smart Object is a working preview of an image. With it we’re free to transform, scale, mask, or filter the Smart Object, which is then regenerated through its link to its parent file. The only difference here is that the original isn’t a traditional outside link, like in InDesign, but rather embedded into (and therefore portable with) the Photoshop document. Since the original can only be edited outside the document where it’s placed, changes such as transforming, scaling, masking, and filtering are always un-doable and completely nondestructive. On the flip side, you can’t perform operations that alter pixels directly such as burning, dodging, painting, or cloning.
Figure 21a is a photograph with drab colors, a flat and overexposed background, and a foreground that’s dark and underexposed. Had this image been captured in a raw format, balancing dynamic range would be much easier. Here’s how to use Smart Objects to make nondestructive changes to salvage this snapshot.
Figure 21a. The underexposed foreground and flat background levels in this photo should be better balanced.

- In Photoshop, select File > Open as Smart Object > and select the image you want to work on.
- Double-click the Smart Object icon in the lower-right corner of the Layers panel thumbnail to launch the Adobe Camera Raw dialog box.
- In the Basic panel, drag the Clarity and Vibrance sliders as shown in Figure 21b to punch up the background.
Figure 21b. Increasing Clarity and Vibrance helps accentuate the otherwise flat colors in the background.

- Switch to the Detail panel and drag the sliders as shown in Figure 21c. This will reduce the color noise you’ll see in the sky. Click OK to exit the Camera Raw dialog.
Figure 21c. Camera Raw’s Detail panel includes a set of sliders for reducing image noise.

- From the Image menu, choose Adjustments > Shadows/Highlights. Drag the sliders as shown in Figure 21d. Pay particular attention to the Shadows > Amount slider. Increasing it and the Shadows > Radius slider will lighten up the figures in the foreground. Click OK to exit the dialog box.
Figure 21d. Applying the normally destructive Shadows/Highlights filter as a Smart Filter gives you infinite opportunities to tailor your results.

- Click on Smart Filters Layer Mask. Take a 300-pixel brush and set its Hardness to around 6 percent. Paint on the Layer Mask with black set to a 25 percent Opacity (Figure 21e). This will return some of the darkness that was removed by the Shadows/Highlights filter.
Figure 21e. Painting with a large, soft brush on a layer mask helps bring back some of the darkness that was removed with Shadows/Highlights.

- Click OK and Save your file as a layered Photoshop document (Figure 21f).
Figure 21f. The end result of working nondestructively on this image.

If you’re wondering whether the above could have been done without first converting the image to a Smart Object, the answer is yes. But had we done that, we couldn’t have applied Shadows/Highlights nondestructively and taken advantage of its Layer Mask to darken the bottom of the photo.
#22. Lens Correction Weight-Loss Clinic
Among the processes we routinely apply when retouching portraits is a healthy dose of the Lens Correction filter. Long buried in the Distort subfilters list (Filters > Distort), now with Photoshop CS5 this useful gem has been promoted to a higher level of visibility (Filters > Lens Correction).
Among the more obvious uses for this filter, like fixing converging verticals of buildings, we often use Lens Correction to shave a few pounds off the faces we photograph. Maybe our subjects just aren’t wan enough, but rarely do we see a portrait that won’t benefit from a quick trip under the digital knife.
Open your image (we’re using Figure 22a) and convert the background layer into a Smart Object (target the layer and choose Layer > Smart Objects > Convert to Smart Object). This allows you to revisit the filter settings at a later time and to check your work against the original.
Figure 22a. A pleasant shot to begin with, no?

From the Filter menu choose Lens Correction. In the Lens Correction dialog, click the Custom tab. Adjust the settings as in Figure 22b or to taste. As you can see, we’ve dragged the Remove Distortion slider to +12 (i.e., more concave) and the Scale slider to 108 percent. The Scale slider is used to enlarge the image slightly to counter the decrease in overall dimensions resulting from the Remove Distortion change.
Figure 22b. Use these settings as a starting point for your own experimentation. Be careful not to go too far, otherwise you’ll give away your handiwork.

Use the Preview button to see a Before & After of the image.
When you’re satisfied with the results, click OK to apply the settings and exit the filter dialog. Compare the final results shown in Figure 22c with its original in Figure 22a.
Figure 22c. Introducing a subtle amount of concave distortion via the Lens Correction dialog is a simple way to improve most portraits.

#23. Using Adobe Camera Raw to Edit RAW Images
If you’re among those who aren’t sure why Photoshop’s Camera Raw plug-in is important, allow us a quick moment of explanation. Say tomorrow is Mom’s birthday, and you’d like to bring her a cake, for which you have two choices: buying a cake or baking a cake. They both taste good, but the store-bought cake is the product of someone else’s decisions about how cake should look and taste. The cake you bake from scratch, though, reflects your choices and decisions about birthday cakes.
In the same way, JPEG and TIFF images begin life as raw cakes, but before you take a bite, the images are precooked and then baked to how the camera manufacturer thinks your images should look. Although this isn’t necessarily bad, a prebaked image has much less latitude for creative expression as a raw image. Plus, software for processing raw images such as ACR 6.0 is much more sophisticated (think KitchenAid mixer and Viking stove) than the software inside your point-and-shoot camera (think Suzy Homemaker).
The other advantage of working with raw images is that all changes are the result of instructions being given to the image by the software. Not only does this method result in faster, almost instantaneous changes, but also all changes are nondestructive. Since pixels aren’t pushed, pixels aren’t harmed.
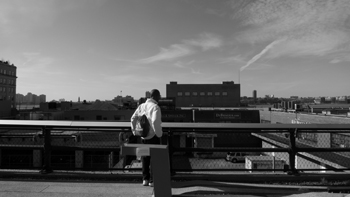
Let’s start by having a look at Figure 23a. This is a deceptively simple photograph, one you might pass up after a cursory glance.
Figure 23a. Nothing much going on here at this stage of our photograph.
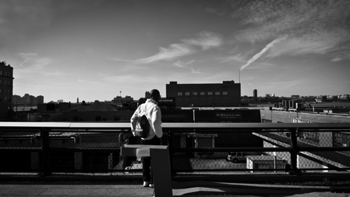
Yet by applying a number of features of ACR 6.0, this average photo turns into a dramatic and beautiful image. Begin by working from top to bottom in the Transform area of the panel. Adjust things like Distortion, Rotation, and Scale to counter the effects of the lens (Figure 23b). Use the Basic panel to control Exposure, Black values, Contrast, Clarity, and Vibrance (Figure 23c). Switch to the Detail panel to apply Sharpening and Noise Reduction, if needed (Figure 23d). Click on the HSL/Grayscale panel to adjust specific color Luminance or to convert your image to grayscale (Figure 23e). The Effects panel is where you can now add film-like grain or post-crop vignetting (Figure 23f). Finally, the Camera Calibration panel provides menus to select a demosaicing process (2003 or the higher-quality 2010) and an appropriate Camera Profile (Figure 23g). To see the result of all these adjustments, have a look at Figure 23h.
Figure 23b. Use Manual Lens Corrections here to fix parallax distortion and a slight barrel distortion caused by the camera’s wide-angle lens.
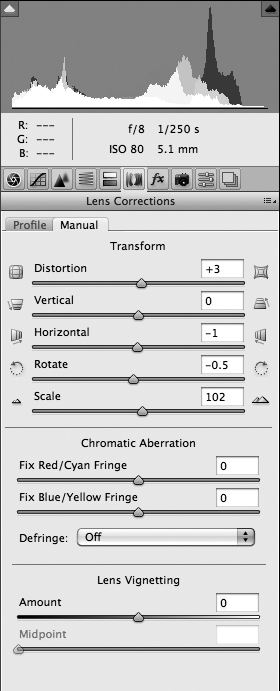
Figure 23c. These settings in the Basic panel were used to mostly add Contrast, Brightness, Clarity, and Vibrance.

Figure 23d. The Detail panel settings we used to apply Sharpening and Noise Reduction.

Figure 23e. In the HSL/Grayscale panel we reduced the luminance of the blues.

Figure 23f. The Effects panel was helpful for adding Grain and Post Crop Vignetting.

Figure 23g. The Camera Calibration panel allowed us to make some final choices that affected the raw processing engine and the look of the blue primaries applied via the camera’s profile.
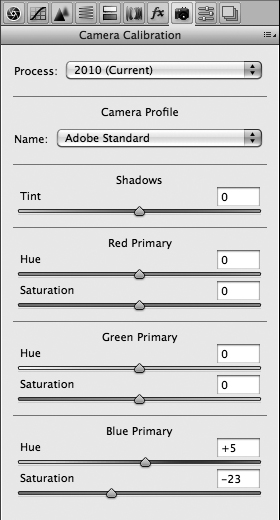
Figure 23h. The result of applying the above settings from inside of Adobe Camera Raw 6.0. Here we see either the final image, which could be the end of your processing, or the beginning of additional work in Photoshop.
#24. Using Vanishing Point to Create a 3D Mock-Up
Although Vanishing Point (Filter > Vanishing Point) is great for removing or cloning objects in perspective, one of its best uses is for producing mock-ups of packaging or products. In this tip, we show how easy it is to simulate a 3D book using finished 2D artwork.
- We start by opening Figure 24a.
Figure 24a. This original image was part of a free set of high-resolution, copyright-free, images we found on the Web. Each image in the set (tin cans, billboards, toothpaste tubes, bottles, etc.) was specially designed with white labels that were intended to be replaced by 2D artwork to realistically mock up common packaging or signage.

- Also open the front-cover artwork you plan to use in its native application, be it Photoshop or Illustrator (Figure 24b). Select the cover artwork or image and copy to the clipboard (Edit > Copy).
Figure 24b. The 2D artwork to be used for the front panel of the book jacket.

- Add a new blank layer to Figure 24a. Target the blank layer and choose Filter > Vanishing Point.
- In the Vanishing Point dialog, choose the Plane Grid tool
 . Click with the tool on the upper-left corner of the front-cover area to place your first point of the perspective grid. Drag down and click to place another point on the lower-left corner. Continue dragging and clicking until your grid covers and aligns with the front area (holding the X key while clicking simultaneously invokes the zoom-in tool, which facilitates accurate point placement). Photoshop will warn you with a red or yellow grid if the grid you create doesn’t align accurately with the verticals and horizontals of the image. When things are aligned properly, Photoshop signals this state by turning the grid blue (Figure 24c).
Figure 24c. The book’s front-jacket panel with perspective grid applied.
- With the front grid selected, type Command/Control+V to paste the front artwork into the Vanishing Point dialog. Use Command/Control+plus or minus to zoom in or out. Chances are the artwork will be larger than necessary, so click on the Transform tool to scale the artwork smaller.
- When you’re done transforming and positioning the front-cover artwork, click OK to exit the dialog box (Figure 24d).
Figure 24d. The mock-up with cover art in place.

From here you’ll want to repeat steps 2–6 with the spine art, beginning by first copying it to the clipboard and then creating the spine’s perspective grid in the Vanishing Point dialog (Figure 24e).
Figure 24e. Back inside Vanishing Point, add a new perspective grid for the spine art. Provided you’ve copied the spine art to the computer’s clipboard, you’re now ready to choose Edit > Paste.

Remember to create another new, blank layer for the spine before invoking the Vanishing Point filter. With each object on its own layer, repositioning or tweaking the objects later will be much easier (Figure 24f).
Figure 24f. With each object on its own layer, making final adjustments will be easy.

The final important step to complete the 3D illusion is to select both spine and cover layers and change their blend mode from Normal to Multiply. Figure 24g shows the final composite mock-up.
Figure 24g. If done correctly, the mock-up can often look better than a photo of the actual book and real cover.