11. iTunes Tips and Tricks
Get more out of iTunes with the tips and tricks listed in this chapter. From tweaks to trouble-shooting, you’ll find ways to optimize your iTunes experience.
If you’ve read the preceding chapters of this book, you’ve mastered the basics—and beyond—of iTunes. This chapter supplements your iTunes knowledge with tweaks, fixes, and suggestions to help you get even more out of iTunes.
Whether you want to add lyrics to a song, adjust the length of a track, or listen in a smaller player, you’ll find instructions here. You’ll also learn how to do things you may not even have realized you could do with iTunes: share files between your computer and your portable device and control iTunes remotely using your iPod Touch, iPhone, or iPad. There’s a comprehensive list of keyboard shortcuts for both Windows and Mac users. And if you’re having trouble getting iTunes to work properly, check out the list of troubleshooting tips that ends the chapter.
Adding Lyrics to a Song
Some people like to listen to music; others need to know each and every word that’s being sung. Whether you like to sing along or just follow along, you can add lyrics to any song in your iTunes library.
First, get the lyrics. You might find these on a band’s website or in the booklet that comes with a CD. Next, go to iTunes and select the song you’re adding lyrics to. Select File, Get Info and click the Lyrics tab. The Lyrics tab consists of a big text box where you can paste or type in the lyrics you’re adding to the song. When you’ve added the lyrics, click OK to save them.
To view or edit a song’s lyrics, repeat the process: Select the song you want; then select File, Get Info and click Lyrics. The lyrics appear in the text box on that tab. You can simply read them or make changes to them. Click OK when you’re done.
Using the iTunes Mini Player
When you open iTunes, you see the familiar window that takes up the full screen (or a big portion of it). If you’re doing other work on your computer as you listen to music, you have to switch back to the iTunes window when you want to adjust volume, pause playback, see the name of what’s playing, or move to another song. Jumping back and forth between the window where you’re working and the iTunes window can be distracting.
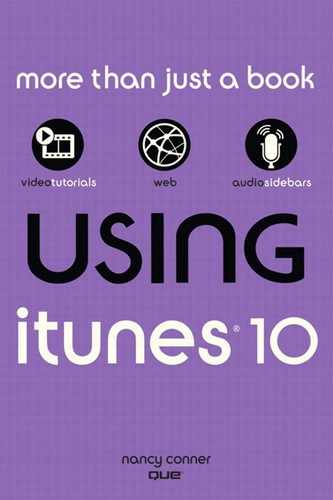
Enter the iTunes Mini Player, shown in Figure 11.1, which shrinks iTunes to its most basic function: playing music. When you turn on the Mini Player, you can see the name of the current track and control playback without having to look in the full-size iTunes window.
Figure 11.1. The iTunes Mini Player
Show Me: Media 11.1—Playing Music with the iTunes Mini Player
![]()
Access this video file through your registered Web Edition at my.safaribooksonline.com/9780132660273/media.
When you want to use the Mini Player, start playing a track, album, or playlist and select View, Switch to Mini Player. (You can also press Ctrl+M on a PC or Cmd-M on a Mac.) As your music plays, you can use the Mini Player to do these actions:
• Start or pause play—The familiar Play/Pause button works just as it does in your iTunes Controls.
• Repeat previous track—Click the button with the left-pointing arrows to play the previous track again.
• Jump to next track—Click the button with the right-pointing arrows to skip ahead to the next track on your list.
• Adjust the volume—Move the slider left or right to decrease or increase the volume.
• View or hide track information—The Mini Player comes in two sizes. The expanded version (see Figure 11.1) shows track information for the song that’s playing. The compact version hides track information, showing just the playback controls. To expand the Mini Player and see track info, point at the player’s lower-right corner, click, and drag to the right. To use the compact version and hide track info, point at the lower-right corner, click, and drag to the left.
• Return to the full-size iTunes window—On the Mini Player’s left side, click the Restore button. You can also return to the full iTunes window by pressing Ctrl+M (on a PC) or Cmd-M (on a Mac).
• Minimize iTunes—When you click the left Minimize button, the Mini Player minimizes but keeps playing.
• Close iTunes—Click the upper-left x to quit iTunes. If you close iTunes this way, the next time you start it again, the Mini Player opens.
Using the iTunes Desktop Player
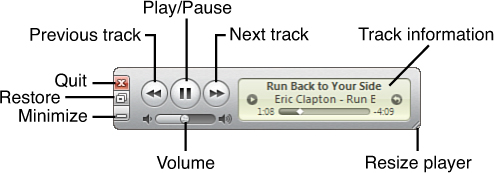
If your preferences land you somewhere between the Mini Player’s minimalism and the full-blown iTunes window’s complexity, you’ll be pleased to know that there’s a middle ground: the iTunes Desktop Player. This controller displays album art along with playback controls, as shown in Figure 11.2.
Figure 11.2. The iTunes Desktop Player
Show Me: Media 11.2—Playing Music with the iTunes Desktop Player
![]()
Access this video file through your registered Web Edition at my.safaribooksonline.com/9780132660273/media.
To display the Desktop Player, start by playing a song. Make sure that the album cover of the currently playing selection shows in the artwork viewer, in the lower left. (If the artwork viewer is closed, click the upward-pointing triangle just below where it should appear.) Point at the artwork that appears in the artwork viewer. When the mouse pointer changes to a pointing hand, click the artwork. iTunes launches the Desktop Player in a separate window.
At the top of the player, the title bar shows you what’s playing now. In the upper right, you’ll find buttons to minimize, restore, and close the player. (Clicking the upper-right x closes the player but leaves iTunes open.) Use the playback controls at the bottom of the player just as you would in iTunes. To make the player the perfect size, click and drag the lower-right resizing handle.
Controlling iTunes Remotely
You don’t have to be tied to your computer to control iTunes. Thanks to Remote, a free app available through Apple’s App Store, you can select songs, albums, or playlists to play; choose videos or TV shows to watch; pause playback; adjust the volume; skip to a different track; create playlists; and more—all by using your iPhone Touch, iPhone, or iPad over your home’s wireless network. The Remote app is especially useful if you use Apple TV or AirPlay to experience your iTunes library on your TV or remote speakers.
![]() To learn more about Apple TV, see “Apple TV and iTunes” (in Chapter 6, “Viewing in iTunes: TV, Movies, and More”). To read about AirPlay, see “Playing Music throughout the House with AirPlay” (in Chapter 9, “Syncing and Sharing”).
To learn more about Apple TV, see “Apple TV and iTunes” (in Chapter 6, “Viewing in iTunes: TV, Movies, and More”). To read about AirPlay, see “Playing Music throughout the House with AirPlay” (in Chapter 9, “Syncing and Sharing”).
Getting Started with the Remote App
To use the Remote app, you need to have an iPad, iPod Touch, or iPhone with iOS 3.1.2 or later. To find out which version of iOS you have, go to your device’s Home screen; tap Settings, General, About; and look under Version.
![]() When you’re using the iTunes DJ to play a live mix, the Remote app lets you—and your guests—request a song remotely. See “Requesting a Song Remotely” (in Chapter 5, “Playing with Playlists”) for details.
When you’re using the iTunes DJ to play a live mix, the Remote app lets you—and your guests—request a song remotely. See “Requesting a Song Remotely” (in Chapter 5, “Playing with Playlists”) for details.
![]() LET ME TRY IT
LET ME TRY IT
Setting Up the Remote App on Your Portable Device
Begin by downloading the Remote app from the App Store to your device. After you’ve done that, follow these steps:
- On your device’s Home screen, tap the Remote icon to open the app.
- Tap Settings.
- On the Settings screen, shown in Figure 11.3, tap Add an iTunes Library.
Figure 11.3. Choosing or adding an iTunes library

- The app gives you a four-digit passcode. Make a note of it.
- Open the iTunes library you want to add and, under Devices in the Source list, select your device (it has the Remote icon beside it, as you can see in Figure 11.4).
Figure 11.4. Enabling remote access to an iTunes library

- iTunes opens the Add Remote screen, shown in Figure 11.4. Type the four-digit passcode from your device into the boxes.
- iTunes enables remote access to your library, and your library gets added to the Remote app on your device. Libraries to which you have access appear at the top of the Settings screen, as in Figure 11.3, with a check mark beside the current library.
You’re all set to start using Remote (read on to find out how to do that). If you want to add another library, repeat the steps in this list.
Turning On Home Sharing in the Remote App
If you’ve enabled Home Sharing on computers linked by a network, you can turn on Home Sharing in your Remote app to find and control iTunes libraries and Apple TVs that also have Home Sharing turned on.
On your device’s Home screen, tap Remote to open the app. Tap Settings. On the Settings screen (see Figure 11.3), tap the button in the Home Sharing section to change it from Off to On. Apple asks you to sign in to your iTunes Store account; type in the Apple ID and password you use for the computers linked by Home Sharing, and then click Done.
Apple verifies your account information and turns on Home Sharing. Now you can use Remote to control any library or Apple TV that participates in Home Sharing.
Using Remote to Control iTunes
After you’ve set up the Remote app with one or more of your iTunes libraries, you use it to control iTunes in the same way you would play music on your iPod or other portable device. Instead of playing on your device, however, the music or videos plays in iTunes or via Apple TV.
If you want to change your settings in Remote, click the Settings button and take one of these actions:
• Choose a different library—Remote displays available libraries at the top of the Settings screen. Tap the one you want to gain remote access to it.
• Add a new library—Tap Add an iTunes Library and follow the steps listed earlier to add another library to Remote.
• Delete a library—Tap the upper-left Edit button. A red Delete icon appears next to each library on your list. Tap that icon and then tap the Delete button to confirm. Click Done when you’re finished.
• Turn Home Sharing on or off—In the Home Sharing section, tap the On or Off button to enable or disable Home Sharing. If you’re turning on Home Sharing, you must enter the Apple ID and password you use for Home Sharing to complete the process.
Copying Files to and from Your Device
You can use your iPad, iPod Touch, or iPhone (running iOS 4 or higher) to share files, transferring copies from your computer to your device or from the device to your computer. You might transfer written notes, other documents, ringtones, and so on.
Connect your device to your computer, select it from the Source list, and click Apps. Scroll down to the File Sharing section, shown in Figure 11.5. (If you don’t see this section, you don’t have any apps installed that can share files.)
Figure 11.5. Sharing files via iTunes

In the File Sharing section, you can move copies of files between your device and your computer:
• To transfer a file from your device to your computer—From the Apps list on the left, select an app to see its files. Select the file you want to copy to your computer, and then click Save To. In the dialog box that opens, navigate to where you want to save the file. Select the folder you want and click OK.
• To transfer a file from your computer to your device—Select the app that will store your file. Click Add. Find and select the file you want to transfer; click Open.
iTunes syncs with your device and transfers the file.
Modifying Tracks
You may have tracks in your library whose length you would like to change. For example, you might want to cut lengthy credits from the beginning of a movie or skip the question-and-answer session at the end of a podcast. Or maybe you want to import a digital recording you made of an old LP or cassette, but the recording is a single long file and you want to make each song its own track.
If you’re seriously into editing audio and video files, you should look into a program that’s designed to do that (listen to this chapter’s Tell Me More file for some suggestions). But you can do some quick-and-dirty track modification right in iTunes.
Show Me: Media 11.3—Changing the Length of a Track
![]()
Access this video file through your registered Web Edition at my.safaribooksonline.com/9780132660273/media.
Tell Me More: Media 11.4—Editing Audio Tracks
![]()
Access this audio recording through your registered Web Edition at my.safaribooksonline.com/9780132660273/media.
Choosing Where a Track Begins and Ends
You may not always want to hear an entire track from beginning to end. For example, if you’re listening to songs from a live concert, you may not want to hear the patter at the start of a song or the cheering at the end. iTunes lets you set the beginning and ending points of an item—including songs, videos, audiobooks, and podcasts—so you can skip whatever you don’t want at the beginning or end.
![]() LET ME TRY IT
LET ME TRY IT
Setting Start and Stop Times
When you want to shorten a track by trimming its beginning or end, follow these steps:
1. Start by playing the track and watching the Status pane at the top of the iTunes screen. When the track reaches the point where you want to start (or end) it, make a note of the elapsed time that appears in the Status pane.
2. Select the track you want to modify.
3. Select File, Get Info.
4. Click Options to open the Options tab, shown in Figure 11.6.
Figure 11.6. Setting a track’s start and stop times

5a. If you want to trim the beginning of the song, type your desired starting time into the Start Time text box.
5b. If you want to trim the end of the song, type your desired ending time into the Stop Time text box.
6. Click OK.
Now when you play the track, iTunes plays only the portion between the Start Time and Stop Time you indicated.
iTunes doesn’t discard any part of the file you trimmed. The whole file is still there; iTunes simply starts or stops playing it at the time marker you specified. If you want to reset the track to its previous length, select the track and select File, Get Info. If you’re not sure how long the full-length track is supposed to be, click the Summary tab and look for the track’s length, next to its name. (Alternatively, you can check the Time column in List view, which shows the track’s full length.)
Click Options and set the Start Time to 0:00 and the Stop Time to the song’s length. Click OK. iTunes goes back to playing the entire track.
Breaking a Long Track into Multiple Shorter Tracks
You can break up one long track into shorter tracks in iTunes. If you primarily get your music from the iTunes Store or by ripping your CD collection, you probably won’t run into this situation too often. But you may have a digital recording of a lecture that you want to break into smaller segments, for example, or maybe you’re digitizing an old LP.
![]() LET ME TRY IT
LET ME TRY IT
Splitting Up a Long Audio Track
Before you begin, make sure you have a suitable track to work with. Use the iTunes WAV Encoder or AIFF Encoder to rip the CD that contains the long track that you want to break into smaller segments. (You need to use one of these formats so you can work on an uncompressed file as you split up the long track.) After you’ve ripped the CD, change your CD import settings back to AAC or MP3—whichever you normally use.
![]() To read about selecting an encoder to use when you import tracks from a CD, see “Fine-Tuning CD Import Settings” (in Chapter 2, “Getting Content into iTunes”).
To read about selecting an encoder to use when you import tracks from a CD, see “Fine-Tuning CD Import Settings” (in Chapter 2, “Getting Content into iTunes”).
Play the long track you’ve imported. For each segment you want to create, note the elapsed time of its beginning and ending. When you’ve written those down, follow these steps:
- Select the track you want to break up.
- Choose File, Get Info.
- Click the Options tab (see Figure 11.6).
- Type in the Start Time and Stop Time that correspond to the track length you want.
- Click OK.
- With the long track selected, choose Advanced, Create AAC Version or Advanced, Create MP3 Version (what you see on the menu depends on the kind of encoder you’ve chosen in your Import Settings).
- iTunes creates a new track in the format you chose, using only the segment you’ve defined. Select the newly created track and click its name. When the name changes to a text box, type in a new name for the track. If you’re breaking up one long track containing different songs, for example, type in the name of the song you just split off.
- Repeat steps 1–7 for each segment that you’re turning into a separate track.
- When you’ve finished, delete the long track you broke up: Select the track and press the Delete or Backspace key. If prompted, click Remove to confirm that you want to delete the track, and then click Move to Recycle Bin or Move to Trash.
Now you can group the tracks together on a playlist if you want to hear them in order.
![]() To read about setting up a playlist, see “Creating a Playlist” (in Chapter 5).
To read about setting up a playlist, see “Creating a Playlist” (in Chapter 5).
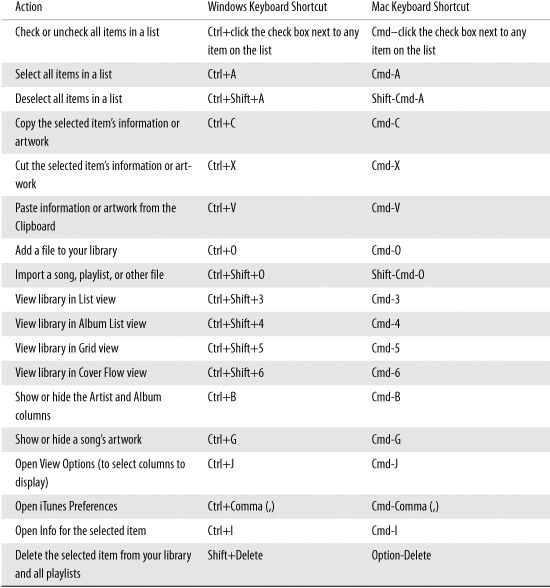
Using iTunes Keyboard Shortcuts
As anyone who works with computers can tell you, the fastest, most efficient way to get things done is to use keyboard shortcuts whenever they’re available. Instead of reaching for the mouse, moving it around, clicking, and then repositioning your hand on the keyboard, you keep your fingers on the keys—and your mind focused on what you’re doing.
iTunes offers keyboard shortcuts for the program’s most common activities. This section shows you how to power up your iTunes use with these shortcuts.
Shortcuts for Listening or Watching
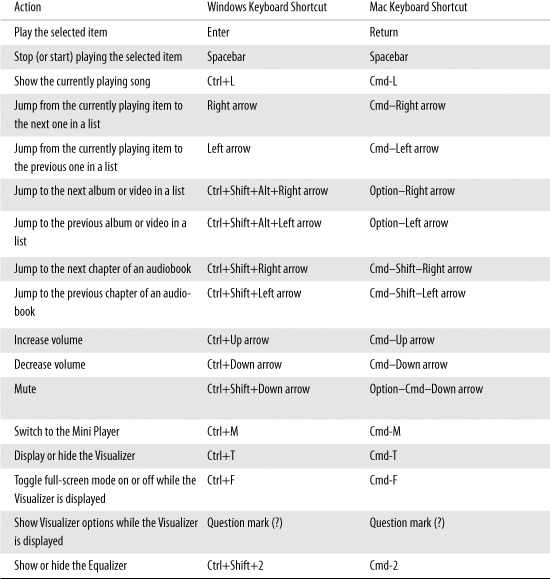
When you’re listening to music or watching a video in iTunes, you can use keyboard shortcuts to give iTunes instructions, such as to change the volume or move to the next item. Table 11.1 shows you these shortcuts.
Table 11.1. Keyboard Shortcuts to Use While Listening or Watching in iTunes
Shortcuts for Working with Your Library
For just about any action you do in your iTunes library—tagging tracks, importing music, browsing your library, adjusting your iTunes preferences, and more—there are keyboard shortcuts to help you out. Table 11.2 lists shortcuts you can use while working with your library.
Table 11.2. Keyboard Shortcuts to Use in Your iTunes Library
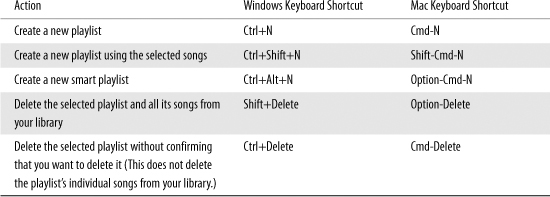
Shortcuts for Working with Playlists
Creating playlists can take a lot of work. Table 11.3 makes it easier by listing the keyboard shortcuts that speed up playlist-related tasks.
Table 11.3. Keyboard Shortcuts to Use with Playlists
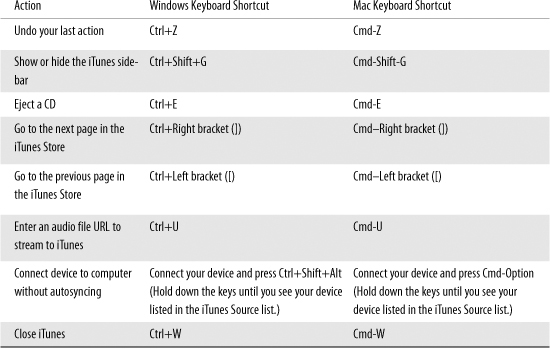
Shortcuts for Miscellaneous Actions
Table 11.4 lists other actions you can accomplish with keyboard shortcuts while working with iTunes or shopping in the iTunes Store.
Table 11.4. Miscellaneous Keyboard Shortcuts
Troubleshooting Tips
Most people find iTunes easy to install and use. But problems do pop up. If you’re having difficulty getting iTunes to work the way it’s supposed to—for example, you can’t connect to the iTunes Store or sync your device—try some of the tips listed in this section.
Here’s a list of possible fixes to common iTunes problems:
• Run iTunes Diagnostics—iTunes has a wizard that checks for problems with your computer that may be interfering with iTunes’ ability to work properly. In iTunes, select Help, Run Diagnostics to open the wizard, shown in Figure 11.7. Make sure there’s a check in the check box of each test you want iTunes to run:
• Network connectivity tests—These tests check two things: the hardware and software your system uses to connect to a network, and whether your computer can connect to the Internet and establish a secure connection with the iTunes Store.
• CD/DVD drive tests—You need to insert a disc that contains data (such as an audio CD) to test your CD/DVD drive. These tests check your computer’s optical drive, the drive where you insert CDs or DVDs, looking to see whether the device’s driver is installed correctly and whether it can read a disc inserted in the drive.
• Device connectivity tests—These tests check your computer’s USB port and whether your computer can recognize and connect to your iPod or other portable device.
• Device sync tests—If you’re having trouble syncing your portable device with iTunes, run these tests, which check necessary software and run a test sync.
Figure 11.7. iTunes Diagnostics
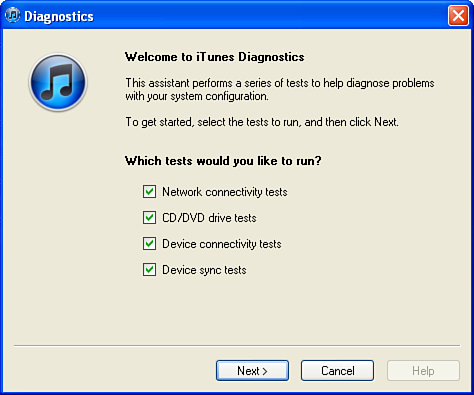
Click OK to have iTunes check your system for problems. iTunes returns a report that lists the tests it ran. A green light next to a test means that the test found no problem. A yellow light indicates a possible problem, and a red light means the test failed. Click the Help button next to a failed test for more information about the problem.
• Make sure you have the latest version of iTunes—In iTunes, select Help, Check for Updates and install any updates that are available.
• Make sure your device is up-to-date—You can check for updates to your device’s software via iTunes. Connect the device to your computer and select it in the Source list. On the device’s Summary page, click the Check for Updates button. (Your device automatically checks for updates periodically, but you can double-check using this method.)
• Restore your device’s original settings—If you’re having trouble with your device and an update doesn’t help, you might want to try restoring its original settings. Restoring resets your device to its original, factory settings and deletes any information you’ve added to the device. Connect the device to your computer and select it in the Source list. On the device’s Summary page, click Restore. iTunes backs up your device and restores its original settings. When it’s finished, you can restore backed-up settings, notes, contacts, calendars, and so on by right-clicking your device in the Source list and selecting Restore from Backup.
• Check for viruses—Make sure your antivirus software is up-to-date. Then disconnect from the Internet and run a virus scan. If your antivirus program finds any viruses, malware, or other suspicious files, follow its recommendations to remove or quarantine them. Then reconnect to the Internet and try using iTunes again.
• Create a new iTunes library—If the new library works, try importing the files from the old library.
![]() See “Creating Multiple Libraries” (in Chapter 8, “Managing Your iTunes Library”) to learn how to create a new iTunes library.
See “Creating Multiple Libraries” (in Chapter 8, “Managing Your iTunes Library”) to learn how to create a new iTunes library.
• Windows users: Disable Direct X—If you use Windows XP, Vista, or 7 and you’re having trouble watching video, try disabling Direct X acceleration in QuickTime. Open QuickTime and select Edit, Preferences, QuickTime Preferences. Click the Advanced tab, shown in Figure 11.8. In the Video section, select Safe Mode (GDI Only). Click OK, and try playing a video in iTunes.
Figure 11.8. Disabling DirectX in QuickTime

• Reinstall iTunes and QuickTime—Sometimes you can solve the problem by reinstalling the software.