
Managing Music on Your iPad
The iPad can do so much, but one of its best capabilities tends to get overlooked. Apple’s big move into true consumer electronics began with the iPod, more than 10 years ago. The iPhone and the iPad are direct descendants; the famous, multibillion App Store that serves the newer devices so well is just a tab within the iTunes Store, originally devoted entirely to audio.
The music app on the iPad is simply called Music. (It was called iPod, out of respect for the original device, until late 2011, when Apple renamed it.) The Music app makes your iPad into the best iPod ever—a gorgeous, large-screen, full-color iPod with excellent storage capability. (Although music space can quickly get squeezed by other uses, such as movies.)
The iPad also supports multitasking for music. Even the initial software release supported the Music app in the background. Now, any music app can run in the background, keeping the tunes playing while you use other apps. This can be a lot of fun! So music is an additional capability to everything else on the iPad, not an either-or proposition.
The only barrier to using the Music app well is that it takes a bit of work to acquire and manage music so that you have it available when you need it. It’s easy to neglect this prep work in your excitement about all the other things the iPad can do. Take the time to do that bit of work before you need it; for your troubles, you can have a powerful addition to everything the iPad can do for you.
The Music app is only one way to play music on your iPad. In earlier versions of the iPad’s operating software, though, this app was the only one that would continue playing music in the background when you switched to another task. Other music apps besides iPod would cut out as soon as you switched what was onscreen, which was enough to make them sort of useless in many cases.
Now, however, all apps have access to a background service that can continue playing music or other sounds while you work on other tasks. There are dozens of other apps that bring music in—streamed music over the Internet, stored music, and much more. Most users of these other apps have experience with an actual iPod and the Music app on the iPhone or iPad. After you learn your way around the Music app, you can better deal with these other apps as well.
Synchronizing Music
Millions of people have song libraries built up over many years using iTunes on their Windows PCs and Macs, shared among iPods, iPhones, and now iPads. It’s a marvelous ecosystem, allowing you to curate a collection of music, podcasts, video, and audiobooks that means something to you.
Even if you’ve just started using iTunes to manage your music library, in doing so, you’re making an investment in your future with music.
Synchronizing your existing song library to your iPad allows you to leverage your investment in iTunes music over yet another device. The iPad is now the best and the brightest device for iTunes music—it does more than the other devices, it has a much bigger screen, it’s fast, and it has great storage capacity.
You can, of course, also use iTunes to find and bring in new music, movies, and more, whether you’re adding to an existing collection or starting a new one. The iPad is often criticized for its dependence on a personal computer to do some things, but it makes sense to use your computer—with its faster processing speed, greater storage, and bigger screen—for acquiring and managing music.
The iPad does bend the paradigm, though, if not break it. It’s so close to a personal computer in capability that it’s easy to use it for acquiring and playing music.
There’s a problem with downloading music directly to an “i” device, such as the iPad, though. If you get music on one device, it’s not available to the others—including future devices that Apple hasn’t even created yet. I recommend that you get as much of your music as possible through iTunes on your personal computer; keep building up that iTunes library for the future.
When you sync your iPad to iTunes, you have two options:
• Sync everything: This is quick and easy. The problem is, you may or may not have room on your iPad for your entire iTunes music collection. My advice: Make room! It’s a comfort to have your entire collection available on the iPad and, potentially, on other devices as well.
• Sync some: This takes more gray matter to figure out what to do. You choose playlists, artists, and genres. If you do this, you need to arrange your collection into playlists first before you sync. Doing so can make syncing easier.
If you want to delve deeper into getting iTunes to do more for you, there’s an in-depth book with all the gory details. Check out Using iTunes 10 by Nancy Conner from Que, ISBN 978-0-7897-4787-7.
 TELL ME MORE Media 12.1—Delving into Your Music Syncing Options
Access this audio recording through your registered Web Edition at my.safaribooksonline.com/9780132709590/media or on the DVD for print books.
Get good at keeping your music in sync between your iPad and your personal computer. It can pay off in keeping things simple on all your devices, now and for years to come.
Follow these steps to synchronize music from iTunes to your iPad.
![]() LET ME TRY IT
LET ME TRY IT
Synchronizing Music
1. Connect your iPad to your Windows PC or Macintosh. iTunes opens.
2. In the iTunes sidebar, click your iPad in the Devices list. iTunes displays the Summary tab.
3. Click the Music tab. The Music tab is shown in Figure 12.1.

Figure 12.1. iTunes lets you sync all your tunes or just selected groups of tunes.
4. Click the Sync Music check box to activate it.
5. To sync your entire music collection to your iPad, click to choose the Entire Music Library option, and skip to step 8.
6. To sync part of your music collection to your iPad, click to choose the Selected playlists, artists, and genres option.
Now choose playlists, artists, and genres. To manage this process, create playlists that separate the wheat (what goes on your iPad) from the chaff (everything else).
7. In the Playlists, Artists, and Genres lists, click to make your choices of what content to sync to your iPad.
8. Click Apply. Your choices are used to synchronize the music stored in iTunes on your personal computer to your iPad. Wait while the sync completes.
9. Click the Eject icon next to your iPad’s name in the Devices list in iTunes. The syncing completes.
Playing Music with the Music App
The actual iPod device is a marvel, and the Music app on the iPhone is cool, but in many ways, the iPad is better. This is because of the iPad’s large touchscreen. The touchscreen makes it easier both to see lots of information and to enter information and commands. It’s just a larger control panel to your music and media collection, but that makes a big difference—no pun intended.
One of the coolest things about using the iPad for your music, though, is that, because of iTunes, you have a standard approach to getting, synchronizing, and playing music on your personal computer, iPad and, if you have them (or buy them), your iPod Touch and iPhone. The songs that you can play across all these devices are often referred to as Your iTunes Collection because iTunes is the common denominator.
Although there are lots of other things you can do with your iPad, take the time to learn to use the iPod app. Bringing in music and organizing it does take an up-front investment of time and, if you buy new songs as you go along, money. However, after the work is done, you have a kind of magic radio that’s available to you on multiple devices that contains only music that’s meaningful to you. The result is special and rewarding.
Navigating the iPod App
To start the iPod app, tap the iPod icon, which appears in the dock of your Home screen. Your library appears—everyone’s looks a little different. However, five buttons are always at the bottom of the screen to show five ways to get to your music:
• Songs: An alphabetical list of songs. This is good for going to a specific song, and for scanning for interesting songs. If you have more than a few hundred songs, though—and many iPod, iPhone, and iPad users have thousands of songs—scanning gets wearying after a little while.
• Artists: Music is arranged by artist. There are likely to be many fewer artists than songs in your music library, so this is a much easier way to scan through a larger collection. See Figure 12.2 for a (brief) example.

Figure 12.2. Viewing your tunes by artist makes them easier to find.
• Albums: As with the Artists button, Albums drastically cut the number of items you have to look at to navigate your music collection. This is also a good way to get to some of the hidden gems in your collection that may not be the biggest hit songs but are still worthwhile.
• Genres: There are potentially dozens of genres, and distinctions can be quite fine. For instance, electronic music, which to me is all one category, includes Industrial, Drum and Bass, and others. Hispanic music includes Alternativo Latino, Regional Mexican, Reggaeton, and Pop Latino. However, only the genres that you have songs in appear, so your genres list is likely to be another effective way into even a large song collection.
• Composers: For classical music, this is a strong way into your collection; for popular music, it can be a bit confusing because pop songs are known more by who performed them than who composed them. (Even Bob Dylan, for instance, who has a distinctive songwriting style, did a lot of covers; his songs show up in many other performers’ work as well.)
These five categories become more and more important as you pour more and more songs into your iTunes music collection. You may find yourself depending on them quite a bit—and as you think of your music in these categories, you may view your music collection in a new way. The Composer grouping, for instance, is a distinctive way to think about pop songs, rap, and other genres besides classical.
Playing Music
As you build up your song catalog in iTunes, you have the opportunity to play songs back from your personal computer, your iPad, and, if you so choose, an iPod Touch or iPhone. If you have a non-iPhone smartphone, and you don’t want to carry your iPad around all the time, you might find it easier to buy an iPod Touch for music playback than to try to integrate your song collection and the way it’s organized onto your Android, Blackberry, or other smartphone.
There are four ways to listen to songs from your iPad and other devices that support iTunes. You may also listen to music and other audio content through apps such as Pandora, radio station websites, and other means.
For instance, I bought the MLB At Bat app so I can listen to baseball game radio coverage—I actually have Internet access more often than I have reliable radio reception, and I like the infographics in the At Bat app, even if I don’t always take the time to look at them. So having an iPad has changed the single biggest reason that I listen to the radio.
Think through how you want to use your music and other audio content, both at home and on the go. Following are the four kinds of output to consider:
• iPad speaker: The iPad speaker is surprisingly good, considering its size, but it’s not much fun to listen to for a long time. Treat the iPad’s speaker as a kind of emergency backup.
• Regular headset: I like using a regular headset, and I think it looks a bit less dorky than a Bluetooth headset—which to me makes one look like an alien. However, in-ear speakers hurt after a while, and earmuff-style headsets are bulky and tend to be expensive, requiring careful looking after on the move.
• Bluetooth headset: Just like wired headsets, but without the wires, and more expensive. Using a one-ear speakerphone headset is OK for brief periods but becomes limiting after a while.
• Physical speakers: Apple offers a variety of ways to hook up regular speakers to an iPad or an iPad stand, and I recommend that you have this option set up for home use. It enables music or other audio to fill your environment without imposing on you as much as music through headphones does.
![]() LET ME TRY IT
LET ME TRY IT
Playing Music
1. In the Music app, tap a category. If the category has subcategories, tap a subcategory.
For instance, if you choose an artist, composer, or genre, you may then be offered a choice of albums.
2. Tap the song you want to hear.
The Music app begins playing the song and displays any album art, as shown in Figure 12.3. Note how the album art display takes advantage of the iPad’s large screen.
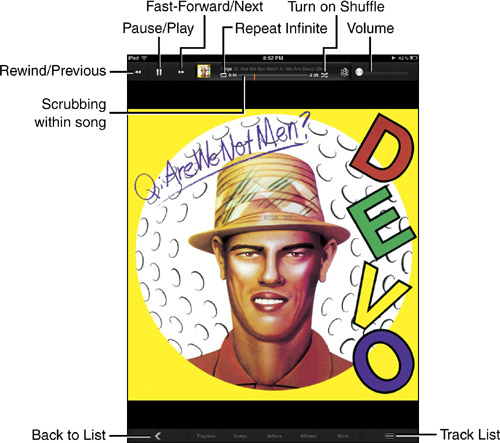
Figure 12.3. Use the features shown to control playback.
However, you’re free to switch to another app; your music continues playing unless the other app you use takes over background music. If the other app simply has sound effects, as with some games, you hear those along with the music—which can be pleasant or confusing, depending on the specific music, the sound effects, and your mood.
3. To turn the volume up or down, drag the slider in the upper left, or use the iPad’s volume rocker switch on the upper-right edge of your iPad (when held upright in portrait mode). If your headphones have a volume control, you can use that as well.
Using the iPad’s volume rocker switch changes the onscreen volume slider. The same thing should occur when you use a volume switch on headphones.
4. To fast-forward or fast-rewind within a song, tap and hold the Rewind or Fast-forward control in the upper right. To move to the beginning or end of the song, tap and release the Rewind or Fast-Forward control.
5. To halt playback, press Pause or the appropriate button on your headset; the control changes to a triangle to indicate Play. To resume playing, press Play or the appropriate button on your headset.
6. To repeat a song indefinitely, press the Repeat control once. To repeat the song just once, press the Repeat control again.
I really like this one, but friends and family complain when I play the Gorillaz “Feel Good” continually for half an hour. Thank goodness for headphones....
7. To move within a song (called scrubbing), drag the scrubbing control.
If you drag your finger down the screen, you get finer and finer control of the point you move to within the song. This is great for transcribing lyrics or voice recordings.
8. To turn on shuffle mode, tap the Shuffle button—or give your Pad a good shake.
The Shuffle Mode button turns blue. Songs from within the currently chosen list play in random order.
9. To return to the list of tunes, press the Back button.
The current song continues playing until you make another selection.
10. To see the list of tunes instead of the cover art within the playback interface, press the Track List button. The current song continues playing until you make another selection.
Creating a Playlist
You can create playlists in iTunes on your Macintosh or Windows PC, which is where you are more likely to have your complete music collection. It may also be more convenient to work with playlists on a personal computer, where you can use the larger screen, overlapping windows, physical keyboard and mouse, or trackpad to move through a large number of songs more conveniently.
However, you can also create a playlist or Genius Playlist on your iPad. You may want to do this when you are away from your computer and want a quick playlist for an event—or you may choose to make many or all your playlists directly on your iPad. You can use the Music app to create a playlist from the music on your iPad.
 SHOW ME Media 12.2—Creating a Playlist
Access this video file through your registered Web Edition at my.safaribooksonline.com/9780132709590/media or on the DVD for print books.
![]() LET ME TRY IT
LET ME TRY IT
Creating a Playlist
1. In the Music Playlists tab, tap the New icon to create a playlist. The New Playlist pane pops up, requesting a name for the playlist, as shown in Figure 12.4.
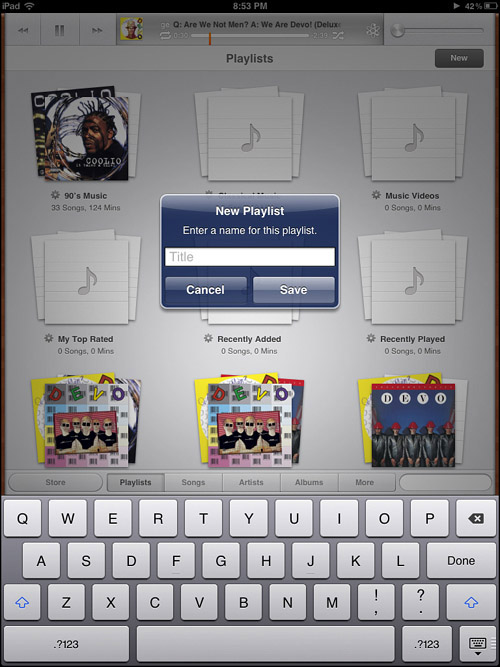
Figure 12.4. Use this pane to name your playlists.
2. Use the onscreen keyboard to enter a name for the playlist and tap Save. When you tap Save, a list of your songs appears.
3. Navigate your songs, using the various categories. Clicking the Sources button makes the pop-up shown in Figure 12.5 appear. You can also use the categories buttons long the bottom—Playlists, Songs, Artists, Albums, Genres, and Composers—to quickly scan through your music sorted in different ways.

Figure 12.5. Click the Sources button to choose which collection you are viewing.
4. When you see a song you want to add, tap the + button.
5. When you are done, press Done. The playlist appears, as in Figure 12.6.

Figure 12.6. You can edit your playlist, add to it, and complete it.
6. Edit your playlist: Press the minus sign (–) icon to remove a song; drag the song up or down in the list using the Towers of Hanoi icon on the right; tap Add Songs to return to step 3 and add songs. When you finish, press Done.
7. The playlist is saved. To modify it some more, tap Edit.