
Tracking Appointments and Events
The iPad’s capability to track appointments and remind you of where you’re supposed to be, and when, is one of its more powerful capabilities. It’s great to store lots of information for a specific appointment and also zoom out to manage your calendar a week or a month at a time.
With synchronization, your calendar is tied into calendar functions on other devices, such as your mobile phone and the computers you use. Your iPad becomes a viewer of your calendar and a tool to update a calendar that you can also access from a personal computer and a mobile phone. The iPad has a special role among these tools, combining strong portability with excellent usability, both for viewing and adding calendar events. The more you learn to use the calendar functions on your iPad, the better you can keep your calendar up to date, and your life organized and easier.
 TELL ME MORE Media 9.1—The iPad Calendar Versus Other Calendars
Access this audio recording through your registered Web Edition at my.safaribooksonline.com/9780132709590/media or on the DVD for print books.
Synchronizing Calendar Information
One of the most important functions for a calendar is to remind you of appointments. So you want your appointments to show up on your iPad, even if you initially enter them on a phone or computer, and vice versa. Synchronization loads your iPad calendar with appointments when you first set it up and keeps the calendar information on your iPad and your other devices aligned as you use them.
![]() To learn more about synchronizing contact and calendar information along with email messages, see Chapter 6, “Setting Up Email.”
To learn more about synchronizing contact and calendar information along with email messages, see Chapter 6, “Setting Up Email.”
As with contacts, described in the previous chapter, you can synchronize calendar information to the Mac OS X Address Book, to Outlook on Windows, to Microsoft Exchange, or to cloud-based services such as the Google calendar or Yahoo! calendar. If you don’t yet use any of these, you can adopt one of them to help connect your iPad calendar to your other devices. You can also set up or manage synchronization of your calendar using iTunes. The steps below show the process using iTunes, as it’s the approach that works for all users.
![]() LET ME TRY IT
LET ME TRY IT
Synchronizing Calendars
1. Connect your iPad to your Macintosh or Windows PC. Your iPad appears in the Devices list in iTunes.
2. Click your iPad in the Devices branch. iTunes displays the Summary tab.
3. Click the Info tab. Synchronization information appears.
4. On Windows, click the Sync Calendars With check box to activate it; then use the list to choose your Windows contacts program, for instance Outlook. This is almost identical to the Sync Contacts With screen shown in the previous chapter, in Figure 8.2. On a Mac, activate the Sync iCal Calendars check box.
5. To sync all your events to the iPad, leave the All Calendars radio button selected. To sync only the events from some calendars, choose the Selected Calendars radio button; then click the check box beside each calendar you want to synchronize with to activate it.
6. To set a limit on the time frame for synchronization, click the check box next to the setting. Do not sync events older than 30 days to activate it. Then change the number of days from the default, 30, to the value that makes sense to you in your circumstances.
You might find that you rarely change old calendar entries and therefore don’t need to synchronize far back into the past.
7. Click Apply. iTunes synchronizes your computer’s calendars to your iPad. If you add new calendar events on your iPad, or change or delete events, those changes are synced to your computer as well.
8. When the sync completes, to end the synchronization session, click the Eject icon next to the name of your iPad in the iTunes Device list.
 SHOW ME Media 9.2—Navigating Your Calendar
Access this video file through your registered Web Edition at my.safaribooksonline.com/9780132709590/media or on the DVD for print books.
Navigating the Calendar
Use the Calendar app to work with calendars on your iPad. Figure 9.1 shows the Month view, one of the many Calendar screens.
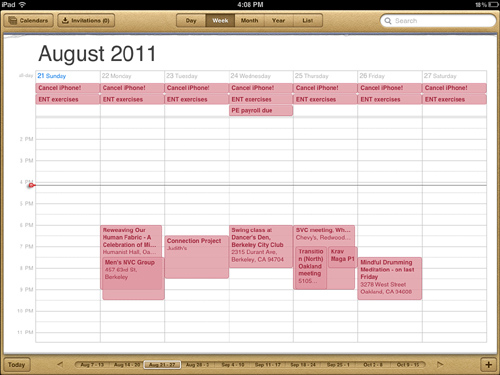
Figure 9.1. Tap the Calendar icon to open the Calendar app and view your schedule and to add, change, or delete entries.
The Week view shows off the iPad’s usefulness with the Calendar to the device’s best advantage. The large viewing area makes a big (no pun intended) difference. Entries are quite readable. You can even rotate the iPad between landscape (horizontal) and portrait (vertical) modes to emphasize breadth (across the week) versus depth (for each day) in how you look at your week’s calendar entries.
Following are five different views available for you to use with the Calendar app:
• Day: If you need to take things one day at a time, the Calendar app can help. The iPad screen has so much space available that the Calendar gives you both a list of events and an hourly view of your day, as shown in Figure 9.2.

Figure 9.2. The Day view gives you a couple of different ways to look at your day.
• Week: This is my favorite view in the Calendar. Using the iPad’s large screen, it effectively relates today’s activities to those in the surrounding week.
• Month: If you have a lot going on, the Month view shows only about a dozen characters per entry; it can be a bit dense and hard to make sense of. Use the Month view, as shown in Figure 9.3, to get an overview of your activities and then the Week or Day view to get more details.

Figure 9.3. The Month view is best used for a quick overview.
• Year: The year view, shown in Figure 9.4, is a kind of “heat map” of your busy (red), somewhat busy (orange), lightly busy (yellow), and non-busy (white) days. It’s most useful as a way to move around from one month to a different month by leaps and bounds. You won’t find a Year view on other iOS devices—the iPhone and iPod touch.

Figure 9.4. The Year view is a “heat map” of your busy-ness.
• List: The List view, shown in Figure 9.5, is almost identical to the Day view, but the list on the left side of the screen extends indefinitely into the future, rather than being confined to the current day. Sometimes useful, but not a view where you’re likely to spend a lot of time.

Figure 9.5. The List view is flexible and scrollable.
To navigate in any view, use the arrow keys at the bottom, near the corners, to move one day, week, or month backward or forward at a time. (The List view works like the Day view.) You can also press on a specific day, week, or month, as shown at the bottom of the screen.
Unlike specific weeks or months, individual days in the Day view are packed in so close together at the bottom of the page that it’s difficult to tap the right one on the first try. Instead, press and hold near the specific day that you want; then drag. Use the highlight that appears above your finger—showing the day you’re pressing—as a guide, and drag left or right as needed to get to the correct day.
To move farther and faster, drag your finger quickly across the list of days at the bottom of the screen. Hold your finger at either end to keep going forward or backward in time, beyond the currently displayed set of days, weeks, or months.
In the List view, to see the list for previous or future days, just drag the list up or down indefinitely.
Adding Events to the Calendar
If you synchronize calendars frequently, you might find that many of your calendar entries are most easily added from a personal computer. Some of the entry steps for calendars are easier using a mouse and physical keyboard rather than the iPad’s touchscreen and onscreen keyboard. Grabbing event information from an email or Facebook page, for instance, and pasting it into the fields of a calendar entry is easier to do on a computer.
However, the iPad has the tremendous advantages of great portability and convenience. You might have your iPad handy at times when you don’t have a personal computer nearby. You might even carry your computer less and less, and your iPad more and more.
As you carry your iPad more, you may often find it convenient to add events on-the-go onto your iPad Calendar, as describe here. You can then sync them later, or they may sync automatically via a cloud-based service such as Google Mail or Yahoo! Mail.
You can specify a number of features for an event: the date, start and end time, location, repetition (if any), invitees, alert, and availability indicator.
Adding Core Information for an Event
Core information for an event is “just the facts,” meaning the event name and when and where it occurs. For many events, this is all you need. Also, if you’re in a hurry, you may want to enter only core information and then enter additional information later.
Follow these steps to add core information for an event.
![]() LET ME TRY IT
LET ME TRY IT
Adding Core Information for an Event
1. From the iPad Home screen, tap the Calendar app to open it.
2. Navigate to the date you want. If you are in Week or Month view, the date of the event defaults to the current date. If you tap within the area of a different date, the date of the event initially sets to the date you tap.
3. Tap the Add (+) icon. The Calendar app displays the Add Event screen, as shown in Figure 9.6. The cursor displays in the Title area of the Add Event screen, and the keyboard appears onscreen as well.

Figure 9.6. A new event is set to occur on the current date or the one you tapped in most recently.
4. Enter the event title. As you enter the title, be aware that in many views of calendar events, only the first ten or so characters of the event title display. So front-load the event title that you enter with distinguishing information, such as the name of the person you’re meeting. Leave out superfluous words such as “meeting.”
5. Tap the Location box and enter the event location. Enter the Location in a format that Google Maps can understand, so you can use Google Maps to help you get to the location. If you have additional information that’s unlikely to be understood by Google Maps, such as “fourth floor” or “near the market” or “red building,” consider including this information in the Notes, or even in the event title, if you want to be sure to see it.
6. Tap the Starts/Ends box to enter the event starting and ending times. The Calendar app displays the Start & End screen, as shown in Figure 9.7. The Starts area is highlighted.
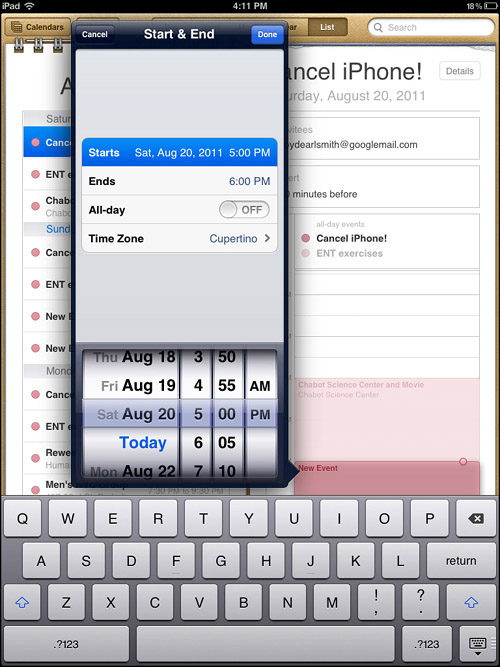
Figure 9.7. Set the event starting and ending times.
7. Use the time wheel to set the event’s starting time. Be sure to set the AM/PM designator correctly. The ending time adjusts to 1 hour later than the starting time.
8. If needed, use the time wheel to change the event’s ending time.
9. Use the All-Day slider to indicate whether an event takes the whole day.
10. Tap Done to complete the entry of the event start and end times. You return to the Add Event screen. This completes the core information for an event.
11. If you finish entering information for the event, tap Done; the event closes and is added to the calendar. Otherwise, leave the event open to see the next set of steps to complete entering information.
SHOW ME Media 9.3—Setting Up a Repeating Event
Access this video file through your registered Web Edition at my.safaribooksonline.com/9780132709590/media or on the DVD for print books.
Editing and Adding Information for an Event
Additional information for an event goes beyond “just the facts” and enables you to specify whether the event repeats, who’s invited, what alert you want to set to remind you of the event, your availability, and to add any notes. This is information that you might add at the time that you create an event, or you might come back to a previously created event and add this later.
Follow these steps to add additional information for an event.
![]() LET ME TRY IT
LET ME TRY IT
Editing and Adding Information for an Event
1. If the event isn’t open, navigate to it and tap the event to open it. Make any needed changes in the title, location, and start and end times. If the event is already open, continue with the next step.
2. To enter repetition, tap the Repeat box. In the Repeat Event screen that appears, choose a frequency of repetition: Every Day, Every Week, Every 2 Weeks, Every Month, or Every Year.
The options here are not as robust as on some other platforms. For instance, you can’t specify repetition by day of the month (that is, the fourth Thursday of the month), only by the specific date of the month. You may want to use another platform to access a broader range of specifications.
3. To begin inviting people, tap the Invitees box. The Add Invitees screen opens.
4. To continue inviting people, tap the Add (+) symbol in the Invitees box. From the list of contacts that appears (see Figure 9.8), type part of a name to home in on it; the list of matches updates with each character you type. Alternatively, scroll the list up and down by dragging your finger, or tap a letter in the list to the right.

Figure 9.8. Add people to invite to your event.
Only parts of a name that match the beginning or end of a name are matched; characters within a name, such as “mit” in “Smith,” won’t be. (So searching for “mit” would bring up “Mitchell,” but not “Smith.”)
5. To invite people from additional lists, tap the Groups button. From the Groups screen that opens, choose other lists and select people from those as well. Click Cancel to return to the Add Invitees screen.
You can’t enter an email address or other contact information directly from here. Consider entering a new contact, as described in the previous chapter, or using a different platform to invite people.
6. Click Done to finish inviting people. You return to the Add Event screen.
7. To set an alert for the meeting, tap Alert. The Event Alert screen appears, as shown in Figure 9.9.
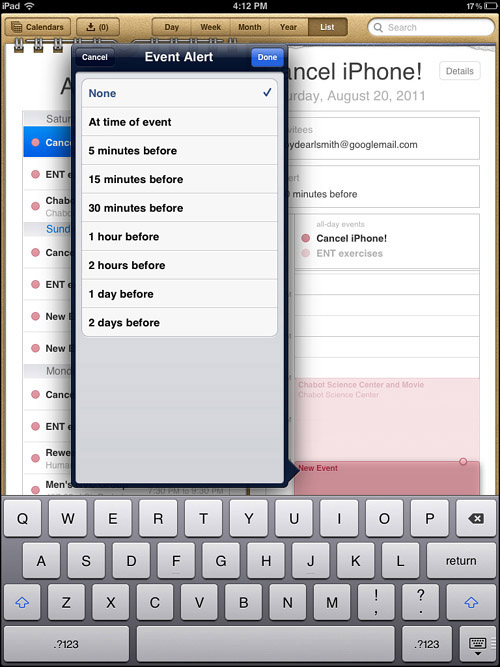
Figure 9.9. Tap Alert to open the Event Alert screen, and then choose how far before the start time you want to be alerted.
8. To finish setting the alert, tap to choose the amount of time beforehand at which the alert will appear: None, 5 minutes before, 15 minutes, 30 minutes, 1 hour, 2 hours, 1 day, 2 days, or the day of the event. Tap Done when finished. You return to the Add Event screen.
9. To specify how your availability will be shown to others, tap Availability. From the Availability screen that appears, choose Busy, Free, Tentative, or Out of Office. Click Done to finish specifying your availability.
The specifics of how your availability displays to people depends on what platform they use to view your calendar information.
10. To enter a note, tap in the Notes area. Type your note. Notes can include additional address information, suggestions as to transportation time, and more.
11. Tap Done to close the event. The event will be added to, or updated on, your calendar.
Reading and Responding to a Meeting Invitation
If you use a Microsoft Exchange account on your iPad and you have Calendars enabled for Exchange, you can receive and respond to meeting invitations from people in the same organization using the Calendar app.
An invitation appears on your calendar with a dotted line around it, and the Inbox tray icon in the upper-left corner of your screen shows the number of invitations you have.
Follow these steps to reply to an invitation.
![]() LET ME TRY IT
LET ME TRY IT
Reading and Responding to a Meeting Invitation
1. Find the invitation in the calendar, in the Inbox, or in an email message, and tap it.
2. To send an email to the organizer, tap Invitation From. Tap the email address that appears to send a message to the host.
3. To see who’s invited, tap Invitees. Tap a name to see another invitee’s contact information, and tap the email address that appears to send a message.
4. To add comments visible to the meeting organizer, tap Add Comments, and type in your comments. Your comments also appear in the info screen for the meeting. Make sure your comments are suitable to be viewed by everyone present!
5. To set an alert for the meeting, tap Alert, and set an alert as you would for a meeting you create.
6. To respond, tap Accept, Maybe, or Decline.
The response is sent to the meeting organizer, along with any comments you’ve added. If you choose Accept or Maybe, you can change your response later, and change or add comments by tapping Add Comments.
Following Another Person’s Calendar
You can have another person’s calendar entries appear on your calendar. This is useful for coordinating schedules with anyone—a boss, a coworker who you’ve teamed up with on a project, or your significant other or computer-savvy children.
To follow another person’s calendar, it needs to be published in either the Mac’s iCalendar format (file suffix .ics) or a format called CalDAV. Also, the events from the calendar you’re following are read-only. You can read the events, but you can’t edit them. You also can’t create new events in the other person’s calendar, and you can’t accept invitations from CalDAV accounts.
You can publish calendars from several services. Google, Yahoo!, and the Mac’s iCal program all publish in either format. You can also subscribe to iCalendar calendars published in .ics format on the Web. A link to the calendar arrives in an email link; just click it to subscribe to the calendar.
Follow these steps to subscribe to a published calendar.
![]() LET ME TRY IT
LET ME TRY IT
Subscribing to a Published Calendar
1. From the iPad Home screen, choose Settings.
2. Choose Mail, Contacts, Calendars; then tap Add Account.
3. Choose Other; then, choose either Add CalDAV Account, or for iCalendar, Add Subscribed Calendar. (The screen for Add Subscribed Calendar is shown in Figure 9.10.) For Add CalDAV Account, enter the server name, username and password, and the description. For iCalendar, enter the server name and pathname of the calendar file.

Figure 9.10. Subscribe to an iCal calendar by entering its server address in the Subscription screen.
4. Enter the address of the published calendar in the Server box; then tap Next. Your iPad verifies the address and displays the subscription configuration screen.
5. Tap Save. Your iPad creates a new Subscribed Calendar section in the Mail, Contacts, Calendars screen. It adds your subscribed calendar to the new section.
You may want to temporarily remove a subscribed calendar so that it doesn’t clutter up your own. Or you may want to delete it.
Follow these steps to disable or delete a published calendar.
![]() LET ME TRY IT
LET ME TRY IT
Disabling or Deleting a Published Calendar
1. From the iPad Home screen, choose Settings.
2. Choose Mail, Contacts, Calendars; then tap Subscribed Calendars.
3. Tap the calendar. An Account slider to disable the calendar and the Delete Account button appear.
4. To disable the calendar, slide the Account switch to Off.
5. To delete the calendar, tap Delete Account. When the iPad asks you to confirm, tap Delete Account again.