
Surfing the Web on Your iPad
In a recent hit movie, The Adjustment Bureau, the “adjusters” of the title use a kind of magic book to track the progress of individuals’ fates in the sectors for which they’re responsible. The book is alive, changing, and updating as circumstances dictate. That magic book looks an awful lot like an iPad.
Using the Web via touchscreen is somehow more personal and more involving than using it on a personal computer. The large screen of the iPad really brings the Web to life, giving it added breadth and depth. You interact directly with web information and images on your iPad. Using a link by tapping it to bring up the new page feels a bit magical. Panning, zooming, and scrolling are all a lot of fun.
There are also some frustrations with using the Web on the iPad. The iPhone and iPad famously don’t support Flash, a multimedia technology from Adobe that’s used for posting many web videos online, among other purposes. You probably know what Flash is from having it crash when surfing the Web on your personal computer, rendering many videos—and many ads—unusable.
You never have that problem on the iPad because it doesn’t support Flash at all. You either get your video, but delivered via a different technology, which is fine, or you get a message telling you that the video isn’t available.
There are other issues. Some web pages are designed for a laptop widescreen and may force you to scroll horizontally to see the whole page. Or the page may just render badly.
All these problems, though, are being fixed as site developers realize what an important part of their audience iPad and other tablet users make up. YouTube quickly changed its video display technology so that HTML5, which is the main alternative to Flash for video display, is used instead of Flash when an iPad is the client machine. More and more sites are following YouTube’s lead.
All this just keeps decreasing the hassle factor, and supporting the fun factor, of using the web “live” on a touchscreen. I wouldn’t be surprised if the kids of today, many of whom are growing up using iPads, end up considering it odd to use the Web any other way.
Surfing Web Pages
You may well have tried using the Web on a mobile phone—and ended up limiting your mobile web usage in frustration. The small screen of a mobile phone just doesn’t handle the full web very well. Some sites are hard to use, or even unusable on mobile phones. Many site owners have created special, limited versions of their sites for use by phones, but that’s not much fun either.
The iPad is a different story. The screen resolution, 1024 × 768, is a standard computer screen resolution, so most web pages display well on it. (Some pages are designed for laptop widescreens, which are typically 1280 × 1024 and may be wider than the available space on the iPad screen.) Not only that, but the extra room on the iPad’s screen completely changes the experience. Panning and zooming—a grim necessity on small mobile phone screens—is fun on the iPad. The Web feels like it’s at your beck and call.
The following sections of this chapter show you specifically how to use your iPad to navigate web pages. Start by tapping the Safari icon on your iPad Home screen. It’s one of the apps docked at the bottom of the page by default. Figure 10.1 shows the Safari web browser screen and highlights its key features.

Figure 10.1. Get ready to go surfin’ with Safari.
Scrolling a web page is easy—just flick to make the page go in the direction you want. Scrolling up and down is easy and fun; scrolling from side to side is more difficult because it’s hard to keep the context in one’s mind when the horizontal scrolling is used. It’s also hard to read text when each line of the text doesn’t entirely fit on the screen horizontally. To reduce or, in some cases, eliminate side to side scrolling, turn the iPad horizontally, and use it in landscape mode. This gives you a wider view of the page—1024 pixels instead of 768, one-third more.
To zoom in and out, place two fingers—or a thumb and one finger—onscreen. Spread them apart to zoom in, or squeeze them together to zoom out. You can often zoom to the width of a column of text or an image by double-tapping the screen. In most cases, the screen resizes so that the current column of text, or the current image, fills the width of the screen in front of you. (In landscape mode, I can sometime read a web page without my glasses after I zoom in on a column of text this way.)
 SHOW ME Media 10.1—A Quick Tour Through Safari
Access this video file through your registered Web Edition at my.safaribooksonline.com/9780132709590/media or on the DVD for print books.
 TELL ME MORE Media 10.2—Delving into Your Music Syncing Options
Access this audio recording through your registered Web Edition at my.safaribooksonline.com/9780132709590/media or on the DVD for print books.
Entering a Web Page Address
You can enter web addresses directly into Safari, as described here, or use bookmarks, as demonstrated in the next section.
When you start Safari and tap in the address box, your onscreen keyboard changes to a slightly different version designed for entering web page addresses, as shown in Figure 10.2. There’s no spacebar, and you see a key labeled .com and a backslash key. Tap and hold on the .com key, and you see four related keys: .net, .edu, org, and .us, all of which are more or less commonly used in web page addresses. To select one of the alternatives, drag your finger from the .com key to the alternative key you want; then raise your finger.

Figure 10.2. The Safari browser offers a special keyboard for entering web page addresses.
You’re likely to enter many web addresses directly into the address box. Safari uses previously entered addresses to prompt you, making entry easier in many cases.
![]() LET ME TRY IT
LET ME TRY IT
Entering a Web Page Address
1. Tap inside the address box. The search box grabs the cursor; you may need to tap inside the address box twice to get the cursor to go there.
2. If there’s already a web address in the box, tap the X to clear it. The address box clears.
3. Start typing the web address you want. You can usually skip entering www. at the beginning of the web address. If you type characters that are part of web addresses you’ve used before, or part of the name of a page that you’ve used before, Safari displays the web addresses and page names in a list beneath the address box, as shown in Figure 10.3.
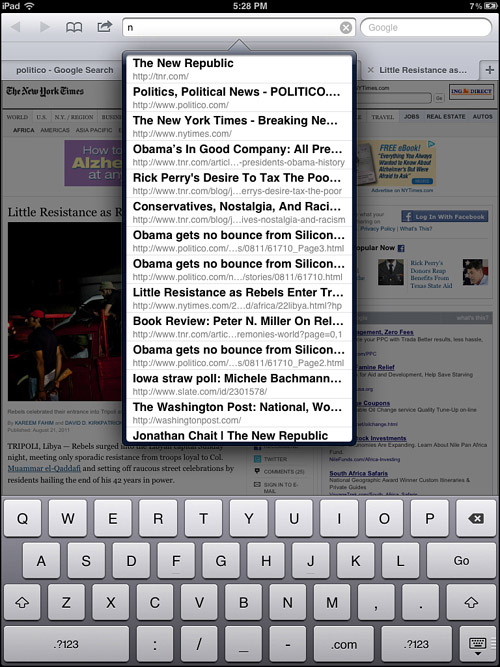
Figure 10.3. Safari helps by prompting you with related addresses you’ve used before.
4. If the web address you want appears in the list beneath the address box, choose it. If not, type the entire address; then tap Go. Your iPad displays the web page.
Using Tabs in Safari
Tabs for the Safari browser on the iPad, as shown in Figure 10.1 and other figures in this chapter, work similarly to tabs on a web browser on a personal computer. Tabs enable you to easily move among different open windows.
One difference between Safari on the iPad and a web browser on a computer, though, is the number of separate browser windows you can have open. Safari on the iPad only allows you to have one open browser window, albeit with as many tabs as you’d like. A web browser on a personal computer allows you to have multiple windows, each with as many tabs as you’d like.
Managing tabs is fairly simple:
• To open a new tab, tap the + button. The new tab opens.
• To close the currently open tab, tap the X in the tab name. The tab closes. (You can re-open it via the History function, described below.)
• To move to a different tab, tap the tab name. The tab opens.
• To move to a previously visited web page within a tab, tap the Back button. To move forward again among your visited tabs, tap the Forward button.
The iPad doesn’t impose a hard limit on the number of tabs you use at once. However, every web page that you keep open takes a certain amount of the iPad’s memory.
At a certain point—which varies depending on the totality of what’s running on your iPad—the iPad’s memory will fill up, and the risk of Safari crashing increases. If Safari crashes, you may or may not lose your tab set, and return to a single tab.
There’s also a practical limit to the number of tabs you want to open because it becomes more and more difficult to identify tabs (from very short labels) and to select a different tab by tapping it (because the label is so small). The practical limit seems to me to be about 10 tabs.
If you’re like me, you might find yourself opening numerous tabs during a session and leaving them open when you get distracted and start doing something else—either on the iPad, or in the rest of your life. You may then feel frustrated, when you return to Safari, to see open tabs whose purpose you’ve forgotten and, frankly, don’t care about.
Using Web Links and Saving Photos
Clicking links accounts for much of the joy of using the Web. Much of the reason it’s called “web surfing” is the free and flexible feeling of moving smoothly from one page to another. It’s always good to have options, though, including when you encounter a web link you want to use. Experienced web users are familiar with right-clicking (or on the Mac, command-clicking) to see a range of options for a web link.
The equivalent to right-clicking the iPad is to tap and hold to see options. One of the options is to open the web page at the other end of the link in a new browser window. When you choose this option, Safari closes the current page temporarily, shows you a graphic with all open pages, and then opens the new page. To return to the previous page, tap the Pages icon; then choose the previous page from among the page images.
Following links, using options, and saving images are described in the following steps.
Using Links in Safari
1. When you see a link, tap and release to follow it without seeing options. The browser window refreshes with the destination page’s contents; in some cases, the link automatically opens in a new window, even if you don’t choose that option. This can be surprising; if you already have nine windows open in Safari, and the new window opening causes you to lose one of the previously open ones, it can be downright frustrating. Google News at news.google.com is an example of a website that always opens links in a new window.
2. Tap and hold a link to see options.
Options appear—usually Open, Open in New Page and Copy as shown in Figure 10.4.

Figure 10.4. Safari gives you options when you tap and hold a link.
The destination URL displays above the options. If the URL doesn’t look like a website that you want to go to, tap Cancel.
3. To open the link as if you had simply tapped it, tap Open. To open the link in a new page, tap that option. To copy the link address for use in another program or another browser window, tap Copy. To return to the page you were visiting, tap Cancel.
Safari opens the new web page—in the same window or another window, depending on what you choose—or copies the web address to its internal clipboard.
If you’ve opened the link in a new page, the Pages icon displays the new number of currently open pages—one more than previously shown.
4. To save an image that appears on a web page, tap and hold on the image. From the options that appear, choose Save Image. The image is saved to the Camera Roll album for your iPad. To view the image, from the Home screen, tap the Photos icon; then tap Camera Roll.
If the image is a link, the destination web address displays in the list of options, just as it does for other links. In this case, you can also open the destination page, open it in a new window, or copy the destination address—not the photo.
5. If you opened the link in a new page and want to return to the previous page, press the Pages icon—the one with a number on it. The currently open pages display, as shown in Figure 10.5.

Figure 10.5. Safari shows you the pages it currently has open.
6. To finish returning to the previous page, or to go to a different page, select it from among the icons on display. The selected page opens in the browser.
Using History and Bookmarks
You can get to previously visited web pages using Safari on your iPad in three ways:
• Predictive prompts: While typing in the address bar, Safari produces a list of recently visited pages that match the characters being typed, as described in the previous section. Either the URL or the page title can provide the match. A few characters is usually enough to retrieve the needed site.
• History: Safari keeps track of pages you’ve visited and when and makes that information available to you in a list under the Bookmarks icon, as shown in Figure 10.6. To access the list, just press the Bookmarks icon, tap the History folder (if it’s not already open from a previous access), and then tap your way to the page you’re looking for. To clear history, tap the Clear History button.

Figure 10.6. To get to your history of visited web pages, begin by tapping the Bookmarks icon; then tap History if needed.
SHOW ME Media 10.3—A History of Your Web Surfing
Access this video file through your registered Web Edition at my.safaribooksonline.com/9780132709590/media or on the DVD for print books.
• Bookmarks: Safari enables you to put bookmarks in a list or in a Bookmarks Bar, as shown in Figure 10.6. To access a bookmark, simply tap it. To edit bookmarks, press the Edit button. Then press the red minus symbol to delete a bookmark, or drag the Towers of Hanoi icon—three stacked disks—to reorder the entries.
The predictive prompts provided in the address bar and the History function are automatic. The next section describes in detail how to add a bookmark and how to synchronize bookmarks with other platforms.
You can also search the web using the search box. Just tap in the search box and enter the search terms you want to use. Google then looks in its index for pages that most closely match the terms you enter, just like on a personal computer; it even recalls recent entries you’ve made (see Figure 10.7).

Figure 10.7. Google search works just as well on the iPad as on a personal computer, opening up the whole Web for you.
Tap and release on a link in the search results to update the current browser window with the destination page. Tap and hold to see alternative actions, which include opening the web page in the current browser window, opening the web page in a new browser window, and copying the link address for use elsewhere.
Adding Bookmarks
Bookmarks save time and hassle. They replace the somewhat laborious process of entering a web address in Safari with a few quick taps. There are two complementary ways to get bookmarks into Safari on your iPad. One way is to import them from your browser on a Macintosh or Windows PC. The other way is to add bookmarks as you go along. Use both techniques to build up your Bookmarks list.
The only browser supported for Windows PCs, at this writing, is Internet Explorer. If you use a different browser, you may want to import its bookmarks into Internet Explorer and then synchronize bookmarks with your iPad. See the online help for IE to see how to do this for your browser.
You can also add and remove bookmarks to make the list suitable for use on your iPad. Then sync from the web browser on the personal computer to Safari on the iPad.
You should also be mindful, though, that you may end up using a different browser than Safari on your iPad. Tabbed browsing, in particular, is natural for use on a touchscreen, and Safari doesn’t have it; other iPad browsers do.
Some other browsers also support Adobe’s Flash technology, such as web pages that use Flash to put video onscreen. You simply can’t see such videos when you use Safari on the iPad; with some other browsers, you can.
There are several good competing web browser apps available in the App Store, and you may fall for one of them. In that case, the work you do to get bookmarks into Safari on your iPad may turn out to be at least partly wasted. However, it’s nice to have any browser seeded with the links from your personal computer, so you might as well just get it done.
Safari makes it easy to add bookmarks, either to a menu-like list under the Bookmarks button or onto a Bookmarks Bar. The Bookmarks Bar shows only when you first open a browser window, however. You can’t use the Bookmarks Bar from a window that you’re already using; you have to open a new window instead.
You can also use the Actions icon, shown previously in Figure 10.1, for several other actions:
• To add a Page icon to the Home screen. A Web Page icon is added to the Home screen, with a name you can edit. This is a convenient feature, especially because you can now put these icons, and app icons, in folders on the Home screen to organize them.
• Mail links to this page. An email message opens with the Subject preset to the name of the page and the contents being the link to the page. Your email address (for the user account currently active on your iPad) is provided as a cc: page.
• You can specify the number of copies to print and which printer to use.
Follow these steps to add a bookmark.
![]() LET ME TRY IT
LET ME TRY IT
Adding a Bookmark in Safari—and More
1. When you reach a web page that you want to save as a bookmark, tap the Actions icon. A list of actions appears, as shown in Figure 10.8.
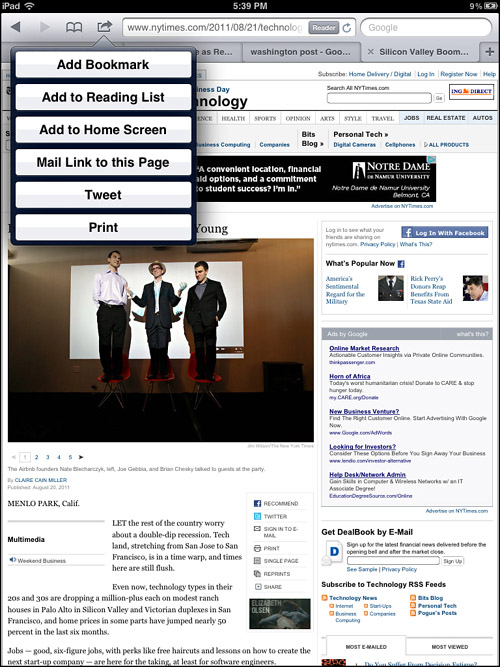
Figure 10.8. You can do several things with an open web page, including adding a bookmark for it.
2. To create a bookmark, tap Add Bookmark.
The Add Bookmark pane appears, as shown in Figure 10.9.

Figure 10.9. You can rename a bookmark before saving it.
3. To rename the bookmark, use the keyboard to enter the new name. Now take a look at the bottom of the Add Bookmark pane, as shown in Figure 10.9. If it says Bookmarks, your bookmark will be saved in the Bookmarks list; if it says Bookmarks Bar, your bookmark will be saved there instead.
The next step tells you how to change where your bookmark will go.
4. If Bookmarks is showing at the bottom of the Add Bookmark page, and you want to put the bookmark into the Bookmarks Bar instead, tap Bookmarks to open the Bookmarks pane; then tap Bookmarks Bar in the pane. If Bookmarks Bar is showing at the bottom of the Add Bookmark page, and you want to put the bookmark into the Bookmarks list instead, tap Bookmarks Bar to open the Bookmarks pane; then tap Bookmarks in the pane. Tap Add Bookmark to return.
This is potentially confusing; many people may end up putting bookmarks in the place where they didn’t want them.
5. Tap Save to add the bookmark.
Synchronizing Bookmarks
You may have an impressive and, more important, useful list of bookmarks on a personal computer. Use these steps to transfer the bookmarks to Safari on your iPad.
Follow these steps to synchronize bookmarks between Safari on a personal computer and Safari on the iPad.
![]() LET ME TRY IT
LET ME TRY IT
Synchronizing Bookmarks in Safari
1. Connect your iPad to your Macintosh or Windows PC.
2. In iTunes, in the sidebar on the left, look for your iPad in the Devices branch. iTunes displays the Summary tab.
3. Click the Info tab. iTunes displays the Info tab, as shown in Figure 10.10.

Figure 10.10. iTunes can sync to many browsers.
4. For a Windows PC, click the Sync Bookmarks With check box to activate it, and then choose your Windows PC web browser from the list that appears. (At this writing, the only browser that appears is Internet Explorer.) For a Mac, click the Sync Safari Bookmarks check box.
5. Click Apply. iTunes synchronizes bookmarks from your computer to Safari on your iPad.
6. When the sync is complete, click the Eject icon next to the name of your iPad in the iTunes Devices list.
Using the Reading List and Reader
Reading is a very popular use of the iPad, and reading from a web browser is made much easier with the Reading List and the Reader.
The Reading List saves a currently open web page into a list that you can manage, much like your list of bookmarks. You can ease the burden of managing tabs by saving pages you want to read in the Reading List, and then using the tab that the page had been occupying for something else.
The Reader simply extracts the text from a web page and presents it in an easily readable format, in which you can increase or decrease the font size. See Figure 10.11 for an example.

Figure 10.11. The Reading List adds a whole new dimension to Safari.
It’s a little odd to use the Reader at first, because you see the page’s content out of context. However, many web pages are so crowded with navigation and/or ads that they’re hard to read, especially on the iPad (because the screen is smaller than most computer screens). Reader can be very useful for breaking free of screen clutter.
![]() LET ME TRY IT
LET ME TRY IT
Using the Reading List and Reader in Safari
1. Open Safari on your iPad.
2. Open a web page.
3. To see the main content of the page in Reader, press the Reader button in Safari’s address bar.
The main content of the page opens.
4. To save the page in your Reading List, press the Action button and choose Add to Reading List.
The page is added to your reading list.
5. To access the Reading List, tap the Bookmarks icon to open it. Tap Reading List.
The Reading List opens, as shown in Figure 10.12.

Figure 10.12. The Reading List gives you access to web content when you’re offline.
6. Tap All to see all Reading List stories. Tap Unread to see unread stories.
7. To open a story, tap its description in the Reading List.
The web page with the story opens.