
Managing Contacts on Your iPad
As you go about your day, you meet new people all the time—and learn new things about people you already know. And you need to reach out, get in touch, or act on some partly remembered detail. The iPad’s Contacts app makes this easy.
The large screen of the iPad makes it quicker to search for a person, scroll through a list of names, or find a phone number or other important piece of information. The iPad is also easy to use for entering new information quickly and conveniently.
Depending on how you set up your email accounts, your contact information may be synchronized with another source based on an email account—whether that’s an Apple mail account, a Microsoft Exchange server, or a webmail application. This makes your iPad into a portable terminal for contacts and related information, such as email and calendaring.
You maintain your contact information through the Contacts app. It’s shown in Figure 8.1. It’s quite similar to an old-fashioned address book, with indented tabs for each letter. The letters are so close together that it’s hard to tap the right one. So the easiest way to get to a specific letter is to run a finger or thumb up and down along the tabs, watching them change.

Figure 8.1. Drag your finger up and down the letters to get the one you want.
Keeping your contact information up to date makes it easier to use email, calendaring, and other tools as well. For example, in email, you can start to type in someone’s actual name; their name and email address appear in a scrolling list that you can pick the right contact from. Similarly, you can tap a person’s address, and it appears in the Maps app, drawing from information in your Contacts. From there, you can easily get directions to or from the location.
You may find performance problems with large contacts lists with a smartphone or with the iPad. Usability for large lists is also better on a computer than it is on an iPad, let alone on a smartphone.
Some people have thousands of contacts, either in their regular contacts list, or in specific places such as LinkedIn. You may need to keep the list of contacts that you sync in the hundreds, rather than the thousands, to get acceptable performance and usability on your smartphone and iPad as well as on a computer.
Take advantage of the iPad’s capabilities to stay on top of, and interact with, the latest information about friends, family, and professional connections.
Synchronizing Contacts
You may have two different sets of contacts: work contacts, which may well be maintained on Microsoft Exchange or Lotus Notes, and personal contacts. Or you may have them all integrated into one big list. It may even be that you’ll create your first online list of contacts now, on your iPad.
In most cases, you want to synchronize your iPad contacts with contacts on other devices. You have several choices:
• Mac OS X: Use the Address Book application on your Mac.
• Windows: Use Outlook or the Windows Contacts app.
• Microsoft Exchange: You may have contacts on an Exchange server, usually at work, with which you want to synchronize.
• Online: You can use Google contacts or Yahoo! contacts. Online contacts are more likely to update seamlessly and automatically, without any effort on your part. This way, you don’t have to explicitly synchronize your iPad to your computer to get updated information from one to the other.
If you don’t yet use any of these, consider moving to one of them, particularly one of the online choices, if possible. By staying in sync, you can have seamless access to contacts across your computer and, with some additional effort, your mobile phone.
You can set up or manage synchronization of contacts using iTunes.
![]() LET ME TRY IT
LET ME TRY IT
Synchronizing Contacts
1. Connect your iPad to your Macintosh or Windows PC. Your iPad appears in the Devices list in iTunes.
2. Click your iPad in the Devices branch. iTunes displays the Summary tab.
3. Click the Info tab. Synchronization information appears.
4. On Windows, click the Sync Contacts With check box to activate it; then use the list to choose your Windows contacts program, such as Outlook. The result is shown in Figure 8.2. On a Mac, activate the Sync Address Book Contacts check box.

Figure 8.2. On Windows, check the Sync Contacts With check box.
5. To sync your entire address book to your iPad, choose All Contacts. To sync selected groups online, choose Selected Groups; then activate the check box for each group you want to include in synchronization.
6. You can choose whether contacts created on your iPad outside of the selected groups are synced to your overall list of contacts. Check the check box with a long name: Add Contacts Created Outside of Groups on This iPad To. Then, from the menu, choose the group you want the contacts to sync to.
7. On a Mac, to sync either Yahoo! Address Book contacts or Google Contacts, check the appropriate box. Then, when prompted, enter your Yahoo! or Google user name and password.
8. Click Apply. iTunes synchronizes contacts between your computer and your iPad.
9. When the sync is complete, to end the synchronization session, click the Eject icon next to the name of your iPad in the iTunes Device list.
Creating a New Contact
Synchronizing contacts, either by direct connection or through cloud services such as Apple, Google, or Yahoo!, is a great way to populate your contacts list on your iPad. Synchronizing can also keep your contacts list refreshed with new contacts that come in from other devices you use.
However, your iPad is also great for picking up new contact information while you’re out and about. The ease of using the iPad, with its large screen, makes getting contact information into the iPad easier. And with ongoing synchronization, the contact information you gather on the iPad can show up on your other devices as well. Your iPad time can thus contribute to your ease and comfort even when you’re using a computer or a mobile phone.
Entering a lot of information through the touchscreen can be a bit of work, so in this chapter, the task is divided into different sections for each type of information. (And hopefully, dividing the task helped you to conquer it.) All sections use the Add Contact screen (refer to Figure 8.1). To reach this screen, open the Contacts app, and then tap the Add icon (+) to open the New Contact screen.

Figure 8.3. In portrait mode, you can see all the Contact fields.

Figure 8.4. In landscape mode, you have access to a big keyboard for typing Contact info.
These steps show you how to start a new contact.
![]() LET ME TRY IT
LET ME TRY IT
Starting a New Contact
1. On the Home screen, tap the Contacts icon. Your iPad launches the Contacts app.
2. Tap inside the First field, and type the contact’s first name. If your contact has a middle name that you want to include, enter it after the first name. (Same for multiple middle names.) For a company entry, leave this field blank.
3. Tap inside the Last field, and type the contact’s last name. For a company entry, leave this field blank.
4. Tap inside the Company field, and type the company name. If you enter a company, leave the First and Last fields blank, and enter this field only.
Adding a Phone Number
The phone field starts with a default value of “mobile” for the type of phone number. Don’t worry if the number you have is not a mobile number; you’ll have an opportunity to change this designation after you enter the actual phone number. These steps show you how to add a phone number to a contact.
![]() LET ME TRY IT
LET ME TRY IT
Adding a Phone Number to a Contact
1. Tap the Phone field.
2. Type the contact’s phone number, or paste it in. You can use a variety of formats, including parentheses around the area code, dashes or no dashes, and so on. The iPad formats the number to its standards. For numbers that require a pause, such as some office extensions, insert a comma for a pause of about 1 second.
As you enter the number, a new field opens up for an additional phone number. The label is different than the label for the current phone number; for instance, if you already specified that you entered a number with the Mobile label, the Contacts app may label the next one Home.
3. Tap the label to the left of the phone number. The default label for the first phone number you enter is Mobile. The Contacts app displays the Label screen, as shown in Figure 8.5. It lists the labels you can assign to the phone number.
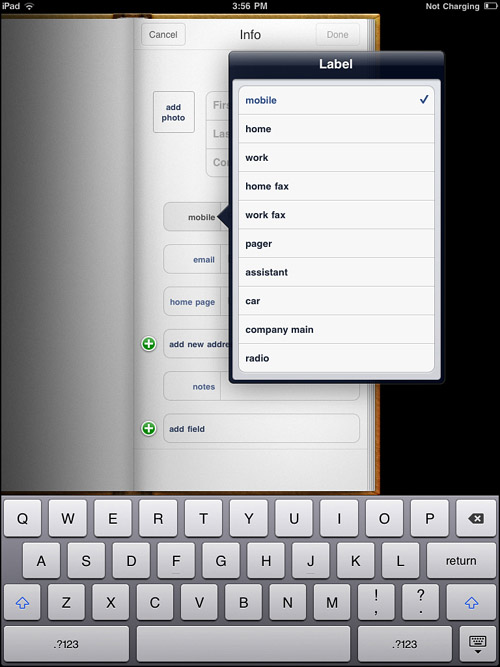
Figure 8.5. You have lots of choices for the type of phone number.
4. To add additional phone numbers, repeat steps 1 through 3 for additional phone numbers. Capture all the phone numbers you can get a hold of at any given point; this gives you much more flexibility to reach out to people later.
 SHOW ME Media 8.1—Understanding the Usefulness of Contact Labels
Access this video file through your registered Web Edition at my.safaribooksonline.com/9780132709590/media or on the DVD for print books.
Adding an Email Address
Note that the email address starts with a default value of “home” for the type of email address. (I’ve found that it might better be labeled “personal” because people enter their personal email addresses from all sorts of places.) Don’t worry if the email address you have is not a home (or personal) email address; you’ll have an opportunity to change this designation after you enter the actual email address.
Following are the steps to add an email address to a contact.
Adding an Email Address to a Contact
1. Tap the Email field.
2. Type the contact’s email address, or paste it in from another source, such as an email message. As you begin to enter the email address, another field opens up for you to type an additional email address.
3. If you want to add an additional email address, repeat steps 1 and 2. Capture all the email addresses you can; this gives you more flexibility to reach out to people later.
Adding a Home Page Address
You can add the address of a person’s Web home page to a contact. This can also be a Facebook page address, Skype designation, or something similar. You can enter multiple Web addresses; as you enter one, a new field opens up for another.
If your contact works at an organization and has a personal home page, you may want to include the personal home page in the person’s contact. Then create a separate contact for the person’s organization, and enter the organizational home page there. Use the Notes field, described in a later section, to tie them together, to refer to one record from the other.
Follow these steps to add a home page address to a contact.
![]() LET ME TRY IT
LET ME TRY IT
Adding a Home Page Address to a Contact
1. Tap the Home page field.
2. Type the contact’s Web address, or paste it in. As you begin to enter the home page address, another field opens up for you to type an additional Web address.
3. If you want to add an additional Web address, repeat steps 1 and 2. As with other information, enter all the Web addresses you can; this gives you more flexibility in reaching out to people later.
Adding a Street Address
In these Internet-oriented times, it can seem like unnecessary work to capture a street address. However, there are times when the address can be valuable. The address is especially useful if you need to use the Maps app to get to, or near, the address as a destination—or if you want to send a holiday card or birthday card.
Following are the steps to add a street address to a contact.
![]() LET ME TRY IT
LET ME TRY IT
Adding a Street Address to a Contact
1. Tap the Plus symbol next to the Add New Address field, or tap directly in the Add New Address field.
The address area opens up: Street, City, State, ZIP, and Country.
2. The type of address defaults to a home address. To change it, tap the word Home. Choices appear: Work and Other. Choose the appropriate label.
3. Tap the Street field, and enter the contact’s street address.
An additional Street field opens up, in case there is additional information for the address. Enter this information, if available.
The Maps app uses the address to plot the location of the contact. Be careful, though, about adding information that the Maps app might not understand, such as the floor of a building that a business or a personal contact is on; it might confuse the app. Consider entering such information in the Notes area instead.
4. If there’s additional addressing information, tap the second Street field and enter the remainder of the contact’s street address.
5. Tap the City field, and enter the city name.
6. Tap the State field, and enter the state or province. For clarity, in the United States, use the official two-letter state code, which you can find online at the United States Postal Service website: http://www.usps.com/ncsc/lookups/usps_abbreviations.html.
7. Tap the ZIP field, and enter the ZIP code or postal code for the contact. You can find both the five-digit ZIP code for an address—and, even better, the ZIP+4 code—online, at the United States Postal Service’s ZIP4 website: http://zip4.usps.com/zip4/.
8. The country name defaults to your home country. To change it, tap the country name; then choose the country name from the scrolling list, as shown in Figure 8.6.

Figure 8.6. Finding your country in the regional lists can be a bit tough.
The country names are grouped by continent or major region, which can be confusing compared to a straight alphabetical list. To help you navigate through the list, the regions, in the order in which they appear in the list, are: Africa (Eastern, Middle, Northern, Southern, and Western); America (Central, North, and South); Asia (Central, Eastern, South-Eastern, Southern, Western); Caribbean; Europe; and Oceania. It’s often difficult to guess which region a country in, say, the middle area of Africa is.
9. As you finish, a new address area opens up. To add another address, repeat steps 1 through 8; enter the type of address, street, city, state, ZIP code, and country.
Your choice of type of address is limited—if you’ve already entered a Home address, for instance, your choices are limited to Work and Other. That is, you can’t enter two home addresses, for example.
When you have a second address up, to change the designation of the first address you entered, you have to change the second address to the value you don’t want to use, change the first address to the needed value, and then change the second address to its needed value.
SHOW ME Media 8.2—Assigning a Photo to a Contact
Access this video file through your registered Web Edition at my.safaribooksonline.com/9780132709590/media or on the DVD for print books.
Adding a Photo
Facebook and other applications have made people very much used to seeing photos next to information from specific people. Some applications find photos automatically, so you don’t have to do anything (unless you don’t like your automatically chosen photo); others enable you to manage it. WordPress blogging software and many other online services use something called a Gravatar, which is a central point for managing your photo or other image to be used across many applications.
On the iPad, though, the process to assign a photo is explicit. After you assign a photo, though, it can be used on your iPhone and Mac, if you have them, and perhaps elsewhere as well.
The iPad enables you to zoom in on part of an existing photo and use the zoomedin portion as the contact photo.
Follow these steps to enter your photo.
![]() LET ME TRY IT
LET ME TRY IT
Adding a Photo to a Contact
1. If it’s not already available, bring the photo you want to use into your iPad. To learn how to do it, see Chapter 15, “Importing and Viewing Photos.”
2. At the top of the New Contact screen, tap Add Photo. A list of available photo albums appears.
3. Tap to choose a photo album. Thumbnails of photos appear.
4. Tap to choose a photo. The photo appears in the Move and Scale screen, as shown in Figure 8.7.

Figure 8.7. When you tap the photo you want for your contact, use the Move and Scale screen to pan to and zoom in on the portion of the image that you want to use.
5. To zoom in, put two fingertips next to each other on the screen; then spread them apart.
6. To zoom back out, put two fingertips spread apart on the screen; then pinch them together.
7. To pan, put a single fingertip on the screen and move it (and the image) around. The image used for your contact is quite small. Therefore, it’s best to zoom in quite closely on the person’s face if you want to recognize it. (Though you might recognize the person from a distinctive position or background as well.)
8. When you’re happy with the image, tap Use. The Contacts app assigns the photo to the contact.
Adding Notes to a Contact
You might often find that you have information associated with a contact that doesn’t actually fit in any of the fields you have. Sometimes, the information is an annotation to existing fields—for instance, you might have noted the hours a friend is usually home next to the address.
In the past, this kind of information would have been a marginal note in your address book, next to the address itself. However, in your Contact information, you can only put the address itself—or you can’t use the address to drive the Maps application and get directions to the person’s house. (This type of problem also comes up when making appointments, as described in the next chapter.)
You can put this additional information, and other comments about the contact, in the Notes field. Get in the habit of adding this kind of extra data whenever you have it. Then, get in the habit of checking your contacts for notes before using them; otherwise, you might miss this kind of valuable additional information.
To add a Note to a contact, simply tap in the Notes field, and type the additional information. You can also type it in another app, such as the Notes app, and copy and paste it into the Notes field.
The Notes area of a contact holds hundreds of characters. However, such a small area displays that it’s hard to use more than a few lines worth of information, as you can see from Figure 8.8. The most you could fit into the Notes area displayed in the Contacts app on your iPad is approximately 250 characters, or approximately 40 words.

Figure 8.8. The Notes field is useful for small chunks of information.
Adding Additional Fields
The iPad Contacts app enables you to add additional fields to a contact, choosing from 11 available fields:
• Prefix: Useful for distinguishing a Miss from a Ms. from a Mrs., adding the Dr. prefix for those with the appropriate qualifications, and so on.
• Phonetic first name: Sometimes you need a reminder of how to say a first name. For instance, I have a friend, Luis, who is “Lewis” to some friends and “Loo-ees” to others. You can add that kind of reminder for yourself here.
• Phonetic last name: Just as some first names need pronunciation reminders, so do some last names. Enter that here.
• Middle: There’s no room for middle names or initials in the fields provided by default, but this can be valuable information. For instance, because my name is Bud E. Smith, to distinguish me from a few other Bud Smiths out there, I like having room for the middle initial.
• Suffix: You can specify whether someone is a Jr. or Sr., add an academic qualification such as an MBA, or add professional certifications here.
• Nickname: Again, very useful, if only to help you remember that your company’s new CEO was known as “Poochie” in her college days.
• Job Title: Useful for all sorts of contacts.
• Department: In big companies in particular, having the department a person works in can be a big deal. (“Do you mean the Bud Smith in accounting, the one in sales, or ...?”)
• Twitter: The contact’s Twitter handle. Apple may increase the integration of its products with Twitter over time, so start capturing Twitter handles or your contacts wherever possible.
• Profile: The contact’s social media contact name; choose from among Facebook (the default), Flickr, LinkedIn, Myspace, or a custom service. For a custom service, you type the name of the service as the field name, and then the contact’s name on that service.
• Instant message: Enter an IM address. This field enables you to change the label among AIM, Yahoo! Messenger, MSN Messenger, ICQ, and Jabber. (For a Skype or similar address not listed here, use the Notes field so that you can label it properly.)
• Birthday: A great thing to be reminded of when it rolls around.
• Date: When you tap this, you’re asked to enter a date under the heading, Anniversary. You can use it to enter other dates, too. For bonus points, make a note as to what the date is for in the Note field.
• Related People: Add the names of relatives—mother (the default), father, parent, brother, sister, child, friend, spouse, partner, assistant, manager, other, or a custom label. For a custom label, you type the label name, then the field. Perfect for today’s complicated family situations!
Follow these steps to use the Add Field area.
![]() LET ME TRY IT
LET ME TRY IT
Adding Other Fields to a Contact
1. Tap in the Add Field area, or the + symbol next to it. The Contacts app displays the Add Field screen with the extra fields just described: name-related fields Prefix, Phonetic First Name, Phonetic Last Name, Middle, Suffix, and Nickname; jobs-related fields Job Title and Department; and Instant Message, Birthday, and Date.
2. Tap the field you want to add. The field appears in the relevant part of the Add Contact screen; for instance, if you tap Middle, the Middle field appears between First (name) and Last (name).
3. Tap in the new field, and enter the data for it.
4. For the IM field, tap the service name AIM to choose from among AIM, Yahoo! Messenger, MSN Messenger, ICQ, and Jabber.
5. To add additional fields, repeat steps 1 through 4 for each field.
Completing the New Contact
After you populate all the existing fields, create notes, and add those fields you deem relevant, it’s time to complete the contact.
Follow these steps to complete the new contact.
![]() LET ME TRY IT
LET ME TRY IT
Completing the New Contact
1. Check the data you’ve entered carefully. If the data is accurate, and formatted correctly, you can reuse it for many purposes. For instance, you can use address information in the Maps app on the iPad, and you can use phone number information to complete calls from a mobile phone.
2. Tap the Done button at the top of the screen to save the information or Cancel to delete it. You return to the All Contacts screen.
Editing a Contact
You can get contact information into your iPad in a number of ways—by syncing via a physical connection to your computer, by having information pushed over the Internet, and by creating contacts yourself.
The real art of having useful contacts, however, is to keep correcting, updating, and adding to them as you pick up new information. This way, your iPad and other electronic systems become a truly useful support system. Your iPad can be a bit like the royal aide who whispers guest’s names in the monarch’s ear at a diplomatic function!
These steps allow you to edit a contact.
SHOW ME Media 8.3—Creating a Contact
Access this video file through your registered Web Edition at my.safaribooksonline.com/9780132709590/media or on the DVD for print books.
![]() LET ME TRY IT
LET ME TRY IT
Editing a Contact
1. On the Home screen, tap the Contacts icon. Your iPad launches the Contacts app.
2. Use the alphabetical tabs on the left to move quickly to your contact. Or if it’s enabled for your contacts, use the Groups ribbon.
3. Tap the Contact you want to edit; then tap the Edit button.
The Contacts app opens on the Info screen, as shown in Figure 8.9

Figure 8.9. Display the contact you want; then tap Edit to open it for editing.
4. To change existing data, tap the data inside the field. Tap the X button that appears to clear the field, or edit the contents.
5. To add data in an empty field, tap inside the field and type the new data.
6. To remove a field, tap the red Delete icon to the left of the field; then tap the Delete button that appears.
7. To add a new field, see Adding Other Fields to a Contact in the previous section.
8. Tap the Done button at the top of the screen to save the information, or Cancel to delete it. You return to the All Contacts screen, with the contact you just edited selected and highlighted.
Deleting a Contact
Getting rid of contacts makes it easier to navigate your contacts list, shortens the list of names that appears when you enter an email address in the Mail list, and so on. So consider deleting contacts when you can.
These steps allow you to delete a contact.
![]() LET ME TRY IT
LET ME TRY IT
Deleting a Contact
1. On the Home screen, tap the Contacts icon. Your iPad launches the Contacts app.
2. Use the alphabetical tabs on the left to move quickly to the contact you want to remove. Or if it’s enabled for your contacts, use the Groups ribbon.
3. Tap the Contact you want to edit; then tap the Edit button. The Contacts app opens on the Info screen for that contact.
4. Tap the Delete Contact button at the bottom of the Info screen. (You may have to scroll down to see it.) The Contacts app displays a dialog asking you to delete the contact, or cancel the operation, as shown in Figure 8.10.

Figure 8.10. In today’s world, it’s deleting that’s such sweet sorrow.
5. Tap Delete to remove the contact. The Contacts app removes the contact. There is no Undo function for deleted contacts.