
Customizing Your iPad
One of the advantages of using the iPad is its utter simplicity in so many operations. The iPad is “locked down”—not subject to change—to a much greater extent than a personal computer.
However, you may want to make some useful changes. You have your own way to get things done, and you can customize your iPad in several ways to fit your needs. For instance, you not only can move icons around on the Home screen, but you can also create folders and arrange apps into them. You can also change the screen brightness, which is a near-necessity because the brightness level around you changes while you use your iPad.
You can use the customization tools described here to change and improve the way your iPad works for you. This chapter shows you how to use a “top ten” of customization changes for your iPad.
Customizing the Home Screen
The iPad is different from a personal computer in one important way: There are no overlapping windows. Each app you use completely takes over the screen. So the iPad’s Home screen is very, very important. You’re likely to find yourself frequently returning to the Home screen to start a new app.
The Home screen is more than one screen of content. It’s made up of six panes, each the size of a full screen, which can hold app icons and folders. Each screen can hold up to 20 icons, with a mix of app icons and folders that can each hold many apps. See Figure 18.1 for an example of one pane.

Figure 18.1. The Home screen uses up to six panes, with up to 20 icons each.
 SHOW ME Media 18.1—Working with Panes on the Home Screen
Access this video file through your registered Web Edition at my.safaribooksonline.com/9780132709590/media or on the DVD for print books.
When you press the Home button, you go to the first pane. Swipe the screen to see the next pane to the right, and keep going for up to six panes that are available for app icons and folders.
Every pane shows the Dock, which is populated with four icons when you first get your iPad. (These icons do not also show up on the other part of the Home screen.)
You have three options for customizing the Home screen:
• Move icons around to different panes.
• Create folders and move icons into and out of folders.
• Move icons and folders to and from the Dock that’s available at the bottom of each pane of the Home screen.
Arranging your icons and folders on the Home screen is a challenge because you want two contradictory things: You want to keep tweaking the layout so that it works for how you want to use it differently over time; and you want a layout that doesn’t change much so that you can develop muscle memory for often-repeated tasks. Keep in mind that a given task can involve using more than one app, such as checking your email and social media apps when you first turn on your iPad in the morning.
So try to put some up-front thought into creating a layout that works for you, and that you can add to over time, without wholesale changes. Start with the Dock. If you can put your six most frequently used apps in the Dock, in a sensible order, you can get to them without much thought.
Then concentrate on the first pane of your Home screen. Put more frequently used apps there, again in a sensible order. You can use folders if you’d like.
Use the remaining panes in a lot of different ways. You can devote panes to themes such as news or sports, depending on your interests. You can do the same thing with folders. Remember that the fewer panes you use, the less swiping around you have to do to find something.
You might find the process to be fun. Following is a detailed description of how to get icons into the Dock; how to move icons around onscreen; and how to create a folder and move icons into it.
Follow these steps to put an icon in the Dock that appears at the bottom of each pane of the Home screen.
![]() LET ME TRY IT
LET ME TRY IT
Putting an Icon in the Dock
1. From the Home screen, swipe to bring up the pane with the icon that you want to put in the Dock.
2. With the desired icon in view, tap and hold any icon until it starts to shimmy. All the icons shimmy. An X appears on each icon that you can delete; don’t touch any of the Xs unless you mean to.
3. If there are already six icons in the Dock, drag one out of the Dock onto a pane of the Home screen. This opens up an empty space in the Dock.
4. Drag the desired icon into any desired position in the Dock, as shown in Figure 18.2. Other icons move around to accommodate the new one.
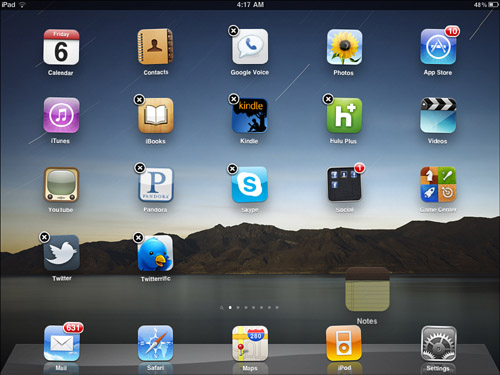
Figure 18.2. If there’s room, the Dock icons shift to accept another icon in the Dock.
5. Drag the other icons in the Dock around if needed to put them in the desired order.
6. Press the Home button to return the icons to normal status.
The next set of steps enable you to move an icon—either an app icon or a folder icon—around on the Home screen, including from one pane to another.
SHOW ME Media 18.2—Putting Icons in the Dock
Access this video file through your registered Web Edition at my.safaribooksonline.com/9780132709590/media or on the DVD for print books.
![]() LET ME TRY IT
LET ME TRY IT
Moving Icons Around on the Home Screen
1. From the Home screen, swipe to bring up the pane with the icon that you want to move. You may also want to check the pane or folder that you want to move the icon into to make sure there’s room.
2. With the desired icon in view, tap and hold any icon until it starts to shimmy. All the icons shimmy. An X appears on each icon that you can delete; don’t touch any of the Xs unless you mean to.
3. To move the icon on the same pane, drag it to the desired spot. Other icons shift to make room for the icon that you’re moving.
4. To move the icon to a different pane, drag it to the right or left edge of the current pane—in the direction you want to move the icon. The next pane over on that side replaces the current pane.
5. Continue dragging the icon to the edge of a pane until you reach the pane you want.
6. Place the icon in the desired position in the pane and, if desired, in the folder you want.
7. Press the Home button to return the icons to normal status.
Folders on the iPad home screen are not created in the same way they would be on a personal computer, such as pressing on an empty square to see a New command, or some similar approach. Instead, you create a folder by dragging the icon of one app onto another. Your iPad creates a folder with both icons in it, gives it a name, and gives you the opportunity to rename the folder.
If you want a folder with just one icon in it, create a folder with two icons; then drag one of them out.
Following are the steps to create a folder.
![]() LET ME TRY IT
LET ME TRY IT
Creating a Folder
1. From the Home screen, swipe to bring up the pane with the icon that you want to use to create a folder.
2. With the desired icon in view, tap and hold any icon until it starts to shimmy. All the icons shimmy. An X appears on each icon that you can delete; don’t touch any of the Xs unless you mean to.
3. Drag the icon that you want to put in a folder over another icon. Your iPod creates a folder.
4. Release the icon. A folder is created with the two icons in it, as shown in Figure 18.3. Your iPad gives the folder a name according to the category that the app you’re dragging belongs to.

Figure 18.3. Dragging one icon over another creates a folder.
5. To rename the folder, tap on the text box with the folder name to bring up the onscreen keyboard. Enter the new name.
6. If you want to remove an icon from the folder, drag it out. You can remove one icon from a folder that has the original two icons in it. But if you also drag the last icon out, the folder disappears.
7. Tap the folder to close it.
8. Drag additional icons into the folder if you’d like.
9. Press the Home button to return the icons to normal status.
Managing iCloud Settings
You and your iPad have access to iCloud, which provides two major functions:
• Synchronization among zero, one, or more Macintosh computers and one or more iOS devices—iPads, iPhones, and iPod Touch devices on which you access an iCloud account.
• Backup for one or more devices, providing 5GB of free storage for your iPad data. Your iPad has at least 16GB of storage, so you will probably have to be selective in what you back up—or just buy extra iCloud storage and back up more of your data.
To manage use of iCloud on your iPad, you make two sets of choices:
• Which apps and functions to synchronize
• Which apps and functions to back up
Synchronizing and Backing Up in iCloud
Follow these steps to choose which apps to synchronize and which apps to back up:
1. From the Home screen, tap Settings. The Settings app opens.
2. Tap iCloud. The iCloud Settings screen opens, as shown in Figure 18.4.

Figure 18.4. Start by choosing which apps to synchronize in iPad.
3. For each app or function displayed, use the slider to turn synchronization on or off. You might choose to synchronize your calendars across devices, for instance, but not your photos.
4. To set storage and backup options, tap the tab Storage & Backup. The Storage & Backup screen appears.
5. Tap Manage Storage to manage apps. The Manage Storage screen appears.
6. Tap the name of your iPad, labeled This iPad. The Info screen appears, as shown in Figure 18.5.

Figure 18.5. Choose which apps to back up in iCloud.
7. For each app, use the slider to back it up in iCloud or not. Tap Show All Apps to show more apps and continue choosing which apps to back up in iCloud.
8. When you’re finished, you can exit the iCloud Settings.
9. You can back up immediately by returning to the Storage & Backup screen, ensuring you have Wi-Fi access, and tapping the button, Back Up Now. Your iPad will automatically back up when it’s locked and connected to a power source and Wi-Fi.
Putting the iPad in Airplane Mode
Your iPad has several antennas that constantly scan for different types of signals. A Wi-Fi-only iPad has a Bluetooth antenna and one for Wi-Fi connections. A Wi-Fi+3G iPad adds a 3G cellular antenna and a GPS antenna for getting your location.
When you take a plane trip, airline personnel ask you to completely turn off all electronic devices on take-off and landing. Turning off the iPad turns off all the antennas. When you are allowed to turn your iPad back on, though, during a flight, you still need to turn all the antennas off.
To quickly turn off antennas, your iPad provides airplane mode. Use airplane mode to operate your iPad safely while in flight.
Follow these steps to put your iPad in airplane mode.
![]() LET ME TRY IT
LET ME TRY IT
Putting an iPad in Airplane Mode
1. From the Home screen, tap Settings. The Settings app opens.
2. Drag the slider to move the Airplane Mode switch to On. Your iPad disables all antennas and displays an Airplane icon in the upper left of the status bar, as shown in Figure 18.6.
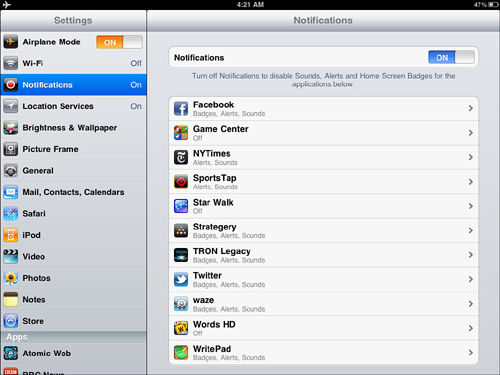
Figure 18.6. Your iPad shows an Airplane icon to remind you that the Airplane Mode switch is on.
 TELL ME MORE Media 18.3—Using a Passcode
Access this audio recording through your registered Web Edition at my.safaribooksonline.com/9780132709590/media or on the DVD for print books.
Using a Passcode Lock
A passcode lock helps protect you from illicit use of your iPad by others when someone gains access to your iPad, either by borrowing it or by theft. Anyone can turn an iPad on and use it if it’s not protected by a passcode lock. Using the passcode lock protects your data, such as your personal email, and prevents people from, for instance, making online purchases with stored passwords and credit card numbers.
You can enter a simple passcode of four digits, like a bank ATM PIN number, or a more complex one:
• Simple passcode: A four-digit code that could be vulnerable, with “only” 10,000 possibilities. If it’s the same passcode you use for other purposes or is a birthday or something else that could be guessed, it’s particularly vulnerable.
• Complex passcode: A longer combination of letters, numbers, and symbols, with millions of possibilities. To get the highest passcode strength, combine lowercase letters, uppercase letters, numbers, and symbols. (Yes, this requires you to switch among different onscreen keyboards to enter your passcode!)
Follow these steps to equip your iPad with a simple or complex passcode.
Protecting Your iPad with a Passcode Lock
1. From the Home screen, tap Settings. The Settings app opens.
2. Tap Passcode Lock. The Settings app displays the Passcode Lock screen.
3. If you want to enter a complex passcode, drag the Simple Passcode slider in the middle of the screen to Off. Your iPad now enables you to enter a complex passcode.
4. Make sure to review the previous step—then, tap the Turn Passcode On button. Your iPad prompts you to enter a passcode. The entry screen for a complex passcode is shown in Figure 18.7.

Figure 18.7. Enter a complex or simple passcode, as your needs dictate.
5. Carefully tap your passcode. If you enter a complex passcode, tap Next. For a simple passcode, enter four digits. For a complex passcode, consider combining lowercase letters, uppercase letters, numbers, and symbols. Your iPad displays the passcode as dots, so be sure you know, and remember, what characters you enter.
7. If you enter a complex passcode, tap Done. Your iPad is now passcode-protected. Make sure you don’t forget your passcode!
Turning on Parental Restrictions
The iPad comes equipped with the capability to use a set of parental restrictions that manage what kind of apps and content people of different ages can access. These restrictions can block some risqué content; however, they are not fully reliable, so you should use other tactics besides parental restrictions to manage what younger people who use your iPad can use it for.
Parental restrictions work with software and content that has an age restriction. When software developers send their apps to Apple for review, they must include a parental restriction rating. Apple must approve the suggested rating before the app can go in the App Store. So software ratings are fairly strong.
However, web pages are often not rated. So a web browser, such as the Safari app built into the iPad, can easily be used to access risqué content and related functionality. Email, Facebook, and Twitter are other avenues for risqué content.
There is a lot of protection built in. You can manage the following:
• Apps: Restrictions apply to Safari, YouTube, iTunes, Ping (the Apple social network for iTunes), and whether apps can be installed or deleted.
• Location Services: You can turn off location services for apps that use them, such as Maps and Safari.
• Accounts: You can disallow the addition, deletion, or modification of accounts.
• In-App Purchases: You can turn off the ability to make in-app purchases. This can be a good idea; some apps encourage the spending of up to hundreds of dollars in a single session.
• Country settings: You can set the country whose standards are used for ratings.
• Explicit ratings: You can disallow music and podcasts with an Explicit rating.
• Movies: You can allow or disallow movies based on their ratings—for instance, the Motion Picture Association of America (MPAA) rating in the United States: G, PG, PG-13, R, or NC-17.
• TV shows: You can allow or disallow TV shows based on their rating as well; for the United States, ratings are similar to MPAA ratings.
• Apps: You can allow or disallow apps based on their ratings: 4+, 9+, 12+, or 17+.
• Game Center: You can allow or disallow multiplayer games or adding friends.
So, if you need to protect a younger user from dubious content, do use parental restrictions. Be prepared, however, to do what you can to manage and monitor usage in additional ways as well.
Follow these steps to activate parental restrictions for your iPad.
![]() LET ME TRY IT
LET ME TRY IT
Activating Parental Restrictions
1. From the Home screen, tap Settings, and then tap General. The Settings app displays the General screen.
2. Tap Restrictions. The Restrictions page appears, as shown in Figure 18.8.

Figure 18.8. Use parental restrictions to help manage apps and content.
3. Tap Enable Restrictions. The Settings app displays the Set Passcode screen.
4. Enter the four-digit passcode, as described previously in this chapter; then retype the code. The Settings app returns to the Restrictions screen and turns all controls to On, including Safari, YouTube, and others.
5. To disable restrictions where there’s a slider, drag the slider to Off. Sliders control settings for Safari, YouTube, iTunes, Ping, installing and deleting apps, in-app purchases, and Game Center.
6. Tap the Location and Accounts buttons and use the submenus to disable restrictions for location services (for each app that uses them) and for accounts.
Built-in apps that use locations services include Maps and Safari. Many third-party apps use location services, including Facebook.
7. Tap the Ratings For button to change the country whose ratings standards will be used.
8. Tap the Music & Podcasts button to allow or disallow content rated Explicit.
9. Tap the Movies, TV Shows, and Apps buttons to set ratings for each type of functionality. Tap to set the rating to the highest level you want to allow, as shown (for Movies) in Figure 18.9.

Figure 18.9. Set ratings for Movies and other types of content.
The default settings are to allow all movies, TV shows, and apps, so change these settings if you want to have any kind of restrictions in place.
Customizing the Wallpaper
Wallpaper is the name for the images that appear in the background for your Home screen and Lock screen. The iPad comes with two rather nice images in place, but you can choose from a total of 30 images that are provided with your iPad, or use your own.
Follow these steps to change the wallpaper for your iPad’s Home screen and Lock screen.
![]() LET ME TRY IT
LET ME TRY IT
Changing the iPad’s Wallpaper
1. From the Home screen, tap Settings; then tap Brightness & Wallpaper. The Brightness slider and a button showing the current wallpaper for the Home and Lock screens display.
2. Press the Wallpaper button. A set of containers for images appears, as shown in Figure 18.10: The 30 images that come with your iPad, images you’ve saved with screen captures or images downloaded as email attachments, and images you’ve imported from your personal computer.

Figure 18.10. You can choose from any image stored on your iPad for wallpaper.
3. Find the image you like and tap it. The image enlarges to fill the screen, and buttons appear for various options, as shown in Figure 18.11.

Figure 18.11. The iPad gives you options for the image you choose.
4. To use the chosen image for the Lock Screen, tap Set Lock Screen. To use it for the Home Screen, tap Set Home Screen. To use the same image for the Lock Screen and Home Screen, tap Set Both. To go to a different image, press Cancel. The image is used as indicated by the button you choose.
5. To check how an image looks on the Home screen, press the Home button. To check how an image looks on the Lock screen, press the Sleep/Wake switch to put your iPad to sleep; then press the Sleep/Wake switch again to wake your iPad. To return to the Wallpaper setting, double-press the Home button, choose Settings, Wallpaper.
6. Continue reviewing images and assigning them to the Lock Screen and/or Home Screen until you’re happy with the results.
Changing the Screen Brightness
Apple tends to tightly control the interfaces of its consumer electronics devices, such as the iPod Touch, iPhone, and iPad. It takes strong steps to make things simple. Most of the choices Apple makes are admirable; almost all are defensible.
One choice, though, that I have a hard time with is the lack of a physical screen brightness adjustment. The only screen brightness control is a software adjustment in Settings. It’s not obvious what an ideal screen brightness control would look like. However, I find the lack of one a real pain.
It’s a hassle to leave what you’re doing on the iPad to change the brightness—especially as the desired brightness can change with a cloud passing in front of the sun or as you move from one app to another. A few apps have in-app brightness controls to make up for this, but that just adds inconsistency and confusion.
Making it worse, some apps don’t remember exactly where you were when you leave the app to do something else. There’s a game that I play, Civilization Revolution, that loses the last couple of moves I make when I leave it to do something else. So I have to save and reload the game each time I want to change brightness.
The iPad does have an automatic brightness adjustment setting that uses the ambient light setting on the iPad to change the brightness. Although this is a viable option, it’s often noticeably different from what I want at a given time.
If you, too, don’t like to use the automatic brightness adjustment—at least not all the time—then you want to get good at changing the screen brightness in Settings, as described here.
Follow these steps to change the screen brightness for your iPad.
Changing the Screen Brightness
1. From the Home screen, tap Settings; then tap Brightness & Wallpaper. The Brightness slider and a button showing the current wallpaper for the Home and Lock screens display.
2. To change the screen brightness, drag the slider left to dim the screen or right to brighten it.
3. To let your iPad change the screen brightness automatically, using the ambient light sensor, drag the Auto-Brightness slider to On. To have the brightness slider completely control the screen brightness, drag the Auto-Brightness slider to Off.
Turning iPad System Sounds On and Off
The iPad doesn’t enable you to use custom sounds for various system functions. It does enable you to turn sounds for these functions on or off and set the volume:
• New Mail
• Sent Mail
• Calendar Alerts
• Lock Sounds
• Keyboard Clicks
By default, all sounds except keyboard clicks are set to Off.
Follow these steps to turn system sounds on and off for your iPad, to preview each sound, and to set the volume for all sounds.
![]() LET ME TRY IT
LET ME TRY IT
Turning System Sounds On and Off
1. From the Home screen, tap Settings; then tap General.
2. Tap the button, Sounds. Sounds options appear, as shown in Figure 18.12.

Figure 18.12. You can turn on sounds for specific alerts and actions.
3. Drag the slider to turn sounds on and off for new mail, sent mail, calendar alerts, lock sounds, and keyboard clicks. As you drag a slider to On, the sound clip used for that system function plays, as a preview. By default, only the sound for keyboard clicks is turned on.
4. To set the volume setting for all the sounds, drag the volume slider left (for quieter sound) or right (for louder sound).
You can’t set the volume separately for different sounds—all the sounds that you activate are controlled by a single volume setting.
Adding Keyboards and Changing Settings
Lots of people complain about the iPad’s onscreen keyboard at first, and many buy a physical keyboard to speed text entry. However, most people grow accustomed to the onscreen keyboard quickly, and many of those physical keyboards end up going more or less unused.
There are two entirely different sets of keyboard options for the iPad, which are, perhaps unfortunately, combined in one group of settings. The first controls how much the keyboard interferes with the exact characters you type. These settings include the following:
• Auto-Capitalization: The iPad can capitalize the first letter of a new sentence for you automatically, unless you turn the option off.
• Auto-Correction: The iPad can fix your mistakes, but can also convert many unusual but correct words, acronyms, and so on into whatever it “thinks” you should be typing. Again, you can turn this off.
• Check Spelling: The iPad can check your spelling, helping you sometimes and just being dense others, unless you turn the option off.
• Enable Caps Lock: The iPad has a caps lock key, but for some reason it’s turned off by default when you get a new iPad. Come to this screen to turn it on.
• “.” Shortcut: This is one of the more useful shortcuts—if you type two spaces, the iPad inserts a period, adds a single space after, and automatically capitalizes the next letter. This is a quick and easy shortcut for starting new sentences, but you can turn it off.
• Software Keyboard Layouts: Somewhat “hidden” in the international keyboard settings, you can change between options such as the standard QWERTY layout and alternatives, the AZERTY and QWERTZ layouts. (These alternative layouts are said to allow for faster typing and lower odds of injury.)
• Hardware Keyboard Layouts: To use a distinctive hardware keyboard with your iPad, you can choose from among United States, Dvorak, U.S. International/PC, U.S. Extended, and British and other language-related options.
Along with these specific settings, your iPad also enables you to stack up several “live” keyboards for various languages and then switch easily among them.
One of the interesting things about the iPad is that it’s actually one of the easiest ways around to work with the various character sets for different languages, especially if you need to mix and match different keyboards. Using different physical and/or virtual keyboards on a personal computer can be a pain, and the system can get confused about what characters should be generated at any given time. The iPad makes it easy.
The iPad, at this writing, supports 54 keyboards, with eight varieties of Chinese, three of French, and so on. If you’ve ever struggled with multiple character sets, you might find the iPad a dream come true.
You can add a bunch of keyboards and switch among them easily. The iPad never gets confused about what characters should show up when you tap a key. It’s fun and easy.
The iPad also has settings for each different type of keyboard—again, with lots of options and a great deal of flexibility.
This section explains how to change the settings for a keyboard, using the U.S. English-language QWERTY keyboard as an example. It also demonstrates how to add additional keyboards that you can then easily switch among. The steps are similar for whichever keyboard(s) you choose.
Follow these steps to change keyboard settings.
![]() LET ME TRY IT
LET ME TRY IT
Changing Keyboard Settings
1. From the Home screen, tap Settings; then tap General.
2. Tap Keyboard. Keyboard options appear, as shown in Figure 18.13.

Figure 18.13. The iPad gives you lots of keyboard control.
3. Drag the sliders to turn typing-related features on and off, such as auto-capitalization, auto-correction, spell check, caps lock, and the end of sentence shortcut.
4. To change additional settings for your current keyboard or to add international keyboards, tap the International Keyboards button.
5. To change options for your default keyboard, tap the applicable button—in the United States and many other countries, the button is labeled English. Software and hardware options appear, as shown in Figure 18.14.

Figure 18.14. Software and hardware options help you do even more.
6. Tap to choose a software keyboard layout. Press the Keyboards button when finished with software and hardware keyboard layouts.
Choose the most-used keyboard layout, QWERTY, or alternatives AZERTY or QWERTZ.
7. Tap to choose a hardware keyboard layout. Press the Keyboards button when finished with software and hardware keyboard layouts.
If you associate a hardware keyboard to your iPad, use this option to tell the iPad what kind of hardware keyboard you use. Supported options should work well with the iPad.
8. To add a keyboard, tap Add New Keyboard. New keyboards appear, as shown in Figure 18.15.

Figure 18.15. Your iPad gives you lots of international options.
Any keyboards you add are available at a button-press when you enter text with your iPad.
9. Tap the keyboard you want to add. The keyboard is added to your list of available keyboards.
10. To configure the keyboard, tap it to see the available options. Choose the Software Keyboard Layout and Hardware Keyboard Layout, repeating steps 5 through 7 for the new keyboard. The options for the additional keyboard are set.
11. To remove or re-order keyboards, press Edit. The edit screen appears.
12. To delete a keyboard from the list, tap the minus (–) key; then tap Delete to confirm. To re-order keyboards, drag the Towers of Hanoi icon on the right up and down. The keyboard list changes.
13. When finished, tap Done. Deleted keyboards are removed, and keyboards are re-ordered as specified.
Sleep Setting
Your iPad uses only a minimal amount of power when in sleep mode. You can put your iPad into sleep mode at any time by pressing the Sleep/Wake button.
Your iPad can also be set to go to sleep automatically after a certain period of time. I recommend that you set it to go to sleep after 15 minutes, the maximum amount of time you can choose without turning auto-lock off entirely.
With a setting of 15 minutes, your iPad doesn’t go to sleep “too fast,” but it doesn’t stay on endlessly, running down battery power when you’re not using it.
Follow these steps to change sleep settings.
![]() LET ME TRY IT
LET ME TRY IT
Changing Your iPad’s Sleep Setting
1. From the Home screen, tap Settings; then tap General.
2. Tap Auto-Lock. Auto-Lock options appear, as shown in Figure 18.16.

Figure 18.16. It’s easier to control your iPad’s sleep than your own!
3. Tap to choose the Auto-Lock interval, such as 15 minutes.