
21. Using Word on the Internet
Whatever would we do without the Internet? Sit around and awkwardly look at each other, I guess. At least that’s what we used to do before we had the Web, smartphones, tablets, and laptops as weightless as balloons. Thankfully, we don’t have to do that anymore—we can explore all that cyberspace has to offer, or at least in this chapter, all that it has to offer regarding Microsoft Word. As our grand finale chapter, we’ll specifically explore how you can integrate Word with the Internet.
Some of Word’s components require an online connection, as you have seen so far, so you’re already aware of what sort of connectivity is involved. As long as you have an Internet connection, you can fully tap into Word’s features and take it beyond the scope of just an ordinary word processing program. In this last chapter, I’ll show you how to email documents, insert links to web pages, and put the power of the cloud to work for you.
Emailing Documents
Word has some awesome emailing options for your documents. In the previous chapter, you learned how to share a file with other users for reviewing by saving it to your SkyDrive account—also known as the cloud—and invited others to access the file. You can also send the document directly to a person using your email account, including files you want reviewed. If you’re using Microsoft Outlook or another MAPI-compliant email program (Messaging Application Programming Interface, in case you wanted to know what it really meant) you can summon the application for addressing and sending the email when ready. Word helps you out by opening a message window and attaching the document for you. All you have to do is add the recipient’s email address, a subject line, and any message body text.
You can access the emailing features through the Share screen, shown in Figure 21.1. When emailing a file, you can decide upon one of the following options:
• Send as Attachment—Does just as its name implies, this option sends the document as a file attachment.
• Send a Link—Rather than email the entire document, save it in a shared folder on your SkyDrive account and email a link instead. Users can click the link to access the file. This command isn’t operable unless you’re viewing a document on SkyDrive or another shared location online.
• Send as PDF—If you’re worried the person you’re emailing to can’t work with a document file from Word, send it as a PDF file instead. Most users can read a PDF file. This feature is also useful if you don’t want the recipient to be able to change the document or see any of its background details. (Maybe you don’t want to share the knowledge of your awesome table-creation skills.)
• Send as XPS—Like the PDF format, XPS is another file format you can assign (it stands for XML Paper Specification, a file format similar to PDF).
• Send as Internet Fax—Use this option to send the document as a fax to a fax service provider (usually for a fee), who handles it much like regular faxing except you don’t need a fax machine. The end user’s fax machine receives the document as a fax. You’ll need to sign up with a fax service provider first before you can use this option fully.
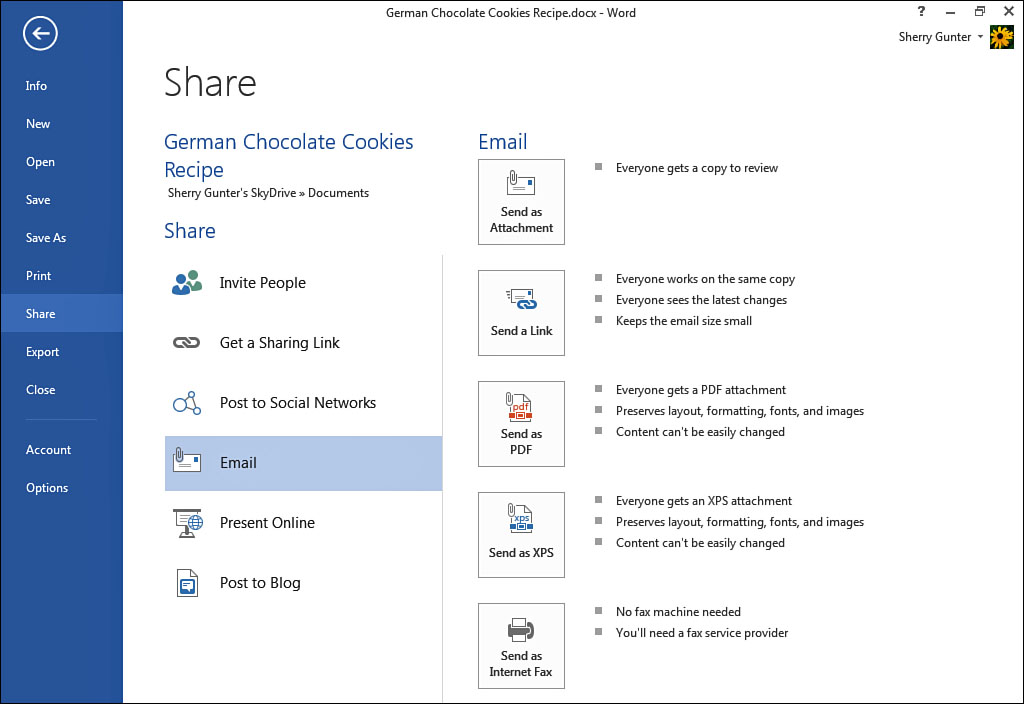
FIGURE 21.1 The Share screen is the place to go to access emailing options.
To send your document as a file attachment, follow these steps:
1. Click the File tab.
2. Click Share to display the Share screen.
3. Click the Email option, shown earlier in Figure 21.1.
4. Click Send as Attachment.
5. Your email application opens a message window, similar to Figure 21.2, with the document already attached and ready to go. Type in the recipient’s email address.
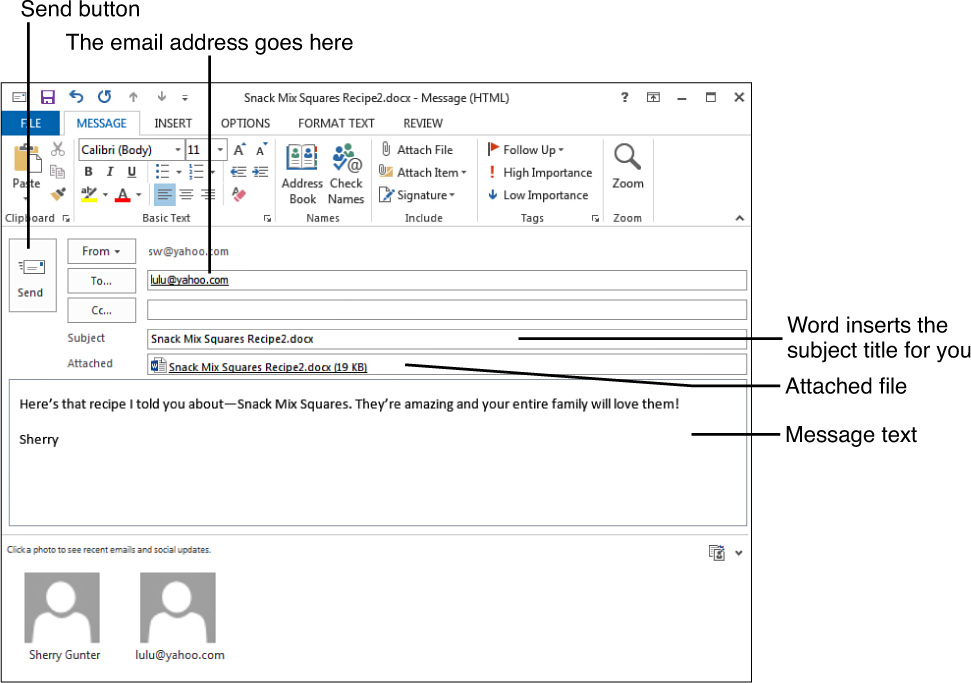
FIGURE 21.2 The document is automatically attached to your email message.
6. Type in a subject heading, unless you’re okay with the default one Word chose for you.
7. Type in any message text you want to include.
8. Click Send.
In this example, I’m emailing with Microsoft Outlook as my email application. Of course, it works harmoniously with Microsoft Word. If you have any trouble making your own email app play nicely with Word, visit the Office.com website and do a little troubleshooting among the support pages.
If you choose to send the document as a PDF or XPS file, the same procedure happens—your email app opens a message window with the file already attached, but as a PDF or XPS file instead of a DOC file. Take a look at Figure 21.3 to see what I mean. Notice the attached file sports an Adobe PDF icon; many file attachments you add to your emails include a tiny logo indicating the file’s origins.
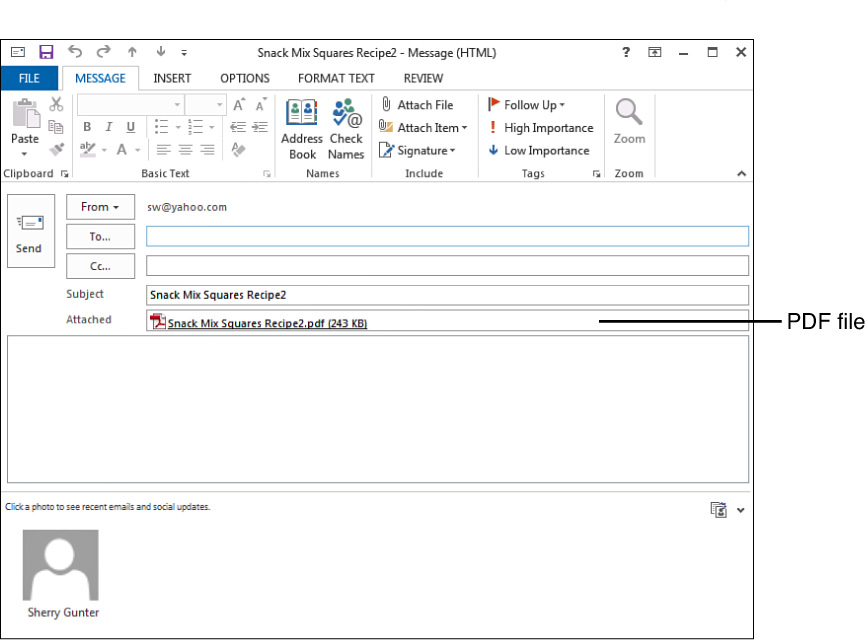
FIGURE 21.3 Now the attached document is a PDF file.
The option for sending the document as a link is not active as a choice in the Share screen unless you’re viewing a file on SkyDrive (or other cloud storage spot). Only then can you send it as a link. The procedure is still the same, though—your email app message window opens, but instead of a file attachment, the message has a link to the file (see Figure 21.4). Although it just looks like an ordinary file path to a document in your message window, the intended recipient sees it as a clickable link in his message window.
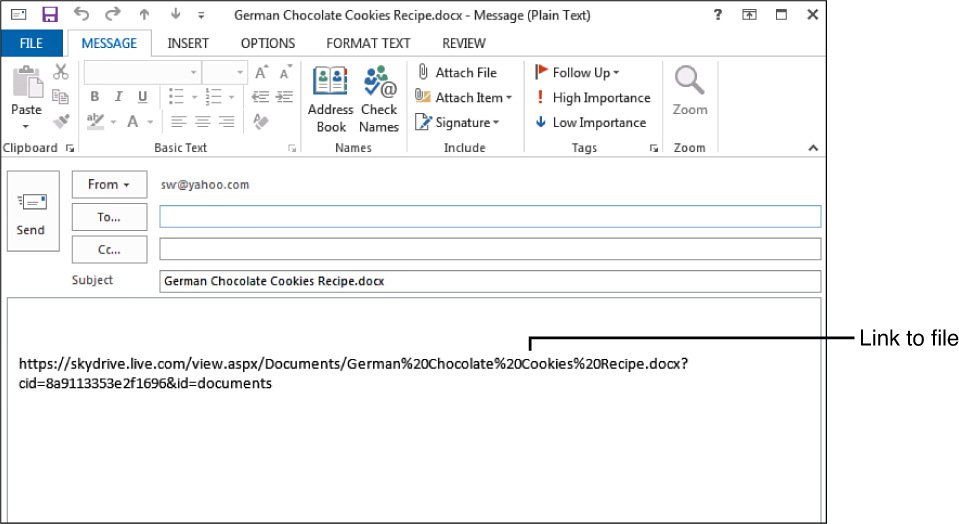
FIGURE 21.4 If you opt to send a link, it’s inserted as a link in your email message.
And that, my friends, is how you email a document without leaving the Word program window.
Turning Word Documents into Web Pages
You can turn any Word document into a web page that can be uploaded to a website. Web pages utilize a special file format, called HTML, which stands for hypertext markup language. So any Word document that you want to use as a web page has to be turned into an HTML file. This is easily accomplished by saving the document to the HTML file format using the Save As dialog box. However, there are several HTML choices among the file types listed. Let’s take a look at your options:
• Web Page, Filtered—Choose this format to keep the content, style, instructions, and other minimal information, but maintain a smaller file size without all the extra coding.
• Single File Web Page—To retain all the document’s properties along with the formatting and content, choose this format. However, doing so will increase the file size almost 10 times larger than the Web Page, Filtered format.
• Web Page—Choose this option if you want to include all the pictures found in the document in a separate folder from the text. You’ll need to remember to upload the associated picture folder along with the text file when you are placing the page on a website.
To save a document as a web page, use these steps:
1. Click the File tab.
2. Click Save As (see Figure 21.5).
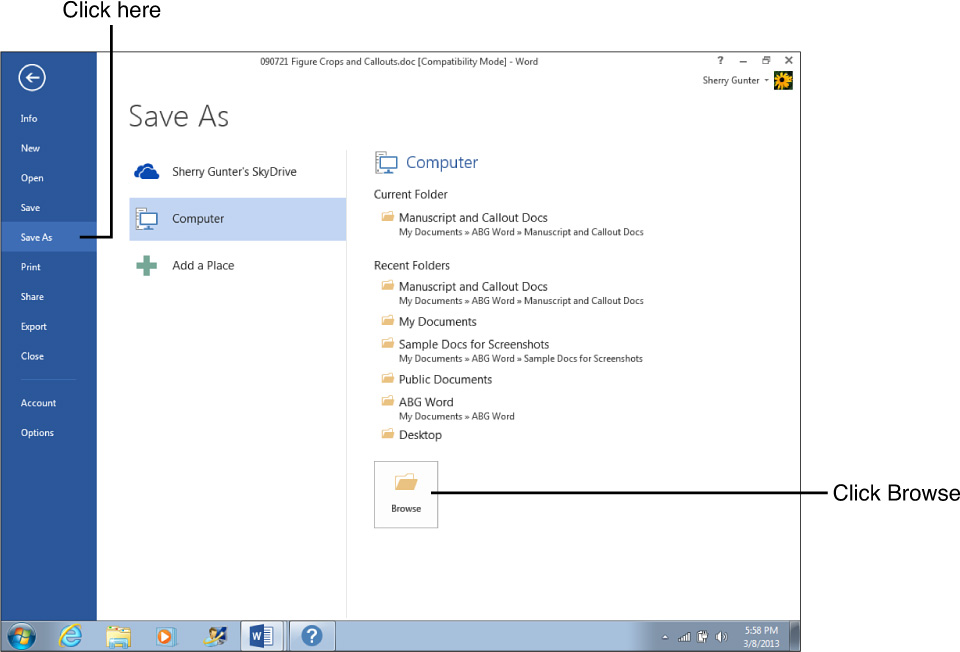
FIGURE 21.5 To create a web page, first you have to activate the Save As command.
3. Click the location you want to save to, such as Computer.
4. Click the Browse button.
5. The Save As dialog box opens. Click the Save as type drop-down arrow, as shown in Figure 21.6.
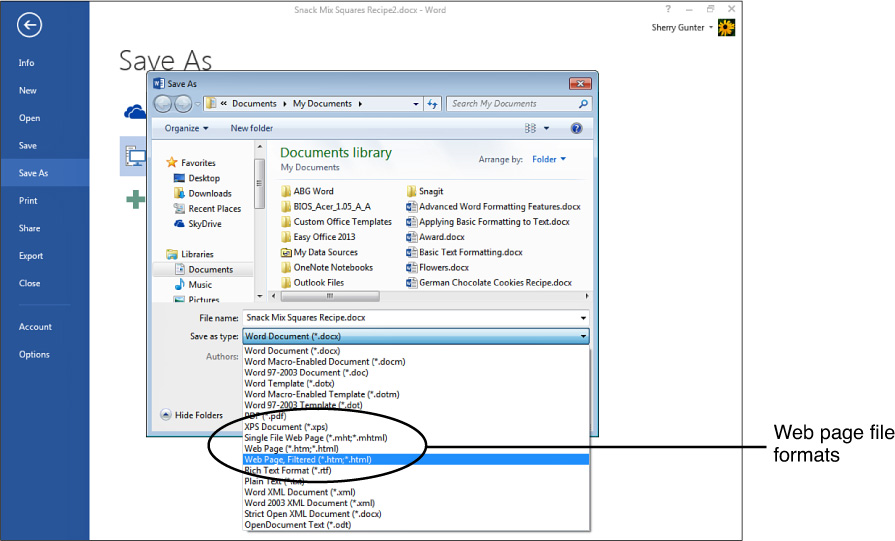
FIGURE 21.6 Use the Save As dialog box to save a document as a web page.
6. Click a web page format.
7. Word assigns the HTML format you chose (see Figure 21.7). Type in a name for the file, if needed, and navigate to the folder or drive where you want to save the file.

FIGURE 21.7 The Save as type field now lists the HTML format you chose.
8. Click Save.
![]() Tip
Tip
Optionally, you can assign a title to your web page that appears in the browser window’s title bar; click the Change Title button in the Save As dialog box and type in a new title.
9. Depending on which HTML format you choose, Word might display a prompt box, shown in Figure 21.8, warning you about losing Office tags and features. Click Yes to wrap this all up.

FIGURE 21.8 Here’s the mandatory warning about not keeping all the bloated Office coding with your web page.
You can view the document as it will look in a web browser using Word’s Web Layout view; click the View tab and click the Web Layout button. You can also open your new HTML file in a web browser; open the browser window, click File, Open, and navigate to the folder or drive where you saved the file.
Adding Hyperlinks
A hyperlink, or link for short, is a piece of text or a graphic that connects somewhere else, typically another Internet document. You can insert links into your documents that, when clicked, take the user to a web page. You can also link to other spots in a document, or to other files on your own computer system. Figure 21.9 shows an example of a hyperlink in a document.
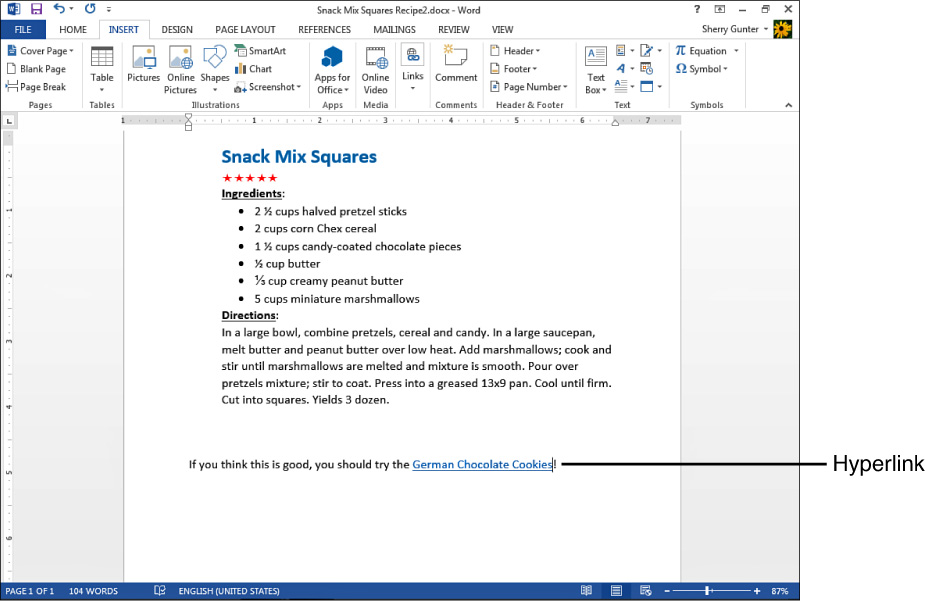
FIGURE 21.9 Hyperlinks appear as blue, underlined text in a document.
Typically, links are underlined and appear bluish in color, which has somehow become the universal declaration of a hyperlink (not always, but much of the time). Links can also be graphics, pictures, buttons, and so forth. To make links work properly in your Word documents, you need to know the exact location of the page you’re linking to, called a URL (Uniform Resource Locator). A URL is the page’s address on the Web, such as http://www.quepublishing.com. Most web pages start with the prefix http or https (the “s” is for secure), which stands for hypertext transfer protocol, followed by ://. (There are other Internet protocols, such as the ftp prefix, but we’ll focus on web pages for this task.) The next part is the domain name, the IP address for the website name or host name, such as office.com or www.microsoft.com. Domain names include a dot and a three-letter abbreviation, such as .org (for organization, usually a non-profit), .gov (government), .net (network), or .com (commercial), or a country of origin (.co, .uk, .de). If the address points to a specific page, the URL includes a path to the file, such as http://mywebsite.com/products/catalog1.html. Slash marks help define the path name and folders.
If you want to link to a web page, you need to first go look up the URL for the page using your web browser. Unless you have a fantastic memory, I suggest you copy it (press Ctrl+C) from the browser window’s Address bar, then you can paste it into the Insert Hyperlink dialog box encountered in the following steps.
To add a hyperlink in your document, use these steps:
1. Select the text or graphic you want to use as a hyperlink.
2. Click the Insert tab.
3. Click Links (see Figure 21.10).
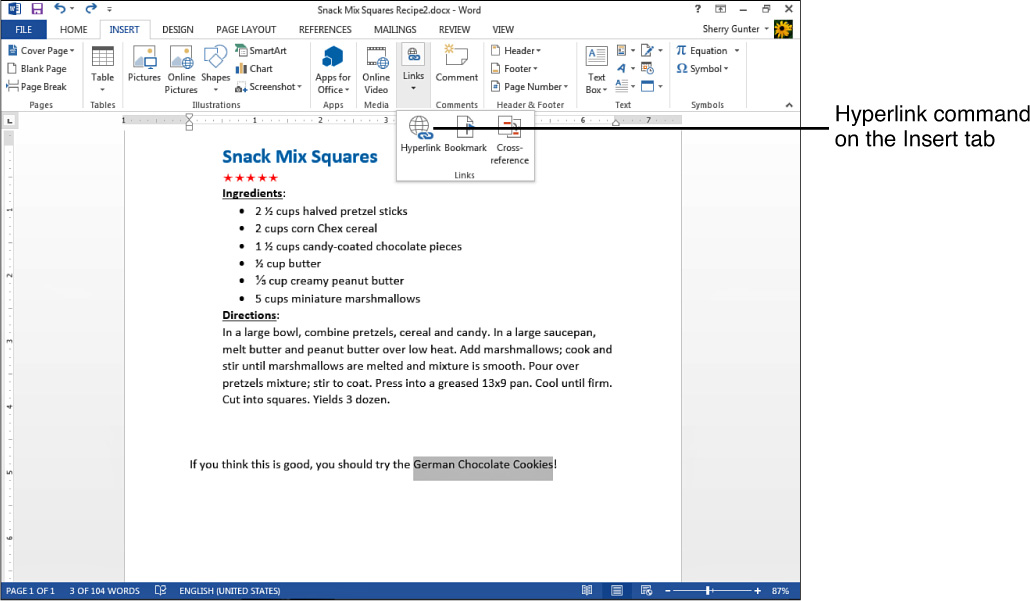
FIGURE 21.10 Look for the Hyperlink command on the Insert tab.
4. Click Hyperlink.
5. The Insert Hyperlink dialog box opens, as shown in Figure 21.11. In the Link to pane, click the item you want to link to, such as Existing File or Web Page.

FIGURE 21.11 Use the Insert Hyperlink dialog box to specify the URL.
6. If linking to a web page, type the page’s URL in the Address box.
7. Click OK.
8. Word converts the selected text or graphic to a hyperlink. To test it, press Ctrl and click the link to open your browser window to the page.
To add a ScreenTip to appear whenever anyone hovers the mouse pointer over the hyperlink, click the ScreenTip button in the Insert Hyperlink dialog box and type in a description for the link. Click OK to exit the Set Hyperlink ScreenTip dialog box. This is actually a pretty good idea, because the default ScreenTip gives the full URL for the link, and it looks pretty bulky!
You can edit your hyperlink just by right-clicking it and choosing Edit Hyperlink (see Figure 21.12) This opens the Edit Hyperlink dialog box—the exact same box you used to create the link, but with a slightly different title and a Remove Link button. From within the dialog box, you can edit the link. Or click the Remove Link button to get rid of it entirely, thus reverting the original text or graphic back to plain old text or graphic.

FIGURE 21.12 The easiest way to edit a link is to right-click it and choose an option.
You can also use the right-click menu to open the link, copy it, or delete it.
![]() Note
Note
You can also link to another file on your computer, or another location in your document (if your document has bookmarks or headings assigned). For example, to link to another file, use the middle area of the Insert Hyperlink dialog box to navigate to the file’s location and select it. When you do, it’s added to the Address box. If you choose to link to a place in the current document, you’ll need to choose the heading or bookmark you want to link to.
Working with SkyDrive
We’ve touched on the subject of SkyDrive in several spots in the book so far, but let’s take a more detailed look at what it is and what you can do with it. SkyDrive is your free online storage service (that is, the cloud) offered through Microsoft. In techno-speak, it’s a file hosting service that allows users to upload and store files, share them with others, or just share them with a select few. When you create a Microsoft account, you can store up to 7GB of data on SkyDrive. That’s a pretty decent amount of storage for pictures, documents, and other file types.
You can access SkyDrive through your web browser (www.skydrive.com), through your Word program window (where you can open and save files to folders on SkyDrive), or through the SkyDrive desktop app (which you can download and install on the Windows desktop). You can also access it through a smartphone or tablet app. Figure 21.13 shows an example of a SkyDrive page in a browser window.
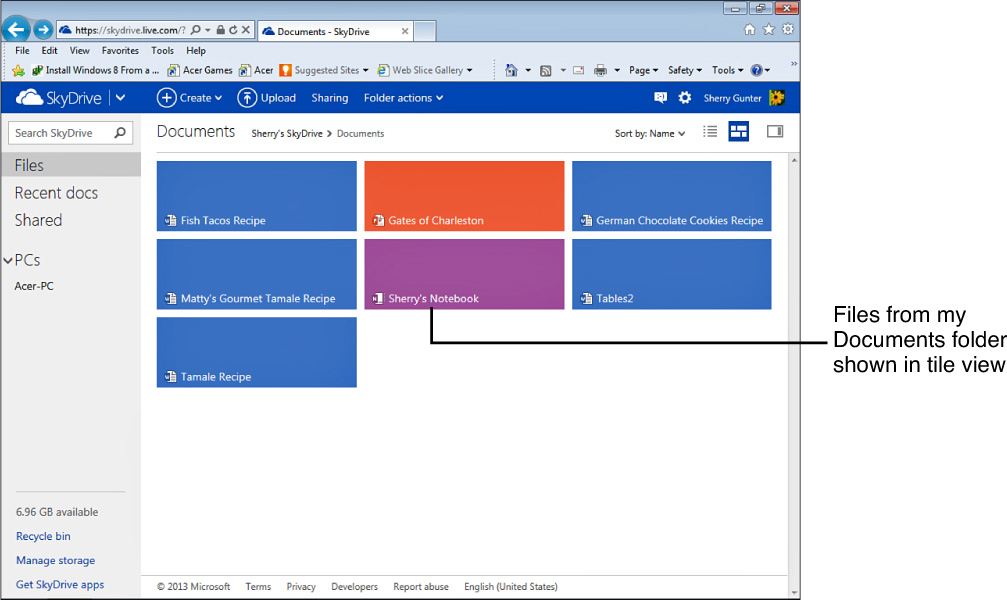
FIGURE 21.13 You can use your SkyDrive account to store Word documents, pictures, and more.
As you’ve encountered already when saving and opening files in Word, the SkyDrive location is quite an integral part of Word. It’s listed as a storage source when you view the Open or Save As screens. As long as you’re connected to the Internet, you can utilize your SkyDrive content. Best of all, you can even connect to it from other computers and devices.
You can organize your cloud storage much like you do on your computer, creating folders. SkyDrive starts you out with several default folders, such as Favorites, Public, and Documents. You can add more, edit their names, control sharing, or remove them as needed.
Managing SkyDrive from Your Browser
If you need to manage your SkyDrive account, such as check how much storage you have left or add and remove folders, use your browser window to navigate to the site: www.skydrive.com. Log in using your Microsoft account and password, as shown in Figure 21.14.
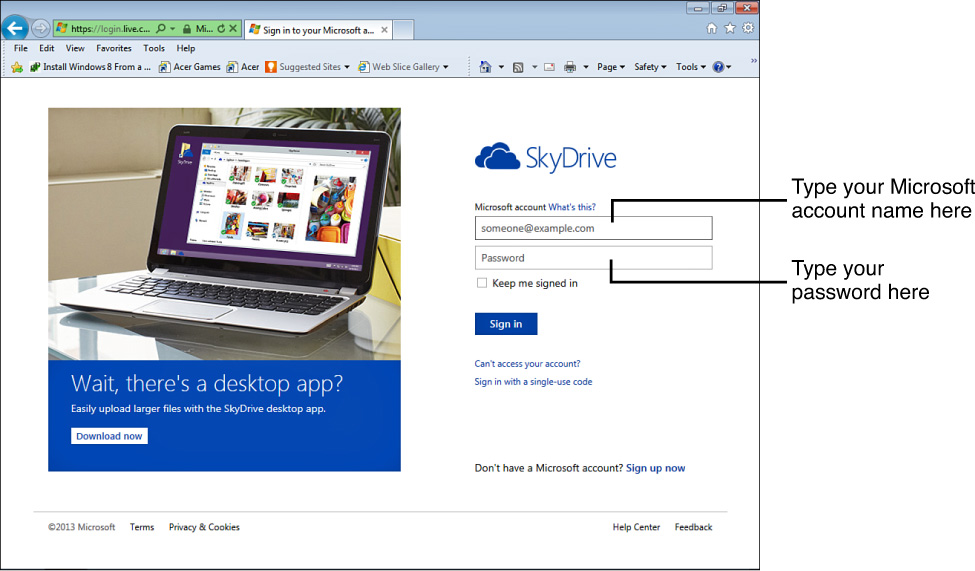
FIGURE 21.14 The SkyDrive logon page.
When you’re logged onto SkyDrive, your page might resemble something like Figure 21.15. The navigation bar along the top of the page offers tools for creating folders and using Microsoft’s Web Apps. You can also upload files, change settings, or message someone with instant messaging.
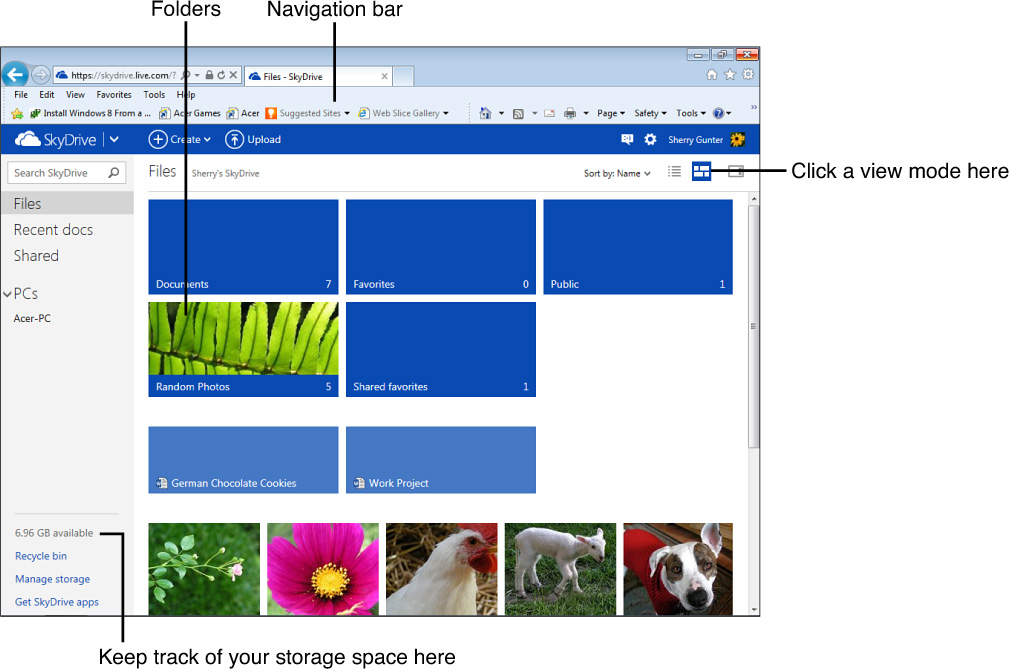
FIGURE 21.15 Your SkyDrive page might look something like this.
After you’re logged in, you can do things like this:
• To view how much storage space you’re using, look in the lower-left corner of the page.
• Use the display buttons to switch your folder and file display from list view to tile view. (The third view choice lets you display a properties pane.)
• To view a folder, click it.
• To view a file, click it and it opens in the associated Office Web App (learn more about Office Web Apps coming up in the next section).
• To view recently used files, click the Recent docs option.
• If you wander off to view other files and folders, you can return to the main SkyDrive page by clicking the SkyDrive icon.
• To make a new folder, click the Create button and click Folder; a new folder is immediately added to the list. Give it a unique name and you’re ready to use it.
• To edit a folder, right-click the folder name to display a shortcut menu where you can open, rename, share, or delete the folder.
• To search for a file, click the Search box, type in a keyword, and press Enter.
• To upload a file, click the Upload button and either drag and drop files into the Upload box, or browse for them on your computer using the Open dialog box.
• To access Microsoft Web Apps, click the Create button and choose an app.
• To view SkyDrive settings, click the cog-shaped icon on the navigation bar at the top of the page, and then click Options.
• To manage storage, or upgrade to more storage, click the Manage storage link.
• You can also right-click a folder or filename and view a shortcut list of options.
• If you delete a file (right-click, Delete), it’s placed in the Recycle bin, just like your desktop recycle bin.
![]() Note
Note
You can add the SkyDrive app to your computer’s desktop and keep your files in sync online and on your computer. To download this app, click the Get SkyDrive apps link on your SkyDrive page, then navigate to the Windows desktop app. After you download the app, a SkyDrive folder is added to your computer and anything you put in this folder is synced between the two locations (your computer and SkyDrive). You can drag items to the folder to automatically add them to your cloud storage. Plus, you can organize your SkyDrive contents using the app. Cool, huh!
To share your file from SkyDrive, select the file and click the Sharing option on the navigation bar. This opens a Share box where you can send the file as an email, post it to Facebook or Twitter, or send it as a link. To share an entire folder, right-click its name and choose Sharing. To share any file with anyone online, store the file in the Public folder.
Using Word to Access SkyDrive
Microsoft Word automatically includes SkyDrive as a storage option for opening and saving files from within the Word program window. You can open files from SkyDrive and save files to SkyDrive. To open a document stored on your SkyDrive account, click the File tab and click Open. The Open screen appears, as shown in Figure 21.16. Click the SkyDrive source. You can choose a document from recent folders, or click the Browse button to navigate to the folder and file on SkyDrive.
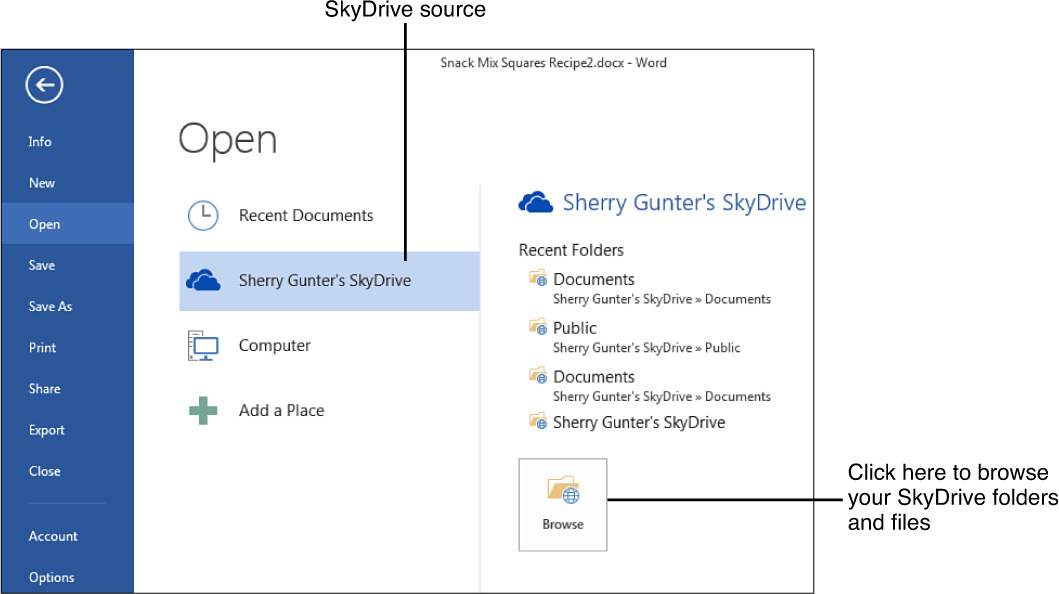
FIGURE 21.16 You can find SkyDrive listed as a source for files you open.
To save a document to SkyDrive, click the File tab and click Save As. The Save As screen appears, as shown in Figure 21.17. Click the SkyDrive source, or use the Browse button to navigate to the folder where you want to save the file. Seriously, could this cloud stuff be any easier? I submit to you that it cannot.
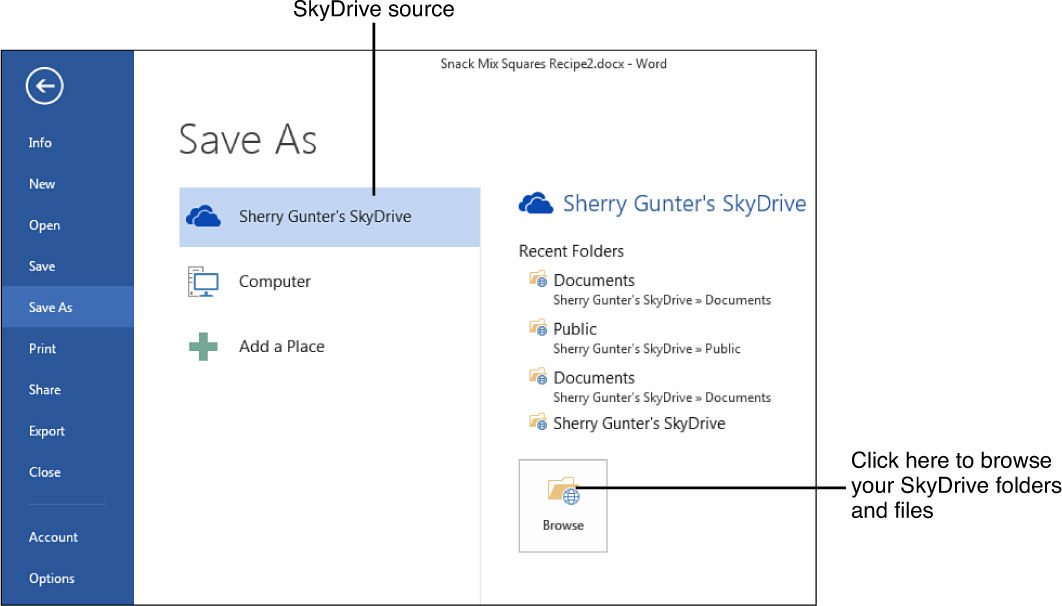
FIGURE 21.17 You can also easily choose SkyDrive as your source for saving a Word document.
Using Web Apps
As part of your Word experience and your Microsoft account, you can utilize “lighter” versions of the Microsoft Office programs online, called Office Web Apps. By “lighter” I mean the web-based versions are limited in functionality and features, but offer enough of the basics so you can create and edit Office files to your heart’s content, so they’re sort of like calorie-free versions of the major players in the Office suite. Using these apps, you can create and share Word documents, Excel spreadsheets, PowerPoint presentations, and OneNote notebooks. Best of all, you can access these apps even if you do not have Microsoft Office installed on the computer you’re using—actually, you can access these programs from any computer with Internet access. All it takes is a Microsoft account.
To find your way to the Office Web Apps, open your browser window to your SkyDrive page and log on (see the previous sections to learn how to use SkyDrive). Click the Create button on the navigation bar, as shown in Figure 21.18, and then click the app you want to open. In this example, let’s open the Word app.
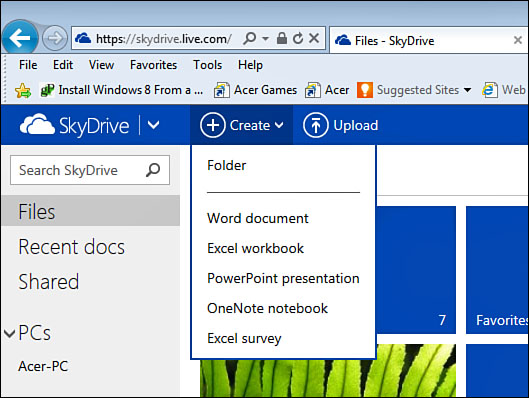
FIGURE 21.18 Access Office Web Apps through your SkyDrive page.
The first thing you’re prompted to do is name your new file. Type in a name for the file, as shown in Figure 21.19, and then click Create.
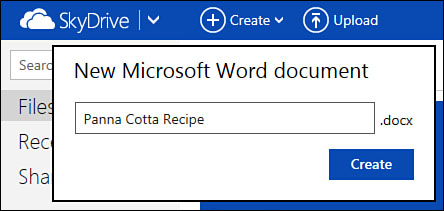
FIGURE 21.19 Start by assigning a name to the file you’re creating.
Next, the Office Web App opens—in this example, it’s the Microsoft Word Web App. Now you can create your document, typing in text and applying formatting as needed, as shown in Figure 21.20. Notice the app includes several of the familiar tabs of tools you’re used to using in the full-blown version of Word. When you finish creating and formatting the document, click the Save button in the upper-left corner. The file is saved to your SkyDrive account.
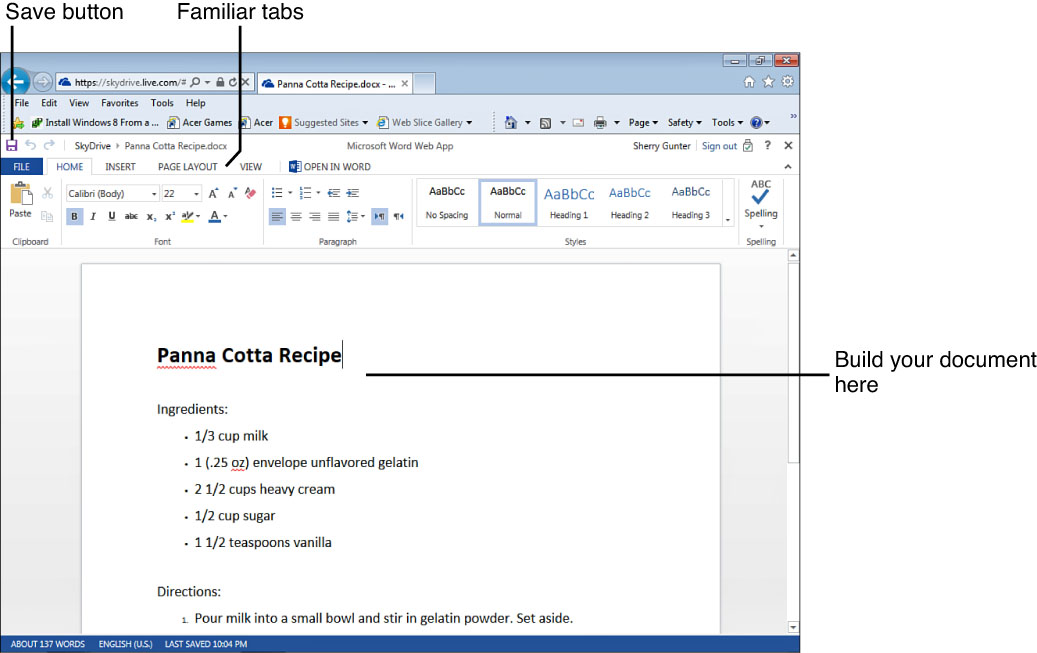
FIGURE 21.20 Build your document in the browser window just like you do with the regular Word program window.
You can also save the file to your computer. Click the File tab and click Save As, and choose to download a copy to your computer.
![]() Tip
Tip
To open the document in your full-blown version of Word, click the File tab, click Info, and click Open in Word.
You can open any of the document files saved in our SkyDrive folders using the Microsoft Word Web App. Just click a document to open it. To return to your SkyDrive page from the Web App, click the File tab and click Exit.