
7. Formatting Text
Anyone can type in some text and call it a day, but can you make the text look compelling, polished, and easy to read? As it turns out, anyone can with a little formatting. Text formatting, also called attributes, refers to the ways in which you can change the appearance of document text. For example, to add emphasis to a word, you might apply bold formatting, or italicize the text. Perhaps you want to make a page title stand out, so you assign a different font style or make the title text appear bigger or in another color. Formatting is all about making your document look good.
In this chapter, we’ll focus on applying basic formatting commands to text. Most of Word’s text formatting tools hang out on the Ribbon’s Home tab under the heading Font. You can apply text formatting to a word, sentence, paragraph, or the entire document. You can even format a single character. Of course, you’ll need to select the text first, so if you haven’t learned that skill yet, back up to Chapter 6, “Adding Text,” and read all about text selection techniques.
Although the idea of sprucing up your text might appeal to your inner designer, try not to get too carried away—a little formatting goes a long way. The general idea is to make your text legible, appealing, and professional looking. Too much formatting, like a different font for every paragraph, can just as easily confuse your intended audience and circumvent the importance of what the text is trying to say.
Applying Boldface, Italics, and Underline
The three most basic ways you can change the appearance of your text is to apply bold, italics, or underlining. Or you can really go out on a limb and apply all three, but depending on the circumstances that might be gilding the lily. Bold formatting adds some “thickening” to the text, making it stand out from the rest of the text. Italics slants the characters to the right for some subtle emphasis. Underlining adds a line under the text, which is pretty in-your-face as far as drawing attention to something. Check out all three at work in Figure 7.1.
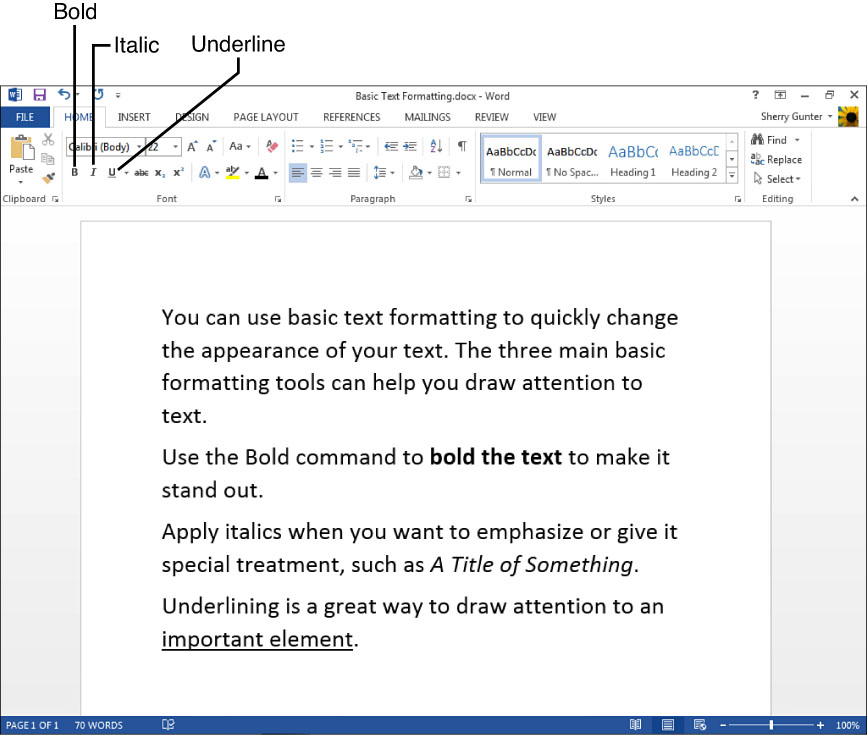
FIGURE 7.1 Use bold, italics, and underlining to add emphasis to your text.
You can find buttons for these three basic formatting attributes on the Ribbon’s Home tab. Each one is fairly self-explanatory, plus the little icons that appear on the command buttons represent what the command does—the Bold button has a bold “B” on it, the Italic button has an italicized “I” on it, and the Underline button has an underlined “U” on it.
Select the text and then click the button for the formatting you want to apply. The feature toggles on or off. Click the button once to apply the formatting, and click it again to remove the formatting from the same selected text.
Because bold, italics, and underline formatting is so commonly used, you might find that memorizing some keyboard shortcuts to apply each in a flash is helpful:
Ctrl+B Bolds the text
Ctrl+I Italicizes the text
Ctrl+U Underlines the text
![]() Tip
Tip
If you click the Underline button’s drop-down arrow, you can choose an underline style to apply other than the default style.
Another way you can apply quick formatting to text is to take advantage of the mini toolbar. Word’s mini toolbar pops up as you work with selected text and offers you shortcut commands to basic formatting tasks, as shown in Figure 7.2. For example, if you select a word, the toolbar appears with many of the tools found under the Font heading on the Ribbon’s Home tab. You can click any of the buttons on the mini toolbar to apply the feature to the selected text.
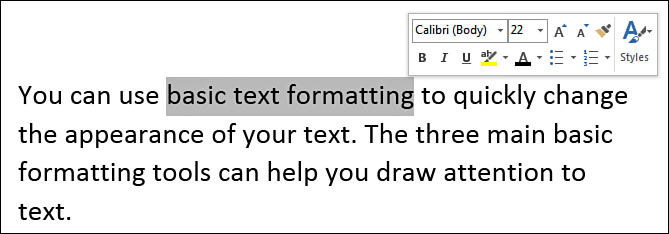
FIGURE 7.2 The mini toolbar offers a subset of formatting commands you can apply.
You don’t have to engage the mini toolbar if you don’t want to. You can choose to ignore it and keep working and the toolbar goes away. As soon as you move the mouse pointer, the toolbar disappears.
You can turn off the mini toolbar if you do not find it useful for the way you work with selected text. To do so, click the File tab and click Options. This opens the Word Options dialog box. Click the General category and deselect the Show Mini Toolbar on selection check box.
![]() Note
Note
Though not really considered basic formatting commands, the Strikethrough, Subscript, and Superscript tools are located next to the Bold, Italic, and Underline commands on the Home tab, and you might find them useful from time to time. All three have special uses pertaining to documents, but aren’t necessarily essential to making things look good. The Strikethrough command puts a line through the text like a proofreader’s deletion mark (example). The Subscript and Superscript tools make the text smaller in size and set it above or below the text baseline, respectively. You might need to assign subscript to a chemical compound (H2O) or superscript to a mathematical expression (422).
Changing the Font
Another way to change the appearance of your text is to change the font. A font is the style of characters applied to your text, also called a typeface. Word features a wide variety of fonts to choose from, ranging from sleek and simple to frilly and fanciful. You might think of fonts as design sets that give a unifying appearance to all the text characters (from A to Z) and numbers. Computer fonts trace their history back to the days of typesetting when printing shops used moveable type to make pages for books, magazines, and newspapers. (Learn all about it on the Web!) Back then, styles were limited to just a few fonts. Thousands of digital fonts are available today, and Word installs with quite a few as well. Figure 7.3 shows an example of several different fonts in use.

FIGURE 7.3 Fonts are an important part of formatting your document text and making it attractive or easy to read.
With Word’s Live Preview, you can preview a font before applying it. The Font drop-down menu, available on the Home tab or on the mini toolbar, lets you scroll through your library of fonts, as shown in Figure 7.4. As you move the mouse pointer over a style, any selected text in your document appears in the font style.

FIGURE 7.4 The scrollable Font menu lets you choose from a vast number of font styles.
To change the font, follow these steps:
1. Select the text.
3. Click the Font drop-down arrow.
4. Click a font and Word immediately applies it to the selected text.
If the mini toolbar is available, you can click the Font drop-down arrow on the toolbar and choose a font. You can also use the Font dialog box to assign fonts. Learn more about this method later in this chapter.
![]() Tip
Tip
You can set a font before you type in any text, and Word applies the font to any new text you type from the current cursor position onward.
![]() Note
Note
When you create a blank document, Word starts you out with a default font and size. Calibri is the default font, but you can apply other fonts as needed. You can also change the default to something else. Click the Font icon in the corner of the Font group of tools on the Home tab to open the Font dialog box. Use the Font drop-down menu to choose a font, and then click the Set As Default button. You can choose whether to set the font as the default for the current document or all documents based on the template.
Changing the Point Size
You can control the size of your document text by changing the font size. All blank documents you create in Word use a default font size of 11 points unless you specify something else. Font sizes are always measured in points, a remnant measurement system from the bygone days of typesetting. You can assign other sizes to your text as needed. For example, you might want a page title to appear much larger than the rest of the text on the page, say 20-point or 36-point, as shown in Figure 7.5. Font size is an integral part of ensuring your document is legible and easy to read for its intended audience. Plus, if you pick a font size that’s too small or too big for your particular printer to handle, you may run into some issues and have to choose another font, too. Using the Font Size drop-down menu, shown in Figure 7.6, you can specify a size to suit your own document needs.

FIGURE 7.5 Controlling font sizes is another important way you can format your document text.
FIGURE 7.6 You can adjust the size of text using the Font Size menu.
To change the font size, follow these steps:
1. Select the text.
2. Click the Home tab.
3. Click the Font Size drop-down arrow.
4. Click a size and Word immediately applies it to the selected text.
You can also click the Font Size drop-down arrow on the mini toolbar and choose a size, or you can use the Font dialog box.
If you’re not sure what exact size you might need for a situation, you can make incremental adjustments to size using the Increase Font Size and Decrease Font Size buttons on the Home tab. Each click of either button adjusts the size of the selected text up or down in point increments. These buttons are perfect for when you need a quick bump up or down in font size.
![]() Tip
Tip
Another way to add flair to your text is using the Text Effects tools. Learn more about these in Chapter 10, “Advanced Formatting.”
Using the Font Dialog Box
If you’re looking for some additional font controls, open the Font dialog box, shown in Figure 7.7. The Font dialog box is your one-stop shop for all things font related; it consists of two tabs, one for regular font controls such as size and basic formatting, and another for advanced controls, such as character spacing. The Preview area lets you see what all of your selections will look like when applied to your text.
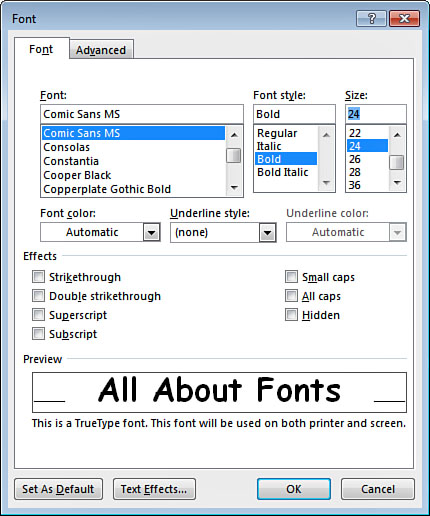
FIGURE 7.7 The Font dialog box.
To open the dialog box, you must click the Font icon in the corner of the Font group of tools on the Home tab. As it turns out, each group of tools on the Ribbon’s tabs have icons for opening dialog boxes associated with the type of commands in the group, and this particular one is for font commands. To apply any changes you make in the Font dialog box, click OK.
Adding Color to Text
Let’s talk color. Do you need to paint the town red, or at least the word town in the color red? You can use the Font Color tool to add color to your document text. You can apply color to your text using a color palette, sort of like a drop-down menu but with color squares to choose from. If you find the palette too restrictive, you can open an additional dialog box with even more color choices.
To apply color to text, follow these steps:
1. Select the text.
2. Click the Home tab.
3. Click the Font Color drop-down arrow, as shown in Figure 7.8.
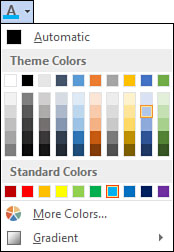
FIGURE 7.8 Use the Font Color palette to assign color to text.
4. Choose a color, and Word immediately applies it to the selected text.
![]() Tip
Tip
When choosing colors, be mindful that sometimes what you see onscreen doesn’t turn out as well when printed, especially with grayscale tones. You can preview how everything looks if you click the File tab and click Print.
To open the Colors dialog box, shown in Figure 7.9, click the More Colors option in the Font Color palette. From this dialog box, you can choose additional shades, or create a custom color. Click a color and click OK to apply it.

FIGURE 7.9 The Colors dialog box.
![]() Tip
Tip
You can use the Text Highlighter tool (located next to the Font Color tool on the Ribbon’s Home tab) to apply color highlighting to your text. Just like a real highlighter pen you might use to mark sections of a textbook, you can use Word’s Highlighter pen to mark up a document. You can choose from several highlighter colors and click and drag across the text you want to highlight.
In addition to color, you can also apply a gradient effect. Gradient effects are two or more shades blending from one to another. Click the Gradient option on the drop-down color palette and choose a gradient variation to apply it.
Copying Formatting from One Place to Another
Let’s say you’ve spent a great deal of time perfecting formatting for a particular paragraph or title text. What if you need to use the same attributes on the next page—what do you do? Reapply all the same formatting controls again? No, break out the Format Painter tool instead. It copies formatting from one spot to another, thus saving you some tedious work.
First select the text containing the formatting you want to copy. Next, click the Format Painter button located on the Home tab, tucked in with the Clipboard group of tools (see Figure 7.10). The mouse pointer changes to a paint brush icon, and you can now drag across the text you want to copy the formatting to; Word immediately applies the formatting. To copy the same formatting attributes repeatedly, double-click the Format Painter button and then start painting.

FIGURE 7.10 Use the Format Painter to copy formatting.
![]() Tip
Tip
Removing formatting is easy—just select the text and then click the Clear All Formatting button found in the Font group of tools on the Home tab.