
10. Advanced Formatting
Just when you thought you had learned all there is to make your Word documents look their loveliest, there are a couple of more tools and features to consider. Let’s wrap up our exploration of all things formatting to include the finishing touches you can apply to your documents to make them look extra special and attractive. Some of these extra features can be, quite simply, timesavers and/or lifesavers. If you’re looking for quick polish for a document, sort of like a manicure for your text, then look no further than Word’s special text effects. They can add instant pizzazz to a document. If uniformity is more your goal, then themes and styles can help you keep your document’s major plot points looking groomed. If it’s overall background elements you need, then borders and shading can help you out, as well as applying a subtle, yet serious, watermark. This chapter shows you how to make a real show of your text.
Applying a Theme
One of the best ways you can apply an overall consistent look and feel to a document is to utilize one of Word’s many themes. A theme includes a coordinating set of colors, fonts, and text effects you can apply to make sure your documents share a harmonious appearance. Themes control the primary design aspects of your document, such as colors, fonts, styling of charts and tables, and shapes and diagrams. You can choose from a variety of preset themes, or browse for more themes online. Figure 10.1 shows a document before a theme is applied, and Figure 10.2 shows a document after a theme is applied. It’s like a makeover for your file!

FIGURE 10.1 Before a theme is applied.

FIGURE 10.2 After applying a theme.
Themes work best with styles you apply in a document, which you’ll learn about in the next section. Themes and styles work hand-in-hand to help ensure design efficiency in your documents. Although at first glance, themes and styles seem a lot alike in Word, they’re actually different in their focus. A theme defines the overall appearance of your document, whereas styles help you control various design options within the document. When you assign a theme, a set of styles is included with the design. Naturally, you can make changes to the various parts of a theme or a style to your liking.
To apply a theme, follow these steps:
1. Click the Design tab.
2. Click the Themes button.
3. Click a theme from the gallery (see Figure 10.3) to immediately apply it.
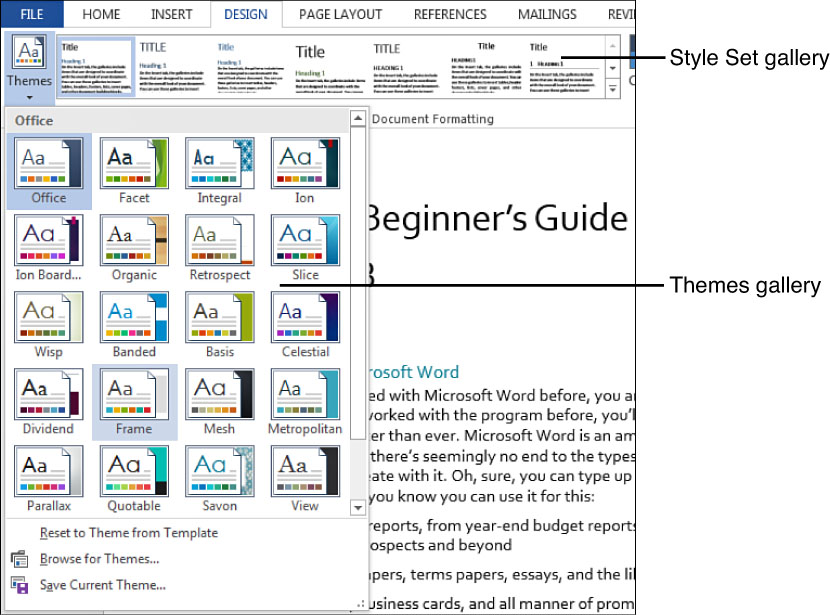
FIGURE 10.3 The Themes gallery lists preset themes you can apply.
You can preview each theme by hovering the mouse pointer over the theme in the gallery menu. Word’s Live Preview feature kicks in and also previews the theme on the document page, just to show you what things will look like if you decide to use that particular theme.
![]() Note
Note
Just a warning: Unless your document already has some styles applied, you might not see much by way of theme elements reflected with Live Preview.
As you can see in the Themes gallery, each theme has a color strip of coordinating colors. When you activate a theme, the Style Set gallery (see Figure 10.4) displays coordinating styles designed for that particular theme.
![]() Tip
Tip
If you find yourself using the themes for every document you create, add the Themes gallery to Word’s Quick Access toolbar—that toolbar in the upper-left corner of the program window where the Save and Undo buttons sit, ready for action. To add the gallery, right-click over any theme name in the Themes drop-down menu, and then click Add Gallery to Quick Access Toolbar. This immediately puts a button on the toolbar; click the button to view the gallery of themes. Pretty handy, huh?
To turn off a theme and return to the default Office theme, click the Themes button on the Design tab and choose the Office theme from the gallery.
Themes aren’t terribly useful until you start assigning styles, so let’s proceed with the rest of the story—learning all about styles.
Applying Styles
Of course you obviously already have your own style going for you—kudos to you—but you might not know your Word text can strut some style as well. When I use the term style, I’m not talking about fashion sense, unless you count good-looking fonts as haute couture, but rather the term refers to a set of formatting definitions. Styles are sets of formatting you can apply to create a uniform look throughout your document. Figure 10.4 shows an example of text without styles, whereas Figure 10.5 shows the same document with styles applied. Notice the change in formatting and text color. That’s what styles are all about.
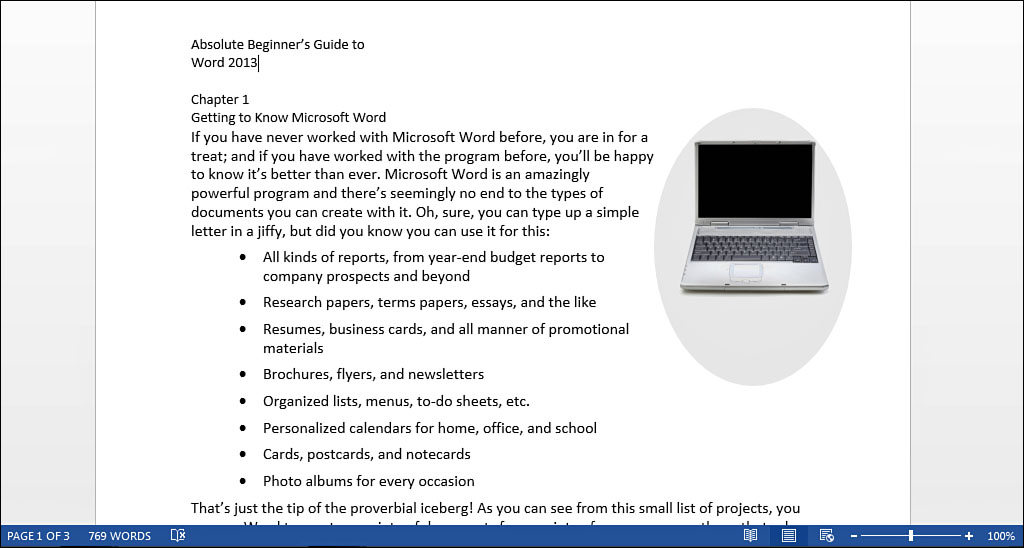
FIGURE 10.4 Before styles.
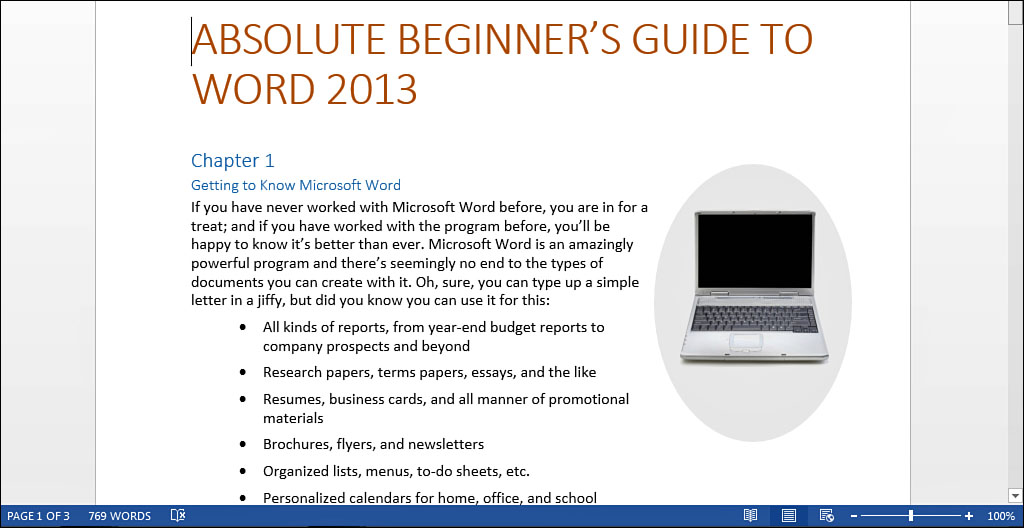
FIGURE 10.5 After styles.
Styles are particularly useful when you need to apply the same formatting to specific types of text in a document, such as headings and subheadings, pull quotes and book titles, references, captions, and all the various parts and pieces that go into building longer documents that require a great deal of consistency. Rather than tediously assign the same formatting manually for each spot in the document where it’s needed, you can assign the formatting to a style and apply all the formatting at one time. Wait—that’s not all. If you update a style in one spot in the document, the changes are made to all the other text sporting the same assigned style throughout the document—automatically.
For example, let’s say your corporate report uses headings throughout the document with the formatting set to Times New Roman font, 16-point size, and bold. Normally, you would have to use three steps to assign the different formatting settings to the selected line of text. With a style, you just perform one step to assign all three formatting commands at once.
Styles can consist of the typical text formatting you might think of, such as fonts, sizes, bold or italics, or paragraph formatting, such as indents and spacing. Just about any formatting you can think of as it applies to your document text can be used with styles. Styles can also include colors, borders and shading, text effects, and anything else you need to apply to create a uniform appearance throughout your document. As you can imagine, styles really come in handy for multilevel, complex documents.
![]() Note
Note
There are technically two types of styles: paragraph and character styles. Paragraph styles contain both text formatting and paragraph formatting, whereas character styles work for single words and characters; that is, text.
As mentioned in the previous section, style sets are part of themes you can apply to a document. Each theme offers different style sets—a collection of styles that coordinate nicely with the chosen theme. Style sets hang out over in the Style Sets gallery on the Design tab, as shown in Figure 10.6. But individual styles are listed in the Styles gallery on the Home tab. A little confusing, isn’t it? Most people who worked with previous versions of Word are used to the styles appearing with the rest of the text-building tools, which are located on the Home tab, but the document formatting tools are over on the Design tab, hence the placement of themes and style sets over there.
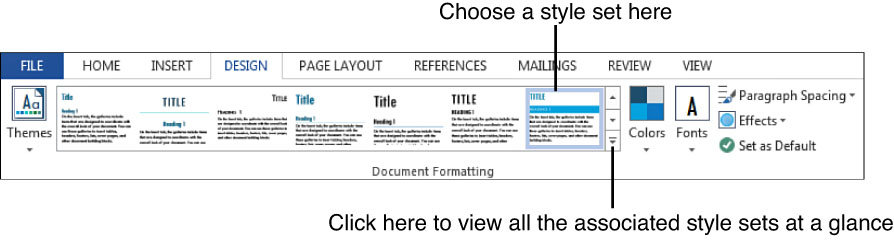
FIGURE 10.6 Use the Design tab’s Style Sets gallery to choose a style set.
Are you ready to view some style sets? Glance through the Style Sets gallery and see what you like. You can click the More button in the Style Sets gallery to view all the associated sets, as shown in Figure 10.7.
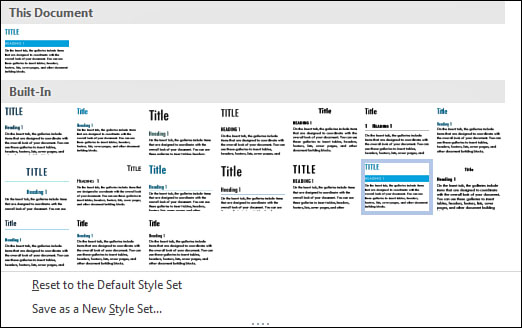
FIGURE 10.7 You might want to expand the gallery to see everything at a glance.
After you designate a style set from the gallery, you can apply individual styles from that set using the Styles gallery on the Home tab, as shown in Figure 10.8. You can also create your own styles and add them to the style set.

FIGURE 10.8 Use the Home tab’s Styles gallery to assign individual styles to document text.
Choosing Style Sets
By default, Word starts you out with the Office theme and a default Office style set. It includes some basic styles for heading levels, titles, and a few other items. For example, it assigns the Normal Quick Style to the body text of your documents, unless you change it.
To choose a style set, follow these steps:
1. Click the Design tab.
2. Click a style set (refer to Figure 10.6).
You can use the tools located next to the Style Set gallery to tweak the overall design, such as changing the color scheme, font, or spacing.
Assigning Styles
You can apply a style to specific text by selecting it first, or you can apply a style to an entire paragraph just by clicking anywhere in the paragraph.
To assign a style, follow these steps:
1. Click or select the text to which you want to assign a style.
2. Click the Home tab.
3. Click a style (refer to Figure 10.8).
The Styles gallery on the Home tab is a bit limiting in what styles appear (unless the one you want is always shown first). To see more, click the Styles button—the tiny icon with an arrow in it displayed in the corner of the Styles group of tools (see Figure 10.8). When clicked, this feature opens the Styles pane, shown in Figure 10.9. This pane lists all the styles for the style set currently applied to the document. You can choose a style from the list to apply it to text in your document. You can keep the pane open to assign more styles throughout your document.
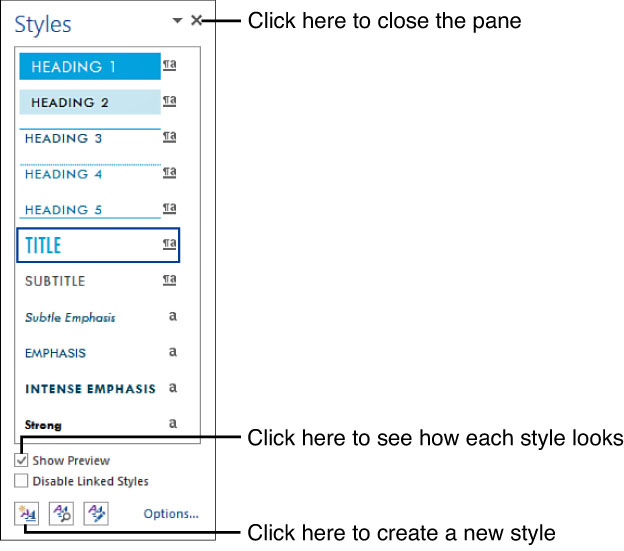
FIGURE 10.9 The Styles pane.
![]() Tip
Tip
If you don’t see all of your styles listed, then click the Options link at the bottom of the Styles pane and change the Select styles to show option to All Styles.
Creating New Styles
You can modify an existing style and save it as a new style in the list. You can also create a new style from scratch. Start by applying all the necessary formatting, then click the New Style button at the bottom of the Style pane (refer to Figure 10.9). This opens the Create New Style from Formatting dialog box, as shown in Figure 10.10. You can type in a name for the style, and change any other settings as needed. Click OK when you finish, and Word adds the style to the Styles gallery. Now it’s ready to go the next time you need it.

FIGURE 10.10 Use this dialog box to create a new style.
If you want the new style available in other documents as well as the current one, you need to select the New documents based on this template option in the dialog box.
If you want to update all the uses of the new style throughout the document (in case you tweak the formatting or something), select the Automatically update check box in the dialog box.
If you notice unexpected formatting changes keep happening to your paragraphs, you probably have the Automatically Update option on and need to change the setting. To turn this off, right-click the style name in the Styles pane and choose Modify. This opens the Modify Style dialog box. Uncheck the Automatically update check box to turn the feature off.
Adding Special Effects
I certainly don’t want to leave you with the impression that your document text isn’t special and glamorous enough as it is. You’ve obviously studied the previous formatting chapters carefully and diligently applied all of your newfound knowledge to make your document a thing of beauty. However, if the situation warrants it, you can easily add some more character to your characters, if you know what I mean. In this section, you learn how to apply the classic drop caps technique, turn up the formatting heat with text effects, and insert a subtle behind-the-scenes watermark.
Inserting Drop Caps
Drop caps have long been a part of the publishing industry, commonly used in books to present the first character of the chapter in a prominent fashion. Typically, a drop cap is an enlarged first letter of the first word of the first paragraph, an initial—check out Figure 10.11 to see what one looks like. European monks used to painstakingly and artfully design spectacular drop caps for manuscripts. We’re not going to do that in Word, but we can make some nice drop caps.
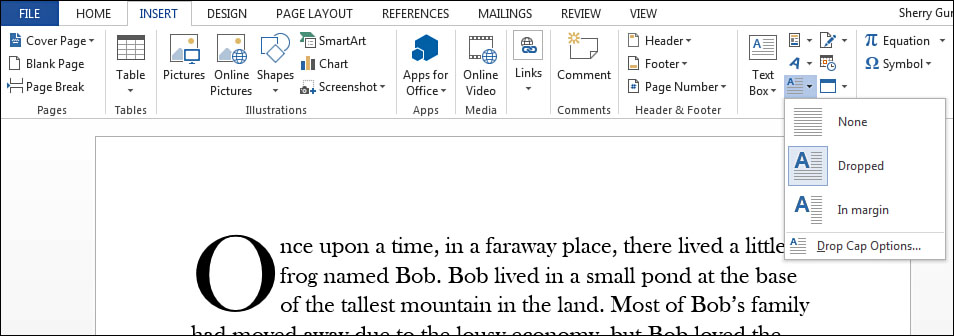
FIGURE 10.11 Here’s an example of a drop cap, plus a peek at the Drop Cap menu.
Drop caps can appear below or above the text baseline (the invisible horizontal line that characters sit on). They work best with a longer paragraph that has more than three lines of text.
To create your own drop cap, follow these steps:
1. Select the text character you want to turn into a drop cap.
2. Click the Insert tab.
3. Click the Add a Drop Cap drop-down arrow to display the menu shown in Figure 10.11.
4. Click Dropped, and Word turns the character into a drop cap.
You can edit a drop cap using the Drop Cap dialog box, shown in Figure 10.12. To open this box, either click the Drop Cap drop-down arrow and choose Drop Cap Options, or right-click over a selected drop cap’s border and choose Drop Cap. You can use the tools in the dialog box to adjust the font style, how many lines to drop, and distance from the rest of the text. If you decide you need to remove the drop cap, select it and activate the None command.
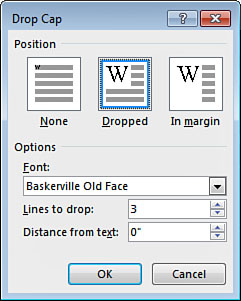
FIGURE 10.12 The Drop Cap dialog box.
Applying Text Effects
Word’s text effect tools can add some serious flair and style to your text. Utilizing such techniques as outlining, shadows, glow, and reflection, you can create a variety of artsy looks. To use the feature, click the Home tab, then click the Text Effects drop-down arrow. A menu of effects categories appears, and each one offers a submenu of choices presented in a gallery. Figure 10.13 shows the Glow gallery, and the text displays a preview of the highlighted effect. To assign an effect, just click it.

FIGURE 10.13 You can add text effects to turn text into fancy-looking typography.
To turn off an effect, select the text, reopen the gallery, and choose the No command offered, such as No Glow.
Adding a Watermark
It sounds like a fancy term for something involving liquid, which is never a good idea near a computer, but a watermark is actually text or an image that appears faded in the background of a page. Take a look at Figure 10.14. Can you make out the DRAFT watermark, printed on an angle?

FIGURE 10.14 Watermarks appear behind text on a page.
Watermarks are commonly used in corporate and industrial settings; for example, to identify documents as confidential or drafts, or in the case of government agencies, top secret. Watermarks appear behind the document text as a background element. You can use text or pictures as watermarks, including photos. Word’s Watermark tool includes several default choices presented in the Watermark gallery (see Figure 10.15).
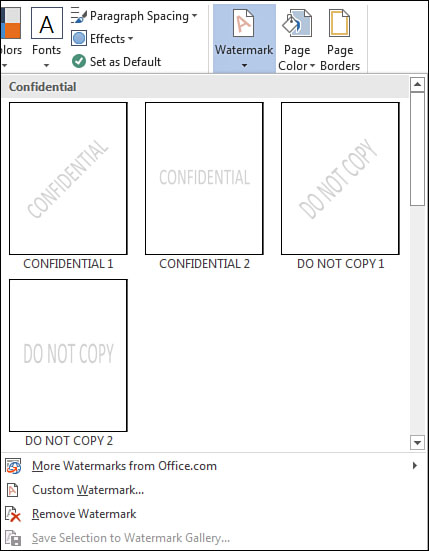
FIGURE 10.15 You can use the Watermark tool to add a watermark from the scrollable gallery.
To insert a simple watermark, follow these steps:
1. Click the Design tab.
2. Click the Watermark drop-down arrow.
3. Scroll through the gallery and choose a watermark design (see Figure 10.15).
To create a custom design, you can open the Printed Watermark dialog box. Click the Custom Watermark command at the bottom of the Watermark menu. This opens the Printed Watermark dialog box, as shown in Figure 10.16. To use a picture as a watermark, click the Picture watermark option and navigate to the file. To use a different word or phrase than the gallery offers, click the Text drop-down menu and make a selection. You can also use the settings to control the font, size, color, and layout of the watermark.

FIGURE 10.16 Use this dialog box to add a picture as a watermark or create custom text.
To remove a watermark, click the Watermark drop-down arrow and choose Remove Watermark.
Adding Borders and Shading
You can add borders and background shading to text, paragraphs, or entire pages. Borders are a great way to section off parts of your document or draw attention to special areas. The use of color as a background can do the same. This section shows you how to utilize the borders and shading tools, and the skills you learn here can help you as you continue to work with other document elements you add, such as tables and clip art.
Colors, borders, and all manner of formatting are great, but always keep legibility in mind. If any of the extra formatting makes reading your text too difficult, then you’ve defeated the purpose.
Adding Text Borders
You can create custom borders in Word and control the color and thickness of the lines. You can also customize the line style and even choose which sides you want bordered. Options, options, options—so many options!
To add a border around text, whether it’s a single word or paragraph, follow these steps:
1. Select the text you want to add a border to.
2. Click the Home tab.
3. Click the Borders drop-down arrow (see Figure 10.17).

FIGURE 10.17 Use the Borders tool to add borders to your text.
4. Choose a border option.
You can customize a border using the Borders and Shading dialog box, shown in Figure 10.18. To find your way to this feature, click the Borders and Shading command at the bottom of the Borders drop-down menu. With the Borders tab displayed, you can choose a border setting, line style, color, and line width. When you’ve set all the options you want, click OK to apply them to the selected text.
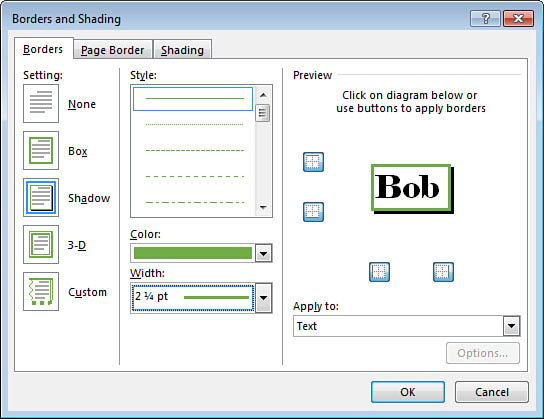
FIGURE 10.18 The Borders and Shading dialog box.
Adding Page Borders
You can add a border to the entire page using Word’s Page Borders tool. You’ll find this feature on the Design tab. Click the Page Borders button to open the Borders and Shading dialog box to the Page Border tab, as shown in Figure 10.19. This tab shows the exact same tools as the Borders tab shown in Figure 10.18, but anything you set here applies to the page instead of selected text. You can set a custom border and specify sides, or choose from a regular box, shadow, or 3-D border. You can also control the line style, line width, and color.
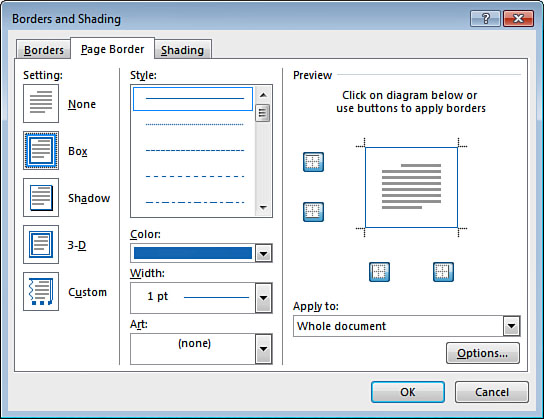
FIGURE 10.19 The Borders and Shading dialog box, again.
Adding Shading
Word’s Shading tool adds a background color behind the selected text or the entire page.
1. Select the text you want to be shaded.
2. Click the Home tab.
3. Click the Shading drop-down arrow (see Figure 10.20).
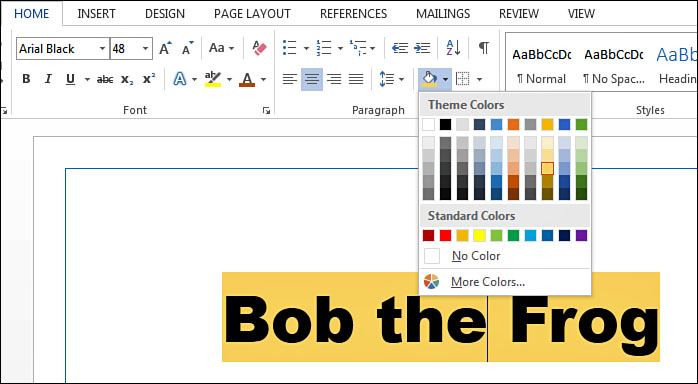
FIGURE 10.20 Use the Shading tool to add background color to your text.
4. Choose a color option. You can choose from the palette of standard colors or theme colors.
You can use the same technique to add shading to the entire page, but the command for this is on the Design tab. Click the Page Color button to display the exact same drop-down palette of colors.
![]() Tip
Tip
You can open the Colors dialog box to find more customized colors than what the color palette presents. Click the More Colors command below the color palette to open the dialog box and explore more choices.