
9. Formatting Pages
Just when your head is about to explode from all the formatting options available in Microsoft Word, it’s time to show you some more! This chapter concentrates on formatting you can apply to entire pages to make them look polished and easy on the eyes. Page formatting includes features such as setting page margins, turning text into columns, adding headers and footers, and controlling vertical alignment. Whereas text formatting and paragraph formatting makes your document’s content look good, page formatting is all about making your pages look good—and when your documents look good, you look good.
Setting Margins
Margins are the area between the content of your document and the actual edges of the printed or visual page. You can adjust the margins in Word to suit your needs. For example, if you plan on binding your printed pages in some sort of book or binder format, leaving ample right margins is key to making sure users can see everything when turning pages. If you are creating a single-page flyer, you might not want much space in terms of margins around the printed page. In some cases, making slight adjustments to the document’s margins can help you cram everything onto one page.
Page margins are also where some special page elements hang out, such as page numbers, headers, and footers (you’ll learn more about these features later in this chapter). By default, every blank document in Word starts with 1-inch margins on all four sides. This default margin scheme is affectionately known as the Normal margin setting. You can make adjustments to your margins using the Margins tool on the Page Layout tab, as shown in Figure 9.1. When you click the Margins button you can choose from several preset margins or you can create your own custom margin(s). That’s right, you can control just one margin on a page, several, or all four. How’s that for flexibility?
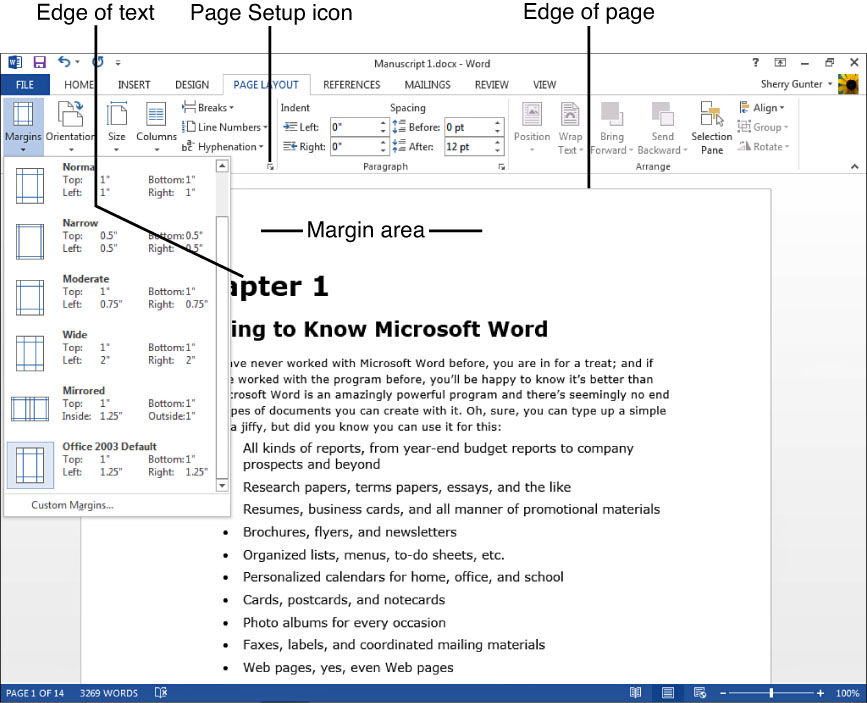
FIGURE 9.1 Find Word’s margin controls on the Page Layout tab.
To set your own margins, click the Custom Margins option at the bottom of the Margins menu. This opens the Page Layout dialog box to the Margins tab, as shown in Figure 9.2. You can also access this same dialog box by clicking the Page Setup icon—the tiny icon with an arrow on it located in the bottom-right corner of the Page Setup group of tools on the Ribbon’s Page Layout tab.

FIGURE 9.2 You can also open the Page Setup dialog box to set your own margins.
In the Page Setup dialog box, you can specify a value—measured in inches—for the top and bottom of the page, and the left and right sides. You can change just one margin, or as many as you want. Click the spinner arrows to adjust the value or type directly into the box you want to change. The Preview area at the bottom of the dialog box gives you a thumbnail preview of what the new margin(s) will look like. Click OK to exit the dialog and apply the changes.
![]() Tip
Tip
When you create a two-page spread, the margins for the adjacent pages are called the gutter. You can control the amount of gutter space using the Page Setup dialog box.
![]() Note
Note
Margins aren’t the only setting you can adjust in the Page Setup dialog box. You can also use the settings within to change the page orientation (direction) for printing, choose a paper size for your printer, and control how page elements like headers, footers, and vertical alignment affect the document.
Remember the ruler you learned how to use in Chapter 8, “Formatting Paragraphs,” to set indents and tabs? Well, you can use it to set margins, too. Click the Ribbon’s View tab and click the Ruler check box to display the horizontal and vertical rulers. The margin area is marked in a darker shade on the ends of the rulers. Move the mouse pointer over the edge of the margin shading, then click and drag the border to adjust the margin, as shown in Figure 9.3. As you drag the margin, a temporary line appears across the page, helping you to see where the new location for the margin will be when you release the mouse button.
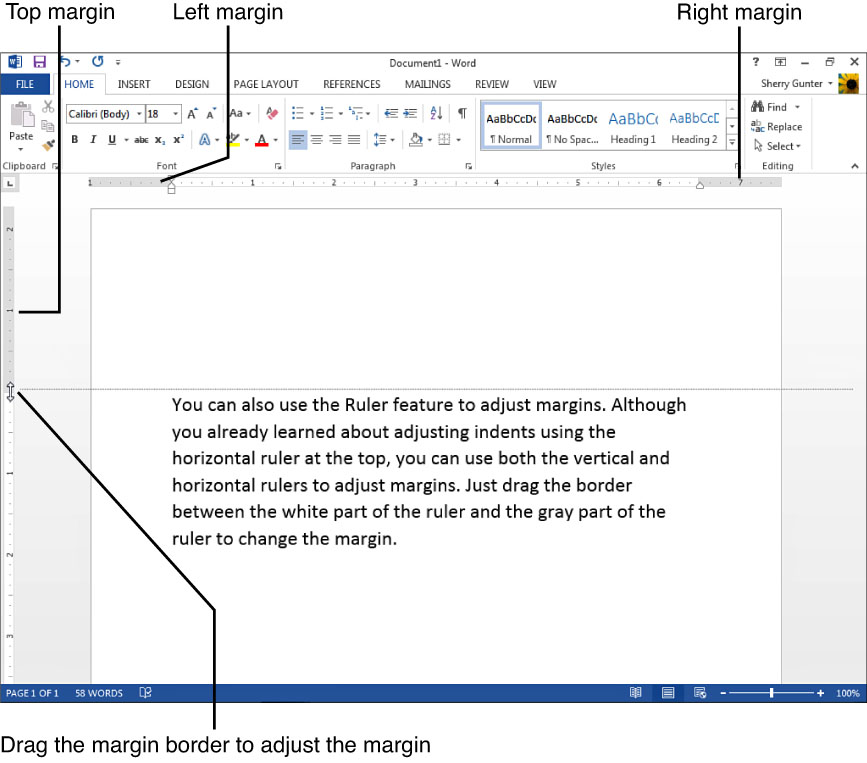
FIGURE 9.3 You can use the rulers to set margins.
If you want to return to the default margins, display the Margins drop-down menu and choose Normal.
Creating Columns
You can turn your text into columns that run up and down the page, just like columns you find in a magazine or newspaper. The column format is perfect for newsletters, brochures, and other printed publications. You can choose between several preset column formats, including two specialized formats that create a narrower right or left column (appropriately called Left and Right)—in other words, the columns differ in width size. You can also create your own custom columns. Figure 9.4 shows an example of columns at work in a document.

FIGURE 9.4 Use the Columns button to assign column formatting.
To create columns, follow these steps:
1. Select the text you want to turn into columns.
2. Click the Page Layout tab.
3. Click the Columns button (see Figure 9.4).
4. Click the number of columns you want to create and Word immediately applies the column formatting to the selected text.
If you need to create custom columns, you can open the Columns dialog box, as shown in Figure 9.5. You can use the dialog box to specify the number of columns, their width and spacing, and even include vertical lines to separate the columns. To display the dialog box, click the More Columns command at the bottom of the Columns menu (shown earlier in Figure 9.4).
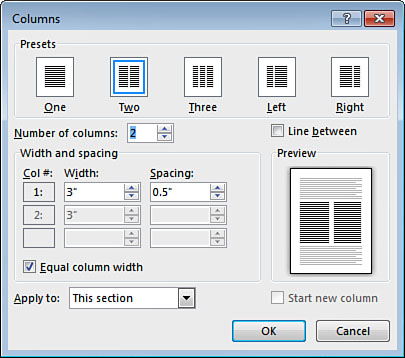
FIGURE 9.5 You can create custom columns using the Columns dialog box.
If you type new text at the bottom of the last column, Word assumes you want to keep using the column formatting. If you do, but need to insert a break of some kind, you can insert a column break. This breaks the column and starts a new column. To do this, click the Page Layout tab, click the Breaks drop-down arrow, and choose Column.
![]() Tip
Tip
If you ever need to revert to a no-column format in your document, select the column text or just click anywhere in the column and use the Columns drop-down menu to choose One. This returns everything to the default page width for the text. You can also do this to turn off the columns and start a regular page again.
Changing Vertical Alignment
Back in Chapter 8, you learned how to control all kinds of horizontal alignment on a page, including aligning text to a margin and setting indents, controlling spacing between lines of text, and using tabs. Did you know you can also control vertical alignment in your document? Well, you can. Word’s vertical alignment controls mirror the horizontal ones, which means you can align text to the top, center, and bottom of the page, as well as justify it between the top and bottom margins. By default, the vertical alignment is set to Top. This means everything you type in starts out at the top of the page. You can use the other alignments to shift text to align at the center or bottom of the page.
Vertical alignment isn’t quite as obvious as horizontal alignment, unless you only have a few lines of text or paragraphs on a page. However, you might find vertical alignment useful when creating title pages or other types of pages where vertical text is important.
![]() Tip
Tip
The best way to see vertical alignment happen onscreen is to adjust the zoom setting to see the entire page. Use the Zoom slider (in the bottom-right corner of the program window) to zoom out and view more of your document page.
You can find Word’s vertical alignment controls tucked away in the Page Setup dialog box, as shown in Figure 9.6. To display the dialog box, click the Page Setup icon, the tiny square with an arrow in it located in the bottom corner of the Page Setup group of tools on the Page Layout tab. After the dialog box is open, click the Layout tab and click the Vertical alignment drop-down arrow to choose another alignment. Click OK to exit the dialog box and apply the new setting.

FIGURE 9.6 Control vertical alignment through the Page Setup dialog box.
Take a look at Figure 9.7 to see how vertical alignment affects a title page. In this example, the Bottom alignment is assigned and all the lines of text stack up against the bottom margin.
FIGURE 9.7 In this example, vertical alignment is set to Bottom.
![]() Tip
Tip
You can choose to apply the vertical alignment setting to the current page rather than the whole document. You might do this for a title page, for example. Click the Apply to drop-down arrow at the bottom of the Page Setup dialog box and choose an option. On the next document page, you can reopen the dialog box and choose another alignment to apply for that page onward.
Adding Headers and Footers to a Document
There’s an invisible no-man’s land that exists between the top and bottom margins and the actual edge of the page—this area is called the header area at the top of the page and the footer area at the bottom of the page. You can use the header and footer areas to add extra elements to your documents such as page numbers, author name, dates, and other pertinent information about the document.
The great thing about this special area is that the information you place here prints on every page, which is quite helpful when organizing your documents.
Longer documents can really benefit from page numbers, and in a busy workplace environment, including the author information, document title, or dates at the top of every page can help other users know where the document came from or when it was created (see Figure 9.8).

FIGURE 9.8 Headers and footers appear between the page margins and the actual edge of the page.
Adding Headers and Footers
The Ribbon’s Insert tab offers access to headers and footers. As with a lot of things in Word, you can choose to create your own header and footer elements, or you can utilize one of the preset designs available. The presets are part of Word’s built-in elements, Quick Parts, which are preformatted elements sporting a variety of designs and styles. You might remember learning something about Quick Parts in Chapter 6, “Adding Text.” Most of the preset headers and footers feature placeholder fields—spots you can fill in with your own text. If you see a “Type Here” spot, that’s where you add your own stuff. Take a look at the drop-down menu for Header shown in Figure 9.9. You can scroll through the library of built-in headers to find something to suit your document.

FIGURE 9.9 You can choose from a variety of preset headers.
If you don’t see anything you like from the preset elements, you can look for more headers on the Microsoft Office website. You can also choose a header and edit to suit your own needs and then save it to the Header Gallery as a template piece to reuse again.
The Footer menu shows a similar setup but with some presets designed for the bottom of pages.
To actually assign a header or footer, just choose it from the appropriate menu. After doing so, you can replace any placeholder text with your own, as shown in Figure 9.10. When you insert a header or footer, Word instantly puts the cursor in the header or footer area and one or more special tabs appear on the Ribbon. You can use the Header & Footer Tools Design tab to add more preset fields (such as a date and time or filename) and customize your header or footer text, as well as assign any special options or positioning controls. You can also use the Design tab to navigate between the two areas of the page, if your document uses both header and footer information.
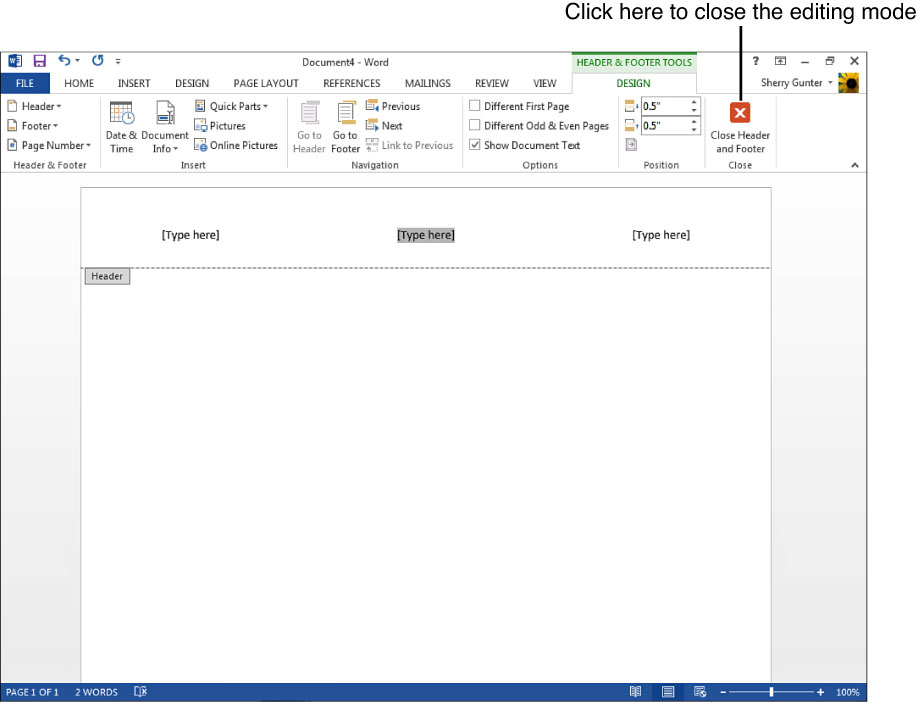
FIGURE 9.10 Word switches to a special editing mode to work on headers and footers, and displays special tabs of tools to help you with the task.
If the header or footer you choose utilizes a special design element, the Table Tools or Drawing Tools tabs might appear offering access to more tools for customizing header or footer appearance.
To start filling in header or footer information, click the placeholder text and type in your own. When you finish creating your header or footer, you can click the Close Header and Footer button on the Header & Footer’s Design tab, or you can double-click anywhere else on the document page.
To return to the header or footer area and make changes, double-click in the header or footer area. To remove a header or footer, click the Insert tab, click the Header or Footer menu and choose Remove Header or Remove Footer.
![]() Tip
Tip
Headers and footers print on every page, unless you specify otherwise. To control printing, open the Page Setup dialog box to the Layout tab where you’ll find options for placing different odd and even or first page headers and footers. Refer to Figure 9.6 to see the location of these controls.
Adding Page Numbers
You can insert simple page number headers or footers using the Page Number drop-down menu on the Insert tab. You can choose from a library of preset designs for various locations on the page. You can also format the numbers the way you want.
To assign page numbers, click the Insert tab and click the Page Number drop-down arrow. Next, choose a position for the numbers and choose a design from the library. Word immediately applies the page numbers to your document (see Figure 9.11).

FIGURE 9.11 Use the Page Numbers feature to insert page numbers as headers or footers on your document pages.
Like regular headers or footers, when you insert page numbers, Word opens the special editing mode for working with header and footer text, depending on where you chose to insert the page numbers. You can double-click anywhere else in the document to exit the special editing mode. To return to the header or footer area and make changes to the numbers or formats, double-click in the header or footer area. To remove the page numbers entirely, click the Insert tab, click the Page Numbers drop-down menu, and choose Remove Page Numbers.
![]() Tip
Tip
Need to navigate to a specific page in your document? That’s easy; click the Home tab and click the Find drop-down arrow, then click Go To (or press Ctrl+G). Type in the page number and press Enter.
Inserting Pages, Breaks, and Sections
When working with documents longer than a single page, Microsoft Word automatically inserts page breaks for you as you type. However, sometimes you need to insert your own new pages or breaks, or divide the document into sections. Not that this comes as a surprise to you by now, but Word has tools for doing all of this. For example, maybe you suddenly need a new page in the middle of your report to add some more information or a graph. You can easily add new pages where you need them. Or maybe you decide to insert a page break and start the next chapter on a new page. You can control page insertions using the Insert tab on the Ribbon.
![]() Tip
Tip
Word can also tally section numbers on the status bar. To turn on section number display, right-click the status bar and choose Section.
![]() Tip
Tip
Need to navigate to a specific section in your document? Press Ctrl+G to summon the Find and Replace dialog box to the Go To tab. Specify sections in the list box, then type in the section number and press Enter.
Inserting Pages
Ready for a blank page? Start by clicking in the page you want to appear after the newly inserted page. After you’ve done this, click the Insert tab and click Blank Page. Bada-boom, bada-bing, Word inserts a new, empty page for you.
You can also insert instant cover pages for your documents. A cover page typically includes some sort of document title, and information about the author, company, or creation date. You can choose from a variety of cover page builtins—preset designs in which you add your own original content. Click the Insert tab and click Cover Page to display a drop-down menu of choices. Scroll through and click the one you want, then replace any placeholder text with your own information.
Inserting Breaks
You can also control where a page breaks using, you guessed it, Word’s Page Break command. When you insert a page break, you’re splitting an existing page into two pages. This is handy when you want to turn a paragraph into the start of a new page, or end one chapter and start another. Click where you want to insert a break and click the Insert tab and click the Page Break command.
As you’re typing along, you can also use a keyboard shortcut to insert a page break: Press Ctrl+Enter.
If you click the Page Layout tab, as shown in Figure 9.12, the Breaks drop-down menu lists other page and section breaks you can add. You can use this menu to insert page breaks, column breaks, and several types of section breaks. Figure 9.13 shows an example of a page break.
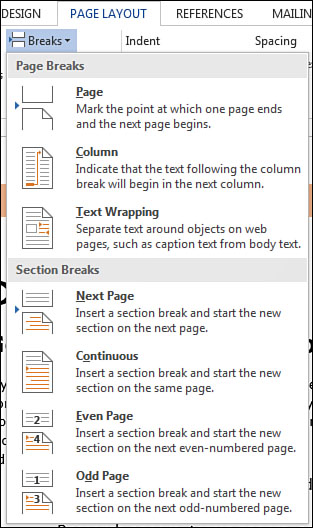
FIGURE 9.12 You can use the Breaks menu to insert page and section breaks.
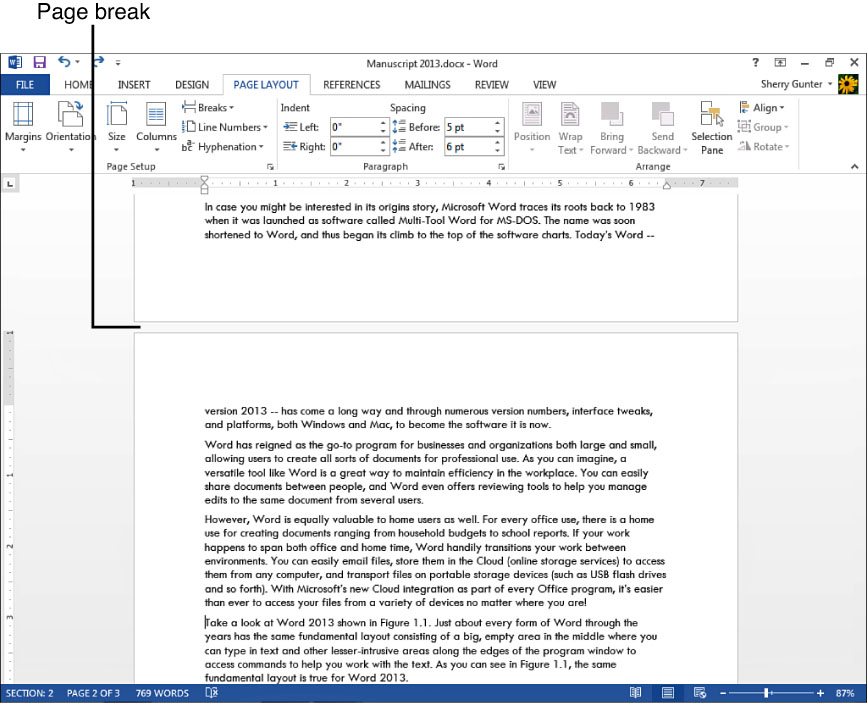
FIGURE 9.13 Here’s what a page break looks like in Print Layout view mode.
Section breaks work a bit differently than forcing a new page. You can divide a page into sections and utilize section header and footers for each section. Section breaks are typically used when you want to start a new area with new formatting. For example, maybe you’re creating a report that utilizes regular portrait-oriented pages (the page is taller than it is wide), but you need to add a graph that fits on a landscape-oriented page (the page is wider than it is tall). You can do this with a section break. Or maybe your research paper uses regular numbered lists in one part, but Roman numerals in another—a section break can help you format both separately.
With page breaks, the new page retains the same formatting as the previous page, but with section breaks, you can use completely different page formatting, including different margins, columns, or page orientation. You can choose from four different types of section breaks:
• Next Page Inserts a new page or continues text on the next consecutive page.
• Continuous Starts a new section without adding a page (common for columns).
• Even Page Inserts a new even-numbered page, or continues text on the next even-numbered page.
• Odd Page Inserts a new odd-numbered page, or continues text on the next odd-numbered page.
![]() Tip
Tip
To remove a break, turn on the display of paragraph marks (click the Home tab and click the Show/Hide button in the Paragraph group of tools—this feature toggles on or off). Now navigate to the page break in the file, select it and press the Delete key to remove it.