
19. Printing Documents
Okay, so you’ve made all these wonderful document files, perfected them with formatting, and proofread them so they sound super smart and professional. Now wouldn’t you like to print them out? In this chapter, I’ll show you how to preview documents before printing, how to adjust the printer settings, and how to print special things like envelopes and labels. As an added bonus just because I like you so much, I’m also going to take you through the top-secret steps for performing a mail merge—so you can see how fun it is to create mass mailings for business or pleasure. Well, mostly for business.
Previewing and Printing a Document
You can both preview and print from the same spot in Microsoft Word. Just open the Print window to see what I mean: Click the File tab on the Ribbon, and then click Print. Shown in Figure 19.1, the window features printer controls and options on the left and a preview area on the right. You can control how many copies you print, which printer you use (if you have more than one), and which pages print out, plus a whole lot more I’m going to tell you about.

FIGURE 19.1 You can preview and print from the same window in Microsoft Word 2013.
![]() Note
Note
You can add shortcut buttons for both printing and opening the Print window to your Quick Access toolbar—the toolbar that sits in the upper-left corner of the program window above the Ribbon. Click the Customize Quick Access Toolbar button (the arrow button at the right end of the toolbar). From the drop-down menu, click Print Preview and Print if you want to add a shortcut to the Print screen (refer to Figure 19.1). You can bypass the whole Print screen and go directly to printing if you add the Quick Print command to the toolbar.
Previewing Pages
Let’s talk about previewing first. The preview area is scrollable, as you can tell from the scrollbar that appears on the far right side of the window. You can use the navigation arrows at the bottom of the preview area to display different pages. Of course, these are only helpful if you’re previewing a document that’s longer than one page. Click a navigation arrow button to move forward and backward among the document pages. To view a specific page, type its number in the box and press Enter.
Another nice control is the ability to zoom in and out to view a page. Drag the Zoom slider left to zoom out or drag it right to zoom in, as pointed out in Figure 19.2. You can also click either end of the Zoom bar to quickly zoom your view. If you zoom in, the horizontal scrollbar appears so you can move around to view different parts of the page. To return to full page view again, click the Zoom to Page button.
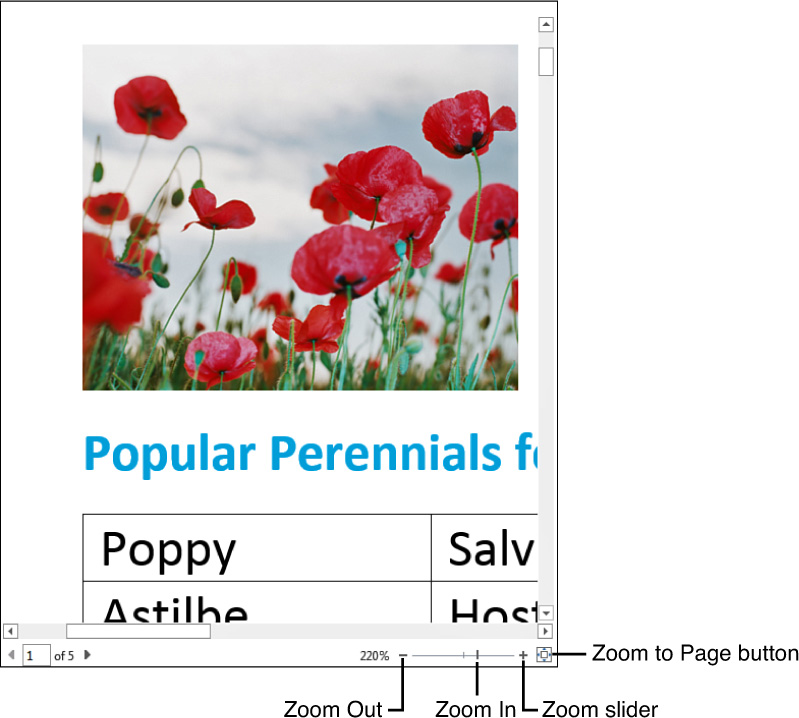
FIGURE 19.2 The preview area offers several controls you can use to check out your pages.
Managing Print Settings
If you’re ready to print and you’re confident all the settings are accurate as is, you can simply click the Print button (refer to Figure 19.1). That’s all it takes, and the document is off and running to the printer. However, if you need to adjust a few things first, such as specifying how many copies to make, then let me take you through all the settings available.
![]() Tip
Tip
Before you get ready to click the Print button, you first need to make sure your printer is connected, turned on, and ready to go. If you have more than one hooked up, you’ll have an opportunity to choose which printer you want to use. If you run into any kind of printing problems, most of the time it’s a hardware problem, like running out of ink or paper. A printer pre-check can sometimes eliminate problems before they arise.
Next to the Print button, you can use the spinner arrows or type in a number for the amount of copies you want to print. This one’s pretty self-explanatory. One copy is the default setting, so if you need two or more, you’ll need to change the value.
To change the printer used for the job (if you happen to have more than one connected), click the Printer drop-down arrow (see Figure 19.3) and choose one from the list. The list also reveals options for faxing, sending the file to Microsoft’s OneNote program, and so forth. At the bottom of the menu is a command for adding a printer, in case you just hooked up a new one that you want Word to recognize.
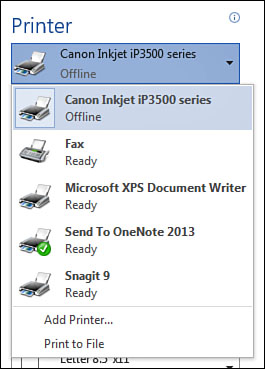
FIGURE 19.3 Change printers using the Printer drop-down menu.
Also at the bottom of the menu is the Print to File command, a holdover from the earlier days of word processing and DOS (which stands for disk operating system, one of the earlier personal computing platforms back in the ’80s). When you activate this command, it saves the document’s formatting and layout so a printing facility can print the file without needing to open it in its native application. You usually don’t have to worry about this sort of thing these days. Saving a file to XPS or PDF format does the same thing, and almost anybody can read the file in XPS or PDF format.
If you need to view settings pertaining to your particular brand of printer, you can open the Properties dialog box, similar to what you see in Figure 19.4. To display the dialog box, click the Printer Properties link located just below the Printer drop-down menu.
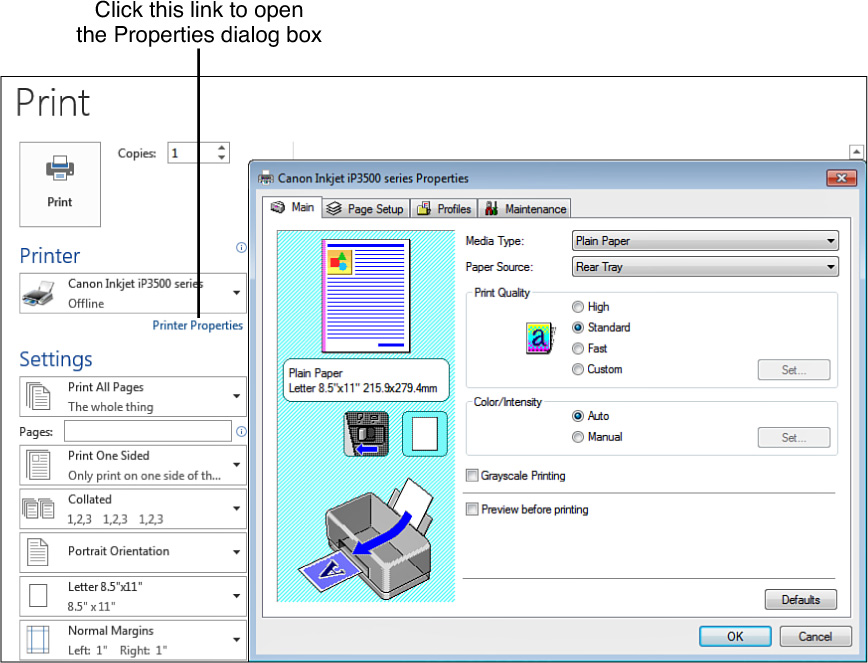
FIGURE 19.4 You can open a dialog box of properties for your particular printer.
You can control what prints using the first option listed under Settings, as shown in Figure 19.5. By default, Word assumes you want to print all the pages in your document and sets the option to Print All Pages. But if you click the drop-down arrow, you can choose to print just the current page, particular pages (which you then have to specify), or just the selected text (which you select in the document before flipping over to the Print window for printing). The menu also lets you choose to print extra document info, such as a list of styles used or file properties. The bottom of the menu lets you control odd and even page printing and whether any markup edit marks print.
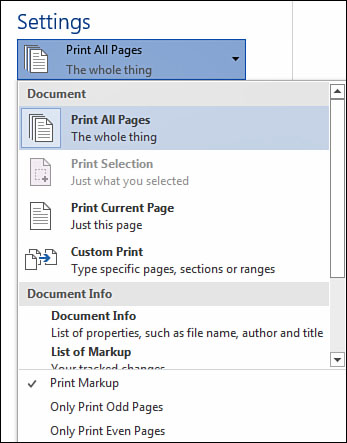
FIGURE 19.5 Control what prints using this menu.
If you need to print on both sides of the paper, you can click the next setting (see Figure 19.6) and instruct the printer on which paper sides are utilized or not utilized. Some printers can print both sides without any intervention, but others require some manual help to do this (such as home printers). You can choose the manual option and you’ll be prompted when to switch the paper load for the second side’s printing. The default setting, Print One Sided, does exactly as its name implies—just prints one side of the paper.
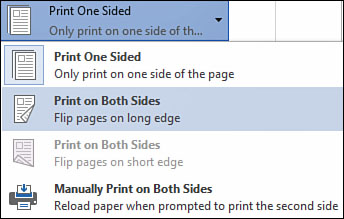
FIGURE 19.6 Use this menu to control which sides of the paper involves printing.
If you need to collate the pages for stapling together or binding, click the Collated drop-down arrow and choose whether to collate or not (see Figure 19.7). If you’re making two copies of a 10-page document, for example, you can choose to print each set of 10-pages in order, which is the Collated option. If you want to print out two or more copies of each page at a time, such as two copies of page one, then two copies of page two, then choose Uncollated.
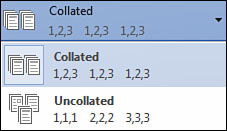
FIGURE 19.7 Need to collate your printouts? Use this menu to choose between collated and uncollated pages.
To change the page orientation, click the next setting (see Figure 19.8) and specify whether the page is taller than it is wide (portrait), or wider than it is tall (landscape).
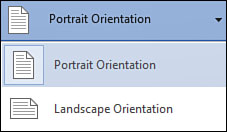
FIGURE 19.8 Choose a page orientation.
If you need to specify a paper size, such as legal size, click the Size drop-down arrow and choose your paper size (see Figure 19.9). The menu list includes label sizes, business card sizes, envelope sizes, and more. Plus, you can click the More Paper Size command at the bottom of the menu and open the Page Setup dialog box to more paper size settings. Letter size (8.5” × 11”) is the default setting.

FIGURE 19.9 Need a different paper size? Choose one from this list.
![]() Tip
Tip
Have you ever wondered why some drop-down menus drop up instead of down? It’s because of how much display space is available onscreen. If there’s not enough room to display the menu in a downward direction, Word displays it upward instead.
Want to adjust your margins before printing? No problem. Click the Margins drop-down arrow, shown in Figure 19.10, and make a selection. You can learn more about setting margins in Chapter 9, “Formatting Pages.” Careful, though; adjusting margins might create some issues for your pages, changing the layout and flow of text. Thankfully, you can preview everything you do in the preview area before committing the changes to a printout.

FIGURE 19.10 Use the Margins drop-down list to apply different margin settings to the document.
Lastly, you can fiddle with how many pages appear on a single printed page with the Page per Sheet drop-down menu, shown in Figure 19.11. Generally speaking, you only want to print one page on one piece of paper, but occasions might arise when you want to print 2, 4, 6, 8, or 16 pages on a single piece of paper. Naturally, the more document pages you print out on a single piece of paper, the smaller the pages appear and the less legible they are. But, hey, if you’re into saving some paper, sometimes printing several document pages on a single printout might be helpful. The other option on the menu is to scale your document to fit a certain paper size, which might come in handy if you need to squeeze a document built on a larger paper size model onto a smaller actual paper for a printer.
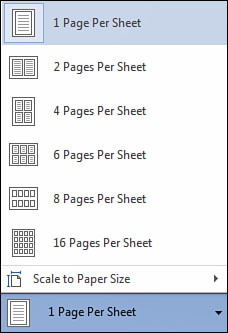
FIGURE 19.11 You can use this menu to print multiple document pages on a single printout page.
Any changes you make to the printer settings will remain in effect for any additional printing for the document, unless you change them again.
Controlling Page Setup
You can find plenty of tools for setting printing options before you actually get to the Print window. The Page Layout tab, for instance, lets you set margins, page orientation, and paper size with a click of a button. As you can see in Figure 19.12, you can click the Page Layout tab to view the settings, all of which are grouped under the heading Page Layout. You can set these options before you even begin building a new document, or you can assign them at any point of the document creation process. Just click the tab, then click a drop-down arrow to display a menu of choices.
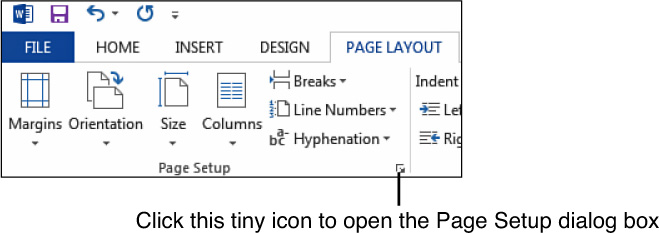
FIGURE 19.12 You can find page layout controls on the Page Layout tab for setting margins, page orientation, and paper size.
The following Page Setup group commands can help you control aspects of your pages before printing:
• Margins—Click this button to view a menu of margin settings you can apply.
• Orientation—Switch between portrait and landscape page orientation using this button.
• Size—Specify a paper size, such as letter or legal, using this drop-down menu.
You can also adjust page settings through the Page Setup dialog box. Click the Page Setup icon (the tiny box with an arrow on it in the corner of the Page Setup group of tools) to open the dialog box, shown in Figure 19.13. The dialog box has three tabs: Margins, Paper, and Layout. The Paper tab lets you choose a paper size and source for your printer. Simply make your changes and click OK to apply them to the document.

FIGURE 19.13 The Page Setup dialog box.
![]() Tip
Tip
You can learn more about setting margins in Chapter 9, as well as how to use the Page Setup dialog box to add headers and footers, and set vertical alignment options.
Printing Envelopes and Labels
Printing document pages is fairly straightforward; you click the Print button and away it goes. But did you know you can also print envelopes and labels with ease, too? Word has special tools for these very tasks, and I’m about to walk you through the steps for using them. Now go rummage through your desk drawer for some envelopes and labels and we’ll put these features to work.
Printing Envelopes
You can grab the address information off of any letter you create in Word and turn it into a printed envelope. Using Word’s Envelopes command, you can quickly whip up an envelope containing both the sender and delivery addresses, and control how the envelope prints out of your printer. Plus, you can change the font, envelope size, and position of the addresses on the envelope, such as moving an address to make room for a pre-printed logo on the envelope.
By default, Word is set up to process a standard size 10 envelope, which measures 4⅛" by 9½". If you need another size, you can specify one before printing. Also by default, Word assigns 12-point type for the envelope text, but you can change the font and size if you prefer something else.
Follow these steps to print an envelope:
1. Open the letter document containing the address information you want to turn into an envelope, similar to what’s shown in Figure 19.14.

FIGURE 19.14 To make your way to Word’s envelope printing feature, look for the Envelopes button on the Mailings tab.
2. Click the Mailings tab on the Ribbon.
3. Click the Envelopes button.
4. Word opens the Envelopes and Labels dialog box shown in Figure 19.15, to the Envelopes options. (If the Envelopes tab is not already selected, click it.) Based on the letter document, Word guesses as to which lines of text comprise the sendee’s address. To type another one instead, click in the Delivery address box and type another.
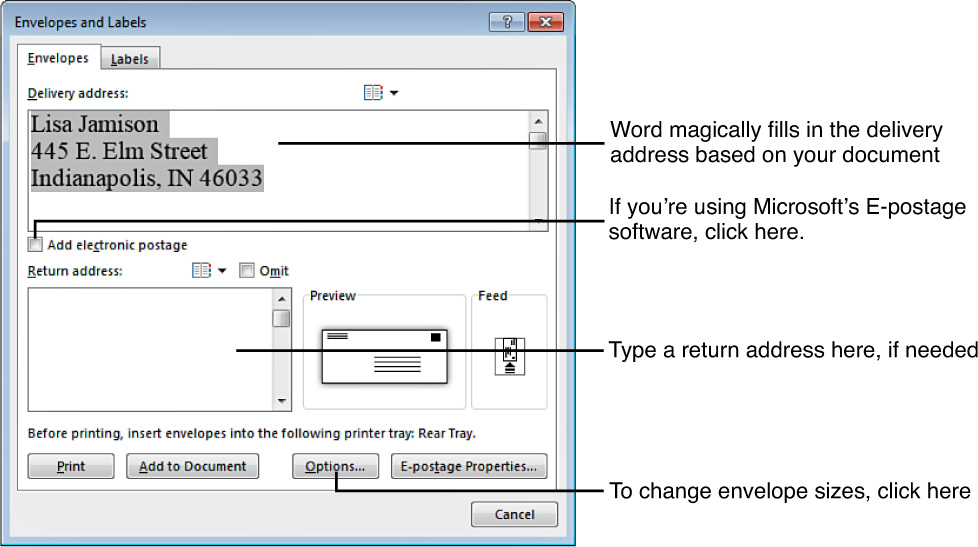
FIGURE 19.15 The Envelopes and Labels dialog box.
5. Click the Return address box and type in a return address, if needed.
6. Click the Options button to open the Envelope Options dialog box, shown in Figure 19.16.
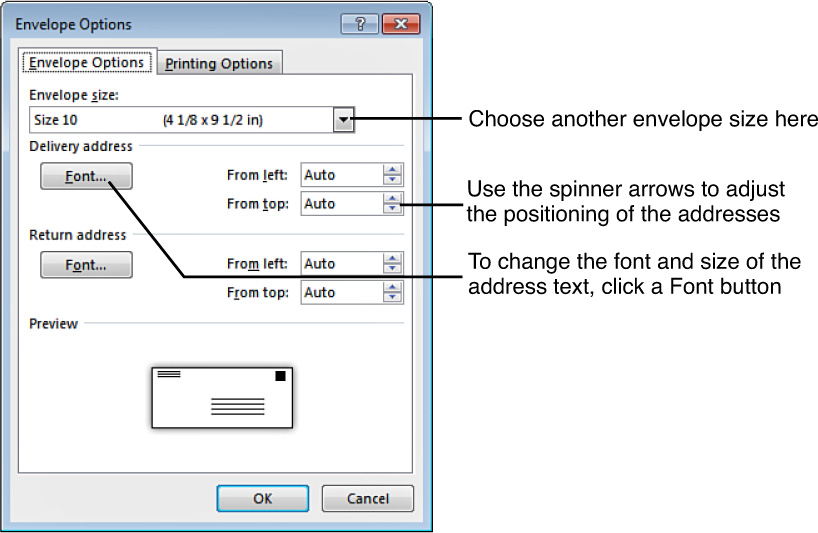
FIGURE 19.16 Use the Envelope Options dialog box to change the envelope size or reposition the addresses.
7. From the Envelope Options tab, click the Envelope size drop-down arrow and select a size.
8. If you need to control any positioning settings for either the delivery address or the return address, make your adjustments using the spinner arrows.
9. Click OK.
10. Click Print and feed your envelope through the printer per your printer’s configuration.
Are you using electronic postage? You can print it out on the envelope as well, but only if you install the electronic postage software from the Microsoft Office website. Go ahead and click the Add electronic postage check box (refer to Figure 19.15) and Word displays a prompt box with some instructions for visiting the website to download the software. If you already have the software installed, you can click the E-postage Properties button to adjust the settings as needed.
If you need to tweak how an envelope is processed through your printer, such as changing the feed method or which printer tray to use, click the Printing Options tab in the Envelope Options dialog box and make your changes.
![]() Tip
Tip
Tired of typing in your return address for envelopes and labels? Why not add it to Word’s customizing info so it’s automatically added each time? Start by clicking the File tab and clicking Options to open the Word Options dialog box. Next, click the Advanced category, then scroll down the page to find the General options. There’s a big text box located there labeled Mailing address. Type in your return address and click OK to exit the dialog box. Next time you use the Envelopes and Labels dialog box, the address is already there.
Printing Labels
Word also has tools to help you print out labels for addresses. You can print a single label or a sheet of labels. If you use label paper from a particular manufacturer, you can feed them into the printer, choose that manufacturer and label size, and print them from Word, too. When you create labels in Word, they’re turned into a table with cell size matching that of the designated label vendor size you select. Most label paper is self-adhesive these days, and the entire sheet of labels is constructed of individual labels spaced out across the page. Your Word-based labels need to match the layout of your label paper, so you’ll need to know the manufacturer and product number. Lots of label vendors are out there, including Microsoft, 3M, and Avery, so chances of finding a match among the labels listed in Word are pretty good. Even if you don’t, you can designate your own new label size and layout.
You have the choice of printing a single label from your label sheet, which is handy so you don’t waste label paper, or printing out a full sheet of the same label. You can also print out a sheet of different addresses. To do a full sheet of the same or different addresses, you instruct Word to create a new document. When you do, the addresses are all positioned across the page according to the label type you specify. To create a sheet of differing addresses, you can use this new document to type them all up. You can save the document to use over and over again.
Follow these steps to create and print a full sheet of labels:
1. Click the Mailings tab on the Ribbon.
2. Click the Labels button.
3. Word opens the Envelopes and Labels dialog box to the Labels tab, shown in Figure 19.17. (If the Labels tab is not already selected, click it.) If you’re creating a sheet of the same address, click in the Address box and type the text you want on the label.

FIGURE 19.17 The Envelopes and Labels dialog box with the Labels options displayed.
4. If you need to apply any special formatting to the text, right-click in the Address box and choose Font or Paragraph to open the corresponding dialog box and make your changes.
5. To print all the same label, click the Full Page of the Same Label option.
6. Click the Label section to open the Label Options dialog box shown in Figure 19.18 (or click the Options button to do the same thing).
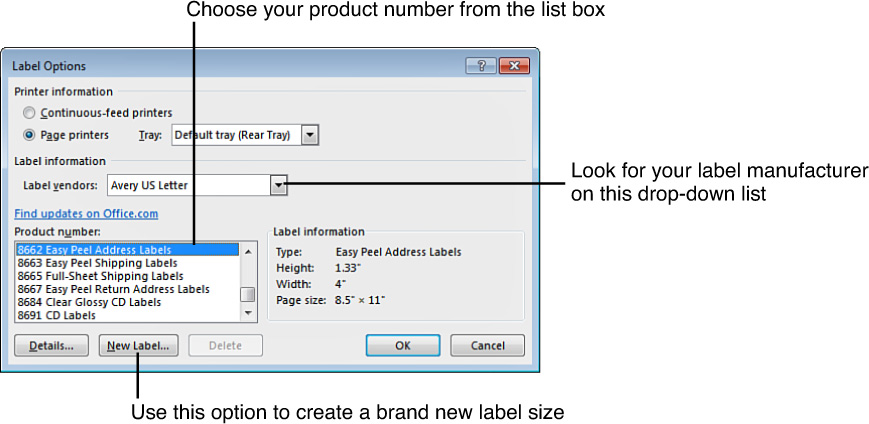
FIGURE 19.18 Use the Label Options dialog box to choose your label vendor and product number or style.
7. Select the type of label you’re going to print on; if you can’t find a match, choose New Label and enter the correct dimensions for your labels.
8. Click OK to return to the Envelopes and Labels dialog box.
9. Click New Document.
10. Word opens a new document with the label table in place (similar to what you see in Figure 19.19). If you’re printing different addresses, this is the place to type them all up. Click in a table cell and start typing them in.

FIGURE 19.19 How about that—a new document filled with a label table to match your label manufacturer’s label page layout.
Saving the page is a good idea if you want to reuse the labels again. Click the Save button on the Quick Access toolbar or press Ctrl+S to save the file.
11. When you’re ready to print the sheet, press Ctrl+P and feed your labels through the printer per your printer’s configuration.
![]() Tip
Tip
To avoid wasting your expensive labels, print a test set first. In step 11, use a blank sheet of printer paper rather than a sheet of labels. Place the newly printed page in front of a page of blank labels and hold the two sheets up to a light. If the printed text appears to be positioned correctly over the individual labels, you’re ready to print on the labels. If not, adjust your settings and repeat the test until the printed sample and the labels are perfectly matched.
If you want just a single label, you can type it up in the Address box and click the Single label option, and then specify which label on the sheet to put it in before printing.
![]() Note
Note
You can grab mailing addresses from your contacts database, such as Microsoft Outlook. Click the Address Book icon in the Envelopes and Labels dialog box to start the process of using a contacts profile.
Using Word’s Mail Merge Tool
Word’s Mail Merge tool has been around a while now with various editions of Word, but it’s still a pretty nifty feature even if it hasn’t changed much through the years. Basically, you can use it to create mass mailings, such as form letters, invitations, or mass emails. You create a form letter in which you can insert personalized information, such as names and addresses, and end up with a customized letter to mail out. The Mail Merge Wizard walks you through each phase of the process, taking all the guesswork out of it. You can type up a form letter before you get started, or you can stop and do so when prompted. You can also choose to insert contacts and addresses from an existing table (database) or start a brand-new list.
The secret to personalized mail merge documents is designating merge fields. A merge field is preset information for automating parts of a document. Merge fields act as placeholders for information that is inserted later. For example, if your letter starts with a contact’s address you can insert an Address Block field. If your form letter uses an opening salutation, you can insert a Greeting Line field that uses the contact’s first name and a salutation. When you merge the form letter document with your list of contacts, Word grabs the data from the designated fields (such as a contact’s address or first name) and inserts it into the document where you told it to.
To show you how this procedure works, we’ll begin with an existing form letter I’ve typed up. To get things rolling, click the Ribbon’s Mailings tab and click the Start Mail Merge button, as shown in Figure 19.20. We’re going to use the Wizard for this procedure, which is simply a step-by-step walkthrough using a pane, so click the Step-by-Step Mail Merge Wizard option to open the Mail Merge pane, shown in Figure 19.21.
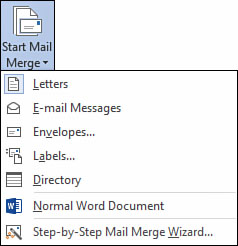
FIGURE 19.20 Start a mail merge using the Mailings tab.
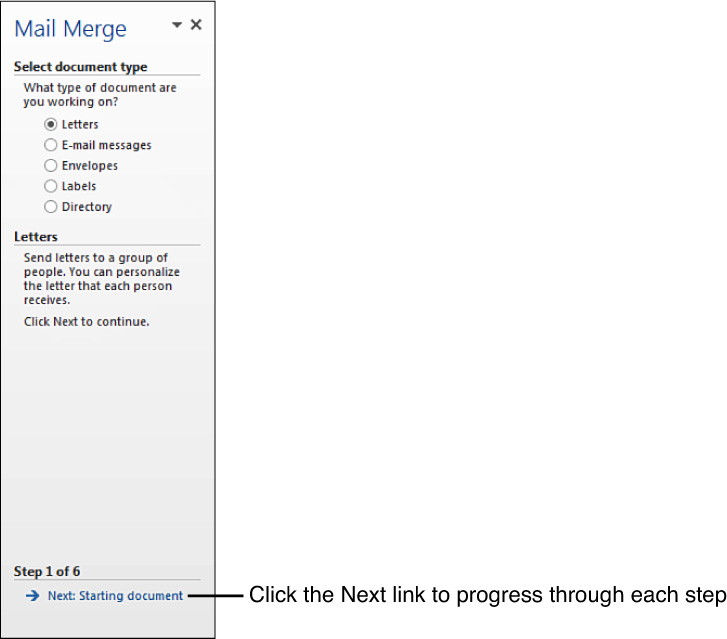
FIGURE 19.21 The Mail Merge pane walks you through each step.
Step 1, shown in Figure 19.21, is to select the type of document for the mass mailing. For this example, I’m going to choose Letters, but you can choose something else, if needed. After you make your selection, click the Next link at the bottom of the pane. Just so you know now, you can click the Next link every time you finish a step to progress to the next step.
Step 2, shown in Figure 19.22, asks you to specify a starting document. Unless you want to use another file as the form letter, leave the Use the current document radio button selected. You can also use a template or another document. Click the Next link at the bottom of the pane to continue.

FIGURE 19.22 Specify a document for the form letter.
Step 3, shown in Figure 19.23, is where it starts to get a little complicated. You need to choose your source for names and addresses—your contacts list. You can go several different directions here. You can use an existing database of contacts from a file or database, you can grab the information from your contacts list in Microsoft Outlook (if you happen to use Outlook), or you can type up a brand-new list of contacts. Just in case you don’t use Outlook or have an existing list, let’s build a new one. This route is going to take a little longer, but it’s good practice and you just might need a separate list file for other activities on your computer. Click the Type a new list option and then click the Create button to open a window to start typing in names and addresses, shown in Figure 19.24. Of course, if you use an existing list or Outlook contacts, you’ll be prompted to specify those files before continuing to step 4.
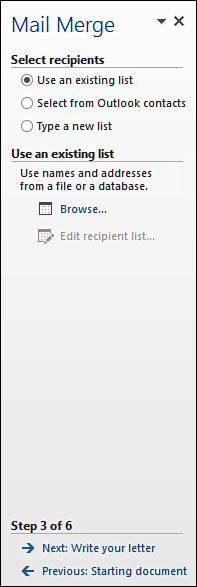
FIGURE 19.23 Choose the source of your contact data.
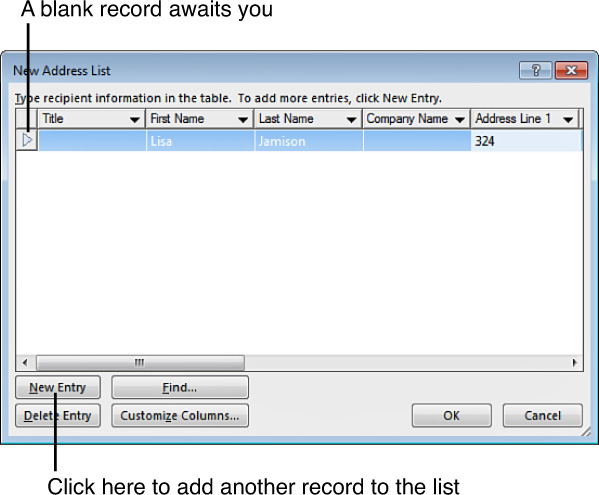
FIGURE 19.24 Use the New Address List window to build a brand-new database of contact information.
Meanwhile, back at the build-your-own list task, start typing in the first record (that’s what they call a contact’s information, in this case a row of entries). Click the Tab key to move from one column to the next. The default list format is pretty basic; each column represents a portion of the contact information, starting with title, first name, last name, address, city, state, and ZIP Code. After you finish entering all the data you want for the first contact, click the New Entry button and type in another. Keep repeating this procedure until you’ve completed your contacts list. When you’re done, click OK (see Figure 19.25). Word prompts you to save and name the new list you just made, as shown in Figure 19.26. Word saves this data as a database file format (.MDB file extension). This file type can be opened in a database program, such as Microsoft Access, in case you were wondering.
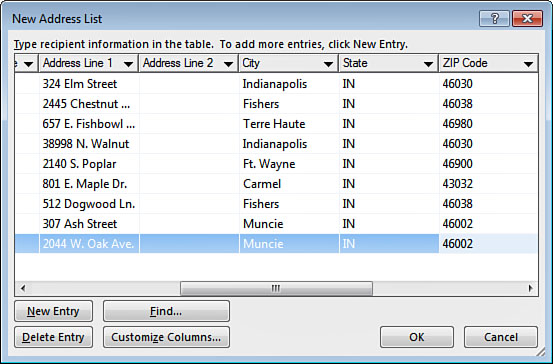
FIGURE 19.25 Click the OK button when you’re done creating your list.
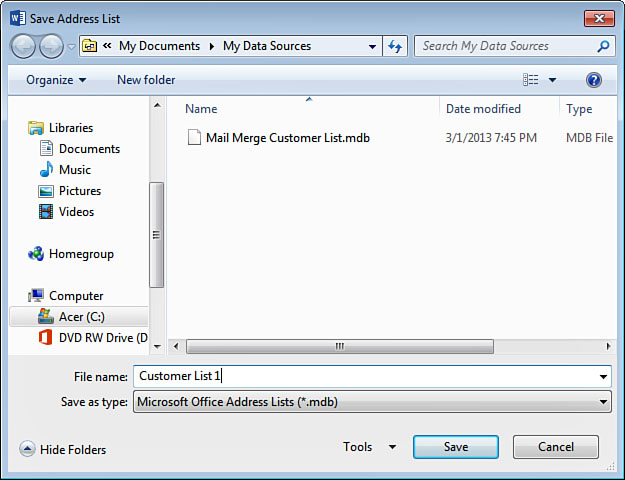
FIGURE 19.26 Word prompts you to save your list file.
You don’t have to use the default fields offered in the New Address List box. You can customize the bits of data you want to use for each record. To do so, click the Customize Columns button and start tailoring the record fields.
The Mail Merge Recipients box appears next, shown in Figure 19.27, listing everything again. This time, it’s to tell you that everybody with a check mark next to their name is going to be included in the mail merge. You can take this opportunity to uncheck anyone you don’t want included. Click OK to exit the dialog box. The newly created list (or at least its name anyway) now appears in the Mail Merge pane as your list source. Click Next to continue.
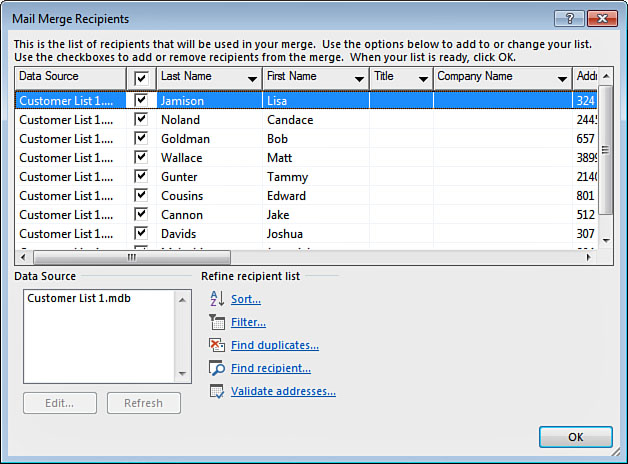
FIGURE 19.27 Now you have a source for the contact information needed for your mail merge.
Step 4 involves adding the special merge fields needed to grab contact information. Using the current letter, click where you want to insert the address and click the Address Block link in the Mail Merge pane, shown in Figure 19.28. Word opens the Insert Address Block dialog box (see Figure 19.29), previewing a contact from your designated list. Check to make sure the information is what you want (in this example, I’m looking for the standard address info, three lines that include the person’s name, street address, city, state, and ZIP Code). You can turn check boxes on or off for other options regarding the address information. Click OK when everything is to your liking.
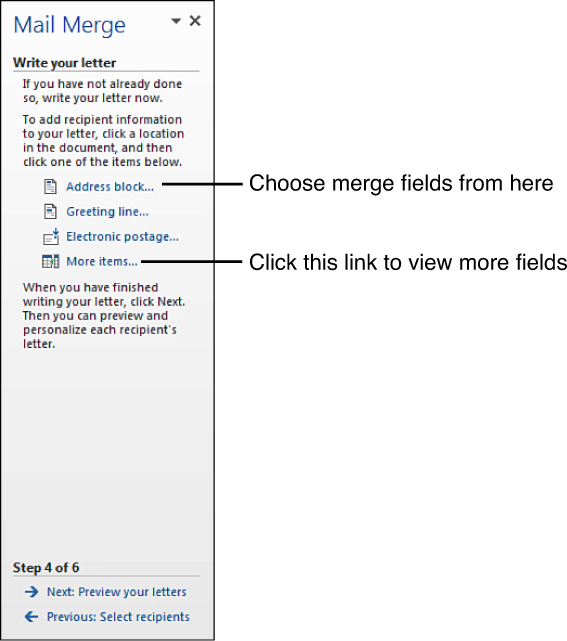
FIGURE 19.28 Step 4 involves inserting merge fields into your form letter.
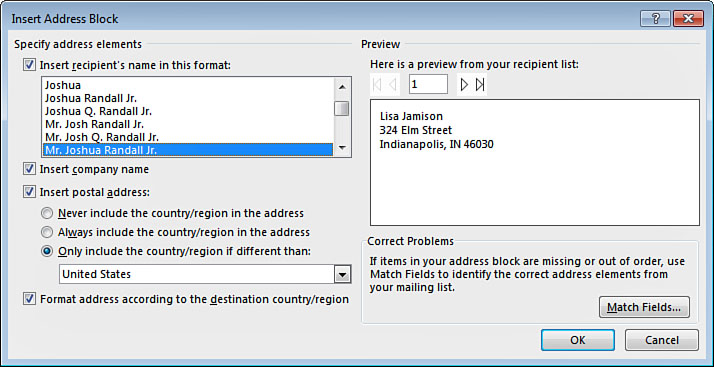
FIGURE 19.29 The Insert Address Block dialog box.
Word inserts the field, as shown in Figure 19.30. You can continue adding more fields to your form letter in spots where you want to customize it, such as a greeting. Figure 19.31 shows the Insert Greeting Line dialog box where you can choose an opening salutation and control how you want the greeting to appear in the letter. A similar type of dialog box will appear for each field you add to your letter. After you’ve placed all your merge fields, click Next in the Mail Merge pane to keep going.
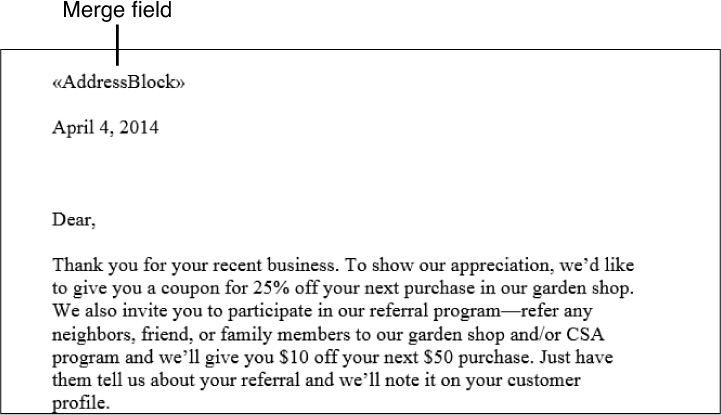
FIGURE 19.30 Merge fields appear with special markings in your document.

FIGURE 19.31 The Insert Greeting Line dialog box.
Step 5 lets you preview what your merged letter looks like with an actual merging of contact info into the letter, as demonstrated in Figure 19.32. You can use the navigation arrows in the pane to view different contacts’ data in the letter. You can also use this preview time to make adjustments to your letter or merge fields. Notice the Mailings tab has a group of tools under the heading Write & Insert Fields. You can use the tools to add more fields, highlight them in the letter so you can see where they are, and more.
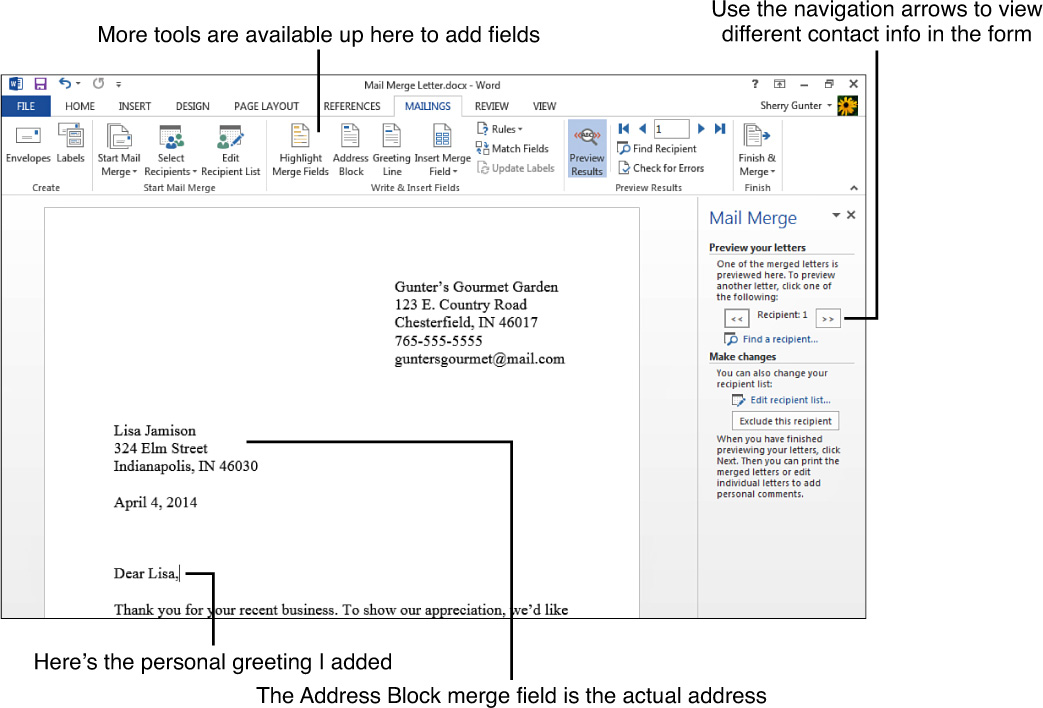
FIGURE 19.32 Step 5 lets you preview your form letter with actual contact information inserted into it.
Whew, we’re almost done. If everything’s looking good and you’re ready to merge, click the Next link at the bottom of the Mail Merge pane. Step 6, shown in Figure 19.33, instructs you on how to complete the merge. You can choose to print the letters directly, or open them in a new document file. Make your selection and away it goes. If you choose Edit individual letters, Word opens a new document with letters for each contact. If you go this route, a Merge to New Document dialog box opens and you can specify whether you want to merge all the records, or just certain ones. If you merge them all, you might end up with a very long document depending on how many contacts you’re mailing.
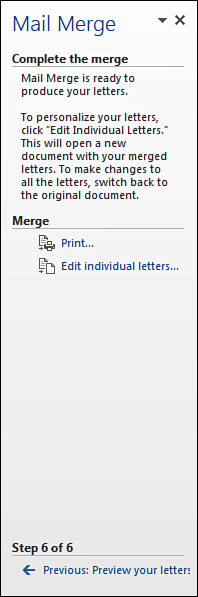
FIGURE 19.33 Step 6 is the last phase of the process; choose whether you want to start printing letters right away or view them all in another Word document file.
Well now, that was fun, wasn’t it? I know it seemed a bit complicated, but it really beats having to type up individual letters. It’s especially speedy if you already have a contacts list available and don’t have to build a new one.
We’ve reached the end of the road in this quest to learn about Microsoft Word 2013. Hopefully, you now feel more confident and qualified to tackle just about any word processing task that comes your way. I would hand you a certificate of completion or something, but you’re going to be so busy making documents now you won’t have time to frame it or hang it up anyhow. So, let’s just call it a job well done and part ways knowing you will always be my favorite reader. See you at the next Microsoft Word revision!