
8. Formatting Paragraphs
Another key part of making your documents look impressive is formatting paragraphs. Paragraph formatting refers to the commands you can apply to control how text is positioned on a page as well as features for enhancing blocks of text, such as indents, alignment, bulleted lists, and other spacing options. For example, you may want to center a page title or add some extra space between lines of text. You can find Word’s many positioning and paragraph commands grouped under the heading of Paragraph on the Ribbon’s Home tab.
Controlling Alignment
You can align your spine, your car, and your text, but the least painful of the three is text alignment. Granted, a car alignment isn’t actually physically painful, unless you count the pain to your pocketbook, and a good chiropractor can produce some pain-free results with your spine, but text alignment is super easy, fast, and you won’t feel a thing. Document alignment is all about changing how text aligns on a page. Word’s paragraph alignment commands control the position of text across the page. You can choose from the following alignments:
• Align Left Lines up text flush with the left margin. Align Left is the default alignment unless you specify otherwise.
• Align Right Lines up text against the right margin.
• Center Centers text in the middle of the page, between the left and right margins.
• Justify Lines up text with both the right and left margins, spacing out words in each line of text as needed (except the last line of text in a paragraph).
To assign any of these alignments, simply click the corresponding button on the Home tab. You can assign an alignment option to selected text or specify an alignment before you begin typing in new text. Each of the alignment commands have an icon representing what the command does; Align Left shows lines lining up to the left edge of the button, for example. Figure 8.1 shows an example of all four alignments.
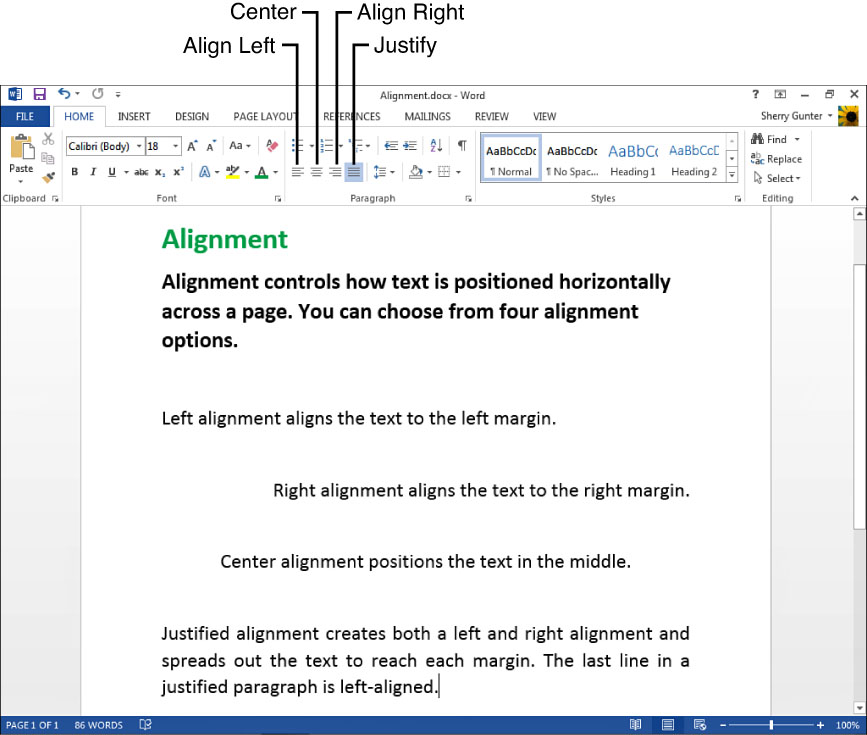
FIGURE 8.1 Alignment controls positioning of text across the page.
![]() Tip
Tip
If you’re into keyboard shortcuts, you can use the following to align text: Ctrl+L to align left, Ctrl+E to center, Ctrl+R to align right, and Ctrl+J to justify.
You can also find paragraph alignment options in the Paragraph dialog box, shown in Figure 8.2. Click the Paragraph Settings icon, the small icon in the corner of the Paragraph group of tools on the Home tab. Within the dialog box, alignment commands are located on the Indents and Spacing tab under the General options. Click the Alignment drop-down arrow to view the settings.
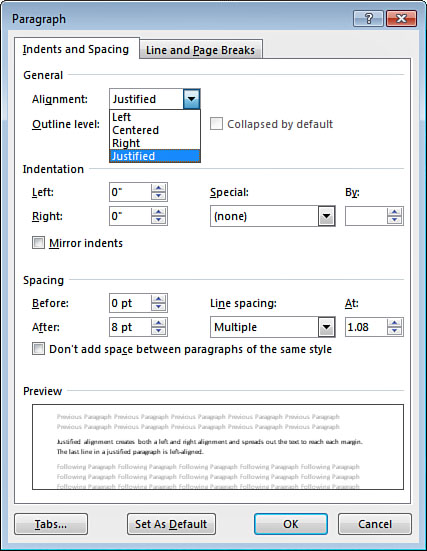
FIGURE 8.2 The Paragraph dialog box offers all the paragraph formatting controls in one spot.
You can also control vertical alignment using Word’s Page Setup dialog box. Learn more about vertical alignment in Chapter 9, “Formatting Pages.”
Indenting Text
Similar to text alignment, indents move text horizontally across a page and are useful for setting text apart from other text in a document or for creating uniform, crisp paragraph placement. You can use indents to nudge text over away from a margin, either the left or right margin, or both. Indents are commonly used for the first line of text in a paragraph, but you can use them in all kinds of other ways. You might indent text quoted from another source, for example, thus setting it apart from the document’s main text. Figure 8.3 shows several indents at work.

FIGURE 8.3 Here are a few examples of indents on a page.
Indents come in several flavors:
• Left Indent Use this indent to shift text away from the left margin.
• Right Indent This indent positions text away from the right margin.
• First Line Indent Indent just the first line of text in a paragraph.
• Hanging Indent This indent positions all the text in the paragraph away from the left margin except for the first line of text, which sort of hangs out to the left.
Simple Indents
If simple indents are what you’re looking for, you can use the Increase Indent and Decrease Indent buttons found among the Paragraph tools on the Home tab, shown in Figure 8.4. You can click either of these buttons to assign a quick indent at half-inch increments.
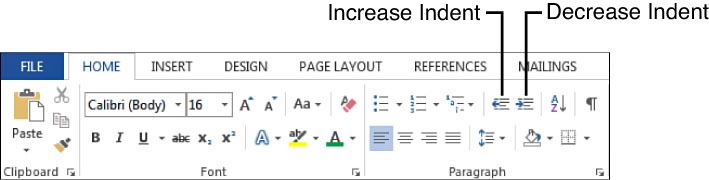
FIGURE 8.4 You can quickly indent a paragraph using the indent buttons on the Home tab.
Custom Indents
If you want custom indents—which are simply indents you control by defining your own measurements—you can use the Left and Right indent commands on the Page Layout tab, pointed out in Figure 8.5. Here you can specify an exact measurement for the left and right indents, measured in points. You can use the spin arrows to adjust the settings up or down, or you can type a number (in points) directly into the text box.

FIGURE 8.5 Use the Page Layout’s Indent commands to set exact indents for your paragraphs.
Special Indents
What about special indents, like a hanging indent? If you want to set a hanging or first line indent, you can use the Paragraph dialog box introduced back in Figure 8.2. Click the Paragraph Settings icon (located in the corner of the Paragraph group of tools on either the Home tab or the Page Layout tab), then click the Indents and Spacing tab within the dialog box, as shown in Figure 8.6. Click the Special drop-down arrow to specify a special indent. You can click the By spinner arrows if you want to set a specific measurement for the special indent.
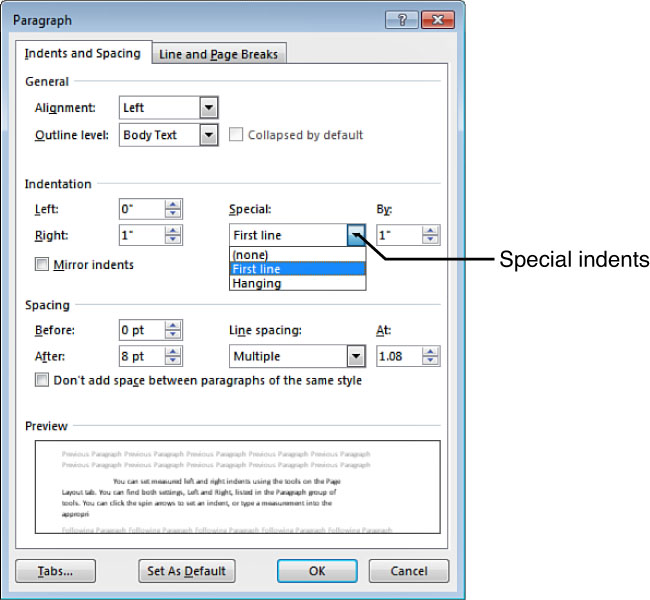
FIGURE 8.6 You can find all of Word’s indent settings in the Paragraph dialog box on the Indents and Spacing tab.
You can also set Left and Right indents using the Paragraph dialog box. After you’ve set your indent measurements, click OK to apply them to the current paragraph or any selected text.
Setting Indents with the Ruler
As if the previous indent options weren’t enough, you can also set indents in your documents using Word’s ruler. That’s right, Word has a ruler—but it’s not visible unless you turn it on. To do so, click the View tab and click the Ruler check box. Check it out in Figure 8.7. When the ruler is activated, you can view both a horizontal ruler at the top of the document and a vertical ruler running along the left side. Measuring in inches (by default), you can use the rulers to help you design your documents and position items on a page when needed.
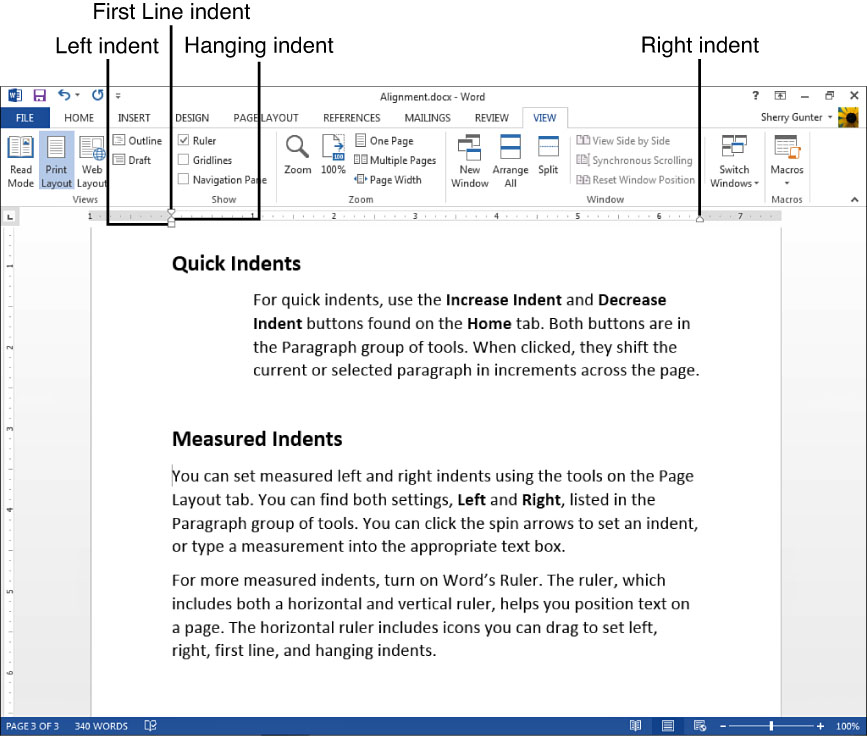
FIGURE 8.7 If you turn on Word’s ruler, you can use it to set indents, too.
For the topic at hand, the horizontal ruler is our tool for indents. If you look closely on the horizontal ruler, you’ll see some strange-looking icons. The left end of the ruler has three, two of which together look like an hourglass. Those are indent icons. You can drag them on the ruler to set indents. If you hover your mouse pointer over any of the icons, a Screen Tip appears identifying the type of indent it controls. The top icon of the hourglass creates a first line indent. You can click and drag it on the ruler where you want it. The setting controls the current paragraph and any new paragraphs you type after it, as shown in Figure 8.8.
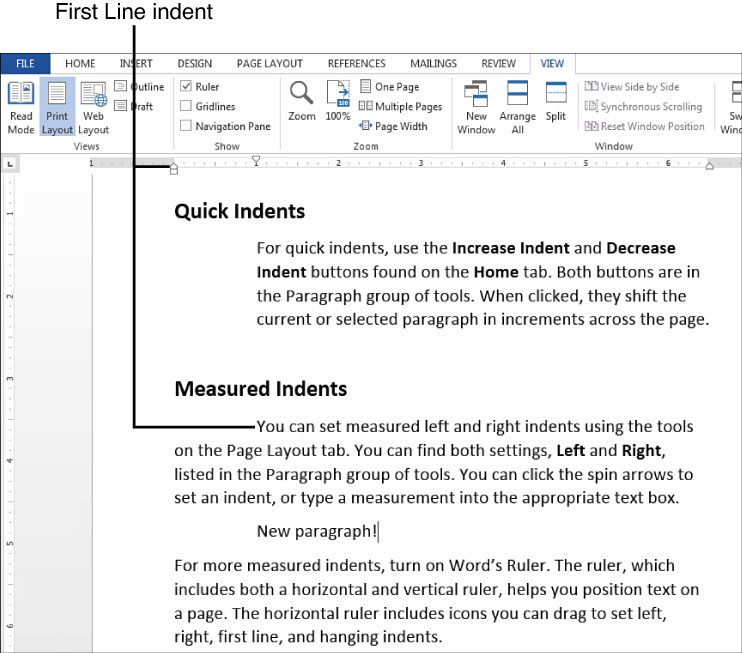
FIGURE 8.8 Here, a first line indent is set.
The second icon (bottom part of the hourglass) creates a hanging indent. Drag it to set a hanging indent for the current paragraph.
The third icon, which is a rectangle shape sitting under the hourglass, is the Left Indent marker. You can drag it on the ruler to set the left indent.
Over on the right side of the ruler sits the Right Indent marker. You can drag it, as well, to specify the right indent for the current paragraph.
![]() Tip
Tip
You can also toggle to the Hanging Indent and First Line Indent using the tab stop icons. See the next section to learn more about tab stops.
![]() Tip
Tip
Tired of the ruler? You can turn off the display by deselecting the Ruler check box on the Ribbon’s View tab.
By default, Word’s Ruler displays inches, but you can customize the measurement to something else. Click the File tab and click Options to open the Word Options dialog box. Click the Advanced category, then scroll down to find the Display group of settings. Click the Show measurements in units of: drop-down arrow and choose another measurement. You can choose from centimeters, millimeters, points, and picas—all common measurements in the world of typesetting.
To undo any of the indents, you can drag the markers on the ruler back to their respective positions.
Setting Tabs
You can use tabs in Word to create columnar text across the page. For example, you might want to use tabs to line up several columns of numbers or names. You can assign leader characters, such as dots or dashes, to tabs to display these characters between tab stops, as shown in Figure 8.9. You can use Word’s preset tab stops or set your own tab stop measurements.
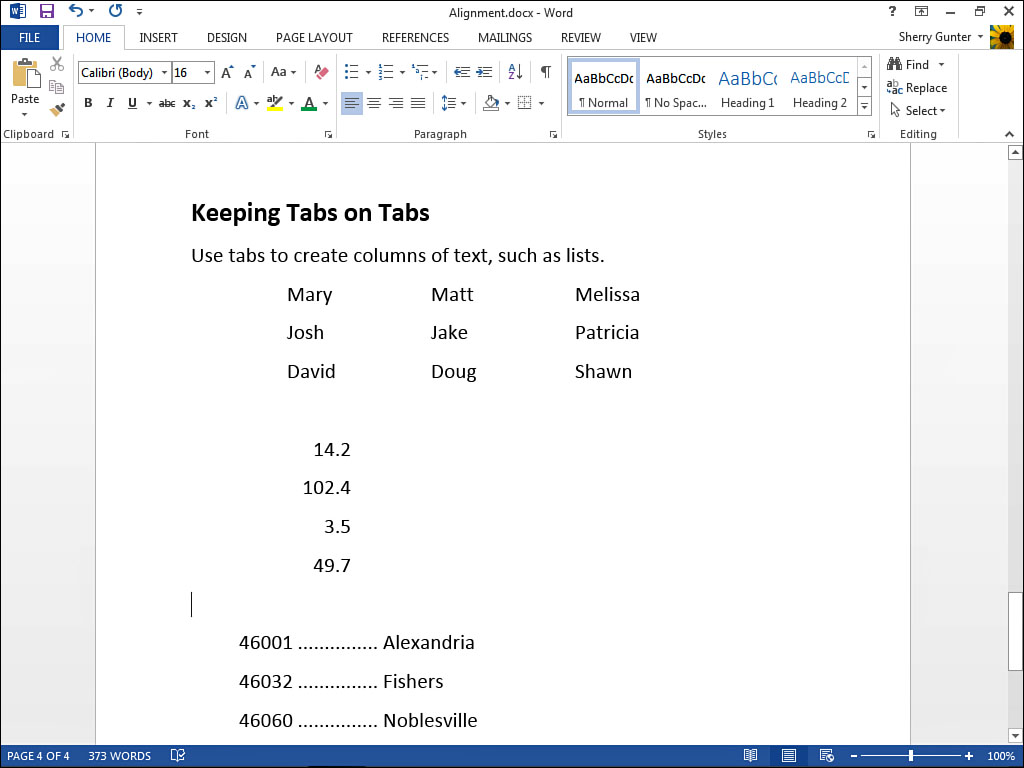
FIGURE 8.9 Here’s an example of tabs in a document.
Tabs are a remnant of the old typewriter days in which users had to manually create tab stops to move the typewriter carriage across the page at fixed stops to make columns. Creating columns of text in word processing programs is much easier today, specifically by using the Columns command, tables, or using indents. However, you might still find tab stops useful for your documents for a variety of tasks.
For starters, you can easily indent a line of text with a quick press of the Tab key on your keyboard. Some purists ridicule such an action, but what does it matter if you press a Tab key or activate an indent command? An indent is an indent on a printed page regardless of how it got there.
The handiest way to create tab stops is to use Word’s ruler. Click the View tab on the Ribbon, then click the Ruler check box to turn the rulers on. To the left of the horizontal ruler is a tab well. I know—it’s a strange name. Basically it’s a stack of tab stop icons. It actually toggles, when clicked, between several kinds of tabs:
• Left Tab Aligns tabbed text to the left of the tab column.
• Center Tab Centers the tabbed text in the tab column.
• Right Tab Aligns tabbed text to the right of the tab column.
• Decimal Tab Aligns decimals in the column.
• Bar Tab Aligns text to the left of a vertical bar.
The little icons that represent each type of tab stop give you a clue as to what type of tab stop it is. To set a tab stop, click the tab well until the tab you want to use appears. Next, click on the horizontal ruler where you want the tab stop to be set in the document. Word inserts a tiny icon on the ruler representing the tab, as shown in Figure 8.10. You can drag the icon to reposition it, as needed. Or if you no longer want the tab stop, just drag it off the ruler entirely.

FIGURE 8.10 Tab stops appear as tiny icons on the ruler.
If you would rather be more precise about your tab stops, you can open the Tabs dialog box. You must use the Tabs dialog box if you want to set leader characters between tab columns. Follow these steps:
1. Click the Paragraph Settings icon in the corner of the Paragraph group of tools (either on the Home tab or on the Page Layout tab) to open the Paragraph dialog box.
2. Click the Tabs button to open the Tabs dialog box, shown in Figure 8.11.
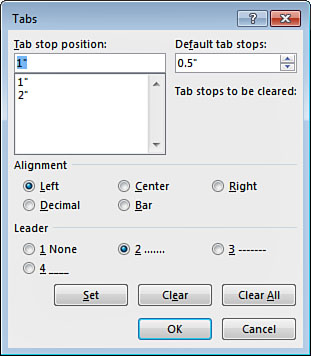
FIGURE 8.11 Use the Tabs dialog box to set custom tabs or add leader characters.
3. Type in the position for the tab (the default measurement is inches). Tab stops are measured from the left margin.
4. Click an alignment option.
5. Optionally, to assign leader characters, specify a leader character to use.
6. Click Set and Word adds the custom tab stop to the list. You can add more tab stops, if needed.
7. Click OK to exit the dialog box and start using your new tab stops.
You can revisit the Tabs dialog box to remove tabs; just choose the tab to remove and click the Clear button, or click Clear All to delete all the custom tabs in the list.
Using Bulleted and Numbered Lists
Say you’re typing along in a document and decide you need an organized list. Sure, you could create your own and type in numbers or make your own bullets out of asterisks or something, but why not let Word’s Bullets and Numbering tools help you out instead? Turning any text into a bulleted or numbered list is incredibly easy, as shown in Figure 8.12. Bullets are simply large dots or other graphics, whereas numbers are, well, numbers. Actually numbers can include Roman numerals and other multilevel listing formats as well.

FIGURE 8.12 Bulleted and numbered lists can really spruce up a document and turn ordinary lists into something special.
To create a bulleted list, follow these steps:
1. Select the text you want to turn into a bulleted list.
2. Click the Home tab.
3. Click the Bullets drop-down arrow and click a bullet style, as shown in Figure 8.13, and Word immediately applies the bullets to the list.

FIGURE 8.13 You can choose from the Bullet Library to assign a particular bullet style.
To create a numbered list, follow these steps:
1. Select the text you want to turn into a numbered list.
2. Click the Home tab.
3. Click the Numbering drop-down arrow and click a number style, as shown in Figure 8.14, and Word immediately applies the numbers to the list.

FIGURE 8.14 You can choose a numbering style from the Numbering Library.
You can also use the Bullets or Numbering buttons on the mini toolbar that appears next to selected text to create quick lists.
To turn off bullets or numbers, just click the Bullets or Numbering buttons on the Home tab to toggle the feature off again. You can also press Enter twice at the end of the list to turn off the listing feature and return to regular text.
![]() Note
Note
If you want to be a bit more choosy about your bullet or number styles, you can define something else using the Define New Bullet or Define New List dialog boxes. For example, at the bottom of the Bullets drop-down menu is a Define New Bullet option. Click it to open the Define New Bullet dialog box, and then click the Symbol button to choose a different bullet style from the Symbol dialog box.
![]() Tip
Tip
You can also utilize multilevel listing in Word, which is like bullets and numbers, but creates hierarchical lists with subsets of indented list text. To activate multilevel listing, just click the Multilevel List button on the Home tab—it’s right next door to the Numbering button.
Controlling Spacing
Up until now, we’ve been discussing horizontal spacing controls. Now let’s talk about vertical spacing in a document, particularly in regard to paragraphs and lines of text. When you start typing into a blank document, some default spacing settings are already in place. For starters, line spacing controls the space between lines of text. (It’s an appropriately named control, don’t you think?) Word automatically sets line spacing to Multiple, which puts 1.08 points of space between lines of text. This default setting is quite legible and easy to work with, but you might prefer something different. It turns out you can assign other settings. You might want double or triple spacing, or single spacing, or an exact amount of spacing between lines of text in a paragraph. You can control it all, as long as you know where the right commands are located.
In addition to line spacing, Word also automatically assigns some extra spacing between paragraphs, called paragraph spacing. (Didn’t see that one coming, did you?) By default, Word inserts 8 points of space after every paragraph you type. This might suit you fine, or might not be enough, or might be too much and you want to take it down a notch. You can do that using the paragraph spacing controls.
As if vertical spacing in paragraphs isn’t enough to ponder, you can also control the spacing between characters of text. So as you can see, you’re really in charge of your own space.
![]() Note
Note
If you’re curious about what a point measures, let’s just stop and satisfy your curiosity right now. A point measures about 1/72 of an inch. The point measuring system comes from the early days of printing when space between lines was called leading (pronounced “LED-ing”). Technically speaking, line spacing is the space between two baselines in a paragraph, the baseline being the imaginary line upon which the characters sit. Some characters, such as the letter t or the letter y (depending on the font style), feature ascenders (that rise above the midpoint) or descenders (that drop below the baseline), and they need a little extra allowance to make sure they appear legible. Back in the days of manual typesetting, printers used actual strips of lead to add space between lines of text for books and newspaper printing, and inserting the lead was known as leading.
Line Spacing
As mentioned previously, you can change the appearance of your document text by controlling the spacing between lines. Take a look at Figure 8.15 to see some examples of line spacing at work. Hopefully, you can see the difference in each paragraph. Depending on your situation, you might need a document with more or less line spacing. In some cases, changing line spacing can help you reduce the page count for a file by reducing the amount of space consumed by your text. In other cases, you might want to adjust line spacing to offer better legibility or to suit project needs.

FIGURE 8.15 Here are some examples of line spacing applied to different paragraphs.
To change the line spacing, follow these steps:
1. Select the text you want to change, or click where you want to set a new line spacing.
2. Click the Home tab.
3. Click the Line and Paragraph Spacing button (see Figure 8.16).
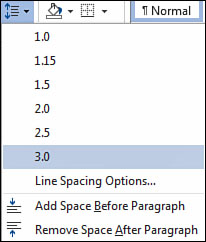
FIGURE 8.16 Use the Line and Paragraph Spacing menu to change line spacing.
4. Click a spacing setting and Word immediately applies it to the document.
You can also open the Paragraph dialog box to control line spacing, as shown in Figure 8.17. Click the Line Spacing Options command on the Line and Paragraph Spacing menu. With the Paragraph dialog box open, click the Line spacing drop-down arrow and make a selection. If you select Exactly or Multiple, for example, you can use the At spinner arrows to set a value for a custom line setting.

FIGURE 8.17 You can also open the Paragraph dialog box to change line spacing.
Paragraph Spacing
To control the spacing between paragraphs, you can use the same Line and Paragraph Spacing drop-down menu on the Home tab that you used to control spacing between lines of text. Word is automatically set up to add a little bit of extra space after each paragraph. You can change this value, such as setting it to 0 or specifying another measurement.
To make a quick change, select the text then click the Line and Spacing drop-down menu, shown in Figure 8.18. Click Add Space Before Paragraph to add extra space, or click Remove Space After Paragraph to remove it.
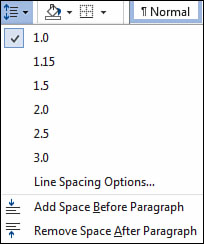
FIGURE 8.18 Use the drop-down menu for quick adjustments.
To specify an exact spacing, open the Paragraph dialog box (see Figure 8.19) and enter a value in the Before or After boxes. To display the dialog box, click the Line Spacing Options command in the drop-down menu, or click the Paragraph Settings icon (located in the corner of the Paragraph group of commands). You can use the Spacing Before and After spinner arrows to set a value, or you can type a value into the box. Remember, spacing is measured in points.
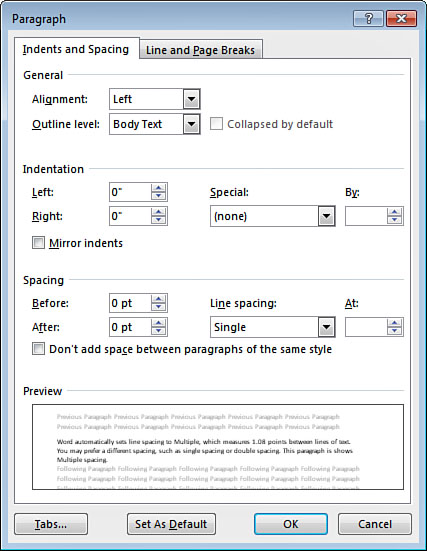
FIGURE 8.19 Or you can open the Paragraph dialog box to change paragraph spacing.
Does a paragraph need more oomph? Or maybe you want to completely set it apart from the rest of the page? Try assigning a background shade or color, or place a border around the paragraph. To add a background color, click the Shading drop-down arrow and pick a color from the palette. You can find the tool right next to the Line and Paragraph Spacing tool. If you prefer an actual border instead of a color, click the Borders drop-down arrow and choose a border style. (See Chapter 10, “Advanced Formatting,” for more on these special features.)
Character Spacing
One more way you can control text spacing is to adjust the amount of spacing that occurs between characters on a line of text, often referred to as tracking. You can expand or condense the appearance of characters using character spacing. I know this isn’t really related to spacing paragraphs per se, but it still falls under the umbrella of spacing and it can affect the appearance of your paragraphs. For example, you might want to expand text to fill a particular spot in your document, or you might need to condense it to fit properly in your document layout.
To change character spacing, you must first open the Font dialog box to the Advanced tab. Click the Font icon in the corner of the Font group of tools on the Home tab. Click the Advanced tab to view all the character spacing controls. Here you can adjust the scale of the font style, expand or condense characters, or change the baseline for your text. To adjust character spacing, click the Spacing drop-down arrow and choose Expanded or Condensed. You can use the By spinner arrows to adjust the value for each.