4. Playing Music and Video

In this chapter, you learn how to use the Music and Video apps to play music and watch video. You also learn how to use Apple Music.
![]() Sharing Purchases with Your Family
Sharing Purchases with Your Family
![]() Having It All with Apple Music
Having It All with Apple Music
![]() Using AirPlay to Play Music and Video on Other Devices
Using AirPlay to Play Music and Video on Other Devices
The iPad handles playing music as well as any iPod or iPhone ever has, plus it has a large, beautiful screen for you to use to browse your collection. Chapter 3, “Networking and Syncing,” explains how to sync music to your iPad from your computer. That’s one way to get music onto your iPad. You can also use the iTunes app to purchase music. Families can share purchases using the Family Sharing feature. Apple’s streaming music service, Apple Music, gives you unlimited access to nearly all the songs on iTunes.
No matter how you put music on your iPad, you play your music using the Music app. You can also listen to podcasts with the Podcasts app, and you can watch movies and TV shows with the Videos app.
New! iOS 10 Redesign
The Music app has undergone a redesign since iOS 9. The new design features white backgrounds, larger text, and more spacing between elements.
Playing a Song
So let’s start by simply selecting and playing a song synced to your iPad from your computer or purchased from iTunes. Skip ahead to the “Having It All with Apple Music” section if you are using Apple Music.
1. Tap the Music icon. It is located along the bottom of your Home screen, unless you’ve customized your toolbar and moved it elsewhere.

2. Tap the Library icon at the bottom of the screen, if it isn’t already selected.
3. At the top of the screen, tap the Library menu and then choose how you want to view the songs in your library. You can view a list of recently added songs, your custom playlists, songs by artist or album, a full list of all songs, or just your downloaded music.
4. Choose Artists.

5. Tap an artist on the left. A list of albums by that artist displays on the right. It doesn’t matter if you own all of the songs from that album, or just some of the songs, you’ll see the album artwork listed on the right.
6. Tap the album to view the songs in that album.

7. Some information about the album (such as the genre and the year it was published) is displayed.
8. The songs on the album are listed. Tap any song to play it.
9. At the bottom of the screen the currently playing song is shown. The Play button changes to a Pause button. You can tap this button to pause the song. If you let the song play out, the Music app continues with the next song in the list.
10. Use the Shuffle All button to play the songs in a random order. That probably isn’t what you want to do when listening to an album. But this interface is the same for playlists, which are often nice to shuffle.
11. Tap the song artwork to see a more detailed set of controls.

12. Tap and drag the dot along the slider to jump to a specific part of the song.
13. Adjust the volume by dragging the dot along the volume slider.
14. The list of songs shows you what song will play next. You can drag the three-line handles on the right side of each item up or down to change the order. You can swipe left to remove a song.
15. You can also tap here to set the whole list to repeat once, or repeat over and over.
16. Tap the left side of the screen to return to the album view.

17. Tap and hold any song to see a small menu on the left.
18. Tap to add a song to the top of the playlist so the song plays next. This allows you to browse through your artists and albums and decide what you want to listen to, song by song. (Instead of tapping once to start playing back the album as described in step 8, you can add a variety of songs.)
19. Tap to add a song to the end of the list.
20. Tap the Love button to indicate that this is one of your favorite songs. iTunes and Apple Music use this information to make suggestions for new music you might like.
21. Tap Artists to return to the screen showing your artists. You can also tap and drag anywhere on the screen from left to right.
22. At any time, tap the Search button to search for songs, albums, or artists in your library.

Siri: Playing Music
You can use Siri to play music.
Here are some examples:
“Play The Beatles.”
“Play ‘Georgia On My Mind.’”
“Play some blues.”
“Play my driving music” (plays the playlist named “driving music”).
“Shuffle all songs.”
“Skip.”
“Pause.”
Building a Playlist
Playlists are a way to take the songs you have on your iPad and arrange them in ordered groups. For instance, you can create one to listen to while working, while working out, while trying to go to sleep, or you can make a party mix for your next get-together.
Creating Playlists
You can create playlists in iTunes on your Mac or PC, but you can also build playlists on your iPad.
1. In the Music app, tap the Library button.
2. Tap the Library menu.
3. Tap Playlists.
4. You see a list of current playlists.
5. Tap New to create a new playlist.

6. Give the new playlist a name, such as My Playlist, by tapping here and typing a name.
7. Tap here and type a description for this playlist.
8. After you start to add songs, the Music app creates a piece of art for this playlist based on the art for those songs. But you can tap here and take a picture or use a photo from your Photos library instead.
9. Tap Add Music.

10. Search for music by artist, album, or song by typing the term you’re looking for.
11. Tap Artists, Albums, Songs, Genres, and so on to dig into your library to find songs to add.

12. Tap the + button next to a song to add it to the playlist.
13. Tap Library to go back up a level to continue to search for songs.
14. Tap Done when you are done adding songs to the playlist.

15. Tap and drag the three-line handles to the right of a song to move them up and down in the list.
16. Tap the red – buttons to remove a song from the list.
17. Tap Add Music to add more songs.
18. Tap Done when you are finished editing the playlist. You see the same list from step 4, but your new playlist is included. Tap it to view the playlist.

19. The playlist is now just like an album. You can tap a song in the list to start playing it.
20. Tap Edit to remove, add, or reorder the songs in the playlist.
21. Tap to shuffle the playlist to listen to it in a random order.

Making iTunes Purchases
You have lots of options when it comes to adding more music to your iPad. You can simply add more music to your iTunes collection on your computer and then sync those songs to your iPad. In that case, you can buy them from iTunes or another online source, or you can import them from music CDs.
How Else Can I Get Music?
You can purchase music on your iPad only through the iTunes app. But through your computer you can sync music that you get from any source that doesn’t use special copy protection, like CDs you import into iTunes. You can buy online from places such as Amazon.com, eMusic.com, cdbaby.com, or even directly from the websites of some artists.
Buying on Your iPad
In addition to syncing music to your iPad from your computer, you can purchase music, movies, TV shows, and audio books directly on your iPad using the iTunes app and using the same account that you use in iTunes on your computer.
1. Tap the iTunes Store app icon on your Home screen to go to the iTunes store. If this is the first time you have used the iTunes Store, you might be asked about setting up Family Sharing. See the next task for more information about this.

2. Tap Music at the bottom of the screen.
3. Initially, you see a screen showing featured albums and songs from all genres. But you can select a specific genre of music instead.
4. Swipe left and right to browse more featured albums.
5. Drag the screen up to reveal more lists, such as top albums, top songs, and music videos.

6. Use the Search field to search for an artist, album, or song by name.
7. Select a suggestion from the list, or tap the Search button on the keyboard to complete the search.

8. Find a song or album you want to buy, and tap its artwork to view more information.
9. Swipe up to move down the page and see ringtones, music videos, movies, and even books that match your search.

10. Tap a song name to listen to a sample of the song.
11. Tap outside the album window to close it and return to the previous view.
12. To buy a song, album, or any item in the iTunes music store, tap the price of that item, and then tap again on the Buy button.

Syncing Devices
After you make an iTunes purchase, the music, TV show, or movie you downloaded should transfer to your computer the next time you sync your iPad. From your computer, you can sync your new purchase to any of your other devices that use your iTunes account.
You can also set iTunes on your computer and your other devices to automatically download new purchases. So when you buy on your iPad, you get the new music everywhere. On your iPad, that setting is in Settings, iTunes & App Store, Automatic Downloads. In iTunes on your computer, the setting is in iTunes, Preferences, Store, Automatic Downloads.
Apple Music—No Purchase Required
If you use Apple Music, you don’t need to use the iTunes app to purchase music. There’s no need to use the iTunes Music store except for rare cases where some music may be available for purchase in iTunes, but it isn’t available for streaming in Apple Music.
Sharing Purchases with Your Family
Family Sharing lets you share items you purchase from iTunes with other members of your household. One family member is set up as the organizer, and his or her iTunes account is the one that will be charged for all purchases
Each member of the family sharing group can have their own Apple ID and iCloud account, which will be used for email, calendars, and other purposes. Purchases are made through the iTunes account of the organizer’s Apple ID.
In addition, those who are part of your Family Sharing group will also have a shared photo stream in the Photos app, a special shared calendar in the Calendar app, a shared Reminder list in the Reminders app, and they can see one another’s location with the Find My Friends app.
Setting Up Family Sharing
1. Tap Settings to open the Settings app, and then tap iCloud.
2. Tap Set Up Family Sharing.

3. Read through the screens telling you more about Family Sharing and asking you to read the legal agreement and confirm your Apple ID and payment information. Tap Get Started to begin working with Family Sharing.

4. You are listed as the organizer for Family Sharing. Tap your name to alter your settings.
5. Tap Add Family Member to add another family member to the group.

6. Type the member’s Apple ID email address or choose it from your list of contacts.
7. Tap Next.

8. Tap Send an Invitation to send the invitation to the family member’s iPad or other Apple device so they can confirm their membership in your Family Sharing group.

9. The other person sees the invitation when they look in Settings, iCloud. They should tap here to view the invitation.

10. They need to tap Accept to join the group.

Having It All with Apple Music
A popular option for music lovers today is to subscribe to an unlimited music service. Apple offers such a service, called Apple Music, which is built into the Music app on your iPad.
For a monthly fee, you can play music from a huge collection of millions of songs—nearly everything that is available in iTunes, with only a few notable exceptions, like The Beatles. You can listen to what you want, when you want, on your iPad, iPhone, and Mac. For a modest increase in the monthly fee, you can also share your music access with your family members.
Signing up for Apple Music is fairly easy, and Apple even allows you to try it for a while before you start paying for your subscription. After you are signed up, you can browse Apple Music and pick songs or whole albums to add to your collection in the Music app, and then play those songs any time you want.
Apple Music also includes a For You section that offers specially curated playlists and listening ideas based on your listening preferences and history.
Signing Up for Apple Music
You sign up for Apple Music in the Settings app.
1. In the Settings app, tap Music.
2. Tap Join Apple Music.

3. Tap the button to begin your trial period.

4. Select your plan. The Individual plan is just for you and works on all of the devices and Macs you have set up with your Apple ID. The Family plan also includes others you have set up with Family Sharing. Continue to follow the prompt to complete setup.

Cancelling
Signing up for the trial is low risk because you can always cancel your subscription before the trial period ends. Just tap the ID button at the top of the Music app (it looks like a circle with a head in it), select View Apple ID, and then tap Manage under Subscriptions.
Playing Songs with Apple Music
Think of Apple Music as an all-you-can-eat music buffet. You can search the entire Apple Music library and play any song you like. Let’s start off by searching for and playing a song. You can also add songs to your library just as if you had purchased them.
1. In the Music app, tap this icon to go to the New Music page of Apple music.
2. You see featured new artists, albums, and songs. Tap a song to start listening to it.
3. Alternatively, tap the For You button to see music that you might like based on your previous behavior.
4. Another alternative is to tap the Search button to look for a specific song, artist, or album.

5. Tap the search field and start typing your search term.
6. Make sure that you select Apple Music as the search type. If you have Your Library selected instead, you get search results for only music that’s already in your library.
7. Tap a result that best matches what you are looking for. Alternatively, you can tap the Search key on the keyboard to get all search results that match what you are typing.

8. If you see the song you want to hear, tap it and it starts playing.
9. Tap the + button next to any song to add the song to your library, which makes it easier to play the song again later. Adding songs to your library mimics “purchasing” the music, and the song is listed in your library next to others you have imported or purchased from iTunes. You don’t pay anything extra for the song, though, because it is part of your Apple Music subscription.
10. If you find an album rather than a single song, you can tap it to go to that album.

11. Tap + Add to add the entire album to your library. When you do, you’re asked if you want to have this album downloaded to your iPad. Doing so means that you can play the album even if you are not connected to the Internet at that moment.
12. You can also add a single song with the + button next to it, or tap the song name to simply play that song.
13. Apple Music screens usually include lots of ways to continue exploring. On this screen you can tap here to see all of the albums by David Bowie.

Playing Offline
The problem with streaming music services like Apple Music is that you need to be connected to the Internet to use them. However, you can decide to keep some of your music library on your iPad for offline listening. Step 11 explains how the Music app sometimes does this for you automatically. You can also tap the three-dot (...) button in Apple Music when viewing albums or playlists and tap Download to indicate that you want that album or playlist to be available offline.
Discovering New Music with Apple Music
Because you have so much music available to you with Apple Music, you might not want to just listen to specific songs. Instead, you might want to explore new artists or entire genres of music. Apple creates special playlists for this. You can also create a custom streaming radio station based on an artist or song.
1. In the Music app, tap the Search icon.
2. Make sure you are searching Apple Music, not Your Library.
3. Type a search term and tap the Search key to get results. You can type an artist name, a genre of music, a mood, decade, or anything that can be used to describe music.
4. Tap and drag to scroll down to see playlists.
5. Tap a playlist to go to it.

6. Read more about the playlist.
7. Tap a song to listen to it, or tap + to add the song to your library.
8. Tap Shuffle All to play the playlist in a random order.
9. Tap the ... button to download the playlist for offline listening, add it to your library, and other functions.

Discovering Music with Apple Music Radio Stations
Another way to explore is to listen to Apple Music radio stations. Apple has a professionally run streaming radio station called Beats 1 that has programming 24 hours a day. In addition, Apple curates special genre-based stations that are simply infinite playlists of music. You can also create your own streaming station based on a song or artist.
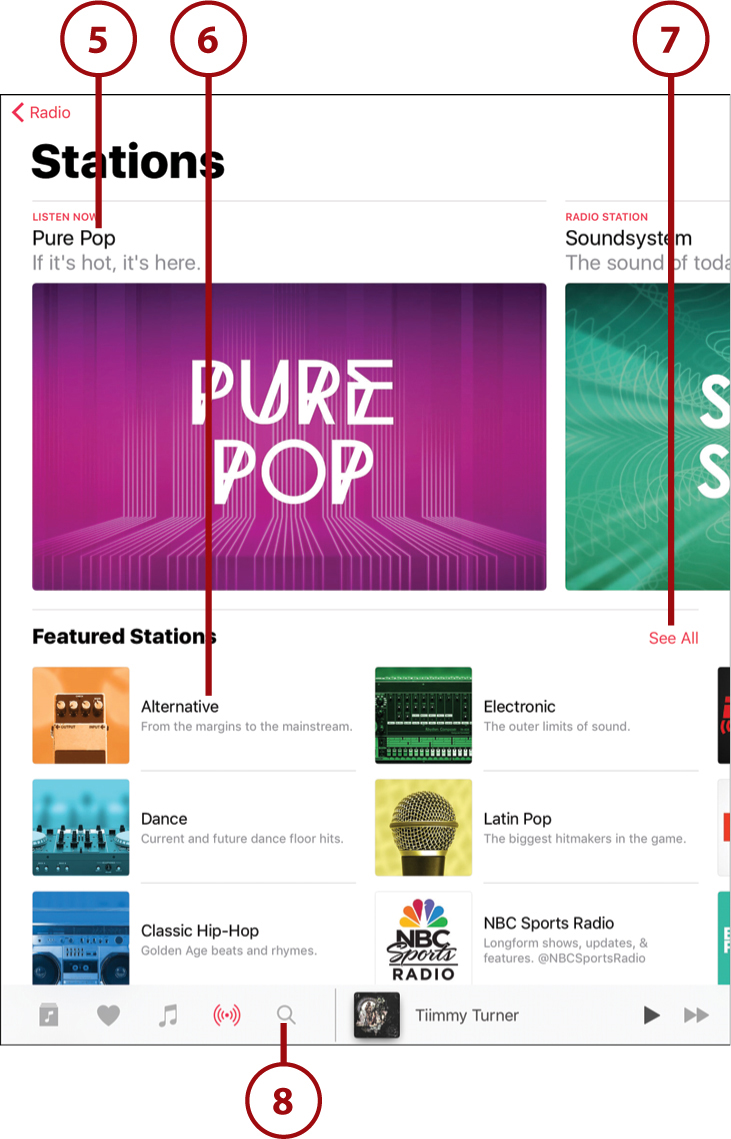
1. In the Music app, tap the Radio button.
2. Tap the Beats 1 logo to listen to Beats 1. Beats 1 is usually the first item in the main list on this screen.
3. Tap the Explore Beats 1 item to see upcoming shows and read more about their anchors (also known as disc jockeys).
4. Tap View All Stations to see more stations.

5. Tap any station to start listening.
6. Scroll down or to the right to keep looking at more available stations.
7. Tap See All to see a large vertical list of all stations.
8. Tap search to create your own station.
9. Type the name of an artist, song, or genre. In this example, I use the name of a song.
10. Swipe up until you see the Stations category in the search results.
11. There is always a station named after your search term followed by the word “Radio.” Tap this item to start a streaming music station based on this song.
12. Tap the control at the bottom of the screen.

13. You can see more information about the song currently playing.
14. Tap the + button if you like the song and want to add it to your library.
15. Use the star button to indicate whether you like this song and want more like it to be included on this station, or dislike the song and want to avoid songs like this. If you use this button often enough, the station gets better and better as it matches your tastes.
16. See what song Apple Music has planned to play next on the station.

How Do I Get Back to This Station?
After you create a radio station, you can find it again by tapping the For You button and looking under Recently Played.
Listening to Podcasts
Podcasts are episodic shows, either audio or video, produced by major networks, small companies, and individuals. You’ll find news, information, tutorials, music, comedy, drama, talk shows, and more. There is something covering almost any topic you can think of.
Subscribing to Podcasts
To subscribe to and listen to or watch podcasts, you use the Podcasts app from Apple.
1. Tap the Podcasts app icon on your Home screen.
2. Tap the My Podcasts button to look at the podcasts you’ve already downloaded. If you start off by looking at your library, you instead see a button labeled Store at the bottom left that takes you back to the screen in the figure.
3. Tap Featured to go to a screen with Apple’s currently featured podcasts. Alternatively, if you know what you are looking for, you can tap the Search button at the bottom of the screen to search for a podcast by name or topic.
4. Tap a podcast to get more information about it. You can also swipe right to left to view more in the list.

5. Tap Reviews to see what others have to say.
6. Tap the Download button next to a single episode to download just that episode. Then this changes to a play button and you can play that episode.
7. Tap Subscribe to subscribe to the podcast. This downloads the latest episode and also automatically gets new episodes as they become available.

8. Using the My Podcasts button from step 2, you can go to the list of podcasts you are subscribed to.
9. Tap the episode to watch or listen to it.
10. Tap the ... button and select View Full Description to get more details about an episode. Other options allow you to mark it as played without listening, queue it for future play, or delete it.
11. Tap the Settings button to set the sort order and auto-download preferences for the podcast. You would want a current events podcast to put the newest at the top, whereas a podcast that tells a story or is a learning series would be better suited for oldest on top.
12. Tap Edit to be able to delete podcast episodes from your library.
13. Tap the Edit button at the top left and then use the red buttons next to the podcast names to remove a podcast subscription.

Playing Video
After you have movies, TV shows, and home videos on your iPad, you need to play them using the Videos app.
1. Tap the Videos app icon on your Home screen.
2. The Movies you have on your iPad display by default. Tap Movies, TV Shows, or Home Videos to switch lists. If you don’t have videos in one or more of these categories, then that button might not appear at all. Other categories, such as Music Videos, might also appear if you have that kind of video content.
3. Tap a movie to view more information about it. Depending on the type of video, it might start playing immediately, which means you have to stop it to see the information. Movies show the information first, but Home Videos just start playing.

4. Tap the Play button to start the movie.

Any Video Alternatives to Apple?
You bet! There is a Netflix app for the iPad that Netflix subscribers can use to stream movies. Amazon also has an Amazon Instant Video app for subscribers to their service. Some companies, such as ABC, have also provided their own apps for viewing their shows on the iPad. You can also view video from any site that has video in standard MP4 formats. The site www.archive.org/details/movies has public domain movies and videos, often in MP4 format. The popular video site http://blip.tv also works well with the iPad.
5. After a movie is playing, tap in the middle of the screen to bring up the controls at the top and bottom of the screen.

If you shoot a home video with a video camera, or iPod touch or iPhone, you can bring that into iTunes on your Mac or PC and sync it to your iPad. They appear as Home Movies in the menu along the top of the Videos app.
6. Tap the Play/Pause button to play the movie and then again to pause it.
7. Adjust the volume with the volume control.
8. Drag the dot along the line to move to a different section of the movie.
9. Use the Back and Forward buttons to jump between chapters.
10. Tap the Done button to exit the movie and return to the movie information screen.
11. Tap here to shrink the video to play in a small window. This frees up the rest of the screen so you can go to other apps. You can check your email or surf the Web while watching a movie!

Changing the Orientation
For most video content, you can rotate your iPad to view in a horizontal orientation and use the Zoom button at the upper right to crop the left and right sides of the video so that it fits vertically on the screen. This is similar to watching a movie on a standard TV.
What About My DVDs?
If you can import CD music content into iTunes, you’d think you’d be able to import video content from your DVDs. Well, technically it is possible (although not necessarily legal) by using programs like Handbrake (http://handbrake.fr/) for your Mac or PC to import DVD content and then drag the resulting file into iTunes. You can then sync it with your iPad. These might also show up as Home Movies because your iPad doesn’t recognize them as official movie content.
Using AirPlay to Play Music and Video on Other Devices
In iTunes, with the Video app and many other apps that play music or video, you have the option to send the audio or video stream from your iPad to another device that is connected to the same Wi-Fi network, such as an Apple TV.
You need to enable AirPlay on those devices first. For instance, using the Apple TV (2nd generation models or newer), you need to go into settings on the device and turn on AirPlay. You also need to make sure that the device is using the same Wi-Fi network as your iPad.
Accessing AirPlay
1. While using almost any app, bring up the Control Center by swiping upward from the bottom of your screen. (See, “Using Notifications and Control Center” in Chapter 1.)
2. Tap the AirPlay button to bring up a list of devices. Note that if you do not have any AirPlay devices on your Wi-Fi network, you will not be able to select this.
3. Tap another device, and the music or video currently playing will start to play over that device.

AirPlay Everything
You can also use AirPlay to mirror your iPad’s screen with an up-to-date Apple TV. In Control Center, you see a Mirror switch appear under any video device you select. Use that to turn on mirroring and send your screen to the Apple TV. This is great for apps that do not have a specific video to present, like games or productivity apps. You’ll just see your iPad’s screen on the TV. Some video streaming apps, however, specifically block this.
Home Sharing
If you are using iTunes on your Mac or PC, you can play this iTunes content on your iPad if it is on the same local network.
1. In iTunes on your Mac or PC, choose Turn On Home Sharing from the File menu. You are prompted to enter your Apple account ID and password.

2. In the Settings App, tap Music.
3. Tap Sign In and enter the same Apple account ID and password used in step 1.

4. In the Music app, tap Library at the top.
5. Tap Home Sharing.

6. Tap the name of the library you want to access. The content in your Music app changes to reflect the content in the iTunes library on your Mac or PC. You can now play songs from your computer without having to transfer them to your iPad first.

What if My Library Doesn’t Appear?
Home Sharing is tricky. It requires that you use the same iTunes account IDs on both your iPad and on your Mac or PC. It also requires that you have the iPad on the same local network as your Mac or PC. In addition, network firewalls and other software might get in the way. It usually works effortlessly, but some users have reported trouble getting Home Sharing to work at all with their particular home network setup.