19. Maintaining Your iPad and Solving Problems

As you continue to use your iPad, you might have questions about how to do things and face problems you can’t solve. There are many ways to seek advice and help. You should also take steps to secure your iPad against theft.
Apple provides excellent support for their products. You can visit one of the Apple Stores for direct hands-on help. Apple also has a place on their website where you can seek out information and communicate with other iPad users. Additionally, there are often ways to get help from inside some apps and by using the iOS Tips app included on your iPad.
Getting Help on Your iPad
The Tips app offers general advice on using your iPad. Some apps include extensive help information inside the app.
Using the Tips App
The Tips app offers bits of useful advice about using your iPad. It does this by presenting a single tip on a screen, along with a graphic or animation.
1. Tap the Tips app icon on your Home screen.
2. Each screen has a single tip.
3. Swipe to the left to go to the next tip.
4. Tap Collections to see more tips that are organized into small collections.
5. Tap the Share button to share the tips by sending a link to the tip via Messages or email. Each link goes to the corresponding tip at Apple’s http://tips.apple.com website.

Updates
Apple should be updating the Tips app with new tips on a regular basis. So check back every so often to see what is there and learn something new. You might also get notifications from Apple when new items appear in the Tips app.
Getting Help Inside Apps
Many apps have how-to and help information inside them. Where to find it and how to use it depends on how the app developer designed the app. Pay careful attention to the buttons and navigation toolbars inside of apps to look for this information.
For instance, let’s take a look at Pages. It has both a help overlay system, which gives useful labels to buttons, and extensive documentation.
1. Tap the Pages icon to open it. Then, open an existing document or start a new one. See Chapter 11, “Writing with Pages,” to learn how to start a new document.
2. Tap the ? button at the top right.
3. Help overlays, called “coaching tips,” are turned on. The yellow labels appear, pointing to buttons and explaining their use with a few words.
4. A button at the bottom left appears that takes you to the documentation. Tap it.

5. Tap a subject to see a list of subtopics.
6. Tap a subtopic to see documentation about it.

7. You can read about the particular subtopic.
8. Tap the List button to return to the table of contents.
9. Tap the Search button to search for keywords in the documentation.
10. Tap Done to close the documentation window.

External Documentation
Many app developers put documentation on their websites. Be sure to look for links to this inside the app, but also use the App Store to find the name of the developer and search for his or her website. Sometimes the App Store listing includes a direct link to the website. Some developers don’t include documentation, but they have instructional videos or support forums that might help.
Getting Help from Apple
Apple offers various support options. You can visit an Apple Store, or ask a question online. Your iPad comes with a warranty, which you can extend for up to two years.
Visiting the Genius Bar
One of the most straightforward and easy ways to get help from Apple is to use the Genius Bar. This is an area inside every retail Apple Store. If you have an Apple Store at a nearby mall, then you have a Genius Bar there, too.
Although you can walk into the store and ask for an appointment, you usually have to wait a while, or come back later. It is easier to make an appointment online at Apple’s site, and then show up at the appointed time.
Appointments at the Genius Bar are free. You don’t need to be covered by a warranty or even have bought your iPad at that store. All you need is to have a question about an Apple product. If you have a question about your iPad, whether if it’s about how to do something or if you think it is broken, you should bring your iPad with you.
Making Appointments
The process for making appointments at the Genius Bar is long with many steps. Apple hopes to be able to solve your problem with an online article or tip and save you the trip and the demand on their staff.
Too Far?
If the nearest Apple Store is too far away to make a drop-by visit practical, you’re best off using Apple’s online troubleshooting. Start by going to http://www.apple.com/support/ipad/contact/.
1. Go to http://www.apple.com/retail/geniusbar/to start making your appointment. You can do this on your iPad, computer, or anything with a web browser. Tap the Get Help Now link.

2. You go through a series of pages where you choose your product (iPad) and the type of problem you are having (Battery, Mail, iTunes, and so on), and you get some suggestions of specific things you can do to fix the problem. The exact screens you see depend on the choices you make. If these screens are unable to solve your problem, you end up at this screen, where you can choose Visit the Genius Bar.

3. You might be asked to sign in with your Apple ID. You then go to a series of screens that help you find the closest Apple Store and set up an appointment time.

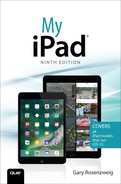
4. You see a list of nearby stores and a map. You can sort the list by availability or distance.
5. Tap a store. Note you can see the next available time listed with each store.
6. Use the appointment overlay to choose a day and time.
7. The reservation confirmation screen shows you the reservation information.
8. Add a comment with details of your problem, if you want. If a tech-savvy friend is helping you with your issue right now, but is unable to come with you to the Apple Store, this may be a good place for her or him to add some information.
9. Read the Before You Come In section, particularly the part about backing up. If you are able to back up your iPad to your Mac, PC, or iCloud before going to the Genius Bar, then do so. The solution to your issue might be a factory reset of the iPad—or possibly even a replacement iPad. In those cases, you will need your backup to restore all of your data and settings. See “Back It Up!” in Chapter 3, “Networking and Syncing.”

If your iPad has stopped working or isn’t functioning properly and you think it might need to be replaced, the Genius Bar should be your first stop. If they determine it needs to be replaced or repaired, they can start that process for you. Although the initial appointment at the Genius Bar is free, repairs might cost you, depending on whether you are still covered by Apple’s warranty. See “Extending Your Apple Warranty,” later in this chapter.
Asking a Question Online
What if your question isn’t critical or urgent? You can always tap into the huge community of iPad users by asking a question on Apple’s discussion forums.
1. Using the web browser on your iPad, or any computing device, go to http://discussions.apple.com.
2. Tap the iPad button.

3. You can tap a discussion to read the question and replies.
4. Swipe up to move down the page and see more. If you scroll down far enough, there is a Search field, and you can search for a discussion.
5. Tap Start a Discussion to ask a question. But be sure that you have searched exhaustively first. It is much better to find that your answer is already there than to ask it again and wait for a reply from a member of the community.

6. Type a title for your question that is short but accurately summarizes your problem. A title of “iPad Problem” is much too vague. A better title would be something like “iPad Screen Too Dark.”
7. Describe the problem with as much detail as you can. Be sure to include your exact model of iPad, your version of iOS, details about the problem, and things you have tried so far. Then check back later to see if you have any replies.

Keeping Your iPad Up-To-Date
One of the most important things you need to do to keep your iPad running smoothly is to make sure it gets all the latest software updates.
Updating iOS
Apple comes out with regular free updates to iOS. Some are minor updates that fix problems and make your iPad more secure. Others include new features.
1. Tap the Settings icon on your Home screen to open it.
2. Tap General.
3. Tap Software Update.

4. In this space, you should see a message telling you that your version of iOS is up-to-date. Otherwise, you might see a Download and Install button and some instructions that allow you to perform an update.
Your iPad should alert you when an update is available. But it is a good idea to periodically check the Settings app to make sure you didn’t miss an update.

Updating Apps
You should keep your apps updated as well. Just as with iOS, minor updates will fix problems, and major updates often introduce new features.
1. Tap the App Store icon on your Home screen to open it. Note that the number in the red circle indicates that you have some apps that need updating. But even if that red circle is not there, you might want to check anyway—it would force the App Store app to see if there are any updates.
2. Along the bottom of the screen, look for and tap the Updates button.
3. Look for Available Updates. If you don’t see it, that means all of your apps are up-to-date.
4. Tap an Update button to immediately update a single app. If you have a lot of updates but are short on time, you might want to update the apps you know you use right now, and then save the others for a more convenient time.
5. Alternatively, tap Update All to update all of the apps.
6. You can also read about apps that have recently been updated. Each update entry includes information from the developer about what is new.

Automatic Updates
In the Settings app, in iTunes & App Store, there is a setting for app “Updates” under the Automatic Downloads heading. If you have that turned on, then apps should automatically update without requiring that you go through these steps. But you can still use this process to check to see what has been updated and what notes are included with the update.
Securing Your iPad
Not only is your iPad valuable, but the information you have on it is valuable as well. If your iPad is lost or stolen, you want to make sure no one gets your information, and that you have a chance of getting your iPad back.
Basic Security Measures
There are four main actions you need to take to secure your iPad and your information.
• Set a passcode—This is covered in “Password Protecting Your iPad” in Chapter 2, “Customizing Your iPad.”
• Secure your Apple ID and iCloud account with a strong password—A strong password means you should not use a word that appears in the dictionary, a name, or a date in any format. Even a combination of those will make it easier for a malicious hacker to break into your iCloud account. Choose a password with random letters and digits, even mixing the case of the letters.
• Make sure Find My iPad is turned on, and you know how to use it—This is covered in the next section.
• Back up your iPad often—See “Back It Up!” in Chapter 3. You can back up your iPad to a computer using iTunes. You can also turn on iCloud backups by opening the Settings app, tapping iCloud, and then tapping Backup. There’s no reason you can’t do both. These options help you restore your documents and settings to a new iPad if the need arises. Of course, using iCloud to store your data, such as with Pages, Numbers, and Keynote, also means that all your documents would be in your iCloud account and accessible to your other devices.
The Apple Two-Step
In addition to setting a strong password for your Apple ID, you want to use Apple’s two-step verification system to make it even harder for someone to access your data. See http://support.apple.com/HT204152 to get started.
Using Find My iPad
So what happens if your iPad is missing? Your main tool in dealing with that is the Find My iPad feature built into iOS. It does more than its name suggests: Not only can you locate your missing iPad but you can also remotely wipe all your personal information from it.
Find My iPad should be on by default when you set up your new iPad and sign in with your Apple ID. Use the Settings app to check whether Find My iPad is on.
1. Launch Settings.
2. Select iCloud on the left.
3. Make sure Find My iPad is turned on. If it isn’t, tap it to switch it on. You’ll go to a simple screen with an on/off switch to turn it on.
That is all it takes to add a huge security feature to your iPad. Now let’s learn what to do if your iPad is missing.

Locating a Lost iPad
Now your iPad is missing, and it is time to take action. You can log on to iCloud on any computer, another iPad, or pretty much any device with a browser. In fact, you can use a special Find My iPhone app you can download from the App Store. It also works for iPads and even Macs. If you have an iPhone, or a second iPad, it is worth having this app on both devices so you can use it in case the other goes missing.
For this example, I’ve used a computer to log in to iCloud.com.
1. Go to http://icloud.com in a web browser. Alternatively, you can use the Find My iPhone app on your iPhone, if you have one, or on another iPad.
2. Sign in with your Apple ID and password.


4. This is where you keep your fingers crossed. If your iPad has been turned off, wiped by an evil genius, or destroyed in some way, then you might not be able to locate it. But give it a few minutes to try.

5. Whew! None of those things happened. There’s your iPad on a map. You can zoom in and figure out where the iPad is before going any further. Perhaps you simply left it at a friend’s house, in your car, or it fell behind the sofa. Best to be sure.
6. Tap the green dot to see some information in a bubble. You see the name of your iPad and the last time a signal from it was received.
7. If have more than one device registered with Find My iPhone/iPad/Mac, use the pull-down menu to focus on only one.
8. Once you are focused on one device, you will see information about it in an overlay.

9. Tap to have your iPad play a sound. Even if the volume has been turned down and muted, a sound plays at full volume. Use this if you see that your iPad is somewhere nearby, and you have simply misplaced it.
10. Tap to put your iPad into Lost Mode, which locks it. Because you have already set a passcode for your iPad, this should be redundant. But you can also use this to display a message on your iPad’s screen, which can be useful if you have simply forgotten your iPad in a friendly location, and you want to see if someone has found it and is willing to help you by contacting you.
11. Tap Erase iPad, which is the nuclear option. It wipes the memory of your iPad, clearing all your personal information. The downside is that you can no longer track your iPad using Find My iPad. So use this option when you have completely given up finding it and simply want to secure your information.
