
4
Synchronize Data Models—Binding and Triggers
“Associate reverently and as much as you can, with your loftiest thoughts.”
—Henry David Thoreau
We’ve discussed how JavaFX lends itself to separating the UI design from program logic. Ultimately though, you’ll need to establish relationships between these two worlds if you want to create an application of any significance. So how is this association achieved in JavaFX? The answer is through binding. In this chapter, we’ll describe the principle of Java FX binding, explore the semantics of the bind keyword with various JavaFX expressions, and furnish examples demonstrating how binding can and cannot be used. In addition, as they are in many ways related, we’ll touch on triggers and how they work within JavaFX too.
Binding
It is no mystery that the skill set required by the traditional programmer is often times vastly different than the graphic designer. Yet, expertise in both areas is necessary to create effective Rich Internet Applications. JavaFX encourages a division of labor along these lines such that the graphic designer and programmer could—and arguably should—be different individuals, each with different areas of expertise, working on distinct parts of a problem set. But somewhere along the line the fruits of their labors must be synchronized. This is where the concept of binding comes into play.
If, for example, you want the appearance of your user interface to reflect some state change in your logic, or vice versa, you’ll need a way for those differences to percolate over to one another. In JavaFX, the bind keyword is introduced to facilitate this capability. The act of binding a variable associates that variable with an expression, such that whenever the value of the expression changes, its bound variable will automatically change too. This simple yet powerful principle is all that’s needed to connect previously disparate models together.
More formally stated, the bind keyword associates the value of a target variable with the value of a remote variable. Binding in JavaFX follows this general syntax:
var v = bind expression;
where expression can be as trivial as another variable or can include a range of legal JavaFX expressions. When the expression on the right hand side of the bind statement changes, a minimal recalculation takes place. We’ll examine how binding affects each type of expression and what actually gets calculated on update.
Binding to Variables
Starting with the simplest case first and working our way toward the more complex, the code that follows demonstrates binding in perhaps its most trivial case, namely binding of a variable to another variable:
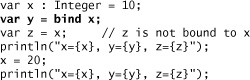
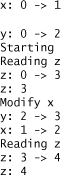
In the preceding example, the variable x is declared as an Integer and assigned an initial value of 10. A second variable y is declared and bound to variable x. Because it is bound to x, the type of y is inferred to be Integer without having to actually declare it as such. When the value of x changes, it forces y to be recalculated—in this instance, reassigned the new value of x.
The statement binding y to x is an example of unidirectional binding, meaning that there is a one-way relationship between x and y. When x changes, y changes, but y on the other hand has no influence on x whatsoever. By default, all binds are unidirectional in nature unless they are specified as bidirectional. This is achieved by including the with inverse keywords as part of the bind expression. We’ll discuss bind with inverse later on in this chapter; suffice it to say, it is traditionally used far less often than the default bind behavior.
In order to contrast between a bound variable and regularly defined variable, a third variable z is introduced. It too is assigned the value of x, but as it is unbound, its value will not change as x changes. Compiling and running this chunk of code produces output as follows:
![]()
Binding to Instance Variables
Variables inside classes can also be bound. To demonstrate, let’s make a few modifications to the preceding example code. Instead of having y and z variables defined at the script level, this time they’re placed inside a class called myClass. In this case, an instance of myClass has to be created, where within the object literal the binding of instance variable y takes place. Line 6 in the following listing creates the binding.

Not unlike the previous example, an additional instance variable, z, is also defined but unbound to demonstrate that its value does not change as the value of x does. Compiling and running this code block produces this output:
![]()
A best effort has been made to assure that the included code blocks contained in this chapter can be compiled and executed in a standalone fashion. When dealing with class definitions, more than likely you’ll want to declare them as public. For our examples, we declare the classes without preceding them with the public keyword. Although not ideal, this will facilitate you being able to cut, paste, and execute these code blocks into an IDE without having to modify the code.
When Can a Variable Be Bound?
With the default bind behavior, a variable can only be bound when it is being defined. In JavaFX, this takes place either with a var or def declaration or during object instantiation via object literals. (The topic of binding and object literals, being a bit more complicated, will be discussed later on in this chapter.) Endeavoring to bind in any other fashion will either result in a compiler or runtime error. For example, declaring a variable first and then trying to use bind in an assignment statement like
![]()
produces the following compilation error, shortened for the sake of brevity:

Furthermore, after a variable has been bound, by default it cannot be subsequently reassigned. Attempting to do so will throw an AssignToBoundException when the guilty code is actually run. As an example, the following code will compile successfully:
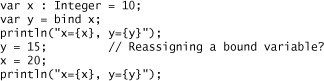
But upon execution, when the assignment of the previously bound variable is encountered, a runtime exception is thrown:

One way to avoid the previously noted exception would be to use the def keyword, rather than var, to define the binding relationship between x and y. If y were to be defined like
def y = bind x;
the attempt to reassign y would instead be caught by the JavaFX compiler and flagged as an error at compile time. As an aside, we’ll see later on in this chapter that the reassignment restrictions mentioned in this section do not apply when using the bind with inverse clause.
Finally, you cannot bind to an operation that would produce side effects. For example,
var x = bind y++;
is not permitted.
A Simple Example Using Binding
We have thus far been highlighting bind’s capabilities by examining small chunks of code. This affords us the ability to focus on the task at hand without having to worry about additional clutter; however, it does not necessarily provide the proper context for how bind might be used in a (slightly) more realistic application. So let’s apply what we’ve learned so far to show how binding can affect what will actually show up on the screen.
The program in Listing 4.1 always displays an image, the contents of which will change depending upon where the mouse is currently located. While running, this program has two states:
1. When the mouse is hovering directly over the image, the image displayed will include text that suggests that in order to change this image, move your mouse outside the image.
2. When the mouse is not hovering over the image, the image displayed will include text which suggests that if you want the current image to change, run your mouse over it.
Listing 4.1 A Sample UI Program Demonstrating the Use of Binding

Figure 4.1 visually depicts what this program would look like when run, and its two possible display states. The image changeover is accomplished in this way:
1. The program creates two instances of the JavaFX Image class, image1 and image2. Their bitmaps are read from a file represented by the url instance variable.
2. At any point in time, the variable currentImage will either point to image1 or image2. Its value is updated whenever the mouse pointer either enters or exits the image on the display. When the mouse pointer enters the image, the onMouseEntered handler will be executed setting the currentImage variable to image1. When the mouse leaves the image, the onMouseExited handler will execute setting currentImage to image2.
3. The actual display is updated by binding the value of currentImage to ImageView’s image instance variable. In particular, the line of code represented by image: bind currentImage makes this happen.
Figure 4.1 The Two Individual Display States for This Application Depend upon Where the Mouse Is Located

Binding with Arithmetic and Logical Expressions
When binding to arithmetic and logical expressions, a bind recalculation takes place if any component of the expression appearing to the right of the bind keyword changes. Let’s run through an example to demonstrate:
prints out:
![]()
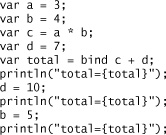
The definition of the variable total specifies that its value will be recalculated whenever c or d change. The second line of output (total=22) is the result of a bind recalculation because the value of d changed from 7 to 10. As part of the recalculation, c does not change. Its value is stored and re-retrieved for the sake of that recalculation. For the third line of output, even though b changes, the bound variable total is not recalculated because neither c nor d changed.
In the preceding example, you may have noticed that the variable c is assigned the product of variables a and b. Yet when either component of c changes it does not cause total to be recalculated. It’s quite possible that the author really meant to have total updated whenever a, b, or c change. This can be accomplished by replacing c’s declaration from
var c = a * b;
to
var c = bind a * b;
Now whenever a or b change, c will be updated, which in turn causes total to be recalculated too. This cascading of bound variables is a powerful concept and is one that you’ll likely encounter often when examining JavaFX code. Re-running our example with the modified statement yields
![]()
Binding and Conditional Expressions
Binding variables to conditional expressions of the form
var v = bind if (conditionalExpression) expr1 else expr2
produces a change in which branch of the if-else statement, expr1 or expr2, gets evaluated when conditionalExpression changes. Again, resorting to sample code

demonstrates how one could use binding with a conditional expression to, in effect, compute the maximum value between two variables. In this case, the bound variable max will always contain the larger of the values of a and b. Whenever a or b change, the conditional expression (a > b) will be reevaluated potentially resulting in the update of max. The output of the code above yields
![]()
Binding and Block Expressions
A block expression in JavaFX is a sequence of zero or more statements with a terminating expression enclosed in curly braces. Binding to a block expression takes on this general syntax:
var v = bind { [statement;]* expression }
As will become important when bound functions are discussed later, the terminating expression is the block’s return value. In reality, bound blocks are quite restricted in functionality in that the statements inside a bound block are limited to variable declarations only. When trying to use any other type of statement (i.e., assignment, insert, delete, etc.), a compilation error will result. So let’s run though a few examples to see what can and can’t be done with bound block expressions:

Binding to Function Calls
So far, we’ve seen how variables can be bound to arithmetic and logical expressions, and in those cases where the bound expression is a relatively simple one, it makes perfect sense to use these facilities outright. But what if your binding expression is a bit more complex? At this point, you could attempt to fabricate a more complicated binding by combining together any number of arithmetic or logical expressions. For example, expanding upon a previous example, this time instead of binding to an expression that finds the maximum of two variables, a and b, let’s bind a variable to the maximum value of three variables, a, b, and c. Using if-else expressions, the assignment statement could look something like this:
![]()
It’s not exactly the prettiest code, and it won’t win you many friends when the time comes for a code review. Instead, one preferable substitute might be to delegate the computation elsewhere and bind to that result. In essence, it would be a lot nicer to bind to a function call. Let’s take a look at how this can be done.
First, a getMax() function could be defined, which takes three arguments and returns the value represented by the largest of the three arguments. Next, a new variable, called max2, is defined and bound to a call to getMax(). The alternative to the original messy bind expression now looks like
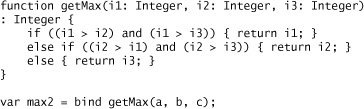
If either a JavaFX function call or a Java method call is preceded by the bind keyword (in the appropriate context), it will be reevaluated when any of its arguments change. In order to show that the two aforementioned bind statements do the same thing, we’ll create two bound variables, max1, which is bound to the compound if-else clause, and max2, which is bound to the getMax() function call, and see what happens when the values of a, b, and c are changed. So:

outputs the same values for each bound variable:

Binding and For Expressions
You can use the for expression to bind JavaFX sequences. For example, the following lines will create a sequence called seq, of length 5, where the elements are [0, 1, 2, 3, 4].

A change in value for either variable, start or end, will also change the bound sequence seq too. Next, we’ll step through changes to start and end to see how that affects what seq looks like. Furthermore, because the incrementVal() function always returns an element with a value one greater than its previous call, we’ll be able to determine when elements are recalculated. So on to the changes.
start = 1; println(seq);
This removes the first element of seq, and will not cause any other recalculations. The contents of seq now look like
[ 1, 2, 3, 4 ]
Changing the value of end from 4 to 5:
end = 5; println(seq);
will change the sequence, inserting a new element at index 4. Only the new element (value=5) is recalculated. The contents of seq are now
[ 1, 2, 3, 4, 5 ]
Finally, let’s set start back to 0.
start = 0; println(seq);
This changes seq once again, this time inserting a new element at index 0. The new element needs a recalculation, but no other recalculation is required. seq now looks like:
[ 6, 1, 2, 3, 4, 5 ]
One corner case with binding sequences and for expressions involves use of the indexof operator. Combining all of the preceding code, and modifying just the bind statement (emboldened below) to include the indexof expression, yields sequences of the same size, but significantly different contents. In essence, any time the start variable changes, all elements are recalculated. Here’s what the set of code looks like now

And here’s the output demonstrating how seq changes:

Bidirectional Binding
JavaFX binding, by default, is unidirectional in nature—that is, a bound variable is dependent upon its binding expression—whereas conversely, a bound expression has no dependency at all on the variable it binds to. Early on in this chapter we demonstrated that after a variable is bound with the default bind behavior, any attempt to reassign it will result in an AssignToBoundException. The classic UI example shown in Listing 4.2 brings this point home.
Listing 4.2 A Simple UI Program Highlighting the Limitations of Unidirectional Binding

Upon execution, this program displays an editable TextField containing the text “Change me”. Unfortunately, if you try and type anything inside that TextField, an AssignToBoundException will be thrown. Why? Because whenever the text inside the TextField is changed, its text instance variable changes automatically too. Because text is bound to str, this activity tries to reassign a bound variable causing the exception. Initially, the application appears like that shown in Figure 4.2.
Figure 4.2 Initial Appearance of the TextField

Figure 4.3 shows what happens when you click on the TextField and clear the string.
Figure 4.3 Clearing the TextField Throws an Exception

In situations like this, it would be nice if the binding relationship between str and text was bidirectional—that is, a change to either variable would automatically update the other. This is possible in JavaFX by using the with inverse phrase when binding. By replacing
text: bind str
with
text: bind str with inverse
a bidirectional relationship is created. With this modification, you’ll now be able to modify the TextField without worry. When the program begins, the text instance variable is assigned the value of str (“Change me”), and when you change the contents of the TextField, its text instance variable and the str variable will reflect the change. Listing 4.3 contains the new version of the program.
Listing 4.3 A Simple UI Program Demonstrating Bind with Inverse

Not all too different from the first, Figure 4.4 shows what the new program looks like at startup.
Figure 4.4 Initial Appearance of UI Using Bind with Inverse

This time, the TextField can be modified with no ill effects, as demonstrated by Figure 4.5.
Figure 4.5 Using Bind with Inverse Allows the TextField to Be Modified

One final point worth mentioning about the bind with inverse construct is that it is limited to variable declarations. Attempting to use any other type of expression in this context will result in a compile time error.
Advanced Binding Topics
Some of bind options offered in this section are considerably more complex, and in some cases due to side effects and/or limitations, should be used sparingly.
Binding and Object Literals
In JavaFX, the preferred mechanism for instantiating objects is via the object literal. Alongside variable declarations, object literals represent the second and final binding option available for developers. We’ve already seen how to bind instance variables via object literals. This is normal and expected behavior. But in addition to binding instance variables, it’s also possible to bind entire objects. For this section, we’ll first state the three possible ways in which object literals can be bound, then follow up with concrete examples.
Object literals can be bound as a whole. In this case, a change to any of an object’s instance variables will result in the creation of a new object instance with the recalculated values.
Individual instance variables inside object literals can be bound. When instance variables are bound, recalculations will update the values of bound variables but will not result in the creation of a new object instance. Again, this is the expected way in which binding and instance variables will take place.
A combination of individual instance variables or whole objects can be bound. In this scenario, by default, a change to any instance variable will result in the creation of a new object except for those instance variables that are themselves bound.
A few examples here should go a long way in illustrating the various binding scenarios that are available to object literals and their instance variables. Included as part of these examples, we’ll demonstrate whether the bind recalculations result in the creation of a new object.
First, let’s define a simple class that will be used throughout to illustrate object literal binding.

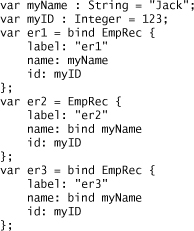
Aside from the definition of the name and id instance variables, a third called label, is utilized. It will not, per se, be one of the variables we’ll attempt to bind in the examples that follow, rather it will simply be used to label and differentiate between object instances of the EmpRec class. As described by the preceding sidebar, the init block gets executed whenever a new object is instantiated. This enables us to output exactly when a new EmpRec object is created, and by including the label variable in the print statement, we’ll know which object was recreated as the result of a bind recalculation. So let’s start by declaring a few instances of EmpRec:

The first variable, er1, instantiates EmpRec and is bound to the object as a whole. A change to any instance variable inside er1 will result in the creation of a new object. This is accomplished in JavaFX by preceding the EmpRec object literal instantiation with the bind keyword.
Determining When an Object Has Been Recreated
There may be situations where you’ll want to know when new objects are created, possibly due to a bind recalculation. So how can you figure out when this takes place? Unlike the Java programming language, JavaFX does not support constructors; however, within a JavaFX class definition, you can provide a code block preceded by the init keyword at the function definition level. The init block is executed whenever a new object of this type is instantiated. So by defining a class like
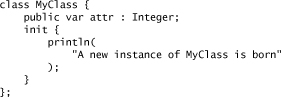
you’ll be able to see when objects are created because "A new instance of MyClass is born" will be printed out every time MyClass is instantiated.

The second declaration shows how to bind an individual instance variable of an object literal instead of the whole object. Specifically, name is bound to the external variable myName. A change to the value of myName causes a recalculation of the name variable without recreating the er2 object. As the id variable is unbound, a change to the myID external variable will not cause any recalculation at all. Instance variable binding is enabled by placing the bind keyword inside the object literal on the instance variables of interest.

The third declaration combines both whole object and instance variable binding. In this scenario, variables that aren’t specifically bound will, when a recalculation takes place, cause a new object to be created. If, on the other hand, an instance variable is bound, a recalculation will update the variable without causing the object to be recreated. In effect, the instance variable bind trumps the overall object literal bind. In the preceding declaration, any update to the myID external variable will trigger an object recreation, whereas any update to myName will cause a recalculation without object recreation. So fleshing this out a little and executing the code snippet
produces this output:

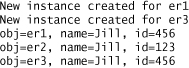
Changing the myName external variable from “Jack” to “Jill” causes a bind recalculation on all three EmpRec objects, and in one case an object recreation. Executing this code:

yields the following:

Finally, changing the myID external variable from 123 to 456 results in a recalculation and object recreation on er1 and er3. For er2, no changes take place at all, because er2’s id attribute is unbound. Running this code:

outputs this:
Bound Functions
Our first brush with bind and JavaFX functions demonstrated how to bind to an ordinary function. Bound functions and ordinary functions are similar in that both, when part of a bind expression, will be recalculated if their arguments change. However, they differ in one key area, namely how to interpret changes inside the function body. Binding to ordinary functions treats the function body as a black box. An internal change to the function body will not cause the function to be re-invoked. A bound function on the other hand will see changes both at the argument level and inside the function causing it to get re-invoked. So let’s see how this plays out with a concrete example.

Here are two nearly identical functions, the only difference being that moveToBound() is preceded with the bound keyword, whereas moveToUnBound() is not. This subtle difference does affect how the variables cell1 and cell2 are evaluated. First, a change in the value of the arguments (r and c set to 5) causes both functions to be re-invoked (twice) resulting in new and updated cell1 and cell2 instances. However, when the value of translate is changed, the behavior of the bound and unbound functions diverge. The moveToUnBound() function is unaware of any change to the translate variable and is consequently not re-invoked, whereas moveToBound() is re-invoked because the bound function can detect the change in translate. Here’s the output of this script:

An important point regarding bound functions is that the function body is no different than the previously discussed bound block expression (with all of its limitations). The last expression—typically the only expression—inside the function body is the bound function’s return value. Finally, bound functions may be invoked outside the context of a bind expression. Calling a bound function in this way is no different than calling a regular, plain old function.
Triggers
JavaFX includes a mechanism that facilitates the catching and handling of data modification events. By adding a trigger to a variable, you associate a block of code that will be executed every time the variable is modified. A trigger is formally introduced to a variable declaration by appending a phrase starting with the keywords on replace. Although strongly discouraged, a trigger, in its most rudimentary form, can be used to mimic the behavior of bind. For example, the following statements:
![]()
can be re-written using triggers in a nearly equivalent manner:

Every time that x is modified, it will run the block of code specified by the on replace phrase, essentially keeping y in lock step with x. However, there is one fundamental difference between the two solutions. Recall that earlier in this chapter it was shown that it is illegal to reassign bound variables by default, and with our trigger example, for better or worse, that restriction is removed. For example:

prints out:

Among others, a few important things to point out here are
1. Even though the variable s is reassigned every time l.phrase changes, the first line of output shows that they are different. Why? Because l is declared and instantiated first. At the time of instantiation, l is modified, but the trigger can’t update s, because s hasn’t been defined yet.
2. The variable s can be reassigned, temporarily un-synchronizing it from l.phrase.
3. The on replace block will not be executed until the value of the phrase instance variable changes, regardless of whether it subsequently appears on the left hand side of an assignment statement. This is evidenced by the fact that the second assignment of l.phrase="farewell" does not cause s to be resynchronized with l.phrase.
Given a choice between bind or on replace, you’ll almost always want to choose bind. In addition to being more efficient, you’ll have the added benefit of avoiding the unsynchronized condition identified in the preceding example. In general, on replace should only be used when there is no alternative. Triggers are appropriate, for example, when state needs to be synchronized between JavaFX and Java, or when there are ancillary effects that need to be dealt with resulting from a change in the value of a variable. For example, if you need to run an animation sequence, your trigger might look like

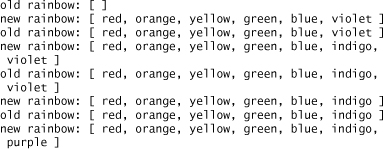
For the next example, we’ll expand on trigger usage by introducing two additional capabilities. First, just like plain variables, triggers can also operate on sequences. Second, the on replace phrase can be enhanced so that while executing the trigger code block, you can access the old value of the variable being replaced. In the example that follows, oldRainbow is an arbitrarily named variable of the same type as rainbow. It appears directly after on replace, and upon execution of the code block, it contains the value of rainbow before it is replaced.
Determining If a Variable or Instance Variable Has Been Updated
As explained in an earlier sidebar, there may be times when you want to know when an object has been recreated. Alongside that information, you may also want to know when a variable or instance variable has been updated, possibly due to a bind recalculation. In JavaFX, you can append a trigger with an associated block of code onto a variable declaration such that whenever its value changes that code will be executed. By defining an instance variable to look like
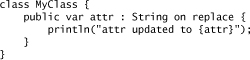
you’ll be able to know when attr changes because “attr updated to ...” will be printed out every time attr is modified.

The output of this code is as follows:
Be Careful When Using Bind/Triggers on Local Variables
When using bind/triggers on local variables, you may come across a situation where the variable is out of scope, yet the trigger still exists. To demonstrate, let’s look at the following pseudo code:

A call to the SomeAsynchronousFunction() will set the result object’s data instance variable. Because, as its name implies, the function is asynchronous, there’s a good chance that by the time SomeAsynchronousFunction() returns, the local variable myInput will be out of scope. So what happens here? Theoretically, the bind and trigger should cease to exist after the variable is out of scope. In reality, however, the trigger keeps on working until the variable has been garbage collected. Quite a few already have been bitten by this problem, which is difficult to debug. If at all possible, avoid such a construct.
Our final example demonstrates the full power of triggers as it deals with an assignment of a sequence slice:

The trigger contains five arbitrarily named variables, and in the context of this example, they have the following meanings:
s1 is the sequence after all the changes have been applied.
s1Orig represents the previous value of the s1 sequence. As such, it is the same type as s1.
begin is the first index of the sequence slice that has been updated.
end is the last index of the sequence slice that has been updated. Both begin and end are Integer types.
n represents the sequence of values that will be replacing the slice of s1Orig[begin..end].
The output of this code looks like this:

For our final example, we’ll contrast how bind and on replace behave when instance variables are inherited and overridden from a superclass. The code block that follows contains two classes, the first of which, called MyClass, contains a public name variable that is both bound and has a trigger. The second class, called MyClassExtended, extends MyClass and overrides name with a bind and a trigger too.

This is the output when the block is executed:

From this example, we can glean that triggers and bound variables, when overridden, behave quite differently. To sum it up:
Overridden triggers are cumulative. When an instance variable with a trigger is overridden by a superclass with another trigger, the original trigger is not hidden. It also gets executed along with the overridden trigger. Based on the output, the base class trigger will be executed first, followed by the superclass trigger(s).
Overridden bound variables are hidden. A bound instance variable in a superclass will be re-evaluated by the overridden subclass instance variable. In our example, when MyClassExtended is instantiated, the value of its name instance variable is the same for both the MyClassExtended subclass object and the MyClass base object.
Coming Features
If you had a chance to try pre-release versions of JavaFX, you may have encountered a feature known as lazy binding. With the formal release of JavaFX 1.1, references to this aspect of the language have been removed because it was only partially implemented. Specifically, work has yet to be done for sequences. Plans call for full support by the next JavaFX release. In the interim, you can experiment with some of the capabilities of lazy binding, keeping in mind that it is currently not supported.
The primary difference between regular binding and lazy binding lies in how and when updates occur. With lazy binding, an update or bind recalculation only takes place when the variable being bound to is being accessed. Whereas with regular binding, any change to the bound expression automatically forces an update. The performance impact of limiting the number of bind calculations can be important. We’ll touch more on this in a moment.
Listing 4.4 highlights how these two forms of binding differ.
Listing 4.4 Comparing Lazy Binding to Regular Binding

The listing includes three variables. The first two, x and y, use traditional binding, whereas the third, z, uses lazy binding as specified by the bind lazy keyword sequence. Each variable has a trigger associated with it such that whenever its value changes, it will be printed. When this code is executed, the output validates that z, which is bound lazily, is only updated when it is being accessed via the println("z: {z}"); statement, while any change to x and y results in an unconditional update.
The performance ramifications of using lazy binding can be significant. Consider the following code that includes a loop that is iterated over 10,000 times.

Because v2 is bound to v1, it will be automatically updated for each of the 10,000 loop iterations. Because v2 is not referenced at all within the loop, those recalculations represent a waste of CPU cycles. The developer might have been better served using lazy binding and avoiding all those unnecessary updates.
With the advent of lazy binding, one might ask, why not just have all bindings be lazy? The answer is that there will be occasions where you’ll want to know about a change in value when it actually happens. With lazy binding, as updates only occur when the bound variable in question is accessed, this is not possible.
Chapter Summary
In this chapter, we looked at how binding can be used in JavaFX to associate unrelated entities such that changes in one can be reflected in the other. To achieve more clarity, this chapter deliberately focuses more on the language syntax and deals less with the user interface aspects of the platform. Don’t worry. As we progress forward, you’ll be able to apply what you’ve learned to solve more realistic problems.