Chapter 7
Technical
Technology may be central to what we do as film-makers and animators, but it is only there as a means to an end – to tell stories, to amaze, to make people laugh and cry, and to inform and educate. But it does mean that we can tell more fantastical stories and in doing so make the impossible tangible and add just a little more sparkle to our everyday experience.
BEFORE WE BEGIN
The technical issues dealing with animation production (other than the ones directly related to animation and animation timing) are very extensive and cover cameras, lights and lighting, modelling, editing, sound recording, sound editing, 2D compositing, filming, film and TV formats, file compression storage, management and retrieval, image compression, computer modelling, and output formats for screening and distribution, all or some of which may be of interest to you. However, they are far too numerous to cover in any single volume on the subject and so it is the intention of this book to concentrate on those issues around animation timing. Other technical aspects of animation production are dealt with in a very general manner, though I have set out a number of recommended sources of additional specialist information that will complement this book. While some deal with aspects of production that are relevant to all types of animation, others are more specialist and only you can decide which are appropriate to your work and ongoing practice. None of the information covered in this book is intended to be software specific, though I cannot avoid giving examples that may cover certain programs.
DOPE SHEETS
What are dope sheets and what are they for?
It is important that the decisions directors, animators and others make about the individual shots within a film are recorded in an established and common fashion that all members of the production team can understand. The dope sheet is one of the tools an animator uses for this purpose. It carries all the relevant information about a particular piece of animation within a particular shot. Dope sheets (information sheets, sometimes called X-sheets or exposure sheets) were developed for animators working in 2D classical animation, and while similar tools are used by computer animators and 3D stop-frame animators we will be mostly concentrating on the traditional dope sheet. Animators working in 3D stop-frame may prefer to use bar charts (see Chapter 6) and those working in CG animation will have access to built-in systems for recording information on animation timing on the time line that includes key-frame information options. In addition to the built-in dope sheets, computer animators may also wish to work from bar charts for that information not included on a time line, such as the director’s notes to the animators. While certain aspects of the dope sheet are specifically intended for use during the 2D classical animation process, the principle that underlies their use applies equally to all forms of animation, and as such they are of use to all animators. Whichever discipline you are practising, this information is necessary if you are to track and properly record your animation in line with the director’s instructions.

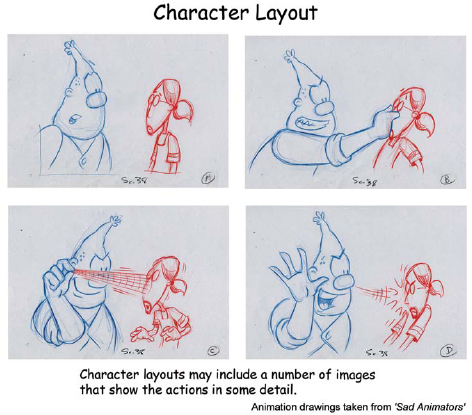
Figure 7.1 While the exact style of dope sheets may vary slightly they will share common elements, and once you are familiar with them moving from one style to the other is not an issue. The template I have illustrated here shows what all the different aspects of the dope sheet are for. At the very top, alongside the production company’s logo, you will see room for the Production Title and episode number. The main part of the dope sheet is divided with horizontal lines into rows. Each one of these rows represents a single frame of film. You will notice that every 25th line is slightly heavier than the others. This is to indicate 1 second of video. Remember that there are 25 frames to each second of video. Other dope sheets are designed to be used with 35 mm or 16 mm film, in which case the heavier lines denote footage not seconds. In the case of 35 mm film, every 16 frames the line is heavier as there are 16 frames to every foot of 35 mm film. In the case of 16 mm film this is every 40 frames as there are 40 frames to each foot of 16 mm film. From left to right the elements are: Action/sync. This is where detailed information of the soundtrack is written. A frame-by-frame phonetic breakdown of dialogue appears here in order that animators may register frame-accurate animated lip-sync to the voice track. This is usually accompanied by a more general indication of the dialogue. Music and spot effects are also placed in this column if needed. The voice track information is transcribed from the bar charts (more detailed breakdown of the film in total) that are prepared by the director. This column is also used to give an indication of the action required by each of the characters or objects and where it is to appear in the scene. This may also, on occasions, need to be frame accurate. Frame numbers. Mostly used as a guide by the camera operator to ensure that errors do not occur during filming. Animation. This is covered in a series of numbered columns, normally around six, sometimes more, in this case 12. Each separate column is used to display individual animation drawings that are placed one over the other to make the necessary composite to complete each frame of the film. The cel positioned nearest to the background is indicated in column no. 1, the cel that is to be placed immediately on top of the first cel is indicated in column no. 2 and so on. Background. The background number is placed in this column. If this column does not exist (as in this case), the background is indicated in column 1. Sometimes, within a single scene, there may be two or more backgrounds required or additional overlays and underlays. These will usually be indicated in separate columns, with the position dependent upon where the animation appears in relation to the background elements. Any dissolves or transitions between the separate background elements are indicated in this column with additional notes in the Camera column. Camera. The column on the far right carries the instructions for the camera operator. This will include all manner of camera effects, such as fades, mixes, pans, tracks, etc. It will also carry information about the field size and position onscreen of the animation.
As animators create the animation they are not simply making a series of sequential images, they are dealing with those issues of animation timing that we covered in Chapter 1. The timing of your animation is vital, as it is timing that not only determines the speed things move at, but also shapes the animated performance. Without the timing you are simply left with a series of drawings. Dope sheets are a way of recording the many decisions the director has made about the narrative and the animator has made about the timing of the animation as it relates to the contents of the shot. This is a very important point. Dope sheets are a detailed record of all aspects of a particular shot, outlining length of shot, content of shot, acting, sound, camera moves, special effects and dialogue. They are a vital part of the production process, enabling important information to be passed on through the production pipeline to all members of the production team in order for them to undertake their specific tasks as they relate to a particular shot. Each separate shot normally carries its own individual dope sheet or series of dope sheets. The scene’s dope sheets should always accompany the animation drawings of the relevant shot right throughout the production pipeline in order to avoid any errors: from leaving the director, through animation, inbetweening, trace and paint department, animation checker and finally the camera operator. It will be necessary for some individuals involved in the various processes to add information to the dope sheet as it moves through production.
In the case of the 2D classical animator, the dope sheet is filled out at the same time as the animation is made. This is important. The creation of the animation drawings for each of the separate elements and their individual animation timings, and the manner in which they relate to one another, are more easily tracked and recorded if these are transferred to the dope sheet at the time the animation drawings are being created. This not only avoids mistakes, it enables any alterations to key drawings or timing to be entered onto the dope sheet as and when they are made. If the dope sheet is on the animator’s desk as he animates, he can see at a glance the director’s instructions and the details of the soundtrack, and number the individual animation drawings accordingly. This is very important when trying to be frame accurate for lip-sync. It is then possible to keep an eye on how the scene is progressing time wise; if there is enough time left within the scene to complete a desired action and if a specific timing of an action will work with other elements within the scene, be these drawings, dialogue, soundtrack, action, etc.
Correct doping not only reminds the animator what happens and when, it clearly identifies this to other members of the production team further along the production pipeline. Getting this wrong can be a very costly process. Mistakes at this stage may mean that animation needs to be reshot or that additional animation needs to be made or even, heaven forbid, animation already completed is surplus to requirements. In any case this would prove to be expensive. It is therefore worth taking time over your dope sheets. Make sure that all the information is included and set out in a clear and simple manner. Any additional information you need people to be aware of should be included as notes at the top of the dope sheet. Don’t leave anything to chance. State the obvious, rather that than miss something out that results in added expense.
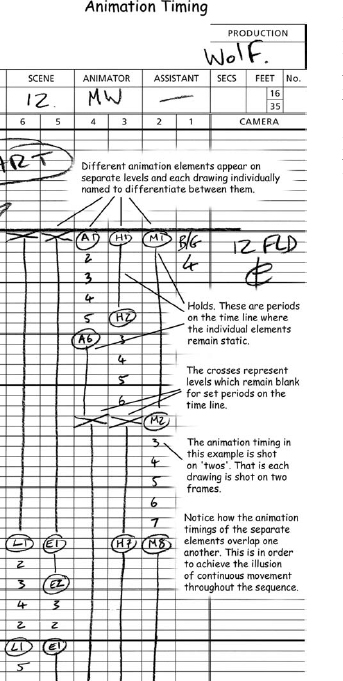
Figure 7.2 You can see on this example that the timing of the animation involves drawings split over many levels; this will sometimes denote a single character that has been split into separate levels, either for economic reasons or for practical considerations of timing, matching to backgrounds or other characters. Lip-sync is often split away from the main character in such a case. The animation is usually made separately and then the lip-sync added once the animation has been tested and approved.
Creating animation timings
So you have made your key frames for a particular action. It is at this point the animator will decide if the animation is to be shot on single frames (ones), two frames (twos) or more. Remember that animation on video is seen at a rate of 25 fps (frames per second), so the number of frames you choose to shoot your animation on will determine how quickly (and smoothly) your animation will appear. Shooting your animation on ones will give the smoothest result but is time-consuming to make. Shooting on twos will be a lot more economical and only slightly less smooth, and is perfectly acceptable in most situations. Shooting on threes will give you a slight jerkiness to the action, though this may be an acceptable economy, while shooting on fours will result in a very definite staccato action, not a good option for most animation. A lot of commercial animation is shot on twos (two frames per drawing), as this is a relatively economic way of making animation (half the number of drawings than making a drawing for each frame) that results in fairly smooth action. Remember, the more frames you choose to shoot of each of your separate drawings or individual positions of the model, the jerkier the movement and stiffer the action will appear. So shooting on ones (one frame for each drawing/position) is smoother than shooting on twos (two frames for each drawing/position), which is smoother than shooting on threes, which is smoother than…. Get the idea?
Animators need a way of recording the timing they are using with the drawings. We have already covered how animators decide on the timing of the drawings they make as they create the animation. Once the animator has completed the rough keys and determined the animation timing, this can be transcribed to the dope sheet before the inbetweens are made. The separate levels of animation can be checked against one another to ensure that everything happens in the correct order and at the correct moment. It is then possible to determine if the animation fits in with the director’s instruction in the Action column. If it doesn’t, alterations can be made before the inbetweens are made.
Alterations to animation timings
Alterations may be made to the animation that does not require additional drawings, simply a shifting of the order they appear in or in moving them earlier or later within a sequence. You may find that you need to make more key drawings if the sequence is too short or take some out if the sequence is too long. While this is more likely to happen if you are working on a scene of a strictly fixed length, working with the dope sheets as you make the animation will reduce the likelihood of this occurring. Such amendments only affect where the animation appears within the sequence (on the dope sheet), though other alterations that you make to your animation timings as a result of testing the action should be recorded on both your key drawings and your dope sheet. This should be done before reshooting either your key pose test animation or the final rough animation; this will avoid confusion later on.
Most of the animation you undertake will be shot on two frames, though there are times when you will need to shoot individual drawings or positions for longer periods. These are called holds.
Holds
Holding the image still between actions is an economic way in which to make animation and means that the animator does not have to produce new images or move the model for every single frame exposed. The use of the held drawing was first introduced as a way of producing economic footage. After all, if you can hold on a drawing for a couple of seconds you have achieved the same amount of footage as if you had done the animation on every single frame, saving a lot of effort, time and money. This approach to animation came to be known as ‘limited animation’ and was much used in the early days of cinematic animation in the first quarter of the twentieth century, when budgets were minimal and schedules were very tight. However, on the downside this method generally makes the held position or key frame more noticeable, which may not be the desired effect some animators require. While the technique began as a simple technique for creating a crude sort of phrasing in animation, the use of the ‘hold’ need not look too much like low-budget limited animation; in the right hands it can become a stylized form of animation that is perfectly acceptable. Tex Avery took the basic principle of the held drawing and developed the technique to highlight rather than hide its properties. He would create exaggerated drawings of his characters – bulging eyes, gaping mouths, wagging tongues, even to the point of dismembering all its limbs – and hold on these drawings for extended periods. Far from looking like a crude shortcut, he created a distinctive style that remains much imitated to this day. Throughout the 1940s, he created a whole new cartoon language all of his own in such wonderful films as Red Hot Riding Hood (1943), North West Hounded Police (1946) and King Sized Canary (1947), and once again demonstrated that animation, even low-budget animation, can be fresh and exciting. Later, the Hanna Barbera studio became experts at this type of limited animation, specifically for television budgets throughout the 1960s.
Figure 7.3 The held drawings are identified on the dope sheet and carry a line through the required number of frames until the next drawing appears to replace it. You will notice that other elements of the animation are still active while the held drawing is current. Inserting held drawings in this manner often masks the fact that drawings are static.
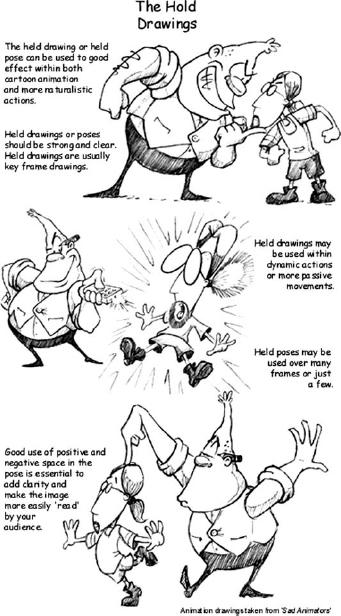
Figure 7.4 A ‘held’ drawing needs to be a key drawing and, while all key drawings should be strong, the pose of a held drawing is more important as your audience has more time to scrutinize it.
Moving holds
In nature a figure seldom comes to a complete rest, and to achieve a more naturalistic movement the use of holds may be inappropriate and a series of actions interspersed by stillness may make the holds more noticeable than you would like. To overcome this problem, the animator should create what is termed a ‘moving’ hold. This is a technique whereby a key frame is created in the usual manner, but once the action reaches its final key position (see section on key frames), it continues to move in small increments, either in the same direction of the last movement (stretching) or in the opposite direction (retracting). Effectively, you are holding the pose but keeping the movement going. If done with sensitivity, this refined action will keep the animation ‘alive’. However, you must be careful not to give your animation timing uniform spacing during the moving hold. This will result in typical computer animation ‘oiliness’, an unnatural smoothness that has been a common mistake in computer animation, though thankfully this is becoming less common. In the past it has been the practice of some less experienced animators to set the key frames and let the computer handle the movement in between these, giving a very unnatural ‘floatiness’ to the work.
Staggered doping
The use of staggered doping can be very effective in creating substantial amounts of action through a limited number of drawings. Consider the action of a ruler bent under tension and then being released. The result would be a rapid though decreasing to and fro action, ending in the ruler coming to rest in an almost straight line. To animate all of this action as it moves backwards and forwards through many cycles could take scores of drawings, though by using staggered doping the same drawings can be used over and over again to achieve the same effect.

Figure 7.5 The moving hold is not evident as such on the dope sheet. The drawings are numbered in exactly the same manner as any other.
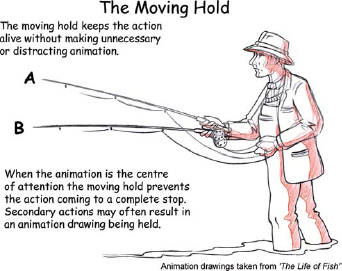
Figure 7.6 The moving hold drawings usually only demonstrate a slight difference in position, though the timing within the moving hold displays a dynamic, usually slowing towards the most extreme drawing.
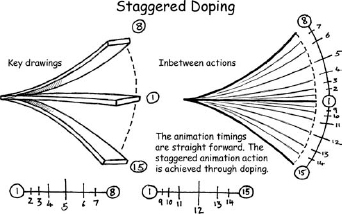
Figure 7.7 You will notice how the drawings within this action seem to have an unnatural timing breakdown that would result in a very uniform motion if shot in sequential order. The numbering of the drawings in this way is for the purpose of inbetweening only. This ensures that the minimum of drawings are used and that they are in the right position. You need to check these drawings against the doping of the action to perceive the dynamic of the action.
Repeat animation
Repeat animation is another very obvious device for creating more footage from a limited number of drawings. A walk cycle or flag, for instance, may be made up of a limited number of drawings, though if shot correctly and repeated this can create a limitless amount of action. It is also possible for certain actions to simply be reversed. Shooting the animation backwards as well as forwards may result in an economy of work.
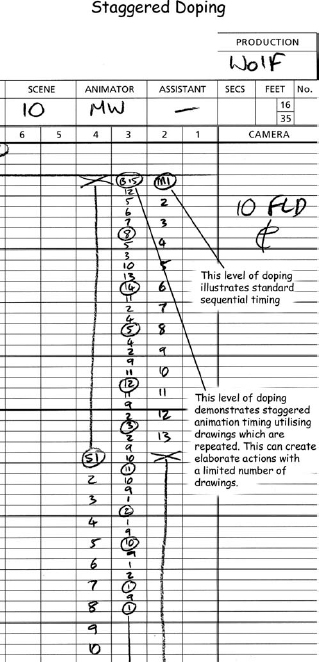
Figure 7.8 The way these few drawings are doped produces the action required. This minimizes the number of actual drawings you need to make. Check the order in which these drawings appear on the dope sheet to create a dynamic within this fast action. This is a good example of how a little forethought and consideration to doping your animation can save you an awful lot of work.

Figure 7.9 In this particular action of an arm striking an anvil with a hammer, the downwards action may be reversed to create a believable though simplistic cycle. More elaborate actions of this nature would involve the use of overlapping action and follow-through. The more excessive use of overlapping action to achieve a ‘naturalistic’ action would probably negate the use of a reverse action. Notice that in the animation of the car wheels there are far fewer drawings, but it still illustrates the point well. More drawings could be added to this cycle, though the effect would be to slow the rotation down. If only two drawings were used it would result in a flickering to and fro between one position and the other of the wheel texture, and the illusion of rotation would be totally lost.

Figure 7.10 To achieve the reverse action, the doping of the action needs to be reversed. The example on the far right is the animation of the action of the hammer striking the anvil. Notice also how the action involves a small hold at the top of the action and elements of staggered action by the omission of certain drawings at both the top and the bottom of the action. The door animation is represented by drawings denoted with a letter D. The flag cycle animation (F) sits on top of a level representing a flagpole (P). Likewise, the wheels of the car (W) sit on top of the car level, represented by the letter C.
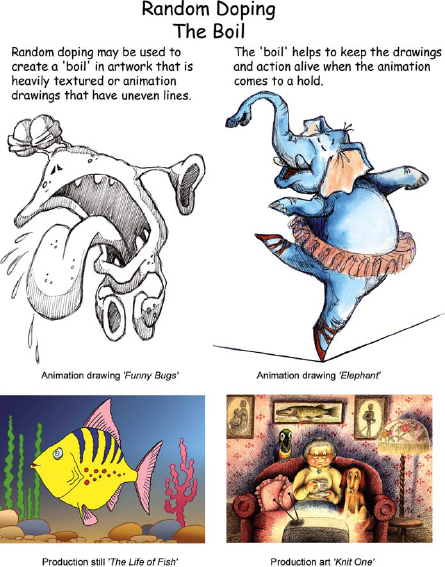
Figure 7.11 The drawings used in a boil are key drawings and, while the pose remains the same, the separate drawings differ in order to keep the line alive and to avoid a sudden kick in the animation as the hold becomes apparent. A minimum of three drawings will create the effect of a boil. Using two drawings will create a kind of flicker.
Random doping
The use of random doping can also create interesting effects. We have seen how the use of a held drawing can be a very economic way of making animation, and if the animation is a typical cartoon type there will be little difference between a ‘held’ drawing and one within a moving sequence. If, however, you work in a more expressive manner and the individual drawings are very distinctive, then you will find that the use of the held drawing will create a very noticeable and undesirable kick in your animation as it stops dead. A more expressive form of drawn animation need not be a problem and the kicks in the animation can be avoided. The way around this is to create what is know as a boil. By making several separate drawings (three is usually enough) of the one pose used for the held position and by shooting them in a random manner, the line and any rendering will continue to move even though the pose remains static. The work of Joanna Quinn is a good example of how this technique helps to achieve a vivacity and energy throughout, due to the very liveliness of the line work. The children’s TV series Rhubarb and Custard by Bob Godfrey made a virtue of the wobbly line, while The Snowman managed to emulate the original rendered colour pencil drawings of Raymond Briggs by using this method.
There are a great many variations on doping, far too many to go into here, each of them specific to the individual action. You will no doubt develop your own approach to doping and animation timing as you gain more experience as an animator. The ones outlined above are just a few of the standard uses of doping.
Dope sheets are available from a number of animation suppliers.
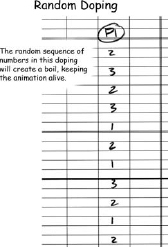
Figure 7.12 When the animation comes to a stop, the drawings used for the hold continue to keep the pose alive. However, if the individual drawings used for the boil were shot in a strict repeated sequence – 1, 2, 3, 1, 2, 3, etc. – the result would be a definite repeat action, which could be very distracting. If the animation is shot in a more random manner – 1, 2, 3, 2, 3, 1, 2, 1, 3, 2, etc. – the repeat within the boil would be less obvious. It stands to reason that the more drawings used for the boil the less likely it is that the hold will be noticed, as the line itself remains ‘alive’.
QUESTIONS TO ASK YOURSELF ABOUT DOPE SHEETS
Q. Does the dope sheet identify clearly what scene or sequence it refers to?
Q. Is the doping clear? Can other people read and understand it?
Q. Does the animation match with the direction given by the director?
Q. Is the sound synchronization and lip-sync in registration with the drawings?
Q. Are all the instructions on the dope sheet, including the camera instruction and field size, given clearly?
Q. Are all the separate elements identified on the correct levels?
Q. Are the backgrounds and overlays identified?
Q. Is the use of reused animation identified, including the scenes where they can be found?
LINE TESTS
Before animators commit their 2D work to film or before it goes for trace and paint, which is an expensive business, they need to be as sure as they can that the animation is working in the way they planned it and that the timing is right. To achieve this, they often make a test of the animation drawings by shooting them on video; these are known as line tests or pencil tests. The animation is shot, as near as possible, in the same way as the finished animation will appear, giving a clear indication to the animator, the director and anyone else on the production crew if the sequence is working in the way they had planned. Often, these tests do not include camera moves, as these are difficult and time-consuming to do, and such tests sometimes only cover certain aspects of the final animation. Experienced animators may decide to skip the use of line tests for certain simple actions if they are confident that the animation will work anyway. While the use of line tests can save the time and effort of reanimating sequences after they have been through paint and trace, the line tests themselves take time and the decision to test the work in this way is dependent on the budget – and the skill of the animator.
In the days before the development of such sophisticated video equipment, all animation tests were shot on film, usually on black and white reversal film to save expense. They were then viewed on a small projector known as a Moviola. This device allowed the viewing of film through a very small and poorly illuminated screen. In the early days at the Disney studios, one such machine was tucked away in a small dark corner under the stairs with barely enough room for two or three people to view the animation at any one time. The animators named this the sweatbox, probably due to the rather warm conditions under which they had to work, but maybe because of the stress induced by having Disney look over their shoulders as they viewed the work for the first time. The name stuck, and even after the Disney studios had grown to such a size that the pencil tests were viewed in a purpose-built viewing cinema, the viewing of the animation in this form became known as sweatbox sessions. The animators may have had a better environment in which to view their animation but it is doubtful, taking into account Disney’s reputation, his forthright manner and acerbic wit, if they felt any less discomfort. The sweatbox was well named. Computer animators normally make their work using stripped down versions of their models with no texture mapping or lighting. Without such details the computer can handle the animation more quickly and play back the animation in real time. This enables animators to more quickly assess the animation as they are making it, which is a far more efficient way of creating animation than having to stop and make separate tests of the work. Records of the animation in flick-book form can then be seen and approved by the director before the more costly process of rendering animation after texturing and lighting and placing the models into an elaborate CG environment. Unfortunately for animators working in stop-frame animation, the equivalents of pencil test or line test animation are not possible.
LAYOUTS AND FIELD GUIDES
When setting up a shot to be animated it is important to frame it correctly; getting this wrong can ruin the best animation. The framing and choice of camera angle is something that the director will do during the storyboard and layout stage of the project. This decision is then conveyed to the animator through the use of layouts and field guides.
What are layouts?
When making 3D stop-frame animation, the action is framed when the shot is set up simply by looking through the camera. The same method is used in computer animation, though in this case the camera is a virtual one. In 2D classical animation, all the framing needs to be planned before the animator begins work, as this will be shot as a separate activity only after the animation is completed. This framing of the action is done through creating layouts. Layouts are drawn up by a layout artist following the instructions of the director and based upon the shot designs in the storyboard, and are used to determine the content of the shot, backgrounds, foregrounds, the action within the shot and any camera moves. Figures may move through the shot and interrelate with other characters and/or their environment, and all of these things will determine the manner in which the shot is set up. To properly frame the shot, a layout artist must use a device called a field guide, sometimes referred to as a graticule.
What are field guides and graticules?
The field guide or graticule is a device for accurately measuring and dividing the size of the screen into sections called fields. There are two general sizes that animators work with, 12 fields and 15 fields. Regardless of the actual size of the field, the aspect ratio of each of the fields remains the same, 4:3. The measurements are based on the width measurements of increments of 1 inch. Therefore, an eight-field guide will be 8 inches wide while a seven-field guide will be 7 inches wide. While it is a very common format, there are many exceptions to the 4:3 aspect ratio used for traditional TV proportions, such as widescreen or high-definition TV, which is 16:9.
Even though you may take a great deal of care to frame your animation correctly, you must take into account that part of the image will be lost. The recording of an image on video or film to a specific field size is no assurance that the playback or projection will be exactly the same size. Always leave room within the frame to accommodate cut-off. You will always lose a little from the edges of the frame; in the case of video this is known as TV cut-off. Allow around a field and a half on a 12-field setting as a safe area; the safe area for titles is even tighter again.
One major benefit of computer animation is that it enables the animator to animate the camera in the same manner as any other object within the scene. This can be very liberating for 3D stop-frame animators used to locked-off cameras or for 2D animators facing the additional expense of camera moves. However, the problem with such a free roving camera is that this has often resulted in animators overusing camera moves, creating the ubiquitous ‘fly-through’ shot. Thankfully, this is becoming a thing of the past and animators are relying much more on their cinematic skills and using the animated camera as simply another tool.
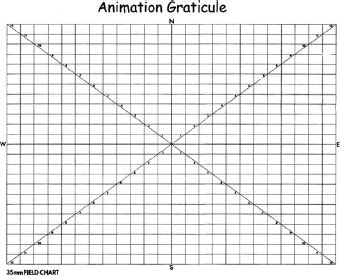
Figure 7.13 The field guide or graticule standard sizes are 12 fields and 15 fields. These in turn break down the frame into a number of framing possibilities, from 1 to 12 and from 1 to 15 respectively, though the exact framing of these does not need to be centred.

Figure 7.14 The layout is used to determine the framing of the shot and its content throughout the sequence. This is determined by the director, who uses a field guide or graticule to establish the exact framing. In this instance the framing is offset slightly, though the aspect ratio always remains 4:3. The field guide is drawn up by the layout artist and used as a guide for animators in order that they place the action correctly within the scene.

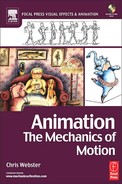
Figure 7.15 Separate layouts, character layouts, are sometimes made that show the exact position of the characters at key moments throughout the sequence as an additional guide to animators. All these separate elements – layouts, field guides, character layouts and backgrounds – all carry the same information regarding the scene and sequence number for the animation. In this example you can also see how the camera move is set out in a separate field guide. The start and end positions are identified along with the field sizes of each of these positions. The animation needs to be planned to happen at the same moment and the same place that the camera is covering. Getting this wrong can result in very costly time animation being framed incorrectly and appearing on the wrong part of the screen or, worse, not on screen at all.
Camera moves
In 2D classical animation, all the camera moves need to be planned beforehand. Establish what is going to be seen, how wide or tight the shot is, establishing the nature of the camera move, the distance travelled and the speed of the camera move (the speed of this is determined by how many frames you shoot to cover the distance of the move). All of this information is identified and noted on the dope sheet in the ‘Camera’ column. With the use of computer technology, the exact camera move can be worked out within the computer, borrowing much of the same approach that computer animators have had from the beginning. This has created a good deal of flexibility, enabling animators to make final decisions on camera moves once the animation and backgrounds have been scanned separately. This approach largely negates the need to work out the exact speed of a camera move frame by frame before the work is scanned and composited with other elements, as was the case when shooting on film under a rostrum camera.

Figure 7.16 The finished background is made by the background artist using the accurate layout. Animators do not generally use the background to register their work to, but work from the original layout. Great care is taken that these two are the same in every regard to ensure that correct registration of artwork is achieved.
QUESTIONS TO ASK YOURSELF ABOUT LAYOUTS
Q. Are the layouts clear and easily read by both the animator and the background artist?
Q. Are the sequence or scene numbers and production title identified on each of the layouts?
Q. Are the design and framing of the shot in keeping with the storyboard?
Q. Do the characters fit to the backgrounds and are any match lines identified?
Q. Are separate overlays or underlays identified?
Q. Is the layout accompanied by a field guide identifying the framing of the shot and any camera moves such as track-ins or pans?
FORMATS
Recording formats
The way in which you work will, in some small measure, depend upon the chosen format you are working in. Working in some formats will prove to be cheaper than others, while others may prove to be more convenient. The way in which you will be distributing or viewing your work and the purpose for which it is being made will also determine your choice. Broadcasters may require different formats from those distributing work on the Web, and some animation festivals still prefer to receive animation on film.
Video or film?
This can be a very personal preference. Some animators still enjoy the physical aspect of working with film, though this usually entails a very different approach to recording and processing images, sound synchronization, editing footage, and final output and distribution. When choosing equipment expense is often a major consideration, so you will need to balance one against the other to determine which is the best option for you. Be sure to shop around for the best deal and check out second-hand equipment; some people are very quick to upgrade, making very decent pieces of kit available at a fraction of the original asking price. The specification of software and hardware is always changing, as is the development of new software, so to recommend specifics here would be useless as they would probably be out of date by the time the book went to print. The best approach to choosing equipment is to regularly review the trade press, of which there is an enormous amount, covering all aspects of video and digital media production, specifically for animation. A few useful websites are listed in the appendix section.
There are many film formats available to the animator, ranging from Super 8 mm, 16 mm, Super 16 mm, to 35 mm. Larger 70 mm format film requires such specialist equipment that it is simply out of most individuals’ reach. Most professional animation shot on film uses 35 mm. Generally, the larger the format, the better quality the image, as it is being projected from a larger original frame size, which makes for better resolution, though the speed of film and associated graininess also has a major impact upon quality. Some film-makers do not like to use digital media specifically because of the lack of film grain. The use of film and the appropriate film equipment is covered extensively in Susannah Shaw’s book Stop Motion: Craft Skills for Model Animation.
There are a bewildering range of video formats available that include VHS, SVHS, Betacam SP, Digi Beta, DV, DVCam, DVCPro and HD. In order to make sense of this you will need to do a little research to find out which one is most suited to your needs. Again, the trade press is a good starting point. For much more detailed information on the range of video and digital formats, I have listed some useful websites in the Appendix section. A number of countries, most notably the USA and Japan, use the NTSC (National Television Standards Committee) video system, which is a system that records and plays back at 30 frames per second. European countries, Australia and China use the PAL (Phase Alternation by Line) system, which records and plays back at 25 frames a second. A third system, SECAM, is also a 25 frames a second record and playback system, and is the standard used by a number of countries. The standard size format (that is, the proportionate frame size), established in 1936 in the UK, has an aspect ratio of 4:3, which matched the standard film projection frame size at that time. While film continued to develop and now has many different aspect ratios, video remained constant and it is only now moving towards a broader aspect ratio of 16:9. Much more detail regarding the technical issues of video can be found in the excellent book Cinematography, Theory and Practice by Blain Brown.
A good way to get started making animation is to utilize digital cameras to input directly into the computer using programmes such as Adobe Premiere, which runs on a Mac or PC. While Premiere is predominantly a mid-priced desktop editing facility, it does have a frame capture facility that will enable you to shoot 3D stop-frame animation. There is also a useful blue screen facility, which automatically creates mattes as a series of alpha channels that allow you to set your animation against different backgrounds. There are a number of more specific pieces of software for recording 3D animation available, one of which is Stop Motion Pro. This has a number of very useful tools, is reasonably intuitive and has a very useful onionskinning facility, allowing animators to see the previous frames and making more precise animation possible.
For making 2D animation via a computer, the Animo system from Cambridge Animation Systems is the current industry standard, though much less expensive alternatives are available for the student and professional, such as Toon Boom and Flipbook from Digi Cel. These programmes enable you to create new artwork, scan existing artwork, paint it, place multiple elements against backgrounds, work out animation timings set against existing dope sheets, complete camera moves and effects, and render the final composite and output the work to a range of formats, including DVD, CD, videotape and the Web.
Editing your material will also depend on your approach, film or video. Editing film used to depend on the physical splicing and joining of sections of film stock using purpose-built film edit machines. However, film can also be transferred to video or a digital format, a process known as telecine. If this is undertaken before the editing process, it will enable the animator to use non-linear editing software such as Final Cut Pro or Avid to cut the film together. Alternatively, the film can be edited in a more traditional physical manner before the final cut print is transferred to video or digital format for distribution. Non-linear editing is far and away the most popular method of editing; it is less cumbersome than film, mistakes can be easily rectified, multiple edits are easily and cheaply compiled and, as the process is digital, there is no loss of quality.

Figure 7.17 The different aspect ratios are clear to see in this illustration.
PRODUCTION PROCESSES
It is important at this point to cover certain aspects of production and production management. Space doesn’t really allow for any more than a cursory glance at this very vital aspect of animation production. However, it is necessary that you are organized in your production if you are to work in an effective manner, meet deadlines and stay on budget.
Production management
Even the most modest of animation productions needs to be managed properly. A professional production demands a well-structured production model with a well-established production pipeline, with each member of the production team knowing their own role within it. For independent animators or the keen amateur, it is just as important to have some kind of production plan and while this will probably be far less detailed or intense than a professional system, it will still save time and effort and could probably save you money too. Working in a methodical manner is the key to creating a successful animated film. Without a good understanding of production methods the simplest and most mundane of tasks can become a big job for the animators, a huge headache for the director, a financial liability for the producer and something that could jeopardize the outcome of the entire project. For most creative types the very idea of ‘production management’ seems like a drudge, yet basic production methods, if embraced, can liberate the animator from the time-consuming task of finding their own ways of dealing with the daily routine of putting together a film, enabling them to spend more time on the thing that they do best, being creative. While the film will be judged by the animation that ends up on the screen, not how it got there, it is important to get it onto the screen in the first place. You avoid learning the basics of production management at your peril – it’s just looking for trouble. In the long run it will cost you time and effort and, as we all know, that equals money. Good housekeeping – that is, basic production methods – should become a habit and just another part of the process. Simple issues such as the identification of key and inbetween animation drawings with drawing and scene numbers, the creation of clear dope sheets, the use of scene folders and keeping a production chart, none of these things take long; putting right the mistakes that can occur without them can take days.
Production charts
Within any studio system the creation of production charts is standard procedure; it is the one way in which every aspect of the animation is identified. This is usually the task of the production manager, whose job it is to identify each element of the film, set this against the production schedules and thereby track the state of the separate processes. The creation of production charts helps all those involved in making an animated film keep up to date on the current state of affairs. This should be updated on a daily basis; that way the producer, director and production manager should always have a clear idea of where all the work is, what stage the film is at, and most importantly if they are on target to meet the production milestones and ultimate deadline. The production chart breaks down entire film into separate scenes or sequences, and identifies the separate tasks needed to be undertaken to complete the production. It not only identifies each scene by number, it indicates the frame count for each scene plus a total running length as established when the animatic was made. This way, the production manager knows exactly what footage each animator has been assigned. The production chart matches backgrounds against scenes and identifies any reuse of other production elements and the sequence or episode they are reused from. This can include layouts, backgrounds and overlays, even stock animation. Many productions are planned from the outset to utilize stock animation and, with the advent of asset management software, this process has become much more widespread. Such savings can make a great difference to the overall production costs; for animation studios it can mean the difference between making a profit and turning in a loss.
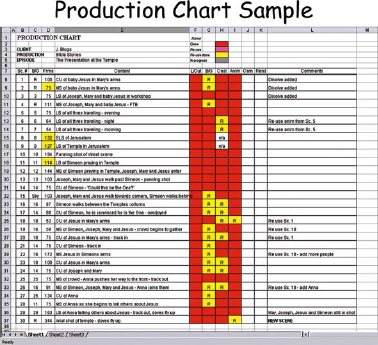
Figure 7.18 Included in the production chart is a column marked Type; the reason I have put this in is to give an indication of how difficult a scene is in terms of animation. The scenes are divided into three categories: H = heavy, M = medium, L = light. Using this method I find that I have a better understanding of the progress I am making with the project and am not simply looking at the boxes I have filled in. You may find that in a sequence consisting of 10 scenes, two or three of them will make up as much as 60 per cent of the workload, while the rest will be easy by comparison. The column on the right-hand side is for any notes that need to be made during the production, such as the addition or subtraction of frames, alterations to content or any other amendments.
Using the system illustrated here, each of the fields is filled in once the task has been completed. This gives a clear indication of how much work has been done and how much is left to do on a daily basis throughout the production period. The column on the right-hand side is for any notes that need to be made during the production, such as the addition or subtraction of frames. Every animator will have their own preference as to the inclusion of the separate elements and the order in which they are placed, and this will be determined by the nature of the project, as the separate processes may be different each time. Production charts are not only useful for commercial productions; even animators making a short independent project would benefit from keeping their own production chart as a constantly updated reminder of their own schedule. That way they can monitor which scenes have been roughed out, which are in clean-up or ready for inbetweening, how many have been line tested, and how much work is left before the sequence is finished. For a freelance animator, a production chart is all important as a way of tracking the work, as payment for the work will nearly always be after completion of the animation and a good production chart will give you an idea of how the financial side is working out week by week. This is even more important if the animator is subcontracting out assistant or inbetweening work, for not only do they need to be paid, but any delay with their work will have a knock-on effect, which may upset your cash flow situation unless you have sufficient financial back-up. Proper tracking of a project can determine the animator’s very survival as a freelance. You may wish to include a delivery date and an invoice column; this would be a reminder of when work was completed and the date on which the invoice was generated. To give even more detail it might be advisable to include the date on which you commenced the work and how much the job is worth; this can be done either scene by scene or as a complete sequence. You may find that the individual scenes have already been cost to a set price or you may be working to a footage rate, i.e. 1 foot of film (or second of film) = £ x. This kind of information will enable a weekly rate for animators, assistants and inbetweeners to be worked out.
Production schedules
Within any production studio the importance of a production schedule is difficult to overemphasize. Deadlines for the client are very real; they may have a broadcast or delivery date of their own, which cannot be moved. Unless you know the deadlines and milestones involved in a production it cannot be fully or realistically planned. Schedules can only be developed once the nature of the project and the resources available are established. A production schedule, along with the production budget, may shape the nature of the production and its production values; conversely, the production values and budget may determine the schedule. They are all interdependent elements of production management, and achieving a balance between them and focusing on the most pressing of these is vital to a production’s success. Creating and sticking to a schedule can mean the difference between profit and loss. The production manager will have a separate schedule outlining the individual schedules for recording artists, storyboarding, layout, animation, paint and trace, camera, processing, final edit, and the all-important delivery/air date. The production manager will also have their own version or versions of a production schedule outlining exactly when the backgrounds were commissioned, what date they are due back to the studio, a detailed breakdown of who has been allocated which animation sequence, who the assistant is and on what date the animation is due back in the studio. Obviously, not all of this is necessary for a small independent project, but if you are to complete the production within a certain time period you will need to undertake some form of scheduling.

Figure 7.19 Production schedules can be very elaborate affairs depending on the size of the production. This very simple example, created in Microsoft Office’s Excel, shows how a small project can be broken down into tasks and tracked across time. Schedules need not be overcomplex and should reflect the intricacy of the project. Simple projects – simple schedules. Using more specialist production management software tracking resources for more complex projects involving many separate elements and large production crews linked to a series of milestones and individual production costs can become a relatively simple task.
Production folders
Animators should get into the habit of creating production folders for all their scenes. These should contain copies of all relevant material, such as layouts, overlays, underlays, character layouts, dope sheets and field keys. Once the animation is complete, each separate element of the animation – individual characters, separate character elements such as heads and arms, lip-sync, etc. – should have its own folder within the main scene folder. This need only be a sheet of paper folded in two with the drawing numbers written on the front. If a sequence of a character is numbered as A1–A57, for example, it would help if this was identified on the front of the folder, along with the scene number and the production title. This helps to keep all the various drawings in order, which is particularly useful when working on limited animation, where there are many separate elements involved within each scene. It also helps to identify the individual drawings that belong to a specific scene within a specific project. This is vital in a production that involves many scenes to avoid misplacing animation. This may seem like a bit of a bother, but it can save time and effort in trying to find all the relevant drawings within a scene if alterations or additions need to be made at some point.
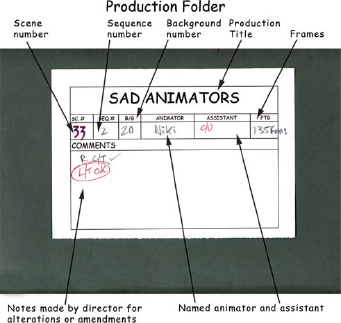
Figure 7.20 Each scene needs to have its own production folder clearly labelled with production title and scene number. All the relevant documentation, such as dope sheet, layout and field guides, is kept within this folder. All the animation drawings for this scene are kept separately within this folder.
Production budgets
The other main aspect of production management is the production budget. If you are simply making a film for your own enjoyment this need not be a very complex process, though it would benefit you to know at the outset how much the completed film will be costing you. For commercial productions this is vital. Get this wrong and no matter how creative you are or how well you animate the work you will be in for a hard time. This would tie in with both the production schedule and production chart, as the budget available will ultimately determine how long you can spend on a project and the amount of resources, including production crew, you can allocate to the film. As formulating a production budget is usually the work of the producers and the production accountant, most animators need not get involved. As finance and budgets are such complex and important areas, I have only touched on them here. There are a number of very good guides on putting together a production budget, which I have included in the appendix section.
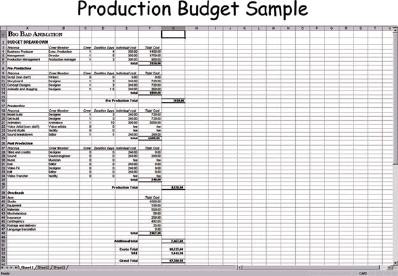
Figure 7.21 This is a very simple production budget that outlines the separate costs of each of the processes involved in a short, low-budget production. Notice how the animators have a daily rate; this is important for the production schedule as any overruns will potentially put the production over budget. Figures for each of the elements are omitted as these will vary greatly. Please note that this budget template is intended to be used as a guide only. This does not constitute any kind of formal or official document and in no way constitutes a contract.
There are a number of media production management and media resource management software packages available, though production management can easily be undertaken without this and little knowledge of standard spreadsheet software will enable you to achieve most of the things you will need even within a substantial production. For a more detailed text on production management for animation, you should look at Producing Animation by Catherine Winder and Zahra Dowlatabadi.
QUESTIONS TO ASK YOURSELF ABOUT PRODUCTION MANAGEMENT
Q. Is the project achievable?
Q. Have you identified all the resources you need for the project, including materials, equipment and production team?
Q. Have you drawn up a realistic production budget?
Q. Do you have sufficient resources to complete the production?
Q. Have you broken down your project into the separate tasks in the form of a production chart?
Q. Have you established a realistic and achievable deadline for the milestones within the production, and are these identified within the production schedule?
Q. Are each of the scenes timed out to comply with your animatic and are these organized into separate production folders?
Q. Are all your production crew aware of what they have to achieve and within which milestones and deadlines?
Q. Is all the relevant documentation in place to track the film in its entirety?