Chapter 4
Design

Good design is the foundation of every successful product. Animation is a product. Films don’t just happen, they are crafted. Every element is planned out and designed, and the more elaborate the film, the more meticulous the design and planning.
BEFORE WE BEGIN
We need to establish exactly what we mean when we talk about design for animation. It would be a mistake to think that this is merely limited to designing funny cartoon characters. In the context covered by this chapter, we will be looking at the most obvious graphical design elements of character design, storyboards and backgrounds.
Design for animation does indeed involve character design, but beyond that it extends to backgrounds, sets, props, storyboards, animatics, cinematography and other non-graphic elements, such as sound, music, and scripting and characterization design, aspects that may be found in a writer’s bible rather than an animator’s bible. Each of these specific areas of design clearly contributes to the overall result. It can be argued that even animation timing can be classified and identified in terms of design. It is not only in the graphic quality of the animation that differentiates work such as Phil Malloy’s and Erica Russell’s. Design extends to the way in which each animator uses time as a design element, not simply using animation timing as a way of moving things around the screen but by creating an animation language. Animation timing as a design element is also clearly evident in computer games, where the playability of the game is of paramount importance. We often find that the separate actions of the characters within a computer game are subservient to the need for optimum game playability.
Design for animation is such an extensive subject encompassing so many different aspects of production that it is not possible to cover it fully here. So broad is the subject of design for animation that there is probably a need for separate volumes on each of the individual topics. The making of a successful animated film does not necessitate the use of stunningly beautiful and naturalistic animation. Great films can be made with a minimum of animation that depends on good scripts and first-rate design. UPA (United Productions of America) are testament to that. They formed as a direct result of the 1941 strike at the Disney studio and began to make animation that was seen by many to be an artistic response to the ubiquitous Disney-style animation.
Much of UPA’s output depended upon design and script-driven material, which resulted in what became known as limited animation. It may have been limited but it was anything but limiting and it provided a brand of animated movie-making that was fresh and innovative. UPA’s version of Edgar Allen Poe’s Tell Tale Heart was one such film. The strength of the design work, with its emphasis on neocubist backgrounds and film noir cinematography, make this a startlingly fresh film that cuts to the very heart of Poe’s original work. Much more recently, Cartoon Network’s Samurai Jack uses screen space design and cinematography to similar effect. The minimal use of animation does not detract from the stories, it enhances them and presents the narrative in a fresh and unusual way. The overall result is an animation that is reminiscent of the comic strip and graphic novel. The combination of strong design and limited animation allows the audience’s attention to be focused on the story and highly original design. This creates a unique type of cartoon-based animation. Design for animation, like all other forms of design, should be appropriate to the production and meet a wide range of aesthetic and practical criteria, taking into account the purpose of the film, the methods of manufacture, its use and distribution.
Production
The entire production process of even a modest animated film will have an impact upon the final design. The methods adopted, the technology used in production, the type and amount of resources available (including staff), the production team and the level of skills available to them, and the production paradigms used by the production team will all have a bearing upon the design decisions made at the outset.
Style
It is important when designing for animation that the separate elements fit in with the overall styling of the film and that character design stays on message. Design must reflect the style. That is, the design must fit within the conceptual environment. Flat cartoon characters such as Ren and Stimpey would simply look out of place set against richly detailed and complex Disney-type backgrounds, and vice versa.
Audience
The differences between targeted audiences will determine design issues. Animation aimed at children will have the obvious limitations imposed upon it, though this may even extend to choice of colours, while animation aimed at an adult audience may utilize more abstract forms or contain material of an adult nature.
Distribution
The manner in which the animation is to be distributed may also have an impact on the design. Animation seen on the Web, TV, standard cinema or Imax will have a very different effect. A close-up that may be suitable for a small screen may prove to be alarmingly large for a cinema and almost impossible to read in Imax format.
Format and budget
The format of the animation must also be considered. Animation made for a TV series with a limited budget must take into account the reuse of animation, the separating of characters into constituent parts, limited lip-sync, etc. The design decisions for a series will have a major impact upon the profitability of the work. The simple addition of a patterned material on the costume of a character could have serious consequences for the budget. A patterned shirt takes longer to draw and colour than a plain one. Taken over a series of 26 25-minute episodes, this could add up to a lot more pencil mileage – which means money! For feature work the design is often more complex, as the budgets are usually much higher and allow for additional detailing. One-off films may not be subject to such design considerations and constraints, as there may be less opportunity to make economy-of-scale savings. There is still a very real need to consider design and set this against the resources and budget available.
STORYBOARDS
What is a storyboard and what is it for? A storyboard is a set of sequential images that sets out in visual terms, panel by panel, the progressive narrative of a film. Storyboards consist of a number of panels, each of which is representative of how the final animation will appear on screen. Storyboard panels provide a framework of separate images that create a sequential whole, reading from top left to bottom right, much like a comic strip, though the similarity is often overstated. Unlike most comic strips, storyboards utilize a variety of cinematic devices and a range of shots that will be in the completed film to illustrate the narrative; a storyboard is a vital tool for all those within the production team. Producer, director, designer, animators, voice talent and editors will all find a use for the storyboard in their own particular part of the production process. In order to ensure that the full cinematic narrative is explained clearly to all the production crew, additional information regarding dialogue, sound, action, camera moves and sometimes even technical issues sits alongside the graphic representation.
It’s at the storyboard stage that a script starts to become concrete; some have even argued that when the storyboard is finalized the film is complete. I would not support this view. It is true, however, that during a professional production it is normal practice that once a storyboard has been agreed upon and animation commences there are usually only few and minor alterations made to the storyline. Since animation is a very expensive process and reshooting is by and large out of the question, it is vital that the film works at the storyboard stage, with little or nothing left to chance. Some animators prefer to use the storyboard as a rough guide to the animation, allowing alterations to be made right throughout the production. While this looser approach to film making may enable the director and the animator to continuously develop the idea and make a creative input to the film through animated performances, it can also mean a lack of structure which could result in an uneconomic and inefficient use of time. This approach is something that is anathema to the professional production running on a tight budget up against an even tighter deadline. If the storyboard remains unresolved before production commences, it is more likely that expensive mistakes will be made. Time spent getting the storyboard right is time (and money) that will be saved at a later stage. The storyboard, and the animatic, will throw up difficult issues and highlight design problems that can be resolved before animators get to work, saving time and money. It is important that key members of the production crew are familiar with and have input to the storyboard; this will enable them to better assess the work involved and the resources required to accomplish a favourable result.
Very often, in the early days of animation, films had only the barest of outlines and animators made up the narrative as they went along. Perhaps this is why many of the animations of the 1920s look so clumsy and unstructured by today’s standards. It wasn’t long before audiences became more sophisticated and the sheer novelty factor of animation was no longer sufficient to captivate them. The need for a stronger narrative content became paramount and increasingly creating gag sketches for the films became the norm. As more and more gag sketch drawings were added over time, it eventually became customary to plan and draw out the entire film in this way. The storyboard was born.
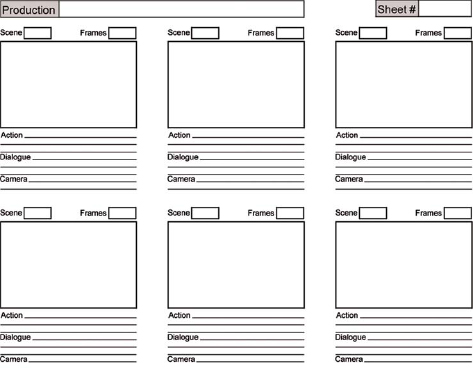
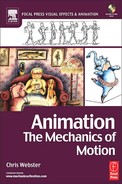
Figure 4.1 While the exact format of storyboards may vary slightly, they all have common elements within them. The template illustrated here shows how all the necessary information is included, not just a drawing of the proposed animation. The individual storyboard pages carry the production title and the storyboard page number to avoid possible confusion with other production or episodes. The scene and shot number are identified and a frame count for each scene/shot may also be included, though the actual animation timings will be slugged out on the corresponding dope sheets. The separate panels visually show the content of each shot, though there is often more than one panel per shot depending on the nature of the action. Dialogue, action and sound are indicated below each panel so as to link them to the graphic element.
Script first
Without a script it is difficult to create a storyboard. You need some kind of idea to work around, even if this is in a very basic format. The original idea may well change as the storyboard is being developed. It may even be changed beyond all recognition or be thrown out altogether to be replaced by better ideas, but as a starting point it is very necessary. The idea and the script should not be so rigidly designed that changes cannot be made throughout the production. This will reduce the animators to mere technicians and deny them the opportunity to contribute their own particular brand of creativity through performance. A good performance will often enhance an idea way beyond what was originally expected or planned for. You must allow for this sudden inspiration but not be dependent upon it. Remember what John Lasseter said – script, script, script. Film is perhaps one of the most plastic of art forms; the work is subject to development from its concept to practically the moment it is screened.
Generally, there are three types of storyboard: thumbnail or rough storyboards; presentation storyboards; and working storyboards. Each has distinctive qualities and serves very different and particular purposes.
Thumbnail or rough storyboards
A thumbnail or rough storyboard serves the purpose of capturing an idea quickly. At this stage the flow of creative energy is high and the rough storyboard is often created at breakneck speed. The idea is paramount when creating thumbnail storyboards. Good ideas often come in fleeting moments and so must be captured quickly. It is important not to fixate on style or drawing unless the drawing style is the idea. The emphasis should be on the script and developing a cinematic narrative through the choice of shots and the pacing of the action. When developing character animation, the characters are often unrecognizable and may even be represented by little more than stick men. It’s at this point that a rough working storyboard comes into its own. If the drawings are kept simple and the work is done quickly, it allows the ideas to begin to flow, one gag or situation being easily replaced by better ideas or funnier gags. It’s important not to get bogged down at this stage with concern for the quality of drawing, that comes later; if the drawings are simple and there is little artistic investment in them, they are easily expendable. When making thumbnail boards you are likely to throw as many panels away as you use, though as you have invested little effort in the actual drawing of the board this is no hardship. A rough storyboard may be all that is needed for your animation. If you are making the work alone and do not have a client to satisfy, then there may be little point developing it beyond this stage, though it will still be of immense value to work out the animation shot by shot, even if it is with stick men. At least that way you will be sure your idea works before you commence animation.

Figure 4.2 The drawings for this thumbnail storyboard are extremely rough, which enabled me to draw up an idea very quickly. I prefer to work with a pen at this stage, as it means that I cannot be tempted to make alterations to my drawings, sketching out the idea very quickly on sheets of A4 or A3 paper. This forms the basis for a presentation board. These rough drafts are for my purposes only; a client would never see such storyboards nor would they be used by a production crew. They are simply the first step in the storyboarding process.
Presentation storyboards
Presentation storyboards are usually made with the sole intention of formally presenting an idea to a client or an interested third party. This is usually done in order to get approval for a production. They are used by the producer, director and others to secure financing and in order to agree on a production budget. They are used to get money flowing out of a client or investor’s pocket and into the production and, once out, keeping the money flowing out. This is not such a mercenary aim as it may at first seem; the clients or backers need to be reassured that their investment, and in some cases very large investment, is being used in a manner of which they approve (and can understand). It is often the only way of showing the backers, who are often non-artistic people, what the end result will be like. Presentation storyboards often have far fewer panels than working storyboards, though the panels are usually far more detailed, giving a much closer representation of the final look of the film. They also carry much less technical information, as this is usually irrelevant at this stage.
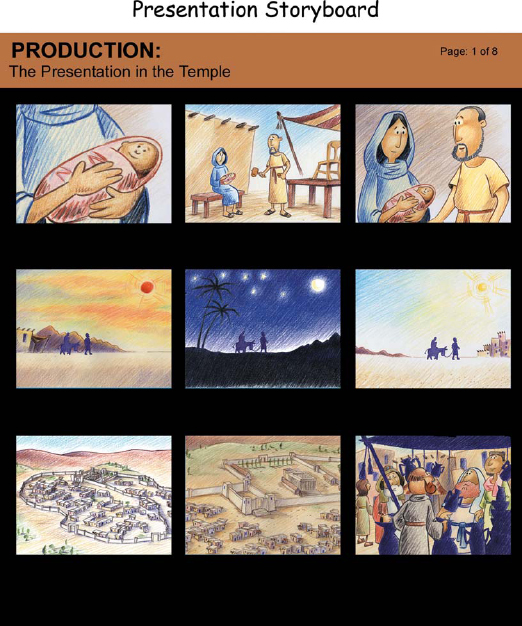
Figure 4.3 Notice how, in these drawings, there is far more detail. While this may not be an exact representation of the final look of the film, it is usually fairly close. Colour is used to more closely represent the final animation. The client was able to approve the design of the film and production was able to continue to the next stage. When working in 3D stop-frame animation, presentation boards may sometimes consist of stills of the actual models placed in appropriate sets, though the cost of making those models in the first place may be prohibitive if finance has still not been secured. In such cases it is clearly acceptable to substitute drawings for these.
Working storyboards
These are used to help the director, animators, scriptwriter, background artists, etc. in making the film. They need to explain in visual terms the content, pacing and flow of the film, with a good indication as to the type of action the director is looking for. While they must make the aims of the director abundantly clear to all those involved, it is not necessary for the character designs to be accurate or the standard of draughtsmanship to be of the same high level as the finished animation.
There is a real need to communicate the exact nature of the animated production so that everyone knows what they are doing and that all the separate elements fit within the director’s original plans. A working board is the template for the film and as such must accurately reflect the director’s vision. A working board is not simply a series of graphic panels, it also contains such information as scene and sequence number, details of action, dialogue, sound and music; it may even include details of the scene length through a frame count, details of camera moves and other technical issues, and even detailed notes on animation timing, particularly if the animation has continuity implications or is synched to a specific sound.
Above all, it should be remembered that the only purpose of the working storyboard is to assist the crew in making the film; it should not be created as something separate from the film with a value beyond its worth. Remember, all storyboards are only the tools used to enable the production crew to get the film developed, financed and made. Storyboards are not the main aim of the film-maker, nor are they the end result of your efforts; your audience rarely gets to see them, so they should only be developed to a level that enables them to be used for their appropriate purpose.
ANIMATICS
Once the storyboard has been finalized and all the bad and sloppy ideas consigned to the waste-paper basket, it’s time to see if the storyboard actually works as a film. To do this, animators make an animatic.
Figure 4.4 Drawing is far less important than an in-depth understanding of film grammar, which is essential when making a working storyboard.
The animatic is a kind of movie that runs in sequence and is paced out in the same way as the final film, but unlike the final film the animatic consists not of animation, but only of the stills drawn up for your storyboard. The procedure for making animatics is quite simple. Each shot of the film is timed out with a stopwatch scene by scene. You can do this either by acting out the actions yourself or with others, or simply imagining how long the separate actions contained in the shots will take. If you are using dialogue it sometimes helps to read the script out aloud. The storyboard is then shot either on film or video to those timings (25 frames each second); the resulting footage is known as an animatic. An even simpler way to do this is to scan the individual images of your storyboard into a computer and import them into a desktop editing programme such as Premiere. The separate images can then be assigned a specific number of frames. Using Premiere it is easy to make adjustments to your animatic without having to reshoot the storyboard. You can even add camera moves and effects such as pans, zooms, dissolves, fade to black, etc. Importing your soundtrack also allows you to accurately synch your shots to soundtrack and/or music. Using such techniques it is possible to get a good idea if the animation is going to cut together well and make sense as a filmic narrative. As such, it is difficult to overemphasize the importance of the animatic. A lot of time, effort and money can be saved at this stage. If there are any problems with the way the film cuts together, it can often be easily rectified before animation begins.
Making the animatic is usually a job undertaken (or at least supervised) by the director. Many of the terms in animation have changed over the years and they do not all share the same common currency. You may often hear the term ‘story reel’ used instead of animatic. When the term story reel is used, the term animatic often refers to a sequence of rough, first-pass animation. To complicate things even further, the animatic is sometimes referred to as the ‘Leica reel’, named after the camera (Leica) that they used to shoot these on. This has mostly passed into disuse, but you do hear it from time to time. However, call it what you will, the principle remains the same.
CHARACTER DESIGN
I think you have to know these fellows definitely before you can draw them. When you start to caricature a person, you can’t do it without knowing the person.
Walt Disney
The graphic elements of character design are only part of the design process. The director and the animators need to know what makes them tick just as much as how tall they are, how many fingers the character has or what colour their shoes are. In many studios, character design is not undertaken by any one particular artist or animator, a variety of individuals may have a hand in the creation of new characters.
In larger studios such as Pixar, the role of the designer is considered to be very important and it is likely that this will be an entirely separate job within a design team, consisting of concept artists, illustrators, storyboard artists, layout artists and animators. However, whether part of a big team or working as an individual, the one thing for sure is that anyone responsible for the development of the characters will shape the entire project and greatly affect the outcome of the end product.
As with live action film, the cast members are vital to the success or otherwise of the venture; they must be believable in both physical and psychological terms, and must operate convincingly not only on an individual level, but within the broader context of the film. There are some very famous examples of groups of characters working together to create a believable and captivating cast. Bugs and Daffy, Tom and Jerry, Baloo and Mowgli, Yogi Bear and Boo Boo, Woody and Buzz Lightyear, etc. As individuals appearing within the context of their cast they are very successful, but once taken out of that context or operating within a different type of cast demonstrating unsympathetic characteristics or design traits the resulting chemistry may be one that will be rejected as implausible by the audience. The actual drawing style used for each of the characters should be consistent with one another, otherwise they will not sit comfortably together on screen.
Character development
To develop a character fully it is necessary not only to have a clear understanding of their behavioural patterns, but to get under the skin of that character and really get to know what makes them tick. The way in which Daffy Duck behaves as a cowardly, greedy, megalomaniac, strutting hedonistically around the screen, is convincing because the character is well conceived and completely understood and believed in by the designers. So convincing are the characteristics of this and other characters that it is quite possible (for the animators it is essential) to be able to predict the behaviour of such a character in almost any situation. We know how they would respond; they become real. To make completely convincing designs, it is vital that the artist has a good understanding of anatomy. In order to exaggerate, diminish or omit chosen physical characteristics to make a really first-class cartoon design of an animal, it is first necessary to have a clear understanding of that animal in real life, to know its proportions and its structure, and the way in which it moves. This obviously doesn’t apply if the character is abstracted beyond the realms of realism; after all, Jerry doesn’t behave much like a real mouse and Daffy doesn’t move much like a real duck.
The animation bible
It is vitally important that, once the character designs have been completed and approved by the director, the producer and others within the design team, the designs are adhered to by the entire production crew. To this end, a design document is created to assist in this. The document, known as the animation bible, consists of separate sets of designs, known as model sheets (which can sometimes be very extensive, particularly for feature productions). The animation bible usually includes different types of designs sheets that enable the animators and others to stay ‘on model’ throughout the production, and also includes basic model sheets, construction sheet, height relation chart, action sheets illustrating a series of dynamic poses, a lip-sync guide and colour model guides. It is possible that the animation bible will also include actual test animation so the animators can keep on model with regards to the actual movements. There is little point going to great lengths developing a character and painstakingly drawing up a series of model sheets if the animators don’t use them. Using these aids, it is possible for even a very extensive animation production made by scores of individual animators and technicians to look as though the animation has been created by a single hand. The result of animators and others (even within a very small crew) working in ways other than deemed by the development crew would be discontinuity and disharmony. Without model sheets, the designs could vary from scene to scene, the way the drawings were made could look different and the animation timing could look like it was made by different people. In 3D computer animation it may also be beneficial to include illustrations and a detailed explanation of the functionality of the animation rigs, the particular constraints and appropriate use for each of the separate characters. The important thing to remember here is that these documents are done in order to assist the animators and to make their life easier, enabling them to concentrate on the job in hand – performance.
Will it animate?
There is a world of difference between drawings that make good illustrations and those designs that are suitable for character animation. The final test of a good design is summed up in one question: will it animate? No matter how attractive the drawings seem to be, if the design doesn’t work in animation terms then it is unsuccessful and will need further development. This is not just a 2D classical animation issue, it extends to 3D stop-frame as well. A well-drawn design will not necessarily translate into a model that is capable of performing all the necessary actions and movements needed from it.
Model sheets
When considering the structure and the anatomy of the animated character, simplification is the order of the day. It is necessary to break down a design into a form where it becomes possible to handle the character efficiently as animation. That’s where model sheets come in. Generally, the use of model sheets for animators is restricted to 2D classical animation, as they create every frame of the animation from scratch each time. While the need for model sheets in 3D stop-frame animation or computer animation may not be seen as such a great issue for the animators, as they are working with prefabricated models, they will certainly benefit from those model sheets and action sheets that illustrate the range and type of actions that a character is capable of. This can only enhance the performance that an animator gives.
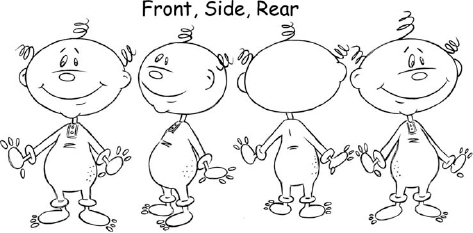
Figure 4.5 The basic model sheet shows a character from all sides. This gives the animator a clear idea of the character’s form and any details of costume. These designs give a clear indication of the overall structure and proportions of an animated character seen in 360 degrees. They are designed specifically for use by animators in order for them to gain a clear understanding of the individual character’s ‘three-dimensional’ form.
Model sheets should contain all the relevant visual information the animators need. There should be no ambiguity at all within the drawing or the poses. Model sheets should illustrate the character in a simple pose giving, within separate drawings, details of front, rear and side views. This is just as important and useful as showing the character in a series of dynamic poses. The model sheet should enable the animator to gain a good understanding of what the character looks like through 360 degrees. Model sheets should always be clear, with any additional information added as notation. They should also provide all the detailing of costume and in some circumstances it may be necessary to create more than one such model sheet for a character if, for instance, the character changes costume within the film.
Height relationship chart
If two or more characters are to be used in any sequence, a height relationship chart will be useful to ensure that issues of relative scale are addressed. There is nothing more disconcerting than seeing characters growing and shrinking throughout a film, and you need to avoid problems of this sort; believability will just jump out of the window.
Colour models
The use of colour is an important aspect of character design. It must be in keeping with the general design concept and fit comfortably with the rest of the design elements of the production. A multitude of psychedelic colours outlined by a heavy black line may not be what is required if the backgrounds are to be painted in delicate Chinese watercolour techniques. Colour must also be used with care when targeting a specific audience. Designs using bright primary colours may be appropriate for a pre-school TV series but unsuitable for a darker piece aimed at an adult audience.

Figure 4.6 The height relation chart places all the characters together in order that they are drawn to the right scale throughout the production.
The practical use of colour and the constraints upon production and distribution must also play a part in the design. Because the colouring of 2D classical animation can be a very major part of the production budget, the level of detailing and the number of colours used for a particular character must also be considered. The more colours you have and the more detailed a character is, the more costly the enterprise.
Colour model sheets are generally used by the department dealing with paint and trace to ensure that all the individuals that colour and shade the characters do so in line with the director’s instructions. Again, this can involve creating many different versions of colour models to accommodate different costumes and different environments. A character dressed in the same clothing would look very different when seen in a brightly lit room than they would in an exterior moonlit scene or in the glow of a camp-fire. Digital paint and trace systems such as Animo, developed in 1992 by Cambridge Animation Systems, have replaced much of the work that was traditionally done on cels. Computer programs such as Animo are used not only to paint the artwork, but allow all manner of special effects to be achieved for a fraction of the cost and within a much tighter schedule than the traditional methods. They have done away with the need for messy paints and cels that were prone to scratching if mishandled, and required vast amounts of space to paint and leave to dry. This type of software also incorporates a system whereby all the camera work hitherto undertaken on a rostrum camera is built in to the programme, enabling a full range of camera moves and effects to be achieved. The work is then rendered and output directly to a range of formats, including formats for the Internet, doing away with the need to shoot the footage as a separate activity. While the high-end professional software may remain outside the reach of many of us, there is now a range of affordable animation-specific software available for amateur animators.

Figure 4.7 Colour models are usually used only by the trace and paint department in a 2D classical animation production. They are also useful when designing sets and backgrounds, so that incompatible colour schemes are avoided.
Construction sheets
A construction sheet is also a very helpful addition to the 2D classical animation bible. These model sheets demonstrate how the character is made up in the form of simplistic shapes, circles, ovals, etc. If a character is animated using good construction techniques, the animation drawings will keep their true proportions and have less likelihood of looking flat or going ‘off model’ and out of character. Construction sheets are created in order to take the animators and assistant animators through the actual sequential drawing of the characters in a step-by-step manner. Building the character up through a series of stages from simple primitive shapes through to fully detailed drawings of costume items ensures an efficient and economic use of the animator’s time. Using construction sheets means the animator will spend far less time struggling with the individual drawings.
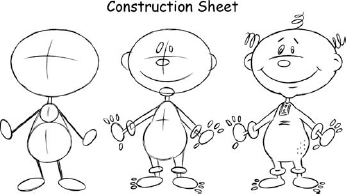
Figure 4.8 The construction sheet is used by animators making 2D classical animation and illustrates, in a step-by-step manner, how a character is drawn from simple primitive shapes through to its final complex form.
Action sheets
These are designed to give an understanding of the range of actions a specific character is likely to undertake, not only the typical poses which they make, but also the extremities of actions. Any peculiarities that a character may possess or actions that typify a particular character are sometimes included in these sheets. Such design sheets can be of immense value to all animators whichever discipline they are working within, as they provide a deeper insight into the character, not simply in how they move, but also their personality. Action sheets are often an ongoing design development. The series of design sheets may be added to from actual animation key drawings as the production develops. Updated action sheets will then be distributed to the appropriate members of the production crew. There is little need for this on a short one-off film, as the animation crew is usually very small and the production schedule relatively short. For a TV series, however, it may be very useful to adopt this type of organic development of the action sheets, particularly if the designs of the characters themselves develop over time. There are good examples of how characters have developed; consider how the characters in The Simpsons have changed since the first series. Model sheets are working documents, they are not an end in themselves, and must be updated to reflect developments in the project. Using old model sheets would simply create problems in current productions.

Figure 4.9 Action sheets cover a wide range of poses, and aim to illustrate a character in action and displaying a variety of moods.

Figure 4.10 Design for 3D stop-frame and computer animation must meet many of the same requirements as 2D classical animation. In these concept drawings, the detailing needed for the model can clearly be seen.
Lip-sync guides
Lip-sync guides can be a very useful addition to the animator’s bible, particularly if the characters have peculiarities of design, unusual mouth structures or if the shapes made during speech are, for one reason or another, outside the norm. Lip-sync guides will also help if the production is being animated in different countries, where a number of languages are used by individuals within the production team. This proved to be invaluable during a production I was involved in where the pre-production was undertaken in Europe and the animation (including lip-sync) was being done in China. The separate mouth shapes were given numbers and the animators simply drew in the appropriate mouth shape onto the characters at specific points throughout the film, determined by the director’s notation that appeared on the dope sheets.

Figure 4.11 The model sheet illustrated here, used as an armature plan, has much in common with a model sheet for 2D classical animation. In it, the character is placed in a very simple pose, allowing for ease of modelling. They are not used to explore the animation possibilities and capabilities of the model; these should have been established earlier in the development process. This is a simple blueprint for the actual construction of the puppet.
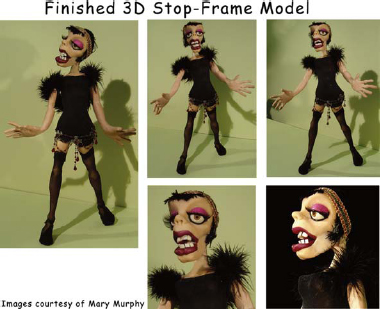
Figure 4.12 The final model.
DESIGN CRITERIA
The criteria for designing for different types of animation may vary greatly and while each may have its distinctive elements, there are aspects that they have in common and must be taken into consideration.
• Your designs should demonstrate suitability for the concept. If you are making a horror movie it may not be appropriate to use pale, washed-out pastel colours for your backgrounds. The design for Tim Burton’s Nightmare Before Christmas utilized classic horror stylization and lighting to great effect. In contrast, the TV series Noddy held true to the original Enid Blyton concept, simplicity and clarity of design with clean bright colours.
• Design should have empathy with the narrative of the film; this is evident even in abstract pieces. The abstract work of Clive Walley in his brilliant animated film Dark Matter as part of Divertimenti does not simply echo the sound narrative, it presents an interwoven whole. This film illustrates clearly Walley’s approach to creative collaborations and design symbiosis.
• Design should always be determined by the suitability for the process – 2D classical animation, 3D stop-frame, computer animation, cut-out animation, etc. Each of these disciplines has its limitations, which need to be understood if you are designing for the medium. There is little point in designing a character for 2D animation by making its costume so complex that the drawing of it will exceed the budget.
• Design for computer animation should take into account the complexity of the character, as this will affect the time required for rendering, which will have an impact on budget. It is also true that design for computer games is often centred on polygon economy, as complex and high-polygon models will be handled more slowly by a games engine than a low-polygon model, which may in turn affect game play.
• The nature of the armature and complexity of model and materials should be considered when designing for stop-frame animation. The way certain materials behave will have a profound effect on the design decisions, as will the physical size of models. These may have a knock-on effect and determine the size (and cost) of the set.
• The design must meet the practical requirements of production and be suitable for the specific needs of animated motion. If a character in a 3D stop-frame animation is expected to go through a series of complex and extreme actions, the design of the model and the engineering of its armature must enable the animator to complete these actions. The same is true for CG models. If they are constructed inappropriately the result may be that the model will ‘cut through’ itself in certain places.
• Design must take into account all processes and other people working within the production pipeline. What looks good on a drawing board does not necessarily mean that everyone will be happy with the design. A set of cityscape designs with high shots featuring the skyscrapers of New York may look spectacular in a presentation board and go down well in a presentation meeting, but be totally impractical in terms of set building. Pragmatic considerations should be given to the entire process, including the budget.
• Finally, when designing for any animation project you must ensure that others can understand and ‘read’ the designs in the manner intended and appropriate for the needs of the project. Design is not just about making beautiful or funny drawings, it’s more fundamental than that. It is sometimes easy to forget that design is a form of communication and that communicating the idea is the most important factor, not just in animation but in all design.
The morgue
Those wishing to develop their skills and perhaps a career in one of the many design disciplines should begin collecting visual reference material of all kinds. A well-organized and extensive collection will be invaluable for those working in illustration, character design, storyboarding and layout or as a background artist. The famous animator Shamus Culhane termed such a collection of varied reference material a morgue. A collection can not only contain photographic reference of all kinds, but drawn images and graphic design as well. The subjects covered should be as wide as possible: humans, animals, machines, vehicles, architecture, places, plants, etc. The trick to having a good morgue, as with so much in animation, is organization. If you catalogue it properly into various sections you should be able to find the relevant photograph or drawing quickly. You will obviously collect and file the kind of material according to your personal interests and its relevance to you and your practice. A comprehensive morgue will take years to put together, but rather than a task it should be seen as an enjoyable way of continuing your art education. It will also provide the much needed reference for the job in hand. The Internet is a valuable source of such material and search engines can usually direct you to the resources you need.
QUESTIONS TO ASK YOURSELF ABOUT DESIGN
Q. Do your designs communicate and support the central idea?
Q. Do your designs relate the narrative?
Q. Are the designs stylistically appropriate to the production?
Q. Are your designs practical? Will they perform in the way they should and do they work within the limitations of the medium?
Q. Are your characters’ designs believable? Do they reflect the physical and psychological aspects of the character?
Q. Do the characters fit in with the rest of the design elements of the production?
Q. Will your characters animate?
Q. Can others use the design bible for practical production purposes?
Q. Are they suitable for your target audience?
Q. Are the designs efficient and do they fit within the production budget?