Chapter 5
Animals in Motion

The animal kingdom is hugely complex, offering almost infinite possibilities and challenges for the animator. Nature fills in all the blanks, from the largest whale to the smallest bug; if there’s a gap in the ecological market, nature meets it.
BEFORE WE BEGIN
It’s through direct and detailed action analysis, either in the flesh or on video, that you will gain a more in-depth knowledge of the motion of animals. You don’t need to concentrate on the wild or the exotic to develop these analytical skills. The average domestic cat or dog will provide enough fascinating material for serious study. The difficulties of animating animals with four legs are considerable, but like the walk cycle we covered earlier, the process can be broken down into its basic components, resulting in a fairly straightforward problem. All the principles that we have looked at so far still apply, and once you have practised a little with the earlier exercises you should find these much less daunting. Having said that, the realistic animation of animals is a difficult matter and requires much practice and patience, so don’t get too despondent if your first efforts fall short of your goals; you will get there, but it will take time.
This chapter can only cover very limited examples of animals in motion. A whole volume dedicated to this one subject alone couldn’t possibly cover all the variables of the animal kingdom. The actions of mammals, amphibians, insects and birds would take a lifetime to study in detail, and as we don’t have time to do that right now, I have purposely limited this chapter to cover a single four-legged animal – a horse – and the action of a bird about the size and shape of a pigeon. With these examples I aim to cover some of the basic principles as applied to animal locomotion.
In addition to studying the movement of animals from life, you may wish to study the work of Eadweard Muybridge and Jules Marey. While Muybridge began his work during the latter part of the nineteenth century, his work became and remains a standard text for those (animators included) interested in studying animals and people in motion. His volumes of photographs are still available today and will invariably help your understanding of animals in motion; I recommend them to all my students. However, I would urge that you use the Muybridge photographs as a guide only. This kind of material, no matter how good, is no substitute for direct personal observation and analysis. Marey’s work is perhaps a little less well known. A contemporary of Muybridge, he not only recorded animal motion through photography, he developed a number of interesting devices to graphically record locomotion and movement. We have already seen how motion capture and rotoscoping have been used to good effect in Lord of the Rings, and it is now common for motion capture to be used as a way of providing reference, and in some cases a substitute, for more traditional hands-on approaches to making animation. This approach is most notable in the computer games industry.
FOUR LEGS
While we are already limited to the various actions of a horse, I have decided to concentrate on the actions of the ‘average’ horse (if such a thing exists), as even horses vary a great deal. A little Shetland pony will move in a very different way to a thoroughbred racehorse or the slow powerful action of a shire horse or the exaggerated actions of a horse trained in dressage. In the examples covered we will look at the walk, the trot and the run, though there are many other separate actions we could look at in detail. These actions have been chosen to give you a general feel for the type of animation we can expect from such an animal. The exercises should be challenging enough to extend your practice and develop your skills. The principles of the specific movements we will cover will be much the same for most four-legged animals, though there are some very obvious exceptions. The manner in which a camel walks is the same in principle to the action of a horse; however, it runs in a very different manner to a horse. Unlike the horse, the camel when running (an action that in camels is known as pacing) alternatively throws its front right and rear right legs forward, and then the front left and rear left legs forward together. The sequence of movement of the horse’s legs during a run involves a diagonal action, which we will cover in some detail.
Before we get too involved in making animation, we should take a little time to familiarize ourselves with the physiognomy of the horse.
The structure and proportion
The structure is broken down in such a way as to create a much simplified form for ease of construction and for our animation purposes. I have omitted muscle structure or any other internal structures, though I have included the main bones, joints, and skull and chest cavity, albeit in a very simplified manner, not intended to represent even the general shape of the separate structures. Additional details are added to the outline of the horse, such as the tail and ears, simply to indicate form.

Figure 5.1 The main aspects of the structure; the head shape, body, fore and hind legs have been illustrated in a fairly simplistic manner. The skeletal structure, while much simplified, may still be too detailed for the purpose of the exercise. The overall proportions of this horse are a little over 2.5 head lengths high (from ground to shoulder) and around 2.5 head lengths long (from breast to rear end). You will notice that the length of the neck and head are not taken into account in this measurement. This makes the overall structure of the horse almost square. The distance between the ground and the underside of the horse is approximately half the distance between the ground and the horse’s shoulder. While this is not an accurate measurement, it does offer a good working guide.
The proportions of four-legged animals will vary greatly, depending not only upon species, but also on the breed, gender and age of the animal. Using the length of the head as a measurement guide, you can begin to define the various distances between the different aspects of the horse’s structure.
If you are drawing the animation you should make construction drawings of your animation. These drawings clearly show the structure of the figure in terms of primitive shapes; they help to keep the proportions consistent throughout the animation and they also help to concentrate the mind on animating the structure of a figure and not on drawing issues that can result in distractions by creating unnecessary surface details.

Figure 5.2 In this drawing I have identified the main joints of the horse and body bulk in terms of primitive shapes: circles, ellipses and cylinders. While the proportions are reasonably accurate, this drawing is obviously not intended to be anatomically correct. When animating a figure it helps if you strip it down to the basic elements. Once you have got this working, you can then go back and add more detail. On top of this basic structure I have drawn a little more detail to add form, though this is also limited. Notice that I have used different colours to illustrate various aspects of the horse. This is so when I make a line test of my animation it is easier to keep track of the separate legs and to make more accurate analysis of the movement. The animation is less likely to become a jumble of indistinguishable lines. You will find that once 2D animation is blocked in with colour, a figure appears to be more solid and the animation is ‘read’ more clearly.
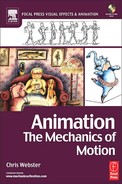
If you are animating using one of the many 3D CG packages, I suggest for these exercises that you keep the modelling simple. Use primitive shapes for the structure wherever possible; this will not only keep the polygon count lower on your model, enabling faster rendering times, but it will concentrate your efforts on animation, not on unnecessary modelling details.
Making models for stop-frame animation often includes the use of rather elaborate materials and textures, though for the purpose of developing animation skills only it really doesn’t have to be such a complex matter. Rather like the other two disciplines, you may wish to build a model that has little or no detail and consists of quite a primitive armature. The one thing you will have to look out for is fixing your model securely to the surface of the animation table, either with pins or magnets, in order to maintain the balance of your model.
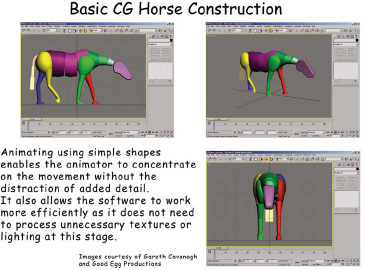
Figure 5.3 Notice how the general structure and the proportions of this CG horse are well defined and yet there is little detail to distract. Some animators prefer to make the separate limbs different colours in order to assist in modelling and to make the identification and selection of the limbs easier during animation.
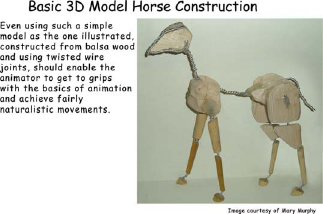
Figure 5.4 While professional armatures are engineered to a high specification, you can make a fairly simple model out of twisted wire and wood for very little cost. Also notice that there is no material covering the basic structure; once again this is to ensure that you concentrate your efforts on the primary and secondary aspects of animation and don’t get involved with the details of tertiary movement.
The walk
The walk pattern of a quadruped usually begins by a movement of the hind legs thrusting the animal forward, resulting in a forward movement of a front leg to support the animal and maintain balance as it moves forward. The principle of the controlled fall remains the same as in the bipedal action; the weight of the animal is thrown forward and a leg is swung forward and outstretched to a position forward of the centre of balance in order to support the figure. Just as in the bipedal animation that we covered earlier, each of the individual legs demonstrates two distinct phases: the stride and the passing position. There then follows a sequence of alternating diagonal movements as it walks forward, sometimes supporting the horse on two feet, at others on three. Just as in the bipedal walk the action is mirrored, the right and left sides demonstrating the same type of action. The sequence of footfalls in a walk is such that the feet land separately one after the other; none of the feet land simultaneously, so if we listened to a quadruped walk we would discern all four feet as separate beats.

Figure 5.5 The sequence of the strides is such that there is an easily identifiable diagonal and forward and rear movement. While the start of the sequence may vary depending upon the animal’s position, we can track the sequence by identifying in which order the separate feet make contact with the ground. For our purposes we will look at the order of footfalls and the order in which feet are lifted from the ground. We will start with the front left foot making contact with the ground. Stage 1. The front left foot makes contact and the front right foot is raised from the ground. Stage 2. The back right foot makes contact and the front right foot swings forward. Stage 3. The front right foot makes contact with the ground and the back left foot is raised from the ground. Stage 4. The front left foot is raised from the ground. Stage 5. The back left foot swings forward and is about to make contact with the ground, the front left foot swings forward. Stage 6. The back left foot makes contact with the ground, the left front foot is about to make contact and the back right foot is about to lift from ground. Written down here it looks quite complex, though the drawings will give you a much clearer idea of the sequence. One way to see this is to imagine that a rear leg swinging forward through the passing position ‘kicks’ the front leg of the same side of the animal out of the way, making contact with the ground after the front leg has risen. In this instance (though not in all cases), this results in a moment when both front and rear right (or left) legs are off the ground together at the same time. The slower the walk is, the less likely this is to occur, and there will be times when the rear right leg (or left) makes contact before the front right (or left) leg rises from the ground.
There is a degree of lateral movement in both the hips and the shoulders throughout the walk, demonstrating a slight movement in the direction of the supporting leg. As the opposite legs (i.e. front right, rear left) support the animal, a noticeable twist in the body occurs. This movement can be very noticeable in such animals as large cats, particularly when they are stalking prey and they adopt a more squat position, and the movement at the shoulders appears more pronounced. As with a bipedal walk, you will also notice that the hips are lifted slightly during the passing position and are lower through the stride.
ANIMATION EXERCISE 5.1 – BASIC WALK CYCLE
In order to further develop animation skills built up over the first few chapters, you could try the following short animated exercises of a four-legged animal going through a series of basic actions. While the exact nature of the action is left to your discretion, they should be based around the creation of a walk cycle, a run cycle and a more elaborate sequence involving a walk. You should attempt to assimilate your first-hand research of four-legged animals and, through the creation of a series of animated sequences, replicate a realistic action.
Aims
The aim of this short exercise is to extend your understanding of animals in motion through research and analysis, and through animation, to develop an understanding of the basic principles as they apply to a four-legged walk cycle.
Objective
On completion of the exercise you should be able to create a short animated sequence of a basic four-legged walk that works within a repeatable animated cycle.
For this first exercise you should limit the character to moving in profile either from left to right or right to left. Don’t concern yourself with the difficulties of perspective animation at this stage. Concentrate your efforts on the animation, not on design. Keep the drawings simple with a minimum of detail, rough but clear rather than cleaned up to a high level of finish. Concentrate your efforts on getting the legs and body right first; the secondary action of the head and neck can be added afterwards. Initially you should ignore the horse’s mane and tail; these can be added later once the primary and secondary animation is complete and you are happy with the results.
1. You should begin by analysing the manner in which an animal with four legs walks. Take a look at a dog or cat then go back and have a look at the examples illustrated here.
2. You should make the animation using the key-frame or pose-to-pose method; that way you can break it down into basic positions before adding your inbetweens. You may find it easier to animate the front and back legs separately and then bring them together in a single drawing once you have figured out the movement for each pair.
3. You may find it easier to start with the front pair of legs, as the knee joints move in a similar manner to a biped and your experience in making a human walk will come in handy here. Make your first key drawing of the first stride position.
4. Make a similar drawing with the opposite legs thrown forward or backwards as appropriate, so that if in drawing 1 the front right leg is in a backwards position in this drawing it will be the front left leg that is in this position.
5. Use these two stride keys to make the first passing position drawing.
6. Now you have the first passing position drawing you can now make a similar drawing as with the stride. If in your first passing position the left leg was the supporting leg, simply make that the right leg in this drawing. You should now have two stride drawings and two passing position drawings.
7. Work out the animation timings as discussed in earlier chapters; remember to include slow outs and ins to create variable timings.
8. Go through the same process with the back legs, making keys of the stride and passing position, taking care to ensure that the structure of the leg is correct.
9. The timing of both pairs of legs must be the same and include the same number of drawings, otherwise the two sets of legs will be out of sync.
10. Redraw the key drawings for the two sets of legs together onto separate pieces of paper, making sure you get the sequence right. You will find that if you draw the separate legs in a different colour you will more easily be able to differentiate them, making animation simpler. You can make a good rule-of-thumb judgement on the sequence of movements of front and back legs by remembering that when one set of legs describes a stride, the other will be describing a passing position.
11. Remember that the animation should work as a cycle.
12. Line test your work, making careful critical analysis before you go on to make any alterations.
13. If the keys work, you can now complete the animation by making the inbetweens according to your animation timing breakdowns.
14. If the animation doesn’t work, don’t go over it immediately as you can learn just as much from your mistakes as you can from getting things right first time. It’s not good enough just to get your animation ‘right’, you must understand why it is right so you can repeat the process time and again. This comes from thorough analysis of your work.
The trot
During the trot we can see that at some points the number of feet on the ground is now two or none. The big difference between a walk and trot or a run is that within the walk there is always at least one foot on the ground; within the trot or the run there is a suspended phase where all the feet are off the ground. The sequence of footfalls in a trot is such that two of the feet make contact with the ground simultaneously in a series of synchronized events. The result of a quadruped trot is that we would hear the feet making contact as three distinct beats, not four as with the walk. The sequence of movements is structured around the synchronized movement of diagonal sets of front and rear legs. Simply put, the front right leg works in coordination with the rear left leg, while the front left leg works together with the rear left leg. Two of the four would make contact together, swing forward through the passing position together and together propel the animal forward, resulting in both legs leaving the ground simultaneously. The second ‘pair’ would land one slightly after the other. As a point of interest, it was to verify the theory of the suspended phase of a running horse during which all four feet leave the ground simultaneously that formed the subject of Muybridge’s first experiments with sequential photography. Using the horse Occident, belonging to Leland Stanford, a wealthy American businessman and former governor of California, Muybridge conducted some of his earliest experiments in sequential photography and was able to confirm earlier beliefs that a horse did indeed have all four feet off the ground during a run.

Figure 5.6 For the purpose of illustration we will look at the order in which feet make contact with the ground, the passing position and the suspended phase. We will start with the front left and right rear feet making contact with the ground. Stage 1. The front right and back left feet make contact while the front left and back right feet swing forward. Stage 2. The suspended phase is where all four feet are off the ground. Stage 3. The front left and back right feet make contact while the front right and back left feet swing forward. Stage 4. Passing position – the front right and back left feet swing forward passing the supporting legs. Stage 5. The front right and back left feet are extended forward and are about the make contact. Stage 6. Suspended phase.
Figure 5.7 For the purpose of illustration we will look at the order in which feet make contact with the ground, the passing position and the suspended phase. Notice that both back and front legs have a leading leg – that is, the one that makes contact with the ground shortly before its front or back partner. You may also notice that the leading legs are both on the same side of the animal; in this instance it is the right side. We will start our cycle with the front left and back right feet making contact with the ground. Stage 1. There are three feet on the ground; both back feet are well planted on the ground and the front right foot has just made contact. Stage 2. The back right foot is lifted from the ground and the front right swings forward. Stage 3. The front right foot makes contact (in this example this is the leading front leg), the back left and front right legs are lifted from the ground together. Stage 4. Suspended phase. The front right foot is lifted from the ground and both rear feet move through the passing position. Stage 5. The back right foot makes contact. Stage 6. The back left foot makes contact shortly after the back right foot (the back right foot is the leading back leg in this example), followed shortly afterwards by the front right leg (the leading front leg).
The run
Rather like the trot, the run involves a suspended phase within the cycle where all four legs are off the ground at once. However, unlike the trot, the legs do not operate as simple synchronized diagonal pairs, the pattern of movement changes from a pair of legs working in synchronization to a sequence that involves the rear legs working together (though not simultaneously) as a pair of thrusting limbs with the front legs working together, with one or the other being the leading leg. The sequence of footfalls during a run would result in us hearing four distinct sounds, though not evenly spaced.
ANIMATION EXERCISE 5.2 – BASIC RUN CYCLE
Using the same approach to the animation as in the walk cycle, you could now try to animate a horse running. Keep the drawings simple with no detail and limit the animation to a profile view; this will make things a lot easier. Make the keys first, work out your animation timings and shoot a line test. Once you are satisfied with that, you can go on to complete the inbetweens. Remember to make this into a cycle so that you can loop the animation on playback.
ANIMATION EXERCISE 5.3 – ADVANCED ACTION
For a more advanced exercise you could try to animate a series of actions that link together to form a whole sequence.
1. Begin by drawing a standing horse and animating it from a standing start into your previously completed walk cycle.
2. From the walk cycle you could try to animate the horse walking in a complete 360-degree turn.
3. Link the turn animation to the cycle animation.
4. Animate the horse coming to a halt.
This is not an easy exercise and you will need to take a great deal of care linking the separate elements together in order to make it believable. Once again you should keep your drawing simple, constructing the figure from basic shapes and omitting any unnecessary detail such as facial details, mane or tail. These can always be added later.
QUESTIONS TO ASK YOURSELF ABOUT A FOUR-LEGGED ANIMAL IN MOTION
Q. Have you established a form created from primitive shapes that will allow you to achieve your animation simply without undue detail?
Q. Do you have a clear idea of what you are trying to achieve?
Q. Do the separate pairs of legs have the same timing? Will they be synchronized?
Q. Is the apparent weight of the animal reflected in the nature of its overlapping action?
Q. Have you taken into account the secondary animation in the head and neck movements?
Q. Is the sequence of leg movements correct? Does the animal look balanced throughout the sequence?
Q. Does the overall animation have varying dynamic properties running through it?
BIRDS IN FLIGHT
There are hundreds of different types of birds in the world, many of them with very distinctive actions that are determined by their size and physiognomy, the environment they live in and their habits. Hawks and eagles soar, swifts and swallows swoop, geese slowly and methodically beat their wings, and hummingbirds hover. (Interestingly there is a limit on the size hummingbirds can be – about the size of a blackbird, determined by the nature of the wing action. Any larger and the bird would not be able to beat its wings in the peculiar and distinctive figure-of-eight pattern sufficiently fast to keep it airborne.) Whatever the determining factors were for the development of flight in individual species of birds, the result is that they vary greatly, though generally the larger and heavier the bird, the slower the wing action. A wren flutters its wings so fast they appear as no more than a blur. A blackbird, being larger, has a much slower action, while a swan beats its wings in a very slow and measured way.
Flight cycles
At first glance the wing beats of a bird appear to be a simple upward and downward motion, but as you would imagine there is much more to it than that. Flight is determined by a wide variety of circumstances other than the type of bird. Different stages of flight will produce different types of actions: take-off, powered flight, acceleration, cruising, gliding, hovering and landing. The nature of flight is also determined by a number of other factors – for instance, if the bird is hunting, or being hunted, if it’s migrating, if it is displaying, either as a courtship ritual or as a defence mechanism. In very general terms the wing cycle can be seen to describe a kind of rowing or swimming action. The wing not only moves upwards and downwards, it also moves forwards on the down-stroke and backwards slightly on the up-stroke, with the wing folding slightly into the body. The downwards movement of the wing is typified by the wing being stretched to its full length to maximize thrust; this is what propels the bird forwards. The upward movement of the wing offers a lower profile and is designed to create minimum resistance and drag, therefore utilizing the maximum energy of the downward thrust to gain more efficient forward momentum. These are simplistic and very general statements and this type of subtle motion is sometimes imperceptible, while at others it is clearly evident. There are some very obvious exceptions to the above description, such as birds that use air currents to soar.
The albatross, for instance, manages to accomplish forward motion with the minimum of wing movement by using the lift gained from the very small uplift from the surface of the ocean waves. Using this technique it is able to traverse enormous distances practically without a wing flap. The hummingbird also has a method of flight through a backwards and forwards movement of the wings, twisting them in such a way that they gain lift from both the forward and the backward actions.
As we have already established, the timing of a wing beat is determined by many variables, though the following timing will give some idea of the general dynamics that can be applied. The cycle of a beating wing has much in common with the flag cycle that was covered in an earlier chapter.

Figure 5.8 The flight cycle illustrated here is a simplistic model of powered flight.
While these illustrations and statements can only be used as guides, the exact nature of a bird in flight will be determined by the individual requirements of the animation; they are useful as a starting point and illustrate the general principles of a bird in flight.

Figure 5.9 Notice how the movement of the end of the wing tips drags behind the main part of the wing. Once a change of direction occurs in the wing the wing tip will continue, for a short while, to move in the original direction.
ANIMATION EXERCISE 5.4 – BASIC FLIGHT CYCLE
Aims
The aim of this short exercise is to increase your understanding of animal locomotion and to develop an understanding of the basic principles and animation timing as they apply to a flight cycle.
Objective
On completion of the exercise you should be able to create a short animated cycle of a bird in flight that demonstrates variable dynamics and includes the basic principles of animation.
Ignore any unnecessary details on the bird, keep the drawing simple and construct the bird from simple shapes.
1. Begin by studying the examples given here, then take a look at birds in flight for yourself.
2. Use key-frame or pose-to-pose animation techniques; this will make it easier to build your basic animation before going on to create the animation timing and adding inbetweens.
3. Start by making the two most extreme positions, the upbeat extreme and the downbeat extreme.
4. Using these, you should then make the two main animation breakdowns: the one that fits between the up-stroke and the down-stroke (model 1) and the one that fits between the down-stroke and the up-stroke (model 2). Note that these drawings, while generally in the same position, will demonstrate very different properties. The drag affecting the tips of the wings in model 1 will create an upturn in the primary feathers. In model 2, the drag will cause a downturn in the primary feathers.
5. Once you have these drawings, you should create your animation timing breakdowns before creating your inbetweens. Remember to create variable dynamics within the cycle; take time to consider where the action will be faster and where it will be slower. Also remember that the animation should work as a cycle.
6. Rather than testing the animation keys before inbetweening as suggested with the four-legged walk cycle, wait until you have completed all your drawings. As you should have some experience now of creating animation with variable timings, this should give you more confidence in your ability to undertake animation without constant checking. Eventually you will find yourself making key pose tests to check only the more difficult sequences before completing your inbetweens.
7. After shooting your animation, make thorough analysis of your work before making any corrections and reshooting.

Figure 5.10 Notice that at the top and bottom of the wing beats the movement is noticeably slower. There is considerable drag on the wing tips, resulting in a degree of overlapping action; when the wing is being powered downwards at the shoulder the wing tips may still be moving upwards. The tips of the primary feathers only begin to move down once the force from the shoulder has transferred through to the wing tips.
Take-off
During take-off the action of the bird will often be far more vigorous than at other stages of flight, as the bird needs to gain momentum. Various birds need to adopt different strategies in order to take to the air. Ground-feeding birds such as sparrows and pigeons jump into the air to gain momentum, while swans need to take off from water by running along until enough speed is gained in order to achieve lift-off. Air-feeding birds such as swallows don’t land on the ground, so they simply drop from their perch (often a telegraph wire) in order to gain the necessary lift from the air moving across their wings. Birds that roost and make their nests on cliffs simply launch themselves from their rocky perches into the air to pick up the air currents. As we have seen earlier, the effort needed to overcome inertia and gain movement is greater than the energy required to keep the momentum going.

Figure 5.11 Different birds can be very different in structure. Keep the design of your bird simple with no unnecessary detail; by including the construction shapes, you will be more easily able to animate it.
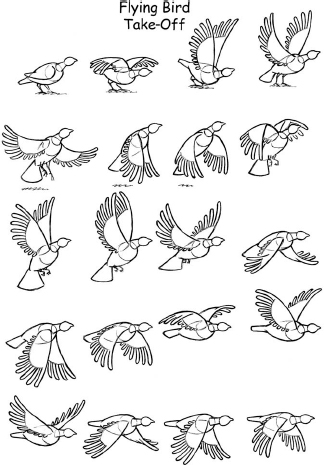
Figure 5.12 The bird in this illustration is taking off from the ground and needs to exert a great deal of effort to take to the air. Its first action is to quickly crouch down as an anticipation movement of the jump. As it does this, it spreads its wings outwards in readiness for the downwards thrust of the wing. As it leaps into the air its legs are fully extended and it completes the first of the downward sweeps of the wings. On the down thrust, the wings are spread to their widest to achieve the maximum thrust. The bird quickly raises its wings to the vertical position, folding them in to reduce air resistance and drag in readiness for the second downwards sweep; as it does this it brings its legs back towards the body. Notice how extreme the wing movements are during this phase; the wing tips practically touch one another at the upper and lower extremities of the wing beat.
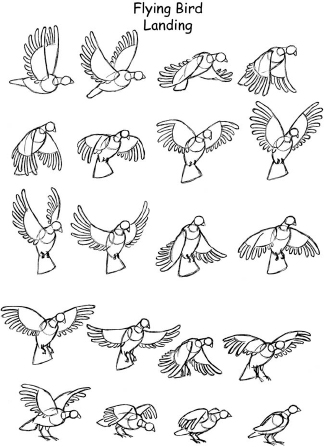
Figure 5.13 In this illustration the bird is landing on the ground, which means that it can neither use gravity nor the particular qualities of its environment to assist it. As a first stage in landing, the bird angles its tail downwards and spreads out its tail feathers to increase drag, rather like the flaps on the wing of an aircraft. At the same time, it spreads its wings out fully and angles them in such a manner as to increase drag. The bird then changes its angle of approach from the horizontal position to a more vertical attitude, yet again increasing surface drag, keeping the wings outstretched. It also extends its legs in preparation for the landing and to increase drag. As a final measure, the bird increases the angle of approach to a more upright position and begins to beat its wings in a forward motion to create a kind of reverse thrust. Once again it folds its wings on the backbeat to reduce any amount of forward thrust this action would otherwise incur. The bird finally stretches out its legs in front of it, makes contact with the ground and uses the cushioning effect of its legs to bring it to a halt.
Landing
On landing a bird needs to do almost exactly the opposite of the take-off; it needs to lose air speed. This can also entail a good deal of effort on its behalf. Some birds use the environment to slow themselves down, while others use gravity. Some birds have become adapted to such specialist environments that they cannot land in situations outside of that environment. A swan, for instance, can only land on water. When it comes in to land, it reduces its air speed by extending its wings fully and lowering its legs to increase drag, then as it nears the water’s surface it swings its legs to a forward position and, using them almost like water skis, uses the friction with the water to bring it to a rather graceful stop. Some birds, when coming to land on a perch, cliff or wire, will approach the landing site by flying below the desired spot and at the last moment move upwards, using their weight and the effect of gravity to lose momentum, timing it perfectly. All birds are not so graceful. The blue-footed booby is an elegant flyer, though somewhat less graceful when landing. It uses a strategy that resembles nothing more than a slightly controlled crash landing.
ANIMATION EXERCISE 5.5 – TAKE-OFF AND LANDING
Aims
The aim of these two short exercises is to extend your understanding of the motion of a bird in flight.
Objective
On completion of these exercises you should be able to create short animations that link together to form a cohesive sequence.
Take-off
1. Begin by animating the bird taking off. Start by drawing a bird in a standing position and using a combination of pose-to-pose and straight-ahead techniques, animating the bird leaving the ground and entering the steady flight cycle.
2. Use one of your animation keys from your previous flight cycle as the link drawing between this sequence and the flight sequence.
3. Use key drawings for the initial pose, the anticipation and the jump from the ground. From there on, you should try to use straight-ahead techniques to give the animation more spontaneity and vigour.
4. Link the take-off animation to the cycle animation by utilizing a key drawing from the flight cycle and inbetween to it.
5. Test your animation and analyse before making any corrections.
Landing
1. Begin by choosing one of your animation keys from your flight cycle. This will be the first drawing of the landing sequence. Once again, try utilizing both key-frame and straight-ahead animation within this sequence.
2. Make the first drawing of the bird in the landing sequence and use this as a second key drawing. You will be inbetweening from the flight cycle drawing to this first landing sequence key, which will create the link animation.
3. From here you should try to animate the bird straight ahead into its final touchdown position, its wings and tail spread wide and its feet just about to make contact with the ground.
4. Make a number of key drawings illustrating the bird’s final resting position and the previous squash and follow-through drawings.
5. Using these key drawings you can then create animation breakdowns for the pose-to-pose sequence before inbetweening.
6. Once the sequence is complete, you should line test your animation.
7. Analyse thoroughly before making any alterations and reshooting.
QUESTIONS TO ASK YOURSELF ABOUT BIRDS IN FLIGHT
Q. Does the level of movement within the wings reflect the type of locomotion the bird is undertaking? Is it too busy? Is it busy enough?
Q. Does the animation reflect the appropriate size and weight of the bird?
Q. Does the bird demonstrate follow-through and drag on the wing tips?
Q. Do the wings illustrate a downward thrust and a movement to create a reduction in drag on the upward movement?
Q. Have you included a little squash and stretch and follow-through on the landing?
Q. Does the bird’s body move slightly in a contrary direction to the thrust of the wings during flight?
Q. Does the overall animation have varying dynamic properties running through it?
Q. Is the effect of drag apparent throughout the sequence?