
8 Professional Retouching
When it comes to retouching, Photoshop Elements and Photoshop are definitely the royalty amongst image-editors. The programs jointly contain hosts of tools, filters and adjustment options that can help turn ordinary looking portraits into something that is truly dazzling.
The shear power and dominance of the programs in this area is not difficult to see as most glossy magazine covers, family scrapbooks and wedding albums contain a plethora of photos that have been ‘shopped’ in one way or another. The results, in most cases, are amazing and in a few instances, even a little scary. But for the average photographer (judging by the requests from readers) the interest is not about wanting to recreate the plastic look of celebrity stardom but rather it centers around the gentle art of photo enhancement. And in truth, I feel that this is the best use of the retouching power of programs like Elements.

Technique 8.01 >> Add a dreamlike glow to your portraits using the Diffuse Glow filter.

Technique 8.02 >> Decrease the appearance of freckles whilst still retaining the texture of the skin.

Technique 8.03 >> Remove wrinkles and skin blemishes without destroying the realism of the photo.
Visual surgery without a hint of anything plastic
So with this in mind, I present here a few of the basic techniques that are used by portrait photographers on a daily basis. Most work with, rather than paint over, the basic structure and texture of the model’s face and in so doing they carefully enhance what already exists rather than replace it with something that is manufactured.
Technique 8.04 >> Correct the red skin tones that sometimes appear around noses, cheeks and ears.

Technique 8.05 >> Clean up tired looking eyes with two simple adjustment layers.

Technique 8.06 >> Remove shiny areas of skin and the dark tones beneath the eyes.
8.01 Adding a dreamy effect
Suitable for Elements – 7.0, 6.0, 5.0, 4.0, 3.0, 2.0, 1.0 | Difficulty level – Basic Menus used – Filter | Resources – Web image 801
The Diffuse Glow filter is one of the Distort group of filters that can be found in Photoshop Elements. The feature creates a high-key (very light), glamorous and slightly grainy glowing version of your picture. The filter is great for smoothing out surface marks on the skin of your subject and is often used to add a Hollywood feel to portraits. Try low settings to start with, keeping an eye on the changes in the filter’s preview window to ensure that you are not losing important picture detail in the surface glow.
The Filter dialog contains three sliders and a preview window. The Graininess control alters the dominance of the noise that will be added to the picture. The Glow Amount slider changes the strength of white glow in the picture (and how much detail is lost to it). The Clear Amount slider acts as a counter balance to the Glow Amount restoring detail in the glowing areas of the picture.
As it is often difficult to determine how well the filter will work, apply the changes to a copy of the image layer first and then, with this filtered layer above the original, change its opacity to vary the strength of the final effect.
The Diffuse Glow filter adds a glamorous touch to standard portrait images.
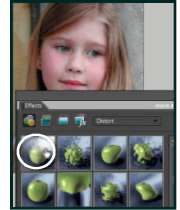
Step 1 >> Make sure that the default foreground and background colors are selected and then with your picture open select the Diffuse Glow filter from the Distort group in the Filter menu. Alternatively you can also choose the feature from the Effects palette (Filters > Distort).

Step 2 >> With the Filter dialog open make sure that the Preview option is clicked and that the preview window is set to 100%. Adjust the three sliders in turn carefully previewing the results. If necessary, drag the visible area in the preview window to examine more closely the changes in other areas of the picture. Click OK.

Step 3 >> As a finishing touch for this example I decided to apply a little sharpening to the eyes to ensure that they stood out from the rest of the scene. Using the Filter > Sharpen > Unsharp Mask feature increase the Levels value to restrict the changes to the areas of the picture with the greatest contrast. Click OK to complete.
8.02 Softening freckles
Suitable for Elements – 7.0, 6.0, 5.0, 4.0, 3.0, 2.0, 1.0 | Difficulty level – Intermediate Tools – Brush | Resources – Web image 802
So many good retouching techniques are not about totally removing or changing the basic structure or makeup of the model’s face. Instead, the aim should be to gently enhance the existing skin tones and textures. There is nothing worse, nor more obvious, than an overworked portrait where the skin’s original texture and tone are replaced with a flat (or sometimes even shiny) surface that has more in common with plastic appliances than anyone I know.
The Brush tool in Lighten blend mode is used here to reduce the dominance of the model’s freckles.
The example image is typical of the sort of photograph that is normally overworked. In an attempt to smooth out the appearance of the model’s freckly skin most photographer’s completely remove this skin characteristic with the result that the final portrait resembles a computer-generated model rather than an actual living and breathing person. This technique aims to reduce the dominance of the freckles rather than removing them totally. In this way the underlying structure of the face shines through and is complemented with, rather than overridden by, just a hint of the freckles.

Step 1 >> Select the Eyedropper tool and then check to see that the Sample Size (in the options bar) is set to average 3 × 3 or 5 × 5 pixels. Next select a flesh color from the portrait that represents a mid tone of the range available across the face surface.
Pro’s Tip: The tone you select at this point in the process will determine which freckles are lightened. Choosing a darker skin tone will change only a few of the darkest freckles whereas a lighter tone selection will alter both midtone and dark freckles.
Step 2 >> With the skin tone selected the next step is to select the Brush tool and then switch the tool’s blend mode to Lighten. Do this by selecting the Lighten option from the drop-down mode list in the tool’s option bar. When the brush is in the Lighten mode Elements compares the paint color with the pixels being painted over. If the pixels are darker then they are replaced with the paint color, effectively lightening the area.
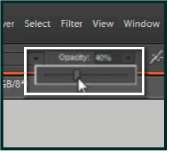
Step 3 >> The next step is to adjust the opacity of the Brush. Turn again to the options bar and this time reduce the opacity to about 40%. An opacity setting of 100% would produce a result that was too smooth. Reducing the opacity has the effect of allowing a little of the old freckle texture to show through – maintaining the feeling of realism whilst reducing the freckle’s dominance. Now paint away, being careful not to paint over details like eyelashes as you go.
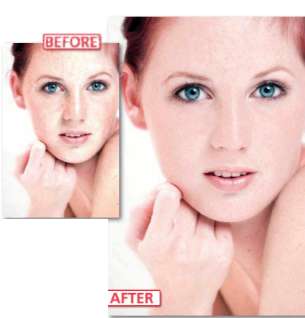
8.03 Eliminating blemishes
Suitable for Elements – 7.0, 6.0, 5.0, 4.0, 3.0, 2.0, 1.0 | Difficulty level – Intermediate Tools – Spot Healing Brush, Healing Brush, Clone Stamp | Resources – Web image 803
Ethical issues aside, Photoshop Elements is a great tool for removing, or at least making less pronounced, a variety of unwanted photo elements. Despite the fact that skin blemishes and wrinkles are a normal everyday occurrence for most of us, photographers are constantly asked to retouch these sections of portrait photos. Like all other techniques discussed here, the secret behind successful retouching of these areas is not to remove them completely but rather to reduce their appearance.
With this in mind let’s look at the three tools that Elements offers for blemish removal and then set these tools to work on a typical portrait image.
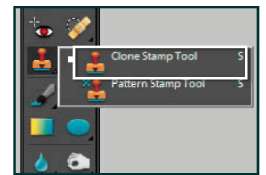
Clone Stamp tool
The most basic of all the retouching tools is called the Clone Stamp tool (or sometimes the Rubber Stamp tool). The feature selects and samples an area of your picture and then uses these pixels to paint over the of ending marks. It takes a little getting used to, but as your conf dence grows, so too will the quality of the repairs and changes you make.
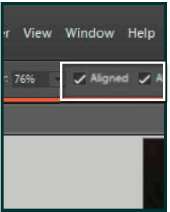
There are several ways to use the tool. For starters, it acts like a brush, so changing the tip size allows cloning from just one pixel wide to hundreds across. You can also change the opacity in order to produce a range of subtle clone ef ects. It can be used in conjunction with any one of the options from the Blend menu and, most importantly, there’s a choice between Cloning aligned or non-aligned with the sample area.
Select Aligned and the sample cursor will follow the destination cursor around keeping a constant distance between the two. When the Aligned option is unchecked the sample cursor starts where you left of with all ensuing paint strokes. Both choices have their advantages.

Healing Brush tool
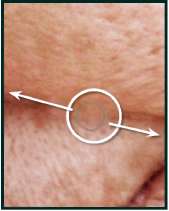
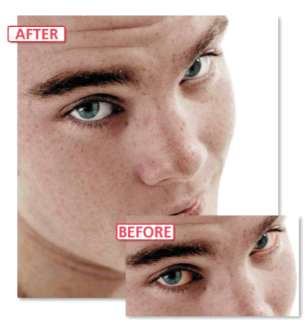
way to the Clone Stamp tool; the user selects the area (Alt-click) to be sampled and then proceeds to drag the brush tip over the area to be repaired. The tool achieves great results by merging background and source area details as you paint. Just as with the Clone Stamp tool, the size and edge hardness of the current brush determines the characteristics of the Healing Brush tool tip. One of the best ways to demonstrate the sheer power of the Healing Brush is to remove the wrinkles from an aged face. In the step-by-step example image we used here, the deep crevices of the model’s face have been easily removed with the tool.
The texture, color and tone of the face remain even after the ‘healing’ work is completed because the tool merges the new areas with the detail of the picture beneath.
Note: Sometimes the best source for sampling can be found in a dif erent photo. With these both the Clone Stamp and Healing Brush tools, you can Alt-click in any open photo and sample from it.

By carefully using any of the three retouching tools in Photoshop Elements it is possible to gently remove skin blemishes and signs of age like wrinkles and cracks.
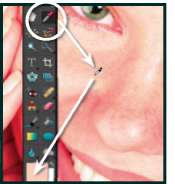
Spot Healing Brush
In recognition of just how tricky it can be to get seamless dust removal with the Clone Stamp tool, Adobe decided to include the Spot Healing Brush in Photoshop Elements.
After selecting the new tool you adjust the size of the brush tip using the options in the tool’s option bar and then click on the dust spots and small marks in your pictures.
The Spot Healing Brush uses the texture that surrounds the mark as a guide to how the program should ‘paint over’ the area. In this way, Elements tries to match color, texture and tone whilst eliminating the dust mark. But don’t just use this tool for spots, scratches too can get the treatment by click-dragging the tool’s tip across the mark. The results are terrific and this tool should be the one that you reach for first when there is dust to remove from your photographs.
Clone Stamp tool step-by-step

Step 1 >> The Clone Stamp tool works by sampling a selected area and pasting the characteristics of thi area over the blemish, so the first step in the process is to identify the areas in your picture that need repair. Then make sure that the image layer you want to repair is selected. Some photographers creat a new layer and then apply their cloning to this layer. If this is your approach then also ensure that the Sample All Layers option is selected.
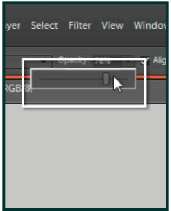
Step 2 >> Next, locate areas in the photograph that are a similar tone, texture and color to the picture parts that need fixing. It is these sampled areas that the Clone Stamp tool will copy and then use to paint over the model’s wrinkles. At this point you can also alter the transparency of the cloning action by adjusting the Opacity slider in the tool’s options bar. Values less than 100% will let some of the original texture through the clones areas.

Step 3 >> Now select the area to be sampled, or the ‘Sample Point’. Do this by holding down the Alt key and clicking the left mouse button when the cursor (now changed to cross hairs) is over a part of the image that suits the area to be repaired.

Step 4 >> With the sample point selected you can now move the cursor to the area to be fixed. Click on the blemish and a copy of the sample point area is pasted over the mark. Depending on how well you chose the sample area, the blemish will now be blended into the background seamlessly. Continue to click and drag to repair more areas.

Step 5 >> You may need to reselect your sample point if you find that the color, texture or tone doesn’t match the surrounds of the blemish. You can also change the brush size and hardness to alter the characteristics of both the sample and stamp areas. A softer edge helps blend the edge areas of the newly painted parts of the picture with the original image. Simply select a different brush tip from the Brush Preset drop- down palette.
Step 6 >> Switching between aligned and non-aligned (when the Aligned option is not selected) can really help when you are rebuilding missing parts of your restoration project. Aligned’ sets the sample point so that it remains the same distance from the stamped area no matter where on the picture you start to click, and ‘Non-aligned’ repositions the sample point back to the original sample spot each time the mouse is moved and then clicked.
Healing Brush tool step-by-step

Step 1 >> The Healing Brush is also a two-step process. After selecting the tool hold down the Alt/Option key and click a clear skin area to use as the sample for the healing. This action is the same as you would take when using the Clone Stamp tool to select a sample point.
Step 2 >> Now move to the area to be repaired and click-drag the cursor over the blemish. The Healing Brush will use the tones, textures and color of the sampled area to paint over the blemish but unlike the Clone Stamp tool, the Brush takes into account the general tone of the repair area and does a great job of seamlessly merging the new detail with the old.

Step 3 >> Like the Clone Stamp tool the Healing Brush contains a Sample All Layers option enabling photographers to perform nondestructive editing of their photos by painting the retouched areas onto a separate layer. Using a retouching layer also means that you can interactively adjust the strength of the changes via the layer’s Opacity settings.
Spot Healing Brush tool step-by-step

Step 1 >> The Spot version of the Healing Brush removes the sampling step from the process. To use the brush you simply select the feature, adjust the brush tip size and harness and then click onto the blemish. Almost magically the Brush will analyse the surrounding texture, color and tones and use this as a basis for painting over the problem area.

Step 2 >> The Spot Healing Brush can also be used for removing marks, hairs, streaks or cracks by click-dragging the tool across the offending blemish.
Pro’s tip: If unwanted detail is used to cover the repaired area undo the changes and then draw around the area to be healed with the Lasso tool and apply the brush again. This restricts the area around the blemish that the tool uses to heal.

Step 3 >> Like both of the previous tools the Spot Healing Brush also contains a Sample All Layers option enabling photographers to perform non-destructive editing of their photos by painting the retouched areas onto a separate layer. Using a retouching layer also means that you can interactively adjust the strength of the changes via the layer’s Opacity settings.

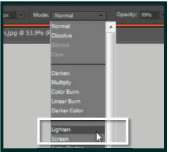
The way that color applied with the Brush tool interacts with the pixels being painted over is determined by the blend mode selected at the time of painting.
By default the Brush tool’s mode is set to normal which causes the paint to obscure the pixels beneath, but Photoshop has many other ways to control how these pixels interact.
Called blend modes, these different options provide a variety of ways to control the mixing, blending and general interaction of the paint and the content beneath.
Blend modes can also be applied to the drawing tools via a drop-down menu in the tool’s options bar as well as individual layers via the drop-down menu located at the top left of the Layers palette.
The retouching technique outlined here makes use of the Color blend mode to neutralize the red or magenta tinges that sometimes appear in portraits.
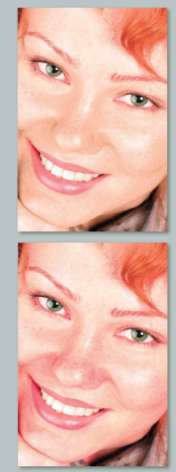
8.04 Removing the Red
Suitable for Elements – 7.0, 6.0, 5.0, 4.0, 3.0, 2.0, 1.0 | Difficulty level – Intermediate | Tools – Lasso | Resources – Web image 804
In this example the model’s bright red (or is that orange?) hair is coloring the light that is reflected back onto the skin tones making them quite warm. This is particularly noticeable in the shadow areas of the face and around the hands. Add to this the fact that there is an obvious magenta tinge to the areas around the nose and chin and you can see that we need to do some color correction to the portrait.
Your initial thoughts might be to reach for the Auto Color Correct and Color Variations feature and use these to reduce the warmth in the photo but this action has the effect of reducing the vibrancy of the hair color at the same time as neutralizing the skin tones. This is not a desired scenario as the hair color is one of the strongest aspects of the image. So instead of making global (all over) changes to the picture this technique uses the Eyedropper tool to sample an area of neutral skin and then employs the Brush tool in Color mode to paint out the overly warm tones. This technique can be used to neutralize ‘red ears’ or the ‘red nose’ that is a sure sign of too much indulgence of the wine variety.

Step 1 >> Start by ensuring that the Eyedropper tool’s Sample Size is set to an average of either ‘3 × 3’ or ‘5 × 5’ pixels and not the Point Sample setting. To do this select the tool and then choose a different option from the drop-down list on the tool’s options bar. This change will make sure that when you use the tool that you sample an average of the pixel tones and colors rather than just a single pixel’s value.
Step 2 >> Next locate a portion of skin tone that is free from red or magenta casts and click on it with the Eyedropper tool. You will notice that the foreground color in the toolbox now contains the color you sampled. Check to see that the color is not too dark or light and that the hue is free from any strange casts. If this isn’t the case, then resample a different areas of skin until you are happy with the color.

Even out skin tones by sampling and using the model's own skin color to remove unwanted areas of red and magenta.

Step 3 >> With the skin color set as the foreground color select the Brush tool and change the Blend mode from Normal to Color (towards the bottom of the drop-down list in the Brush tool’s options bar).

Step 4 >> The last step in the process is to apply the skin colored paint over the red/magenta areas in the photo. Notice that because the brush is in the Color mode that the paint is laid down in such a way that the details of the photo beneath are retained and only the color is altered.
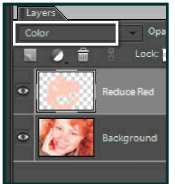
Step 5 >> A non-destructive version of this technique starts with creating a new empty layer above the original photo. Next change the Blend mode of the new layer to Color using the drop-down list at the top of the Layers palette. Select the skin tone with the Eyedropper tool and then switch to the Brush tool. Make sure it is set to the Normal mode and then brush this color onto the new layer. With this approach the colorization of the skin is handled by the layer’s blend mode.
8.05 Brighten Eyes
Suitable for Elements – 7.0, 6.0, 5.0, 4.0, 3.0, 2.0, 1.0 Difficulty level – Intermediate Tools – Lasso | | Resources – Web image 805
No amount of clever photography or tricky lighting can cover the traces of lack of sleep or overindulgence in the eyes of your model. A set of ‘sore red eyes’ staring back at you can easily ruin an otherwise well-produced photo. Elements certainly has the tools to add back the sparkle and life, but over enhancing can easily lead to sci-fi-like results. This technique uses a selection with a couple of adjustment layers for its effect, allowing changes and fine-tuning to the strength of the effect at a later date.

Step 1 >> Use the Lasso tool to make a careful selection around the main part of the eye. Soften the edge by choosing Select > Feather. Here I used a value of 5 pixels but the setting you use will be determined by the pixel dimensions of your photo. Photos with more pixels will need a larger feather, those with less a smaller amount.

Step 2 >> With the Eyes selections still active, create a new Levels adjustment layer by choosing Layer > New Adjustment Layer > Levels. Notice that because of the active selection, a mask has been automatically added to the adjustment layer.
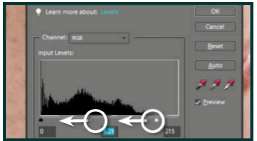
Step 3 >> The addition of a mask means that the changes made in the Levels dialog will be restricted to the clear part of the mask (the eyes). Add a simple brightening and contrast adjustment by dragging the black and white. Click the OK button to apply the changes. Re-select the eye areas by Ctrl/Command clicking the mask section of the adjustment layer.

Step 4 >> Now add a Hue/Saturation adjustment layer. Again the changes will be limited to the eyes via the mask. Select Red in the drop-down Edit menu at the top of the dialog and then pull down the Saturation slider and push up the Lighten setting. This will help to lessen the red veins in the eyes. Click OK to apply.
8.06 Tone down skin highlights and shadows
Suitable for Elements – 7.0, 6.0, 5.0, 4.0, 3.0, 2.0, 1.0 | Difficulty level – Intermediate Tools – Brush | Resources – Web image 806
The example image has all the attributes of a great portrait but as with a lot of photos of this type there are a couple of places where the model’s skin is a little shiny and the area under her eyes is a little dark. Gentle lightening of the dark areas and darkening of the light area are two techniques that, when mastered, you will use often when enhancing your portrait images.
This technique makes use of the Brush tool in both Lighten and Darken blending modes, along with the model’s own skin color, to reduce the appearance of these areas in the final image.
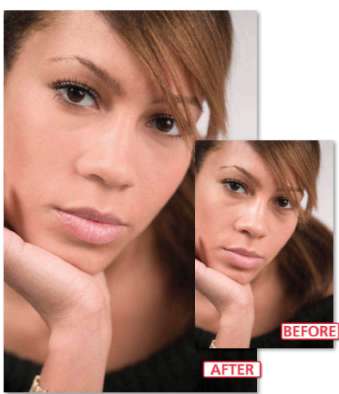
Remove shiny skin areas and bags under the eyes using the Brush in Lighten/Darken modes.

Step 1 >> Start by selecting the Brush tool from the tool bar. Next go to the tool’s options bar and select Darken as the Brush mode. At the same time I also adjust the opacity of the tool so that a little of the original texture remains after retouching. Then select a flesh tone that is slightly darker than the highlight areas whilst still using the brush by holding down the Alt key and clicking on the skin color.

Step 2 >> Next gently brush over the shiny areas on the model’s nose, forehead and cheek regions. When brushing using the Darken mode, only the pixels that are lighter than the sampled color will be adjusted. For the best results keep selecting different sample colors as you brush. Pro’s tip: For even more control apply the enhancement changes to a separate layer. The strength of the changes can then be adjusted via the layer’s Opacity setting.

Step 3 >> The same technique can also be used to lighten the dark areas under the model’s eyes. This time select the Lighten mode before sampling a flesh tone that is slightly lighter than the dark areas you want to fix. Again make sure that you choose a range of sample tones whilst brushing to ensure that the results are not too uniform and plastic looking. If you applied the changes to a separate layer, adjust the opacity of the layer to bring back some of the underlying face structure.
8.07 Retouching non-destructively
Suitable for Elements – 7.0, 6.0, 5.0, 4.0, 3.0 | Difficulty level – Intermediate
When first starting to retouch your portrait photos it seems logical to apply the changes directly to the photograph or image layer itself, but this is not the way that most professional photographers work. For them the original picture is like the negatives of old and should be carefully maintained and not changed in any way. For this reason you will often hear them talking about employing non-destructive editing techniques as an alternative method for retouching their photos. We have already touched on some of these techniques but they are so important let’s take a look at them again in the context of enhancing portraits. Remember these techniques produce the same results as editing the original image but employ some advanced Elements options that leave these ‘virgin’ pixels untouched.
Sample all layers

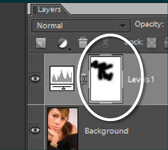
Step 1 >> Retouching features such as the Clone Stamp, Spot Healing Brush and Healing Brush tools all contain an All Layers setting on their options bar. Designed to allow the tools to retouch the contents of several layers this option can also be used to protect your original photo pixels.

Step 2 >> To make use of this option for non-destructive retouching firstly create a new blank layer above the image layer. Make this the active layer and then select the retouching tool and choose the Sample All Layers option. Now when you retouch the changes will be stored on the newly created layer.
Use Adjustment layers

Step 1 >> Many of the editing or enhancement changes that are possible via the options in the Enhance menu can also be applied via Adjustment Layers. Wherever possible use an Adjustment Layer to make a change rather than applying the alteration directly to the image.
Retouch duplicate layer

Step 1 >> If the technique you are using can’t be applied non-destructively then make a duplicate of the image layer and make the changes to the copied image instead of the original. This also gives you the chance to adjust the strength of the changes with the layer’s Opacity slider.
Mask editing adjustments
Step 1 >> Keep in mind that you can mask the effects of adjustment layers by selecting the layer mask in the Layers palette and then painting onto the image with black to hide the effect and white to apply the change.

Step 2 >> You can also selectively apply the effects of a duplicate image layer by grouping this layer with a blank (no settings applied) Levels adjustment layer. Once grouped painting onto the Levels layer mask will either hide or apply the c hanges made in the duplic ate layer.