
9 Photo Restoration
As a digital photography author one of the areas that I am often asked about is photo restoration. As photographers, it is an editing activity that most of us will attempt at least once during our life time. After all, many of the memories of important family events and history are associated with images of the time and, even with the right care and attention, lots of these photos end up a little worse for wear. In this chapter I thought that I would present you with a variety of techniques that you can use to restore, or repair, those images most precious to you. Rather than detailing the techniques in isolation, where sometimes they lose significance, I have chosen to apply them as part of a process of restoring ‘real life’ photos.
As you will discover, most retouching projects require the application of a variety of techniques in multiple steps to coax the

aged photo back to its best. So even though the example photos presented here have quite different problems (and associated solutions) they also contain some degree of overlap in areas such as removing of dust and scratches. These techniques are by no way an exhaustive list of all that are possible, but they will provide you with a good basis to start your restoration work.
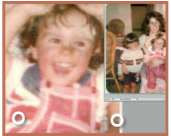
Below and opposite >> The example images here are shown with the before versions above and the after results below. The main restoration tasks involved with each photo are listed in the headings and all the techniques used to produce the results displayed here are contained on the following pages.

9.01 Restoration basics
Suitable for Elements – 7.0, 6.0, 5.0, 4.0, 3.0, 2.0, 1.0 | Difficulty level – Intermediate | Resources – Web image 901
In the last chapter we looked at how the retouching tools in Photoshop Elements can be used to remove unwanted marks and skin details in portraits. In this chapter the same tools are used for critical restoration and surgery work and with some photos, they are even called upon, to recreate detail that has been lost.
Though the application is different, the basic functionality of features such as the Clone Stamp Tool, Spot Healing Brush and Healing Brush, remains the same. Let’s look at how a feature like the Clone Stamp can be used in the world of Photo Restoration.

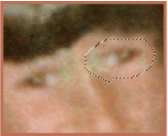
Step 1 >> The Clone Stamp tool works by sampling a selected area and pasting the characteristics of this area over the blemish, so the first step in the process is to identify the areas in your picture that need repair. Make sure that the image layer you want to sample is selected. NB: To work non-destructively, create a new blank layer above the background and select All Layers in the options bar.

Step 2 >> Next locate areas in the photograph that are a similar tone, texture and color as the areas needing to be fixed. Use these areas to paint over the dust and scratches marks. Select the area to be sampled by holding down the Alt key and clicking the mouse button when the cursor (now changed to cross hairs) is over a part of the image that suits the area to be repaired.

Step 3 >> With the sample point selected you can now move the cursor to the area to be fixed. Click on the blemish and a copy of the sample point area is pasted over the mark. Depending on how well you chose the sample area, the blemish will now be blended into the background seamlessly. Continue to click repairing more blemishes as you go.

The Clone Stamp tool is handy for removing dust and scratches but can also be used for recreating the detail lost in areas such as cracks or tears.

Step 4 >> You may need to reselect your sample point if you find that the color, texture or tone doesn’t match the surrounds of the blemish. It may also be necessary to change brush size to suit different repair tasks. Changing the brush size will alter the size of both the sample and stamp areas.

Step 5 >> For difficult repair jobs where you need to recreate picture elements select a similar part from the photograph as your sample point. Here the seam in the dress above the scratch is sampled to repair the damaged area. The same process is used to recreate the folds in the fabric and the texture of the glove.

Step 6 >> Switching between aligned and non-aligned options can really help you rebuild picture parts. Aligned – sets the sample point so that it remains the same distance from the stamped area no matter where on the picture you start to click, and Non-aligned – repositions the sample point back to the original sample spot each time the mouse is moved and then clicked.

Removing dust automatically >> One of the most tedious jobs for the digital photographer is the removal of dust and scratch marks from a badly damaged slide or print. Using the Clone Stamp tool to patch each individual mark can take considerable time and effort. A more automated approach that doesn’t soften the detail in an image is detailed here. It uses the much besmirched Dust and Scratches filter in conjunction with the Layer blending modes to restrict changes to just the areas where it is needed.
9.02 Dust and scratches be gone
Suitable for Elements – 7.0, 6.0, 5.0, 4.0, 3.0, 2.0, 1.0 | Difficulty level – Intermediate Resources – Web image 902 | Menus used – Layer, Filter
The enticingly named Dust and Scratches filter (Filter > Noise > Dust and Scratches) teases us with the promise of a simple solution to repairing the dust and scratches in our scanned pictures. Nearly always the results of using the filter are disappointingly soft or the tones flattened. It is not that the filter doesn’t obscure or disguise the problem marks, it is just that in doing so the rest of the image is also filtered. In areas where there is no dust this causes a deterioration of the picture. If only we could restrict the application of the filter to just the areas where the dust marks appear the results would be more usable.
Pro’s Tips for using the Dust and Scratches filter:
1. Always start with both sliders set to 0.
2. Move the Radius slider first until the marks disappear.
3. Next move the Threshold slider until the texture of the image returns. Do not move this slider so far that the marks start to reappear.
The Lighten and Darken blending modes in Elements can be used for just this purpose. By applying the Dust and Scratches filter to a copy of the background and then blending this filtered layer using the Darken mode, the layer will only change the light dust marks of the original image and will leave the rest of the image unaffected. Similarly a second copy layer also filtered for dust and scratches could also be applied to the original image using the Lighten blending mode to remove the black marks from the picture. If we control where the effects are applied with a layer mask then it is possible to restrict the changes made by the Dust and Scratches filter to just the areas where it is needed most.

Step 1 >> Start the technique by copying the base layer by dragging the background to the New Layer button at the bottom of the Layers palette. Label the new layer Darken Light Spots.
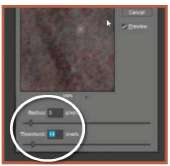
Step 2 >> With the new layer selected apply the Dust and Scratches filter. Start with both sliders set on 0. Move the Radius slider first until you see the dust spots disappear. Next gradually move the Threshold slider to the right until the texture returns to the picture – not so far that you start to see the spots again.

Step 3 >> With the Darken Light Spots layer still selected change the mode of the layer to Darken. This will only apply the dust and scratches changes to the areas where this original layer is lighter – the white dust spots.

Step 4 >> Add a Levels adjustment layer with no changes to the default settings above the background layer. Select the Darken White Spots layer and the choose Layers > Group with Previous.

Step 5 >> Select the layer mask of the Levels adjustment layer and then choose the Edit > Fill Layer option to fill the mask with black. This action hides the u p pe r lay e r a n d reveals the unretouched layer beneath.

Step 6 >> With the layer mask still selected choose white as the foreground color and proceed to paint onto the canvas over the white marks in the photo. The white strokes will reveal the results of the upper layer.
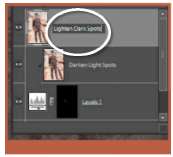
Step 7 >> Create a copy of the background layer and label it Lighten Dark Spots. Apply the Dust and Scratches filter to remove the black marks and change the mode of this layer to Lighten.

Step 8 >> Create a blank Levels adjustment layer and then group it with the Lighten Dark Spots layer. Fill the Levels layer mask with black to hide the filtered results.

Step 9 >> With white set as the foreground color and the mask still selected paint over the dark marks on the picture with the Brush tool.

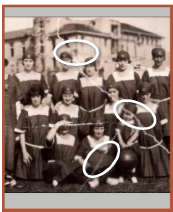
9.03 Uncovering the faded
Suitable for Elements – 7.0, 6.0, 5.0, 4.0, 3.0, 2.0, 1.0 | Difficulty level – Intermediate | Resources – Web image 903 | Menus used – Layer, Enhance
Unfortunately this treasured family photo is well and truly past its prime. Poor storage and exposure to bright light has caused the image to almost fade completely . Though complete restoration is almost impossible due to the extent of the fading it is worth noting the techniques that are used here to conjure hidden detail from the vintage photo.
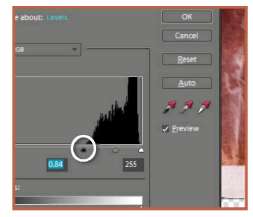
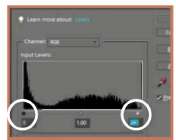
Step 1 >> Using the Levels feature (Layer > New Adjustment Layer > Levels) in Photoshop Elements you can adjust black and white points of the photo. To set the shadow tones, hold down the Alt key and then drag the black point input slider to the right until the first pixels are revealed in the preview. Now move the slider slightly to the left until no clipped pixels are shown.

Step 2 >> Next we will set the highlight tones. With the Alt key still pressed, drag the white point slider towards the left until you see the first clipped pixels displayed in the preview, then move the slider slightly to the right until no pixels are shown.

Step 3 >> With the white and black points set, it is time to encourage hitherto hidden detail from the rest of the photo. We can do this with some careful adjustment with Adjust Color Curves control, but this feature can not be used as an Adjustment Layer so the first step is to Select > All the document and the Edit > Copy Merge to store a composite of all the visible layers in memory. Final Edit > Paste to create a new layer based on the merged details.
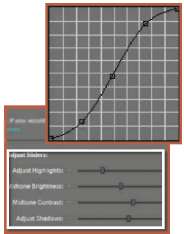
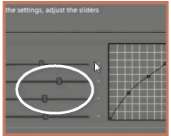
Step 4 >> Now we can alter this layer with the Adjust Color Curves option. Here I selected the Increase Contrast Style first and then customized the enhancement by moving the Adjust Sliders until the Curve diagram resembled the classic steep ‘S’ shape. This adjustment spreads the tones and provides more contrast overall.
Step 5 >> In the process of removing the red cast and converting the picture to grayscale it is also possible to emphasize other hidden detail using the Convert to Black and White feature (Enhance > Convert to Black and White). Adjusting the red and blue color range changes how these hues are mapped to gray provided more opportunity to reveal details hidden by the cast.

Step 6 >> To removemarks, spots and scratches a new blank layer is added to the layers palette above the picture merged layer. Target the new layer and then use the Spot Healing Brush with the Sample All Layers option selected to repair the damaged areas.

Step 7 >> The final step is to add some definition to flat or faded sections of the photo. Do this by adding a new blank layer (Layer > New > Layer) at the very top of the layers stack. Change the Blend Mode to Soft Light and then use a black soft-edged brush to burn-in detail, or a soft-edged white brush to lighten sections.
9.04 Levels based color restoration
Suitable for Elements – 7.0, 6.0, 5.0, 4.0, 3.0, 2.0, 1.0 | Difficulty level – Intermediate Resources – Web image 904 | Menus used – Enhance
Old images, whether they be captured on color films, negatives or slides, are prone to fading and color changes as the dyes they are constructed of break down. It is a source of concern for all photographers who have big collections of images stored away in attics, cupboards or under the bed. After all, many of these photographs, though not valuable in the commercial sense, are irreplaceable as they hold glimpses of a family’s history and echoes of days gone by .
Recently a loyal reader and avid Elements user emailed me with exactly this problem. Tom Edwards asked me if I had a solution for restoring the color to the hundreds of fading slides that he had taken in the Orient in the early 70s as they now all appear to be turning red.
The first step in any such restoration work is diagnosing the problem that is causing the color shift and fading. To get a good understanding of the cause I always turn to the Levels feature (Enhance > Adjust Lighting > Levels) for help. It contains a descriptive display of the spread pixels in the image and also includes the tools needed to coax the picture back to life.
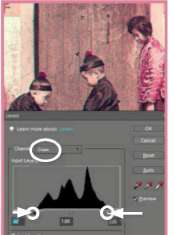
When the Levels feature is first opened it displays a graph of the combined red, green and blue pixels. This is signified by the RGB label in the Channels drop-down menu. To really see what is happening to the tones in your picture select and view the graph for each of the individual color channels. The graphs for each channel of Tom’s example image can be seen to the right. Notice how the green and blue channels are fairly similar but the red channel has all the signs of being overexposed, that is, all the tones being pushed to the right end of the graph. This is where our problem lies.
To help restore the original color and brightness of the photograph the tones of each of the color channels have to be adjusted individually. Starting with the red channel, drag the black input triangle towards the center of the graph until it meets the first major group of pixels. Do the same for the green and blue channels, but with these also adjust the white point Input slider in the same way.
This action will help to restore the color and contrast of the picture and will give good results for all but the most faded slides or prints. Final adjustments to tone and the removal of any slight color casts that remain can be achieved using levels on the combined RGB channel setting and the Color Variations features.

Restoring faded slides >> When you look at the histogram for each of the red, green and blue channels separately it is easy to see why the faded slide appears so warm.
(a) Red channel.
(b) Green channel.
(c) Blue channel.
To restore the color in the image work on each channel separately, dragging the white and black points in to meet the first major group of pixels.
This will balance the distribution of the tones in each of the channels and restore the slide’s color and contrast.
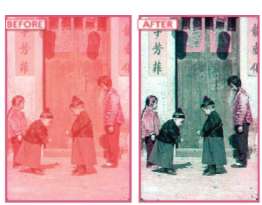
Fading slides >> Over time traditional color photographs, slides and negatives can show signs of fading and take on a dominant color cast. Using the color correction and tonal change tools in Elements might not be aggressive, or selective enough, to correct these problems. Instead use the steps detailed here to rebalance the tones and colors in your picture. Image courtesy of Tom Edwards © 1972.

Step 1 >> Open the Level feature from the Enhance > Adjust Lighting or Layer > New Adjustment Layer menus.

Step 2 >> Start with the red channel and drag the black input triangle to meet the first group of pixels.
Step 3 >> Next select the green channel and move both the white and black input sliders to the first group of pixels.

Step 4 >> Make the same black and white point adjustments for the blue channel as well.Click OK and then Select All, Copy Merge and Paste.

Step 5 >> With the image now balanced, target the Copy Merged layer and use Color Variations to remove any color casts that remain.

Step 6 >> As a final check of the tones open the Levels feature again and adjust white, middle and black points for the composite channel (RGB).
9.05 Working with a scanned print
Suitable for Elements – 7.0, 6.0, 5.0, 4.0, 3.0, 2.0, 1.0 Difficulty level – Intermediate Resources – Web image 905 Menus used – Enhance
Okay with these basics under our belt let’s look at how to restore a scanned print rather than a scanned slide. Unlike their traditional black and white counterparts, color photographic prints often suffer from dramatic fading, or color changes, after only a few years of viewing. In this example, as was the case with the previous slide, the image has become very red. Apart from the removal of dust marks and the lightening of the photo, restoration will involve the reorientation of the photo and the correction of the dominant color.


Step 1 >> Like many a scanned image, this photo ended up being a ‘little’ crooked when it opened in Elements. So the first step is to straighten the photo. To do this select the Straighten tool from the toolbar and click-drag a measurement line a along the top edge of the photo.

Step 2 >> To remove the excess background automatically, select the Magic Wand tool and select the background. Now Inverse the selection and choose the image > Crop command. Hit the Ctrl D keys to deselect.

Step 3 >> To remove the dominant red cast, start by adding a new Levels adjustment layer. In the Levels dialog, select the Red channel from the drop-down menu and drag the black and white input sliders inwards. Hold down the Alt key while you do this to ensure that no pixels are clipped.
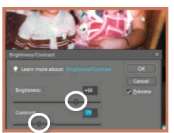
Step 4 >> Repeat this process for both the Green and Blue channels in the Levels dialog before clicking the OK button. Now fine-tune the brightness and contrast of the picture with the addition of a Brightness/Contrast adjustment layer. Make any final color changes with a Color Variations feature to a Copy Merged layer.

Step 5 >> Now let’s turn our attention to the marks and scratches on the photo. A new layer is added above the copy merged layer. Using the Spot Healing Brush and with the new blank layer targeted in the Layers palette. The Sample All Layers setting is selected in the tool’s options bar and the small marks removed.

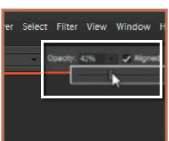
Step 6 >> Targeting the same layer, the Spot Healing Brush is switched to the Clone Stamp tool. The Current and Below setting is selected in the Sample drop-down menu of the tool’s options bar before cloning away marks and scratches not able to be corrected with the Spot Healing Brush.
Step 7 >> When cloning skin detail it is often a good idea to reduce the opacity of the tool and build up the repair areas slowly with repeated strokes. It also pays to move the sample point regularly to reduce the repetition of cloning content. Many photographers use a graphics tablet and stylus setup for this type of editing.
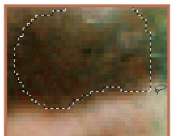
Step 8 >> With the simple marks and scratches removed it is now time to tackle the larger damaged areas in the photo. Here the missing detail must be reconstructed from other areas in the photo. Here I created a soft-edged selection of the boy’s hair and then copied and pasted the detail as a new layer.

Step 9 >> I then duplicated this new layer. To quickly create a copy of a layer hold down the Alt key and click-drag a new copy to a different position in the document. Next each of the new ‘hair’ layers was selected in turn and the Free Transform tool (Ctrl T) used to deform the content to cover the damaged area.
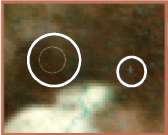
Step 10 >> After creating, and targeting, a new blank layer above the copied hair layers, the Clone Stamp tool is then used to sample existing hair detail, color and tone and carefully blend the pasted detail with the background. Again the opacity of the tool was reduced and detail was built gradually with different sample points.

Step 11 >> A similar approach was used when reconstructing the missing portions of the faces in the photo. This time a soft-edge selection of the cheek and eye was created, copied and pasted into position on the opposite side of the face. Next this layer was flipped (Image > Rotate > Flip Horizontal) and the content rotated to fit.
Step 12 >> Flipping the copied face content meant that the cheek details were correctly position but left the eyes looking ‘cross eyed’. To correct this problem a second feathered selection was created of just the eye area. The eye was then copied, pasted and flipped horizontally before the Move and Free Transform tools were used to massage the detail into place.

Step 13 >> The Clone Stamp tool and Spot Healing brush were then used to help blend the edges of the newly pasted content with the background details. This same process was used to reconstruct the other damaged areas in the photo.
Step 14 >> When making small adjustments or edits on highly magnified sections of the photo it is a good idea to use the View > New Window for... option to display a second 100% view of the document being corrected. This provides a great way to check your work up close and at a distance at the same time.
9.06 Extra correction help
Suitable for Elements – 7.0, 6.0, 5.0, 4.0, 3.0, 2.0, 1.0 | Difficulty level – Intermediate | Resources – Web image 906 | Menus used – Enhance
In the previous techniques we looked at how to balance the color of a photo with a dominant cast. With some images the Levels correction method still doesn’t provide completely cast-free results.
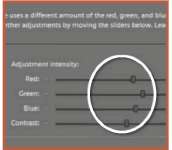
An alternative method for achieving good results is to employ a specialist plug-in for the task. ASF (Applied Science Fiction) now owned by Kodak produces some specialist plug-ins for Photoshop Elements that work well with restoration projects. The Digital ROC (Recreation Of Color) plug-in automatically analyzes corrects, balances and restores the color in problematic images. To give you an idea of how the plug-in performs we used it to correct the cast in the picture from the previous technique and it produced the results you see here.
The plug-in contains two display windows. By default the left window previews the file after changes and the one on the right as a navigator panel and displays a before version of the photo. When first opened the plug-in analyzes the color problems with the image and then automatically displays, what it considers, a ‘best correction’. You can modify the results with the color and brightness sliders on the right of the dialog.
Some contrast changes can also be applied using the slipping adjustments at the bottom of the dialog. For best results, though, alter contrast with features such as Levels or Curves back in Photoshop. The contrast and brightness controls are only included in the professional version of the plug-in.
For more details about Digital ROC or any of the other ASF plug-ins or to download a trial version go to www.asf.com.

The Digital ROC plug-in quickly restores the color to a problematic image like this one.

Step 1 >> When first opened the plug-in automatically analyzes the color in the photo and then displays a corrected version of the picture. You can switch between before and after versions of the file with the settings under the main preview window. Use the three color slider controls to fine-tune the correction. Moving the slider towards a color will add the color to the photo and remove its opposite.

Step 2 >> As a final step, in the Pro version of the plug-in, you can also adjust the brightness and contrast of the photo. If these options are not available then these changes can be made when the photo is back in Elements. Click the OK button to apply the changes, close the plug-in and return the corrected image to Elements. Complete the restoration by removing dust and scratches using the techniques described in the previous pages.
9.07 Adjusting shadow tones
Suitable for Elements – 7.0, 6.0, 5.0, 4.0, 3.0, 2.0, 1.0 | Difficulty level – Intermediate | Resources – Web image 907 | Menus used – Enhance
Some family heirloom images survive the ravages of time pretty much intact. This is the case with the example portrait we see here. Of course, there are a few marks, scratches, creases and a slight stain on the left to remove, but in addition to these enhancements, a good restoration job would also include the revealing of shadow details lost because of print over-exposure or incorrect scanner settings.

Step 1 >> The first step is for us to ‘peg’ the white and black points. Using a Levels Adjustment layer, the black and white point input sliders are dragged in towards the middle of the histogram while holding down the Alt key. Move the sliders until the point just before you start to see clipped pixels in the preview.

Step 2 >> Now that the black and white points are set, let’s reveal some of the hidden shadow details. Start by selecting all (Select > Select All), Edit > Cop Merged and then pasting (Edit > Paste) the content as a new layer. Then using the Adjust Color Curves feature select the Lighten Shadows Style from the menu.

Step 3 >> Now to fine-tune the preset enhancment. First we will concentrate on the shadow areas. Move the Adjust Shadows slider to the right of the dialog. This will lighten and add contrast and separation to the shadow areas.
Step 4 >> This change will also slightly affect the midtones and highlights in the photo. To control these tones separately use the Midtone Brightness and Midtone Contrast sliders. Here I pushed the brightness slider to the right to lighten the midtones and the contrast slider to the left to reduce the contrast slightly.

Step 5 >> With the tones adjusted, the next task is to remove spots, creases and marks. A new layer is added (and targeted) above the copy merged layer. The Spot Healing Brush in the Sample All Layers mode is then used to non-destructively retouch these problem areas.

Step 6 >> To remove the noise that pervades the shadow area, a new copy merge layer was created and pasted above the other layers. This later was filtered with the Reduce Noise filter targeting the shadow noise. A No Settings Levels adjustment layer was then grouped with the filtered layer, the mask filled with black and a white brush used to paint in the noise reduction to the areas that need it.
9.08 Recreating missing content
Suitable for Elements – 7.0, 6.0, 5.0, 4.0, 3.0, 2.0, 1.0 | Difficulty level – Intermediate | Resources – Web image 908 | Menus used – Enhance
The stylish surround of this vintage French portrait is suffering from a little neglect. To restore the photo to its former glory the corners and edge of the presentation card need to be recreated and the tones of the photo itself need a little tweaking.

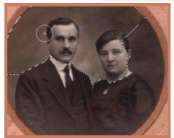
Step 1 >> Before commencing any corrective work we will adjust the tones in the picture section of the document. So that these changes are applied to the photo only and not the textured background use the new Quick Selection Tool to isolate the circular shaped image.

Step 2 >> Next with the selection still active, a Levels adjustment layer is added to the document. Automatically a mask, the shape and size of the selection, is attached to the layer so that the changes are only applied to the selected area. Set the black and white points first and then drag the middle input slider to the left to lighten.
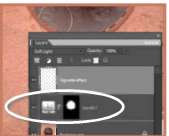
Step 3 >> In the process of lightening and adding contrast, the strength of the vignetting effect has been diminished. Add a new layer above the adjustment layer and change the Blend mode to Soft Light. To rectify this Ctrl click the Levels mask to load the original selection. Now select a soft-edged black brush and paint around the selection’s edge to create a new vignette.

Step 4 >> Now to recreate the corner content. Start by targeting the background layer and then selecting an unblemished section of the card surround with the Rectangular Marquee tool. Now choose Edit > Define Pattern. Enter a name in the Define Pattern dialog that appears and click OK. This pattern will be used for the repair work in the next two steps.

Step 5 >> To recreate the missing corners make a 1 pixel feathered selection in the same shape as the top left-hand corner but positioned at the bottom right of the card. This selection will confine our pattern filling activities and rebuild the corner of the photo frame.
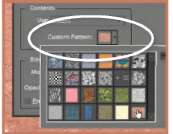
Step 6 >> Now fill the selection (Edit > Fill) with the newly created pattern (select Pattern in the Use menu). Create another selection in the opposite corner and fill it also. Now Lasso the torn side sections, add a 1 pixel feather and pattern fill this selection also. Next use the Healing Brush in Pattern mode with the new pattern selected as the source to disguise the new areas and repair the other wrinkles.
9.09 Removing stains
Suitable for Elements – 7.0, 6.0, 5.0, 4.0, 3.0, 2.0, 1.0 Difficulty level – Intermediate | Resources – Web image 909 | Menus used – Enhance
In this example, the repair work centered around the removal of a yellowish stain running through the middle of the photo. There was also the need to try to restore some details in the highlights sections of the photo.


Step 1 >> Some of the highlight areas in the example file are clipped. The Recovery slider in Adobe Camera Raw 4 is able to reconstruct details in some blown highlights by referencing the details in the other channels. So the first step is to rebuild as much lost detail as possible using this control. NB: ACR 4 also works with TIFF and JPEG files as well as RAW formats. See side panel.

Step 2 >> Next the file is opened into Elements from Adobe Camera Raw. To remove the yellow stain a Black and White Adjustment layer was dragged from a Photoshop donor document and added above the image layer. Double-click the layer thumbnail to open the feature. By adjusting the Yellow slider it is possible to hide the stain in the grayscale conversion process.

Step 3 >> To minimize the blue pen scribble on the subject’s nose, adjust the Blue and Cyan s liders. Variation in density of the stain or scribble may cause some or only part of the stain to disappear. This is the case here so we will have to resort to another process for the final touch up of these problems.

Step 4 >> To retouch residual stains and other marks. Create a new layer above the background image layer but under the Black and White adjustment layer. Select the new layer and then choose the Spot Healing Brush. Change the brush settings to Sample All Layers in the options bar and proceed to retouch problem areas.
ACR and JPEG/TIFF files
The version of Adobe Camera Raw that ships with Photoshop Elements 6.0 and 7.0 is also capable of enhancing JPEG and TIFF files. Use the steps below to open your non-raw files in ACR:

Step 1 >> Display the Elements Full Edit workspace. Next Select the File > Open As option. This enables the user to open specific documents as if they were created in a different format. In this scenario, we will use the option to open a TIFF or JPEG file as if it were a Raw file.

Step 2 >> Next navigate to the file in the file browser window and single click the entry. Choose the Camera Raw option from the Open As menu at the bottom of the Dialog. Click OK and the file will appear in the Adobe Camera Raw dialog. Process as you would normally and then select Open to transfer the converted file in to the Full Edit workspace with the enhancements applied.

Step 5 >> After removing dust marks and scratches add another blank layer at the top of the layers stack. Change the Blend Mode of the layer to Soft Light and choose a black soft-edged brush. This set up works like the Burn tool but the changes are made non-destructively. Carefully add some depth to the areas of the image that appear flat because of the harsh, direct, flash lighting.

Step 6 >> The last part of the restoration process is to add a very small amount of texture to the photo to provide detail in the blown-out areas. Add a new blank layer and change the mode to Overlay. Next fill the layer with 50% gray and filter the layer with the Add Noise filter. Make sure that you view the photo at 100% in order to properly gauge the appearance of the texture.