1
MAKE IT HAPPEN
This book and the accompanying DVD are intended to be a teaching guide, a reference book, and a source of inspiration. It is my hope to make your job easier and your projects more professional looking. To move you towards this goal, I will occasionally take related tangents. Photoshop is a companion to many other applications, so don’t be surprised to dip into specific nonlinear editing systems (NLEs) or even After Effects. Photoshop integration is an essential skill in taking your video editing and motion graphic skills to a higher level.
But I’ll be honest… Photoshop can be pretty intimidating with its myriad of tools and windows. With hundreds of menu commands, it’s pretty easy to get lost. But you need to remember that Adobe Photoshop is the number one selling image editor in the world for good reason. Learning to master Adobe Photoshop is very likely if you take a balanced and measured approach.
Reality Check
Photoshop is one of the most elegantly designed, yet feature-deep pieces of software available. Before you get defensive and proudly stamp your feet in support of Apple, Avid, or Sony, hear me out. No other application has so many tools and processing power combined with the ability to export to multiple formats. Adobe Photoshop is the most flexible program you’ll ever work with, but being a master will take time.
Honestly Evaluate Your Skill Level
 It is OK to be a beginner in some applications and an expert at others. Photoshop requires a “strong bench” of skills.
Working professionals use Photoshop for a variety of tasks. From graphic designers and Web developers to photographers and scientists, nearly everyone uses Photoshop. Because it is the tool-for-everybody, Photoshop sometimes gets a little crowded. There are so many features (distractions) that have nothing to do with video. I am not suggesting that you write Adobe asking for a refund on unused features. Instead, accept that all you need (and more) is waiting for you. The pros know that the best approach is to learn what you need first, and then dabble with the rest over time.
If you’ve used Photoshop before, be prepared to change your viewpoint. Video pros often want to understand every bell and whistle in their applications. This obsession is rooted in the belief that absolute knowledge is absolute power. Personally, I don’t subscribe to this mindset. Rather, I would argue that speed and wisdom (knowing what tools matter to the video pro and how to get the job done quickly) should be the true goal.
This book is not a catalog of every feature of Photoshop. What it will do is show you the tools that are likely to be used by video artists. The book is squarely focused on both technical expertise and design aesthetics. The book will also dip into some third-party plug-ins and related technologies that may help you.
I will waste no time talking about achieving great four-color printing or how to get faster download times. This is a video book, and you work (or want to work) in the video industry—a fast-paced, deadline-driven, technical industry. I respect that, because I am right there with you, and it is my goal to help you get faster and feel more confident in using the world’s best image-editing application.
Suggested Hardware
Photoshop is a great tool right out of the box. However, there are a few things that will help you get more work done. The order in which you add these items on will vary, depending on your work environment and budget. I will not assume you have any of these, other than access to a video monitor in either NTSC or PAL (depending upon your country).
An NTSC monitor.

A second computer monitor. Once you’ve gotten used to having your palettes open, you’ll never be able to go back to opening and closing windows and tabs all day long.
As much RAM as you can hold. RAM has been getting cheaper and cheaper. Fill your computer up with at least 2 GB for heavy lifting.
A FireWire Bridge/DA converter. Photoshop can send out video previews via FireWire, which allow for more accurate judgment regarding color and flicker.
An NTSC/PAL monitor. This lets you can check your work before going into the edit suite.
A scanner that matches your imaging needs. I own four scanners. None of them had a price tag of more than $400, and they all work great for video. In fact, the $99 portable one scanned several photos in this book. Scanners have come a long way in recent years.
For Mac users, a two-button mouse. Because ![]() + clicking gets a little old after a while. Many options are available these days, since USB became a common standard between Mac and Windows.
+ clicking gets a little old after a while. Many options are available these days, since USB became a common standard between Mac and Windows.
A good set of keyboard and mouse wrist guards. Sore wrists get in the way of what you are trying to accomplish.
A tablet and pressure-sensitive pen. These can be used for both fun and serious work. A little bit of digital doodling can be a relaxing activity. Moreover, a pen is often an easier input device than a mouse or trackpad for realistic brushstrokes and tracing activities.
A Wacom tablet.

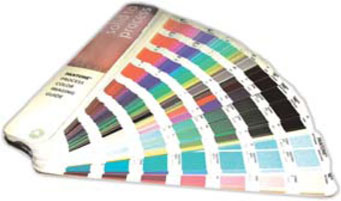
A Pantone color book. So that you have some sort of reference guide for matching the PMS logo colors that your clients give you.
Keep your Pantone color book in its sleeve and in the drawer. Exposure to light speeds up fading (and reduces accuracy).
A card reader for transferring digital photos. There are multiple format readers available. Get one that is self-powered and supports what you use—such as CompactFlash, SmartMedia, or a Memory Stick.
Setting Up Photoshop
Success takes preparation. I cannot promise you overnight success, although I can tell you that this book can make you faster and more confident with each chapter you complete. To get the most out of this book, it will help if you and I are operating in a similar environment. I will make suggestions on how to configure Photoshop to operate more like the video editing system that you are used to. So please take the extra time to reset Photoshop.
The LCD (Least Common Denominator) Test
Pick up a combo TV/VCR unit for checking your graphics. These low-cost consumer models are helpful to give you a real-world view of your graphics.
However, if you are strongly opposed to any of these cosmetic changes, skip them. These are merely suggestions to prepare you for success.
Photoshop has its roots as a video and film application. The print—and more recently, Web—industries have claimed it as their own. Now it’s our turn. Digital video has emerged as the fastest growing technology area; more and more books and applications are popping up on the shelves, promising solutions for all skill levels. It is my goal to help you reclaim Photoshop and learn to harness its diverse imaging abilities to enhance your video projects.
Setting Preferences
Photoshop has all the tools you need (and many you don’t). Let’s get started by setting up Photoshop to work with our video applications. First, we’ll modify its preferences that control how the application functions. To begin, call up your Preferences panel by pressing ![]() . These Preferences suggestions are based on Photoshop CS3. Most of these options exist in earlier versions of Photoshop, but naming conventions may vary.
. These Preferences suggestions are based on Photoshop CS3. Most of these options exist in earlier versions of Photoshop, but naming conventions may vary.
Video #1 Setting Preferences
 See the Setting Preferences video tutorial on the DVD-ROM.
General
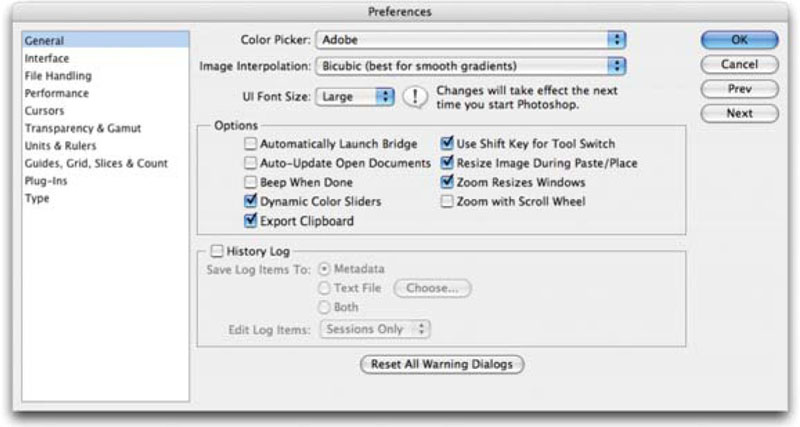
In the General category, choose:
• Adobe Color Picker, which is a consistent, cross-platform color selection tool.
• Image Interpolation set to Bicubic (best for smooth gradients).
• UI Font Size set to Medium or Large depending upon the resolution of your primary display.
• Dynamic Color Sliders checked.
• Save palette Locations checked.
• Use ![]() Key for Tool Switch unchecked.
Key for Tool Switch unchecked.
• Zoom Resizes Windows checked.
• Resize Image During Paste/Place checked.
• Zoom with Scroll Wheel checked.
• Click Next.

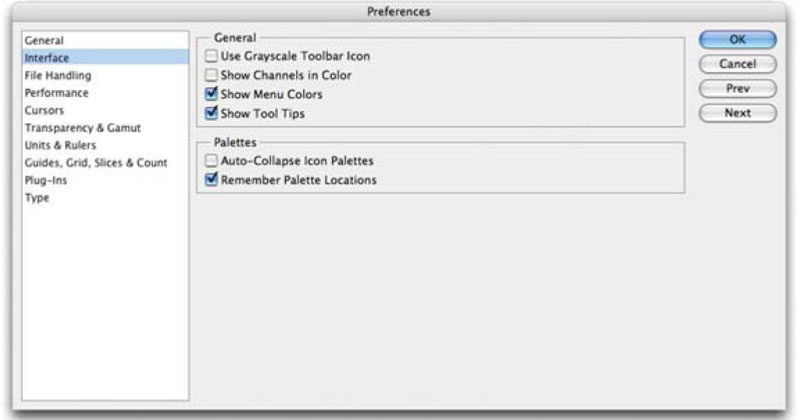
Interface
The Interface category is new to Photoshop CS3 and groups several important preferences together.
• Leave Show Channels in Color unchecked. This option affects how your channels and images are viewed and diminishes the on-screen viewing quality.
• Check Remember palette Locations to keep your palette arrangements after a relaunch.
• Click Next.
What about Tool Tips?
Older versions of Photoshop have an option called Tool Tips, which you will want to leave on. In Photoshop CS3 this option is automatically enabled under the Interface group.
File Handling
In the File Handling category, you need to make some changes to ensure cross-platform functionality. Even if your shop only uses Macs or PCs, you will work with others who are different. Trust me. Be cross-platform compliant when saving your Photoshop files.
• Always choose the Save an Icon and Macintosh and PC Thumbnail options. This will allow you to quickly locate files through visual cues.
• Always append file extension with lowercase tags.
• Set Maximize PSD and PSB File Compatibility to Always.
• Click Next.
Performance
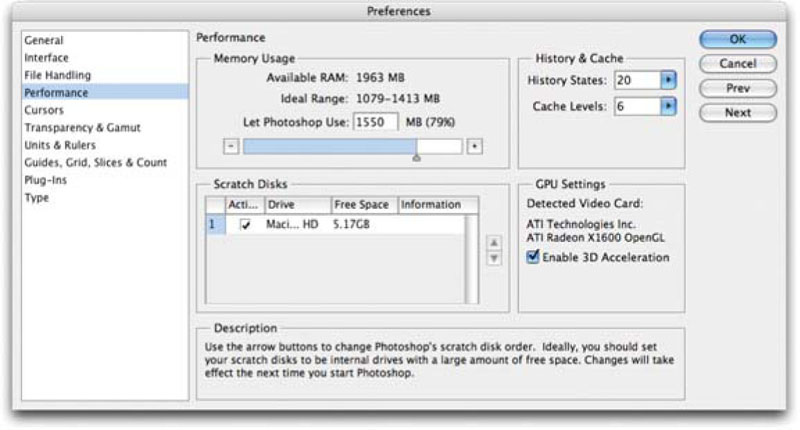
The performance category is new to Photoshop CS3. It groups several options together tied to managing your installed RAM and graphics card.
• Memory Usage identifies how much RAM you have installed. Photoshop has a minimum requirement of 320 MB, but it’s a good idea to choose a number in the ideal range that the program identifies.
• Allow at least 20 history states (levels of Undo). You will vary this number based on RAM and personal experience as you grow less (or more) dependent on undos.
• Memory will generally not be a big deal because you’ll work primarily with low-resolution sources in this book. However, if you have extra (local) drives, make Photoshop aware of them. Set your emptiest drive as the First Scratch Disk. Ideally you will choose a drive that is not the system (boot) drive.
• If you have a robust video card and will be doing a lot of image cleanup, then check the box for Enable 3D Acceleration.
• Click Next.
Scratch Disk Logic
Already maxed out your RAM slots? A dedicated drive or partition makes the perfect scratch disk. This will greatly improve Photoshop’s efficiency in opening large images.
Cursors
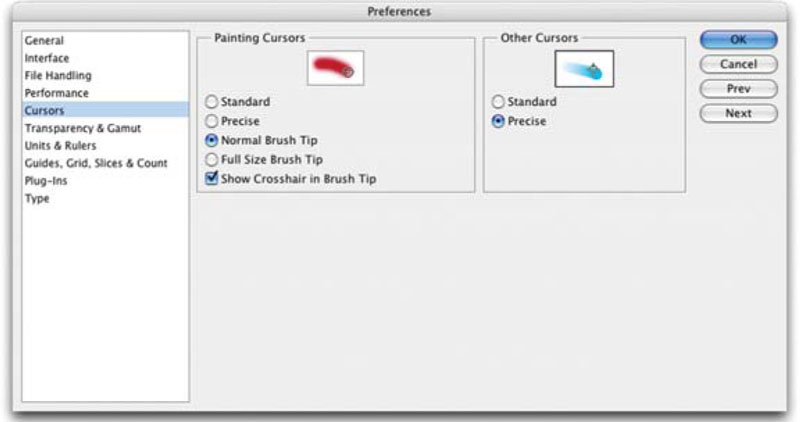
• Set Painting Cursors to Normal Brush Tip. I personally prefer to check Show Crosshair in Brush Tip. (The ![]() key disables this preview feature.)
key disables this preview feature.)
• Set Other Cursors to Precise. This way, you can actually see your sample point for your Eyedropper and Stamp tools.
• Click Next.
Help! I Can’t See My Cursors
 This is the #1 tech support call to Adobe. If you have the
 ![]() key on, Brush Size painting cursors are disabled.
key on, Brush Size painting cursors are disabled.
Transparency & Gamut
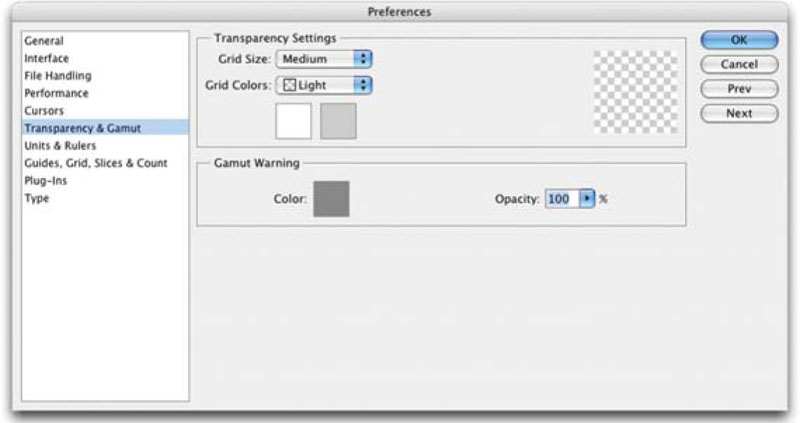
Under Transparency & Gamut, you can generally leave these options alone. However, personal preferences do vary.
• You can change the grid color if you despise light gray. You can also disable the grid altogether. Remember, the grid will not print or show up in your video graphics.
• Do not check Use Video Alpha unless you have an advanced video card and intend to use Photoshop as a live keyer. Chances are there are only a few of you reading this book that are doing this.
• Click Next.
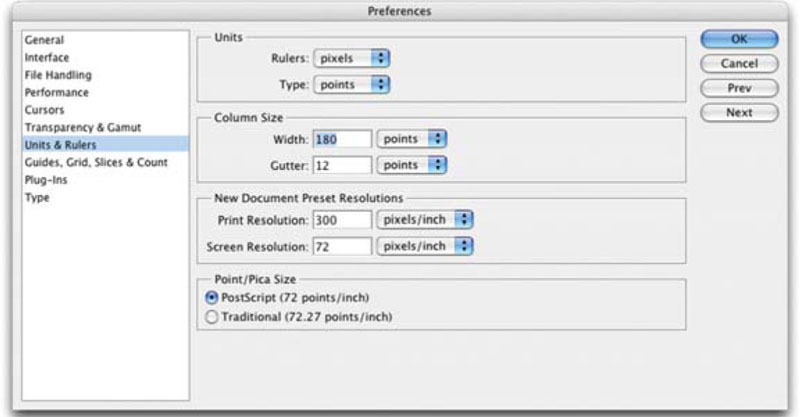
Units & Rulers
Under Units & Rulers, modify Photoshop’s measuring system to match video. If you work in a print environment, you can quickly jump back and change your measurement units by double-clicking on the ruler.
• Set Rulers to pixels.
• Set Type to points.
• Ensure that screen resolution is set to 72 pixels/inch.
• Ensure that the Point/Pica Size is set to PostScript (72 points/inch) so that type acts like other video applications.
• Click Next.
Guides, Grid, Slices & Count
• I find that a Light Red guide is easier to see than the default Cyan.
• Set up a grid using Lines with a gridline every 40 pixels and 4 subdivisions.
• Pick a color such as a dark gray by clicking on the color swatch. You can now turn the grid off and on from the View menu or from the keyboard using ![]() .
.
• Disable Show Slice Numbers unless you are doing a lot of Web work. Slices are used with rollover graphics to trigger button effects on Web pages.
• Click Next.

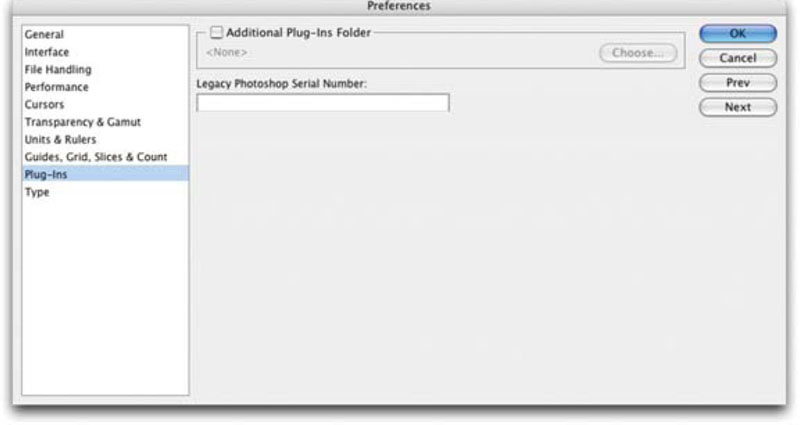
Plug-Ins
• If you need to travel with your plug-ins on a removable drive (for example a freelance assignment) then you can specify an Additional Plug-Ins Folder.
• Click Next.
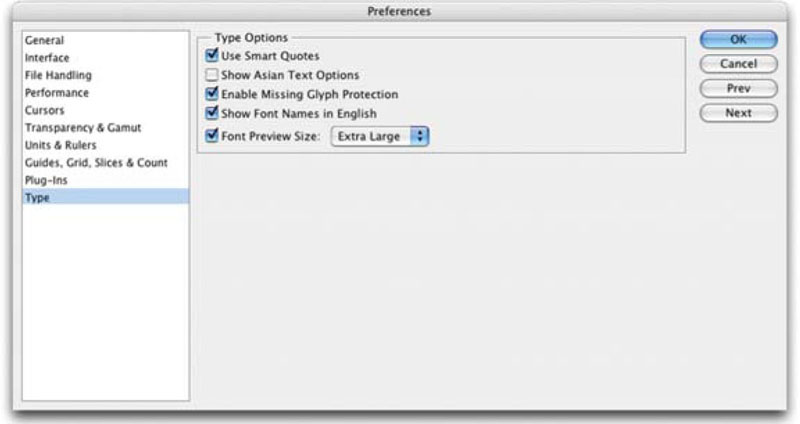
Type
The Type category consolidates several important type options into one area.
• Check the box next to use Smart Quotes if you’ll need true quote marks and apostrophes more than foot and inch marks.
• Leave Enable Missing Glyph Protection checked.
• Choose to show Font Names in English.
• Check Font Preview Size and specify a size that you like. The Huge size is helpful if a producer or client frequently sits over your shoulder.
• Click OK.
Get Smart (Quotes)
Use Smart Quotes will automatically insert true, curly quotation marks when you press the ![]() (feet) or the
(feet) or the ![]() (inches) key.
(inches) key.
Color Settings
Now it is time to modify how Photoshop handles color and color management. Press ![]()
![]() to bring up the Color Settings dialog. The default configuration is optimized for Web and print graphics, which can result in color shifts when opening video frames.
to bring up the Color Settings dialog. The default configuration is optimized for Web and print graphics, which can result in color shifts when opening video frames.
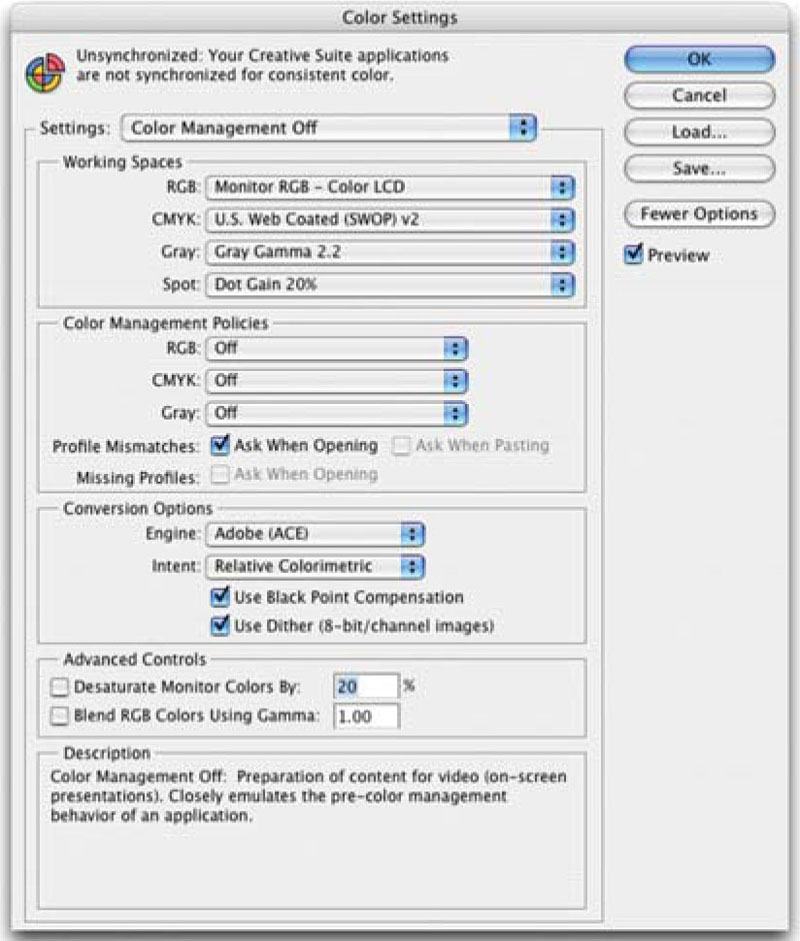
• Click the More Options button first.
• From the Settings list choose Color Management Off for consistent results with video graphics.
• Click OK. Photoshop stores preferences when it shuts down. Quit Photoshop and relaunch in order to write your preferences.
Use a Broadcast Monitor with Photoshop
When designing video graphics, it is very useful to view them on a broadcast monitor or television. Starting with Photoshop CS2, Adobe added support for video previews over FireWire. This allows you to perform essential checks for color, interlace flicker, and readability.
Step 1. Ensure the DV device is connected and powered BEFORE launching Photoshop. You can use a camera or a Digital-to-Analog converter that supports either NTSC or PAL and the DV standard.
Step 2. Choose File>Export>Video Preview. The pop-up window will present you with logical choices (you can rollover an item for a detailed description).
Step 3. Choose an Output Mode that matches your hardware (NTSC or PAL).
Step 4. Set an Aspect Ratio for the monitor. If you have a widescreen monitor attached choose Widescreen (16:9), otherwise use Standard (4:3). Photoshop will automatically adjust the graphics to match the hardware attached.
Step 5. Under Image Options you can specify how to handle when the image size differs from the display.
Step 6. Leave the Apply Pixel Aspect ratio to Preview box checked to get the most accurate previews.
Step 7. Click OK.
For subsequent previews, just choose File>Export>Send Video Preview to Device. This will use the last settings you’ve chosen and bypass the length dialog box. Remember, the only way to see accurate video colors is to hook your machine up to an NTSC or PAL monitor. If this is not an option, you will need to test your graphics with another technique. For more on checking and finalizing graphics, see Chapter 13, “The Road to the NLE or Motion Graphics Application.”
Choosing Keyboard Shortcuts
Photoshop has a logical and powerful set of keyboard shortcuts, many of which you’ll learn throughout this book. But if along the way you find one “missing” or “misplaced,” feel free to change it. Starting with Photoshop CS, you can customize keyboard shortcuts and create new sets of shortcuts.

Defining or Modifying Keyboard Shortcuts
Step 1. Choose Edit>Keyboard Shortcuts or press ![]()
![]() .
.
Step 2. Create a new set of shortcuts or modify the default set.
Step 3. Select a shortcut type to modify (Application Menus, palette Menus, or Tools) from the Shortcuts For menu.
Step 4. In the Shortcut column of the list, click on the shortcut you’d like to modify.
Step 5. Type a new shortcut to replace an existing shortcut or add a new one.
Step 6. After changes are made, the shortcut set will appear with the words modified. You can click OK to keep the changes or click the disk icon to save it.
An Exclamation Point Means the Shortcut is Taken
If a keyboard shortcut is taken, Photoshop will alert you. Follow the onscreen directions to resolve the conflicts.
Defining a New Set of Shortcuts
If you want to create a new set of shortcuts, choose one of the following options:
• Create a new set of shortcuts before you edit by clicking the New Set button.
• Create a new set after you’ve modified shortcuts by clicking the New Set button. This will incorporate any changes you’ve made.
To save the shortcuts as a file, when you click save, Photoshop CS will navigate to the keyboard shortcuts folder. Name the file and add the extension .keys to the name.
Video’s Unique Requirements
Video is a unique creature; it does not enjoy the careful management that other formats do. Web designers have the benefit of designing on computers, for computers. Print designers have precise control during the printing stage, with dedicated professionals calibrating their output devices.
In the world of video, the general population installs $199 color televisions but won’t even read the instruction manuals. To make things worse, there’s a standards war going on between multiple formats, digital versus analog, standard versus widescreen. Let’s just say, your job isn’t easy. I want to establish a few key terms immediately to help us move forward. Many of these may seem familiar, so I will keep the introduction short.
Canvas size. This is the area in which you will work. In Photoshop, specify your work area in pixels. It is a good idea to check with the manufacturer of your video software for requirements. These can be found in your owner’s manual or on the manufacturer’s Web site. You can also check the appendices for recommendations on popular NLE, motion graphics, and DVD authoring programs from top manufacturers.
Aspect ratio. Television is generally a 4×3 aspect ratio, while widescreen is a 16×9 aspect ratio. You will find more information, as well as information on templates, in Chapter 2, “Pixels: Time for Tech.”
Standard video is shown at a 4×3 aspect ratio. In the print world, this is referred to as landscape orientation.

Image mode. Photoshop supports eight image modes, including bitmap, grayscale, RGB, and CMYK color spaces. For video, work in RGB mode for consistent results with video software.
Bit depth. Also called color depth or pixel depth; a measurement of how much color information is available to be displayed for each pixel in an image. Photoshop users generally work in 8 Bits/Channel mode, because it provides a full set of tools. These 8 bits combine to a total of 24 bits for an RGB image or 32 bits for an RGB image with an alpha channel. Some high-end scanners can capture information at 16 bits per channel. These files are approximately twice the size of their 8-bit counterparts, but contain more detail.
16-bit Archives
If you need to archive an image, a 16-bit scan is the best format. You may have to down-convert to 8 bits for compositing or if your NLE does not support the mode, but at least you have the extra data for future applications.
Adobe After Effects and Apple Motion can work with 16-bit images. Starting with Photoshop CS, Adobe now supports layered 16-bit images. However, when working in 16-bit mode, many of the editing tools and filters do not work. You will most frequently work in 8 Bits/Channel mode. Additionally, video editing systems vary on their ability to import 16-bit images. Some will only import a 16-bit image as a flattened file; others will not import it at all.
Luminance ranges. The range of colors supported by video. There are two major color spaces in use for nonlinear edit systems: RGB mapping and 601 Mapping. You should check your syste m to see which is in use. For more details, see Chapter 2, “Pixels: Time for Tech.”
Alpha channels. An alpha channel contains information about all of the transparent areas in your composition. All objects should be on transparent layers when creating an alpha channel. Do not place any of your objects on the background layer. For more details, see Chapter 3, “Why Layers?” and Chapter 4, “What About Transparency?”
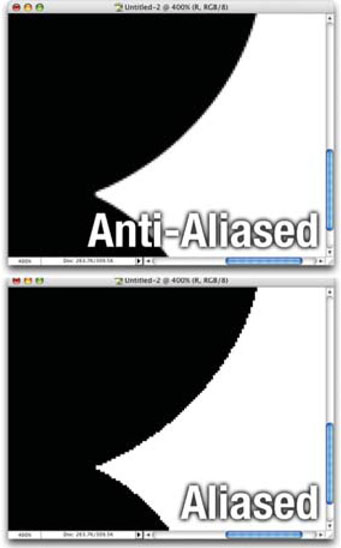
Anti-aliasing. Anti-aliasing causes a gentle blending of the colors along the edge of an image. It is often used to reduce flicker. This technique is effective for straight lines and text, to create a smoother composite of foreground and background elements. It is most common for low-resolution output (such as video or Web). There are four different types of anti-aliasing that can be accessed from the Options bar or the Character palette.
Anti-aliasing helps low-resolution elements containing curved lines (such as text) appear smoother on screen.
Anti-aliasing Essential Information
Anti-aliasing is critical for smooth edges. However, for really small type, leave it off to improve legibility.
Nonsquare pixels. Nonsquare pixels are your own personal demon. These cause more problems for more people than anything else about Photoshop. In a nutshell, computers and Photoshop traditionally work with square pixels (1.0 aspect); most standard-definition digital video works with nonsquare pixels, while high-definition works with both square and nonsquare pixels. Thankfully, Photoshop supports nonsquare pixels, but you will still need a thorough understanding of square pixels. I attempt to squash this problem thoroughly in Chapter 2, “Pixels: Time for Tech.”
A Few Basics
Working with Layers
Virtually every modern editing and motion graphics software has added at least partial support for Photoshop layers. Layers enable Photoshop to keep distinct pieces of a design separated (like tracks in a timeline). These efforts are worth praise, but they still do not eliminate the need for saving specialized formats or creating alpha channels. There are times you want layers, and times you don’t.
For example, you can import a layered file into Adobe After Effects or your edit system if you want to animate the layers. This is particularly helpful for segment bumpers and show titles. It is also common to import a layered file that contains multiple elements that you intend to use in an editing project. By importing just one file, it is easier to manage media on your hard drive.
So why flatten layers? Do you really want a lower third eating up five tracks of your timeline? What about unsupported/partially supported features like blending modes, clipping groups, and layer styles? Never flatten your design files, but rather choose File>Save As… and specify a new file type. When saving a .psd file as a PICT or Targa file, it is flattened to a single layer, with the option to include an alpha channel.
Additionally, we will go deeply into layer management, masking, blending, and alignment. You should come to appreciate how powerful and flexible a layered file can be. You will work hard for your layers, so do not ever flatten your file and trash all of your efforts. Simply choose File>Save As… and check the As a Copy box to write the file out as a flattened format.

Backing Up Your Work
Your work is what keeps you from enjoying the rest of your life. Do you ever want to have to redo something you’ve already done? Growing up in Chicago, we were always taught, “Vote early. Vote often.” I’ve adapted this to the Chicago method of file backups: “Save early! Save often.”
Saving your work is critical, because unlike many video-editing systems, Photoshop does not have an autosave feature. There is no “attic” or “vault” to help cover you. Saving is your responsibility. Make the act of saving a reflex reaction. Every time you are sitting idle, tap ![]() . I often find myself tapping this five times in a row if I am in the middle of a creative thought.
. I often find myself tapping this five times in a row if I am in the middle of a creative thought.

Continue these good habits after the project. Gather up all design and production files, as well as fonts and source materials. Burn them to CD or DVD twice. Maintain two separate project archives so that you always have a copy of the work.
Toolbox
Many tools share space in the toolbox and a keyboard shortcut. Call up the Preferences with ![]() and make sure the Use
and make sure the Use ![]() Key for Tool Switch option is disabled. You can now tap a shortcut key (such as M for marquee) and cycle through the tools contained in that tool’s drawer. This will speed up your ability to switch tools.
Key for Tool Switch option is disabled. You can now tap a shortcut key (such as M for marquee) and cycle through the tools contained in that tool’s drawer. This will speed up your ability to switch tools.
100% Magnification
Double-clicking on the magnifying glass will zoom your image to 100%.
Your hands-on tools are all contained in the toolbox. Similar tools are often nested together. You can access these hidden tools by clicking and holding on a particular tool. Whenever you see a triangle in Photoshop, clicking will open additional options. The first keyboard shortcuts you should master are those for the toolbox. In general, the first letter of the tool is the keyboard shortcut. If you can’t remember the shortcut, click on the tool while holding down the ![]()
![]() key to cycle through the available tools.
key to cycle through the available tools.
A Single or a Double
Older versions of Photoshop offer a two-column toolbox. Starting with Photoshop CS3, you can switch between a one- or two-column view by clicking the small triangles at the top of the toolbox.
Not every tool is useful to the video editor. It is important to remember that Photoshop is the #1 image editor for other industries as well. Many of the tools in Photoshop are designed for print, Web, and scientific professionals. A color-coded chart is provided to point out the “video-friendly” tools. Green tools are ones you will need right away, yellow tools will be used occasionally, and video professionals may use red tools infrequently or not at all. You’ll also find a copy of this chart on the DVD-ROM.
Mnemonic: Devil’s Xylophone
Pressing D will load the default colors of black and white; the X key will toggle between colors.
Next you’ll find the foreground and background colors. Many other tools use these colors. The most obvious usage is for the painting tools. Lesser known is that these colors drive the results for many filters. When working with the Artistic, Brush Stroke, or Sketch filters, you will see great variety when switching colors. These colors are often used in painting masks as well.
The toolbox contains a few other useful features for a video editor. Clicking on the Photoshop icon at the top of the box will take you to Adobe Online. This is the quickest way to check for software updates and extensive resources. You can tell Photoshop to check for resources manually or configure it to check monthly, weekly, or daily.


The remaining items will be used in very special circumstances. The Quick Mask mode is useful for creating advanced selections or masks. We’ll dig deeper into masks and alpha channels in Chapter 4, “What About Transparency?” Next are the screen mode switches, which change how the workspace is presented.
Palette Popping
One of the biggest wastes of times frequently committed is “palette popping.” Many advanced users open and close tools all day long—dragging windows all over the place, closing and opening the same windows over and over. Stop! There are many solutions to this problem.
Temporary banishment. Pressing the Tab key hides all of your tools. Press it again and they come back. Not good enough for you? Using ![]() , you can hide everything except the Options bar and toolbox. This useful command is best combined with fullscreen mode for a video workspace. Tap the
, you can hide everything except the Options bar and toolbox. This useful command is best combined with fullscreen mode for a video workspace. Tap the ![]() key to blank out all other images. Use
key to blank out all other images. Use ![]() or
or ![]() to zoom in and out of your image. Press the
to zoom in and out of your image. Press the ![]() key again to cycle and
key again to cycle and ![]() again to go back to standard screen mode with menus and tools.
again to go back to standard screen mode with menus and tools.
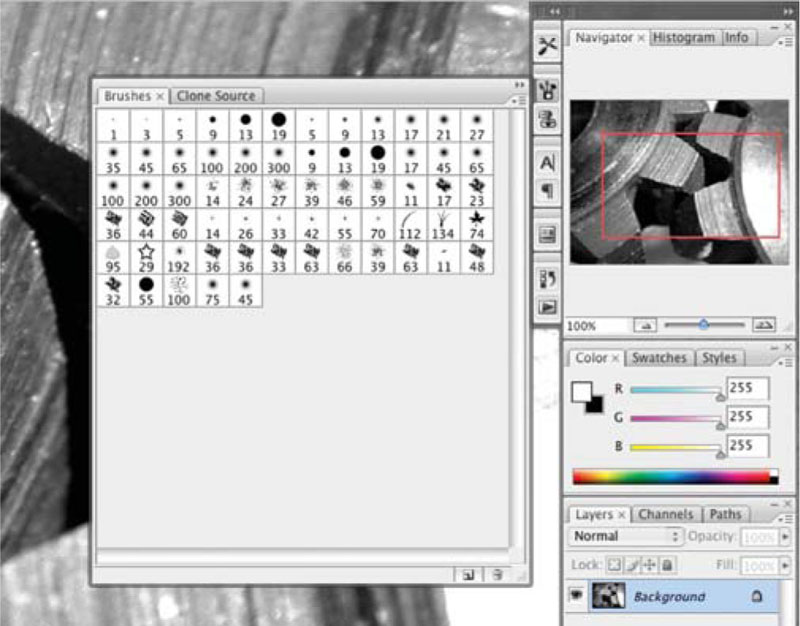
Sitting on a dock. Wish you could keep tools nearby in a virtual drawer? Photoshop 6 brought the welcome addition of the Options bar and its palette well. Photoshop CS3 has further evolved the concept into a dock. You can drag tool tabs to the well or dock, where they are docked as pop-out menus or palettes. Put useful but rarely used tools like the Brushes palette and Navigator here.
A workspace of your own. One of Photoshop’s coolest features is workspaces. Like to work with different tools for different situations? Maybe you use the Channels and Brushes palette a lot when masking, but really wish Layer Styles and the Color Picker were there for text work. You can have any combo you want in one click with workspaces. Open the windows you need, and arrange them into the desired position. To save the current workspace layout, choose Window>Workspace>Save Workspace. Enter a unique name for the workspace, and click OK.
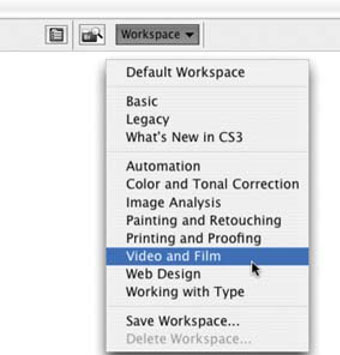
To activate a workspace, simply Choose Window>Work-space, and choose a workspace from the submenu. You update a workspace by resaving it with a new name. To delete a workspace, choose Window>Workspace>Delete Workspace. There is, unfortunately, no way to share workspaces with other users or machines, because they are tied to your preference files.
Workspaces Save Time
Workspaces (custom window arrangements) are familiar concepts in several video-editing applications. They can now be found in Photoshop (v7 or newer).
Startup Optimization
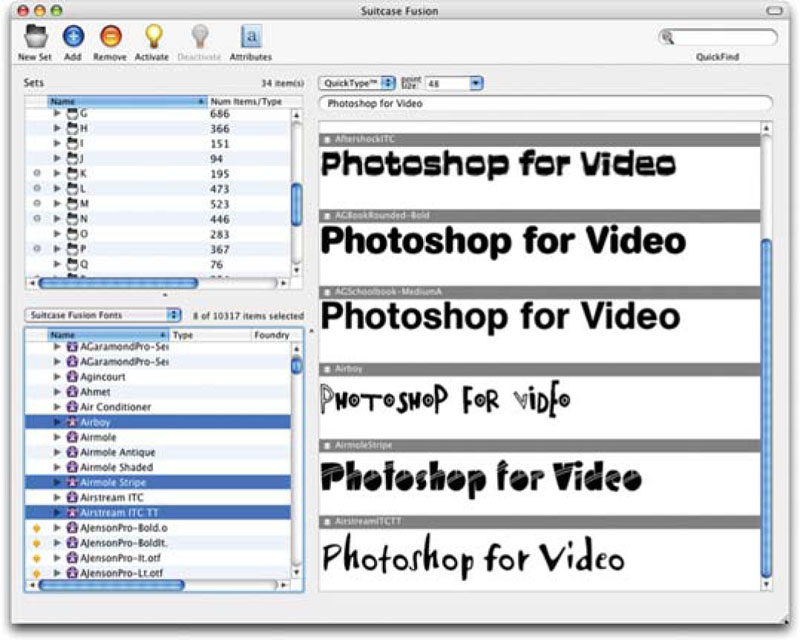
Font overload. Upon startup, Photoshop must examine all of the fonts that will be available for the type tools. Large quantities of fonts installed on your system mean long load times. This can cause Photoshop to take longer to start up. If you find the startup time for Photoshop to be too long, remove any unused fonts from your system (see your OS manual), or use a font management program such as Suitcase Fusion. Shareware fonts are often a source of instability as well, due to conflicting font IDs that may confuse your operating system.
Don’t Miss the DVD
Be sure to check out the many great materials on the DVD-ROM. You’ll find goodies in every chapter’s folder, plus free and trial software. Fully explore the disc for extra articles, tutorials, and training movies. You’ll be amazed at how much good stuff is packed in there.
Changing the Plug-Ins folder at launch time. By holding ![]() keys
keys ![]() immediately after launch, the Additional Plug-Ins Folder dialog will appear. You can specify an additional folder from which Photoshop will load plug-ins. Many editors will carry a USB thumb drive with extra plug-ins (although this won’t work with serialized plug-ins).
immediately after launch, the Additional Plug-Ins Folder dialog will appear. You can specify an additional folder from which Photoshop will load plug-ins. Many editors will carry a USB thumb drive with extra plug-ins (although this won’t work with serialized plug-ins).
Resetting preferences at launch time. If you would like to reset all of your Photoshop preferences, simultaneously hold down the ![]() keys
keys ![]() when you launch Photoshop.
when you launch Photoshop.

Free Tech Support
If you are a registered owner, you get 90-day tech support for new copies and 30 days for upgrade copies.
Hands On | 01
Professional Motion Control Photography with After Effects and Photoshop
Documentary-style motion control photography is becoming increasingly popular for use in all styles of video production. Why just show the pictures, static and full-screen? Most editors have traditionally had three options.
The first method involves sending the images to a motion control camera operator. This is an expensive process and must be adequately budgeted for both time and money. The second method involves setting up a camera and card stand, and then shooting the photos with a video camera. This method is prone to keystoning (due to the tilting to avoid light reflections) and does not allow for photo restoration or precise movement. The third method involves importing the photos into the edit system and enlarging (zooming) them. This method produces softening and had very limited results. Many plug-ins have recently been developed that work within edit systems that improve upon this technique, but there is still a better way.
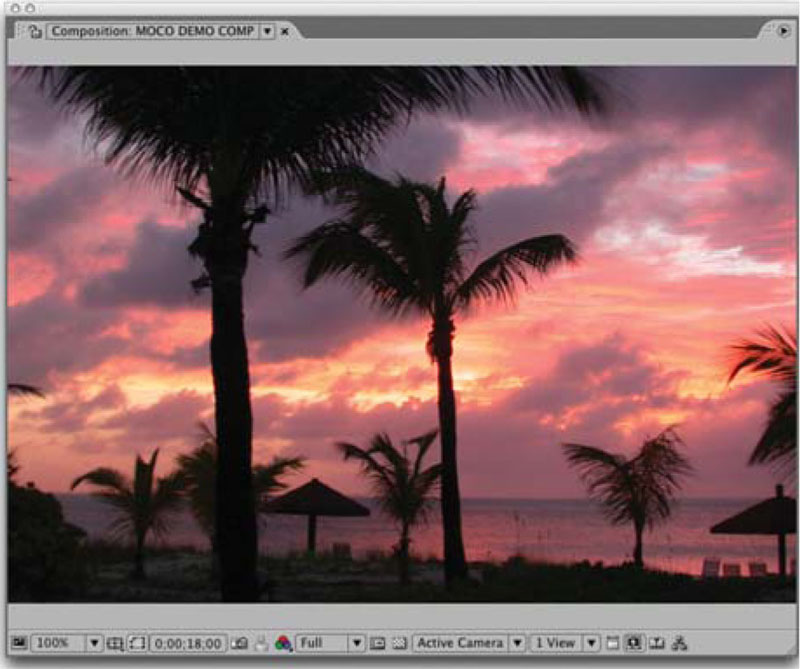
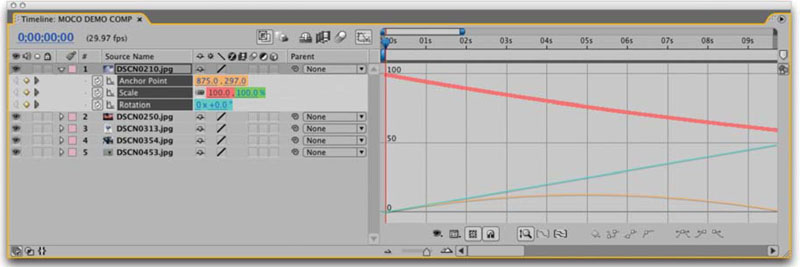
By combining Photoshop with Adobe After Effects, extremely high-quality motion control is possible. In fact, I have produced results that outperform those done on expensive motion control rigs. Everyone knows that Photoshop is the perfect tool for restoring damaged photos. When combined with Adobe After Effects, complex motion is possible.
You’ll find Exercise 01 on the DVD-ROM.
PROfile: Johnathon Amayo

If you ever went to an Avid event during the break of the millennium, you likely met Johnathon M. K. Amayo. As ACSR Program Manager, Senior Instructor for both operational and technical and spokes-model for Avid’s Xpress Pro, Amayo frequently traveled to film festivals, training events and trade shows to demonstrate all fascists of the Avid Editing Software suite. Some even call him Mr. Xpress DV as he was picked to be a “poster” child for Avid’s marketing campaign.
Amayo is an accomplished video professional as well. He served four years in the Air Force as Combat Camera. Amayo joined Avid shortly after, but continues to keep his editing feet wet to stay in touch with the craft. Currently Amayo Los Angeles is a workflow & effects specialist for the studios and independent production companies. He’s also currently in Production on a new film.
“I work on several entertainment and independent projects in the Boston area. I’ve worked on 35 mm and 16 mm film projects, as well as some digital video features,” said Amayo. “Recently, I’ve been doing a lot of DV editing.”
Early in his professional career, Amayo decided to expand his editing skills. The first complementary program he decided to learn was Adobe Photoshop (version 2.5). This was a natural extension that let him better control the use of graphic and still images with his videos.
“Photoshop is the most complementary software programs for on editor using an Avid system or any other NLE. When you add After Effects, it becomes one of the best value programs. Any user can run them on almost any computer,” said Amayo. “An experienced guy can take a thousand-dollar application and compete with million dollar graphic systems.”
Amayo stressed the importance of editors branching out: “Learning Photoshop and After Effects can increase your value to a company,” said Amayo. “We now have to work with DVD, the Web, and CD-ROMs. Editing is changing because we now have to wear so many hats.”
Amayo stressed that experienced pros and even newcomers shouldn’t let these demands overwhelm them. Powerful editing tools such as Xpress DV and graphic tools like Photoshop and After Effects are easy to access.
“We’re expect to be a jack-of-all-trades and master-of-none. But that doesn’t have to be. These programs are available to us early on and they are affordable.”
Amayo has relied heavily on Photoshop’s powerful tools for matte creation. “I seem to have a flair for creating mattes. I find it cleaner and easier to do it in Photoshop.” He suggests cutting a logo or title up into several pieces and then animating it within Avid’s timeline. “When I create a title or an effect, I’ll often lay it down four or five times… I can then introduce moving fills and other effects.” Despite his personal comfort-level, Amayo said that improvements in Avid’s support for Photoshop layers has let him do more and worry less about creating mattes and alpha channels. These improvements were made to make things easier for the editor. However, he still turns to Photoshop for titling effects.
“I really use it for advanced titles… especially since I can import layers into my Avid,” said Amayo. “You get more control, and dynamic editing. You can really adjust things with greater control. When I was learning Avid, I decided that Photoshop was the most complementary tool. It’s flexible and it’s a quick, a very easy program to use. Even today I find it an essential tool when I advise facilities on which tools they should add to their story building suite.”
For Film & DV Editors, Amayo says that Photoshop can be useful for fixing tough problems. “Healing and cloning can be very useful for cleaning up frames. It’s slow, but a good alternative if you are working on a DV system.”
Amayo is a firm believer that most editors need to expand their skill set.
“When you go to big places like LA, especially to a studio, you’re likely expected to only know one application and be the best,” said Amayo. “But not everybody is going to be able to work there. Most of us are at shops where we are expected to do it all.”