
7
A SENSE OF HISTORY
A true test of how powerful a computer application is lies not in the ability to “do,” but rather to “undo.” Having the ability to create with a safety net is a liberating experience. By harnessing the power of the History palette, an editor or designer can manage to try new things without having the pressure of a missed deadline.
Configuring History States
By default, Photoshop has 20 history states. A history state is simply a level of undo. If 20 is not enough for you, then you can increase this number. To do so, activate Photoshop’s Preferences by pressing ![]() . In Photoshop CS3 you’ll find History States under the Performance group (in earlier versions it can be found in the General group).
. In Photoshop CS3 you’ll find History States under the Performance group (in earlier versions it can be found in the General group).

When adjusting history states, you should keep in mind that you are tying up your computer’s RAM for each level of undo. Fortunately, Photoshop is very efficient in tracking changes. History states are stored in RAM, where you can access them quickly. If you run out of RAM, they are written to the available scratch disk.
Photoshop currently supports up to 1000 levels of undo. It would take some very fast mouse clicks to use those up. Since you are generally working with small file sizes, RAM requirements are low. I recommend 100 history states as a starting point. Go up or down as needed based on your workflow.
Accessing History States
To make undos a little easier, you may want to change your Redo key settings. Most nonlinear editing systems will “walk backwards” when the Undo key is pressed. By default, Photoshop will dance a two-step: undo/redo, undo/redo. To change this requires you to access your Keyboard Shortcuts.
History States Use RAM
 History states are stored only in RAM. If you close a document or your computer crashes, you lose your multiple undos. Be sure to save your work frequently.

Step 1. Choose Edit>Keyboard Shortcuts or press ![]() .
.
Step 2. Access Shortcuts for Application Menus and twirl down the Edit Menu category.
Step 3. Delete the shortcut for Undo (which is set to ![]() . Leave this field empty.
. Leave this field empty.
Step 4. Change Step Backwards to ![]() and accept the suggested changes for the History palette as well. Step Backwards will revert you to an earlier version of the document.
and accept the suggested changes for the History palette as well. Step Backwards will revert you to an earlier version of the document.
Step 5. Change the Step Forward command to ![]() if that is what your NLE system uses. Don’t worry that you are replacing the proof colors shortcut, that’s for print use only. Step Forward is used to move forward through states of a document after undos have been performed.
if that is what your NLE system uses. Don’t worry that you are replacing the proof colors shortcut, that’s for print use only. Step Forward is used to move forward through states of a document after undos have been performed.
Step 6. You can save and back up your custom settings, or just click OK to apply them. This will speed up your access to multiple undos and make Photoshop act more like your NLE.
History States = Multiple Undos
Photoshop supports up to 1000 levels of undo. These history states eat up RAM, however. Set yours to taste, but I recommend a number less than 100 for better performance.
The History palette is not the most visible window. Most users have it shrunk down to just a few lines; some have it hidden completely. To make this wonderful palette more accessible, dock it in the palette well. Drag the tab to the upper right corner of your screen. The History palette will dock itself in the Options bar, always ready, never in the way.

Think of the History palette as an edit assistant that tracks your every move. As you move forward through your project, you can instantly jump back as many steps as you need. If you are decisive, set your history state number lower. If you are experimental, leave this number high. Every time you click and make a change that affects your canvas, that change is recorded. You can now access this list visually with the mouse, or through keyboard shortcuts. Take a deep breath, and jump in the pool of creative thinking.
Performing Multiple Undos
The best way to understand the History palette is to simply try it out. For this exercise you will regress a little and finger paint. This is a great opportunity to try out the flexibility of Photoshop’s Brushes.

Step 1. Create a new document sized for video using the NTSC D1 720×486 pixels template.
Step 2. Start painting an abstract background that you could use in your next video or motion graphics project. Combine different brush strokes and colors. Don’t hold back; just create.
Step 3. Continue to experiment until you are satisfied with the image. After you’ve finished painting, look at what you’ve created.
Step 4. Select the History palette tab (if not visible choose Window> History).
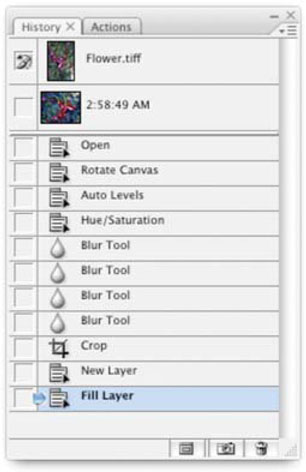
In the History palette you will see a comprehensive list of every step you took (up to your number of history states limit). Your final step is highlighted at the bottom of the list. To go backwards, click on the state you wish to return to. The change is instant.
The speed and flexibility of the History palette will let you explore different approaches without having to keep multiple copies of an image open. For those who prefer keyboard shortcuts, cycling through your undos will take you backwards through the History palette. Earlier you changed the Redo key to ![]()
![]() under the Keyboard Shortcuts window,; this is a faster way to access previous history states.
under the Keyboard Shortcuts window,; this is a faster way to access previous history states.

By default, you should be working with history states using the linear mode. This is the standard mode for the History palette; it can be accessed by going to the palette’s submenu. Click on the small triangle on the right corner of the palette’s tab. Choose History Options and make certain the Allow Nonlinear History box is unchecked.
As you step backwards through each state, you should notice how states become grayed out and italicized. This lets you know that you are working in the linear mode. As you move backwards, Photoshop is alerting you that these steps are undone. Moving forward, by applying a change to the image, will result in these grayed items being dropped off the list. Once an item has been removed from the History palette, it is gone.
It is very important to remember that the History palette is tied to RAM. Power failures, computer crashes, or kicked power strips will all interrupt your computer’s power supply and, therefore, your RAM data. Do not think of the History palette as a replacement for saving your work. It’s also important to note that the history information is not stored with the document when you save it.
The History palette for a specific document resets each time you open that document. However, you can toggle between open documents, and each will retain its own history states and levels of undo. Program-wide changes to palettes, user preferences, actions, or color settings are not recorded to the History palette.
It is possible to create your own time-stamped backups. Photoshop can automatically create a snapshot each time you save. Snapshots are useful, but are only temporary, because they are stored in RAM.
Using Snapshots
A snapshot is exactly as its name implies, a captured moment in time. Making a snapshot creates a point that you can quickly jump to (think of them as digital breadcrumbs). Proper use of snapshots will expand flexibility. Since the changes are stored in RAM, you can jump from one point to another very quickly.

Making a snapshot is easy. At the bottom of the History palette, click on the Create New Snapshot icon (the icon looks like a camera icon). If you want more advanced options hold down the ![]() key when clicking. This will give you advanced options, including the ability to name the state when you create it.
key when clicking. This will give you advanced options, including the ability to name the state when you create it.

Snapshots appear at the top of the History palette. Photoshop will create the first snapshot by default when you open the document. This gives you a very quick return path to revert to the original document, and is significantly faster than reloading the file back from disk. You can add new snapshots whenever you want a milestone to return to. Photoshop supports more than 1000 snapshots, depending upon available RAM and scratch disk space.
One particularly helpful option for snapshots is to have Photoshop create a new snapshot every time you save. This is similar to the “attic” or “vault” features of many nonlinear editing systems. To access this feature, access the triangular submenu in the History palette. Choose History Options and enable the Automatically Create New Snapshot When Saving check box.
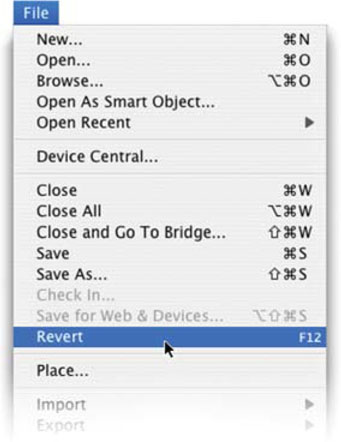
Revert is slow and painful. Your computer has to reload the original file into memory. Instead, use the first snapshot for an instant “go back to start” jump.
Now each time you save your document, a new snapshot will be generated. Jumping between different versions is as simple as clicking on the icon for each in the History palette. Photoshop names the new state with the exact time it was created. This feature is invaluable when the client or producer is sitting next to you and wants to make “just a few” changes. It now becomes possible to jump through numerous hoops, yet always return to any given point in a near instant.
Saving Snapshots
 Be sure to check out Adobe Evangelists (http://wwwadobeevan-gelists.com) for their great tips and actions on using the History palette. One killer action, Saving out Snapshots, allows you to create new documents from each snapshot (up to five) with just one click!
On the subject of frequent changes, you can generate a new document from any history point by clicking the Create New Document icon at the bottom of the palette. This will open a new document (with its own History palette) based upon your current history state. Dragging a snapshot on the Create New Document icon will create a new document based on that state. This is identical to a common editing practice of making a duplicate sequence before undertaking significant revisions.


Linear versus Nonlinear Mode
While nonlinear video editing saves time and adds flexibility, the nonlinear mode of the History palette is not as useful. By default, the nonlinear option is disabled, for good reason. The nonlinear mode opens up an incredible amount of increased flexibility, but making sense of that flexibility often becomes a brainteaser not worth solving.
The Nonlinear History mode can be accessed from the History palette submenu. When enabled, a user can go back in time and make changes without losing the subsequent history states. In practice, this can be seen as branching. You can jump back to step 3 and design in a new direction. Your old steps (which are currently unused) still appear at the bottom of your list; they do not drop off.
While editing video in a nonlinear fashion may seem natural, most users (rightfully) avoid this option in the History palette.

The designer eventually needs to make a choice: return to the bottom of the list, thus abandoning the sidetracked design, or manually remove the unwanted items at the bottom of the list by dragging them onto the Delete (trash can) icon. Sound confusing? It is. A more logical approach that does not involve organizing “alternative realties” would be employing the previously mentioned Create New Document feature. Other users prefer using multiple snapshots to simplify this process.
Using the Edit History Log
Have you ever wished that you had someone to take notes while you worked? Well now you can. … Photoshop can help keep careful track of what’s been modified or done to a file. This can be useful for several reasons:
• You are experimenting and would like to track the design process.
• You need to be able to explain to a peer or a client what changes were made.
• You need to show for legal purposes what sort of modifications have been made to an image (such as images used in forensic videos).
To use the History Log, you must enable it in your General Preferences group by pressing ![]() .
.
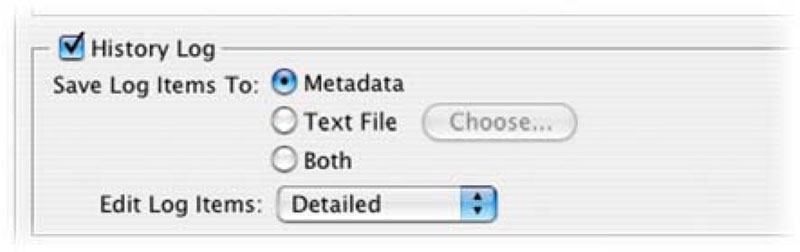
Step 1. In the History Log Options pane, specify how you want to store the log information:
• Metadata to store log info in the metadata of each file.
• Text File to export the text to an external file.
• Both to store metadata in the image file as well as in a text file.
Step 2. From the Edit Log items menu, you must choose what to store:
• Sessions includes information for each time Photoshop is launched or exited. It also tracks each time files are opened and closed.
• Concise includes the text from the History palette as well as the Sessions information.
• Detailed to include Actions palette in addition to the Concise information. Detailed will give you the complete history of a file.
If storing the information as metadata, keep in mind that it adds to your file size. This can slow down the opening, saving, and closing of a document. However embedding the information is convenient, as it is stored with the file. To view the metadata, look in the Metadata window of Adobe Bridge.

What are Those Weird Brushes?
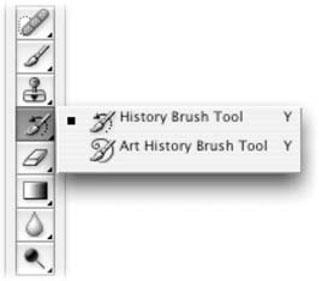
Your toolbox contains two tools with the word history in their titles: the History Brush tool and the Art History Brush tool. Both of these tools require you to use snapshots to define the source of the brush. The first tool lets you paint backward in time. The second tool is used to create impressionistic painting effects. The best way to understand these tools is to see them in action.
History Brush
Let’s give the History Brush tool a try. You can open any source photo with a single subject. You may use the photo called Ch07_ Fish.tif, which can be found in the Chapter 7 folder on the DVD. Ensure that Photoshop created a new snapshot when the document was opened.
These two brushes have very little to do with multiple undos. But you can paint back in time or create a painterly look with them.
Step 1. In order to see the brush in action, you’ll want to filter the photo. Choose Filter>Brush Strokes>Crosshatch. You may use the default values or modify to create your own. Click OK to apply the filter.
Step 2. Examine the image closely. Notice how the photo is now filtered evenly, including facial details. By employing the History Brush tool, you can restore this missing information.
Step 3. Click next to the desired snapshot in the History palette so the Paintbrush icon becomes visible. By default, the icon will already appear next to the original snapshot (which will work for this exercise).
Step 4. Select the History Brush tool from the Toolbox. Using the History Brush, you can paint back the unfiltered photo. This is a good idea for restoring missing facial detail. Paint in detail to restore the image near the eyes and mouth.
Using the History Brush tool, it is possible to “paint backwards in time.” The first image is the original, the second is filtered, and the third has details painted back into the face and mouth area.

Before the History Brush tool, designers would often duplicate the photo, filter the top copy, and then erase back down to the unfiltered version below. The History Brush is essentially giving you the same results without the need for extraneous layers.
Art History Brush
So the History Brush can be truly useful. But what about that other one? The Art History Brush is an attempt to simulate natural media effects. You deploy it in an identical way to the History Brush. You will also notice advanced features in the Options bar that affect the shape of the strokes, as well as tolerance and style.
These two images were created using the Art History Brush tool.

Want to Try the Art History Brush?
 If you’re looking to give f the Art History Brush a spin, you’ll find two tutorials in the Chapter 07 folder. They were written by Daniel Brown and Julieanne Kost from www.AdobeEvangelists.com.
The end result will vary, but the official stance is that you can create paintings from photos. This is often useful for backgrounds, but the Art History Brush toolis not always a practical tool for a deadline-focused environment. Getting good results will often take a lot of time. Other alternatives would include filters or third-party applications like Syn-thetik Software’s Studio Artist or Procreate’s Painter. This is an interesting area to explore, but not an essential skill for use in digital video.
Don’t Panic!
If you get a scratch disk warning, it’s not the end of the world. Photoshop uses RAM to store open documents; when RAM fills up, it switches to scratch disk space. It is a cosmic law that hard drives will eventually fill to capacity. If this happens to you, there are four possible solutions:
1. Purge your history states, undo memory, and clipboard to finish the current task. (Choose Edit>Purge>and the approporiate category).
2. Buy more RAM.
3. Back up old files on your drive then trash and erase.
4. If you have multiple drives or partitions, specify them as additional scratch disks (Preferences>Performance or Plug-Ins and Scratch Disks).

Hands On | 07
Creating a DVD Overlay for Motion Menu Design
The art of DVD menu design is an evolving practice. One of its most enjoyable aspects is the creation of motion menus. These can give your DVD a truly polished look. Motion menus will often use a black & white (or subpicture) highlight layer. This layer is used to signify overlays that will be placed over the motion background when a button is highlighted.

Creating buttons for a motion menu can be a time consuming task, figuring out the highlights, complex selection techniques, and getting the perfect edge. Unless you do it the east way! This tutorial will show you two approaches that work very well for both Adobe After Effects and Apple’s LiveType. You can adapt the techniques to work with other motion graphics software as well.

You’ll find Exercise 07 on the DVD-ROM.
PROfile: Greg Mitchell

Greg Mitchell is a well-established creative director who has completed Avid’s Master Editor Workshop. Not content to just cut and dissolve his way through a timeline, Mitchell is a big fan of graphic-rich videos. Before he co-founded his own company, Greg worked as a producer/editor for a full-service production facility.
“It’s funny to think how I used to long for the green grass over at the big post houses in town. Hearing about those cool boxes with names like Flame, Smoke, Flint, etc., used to make me all warm and fuzzy inside,” said Mitchell. “I love compositing – ‘going vertical’ as I like to call it – stacking track upon track, layer upon layer. Using all sorts of crazy plug-ins, transfer modes, and processors to rack focus back and forth through gooey glowing layers of all sorts of what-have-you… yum. I often felt compelled to outsource stuff just to get that high-end look that my clients expected, because that’s what they saw on TV every night.”
Fortunately the current crop of digital tools allows Mitchell to produce a high-end look right from his desktop.
“I have always been fairly comfortable mixing it up (Photoshop and Avid have always been a match made in heaven). But it has not been until the past few years that a technology has existed that really allows the two worlds to integrate so seamlessly (and affordably!),” said Mitchell. “With the advent of the ‘Holy Trinity’ (Photoshop, After Effects and Avid or similar NLE), all of a sudden I’ve got my own little incendiary device that’s warming me up just fine. Photoshop is no longer just a high-end title generator for my NLE. It’s now the springboard for some pretty wild creativity in the edit suite.”
Although most of Mitchell’s work is only for the small screen, he cautions against building graphics at low-resolution. He says that higher resolution graphics allow more flexibility in compositing and for dealing with client requests.
“I develop all graphics using Illustrator and Photoshop, making sure that the art is vector or at least very big (e.g., 300 dpi). Even if you’re only creating some elements for video that don’t need to be any bigger than 720×540 pixels, you would be surprised how often your client will ask you to ‘send me those graphics you made for the video so I can make an 8×6 ft. banner out of it,’” said Mitchell. “Once you’re happy with your design, just make some copies and dumb them down for video… 720×540 - 72dpi, flatten the image with an alpha channel, and you’re ready to import and edit.”
Mitchell says he relies heavily on Avid’s ability to import layered Photoshop files with alpha channels intact. He will frequently animate right within the Avid to take advantage of its ability to sync audio. He says his emphasis on graphics to complement his stories is essential to meet clients’ demands.
“If you are not interested in expanding your craft beyond classic video editing, you may soon be facing some fierce competition in the marketplace (if you’re not already),” said Mitchell. “Though forever a staple of video editing, cuts and dissolves alone just don’t cut and dissolve it anymore. At least not with the clients I’ve been working with. The most successful editors these days are the ones who are just as comfortable working in a graphics program as they are in their NLE.”
Greg recently co-founded JuiceBox Design Communications, Inc. in 2001 (www. juiceboxdc.com). A company founded and operated by creatives, it’s like an agency, only without all the suits.
