
3
Choosing and Using Lenses

THE IMPORTANCE OF QUALITY
Lenses are critically important to the quality of your images because, among other things, they focus the light that’s recorded by the imaging sensor. Some lenses do this better than others. We believe that it’s more important to buy the best lenses you can afford instead of the most expensive camera. Quality lenses excel at focusing light, so the images are sharper (assuming the photographers do their part), provide good contrast, and deliver accurate colors. A good lens is easy to use and rugged enough to not break easily. You might think all lenses should meet these standards, but lenses built for serious photographers who use their equipment a lot tend to be far more durable than the vast majority of lenses, which are made for consumers who don’t use their gear very much. Lens manufacturers know how to make high-quality lenses, but quality pushes the cost up, and many manufacturers build lenses for those who don’t want to spend too much money on their hobby, as well as the lenses for those who demand quality. No matter what price range, all lenses we’ve seen in our workshops lately have done a good job.
AMATEUR VS. PRO QUALITY LENSES
What lenses you should buy depends on your budget and demand for quality. If you don’t need the absolute best quality, you can save a bundle on lenses. If you’re a stickler for quality, consider the lenses built for serious photographers.
However, many times a much higher price has more to do with added features that you may or may not need. For example, Canon offers EF, EF-S, and the L series lenses. The EF lenses are their less expensive line of lenses. These are quite good and we use some of them with fine results. The L series lenses are made with special lens elements that deliver extremely sharp images, they tend to be faster than EF lenses, and may have other features such as image-stabilization. Of course you pay a price for all of this. The Canon EF 35 mm f/2.0 lens is about $230 while the Canon 35 mm f/1.4L USM costs $1120, a difference of $890! Whether the price
difference is worth it really depends on your needs. The 35 mm f/1.4L USM lens is one stop faster than the non-USM lens, so the glass elements are larger, making the lens weigh more. The letter “L” indicates this lens uses the best optical elements, so you can expect it to be a tiny bit sharper than the other lens, especially when shooting it wide open at f/1.4. If you stop both lenses down to f/8 or f/11, the sharpness difference isn’t really significant. Lens elements of high-optical-quality glass are especially critical to the design of zoom lenses to ensure the lenses are satisfactorily sharp throughout their focal-length ranges. The faster speed of an f/1.4 lens does make it a bit easier to shoot hand-held in dim light, so it would appeal to street and sports photographers. The term USM means the f/1.4L lens has an interior ultrasonic motor that makes for speedier autofocus, something very important for action photos, if not for landscapes. In this case, we don’t feel the difference in price is worth it to landscape photographers who tend to stop down the lens to f/16 for greater depth of field and who use a tripod most of the time.
This isolated euphorbia tree in the Maasai Mara of Kenya is nicely illuminated with golden light near sunset. The awesome black storm clouds to the east are a wonderful added bonus.

The other lens category is the Canon EF-S lenses. These lenses are made lighter and smaller because they’re designed for the smaller image circle appropriate to cameras with small sensors, i.e., cameras with a crop factor. However, the smaller image circle won’t fully cover a full-frame sensor, so the EF-S lenses are generally not used on full-frame cameras. The whole point of this discussion is to show that it’s futile to compare lenses by price alone. You must read about the lenses you’re considering and carefully determine why some are more expensive than others, even though they are the same focal length. Glass quality, and features such as image-stabilization, fast autofocus, and lens speed all play a part in determining the price of a lens.
LENS SPEED
This has nothing to do with how fast a lens can run or how fast it can deplete your bank account. Lens speed refers to how much light a lens can pass. A 300 mm lens with a maximum speed of f/8 is considered a slower lens, while a 300 mm f/2.8 lens is faster because it passes three additional stops of light. Action photographers appreciate fast lenses because the reciprocity principle allows the faster shutter speeds needed to freeze action. This is especially true if they must photograph in dim light, such as during a night football game. If proper exposure at ISO 400 is 1/60 at f/8 and the lens used is a 300 mm f/8, you won’t be stopping the action of many running backs. If your lens speed is f/2.8 (three stops faster than f/8), then you can now use an exposure combination of f/2.8 at 1/500, making sharp images far more likely.
The warm early morning sun bathes this monument while a snowstorm begins to break over the Sierra Nevada Mountains to the west. It’s erected at the Manzanar National Historic site where Japanese and Japanese-Americans were interred during WW II. Since nothing is moving, use f/16 depth of field to capture detail in the distant mountains. In this instance, lens speed isn’t important.

Faster lenses need larger optical-glass elements, so these lenses are bigger, heavier, and more expensive than slower lenses. On the other hand, a fast lens allows higher shutter speeds more easily, the viewfinder is brighter, and the autofocus may also be quicker. What makes the most sense for a landscape photographer? We wish a definite answer was forthcoming, but the right answer depends on your own needs and budget.
We were recently faced with this choice when John decided he needed a Canon lens that covered the 70 – 200 mm range. Our logic in deciding which one to buy might help you decide, too. Canon makes three 70 – 200 mm zooms and all of them are L lenses. The three lenses we had to choose from were the 70–200 mm f/4.0L USM, the 70 – 200 mm f/4.0L USM IS, and the 70 – 200 mm f/2.8L USM. All three lenses were USM lenses with the ultrasonic motor for fast autofocusing, so that wasn’t a factor. The f/2.8L lens was the biggest and most expensive of the three. John’s lens would be used primarily for landscapes, and carrying heavy gear a long distance is a problem, so we dropped this one from consideration. Now we could choose between the two 70 – 200 mm f/4.0L lenses. One has image-stabilization (IS) and one doesn’t. The IS lens is twice as expensive. Image-stabilization is useful in handheld photography because it helps get sharp images when slower shutter speeds are used. We nearly always use a solid tripod when shooting landscapes, so image-stabilization wasn’t important, so we bought the 70 – 200 mm f/4.0L lens that was half the price of the other one and a lot lighter to carry. We have used that lens for two years and know we made the right choice for our particular needs.
Landscape photographers have an advantage over action photographers because expensive lens features are usually unneces sary for serious landscape work done slowly and carefully on a sturdy tripod. This means you don’t need to spend nearly as much money or carry as much weight to be well equipped for your landscape work. We agree your choices are more difficult if you love to shoot landscapes and also like making close-ups or photographing wildlife. We photograph all types of nature (except underwater — John can’t swim!), so we often have to make trade-offs in our lens choices. If you, too, do other kinds of photography, then you must decide if perhaps you really do need a faster lens or image-stabilization.
PROS AND CONS OF FAST LENSES
We like them because:
1. A fast lens passes more light, so it’s easier to use fast shutter speeds.
2. A fast lens gives a brighter viewfinder, improving the ease of focusing and composing.
3. A fast lens is generally built with the best optical glass, so it’s sharper, especially wide open.
4. A fast lens has a larger aperture, such as f/2.8, giving less depth of field when wide open, making it easier to defocus an objectionable background.
5. A fast lens does autofocus faster and more accurately.
But, on the other hand:
1. A fast lens is more expensive than a slower lens of the same focal length.
2. A fast lens is heavier, so hand-held shooting will be more difficult.
3. A fast lens is heavier, so just lugging it around may be a problem.
4. A fast lens is bulkier, so it takes up more room in your camera bag.
5. A fast lens generally requires larger filters, which add to the weight and cost.
IMAGE-STABILIZATION
Canon has offered image-stabilized lenses for many years. Other manufacturers have only recently introduced lenses incorporating moveable elements that compensate to some degree for wiggling cameras and reduce the apparent movement. Canon calls these image-stabilized (IS) lenses, and Nikon calls them vibration reduction (VR) lenses. Whatever the terms used, they do similar things to deliver sharper images. Some companies have built an anti-shake mechanism right into the camera body. Sony’s Super Steadyshot is built into the camera body and, like VR and IS, reduces the negative effects of camera movement. Moreover, it works with any lens that can be used by the Sony camera.
These anti-shake mechanisms do help photographers who shoot hand-held get sharper images at lower shutter speeds. A common rule of thumb states you can safely shoot hand-held if the shutter speed used is 1/(focal length) or faster. For example, if you’re using a 200 mm lens, plugging the 200 mm focal length into the formula shows you need a shutter speed of at least 1/200 second to ensure sharp images. Naturally, this depends greatly on how steady a shooter you are to begin with. Using an anti-shake lens or camera body, photographers can shoot at two shutter speeds slower than the formula suggests, and sometimes more, but this is debatable. With the 200 mm lens, using anti-shake technology can deliver sharp hand-held images at 1/50 second shutter speed. It’s clear that anti-shake helps deliver sharp images, but don’t overly rely on it. Too many photographers shoot hand-held at shutter speeds far too slow for handheld photography, with or without anti-shake.
We find limited use for anti-shake features in our landscape photography because we shoot on a sturdy tripod whenever possible to have complete control over focus, depth of field, and image sharpness. Anti-shake technology might, in a very few cases, eliminate the need for the stabilization benefits of our sturdy tripods, but we’d continue to faithfully use the tripods because of their value as aids to composition. That doesn’t mean there’s little use for anti-shake technology in landscape photography. There are times when it’s awkward or impossible to use a tripod. It’s difficult to use a tripod in mounds of powdery snow, so anti-shake systems do help deliver crisp images there. However, we normally pack the snow down with our feet and still use a tripod. We have often used Canon’s IS lenses and Nikon’s VR lenses to photograph the gorgeous rock formations along the Lake Superior shoreline between Munising and Grand Marais on Michigan’s beautiful Upper Peninsula. Anti-shake technology is terrific for photographing from boats! We’ve been to Antarctica twice (awesome trips!), and we know we could make good use of anti-shake lenses while photographing icebergs from our Zodiacs, the inflatable boats perfect for cruising the ice fields.
It’s difficult to use a tripod in several feet of soft snow, so John used a Canon 24–105 mm f/4 IS lens hand-held to capture these “ghost trees” on Two Top Mountain. He used ISO 200 for more shutter speed, sat down in the snow, rested his elbows on his knees, and gently tripped the shutter to achieve excellent sharpness.

The anti-shake systems of some (but not all) lenses should be turned off when shooting on a tripod. Even if the camera isn’t moving, the anti-shake mechanism may activate to look for shake and cause some of its own. However, there are times when you have camera movement even on a tripod. Anyone who has used a tripod in a howling wind knows what we mean, so if it’s a windy day, use your anti-shake even when using a tripod. It can help! But always follow the maker’s recommendations about whether to use anti-shake when on a tripod.
The number of focal lengths contained in a single zoom lens is enormously helpful to landscape photographers. Barbara used her Nikon 70 – 200 mm lens to isolate these dead lodgepole pines in the fog.

ZOOM LENSES
WHAT’S A ZOOM LENS?
The Canon 17 –40 mm f/4.0L USM, the Nikon 18–35 mm f/3.5 – 4.5, the Sony 24 – 105mm f/3.5 – 4.5, and the Tokina 19–35 mm f/3.5 – 4.5 are all wide-angle zoom lenses that work well for landscape photography. A zoom lens can change its focal length over a certain range. For example, the Nikon 18–35 mm lens can be adjusted to any focal length from 18 to 35 mm. Some zooms cover a much broader focal length range than others, although zooms with very broad focal length ranges are more difficult to build, which often results in a lower optical quality. Notice that some zoom lenses, such as the Canon 17 – 40 mm f/4.0 lens, have a constant maximum aperture, whereas other lenses, like the Tokina 19 – 35 mm f/3.5 – 4.5, have an aperture that smoothly changes from f/3.5 at the 19 mm focal length to f/4.5 when the lens is zoomed out to 35 mm.
Lens makers have offered two kinds of zoom lenses. The so-called push-pull zoom is operated by pushing or pulling back and forth a collar that’s around the lens barrel to change the focal length. The other kind of zoom lens has a shorter collar around the lens barrel, generally called a ring, and one turns this ring clockwise or counterclockwise to change the focal length. Both types work fairly well, but we prefer changing the focal length by turning a ring, rather than by pushing or pulling a collar. We like the greater precision of turning a ring, and we like that dust ingress seems less problematic with the ring zooms. We heartily dislike the irritating gravity-induced tendency of some push – pull zooms to zoom this way and that whenever the camera is pointed up or down.
DO ZOOM LENSES DELIVER QUALITY IMAGES?
Serious photographers shunned zooms when they were first introduced many years ago. Those early zooms were physically fragile and, perhaps worse, optically poor and gave soft images. Today, though, they’re much sharper and far more durable, especially the better lenses made for serious photographers. Get lenses with low-dispersion glass, if they’re available from your lens manufacturer. It’s still true that an excellent fixed focal length lens is slightly sharper than the best zoom lenses, but the difference is so minuscule that it’s no reason to avoid zooms. Skilled photographers use their quality zoom lenses to produce consistently excellent results, so don’t shy away from them.
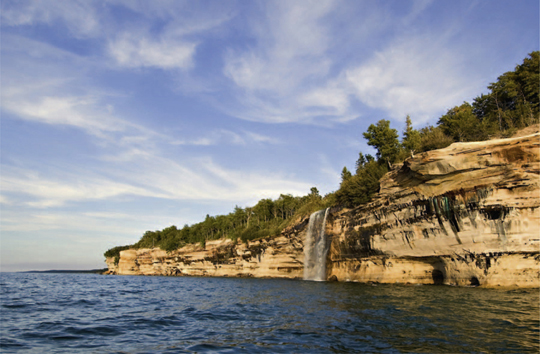
A zoom lens with VR technology is an awesome landscape photography tool. Not only does it permit you to easily adjust the composition of your image, but it makes it so much easier to shoot sharp images when you must shoot hand-held from a boat, such as the scene of Spray Falls along the coast of Lake Superior.
ZOOM LENS ADVANTAGES
In many cases, you must have a zoom lens or you won’t get the image. Years ago we shunned the early zoom lenses and used only fixed focal-length lenses, so we often missed nice images altogether. Many good landscape locations in parks are viewing platforms, from which it’s against the rules to get off, and perhaps dangerous. Murphy’s well-known law states that, if you’ve packed your 24, 35, 50, and 100 mm lenses and have hiked a long way uphill to your remote viewing location, you’ll find that you really need exactly 75 mm for the shot, so you don’t get that composition. Two zoom lenses covering focal lengths from 17 to 120 mm make every composition within this range both possible and convenient.
Zoom lenses are enormously useful to landscape photographers because they offer so many focal-length choices in a single small package. Not only does that focal-length cornucopia ease your compositional burdens, but you won’t have to remove and replace lenses so often. That’s more efficient for you, and it reduces the chance of dust entering the interior of the camera where it’ll surely end up on the sensor. A couple of zoom lenses usually weigh much less than several fixed focal-length lenses covering the same range, take up less room in your camera bag, and are less expensive too!
When photographing the Grand Canyon of the Yellowstone with your Canon 100 – 400 mm f/4.5 – 5.6L zoom, you’ll be pleased that only a single 77 mm polarizer covers your entire range of focal lengths. Your shooting pal with several prime lenses may have to lug around (and pay for) several different polarizers.
ZOOM LENS DRAWBACKS
It’s not surprising to find that zoom lenses are somewhat more fragile than prime lenses because they have many more parts and many more moving parts. Our own experience bears this out. Be especially careful with them in cold weather, too. We’ve had students in our winter tours of Yellowstone National Park bring a zoom lens into a warm room without first putting it in a tightly closed plastic bag. Condensation immediately covered the lens and formed inside the lens, even on the glass elements. The students spent all night trying to dry the lens out by baking it in an oven at 90°F. Caution! Notice carefully the F in the preceding statement! When the students tried to use the lens the following morning in below-freezing temperatures, residual moisture inside the lens froze, making it impossible to zoom the lens.
We’ve already noted that some push – pull zoom lenses zoom all by themselves when they’re pointed up or down and that fixed focal-length lenses don’t have this problem. We should mention, though, that some push – pull zoom lenses, such as the Canon 100 – 400 mm, have a locking collar to eliminate the zoom slippage.
Zoom lenses tend to be slower than comparable fixed focal-length lenses. For example, the Canon 75–300 mm zooms are f/5.6 when zoomed out to 300 mm. The two Canon 300 mm prime lenses have speeds of f/4 and f/2.8, both faster than any of the Canon lenses that zoom to 300 mm.
VARIABLE APERTURE ZOOMS VS. CONSTANT MAXIMUM APERTURE ZOOMS
The aperture varies during zooming on most zoom lenses, but not all. The Canon 28 – 300 mm f/3.5 – 5.6L lens has a variable aperture that loses 1 1/3 stops of light as the focal length is changed from 28 to 300 mm. The Canon 70 – 200 mm f/4L doesn’t lose lens speed (i.e., vary the aperture) as it is zoomed from 70 to 200 mm. Let’s explore the pros and cons of these two types of zoom lenses.
Variable aperture zoom lenses don’t need such a large front glass element because the maximum aperture is allowed to get smaller. This means these lenses tend to be lighter, smaller, and less expensive than zoom lenses that have a constant maximum aperture. On the other hand, as the aperture of a variable aperture zoom gets smaller as the lens is zoomed out, the viewfinder becomes darker and it becomes more difficult to see composition, to maintain high shutter speeds, and to discern critical focus. Even autofocus performance may become problematic at reduced apertures.
Constant aperture zoom lenses, on the other hand, tend to be bigger, heavier, and significantly more expensive because of the larger pieces of optical glass in the lenses. However, their faster lens speeds provide a brighter viewfinder, permit easier manual focusing, better autofocusing in dim light, and allow faster shutter speeds at the longer focal lengths. Both types of zoom lenses will permit you to shoot fine images. The choice between variable and constant maximum aperture zoom lenses depends on your budget, how much space and weight you’re willing to devote to them, and the particular features you need. There’s no wrong answer, so choose what you like. Barbara and I tend to buy constant maximum aperture zooms when they’re available.
A short zoom lens easily frames this autumn scene along Lake Superior. Since it doesn’t cost anything to shoot digital images, Barbara shoots many images to catch the waves when they’re in the most attractive position.

Due to gravity, many push – pull zoom lenses zoom all by themselves when pointed up or down. Some zoom lenses have a tension device that can be tightened to prevent unwanted zooming. Lacking the tension device, try a wide rubber band around the lens barrel to lock in the preferred focal length. Here’s Yellowstone’s Lower Falls from the brink, which has a convenient viewing platform.

FIXED FOCAL-LENGTH LENSES
The Canon 300 mm f/4.0L IS USM, Nikon 50 mm f/1.8D AF, and Sigma 20 mm f/1.8 fisheye are all examples of lenses where the focal length is fixed. These prime lenses have but one focal length, which can’t be varied. It’s a fixed attribute of the lens. When using a camera with a crop factor, remember that the focal length of the lens doesn’t change, but the angle of view and its resulting field of view does. Fixed focal-length lenses are usually faster than zoom lenses set to the same focal length, and they’re a bit sharper as well. This sharpness difference is definitely present, albeit not great. It’s easier to maximize the sharpness at a single focal length than over the full range of focal lengths covered by a zoom. Moreover, fixed focal length lenses generally have fewer elements than a zoom lens, and fewer elements translate into greater flare resistance. You’ll notice this flare reduction when you’re pointing your prime lens toward the sun.
We do prefer prime lenses over zooms at focal lengths of 300 mm and greater. An important exception is the superb Nikon 200–400 mm f/4 VR zoom, which we like a great deal. The accurate focusing and faster shutter speeds of prime lenses are critical when using long telephoto lenses, such as our 500mm f/4 lenses. Admittedly, we don’t use these lenses much for landscape photography. Prime lenses are more widely used by wildlife photographers and by macro specialists, whereas zoom lenses are generally preferred by most landscape photographers, including us.
These bison are searching for grass along the Madison River in Yellowstone. Even though it’s cloudy, it’s wise to use a lens hood to prevent light from striking the glass at an odd angle, which can cause flare and a loss of contrast. The lens hood keeps snowflakes off the glass too.

These incredible underground formations in Carlsbad Caverns, New Mexico, are illuminated by weak artificial lights. Lenses that have a maximum aperture of f/2.8 or even f/2.0 make it easier to focus and compose the image.

PROTECTING YOUR LENS
LENS CAPS AND CAMERA BAGS
New lenses generally come in a protective covering, and we use them when traveling. The lens is the second most critical component of shooting sharp, clear images, so always keep it clean and well protected from impact shock. Second? Yes, the lens is number two. John and I are convinced the number one most critical component of sharp clear images is your own shooting technique, and later we’ll cover it in Chapter 5.
However, these protective pouches make it harder to access the lenses when changing them, and they slow your operations. The assumption of landscape photography as a slow and deliberate pursuit is often valid, but occasionally shattered by a fantastic but fast-fleeting light illuminating your subject. Then you need to move rapidly, and your pre-shooting planning might need to take that into account. We find it faster to always keep both the front and the rear lens caps on, but carry each lens in plain view in a well-padded camera bag having adjustable compartments so that each lens can fit snugly in the bag. It’s wise to always keep the lens caps on unless the lens is used. Yes, it may slow you down a bit, but you don’t want dirt to settle on the optical glass, and a hard foreign object scratching your glass can surely spoil your day. Additionally, dirt and scratches seriously degrade image quality and diminish the resale value of the lens. By the way, your authors are happy with the Lowepro Photo Trekker AW II photo backpacks we have used for many years (www.lowepro.com).
LENS HOOD
The lens hood, sometimes called a sun shade, offers two important benefits to your photography. The first is that it helps protect your lens against impact damage and against damage to the front glass element, such as scratching. Secondly the substantial reduction in detrimental lens flare under certain shooting circumstances. Nothing adds more protection for your lens than religiously using a proper lens hood. Most lenses come with a well-designed hood, properly engineered to provide the maximum possible protection from flare and, at the same time, eliminate vignetting of the image corners. Consequently, it’s wise to buy only the lens hood offered by the manufacturer for your lens. A proper lens hood greatly reduces the chance that some hard object might scratch the front glass, and it may cushion the lens against damage from a fall onto a hard surface. Secondly, protection against physical damage isn’t the only benefit of the lens hood. In fact it’s main purpose is to block extraneous light from entering the lens at an unusual angle and possibly causing severe lens flare. Flare is often a problem when one’s shooting direction encompasses the sun or is close to the sun, and elimination of flare noticeably improves image contrast and color rendition.
PROTECTION FILTERS
UV and skylight filters are sold to photographers to protect the lens. In theory, if something really bad strikes the front of the lens, the protection filter absorbs the impact, reducing or preventing damage. It sounds like a smart idea but in 35 years of professional photography, it has never saved a single one of our lenses. We’re careful with our equipment, but have destroyed a couple of lenses over the years. Protection filters don’t offer much protection when lenses are dropped on cement, rocks, or over a cliff. From first-hand experience, we know the rocks at the base of a 100-foot cliff vaporize falling lenses on impact!
Quality images are important to us and the success of our business. Lenses are optimized for the glass elements they contain. Any time you introduce another glass element into the optical path, you can expect to lose some quality. All glass filters degrade the image quality a tiny bit. Therefore, we feel it’s pointless to needlessly use protection filters if you’re only looking for added protection. Be careful, use the lens hood, don’t drop the lens, and your lenses should outlast your obligation to pay taxes.
However, there are times to use glass filters. The UV filter does reduce the effects of UV light, especially at high elevations where there’s more UV light, so perhaps it does make sense to use it when shooting in the mountains. But we feel a polarizing filter is far more useful for most situations, so we haven’t owned a UV or skylight protection filter for at least three decades. Unless you can articulate a specific image-improvement reason to use a filter, don’t!
POLARIZING FILTER
By far the most useful filter for landscape photography is the polarizing filter. This filter, like certain sunglasses, reduces glare, thereby increasing the detail and the color in an image. We believe that landscape photographers should be using polarizing filters much of the time. Since this filter should be on your lens a lot, it also serves the purpose of a protection filter. After all, it does protect the front element and provides better image quality, too. We will return to the uses of the polarizer later in this chapter.
The fog in this dawn meadow stands out prominently against the black background. Barbara used her 70–200 mm zoom quickly to capture this image before the fog dissipated a few minutes later. Never assume you always have plenty of time in landscape photography!

DON’T STACK FILTERS
Light is slightly distorted when passing through the glass or plastic medium of a filter — any kind of filter. Moreover, the glass-to-air-interface at each filter surface causes an increased susceptibility to flare and loss of contrast. Those irritants, though, are often outweighed by the beneficial attributes of the filter. As an example, a polarizer can do so much good that we accept its shortcomings.
However, one set of shortcomings is enough! If we were to add a second filter, perhaps a UV filter, to the mix, then the combined distortion and contrast-robbing flare can become more noticeable. Some folks say they can’t see this degradation, but we can spot it easily when testing for it. Unless you’re absolutely petrified to use a lens without protection, we think it’s best to forego the protection filter and use one high-quality polarizing filter instead.
LENS CHOICES
You have more choices of lenses than you may realize. Lens makers offer prime lenses in many fixed focal lengths and different speeds, and they offer zoom lenses in a wide range of variable focal lengths and different speeds. This cornucopia of lenses is further expanded by selections of glass type, optical coatings, mechanical construction, and the need to decide whether you want anti-shake technology.
We shoot both Canon and Nikon, so we look closely at all of the lenses made by them. If we shot Sony, we would look first at Sony’s lenses. It seems reasonable to us that the camera manufacturer is most favorably positioned to engineer and manufacture dedicated lenses that are optically and mechanically optimized for that maker’s cameras. However, the dedicated lenses are more expensive because of market-share limitations when compared to the universal lenses made by independent lens manufacturers.
This is a Nubian vulture perched atop an acacia tree in Kenya. All extra glass surfaces greatly increase the chance of getting unwanted flare when shooting directly at the sun. Don’t use any filters and favor prime lenses (zooms have more glass elements) to reduce or avoid flare.

Sigma, Tokina, and Tamron are independent lens builders that specialize in making lenses that work on many camera systems. Sigma, for example, builds lenses for Canon EOS, Nikon, Sony/Minolta, Olympus, Pentax and, of course, Sigma, cameras. The independent manufacturers, servicing multiple camera brands, enjoy a larger market and can generally sell their lenses at a lower price. We haven’t used independent lenses for our own photography, but many of our workshop students have, and the lenses seem to deliver satisfactory images.
SUPER-WIDE-ANGLE LENSES
Any lens having a focal length of 20 mm or less is called a super-wide-angle lens. These lenses permit skillful landscape photographers to create dramatic foregrounds, to make huge skyscapes because the large field of view covers so much sky, and to shoot effectively in tight places like caves or behind a waterfall. All landscape photographers can greatly benefit from the proper use of super-wide-angle lenses.
Of all the lenses available today, it seems that super-wide-angles are the most difficult for photographers to really master. These lenses cover large areas, so be sure to check all of the frame’s edges to make certain that distractions don’t intrude into your image. Watch for sticks, patches of white sky, wires, fences, and other man-made objects that aren’t wanted. Also, be careful to make sure the horizon stays straight, rather than bowing in the middle. You must keep the lens parallel to the ground to prevent bowing of the horizon. On the other hand, there are times when, for artistic reasons, you might deliberately distort elements of the scene. Super-wide-angle lenses are especially effective for shooting straight up when surrounded by trees so the trees all lean inward.
The angle of view of a 17 mm focal length permitted us to successfully frame this gigantic cloudscape at dawn in eastern California.

These lenses are well suited for shooting images with unusual perspective. Perspective refers to the size relationship between near and far objects in the image. Positioning a 17 mm lens only one foot above the surface of a creek will cause the creek to loom large in the foreground and gradually diminish in size as the creek approaches the base of a distant waterfall. We photograph waterfalls with that technique whenever possible, because the perspective offered by the creek and the waterfall and the nice composition of the leading line of the creek can be eye-catching and appealing.
The super-wide-angle lens used here is crucial for leading you to the waterfall. By placing the camera only a couple of feet from the foreground rock, the perspective of this shooting position creates an enormous foreground that grabs your attention. Then your eye follows the stream up to the fall.
If you have a digital camera with a crop factor, you must calculate the effect of the crop factor on the performance of your wide-angle lens. For example, a 20 mm lens on a camera with a 1.5 × crop factor ends up with a field of view equal to that of a 30 mm lens on a full-frame camera, because 20 mm X 1.5 = 30 mm. The loss of the great field of view of a wide-angle lens because of crop factor was once a serious objection to cameras with small sensors. The camera manufacturers soon responded to the uproar by building special lenses made for small-sensor cameras — lenses that were wider than those made for full-frame sensors. Examples of these very wide lenses include the Canon 10 – 22 mm f/3.5 – 4.5, Nikon 12 – 24 mm f/4.0, Sony 11 – 18 mm f/4.5 – 5.6, and Sigma 10 – 20 mm f/4.0 – 5.6. The equivalent focal length of these lenses on a camera with a small sensor is merely the specified focal length multiplied by the camera’s crop factor.
Let’s consider the Nikon 12 – 24 mm f/4.0 lens when used on the Nikon D300 that has a 1.5 × crop factor. Here, the lens has the same field of view as an 18 – 36 mm f/4.0 lens on a full-frame sensor. Remember, the crop factor doesn’t actually change the focal length of the lens, but it does make it seem as if the lens gives more magnification. There are many available wide-angle prime lenses, too. You can choose from Canon’s 15 mm f/2.8, 20 mm f/2.8, and 14 mm f/2.8L lenses; Nikon’s 10.5 mm f/2.8, 16 mm f/2.8, 14 mm f/2.8, and 20 mm f/2.8 lenses; and Sigma’s 8 mm f/3.5, 15 mm f/2.8, and 20 mm f/1.8, and many others.
WIDE-ANGLE TO SHORT TELEPHOTO LENSES
Wide-angle lenses are generally considered to cover the 20 to 35 mm range, medium lenses cover the 40 to 60 mm focal lengths, and short telephoto lenses fall into the 70 to 105 mm range. Remember, when using a camera with a small sensor the equivalent field of view of these lenses, or any lens for that matter, must take the crop factor into account.
The 20 to 105 mm range is most important to landscape photographers because many good image opportunities demand focal lengths in this range. Your kit of lenses should really cover everything in this focal-length range, a need that points to zoom lenses, because it would be impracticable to fully cover the range with prime lenses. There’s nothing worse than trying to compose the Great American Nature Photograph of a wonderful waterfall, and you desperately need a 65 mm focal length but only have 35mm and 85 mm prime lenses. Here you might be tempted to trade your firstborn for the versatility of a zoom lens!
Many excellent zoom lenses are made to cover this range. John uses a Canon 17 – 40 mm f/4.0L and a Canon 24 – 105 mm f/4.0L. Both of these lenses are superb. The L in the name designates that the optical quality and durability are of professional grade. Barbara uses the Nikon 17 – 35 mm f/2.8 and the Nikon 24 – 120 mm f/3.5 – 5.6 zoom lenses. Another fine Nikon zoom that covers this range nicely, and then some, is the Nikon 18 – 200mm f/3.5 – 5.6. No matter what camera system you shoot, you should find many lenses to choose from. Again, don’t forget about Sigma, Tokina, and Tamron. Look for a couple of good quality lenses that cover this range. It’s tempting to buy a single lens to cover all or most of the 20 to 105 mm range, but there are two issues. One, the quality of some zoom lenses tends to deteriorate as the zoom ratio gets larger. Two, a single extremely wide-range zoom mysteriously failing or dropped over a cliff or into the river will put you out of business, although probably enlarging your vocabulary along the way. If you have two lenses that overlap a bit, you might still get by if the worst happens — and it will happen if you photograph long enough!
Use zoom lenses to completely cover the 20 to 105 mm focal lengths. This range is incredibly important to landscape photographers. A 24 – 70 mm f/2.8 lens, one of John’s favorites, easily frames this autumn season at Thornton Lake in northern Michigan.
MODERATE TELEPHOTO LENSES
This category includes lenses in the 100 to 300 mm range. Landscape photography invites the use of wide-angle lenses to include the very large scenic vistas often encountered. But caution is indicated! Beginning landscape photographers start out with an inclination to include everything within eyesight in the image they’re composing. As they gain experience, they learn to concentrate on smaller areas of the visible scene. Moderate telephotos are very useful for filling the image with those smaller areas that emphasize the most pleasing parts of the landscape, or for illustrating nature’s captivating patterns.
Council Lake is larger than other lakes so a zoom that covers the 100 to 300 mm ranges is useful for isolating sections of the forest on the opposite side.

Anyone who has stood on an overlook at the Grand Canyon in Arizona or Bryce Canyon in Utah sees many a possibility as they view the canyon. The overall view is magnificent, but many of the best prospective images require telephoto lenses to isolate impressive rock formations and make strong compositions. Even when photographing autumn color reflections in northern Michigan waters, we frequently use focal lengths from 200 to 500 mm to isolate the most colorful sections of the overall reflections.
The longer 100 to 300 mm range of focal lengths is also critically important to the making of many fine landscape images, so be sure to cover that range with good zoom lenses. The Canon 75 – 300mm f/4.0 – 5.6 and 100 – 400mm f/4.5 – 5.6L zoom lenses cover this range quite effectively. Nikon offers a couple of 70 – 300 mm lenses that would work equally well. Barbara presently uses Nikon 80 – 200mm f/2.8 and 200 – 400mm f/4 lenses for images that need the extra focal length. However, the Nikon 200 – 400 mm is quite large, quite expensive ($5000 range), and most landscape photographers probably won’t like either the price or the weight of this fine lens. Barbara likes it, though, because it’s a superb lens for her wildlife photography and does double duty for landscapes. Consider the lenses made by your camera manufacturer first. If you find nothing that you consider suitable, or nothing that fits your budget, look to the independent lens makers. There are many good lenses that cover this range, so you should have no trouble finding the perfect match for you.
LONG TO SUPER-TELEPHOTO LENSES
These lenses begin at 400 mm and go up from there. Lenses of 500 mm and 600 mm are most common. They’re used primarily by wildlife photographers when the subject is difficult to closely approach. They’re seldom used by landscape photographers. We use our 500 mm lenses from time to time to isolate small portions of the grand landscape, and we find them incredibly useful for filling the frame with autumn color reflections. Most landscape photographers can probably get by without such long lenses but, if you have one, use it for landscapes. Landscape specialists using something like a 75 – 300mm zoom generally prefer to achieve the longer focal lengths by using a smaller, lighter, and far less costly tele-converter. This optical accessory fits between your camera and the lens. It multiplies the focal length by the power (usually 1.4×, 1.7×, or 2×) of the teleconverter.
Photographers must employ good technique to get sharp images at longer focal lengths. Often you’ll stop down to, say, f/16 to achieve good depth of field, but that demands a slower shutter speed, which invites soft images. Even though one uses superb optics and impeccable technique, many landscape images are marred by atmospheric dirt or heat waves that reduce sharpness and contrast. In clean cool air, though, it’s possible to use a long lens in capturing images not otherwise achievable.
TILT-SHIFT AND PERSPECTIVE CONTROL LENSES
These are among the least known, most poorly understood, and underutilized lenses. Yet, they can be of great value when photographing certain subjects. Both Canon and Nikon make lenses that tilt and shift. Canon calls them TS lenses and Nikon calls them Perspective Control (PC) lenses.
The Tilt-Shift Lens
Canon makes three tilt-shift lenses: the 24 mm f/3.5L TS – E, the 45 mm f/2.8 TS – E, and the 90 mm f/2.8 TS – E. Nikon also offers three tilt-shift lenses: the 24 mm f/3.5 D ED PC – E, the 45 mm f/2.8 D ED PC – E, and the 85 mm f/2.8 PC – E. The tilt-shift lenses can be very useful to landscape photographers in certain situations because the great versatility of a view camera’s lens controls can be enjoyed by DSLR users. (Incidentally, Nikon users can ply the used-equipment markets for the discontinued Nikon 28 mm and 35 mm PC lenses that shift but don’t tilt.)
The camera gains tilt and shift capabilities by two separate controls used to solve two separate problems. First, let’s consider shift. Have you ever noticed when photographing lofty subjects, like tall trees or waterfalls or a lighthouse, that when pointing your camera upward to bring the tops of those tall subjects into the frame the vertical lines seem to converge and the subject seems to be falling backwards? The shift control will help correct this effect. To avoid the leaning vertical lines, you must keep the optical axis of the lens parallel to the ground. Point the camera straight ahead, not up. If the top of the subject is cut off, use the shift control to shift the lens upward until the top of the subject is within the frame. The optical axis has remained parallel to the ground, so vertical lines remain vertical. Software is available now that can straighten leaning vertical lines too, so a shift lens isn’t as important as it once was. Although beyond the scope of this book, you should also know that the side-to-side shift capability of these lenses has certain additional applications.
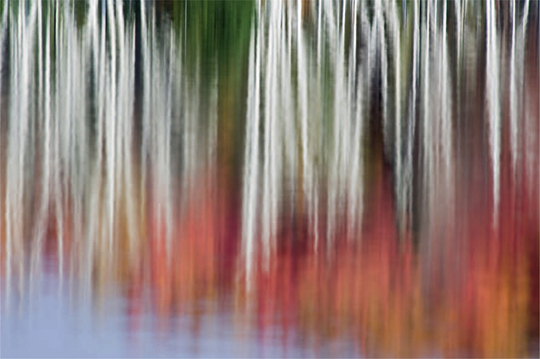
Both of us are avid wildlife photographers, so we have extensively used prime 500 mm super-telephoto lenses for years. While it might be unconventional, we often use these long lenses to photograph the landscape. The 500 mm lens enabled us to easily fill the entire viewfinder with just an autumn reflection of red maple leaves and white birch trunks.
We use tilt more than shift. The front element of a conventional lens is parallel to the camera sensor. (Remember when we referred to something called a film plane?) A tilt lens, though, can be adjusted so that it isn’t parallel to the sensor plane. The lenses can be tilted this way and that, but a common usage finds the camera sensor perpendicular to the ground and the front glass of the lens pointing slightly down toward the ground. Tilting the lens that way can provide extreme depths of field, a boon to landscape photographers. Further, the extreme depth of field is easily achieved at any aperture. Using a tilt lens allows us to adjust the camera’s plane of focus such that our foreground flower, only inches away, is in crisp, sharp focus as well as the mountain on the horizon and the clouds in the sky. And we can do that even when using f/2.8 or f/4! We get the higher shutter speeds necessary to freeze the motion of the blowing flower without any of the diffraction experienced at f/16 or f/22 when using a conventional lens. To learn more about the theory and application of the tilt lens, read a simple explanation of the Scheimpflug Principle, a name far more intimidating than the principle. (See, for instance, http://en.wikipedia.org/wiki/Scheimpflug_principle.)
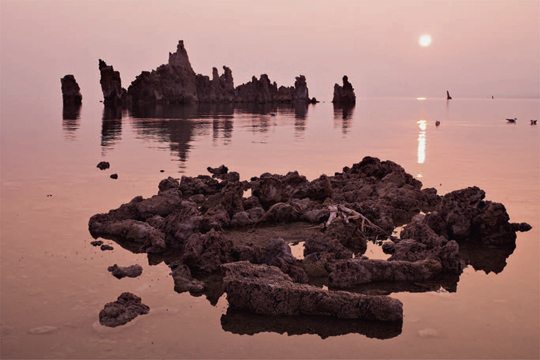
Using a Canon 45 mm TS lens easily handles the extreme depth of field these Mono Lake tufa formations present at dawn. By using a little downward tilt, the plane of focus is rotated so it passes through all of them.
Tilt-shift lenses aren’t for everyone and they’re expensive ($1000–$1800). Their mechanical construction precludes autofocus, so they require manual focusing. That’s not a big deal unless you forgot how to manually focus (!), but they’re consequently slower to use. The effects of the tilt and shift controls can helpfully be seen in the viewfinder, so simple observations confirm your lens settings. Not so helpfully, a detailed explanation of using a tilt-shift lens is far easier to demonstrate than to write. The lenses do require some understanding and experience, and perhaps your local camera store can demonstrate one, but a fundamental approach is this:
1. Set the camera to manual focus and the lens to its widest aperture.
2. Adjust the focus control to make the foreground sharp.
3. Slowly tilt the lens downward (usually) or upward (rarely) to make the background sharp.
4. Repeat 2 and 3 a few times, making slight tilt adjustments until both foreground and background are perfectly in focus.
5. Set any aperture you want and determine the exposure by using the histogram.
6. Shoot.
We’ve both used large-format view cameras in the past. When Canon introduced its TS lenses in the 1980s, we understood their benefits and we’ve been using those lenses ever since. For the new user, a tilt-shift lens offers problem-solving powers not appreciated until experienced. Then you won’t ever leave home without it.
FILTERS
Filters are optical accessories that are generally screwed onto the front of a lens, but are occasionally hand-held in front of the lens. The purpose of a filter is to modify the light entering the camera, in color, in intensity, or in many other ways. Use filters of only the highest quality, because a poor filter can have significant detrimental effects on the quality of your images. We once used various color-correction filters for our landscape images, but today, it’s so easy to adjust the color balance of a digital image in post-capture editing, especially that of a RAW image, that color-correction filters have fallen into disuse. Other filters remain valuable, especially the widely used polarizer.
THE POLARIZER
Most landscape photographers agree that the most useful filter of all is the polarizer. There are two basic types. Older polarizers were called linear polarizers, but newer ones, the ones needed for modern cameras with autofocus, are called circular polarizers. Note that the terms linear and circular refer only to certain optical characteristics, and not to the physical shapes of the filters! The polarizer eliminates randomly scattered light making the sky darker leaving only the polarized light rays traveling on a single plane (similar to a mirrored reflection), which can be admitted to the sensor and limited to a greater or lesser amount by shooting at an oblique-to-parallel angle to those rays. A common use is for darkening a blue sky and making the white clouds more prominent. Note that the effectiveness of a polarizer used this way is governed by the angle between the shooting direction and the sun with the maximum effect achieved when shooting at right angles to the sun. For the trigonometricians among you, the effect is proportional to the sine of the angle between the shooting direction and the sun direction.
Polarizers are widely used for making dramatic skies, but the experienced landscape photographer knows that their photographic gifts go far beyond the sky. Polarizers remove glare from wet objects, such as the rocks in a waterfall and the nearby wet vegetation. Removing the glare causes the rocks to be nicely darkened, providing more contrast to the white water. The polarized wet vegetation shows improved color saturation and increased detail. Moreover, even dry subjects can be beneficially polarized — a common example is dry foliage. Here, a polarizer’s reduction of glare and spurious reflections brings out a lot of otherwise obscured color and detail.
There are warming polarizers with a slight yellowish tint used to both polarize the light and to remove some blue light, resulting in a warmer image. This color-correcting polarizer was important for color film, but unnecessary for digital because software can easily adjust the color of an image.
A polarizing filter must be used properly to get the desired effect. We’ve learned over the years that an astonishing percentage of our thousands of field workshop students misunderstood the polarizer. They believed that the act of screwing the polarizer onto the lens completes the preparation, and that they were then ready to shoot. They hadn’t yet realized that the polarizer has two discs of glass and must be adjusted by rotating one with respect to the other to achieve good results. Adjustment is best accomplished by rotating the outer ring of the polarizer counterclockwise when viewed from behind the camera. Lots of photographers have discovered that wrongly turning the polarizer clockwise risks it becoming unscrewed from the lens and falling off the camera. Polarizers make a very expensive noise when hitting the rocks below.
Turn the polarizer while looking through the viewfinder. Turn until the glare on the subject has been minimized, or until the blue sky is satisfactorily darkened. Use caution here. There’s no law demanding that you always use maximum polarization, and some shooters make the sky so dark that it looks unnaturally gaudy. A common mistake made by many a photographer, inexperienced and otherwise, is forgetting to readjust the polarizer when switching between vertical and horizontal compositions.
A polarizer attached to the front of a lens increases the lens’s susceptibility to flare because of the additional glass surfaces that can reflect stray light. A lens hood easily solves the problem. Many of today’s lenses allow the supplied official lens hood to be used even while a polarizer is attached; if not, then be certain to acquire a hood that will attach to your polarizer. Flare protection is often critical to an image and, to keep the sun off your lens, even a proper lens hood occasionally needs augmentation by a well-placed hand or a dark hat.
Often, a specific combination of hood and polarizer makes it difficult to adjust the polarizer, and the photographer is dissuaded from using the lens hood. Bad move! We seldom shoot without a lens hood, and neither should you. Instead, when using a polarizer on a short lens like the Canon 24–70 mm, we slip one finger inside the hood to carefully turn the polarizer without touching the glass. The deeper hoods of longer lenses make this impracticable, in which case we remove the lens hood, turn the polarizer for the desired effect, and then reattach the hood. It takes only a few seconds and ensures that we get the best possible image quality.
Let’s talk a bit more about getting the effect you want. In some cases, the positive effects of the properly adjusted polarizer are readily apparent. Sometimes not. There are situations in which no polarization effect might be seen, depending on the subject and the light. Remember that in sunlight the angle between sun direction and shooting direction is important. At other times, a subject is in polarized light, but an inexperienced user has a hard time seeing the polarizer’s effect. Be sure to look at the scene where glare is most egregious, because it’s the easiest place to see the effect. Polarizers work well on waterfalls, and we highly recommend them for this subject. Yet, most of our students have trouble adjusting the filter because it’s tough to see the effect on the cascading water. It’s tough for us too, so we don’t look at the tumbling water. Normally, the change in glare is easiest to see when looking at the water above the very top of the waterfall just before it plunges over the edge. When you turn the filter and see the river at the top of the waterfall darken, that’s the polarizer position you want. The darkening was caused by the polarizer having removed the glare from the water. Another technique is to turn the polarizer to maximally darken the wet rocks around the waterfall.
Polarizers reduce the amount of light passing through them by about 1.5 to 2 stops of light. However, when using the camera’s through-the-lens metering system, the camera’s meter takes the light loss into consideration, so the photographer doesn’t need to worry about it. There are times when you might want to use a longer shutter speed anyway, such as when photographing a waterfall. Even if you don’t think you need to remove glare, an admittedly rare occurrence on a waterfall, you can benefit from the polarizer’s attenuation of light. At any given ISO and aperture, the polarizer’s light loss allows a longer shutter speed, helping to produce that smooth and silky water that’s so pretty in many waterfall images. If the polarizer loss is 2 stops of light, then one can use a shutter speed 4 times longer than that without the polarizer. If the unpolarized scene is metered at a 4-second exposure before using this filter, you then can have a 16-second exposure by adding your polarizer.
(a, b) The glare on the water and these Okefenokee Swamp lily pads “hide” much of the color and detail. Rotate the polarizing filter slowly until it eliminates most of the glare, providing much better color saturation and detail in the plants.

Polarizers are also effective for making rainbows brighter and more dramatic. Turn the filter until the rainbow is as brilliant as possible. Be careful though, because it’s possible for the polarizer to obliterate the rainbow. Just look through the viewfinder and rotate the polarizer until the rainbow looks best. Be careful that a broad expanse of bright sky doesn’t cause excessive underexposure in some parts! Use the histogram to guide you to an excellent exposure throughout.
CLEANING LENSES AND FILTERS SAFELY
Lenses and filters must be spotlessly clean to ensure that they don’t do more harm than good. Dirt or smudges on filters or on the front or rear glass elements will surely degrade image quality. Sadly, we often find that our students are using filthy lenses, so we know that dirt and smudges are common problems. Lenses must be scrupulously clean to maximize the image’s contrast and sharpness.
Lenses are easy and relatively safe to clean, so there’s little excuse for dirty lenses. Keep the front and rear lens caps on the lens when it’s not in use. This will help to keep the glass clean in the first place. When the protective caps are off, always put a lens hood on the lens, and never rest the lens with either the front or rear glass pointing up, because airborne dust will certainly settle on the exposed glass. Either put a cap on the side of the lens facing up, or lay the lens on its side so neither side is facing up. Of course, make sure the lens can’t roll around, as that presents its own hazards. It doesn’t hurt to wash your lens caps occasionally, because they collect dirt that eventually migrates to the glass of your lens.
STEP #1: BLOW THE DUST OFF
No matter how careful you are, dust and dirt will find its way to the glass surfaces. Every time you use a lens, make sure that no dust has taken up residence on either the front or rear lens surfaces. Most of the time you’ll need to remove some minor specks of dust. The safest and most efficient way to remove dust is to use a rubber squeeze bulb that throws quite a bit of air when squeezed. This air easily blows away most of the dust, lint, and grit. The Giotto Rocket Blower in the large size works very well for this purpose as well as for blowing dust off computer monitors and keyboards. Some photographers use canned air, but it costs money and might shoot propellant out, which can be difficult to remove from the lens. Never use canned air to clean your camera’s imaging sensor! Use the Giotto Rocket Blower and the chances of damaging either your lens or the sensor are low indeed. Caution #1 — Use only a high-quality blower, such as the Giotto, especially when cleaning a sensor. Some lesser quality blowers are reputed to be contaminated by residual rubber particles that promptly attach themselves to your sensors and lenses like leeches! Caution #2 — Don’t use blowers that have an articulating nozzle! Reports state that one well-known brand, upon a vigorous squeeze of the bulb, caused its nozzles to be violently ejected from the bulbs with catastrophic potential when cleaning sensors! If you can’t see any dirt or smudges on the lens surface, you’re done. Needless further cleaning of the lens only increases the chances of scratching it.
STEP #2: USE A MICRO-FIBER CLOTH
If blowing strong puffs of air on the front and rear glass elements doesn’t remove the contamination, there may be dust or grit stuck to the surface of the glass. Also, carefully examine the front glass element for smudges. Perhaps there’s a fingerprint from careless handling. Or, if you photograph on dewy mornings or in wet weather, you’re likely to find dried water drops that degrade lens performance. The best way to remove stubborn contamination, smudges, and dried water drops is by using a micro-fiber cloth, which is obtainable at any camera store or eyeglass shop. Use it to gently rub the lens, beginning in the center, rubbing in a spiral outward toward the edges of the lens. Be very certain there’s no grit on the lens and be sure to use a clean micro-fiber cloth! The last thing you want to do is rub that lens with grit trapped between the lens and the micro-fiber cloth, because it could easily scratch the delicate coatings of the lens. You paid good money for the manufacturer to grind and polish that lens, so don’t try to improve on their work. Those who can just never remember to clean or replace their micro-fiber cloths might be better off using a good quality paper lens tissue designed for camera lenses, such as that sold by Tiffen. Certainly don’t use the ones sold for cleaning eyeglasses! Many tissues sold for eyeglasses have liquids or chemicals in the paper to help clean them. These additives could be harmful to the coatings on a camera lens. Usually the above process does a fine job of cleaning a lens.
STEP #3: USE LENS CLEANING SOLUTION
Very seldom is it necessary to go to this step. However, it’s possible to get a smudge on the lens that can’t be removed with the dry micro-fiber cloth. Perhaps a bit of pine sap or other sticky stuff settled on the lens. After going through the first two steps, put some lens cleaning solution directly on a small portion of the micro-fiber cloth and rub the stubborn smudge again. This should remove the smudge. Don’t squirt the lens cleaning solution directly onto the lens itself, because excess fluid might leak into the inner workings of the lens. Always put it on the cloth. Unless you’re incredibly careless, unlucky, or photograph in horrific conditions, you should seldom need this step.
STEP #4: LET A PROFESSIONAL CLEAN THE LENS
If the previous three steps fail to clean the lens to your satisfaction, it should be cleaned by the manufacturer’s repair facility or by an independent professional repair shop. We have done this only when dust was inside the lens and we couldn’t access the dust without disassembling the lens.