
5
Techniques for Sharp Images

WHAT IS QUALITY?
Just what is a quality landscape image? It must be well exposed so that color, detail, and contrast make the image appealing and noise problems are reduced. It should be illuminated by an attractive and complimentary light. Good composition, pleasing perspective, and interesting viewpoint are all keys to quality landscape images. Even if all of these goals are met, most landscape images fail miserably if they aren’t sharp. Fortunately, making sharp images is easy with suitable equipment and by employing excellent photographic techniques.
Let’s discuss the factors and techniques that deliver superbly sharp images shot after shot. It may seem like there are many details to remember, but just make good shooting techniques an ingrained habit and it all becomes automatic! Then, you can concentrate on finding photogenic subjects and working with light and composition.
Never underestimate the extreme importance of good shooting techniques. Landscape images that aren’t as sharp as they could be are a common problem for many, but it doesn’t have to be that way. We realize the specialized equipment that helps everyone shoot sharp images does cost money, but for most the cost isn’t so high that it’s a barrier.
BUY QUALITY LENSES AND FILTERS
LENS MANUFACTURER CHOICES
All of the images in this book were taken with Nikon and Canon lenses because we shoot both systems. It’s reasonable to think your camera manufacturer can produce the lenses that work best with your camera, so if the cost isn’t prohibitive, consider those lenses first.
Some independent makers build lenses for several camera systems. The better known brands are Sigma, Tokina, and Tamron. We haven’t used these lenses, but frequently see our workshop students using them, and we haven’t noticed any sharpness problems. They all seem to do well. We had noticed, though, that some of them aren’t made as well as others, aren’t as rugged, and may be less reliable in the field. However, if there’s a difference in reliability, it’s only a small difference when the lenses are compared to Nikon and Canon lenses, so don’t be afraid to buy the independents if price limits your options. The independent makers produce lenses for several camera systems and enjoy such a large market that they can mass produce lenses to sell at significantly lower prices than Nikon and Canon.
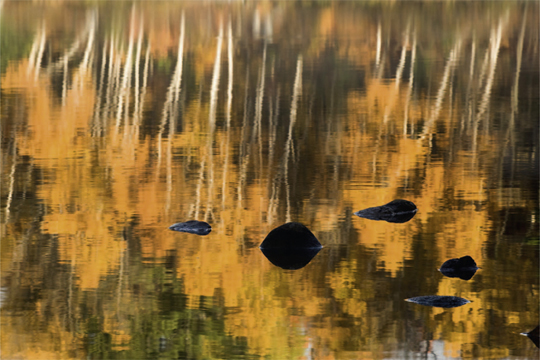
The best color at sunrise may occur well before the sun actually rises above the horizon, so always be early, select your shooting location, and wait patiently for the magic to happen. These exquisite magenta colors developed 20 minutes before sunrise at Pete’s Lake in northern Michigan.

Today’s computer-aided design and manufacturing techniques make it much easier to build optically sharp lenses in the intermediate focal lengths. The widest focal lengths and longest telephoto lenses are the most difficult to produce and that’s where the camera manufacturer’s lenses are more likely to have the edge in overall sharpness and quality.
USE THE BEST GLASS
Most lens manufacturers make two classes of lenses. The less expensive lenses are made with good optical glass while the most expensive lenses have special low-dispersion glass elements that deliver a bit more sharpness and reduce other optical limitations. Moreover, lens makers often advertise that their better lenses benefit from magical concoctions of performance-enhancing coating technologies (e.g., Nikon’s nano technology) to the better good of the resulting images. The manufacturers differently designate the lenses made with their best glass. As examples, Canon is calling them L lenses and Nikon uses the letters ED (extra low dispersion) in their lens descriptions.
BE CAREFUL ABOUT PROTECTION FILTERS
All too often, the camera store clerk that sells you the lens implores you to buy a skylight or UV protection filter to fit your lens. The salespeople have sad tales of woe and issue dire warnings about how the astute photographer must buy these filters to protect his new lens against abrasive sand, filthy dust, smudgy fingers, and other horrific hazards. It sounds like a fine idea, so many folks buy them. They do offer some protection, but quality suffers. Any extra glass that you add to the optical path, such as a filter or teleconverter, will cost you a bit of image quality. Furthermore, many protection filters are cheaply made and very poor in quality. The additional glass and the additional glass-to-air interfaces that you’re placing in the optical path will cause a loss of sharpness, increased flare, and reduced contrast because of flare. We don’t use filters solely for protection, but in rare circumstances of severe environmental conditions, such as saltwater spray or steam from a geyser, it might be an acceptable compromise.
Sometimes a single high-quality filter offers substantial benefits to an image that outweigh any negative effects. We use polarizing filters in our landscape work and we recommend that landscape shooters use polarizers or other filters. Use only the best quality, such as those made by B + W and Hoya. A polarizer will protect your lens and negate any need for additional protection. In fact, the stacking of multiple filters will most assuredly degrade your image.
KEEP LENS AND FILTER GLASS CLEAN
Be sure to frequently and aggressively inspect the glass surfaces of your lenses and filters. Surface grime of any kind interferes with a lens’ ability to focus the light and a filter’s ability to pass light, so lenses and filters must always be kept scrupulously clean. There’s no point to buying an expensive piece of glass to ensure high-quality images and promptly lose that quality because dirt and smudges have taken up residence on the glass.
Lenses and filters do seem to have an affinity for dust and smudges, so prevention is the first order of business. Always store lenses and filters in a protective case when they’re not in use, and always keep front and rear caps on lenses to prevent the lenses from becoming dirty or suffering catastrophic scratching.
Inspect lenses by removing protective caps and checking the front and rear glass surfaces for dust and smudges. The front glass is more likely to get dirty, but the rear glass can too, so be sure to examine both ends. We nearly always see some dust on the front of the lens, no matter how careful we’ve been, so we always clean the lens surfaces at least a little every time we use the lens. We’ve already detailed how to clean lenses in Chapter 3, so we won’t discuss this important and critical process here. Remember that all glass surfaces of your lens must be perfectly clean to capture the highest quality images!
ISO CHOICES
As you know, cameras offer a choice of ISO values. For example, the Canon EOS 1D Mark III offers ISO 100 to ISO 3200 in 1/3- and 1-stop increments. If custom function 1 – 3 is activated, the ISO choices are expanded to ISO 50 and ISO 6400. It makes good sense to use the native ISO speed whenever possible for landscape images, but there are times when one should use other ISO choices. For example, a lower ISO, like ISO 50 on the Canon 1D Mark III, might be useful for reaching a longer shutter speed to artistically blur cascading water or wild-flowers swaying in the breeze. On the other hand, you may be photographing the waves crashing on a beach at sunset and want the waves to be sharp and the entire beach to be in focus. A small aperture, like f/16, may provide the needed depth of field, and you’ll need a fast shutter speed to freeze the action of the crashing waves. Pushing the ISO speed up to 400 or 800 lets you use that sort of aperture and shutter-speed combination.
While freezing or blurring the motion in a landscape image is desirable at times, the typical landscape subject isn’t moving, so using the native ISO speed is a wise choice. The native ISO is usually 100 or 200, depending on the camera. Fortunately, each new generation of cameras offers reduced sensor noise and amplifier noise when used at higher ISOs. The image quality of recently introduced cameras at ISO 400 and ISO 800 and even above is absolutely amazing. This technological improvement benefits all photographers, and makes hand-held landscape photography more feasible, especially with shorter focal-length lenses. We don’t advocate hand-held landscapes unless they’re necessary, but we realize some folks just don’t want to use a tripod.
Use the native ISO speed of your sensor, or a lower ISO if your camera offers an extended range in that direction to achieve longer shutter speeds to reveal the motion of the maple leaves swirling about in a miniature whirlpool.

FILE CHOICES
Your camera lets you choose the type of image files that best suits your needs. The typical choice is between RAW and JPEGs of various quality levels. We see no purpose in choosing a low resolution JPEG because that locks in low quality. While a small JPEG might be fine for Web use, so much data have been discarded when the file is compressed by the camera that making quality large prints isn’t feasible. If you really don’t want to use post-capture processing to make a fine print from a RAW image that contains the most data, then select the highest quality JPEG choice. You can always reduce its size later for Web or other uses.
Many cameras offer a setting so the camera records a RAW image and a high-quality JPEG at the same time. Both images have the same file number, but use a different file extension such as JPG and CR2. JPG is the JPEG and CR2 is the Canon RAW extension. We set all of our cameras to record the highest quality JPEG and RAW file for each shot. Now we have a choice of either type of file for every image we shoot. Storing two files of every image does use up more memory, be we edit ruthlessly using PhotoMechanic (www.camerabits.com), so it isn’t a huge problem, especially for landscape photography where shooting speed and buffer capacity isn’t crucial.
COLOR SPACE CHOICES
Your camera lets you select the color space, too. The two most likely choices are sRGB and Adobe RGB 1998. We once exclusively used Adobe RGB 1998 because it has a wider color gamut than sRGB. However, many output devices like your computer monitor, digital image projector, and the Web make images shot using sRGB look better.
On the other hand, printers such as Barbara want the wider color gamut so the Adobe RGB 1998 and ProPhoto RGB color spaces are preferred by this group to achieve the finest quality images. What color space do you select if you wish to use your images to make prints and for Web use? Here’s our simple answer. We use sRGB so the image looks terrific on our camera’s LCD monitor, computer monitor, and for use on our Web site. When making prints, we (actually Barbara) use the RAW file and convert it with Barbara’s RAW converter of choice (Adobe Camera RAW) to Adobe RGB 1998 or sometimes the even wider color gamut of ProPhoto RGB. Now she can use sRGB when it works best and the wider color gamuts for printing. We find many photographers don’t realize the color space isn’t baked into a RAW image, but can be chosen later during the RAW conversion! Make sure you fully understand that last sentence. There’s no single correct color space choice for all users, so consider your needs and make the choice. We use sRGB because we shoot both JPEG and RAW at the same time, so we have a choice of any color space we want with the RAW image.
OPTIMUM APERTURES
Let’s review apertures briefly. A lens’ optical path contains a device that controls the amount of light passing through a variable-size hole called the aperture. Photographers measure the amount of light that can pass through an aperture using a unit called an f-stop and frequently written as f/stop. The f/stop of a lens is its focal length divided by its aperture’s diameter or, as the mathematician would say, f/stop = FL/D. Photographers usually use millimeters as the units for FL and D, but you could use inches or yards, or any other unit, as long as you use the same for both quantities. The aperture is in the denominator of the equation, so for any focal length, a smaller aperture diameter produces a larger f/stop number. And it follows that a larger aperture means a smaller f/stop number. Consider a lens with a focal length of 100 mm. If we adjust its variable aperture diameter to 25 mm, then the f/stop would be 100 mm/25 mm = 4. But, if we adjust the aperture diaphragm to a diameter of 50 mm, then the f/stop is 100 mm/50 mm = 2. In summary, the smaller numbered f/stop, f/2, is arrived at from the larger diameter 50mm aperture, which passes more light, and the larger numbered f/stop, f/4, is derived from the smaller diameter 25 mm aperture, which passes less light.
In summary, the f/stop and the aperture are closely related but aren’t exactly the same thing. Try this test: Set the aperture to f/22 on a wide-angle lens, say a 24 mm lens. Now do the same on a long lens, perhaps a 300 mm lens. On each, press the camera’s depth of field preview button and look through the lens at the size of the aperture. Do the apertures have the same diameter? Both are set at f/22, but as seen from this test, they have much different diameters. Apparently, the equation was right!
Another reason that the physical size of the aperture is important is that, as the hole gets smaller, a larger percentage of the light rays passing though the aperture touches its edges. This touching causes the light rays to bend, an optical phenomenon called diffraction, which reduces image sharpness. The smaller the aperture, the more the diffraction and the less the sharpness. That’s why lens makers don’t include f/45 on a 24 mm lens. Although the depth of field is huge at f/45, nothing is truly sharp because of the negative effects of diffraction.
You don’t need to know the math and physics behind diffraction. It’s sufficient to know it exists and how to deal with it. Lenses tend to be sharpest about two to three stops down from their wide open setting. For example, you can expect f/5.6 or f/8 to be the sharper f/stops on a 24 mm f/2.8 lens. F/5.6 is two stops down from f/2.8 and f/8 is three stops down. The f/2.8 setting isn’t quite as sharp as f/8 due to some other optical limitations, such as spherical and chromatic aberration. Larger f-numbers, such as f/16 and especially f/22, are less sharp because of diffraction. The photographer can achieve improved sharpness by using the sweet apertures, which are those two or three stops down from the maximum aperture whenever there’s no compelling reason to use other apertures. For example, there may be times when you wish to use selective focus techniques, so go ahead and shoot wide open at, say, f/2.8. There may be some loss of quality, especially around the edges of the image, but you still have a nice image. If you need great depth of field, use f/16. The results are probably more than satisfactory for your (and our) needs. Use f/22 only if you really need more depth of field to adequately cover the scene. The negative effects of diffraction can be serious when the lens is stopped all the way down, especially with wide-angle lenses.
Remember that the physical size of the aperture is larger at f/22 with a 300 mm lens than with a 24 mm lens. At f/22 a 300 mm lens has an aperture of about 14 mm diameter and the 24mm lens has an aperture of only about 1 mm diameter. Therefore, as a guideline, you’re safe to use f/22 for landscapes where the focal length is 100mm or greater because the diffraction isn’t so serious. With shorter lenses, consider f/16 as your smallest aperture unless there’s an overriding reason to stop down more. Great depth of field is often desirable, especially in landscape photography. However, if your subject doesn’t demand the depth of field offered by f/16 or f/22, then use the more intermediate and sharper apertures of f/8 and f/11.
TRIPODS
WHY YOU NEED TO USE A TRIPOD
Serious landscape photographers must use a tripod whenever possible. The tripod is indispensable for shooting sharp images and opens up a world of image possibilities. A good tripod supports the camera and lens and holds them perfectly still, thus allowing utilization of all shutter speeds and f/stops in your pursuit of excellent images. Some photographers pride themselves on never using a tripod, thinking they can hand-hold while still getting sharp images. It’s true. You can hand-hold wide-angle lenses and shoot them using high shutter speeds and high ISOs in bright light, but as an exclusive procedure this needlessly limits your possibilities.
Many attractive landscapes are illuminated by soft light just before sunrise or after sunset, and longer shutter speeds are needed to capture such an image. It’s impossible to shoot a truly sharp image hand-held with a one-second exposure using almost any lens, much less a more likely 100mm or 300mm lens. We frequently shoot artistic images of waterfalls, using wide-angle lenses and exposure times measured in several seconds. We like the cascading silky smooth and blurred water surrounded by sharply focused rocks and trees. You could make everything in this situation blurred by hand-holding the camera, but a tripod offers the choice of having some sharp image elements.
Admittedly, tripods slow you down while adding weight to carry. The slowing may be problematic in some situations, but as well as offering sharpness, it’s a tremendous boon to good composition! The tripod holds the camera still and lets one carefully study the image in the viewfinder, making it easy to fine-tune the composition. Hand-held shooting is hampered by an always changing composition and the photographer’s often unconscious tendency to shoot right now and get it over with. But the handheld camera is nearly impossible to hold perfectly still, and the composition continuously wiggles. Any rifle shooter who has used telescopic sights knows how much those crosshairs wobble about the target, no matter how careful he may be. The same is true of your camera.
Landscape photographers must often wait for the good light to develop or reappear, and it’s far easier for a tripod, not a photographer, to support the camera gear while waiting. Sometimes it’s necessary to wait for the optimal moment to fire the camera — even in landscape photography. Suppose you’re waiting for a huge wave to crash onto a beautiful rock along the shoreline. The easiest method is to compose the image on the tripod, watch for the approaching wave, and then use a remote release to trip the camera at the peak of the action — all without having to peer through the viewfinder. Further, the tripod frees your hands so it’s much easier to use a reflector or an electronic flash to light up the foreground.
FEATURES OF AN EXCELLENT TRIPOD
1. An excellent tripod will be high enough that the viewfinder of your mounted camera reaches your eye level when the tripod legs are extended, but without raising the centerpost. Raising the camera to eye level by elevating the centerpost makes the whole system less stable and reduces image sharpness, or as one famous photographer noted, merely places a monopod on top of your tripod.
2. An excellent tripod has legs than can be independently locked at different angles, so the tripod can easily be used on uneven ground, such as a rocky hillside.
3. An excellent tripod has legs that can spread out flat, getting the camera as close to the ground as possible. The tripod has no center bracing system and no centerpost. This flat-to-the- ground requirement is important for making those wonderful wide-angle landscapes where the camera is close to the foreground, often giving an appealing viewpoint. It’s also a boon to the macro photographer shooting mushrooms, flowers, insects, and other subjects close to the ground.
4. An excellent tripod that’s both sturdy and lightweight is a contradiction and just doesn’t exist. Many small tripods are so unstable that shooting quality images is almost impossible. Those tripods are worthless. However, a tripod that’s so heavy that you don’t bother to take it with you is equally worthless. The best tripod is the sturdiest one you can afford that you’re willing and able to carry. Modern materials, such as carbon fiber and boron, although relatively expensive, allow very sturdy tripods that are actually lighter than less sturdy tripods of traditional steel or aluminum construction. Plan your camera system recognizing many writers opinions that the most important single accessory a photographer can own is a fine tripod.
Using a sturdy tripod enables us to fine-tune the composition, to use small apertures for plenty of depth of field, and to make it easy to wait until the best waves crash into these eroded rocks along Lake Superior.

The tripod holds our camera perfectly still while we use one hand to gently press the cable release and the other hand holds the flash in the best position. This fragile sand tufa is found along the shores of Mono Lake.

TRIPOD RECOMMENDATIONS
We see mainly Manfrotto (Bogen) and Gitzo tripods in our workshops, and both brands offer models that are excellent for landscape photography. Most professional and advanced amateur nature photographers use Gitzo tripods, and throughout our entire careers so have we. The less expensive Bogen-Manfrotto Model 3221 and its several variants have been very popular with nature photographers for decades. The Gitzo 1340 model is perfect for landscape photographers and we used it for years. In 2005, we upgraded to the similar, but more expensive, G1325 CF Studex 3 carbon fiber tripod. This carbon fiber tripod is sturdier and lighter than the Gitzo 1340, and the leg locks are a tiny bit easier to work, but it’s about twice as expensive. Tripods are constantly upgraded and their model numbers frequently change, so watch for discontinued and new models.
TRIPOD HEAD RECOMMENDATIONS
Pan-Tilt Heads
The pan-tilt head has three controls allowing easy and independent adjustment of each of three axes of camera movement. Those axes are a side-to-side rolling motion, an up-and-down vertical tilt, and a side-to-side panning motion of changing azimuth. The airplane pilot would call those axes roll, pitch, and yaw. The pan-tilt head’s ability to independently adjust each axis allows a more precise positioning of the camera than some other heads, specifically the single-control ball head. Another advantage of the pan-tilt head over the popular ball head is that the pan-tilt makes it easier to shoot vertical panoramas. To put some frosting on the pan-tilt cake, a good pan-tilt head is far less expensive than a good ball head. With all that said, we don’t like pan-tilt heads, even though some photographers do. We think that pan-tilt heads have too many awkward-to-use handles, and occasionally one pokes you in the eye when you’re trying to look through the viewfinder.
Ball Heads
We love sturdy ball heads and have used them exclusively for the past 20 years. A good ball head lets you use only one control to tilt the camera in all directions and to pan. No handles are poking you anywhere! They’re very efficient, making it easy to rapidly compose the landscape image. Nearly every professional nature photographer we know, and most advanced amateurs, use ball heads. Excellent ball heads are made by Kirk Enterprises of Angola, Indiana, and Really Right Stuff of San Luis Obispo, California. We use Kirk ball heads. Kirk offers the robust BH-1 and the smaller BH-3. If you plan to do any landscape photography with a super telephoto lens such as the Canon 500 mm f/4, then you need the larger BH-1. Most landscape photographers don’t use big and heavy lenses for landscape work, so the smaller, more affordable, and easier to carry BH-3 is all that’s needed. The Really Right Stuff ball head is terrific too, but size for size, the most expensive of the bunch. No matter what ball head you buy, be sure it has a second control for precisely panning the camera. A separate pan control is virtually essential when shooting multiple images for later assembly into a wide-view panorama.
QUICK-RELEASE PLATES AND L-PLATES
ADVANTAGES
These devices speed up mounting the camera, or a lens with a tripod collar, to the tripod head. The ability to move rapidly with a minimum of fuss makes photographing more enjoyable and helps you capture superb landscape images when spectacular but fleeting light suddenly appears. Quick-release plates come in different sizes and styles for a variety of tripod heads. Make sure any plate or L-plate you buy is compatible with your tripod head.
Speaking of mountings, here’s a common mistake: The camera with a mounting plate is attached to the tripod. Hanging from the camera is a big heavy lens with an unused tripod collar and its own mounting plate floating unused in space. This configuration begs for camera wiggle and fuzzy images! If you don’t believe us, ask your pal the architect about cantilever beams. Bottom line? If a lens has a tripod collar, it’s nearly always better to mount the lens to the tripod and let the camera hang from the lens.
UNIVERSAL QUICK-RELEASE PLATES
These plates are made to fit all cameras and tripod collars. They come in specific styles to work with a variety of quick-release designs. While it sounds appealing to buy plates that work on all of your cameras and lenses and any you might own in the future, it’s best to avoid them. Unfortunately, universal plates don’t seem to work perfectly with anything. Universal plates often become loose, so they require frequent tightening. Constant tightening implies constant looseness, which is no help to your never-ending quest for sharp images. The incessant tightening is inefficient too, and will annoy you time and time again. Also, you might attach a universal plate to the bottom of the camera and everything seems to work fine right up until the time your battery fails. Then you discover the plate has to be removed before you can replace the battery. Sometimes the plate covers up an important button you need to use. When some universal plates are attached to the tripod collar on the lens, it becomes impossible to rotate the camera to the vertical position. These plates might work well for some equipment and for some photographers, but the vast majority of serious photographers use custom plates.
CUSTOM QUICK-RELEASE PLATES
Custom plates are those designed for specific cameras and specific lenses. They’ll stay tight unless you use the correct tool, generally an Allen wrench, to loosen them. These custom plates allow access to all of the camera’s buttons, dials, and batteries without having to be removed first. They’re not much more expensive than universal plates, so don’t scrimp on price. Contact Kirk Enterprises or Really Right Stuff and tell them what camera or lens you’re equipping. They’ll tell you the model number and cost of the custom plate for your application. We use custom quick-release plates on all of our cameras and on all of our lenses having a tripod collar.
L-PLATES
These specialized quick-release plates are enormously helpful to landscape photographers. As its name suggests, the plate looks like the letter L, and each leg of the L is a quick-release plate. These plates are used on camera bodies. Attach the L-plate to your camera and leave it there. A custom L-plate should allow access to everything on the camera without having to first remove it. Shoot horizontal compositions by sliding the L-plate leg on the bottom of the camera into the tripod’s quick-release clamp, and securely tighten the clamp. Now you’re ready for a horizontal composition.
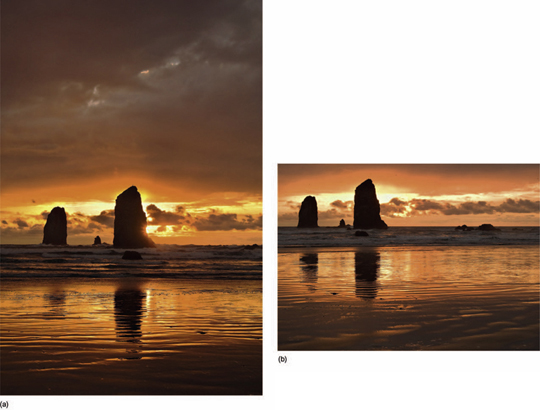
(a, b) Most landscapes suggest right away if they work best as a horizontal or vertical image. The camera captures more color as a horizontal image, but the more vertical sea stacks along the Oregon coast do suggest a vertical composition, too. Expand your compositional skills by always trying to compose every landscape image both ways.
Shooting verticals is easy with an L-plate. Don’t flop the camera over to the side on the tripod head,because even though everything is tight, gravity tends to pull the camera down, especially when a heavy lens is attached. Also, the center of gravity of your camera and lens is off to one side instead of over the center of the tripod, resulting in a greater susceptibility to vibration and loss of image sharpness.
Instead, loosen the quick-release clamp, slide the camera out, and use the other leg of the L-plate to remount the camera on the tripod head. Now the camera and lens remain over the center of the tripod, eliminating the gravity problem, providing a more stable support, and making it easier to look through the viewfinder. Once again, call Kirk Enterprises or Really Right Stuff to find out if an L-plate is made for your camera. These fine companies build lots of L-plates, other quick release-plates, and clamps, so the odds are good they’ll have a model for any popular camera or lens.
ENVIRONMENTAL PROBLEMS FOR TRIPODS
WIND
Just because the camera or lens is mounted securely to a tripod doesn’t mean the images will be sharp. Wind can make it very difficult to shoot sharp images so, if possible, avoid shooting in the wind. Many photographers underestimate the negative effects of wind. Here’s a test: In a wind gusting to 10 mph or more, mount your camera and a medium or long focal-length lens on a tripod and carefully focus on a subject having visible detail. Without touching tripod or camera, watch through the view-finder while the wind is blowing. You’ll be able to see the image vibrating and, if you were to shoot in such conditions, you’d likely have soft images.
(a, b) Tremendous light on the landscape is often fleeting. At times you must be fast! Using equipment that helps you be efficient is crucial. All landscape photographers benefit greatly by using L-plates on their camera bodies to switch from horizontal to vertical compositions and vice versa. It’s so much easier to shoot a vertical by using the L-plate, rather than flopping the camera off to the side of the tripod head. Do yourself a huge favor and get L-plates for your camera from Kirk Enterprises or Really Right Stuff.

WIND TECHNIQUE
If circumstances require that you photograph in the wind, there are techniques that reduce the problems. Can you find another shooting angle behind some trees, a cliff, or perhaps a building to block the wind? We find it’s frequently effective to hide from the wind by shooting from the calm side of a large object. But be careful in selecting your hiding place! We once moved to the calm side of a high sand dune, but the wind-blown sand raining down from the sky soon drove us out.
Here’s an effective technique if you must shoot in the wind. Use a tripod to hold the camera as still as possible. Hang on to the camera with both hands and press down, adding some of your body mass to the tripod. This eliminates a lot of wind vibration, but not all. Don’t use a self-timer or cable release to trip the shutter. Instead, use your finger. Apply the reciprocity principle to favor a higher shutter speed over depth of field, and consider raising the ISO to the highest speed acceptable for your image. Focus carefully and wait for a lull in the wind. If no lull is forthcoming, shoot multiple images of the same thing, hoping that one or more are acceptably sharp. Try placing the tripod as low to the ground as possible to reduce the surface area of the tripod so the wind is less troublesome. We usually don’t use Canon’s image-stabilization or Nikon’s vibration reduction when shooting on a tripod during calm days, but they can be very helpful in a gusty wind.
SNOW
Tripods can be very unstable in soft, deep snow. The legs tend to bow out when pushed into the snow which, by the way, might damage them, and the tripod is very susceptible to vibration if its legs aren’t on a solid base. In deep, powdery snow try hand-holding with short focal-length lenses favoring higher shutter speeds such as 1/125 second or more. To use the tripod, try stomping down the snow to make a solid base. We often use snowmobiles to reach photogenic spots. Driving the snowmobile in a small circle about three times on the same track makes it less likely the snowmobile will get stuck and more likely that our tripods will be well supported.
SOFT GROUND
Sometimes landscape photography must be done in boggy places where the ground is soft. Find the firmest ground and spread the tripod legs out a bit farther than normal. Gently push the fully extended lower legs into the soil until they’re more stable. Don’t walk around too much either, because you want the ground to remain as firm as possible to keep the tripod from shifting about and causing instability of your composition and focus.
MOVING WATER
Running water and lapping waves easily vibrate your tripod making sharp images very difficult to shoot. So, you should keep tripod legs out of moving water whenever possible. If you like to set up in the middle of a stream (we do), find a quiet place in the stream where the water is barely moving. Perhaps there’s an area of calm water just behind a log or large rock. Often, if you’re careful, it’s possible to set the tripod up so that each foot is actually on a rock, log, or some other solid object, and the legs aren’t immersed in moving water. If you must shoot in fast-moving water, use the above-mentioned high wind technique for best results.
TRIPPING THE SHUTTER
HAND-HOLDING
Try to ensure high image quality by always striving to avoid hand-held shooting. This is especially true of landscape photography where, in most scenes, everything from the near foreground to the far background should be in sharp focus. It’s common practice to shoot at f/16 or smaller to achieve these great depths of field, but that in turn demands lower shutter speeds, which makes handheld shooting more troublesome. Consequently, we try to avoid hand-held shooting, but it’s sometimes necessary. Hand-held shooting techniques are always used to photograph, for example, Antarctic icebergs from bobbing ice-encrusted Zodiacs and northern Michigan fall color scenes from a drifting kayak.
It may be necessary to shoot hand-held when using extreme wide-angle lenses from some viewing platforms, such as the one at the top of the famous Miner’s Castle in northern Michigan. On that platform it’s impossible to position a tripod-mounted camera a foot or so over the railing to keep the platform from intruding into your image, so a tripod is out!
Hand-held photography requires being as still as possible at the instant the image is shot. Camera movement reduces sharpness and degrades the image. We can’t stress this enough!
Photographing autumn reflections from a floating kayak is tremendously fun and effective if you use superb hand-held shooting techniques.

It’s necessary to shoot hand-held to capture this view of Miner’s Castle, Michigan’s most famous rock. A super-wide-angle lens is needed to make this composition, so to keep the viewing platform’s railing out of the image is virtually impossible if the camera is mounted atop a tripod. Instead, choose a bit higher shutter speed such as 1/60 second with 20 mm lens and rest your elbows on the railing to steady the camera.
I (John) did some state competition target shooting as a Michigan teenager. I used a.22 rifle with peep sights and, even when in the very stable prone position and using a tight sling, properly holding my breath, and carefully squeezing the trigger, it was amazing how much the gun sights wandered around the bull’s-eye. Your camera wanders, too, a lot more than you realize, causing unsharp images. The hand-holding shooter must religiously concentrate on holding very still.
USING GOOD TECHNIQUES FOR HAND-HOLDING
• Use any nearby steady object to brace your camera, such as a tree, fence post, railing, car hood, or even a non-drinking friend. Any makeshift alternative to your tripod helps a lot.
• Use your camera’s image stabilization, if available. Now’s the time to use it!
• Use higher ISOs to allow higher shutter speeds.
• Use larger apertures to allow higher shutter speeds, trading off some depth of field.
• Use a stable stance, feet apart, firmly planted, and your elbows held tightly against your body.
• Use good breathing techniques. Take in a deep breath, let half of it out, and hold the remainder.
• Use the shutter button in a smooth and gentle motion. Better, some shutter buttons can be activated by a rolling motion of the finger rather than a pushing motion.
SHUTTER SPEED GUIDELINE
The rule of thumb for hand-holding is that one can achieve an acceptably sharp image at shutter speeds equal to or faster than 1/lens focal length. The reasonably steady shooter using a 200mm lens, for example, is probably safe at shutter speeds of 1/200 second or faster. Likewise, using a 24mm lens would require a shutter speed of 1/25 second or faster. Image-stabilization advertisements claim an advantage of at least two stops of shutter speed. Accordingly, one using an image-stabilized 200 mm lens could find equivalent sharpness at 1/50 second. We’re conservative folks, though, and suggest that, if you need critical sharpness, the original guideline of 1/(focal length) should be observed even with image-stabilization.
CABLE OR REMOTE RELEASE
The cable release is a mechanical device comprising a metal sheath and a stiff inner wire. The device has a push button on one end and a plunger on the other. It’s screwed to the camera, and to trip the shutter, the photographer pushes on the button and the plunger operates the camera. Modern cameras use an electrical release. The electrical release comprises a hand-held push button connected to an insulated flexible wire, the other end of which has a connector that mates to the camera body. Regardless of the differences, electrical releases are generally called cable releases.
A remote release does the same thing as a cable release, but isn’t attached to the camera. It uses radio or infrared signals to fire the camera. These releases work well because your quivering and fluttering hand is separated from the camera, thereby greatly increasing your chances of capturing a truly sharp image.
Cable releases are especially good when you’re trying to capture the peak of the action. It’s true that most landscapes are static with little to no action. However, certain images, such as a huge wave exploding into a rocky shoreline, do require timing to capture the peak of the action. Anytime you must catch the decisive moment always use a cable release, because it’s easier to trip the shutter at precisely the peak moment.
Watch out for this problem though: Many cable releases have a lock position for shooting long time exposures. Set the camera to bulb and press the cable release to trip the shutter and lock it, and the shutter will stay open for as long as you keep the cable released locked. Unfortunately, this lock option is easy to set accidently. If you find you have lost control of your camera when you’re using the cable release, always check to see if you unknowingly locked it. This happens frequently to our students, so be alert to it.
SELF-TIMER
Most cameras have a self-timer. This is extremely useful in landscape photography. The default setting for most self-timers is about 10 seconds, which is enough time to get yourself into the image, too, but way too much time if you want to use it to trip the shutter instead of using your finger or a cable release. Fortunately, many cameras let you adjust the duration of the timer. Two seconds is a much better choice for static landscapes where you aren’t trying to catch the peak of the action. Gently push the shutter and remove your finger. The camera counts down 2-seconds, during which the vibration caused by your touching the camera dissipates, and then the camera makes a sharp image. Using the self-timer is efficient and effective. We use this strategy whenever possible, which is most of the time! Using the self-timer eliminates the need to attach or use a remote triggering device. Dangling cable releases often get in the way, so this nuisance is eliminated with the self-timer shooting technique.
MIRROR LOCKUP
Many cameras offer a mirror lockup feature that raises and locks the mirror before the shutter opens. The purpose is to prevent vibration caused by the moving mirror from interfering with image sharpness by eliminating vibration caused by mirror movement during the exposure. The effects of an unlocked mirror’s vibration are most noticeable at shutter speeds between 1/4 and 1/60 second. Mirror-induced vibration isn’t a problem at faster or slower shutter speeds. Why? Mirror vibration and the resulting camera shake occur for a certain length of time. If the shutter speed is fast enough, the shutter opens and closes before the camera can move sufficiently to cause image softness. If the shutter speed is slow enough, then the time the camera is shaking is just a small part of the exposure, and no image softness is detectable. So, fast is okay and slow is okay, but in-between is a problem, hence the recommendation above.
Many cameras don’t have mirror lockup. If your camera doesn’t, then avoid shooting images in the 1/4 to 1/60 second range for optimum sharpness. If it is capable of mirror lockup, you usually activate it by turning a switch on the camera body or setting it with a custom function.
FOCUSING TECHNIQUES
DIOPTER ADJUSTMENT
Most cameras have an adjustment to ensure that the viewfinder is properly set for the user’s eyesight. It’s called a diopter control. It doesn’t affect how the eventual image is focused on the sensor,only how the scene appears to the photographer’s eye. Adjust the diopter control by first removing the lens to eliminate the distraction of an image in the viewfinder. Then, with the body cap off, point the camera at a bright surface and look through the viewfinder at the lines on the viewing screen. Lastly, adjust the diopter control so that the lines are as sharp as possible. If no position of the diopter control produces sharp lines, find out whether your camera maker offers diopter-correction eyepieces for your viewfinder. Your optometrist can help you determine which such eyepiece might correct the problem. Always make sure your view-finder is perfectly adjusted for your vision! It makes a world of difference when using manual focusing.
MANUAL FOCUSING
Most of us over forty remember when cameras were only focused manually. Many viewfinders incorporated aids to help us focus the camera. Manual-focus cameras still exist, but autofocus is by far the norm with modern equipment. Still, if you have good eyesight and work carefully, manual focusing works well. Indeed, if you’re shooting a landscape in heavy snowfall or fog, you’re forced to use manual focus because autofocus can be rendered useless where there is little contrast. Some modern lenses, such as the Nikon and Canon tilt-shift lenses, don’t offer autofocus, so they must be manually focused, too.
For us mere mortals over forty, autofocus is far faster and more accurate than manual focusing. Both of your authors still have good vision, but we prefer autofocus anytime it works, which in landscape photography is most of the time. That said, a few of today’s cameras offer what’s called live view, a feature allowing pre-shooting display of the intended image on the camera’s LCD monitor. This display can be highly magnified in some cameras, allowing selected portions of the image to be closely scrutinized while manually adjusting the focus. This procedure eliminates many operational variables and tolerances of the autofocus system, and can achieve an extremely critical manual focus.
HYPERFOCAL FOCUSING
Landscape photographers sometimes use the hyper-focal distance characteristic of a lens to maximize the zone of sharpness in an image. A lens set to its hyperfocal distance is acceptably sharp from one-half that distance all the way to infinity. The hyperfocal distance of a lens is determined primarily by its focal length and its aperture, so it varies with aperture changes. Lenses of yesteryear had hyperfocal distance scales engraved or silk-screened on the lens barrels, and could be easily set to their hyperfocal distance. Regrettably, most modern lenses don’t have those scales. However, hyperfocal distances can easily be determined from a proper chart readily downloaded from the Internet (e.g., www.cambridgeincolour.com/tutorials/hyperfo-cal-distance.htm). Here’s how to use this useful principle: Assume a nice landscape with a splendid wildflower only 6 feet in front of us, a tree with an eagle at 100 feet, and a nice mountain on the horizon. Also assume you’ll be using a 28 mm lens. Your chart says that a 28mm lens, at an aperture of f/11, has a hyperfocal distance of about 8 feet. So, using f/11, you set the lens’ distance scale to eight feet, and you know that everything from four feet all the way to infinity will be in focus! What should you focus on? Nothing! Don’t even bother! Just point, compose, and shoot!
This group of delicate sand tufas at Mono Lake is sharply rendered by using f/16 for good depth of field, a 2-second self-timer to trip the shutter, mirror lockup, and a 45mm Canon T/S lens to rotate the plane of the sharpest focus through the tufas. By the way, the Canon and Nikon tilt-shift lenses don’t have autofocus, so they must be focused manually with extreme care.

We use a different strategy now for adjusting the zone of focus, a strategy that takes advantage of the live view capabilities of several modern cameras. Remember our scene that has a flower in the foreground and a mountain on the horizon. We don’t want to focus on the mountain because the depth of field will likely not include the flower. Conversely, we don’t focus on the flower or we’d end up with a fuzzy mountain. We solve the problem this way: We initially focus on something, anything, that’s about 10 or 20 feet into the scene. We activate our live view display to see the scene on our bright LCD monitor screen. Then, we press our depth-of-field preview button to inspect the zone of focus while at the shooting aperture. Finally, we manually adjust the focusing to ensure that the zone of focus encompasses both flower and mountain. Although the lens is stopped down to the shooting aperture, say f/16, the live view display remains bright (unlike the viewfinder image), so it’s easy to see how the depth of field covers the scene.
SINGLE AND CONTINUOUS AUTOFOCUSING
Cameras offer two, and sometimes more, focusing modes. They’re called by various names, but the main two are generally called something like single autofocus and continuous autofocus. Single auto-focusing is used for subjects that aren’t moving which, of course, includes most landscape subjects. With single autofocusing, one presses the shutter button half-way down and the camera establishes focus on whatever subject matter is within the selected focus brackets. The focus remains locked there, even if the subject moves, until the shutter button is released and pressed again.
Continuous autofocus is especially valuable for moving subjects. Suppose you point the selected focus brackets at a sprinting cheetah. You press the shutter button half-way down, the camera promptly focuses on the cheetah, and the camera remains in focus even as the cheetah’s distance is changing. Most landscapes don’t gallop around very much, but a wandering fast-moving tornado can easily be considered a landscape.
This Alabama Hills sunrise can confuse a camera set on autofocus. Many cameras that have the autofocus controlled by the shutter button won’t fire if the activated autofocus point isn’t on an object that’s in focus because it’s designed for focus priority. Therefore, we set our camera to back-button focusing and continuous autofocus, which is release priority. Then we point the single autofocus point that we have activated at the top of the lower right-hand rock so the point overlaps the bright sky and the black rock. The camera detects contrast between the sky and the rock and focuses precisely on the rock. Then we compose the scene as you see here and use a cable release or self-timer to trip the shutter.

Single autofocus, then, seems like it would be the most useful mode for landscape photography, but it depends on the camera. Some cameras, set to their single autofocus option, operate in a focus priority mode and refuse to shoot the image if the subject matter within the selected autofocus brackets isn’t in focus. Fortunately, though, some of those cameras also have a custom function that can change the camera to a release priority mode in which the image will be shot upon pressing the shutter button irrespective of whether the active autofocus bracket or brackets are in focus.
If our camera can’t be changed to release priority, we set the camera to continuous autofocus — even when shooting static landscapes. Most cameras, when in continuous mode, use release priority so you can shoot even if the subject matter within the selected autofocus brackets isn’t in focus.
MULTIPLE AUTOFOCUS POINTS
Modern DSLRs have several points in the view-finder that control focusing. (A point is the term Nikon and Canon use for a small rectangle that contains the subject matter being focused on.) As an example, John’s Canon 1Ds Mark II has 45 selectable autofocus (AF) points distributed across the image in the viewfinder. All 45 points are activated in the camera’s default state, but one or more can selectively be activated by the camera’s various buttons and custom functions. Less expensive cameras often have fewer AF points. The Canon 40D, for example, has only nine, yet nine or some other small number of AF points is more than sufficient for landscape photography.
Multiple AF points are an enormous help when photographing fast-moving subjects, such as leaping deer or soaring birds, and dramatically increase your chances of a sharply focused image. However, in landscape photography, we have never found any benefit from multiple focus points, so we deactivate all but the middle one. A single focus point fixed in the center of the viewfinder is easier to find quickly, and is often intrinsically more accurate than some of the outlying focus points.
Most landscapes have depth, and you can select a specific area or item that you want in sharpest focus. For example, it makes sense to focus on the cone of a geyser or on the trunks of white birch trees that are reflecting in foreground water. Wildlife photographers almost religiously focus on an animal’s eye. As a landscape photographer, you might want to focus on that part of a sand dune that’s 10 or 20 feet in front of you to optimize placement of your zone of focus. In those examples, multiple activated AF points might allow the camera to focus on some different but unwanted part of the scene so you can well benefit from the fast, easy, and precise focusing that’s offered by using a single AF point.
We don’t have any use for activating multiple AF points in landscape photography. When there are many solid objects in the scene like this view of Castle Geyser, how does the camera know what should be the most sharply focused? Use back-button focusing to precisely focus on the cone of the geyser.

PROBLEMS WITH AUTOFOCUS
Automation offers many benefits but can also create problems. Autofocusing, for example, is fast and can be precise but must be carefully controlled by the photographer. As an example, let’s use a wonderful scene in the famous wave that lies in Paria Canyon west of Page, Arizona. We’ll use our Canon 17–40 mm lens, zoomed out to about 20 mm, and compose a vertical image. We set the lens to f/16 and, using a single AF point in the center of the viewfinder, we focus on a rock about 10 feet into the foreground. Focusing 10 feet or so into the frame optimizes placement of the zone of focus so that it’s most likely to extend from the near foreground to the clouds in the background. We didn’t use f/22 because of the greater diffraction-induced loss of sharpness that occurs in wide-angle lenses used at smaller apertures.
We support the camera on a sturdy tripod, aim the selected AF point at the rock 10 feet away, and press the shutter button half-way down to cause the camera to acquire focus. Aiming the camera at that rock gave good placement of the zone of focus, but gave an unacceptably poor composition, so we must recompose. Now we have an attractive composition, but the selected AF point is aimed at some insignificant rock in mid-scene, perhaps 100 feet away. We press the shutter button or cable release to record the image. But wait! The camera just refocused! This time, though, it focused on that meaningless rock. Our careful placement of the zone of focus was just nullified, and now we have an attractive composition spoiled by a fuzzy foreground. We need a way to prevent the camera from autofocusing when we don’t want it to.
One solution is to switch the camera from auto-focus to manual focus just before releasing the shutter, but that’s an ongoing nuisance. Another solution favored by some photographers is activating several AF points, hoping that a selectable AF point covers a suitable focus target, in this case the foreground rock. That, too, is a pain because, far more often than not, none do, and there’s no suitable focus target under any AF point. Consider a wide expanse of still water, such as the early morning surface of a calm lake. The always present rock is 10 feet in front of you, and there’s a pretty loon at 100 feet. You focus on the rock, but when you recompose to include both rock and loon, no AF point is anywhere near the rock. They’re all pointed at still water and, with no suitable target, a push of the shutter button just causes the camera to aimlessly hunt for focus.
To the rescue comes a great scheme for removing autofocus control from the camera and giving control to the photographer. This scheme is called back-button focus and, because you’re one of our favorite readers, we’re going to reveal it to you.
THE POWER OF BACK-BUTTON FOCUSING
Almost every digital camera we’ve seen offers a little known feature that gives full control of autofocus initiation to the user. We call it back-button focusing, a self-descriptive name. However, we haven’t seen any camera manual using this term, so one would have to hunt around to find it. Sadly, camera manuals describe this option so poorly that it’s hard to understand what it does, let alone why or how to use it. Nearly every Canon and Nikon DSLR can activate back-button focusing by using a custom function. Unfortunately, at least with Canons, the number of that custom function varies model to model. Nikon can be troublesome, too, because some models use a menu selection and others use a custom function. Still, learning how to set back-button focusing on your camera is well worth the effort. Back-button focusing gives efficient and precise control over autofocus, and we use this powerful technique for all of our autofocus shooting — everything from landscapes to wildlife, but not close-ups. It’s inapplicable, of course, to manual focusing.
This aspen scene is easy to photograph. Stop down to f/16 and try some shots at f/22 because there’s a lot of depth between the foreground rocks and the trees across the lake. Back-button focus on the rocks making sure the activated autofocus point is partially on the light yellow reflection and the black rock. Use a self-timer or cable release to trip the shutter. Determine the exposure using the histogram to guide you.
We will continue to use the term back-button focusing until such time as the marketing mavens at Canon and Nikon finally adopt a reasonable name for it. To illustrate our point, the Canon 1D Mark III back-button focusing selections are buried way down in the fourth group of custom functions with the official name of Shutter button/AF-ON button. Nikon also calls this AF-ON in the custom menu for setting the AF-L/AE-L button. Okay, if you stare at the name for a while, and if you already know what it does, then it can make a little sense, but otherwise… When properly configured, this custom function disables autofocus initiation by the shutter button and moves autofocus initiation to a button on the back of the camera. Our various Nikon and Canon bodies all have that button (AF-L/AE-L) about an inch or so to the right of the viewfinder eyepiece easily reachable by the thumb when conventionally holding the camera.
After autofocus initiation has been removed, the sole functions of the shutter button are to activate the exposure meter when pressed half-way down and to trip the shutter when pressed all the way down. Now, on the rear of the camera, you have a dedicated autofocus button! Only pressing that button initiates autofocus, and happily, the camera will no longer refocus on the wrong spot when you recompose a picture.
Suppose you’re photographing a waterfall and your camera is configured for back-button focusing. Even though you’re reasonably confident that the waterfall won’t run away very fast, set the camera into continuous AF mode. Activate only the center AF point. Aim it at the rocks along the edge of the waterfall and press the AF button on the rear of the camera. The camera autofocuses on those rocks. Release the button, and the focus is instantly locked. Recompose the scene. Set the aperture to f/16 for a large depth of field and shoot.
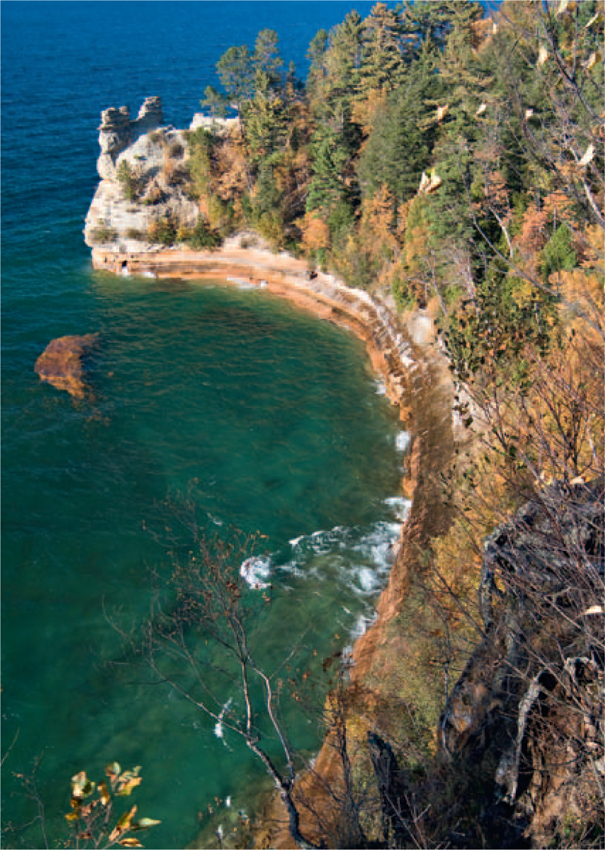
The lines of eroded sandstone nicely lead your eye to this 2-foot waterfall on the east side of Miner’s Beach at Pictured Rocks National Lakeshore. Here we back-button focused on the sandstone about one-third of the way up from the bottom of the image and stopped down to f/22 to sharply record the entire scene. Normally we use f/16, but the extreme depth of this image encouraged us to try for even more depth of field, even though diffraction is slightly more serious at f/22.

Even though you’ve recomposed the shot, the focus didn’t change when you pushed the shutter button. You’ve removed autofocus initiation from the shutter button and you, not the camera, now have sole control over when and upon what to focus.
KEEP THE SENSOR CLEAN
PREVENTION
Image quality suffers from a dirty sensor. Pixels that are covered up by dust and grit, can’t properly measure any photons, causing loss of valid picture information. It’s virtually impossible to keep your sensor spotlessly clean, but absolutely worthwhile to keep dirt to a minimum. Always keep a lens or a body cap on the camera. An uncovered camera body sitting around will most assuredly gather dust and dirt that soon settles on the sensor. Point the camera down when changing lenses or removing a body cap so that dirt falls away from the open camera instead of into it.
SPOTTING DUST ON THE SENSOR
An effective way to check your sensor for dust is to stop the lens down to f/22 and photograph the cloudless clear blue sky or a clean white sheet of paper. Overexpose by a stop or so to get a bright image. Load the image into your computer and view it with editing software. Magnify the image to 100% and scroll around. Serious dust spots should be obvious. If only a few small spots are present, you might ignore them, because you can easily remove them from your images during post-capture editing.
CLEANING THE SENSOR
Send it to a Pro
Some camera makers recommend that sensor cleaning be done only by their own repair facility or by an independent professional repair shop. Many camera stores, too, will clean sensors. Professional cleaning is likely the safest way, because the practitioners are presumably experienced, skilled in the task, have all of the right tools, and, as bailees, are generally responsible for loss or damage to your camera. However, professional cleaning does cost money and, if you must ship the camera elsewhere, there’s a risk of loss, the cost of insured shipping, and the unavailability of the camera until it’s returned. It’s possible to clean your own sensor, but you must be extremely careful — a damaged sensor will substantially damage your pocketbook! We clean our sensors ourselves because we’re often shooting in locations far from help, so we have no choice.
Cleaning the Sensor Yourself
Some people shouldn’t try to clean the delicate sensor themselves. It requires good planning, a low-dust environment, the correct materials, bright light, good eyesight, perhaps a magnifier, a steady hand, and even steadier nerves. Sometimes a post-cleaning check of sensor cleanliness shows that it isn’t really clean and must be done over again. Maybe that professional cleaning fee isn’t so bad after all! If one is heavy-handed, slips, or is careless, a very expensive sensor can be ruined!
Our dire warnings notwithstanding, if you insist, here’s how we do it: We clean our sensors only when our periodic test exposures, or our working images, show unacceptably high levels of dirt. We carefully follow the manual’s instructions to enter the camera’s cleaning mode, which will raise the mirror, open the shutter, and expose the sensor. Then, with the camera facing down, and exercising the most extreme care to not actually touch the surface of the sensor, we apply several vigorous gusts from our Giotto Rocket blower to blow the dirt from the sensor. We take another test shot and re-inspect for dirt. If everything looks good, we’re done. Usually, though, some dirt is successfully blown off while other dirt stubbornly meanders around the sensor or clings to it. Try blowing the sensor off a couple more times, which usually helps, but sometimes just doesn’t take it all off.
We leave our cameras set on continuous autofocus most of the time. Since we use back-button focusing 99% of the time, we have the choice of single focusing or continuous focusing at the touch of a button. Let up on the back-button focusing to lock focus. Hold the button in and the lens continuously refocuses on moving targets such as Kendal loping across the river. He’s a terrific mule packer and horseman.

Delkin Cleaning Kit
We use a kit made by Delkin Devices (there are others, such as those made by Visible Dust) that is specifically designed for cleaning DSLR sensors. The kit includes a lighted magnifier for careful inspection of the sensor surface and the location and type of contamination. The kit also includes a miniature vacuum, which we use with the most extreme care (!) to clean not only the sensor surface, but also the interior walls of the camera, aka, the sensor box. We do so, because these walls have a mysterious affinity for dirt, which will most assuredly — and soon — migrate to the sensor.
After vacuuming the sensor, we again shoot a test image as described above and inspect for dirt. If all looks well, we quit. If some dirt stubbornly remains, we use the cleaning swabs included in the kit. Carefully and precisely following the kit directions, we apply a correct amount of the special cleaning fluid to a swab. We carefully and gently draw the swab across the sensor surface. The swab typically picks up any stubborn bits of dirt, and a clean sensor should result. Sometimes, though, we must use two or even three swabs to clean the sensor to our satisfaction. We never re-use a swab. We also never get every spot off, but we can live with a few small dust bunnies as long as they don’t multiply. Good luck and do be careful!