4
Mastering Exposure

EXPOSURE HISTORY
Shooting excellent exposures is easily the most widespread problem our students have had over more than three decades of teaching nature photography. Many students attended our classes primarily to master exposure techniques. In the mid-seventies we used the camera’s through-the-lens meter, metered the subject using manual exposure, compensated for tonal (reflectance) values, and shot superb exposures on finicky color slide film, shot after shot, and we did it fast. We taught this method to tens of thousands of students over the years. The method we developed to suit our own shooting style was a simple version of the zone system modified for exposing color slides. Once understood, it was enormously effective, but it did require learning to precisely judge the reflectance values of the object being metered, which wasn’t intuitive for everyone and did require a good bit of practice.
Many of you reading this book have probably attended our classes. You might expect us to explore the intricate details of this modified color zone system, but don’t be shocked when we don’t. Exposing the digital image is significantly different from properly exposing slide film, so different strategies and techniques are required.
EXPOSURE DIFFERENCES BETWEEN FILM AND DIGITAL CAMERAS
Color film must be properly exposed to retain detail in important highlights. Sometimes shadows must be allowed to go black to retain the highlight detail. The range of image brightness that slide film can handle while maintaining detail in both highlights and shadows is called the film’s dynamic range and is only about five stops of light. Print film must be given more exposure than slide film to get detail in the shadows. Print film can deal with a wider dynamic range, typically eight or nine stops of light. Digital capture handles a dynamic range greater than slide film but perhaps less than print film. However, digital cameras are getting better all of the time for handling extremes in contrast, and image-processing techniques improve the situation even more. The best digital exposure requires controlling the quantity of photons striking the sensor to ensure that detail is kept in the important highlights, and satisfactory color and low noise levels in the shadows are still achieved. By adequately exposing the dark areas, the ratio of picture information to the electrical noise inherent in digital cameras, called the signal-to-noise ratio, is increased. This is an improvement that reduces picture degradation caused by noise. Good digital exposure might seem difficult because it requires concern with both the highlights and the shadows.
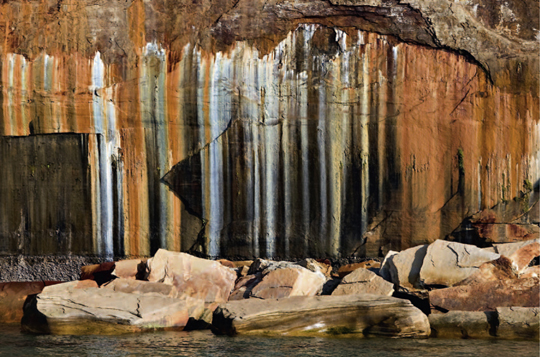
Sunlight passing through fog enshrouded trees sometimes explodes into shafts of light such as in this Idaho forest. This opportunity lasted only seconds, so Barbara caught it with her handheld point-and-shoot camera!

THE GOOD NEWS!
The histogram and highlight alert exposure aids found on all digital cameras (or should be) have made the art and science of shooting proper digital exposures straightforward and guaranteed. No longer must you wonder if the exposure of your images is correct. You know it is when the histogram is properly used. We are thrilled that exposure is so much easier now that it’s easily mastered by anyone. After all, there are far more important aspects of photography to concentrate on, such as light, composition, depth of field, sharpness, and finding photogenic subjects. Finally, we’re all freed from struggling with exposure!
HOW TO DETERMINE THE BEST DIGITAL EXPOSURE
Here’s a brief description of how we determine exposure with our Canon and Nikon digital cameras. We both use manual exposure most of the time, which means we set the ISO, shutter speed, and f/stop. We don’t let the camera select any of these. We use either spot metering or the more sophisticated but functionally similar systems called color matrix metering by Nikon and evaluative metering by Canon. (John uses spot metering while Barbara likes the color matrix pattern.) We use the analog scale in the camera’s view-finder or on a body-mounted display panel to align the indicator to the zero point, or to a different point if we feel the exposure needs to be compensated for reflectance values. We always use the far more informative RGB histogram instead of the averaging luminance histogram. Once we manually set the camera’s meter, we shoot an image and immediately check the histogram on the LCD monitor screen.
We look at the histogram for each of the three color channels to find the one that shows data farthest to the right. We want the extreme right side of the histogram curve to be as close as possible to the right edge of the graph without actually touching. Let’s say the red-channel histogram has some data farther to the right than either the green or blue channel. If, though, no part of the red-channel histogram is close to the right edge, we add light by slowing the shutter speed, increasing the ISO, or by opening the aperture. We recheck the red-channel histogram and, if necessary, continue to change, shoot, and check until the red-channel histogram is as close as possible to the right edge, but not touching.
Suppose that the first image showed the red-channel histogram to be farthest right, but that it was touching the right edge. The touching condition shows that the red channel may be overexposed, a condition sometimes called clipped. Now we must reduce the exposure. We subtract light with the shutter speed, ISO, or aperture and shoot and recheck, until we get the histogram we want; that is, close but don’t touch! This prevents overexposure of the red channel. Normally it only takes a couple of shots to get the desired exposure. Then we process the RAW image with software to get the finest digital image possible. Every photo in this book and our previous book, Digital Nature Photography — The Art and the Science, was exposed exactly this way so we know it works well.
Here’s the Canon 1D Mark III brightness (also called luminance) histogram in use. It averages the three color channels and graphs these data. Unfortunately, it’s easy to overexpose a color channel, but when these data are averaged, no clipping is shown. To avoid overexposing a color channel, use the RGB histogram instead.

Here’s how the RGB histogram looks on the same camera. Notice that the red, green, and blue color channels each have their own histogram. Look at each color channel, find the one that has data farthest to the right, ignore the others, and adjust the exposure until the rightmost data are almost touching the right edge of the graph. That should produce a terrific exposure.

If you follow our example, you’ll find shooting well-exposed digital images is simple! Of course, the devil is in the details, so we won’t end this exposure chapter yet. There are a lot of fundamental exposure details you need to master and it will help to understand the strategies we use in various situations. You’ll notice we both use manual exposure techniques, even though digital camera companies constantly promote how terrific their autoexposure is. We admit the vast majority of nature photographers primarily use autoexposure, and they do fine because modern meters do a fairly good job. However, we want exposing digital images to be fast, efficient, and precise, something we can’t really get with any autoexposure mode. We’ll discuss why this is so later in this chapter.
Let’s cover the important exposure fundamentals you really must know and go over your autoexposure choices in detail. It helps to have some background so you can understand exposure more fully. You may know your camera has an exposure compensation dial, but do you know why and when and how to use it? Do you thoroughly understand the histogram? Why must you add light to a sunny snow scene? Is program, shutter priority, or aperture priority the best autoexposure mode for landscape photography? Why do we use manual exposure? You’ll learn the answers to all of these questions shortly.
EXPOSURE BASICS
LENS APERTURES
Within the interior of a lens is a set of thin overlapping metal blades that can be user adjusted to control the size of an approximately circular central hole. That variable-size hole is called the aperture of the lens. The aperture’s fundamental function is controlling the amount of light striking the camera sensor and thus the exposure of the image. A secondary function, but of importance to most photographers and especially important to landscape shooters, is the aperture’s control over depth of field; that is, the image’s zone of acceptable sharpness.
Landscape images are usually most pleasing with enough depth of field that everything from the near foreground to the distant background is in sharp focus. A small lens aperture endows an image with large depth of field. A large lens aperture produces a small depth of field. The aperture, as stated, controls the amount of light getting to the sensor. A larger aperture passes more light. Of more interest to the lens designer than to photographers, the location of the aperture within the lens structure, specifically the distance between aperture and sensor, also has an effect on the intensity of the light striking the sensor.
The amount of light passing through an aperture is defined by the f-number of the lens, where the f-number is the lens focal length divided by the diameter of the aperture. Consider a 200 mm lens with an aperture diameter of 50 mm. The f-number is
It’s an f/4 lens! But wait! There’s more!
What if the aperture were smaller, say only a 25 mm diameter? Using the same formula, we get:
Now, this is truly important: The larger aperture has the smaller f-number, and the smaller aperture has the larger f-number. An aperture of f/4 is larger than an aperture of f/8, so an f/4 aperture will pass more light than an f/8 aperture.
All very interesting, you say, but do I really need to know all that? Nope! You can be an excellent photographer without knowing most of that, but there are a few things that you do need to know.
1. You need to know the standard f-number series.
2. You need to know the language of stops.
3. You need to know how f-numbers control depth of field.
4. You need to know how varying f-numbers and shutter speeds add and subtract light.
5. You need to know when to change ISO settings.
Memorize the F-number Series
The standard f-numbers must, absolutely must, be thoroughly memorized. You must be able to rattle them off at low speed or high, forwards to backwards, backwards to forwards, from the center to one end, and from the center to the other end, even after several strong drinks. They are
| 1 | 1.4 | 2.0 | 2.8 | 4.0 | 5.6 | 8 | 11 | 16 | 22 | 32 | 45 |
| B | 30 | 15 | 8 | 4 | 2 | 1 | 1/2 | 1/4 | 1/8 |
| 1/15 | 1/30 | 1/60 | 1/125 | 1/250 | 2/500 | 1/1000 | 1/2000 | 1/4000 | 1/8000 |
| Numbers in seconds. | |||||||||
We often use f-numbers in talking photography: How much is that f/2 lens in the window? No lens that we know of has all of the f-numbers. Most lenses begin at f/2.8 or f/4.0 and they go to f/22 or perhaps f/32. Be aware the smallest f-number (largest aperture size) on many lenses is an intermediate one that falls in between the main ones. As examples, Canon offers a variable aperture zoom with a maximum aperture of f/3.5, and another with a maximum aperture of f/4.5 and a 50 mm prime lens with a maximum aperture of f/1.2.
F-numbers Control Depth of Field
As the f-number gets larger, the aperture in the lens gets smaller. Small apertures offer more depth of field. Many photographers have trouble remembering that large f-numbers such as f/22 have the small apertures that give increased depth of field. It seems counterintuitive, but learn to accept it (they’re actually fractions) and memorize how it works. Landscape photographers tend to use the greater depths of field offered by smaller apertures like f/16 and f/22, so you’ll be using those f-numbers a lot. It’s helpful to remember to use f/16 and f/22 anytime you want plenty of depth of field, which is most of the time in landscape photography!
Adding and Subtracting Light Using F-numbers
Look at the standard f-number series again. Each f-number listed varies from its nearest neighbor in terms of how much light it passes to the sensor. F/4 only passes one-half of the light as f/2.8, but passes twice as much light as f/5.6. Each f-number passes twice as much light as the next larger f-number, but passes only one-half as much light as the next smaller f-number. If you begin at f/8 and then move the aperture to f/4, you have quadrupled the light passing through the lens.
THE LANGUAGE OF STOPS
All of this doubling, halving, quartering, and quadrupling can get messy, so the language of stops was developed to make talking about exposure easy once you got used to it. Stops are found throughout photography. F-numbers, shutter speeds, ISO values, and even guide numbers for flash can all be divided into stop increments. A stop refers to a quantity of light. Each f-number in the standard f-number series is said to vary from its nearest neighbor by one stop. F/4 passes one stop more light than f/5.6 and two stops more light than f/8. If we tell you to begin at f/8.0 and add two stops of light, what f-number must you go to? If you said f/16, you have certainly changed the f-number by two stops, but you went the wrong way! Changing to a higher f-number subtracts light, because the aperture is smaller. The correct answer is f/4.0! How many stops are found between f/1.0 and f/45? It’s okay to peek. You should count a total of 12 stops included in the f/1.0 and f/45 series.
SHUTTER SPEEDS
Shutter speeds control the camera’s ability to freeze action or to show motion. The faster the shutter speed, the greater your ability to arrest the motion of the subject or the camera. The slower the shutter speed, the more motion-induced blur appears in the image. Above is a list of common shutter speeds, in seconds, that many cameras have.
Let’s ignore B for a few moments and study the other shutter speeds. Notice that each one is half of its neighbor on one side, and twice its neighbor on the other side. For example, a shutter speed of 1/250 second is twice as long as 1/500 second and half as long as 1/125 second.
Do I care? Yes, you do. This is important stuff. Of the three example numbers, the 1/500 number means that a push of the shutter button will cause the shutter to open for 1/500 second and then close, a speedy event indeed when one considers that it could theoretically be done 500 times in only one second! If we set the shutter control to the middle choice, 1/250 second, then the shutter would be open for twice as long as before. Thus, a shutter speed of 1/250 second will let in twice as much light as a shutter speed of 1/500 second. In photographer jargon, 1/250 second is one stop brighter than 1/500 second. Using similar thinking, we see that 1/250 second is a shorter period of time than 1/125 second. Twice as short. So, the photographer would note that 1/250 second is a stop darker than 1/125 second, or that 1/250 second is a stop down from 1/125 second, and so on.
The letter B stands for bulb exposure. When you use the B setting, pressing the shutter button and holding it down keeps the shutter open for as long as the button is held down. Landscape photographers often use a cable release to hold the shutter open when shooting long exposures, such as the stars twirling about the heavens, the northern lights, lightning bolts, and sometimes waterfalls.
THE LAW OF RECIPROCITY
This law describes how the shutter speed and f-number work together to control the exposure. It can be written as a simple formula:
The exposure is a product of the aperture value times the shutter speed value. For example, if you reduce the exposure by using a faster shutter speed, then you must open up the aperture to allow more light to enter and strike the sensor so the exposure can remain the same.
Enough formulas! Let’s consider a specific example. Suppose the proper exposure for a waterfall is 1/15 second at f/8. Using the reciprocity principle, if you change the aperture to f/22 to obtain more depth of field, you must then also change the shutter speed to 1/2 second to maintain the original exposure. Changing the aperture from f/8 to f/22 subtracts three stops of light (f/8 to f/11 to f/16 to f/22 = − 3 stops). The 3-stop reduction in light is offset by changing the shutter speed to 1/2 second (1/15 to 1/8 to 1/4 to 1/2 +3 stops). After we’re done changing this and that, we have an exposure of f/22 at 1/2 second that puts exactly the same amount of light on the sensor as the original exposure of f/8 at 1/15 second. Yes, the amount of light is the same, but much has changed. The smaller f/22 aperture has increased the depth of field, so more of our waterfall may be in focus than it was at the larger f/8 aperture. The slower 1/2-second exposure has allowed the water to blur a little more, giving us smoother and silkier water than the faster shutter speed of 1/15 second. Which exposure is better? The one you like better.
(a) A1-second shutter speed nicely blurs the cascading water of Portal Falls near the trail head to Mt. Whitney. (b) The faster shutter speed of 1/15 second “freezes” the water considerably. Neither image is wrong because it’s an artistic choice. We tend to like blur in our waterfall images, but if you prefer to arrest the motion of the water more than we do, that’s what you should do.

ISO VALUES
Both film cameras and digital cameras use an ISO rating as a measure of the light sensitivity of the film or digital sensor. All films and sensors rated at the same ISO should produce identical exposures when irradiated by identical light. For example, in a circumstance where a film or sensor sensitivity of ISO 100 produces underexposure, one could correct his film camera’s plight by changing to a higher ISO film. But the digital photographer would just smile, turn a knob, and reset his camera to a higher ISO setting. That lucky digital photographer has a wide choice of ISO settings available at his every whim!
ISO Values (in Stop Increments)
Digital cameras generally offer a selection of several ISO settings. A typical set is
| 50 | 100 | 200 | 400 | 800 | 1600 | 3200 | 6400 |
Interesting, eh? Like shutter speeds, each ISO setting has half the light sensitivity of one neighbor and twice the light sensitivity of its other neighbor. Or, slipping again into photo jargon, ISO 400 is two stops more sensitive than ISO 100.
A sensor’s inherent design speed, called its native speed, is ISO 100 in most cameras, although some cameras have a native ISO of 200 and some may have other native speeds. Users generally can’t change a camera’s sensor, so the native ISO can’t be changed. However, cameras do provide the user with several ISO speeds by electrically amplifying the sensor’s output data. The ability to change the ISO value from shot to shot on a digital camera is a major advantage.
WHY CHANGE ISO VALUES?
If ISO 100 (ISO 200 on some cameras) is the native speed of your digital sensor, why would you want to change it in landscape photography? Increasing the ISO value to ISO 400 or even ISO 800 makes it easier to get more depth of field at f/16 or f/22 while keeping the shutter speed fast. Serious landscape photographers use a tripod most of the time, which minimizes the importance of faster shutter speeds. However, even on a tripod, there are times where fast shutter speeds are helpful. For example, a fast shutter speed is valuable to sharply record a wave crashing into a rocky outcrop. Fast shutter speeds reduce the problem of high wind vibrating your tripod or blowing foreground wildflowers in your mountain landscape image. One occasionally shoots landscape images hand-held. It can be difficult or impossible to use a tripod in situations such as on crowded viewing platforms, in deep snow, when photographing from boats, and where tripod use is prohibited.
THE SENSOR NOISE PROBLEM
Changing the ISO value from the native sensor speed does reduce image quality. A change in the ISO speed is accomplished by electrically reducing the signal from the sensor, or more common, by electrically amplifying it. Either way, but especially when a higher ISO is selected and the signal is amplified, digital noise will be increased. The higher the ISO invoked, the higher the noise. Do you remember what prints looked like when shot with high-speed film?
Film had large light-sensitive crystals that showed up in prints as tiny specs that looked like sand and were called grain. Digital images don’t have grain, but sensor noise resembles the appearance of grain. Sensor noise is easiest to spot in the dark portions of the image. It shows up as specks of an unexpected color or brightness. If there are specks of red or blue in a part of the image that should be black, you’re probably looking at sensor noise. The native ISO of your sensor generates the least amount of noise. The highest ISO setting on your camera gives the worst noise. Digital cameras are rapidly improving in many ways, and lower sensor noise is one of them. Indeed, the new Nikon D3 controls noise so well that it appears to shoot acceptable images even when used at ISO 6400 and higher.
OUR ISO RECOMMENDATIONS
Although new camera technology is minimizing the problem of sensor noise, and software is also available to reduce the problem, we use the camera’s native ISO speed whenever possible. The native ISO speed delivers the cleanest possible digital image, so there’s no point most of the time to use anything else in landscape photography. We use a tripod 95% of the time, so shutter speed isn’t that critical for the vast majority of our landscape images. However, we do love photographing landscapes from boats, and then we typically use ISO 400 (more if necessary) to obtain the higher shutter speeds needed for sharp images. We will discuss shooting strategies from boats in more detail in Chapter 8.
Always use the camera’s native sensor speed if there’s no compelling reason to use another speed. For most cameras, it’s ISO 100, but some use ISO 200 as the native speed. Since there’s no wind to vibrate the tripod or wiggle the vegetation, using the native sensor speed is best to record the highest quality digital image of these dunes in White Sands National Monument.

EXPOSURE INCREMENTS
Most digital cameras offer exposure increments that are finer than the full-stop increments listed above for f-numbers, shutter speeds, and ISO values. A choice of these increments is normally found in the shooting menu or in the custom functions.
Your camera probably offers intermediate exposure increments that are smaller than the full-stop increments we’ve been discussing. Some cameras can be configured to change shutter speeds, apertures, and ISO numbers, not in full-stop increments, but in 1/2 or 1/3 stop increments. For example, the Canon 1Ds Mark II and many others can be set to exposure increments of 1/3 stop. If so set, then between every f-stop of the basic series one could set two intermediate f-stops. For example, you’d have the f-stop series of f/16, f/18, f/20, and f/22. Likewise, if set to 1/3-stop exposure increments, one would find two shutter speeds between the basic speeds of 1/60 and 1/125 second, producing a series of 1/60, 1/80, 1/100, and 1/125 seconds.
SELECTING THE EXPOSURE INCREMENT
One-Stop Increments
Don’t use one-stop increments. It’s easy to expose more precisely than one-stop increments allow, so there’s no point in using them. You get more flexibility when using shutter speeds and f-numbers if you use a smaller exposure increment. Some cameras offer intermediate increments for the shutter speed and aperture, but not for ISO values, which is a minor deficiency. We like having 1/3-stop increments for setting our ISO, but could easily live with full-stop ISO increments if we had no choice.
One-Half Stop Increments
The ability to use half-stop increments between the shutter speeds and f-numbers is very useful. It gives finer control over the depth of field and shutter speed. This setting should work fine for most landscape photographers. One advantage of using 1/2 stop increments over 1/3 stop is that changing the shutter speed or aperture is a bit quicker when using manual exposure because you don’t have to rotate the control dials through so many values. Yes, it’s only a small advantage, but every little bit helps.
If you use autoexposure modes such as aperture priority, shutter priority, or program; using one-half stop increments makes perfect sense. It’s quite effective to use autobracketing and autoexposure to shoot static landscapes. The autobracket feature can be set in several ways, depending on the camera. We suggest bracketing the meter’s recommended exposure by plus and minus a half stop. A three-image autobracket series provides an image the camera thinks is properly exposed, plus a second image that is one-half stop darker, and a third image that is one-half stop lighter. When editing the three images, select the one that has the best exposure as indicated by the histogram. A three-shot bracket using half-stop increments will likely ensure that most landscapes will produce at least one well-exposed image, provided the scene isn’t much more or much less reflective than middle tone. If you used a 3-shot bracket with 1/3-stop increments, you would only cover a range of 2/3 stops, so your chances of getting the optimum exposure are slightly less (1/3 stop).
One-Third Stop Increments
This choice offers fine control over depth of field and shutter speeds, more than most of us really need. However, if your camera offers and you use the RGB histogram (as we do) that shows individual histograms for the red, green, and blue color channels, then 1/3-stop increments is the preferred way to get the best exposure. It works best for us because we expose our landscapes to avoid losing highlight detail. We ensure that the color channel with histogram data farthest to the right has that data as close as possible to the right edge of the graph without actually touching. The precision of the 1/3-stop exposure increments helps us achieve the desired exposures.
METERING MODES
Before using the exposure meter to shoot well-exposed images, you have another choice to make. All DSLRs offer a few metering patterns. The common metering modes are Canon’s evaluative metering, Nikon’s color matrix metering, and partial, center-weighted, and spot metering. These choices refer to the portion of the scene the meter is reading, whether the meter emphasizes certain areas in the scene, and whether software and stored data are consulted by the meter.
CANON’S EVALUATIVE METERING AND NIKON’S COLOR MATRIX METERING
These are the most complex and sophisticated metering patterns that today’s cameras offer. Conceptually, they measure the scene brightness in multiple areas of the frame (some Nikons also measure the scene color in different areas). The meter systems then compare their measured data with a large bank of stored data already in the camera’s computer (a look-up table) and after some unfathomable calculations, they reach an exposure recommendation. I say recommendation, because the meter output will be sent to the camera when in autoexposure mode, although the shooter can intervene by using the compensation dial. In manual exposure mode, the meter output is presented not to the camera, but to the photographer. These fancy systems work quite well in most situations and they take into account bright skies, back-light, background, and other factors. When using any autoexposure mode such as program, aperture priority, or shutter priority, this may be the best metering pattern. All metering patterns can produce a fine exposure by using exposure compensation, but the evaluative and color matrix systems are more likely to get you close to the ideal exposure in more situations than other metering modes. We use them for manual metering too, and they really shine when shooting landscapes. If a scene is very dark or very bright, these metering modes normally get the exposure close to perfect. We achieve a precise exposure by manually adjusting the exposure so the histogram’s right-most data are as close to the right edge of the graph as possible without climbing it.
PARTIAL METERING
Partial metering considers only about 8 – 10% of the middle of the frame. It can be useful for metering back-lit subjects, but evaluative metering used in conjunction with the histogram works perfectly for our needs, so we never use or recommend partial metering. And, if precise metering of a small portion of the scene is necessary, it makes sense to use spot metering.
CENTER-WEIGHTED METERING
This metering pattern is typical of old film cameras from the 1970s and earlier but still lives on, though we don’t know why. The meter averages the entire scene, and as its name suggests, applies a greater importance to the center area. Center-weighted metering has survived because so many photographers are accustomed to it, although we find no compelling reason to use it. If you’re one who still loves it, then it’s the perfect choice for you. However, we feel evaluative or color matrix metering is far more effective and will get you closer to the ideal exposure in more situations.
SPOT METERING
Spot metering measures a very small part of the frame, perhaps only 2 – 3%, so it’s very precise and simplifies metering small areas and small objects. Spot metering is a terrific way to meter if you carefully meter something and compensate for its reflectance. For example, John uses the camera’s spot meter to carefully meter the light-toned sand dunes in Death Valley National Park. He compensates for the sand’s high tonality by adjusting his viewfinder’s analog display to +1 1/3-stops above zero and shoots the image. Then he confirms that the RGB histogram channel with the farthest right data has that data as close as possible to the right edge of the graph without actually touching. If not, he changes the exposure accordingly and shoots again.
Spot metering is quite useful in landscape photography for measuring the contrast range in a scene. If a scene has a shadowed foreground and a sunlit distant mountain, it’s easy to spot-meter both foreground and background to see how many stops separate the two. The spot meter is a fine way to measure a scene’s brightness range to see if the digital sensor can handle it. By knowing the contrast range of the scene in stops, it’s easier to figure out how widely you must bracket exposures so they can later be assembled into one image using high dynamic range (HDR) software to provide excellent detail throughout the image.
USING THE HISTOGRAM
The histogram is a simple bar chart of exposure that’s enormously useful once you learn how to read it. It tells whether you have under- or overexposed areas in the image. The histogram helps to shoot perfectly exposed images while the subject remains available, which is nearly always true in landscape photography.
Histograms can look a bit intimidating if you’re not familiar with charts and graphs. Don’t be alarmed, though. You can use the histogram as a reliable guide to excellent exposures shot after shot, and it’s truly easy! A histogram is a simple graph representing 256 brightness values along the horizontal axis. Those brightness values range from 0, (pure black), which is on the extreme left, and 255 (pure white), which is on the extreme right edge of the graph. For any brightness point along that horizontal axis, the height of the histogram at that point, that is its height on the vertical axis, represents how many pixels of the sensor have that particular brightness. An important note, though. The graphical picture of the histogram doesn’t contain numerical data for the brightness values nor for the number of pixels having any given brightness. That’s unimportant, though, because photographers don’t normally need to know the numerical data — they just need to understand the meaning of the histogram’s shape and the meaning of its left-to-right location within the graph’s frame. Suppose, for example, your histogram shows a large hill of data between the (unnumbered!) brightness values 189 and 242. The substantial vertical development shows that there’s a large quantity of the sensor’s pixels having brightness values within that range. If, though, there’s little or no vertical data between brightness values 189 and 242, then your scene, as exposed, has few or no areas of brightness within that range, so your sensor has few or no pixels having those brightness values.
Beginners tend to hope for a perfectly shaped histogram. They often envision a shape that begins fairly low on the right and left edges of the graph, but gradually rises toward the middle similar to the shape of a mountain or the familiar shape of the common bell curve. But there’s no such thing as a histogram perfectly shaped for all images. The perfect histogram is totally dependent on the image.
If you fill the frame with snow mounds and soft shadows, you should expect to see a lot of pixel values near the right edge of the histogram, because nearly everything in the image is white. You may have some pixels near the middle of the histogram that represent the shadows, but don’t expect any pixels showing up on the far left edge because nothing in the scene, as exposed, is black or even close to black.
As you can see in the snow mound example, don’t be worried if some brightness values don’t show up in the histogram. If the histogram doesn’t contain any pixels of certain brightness values, you just don’t need those tones. It merely means that your scene, as exposed, didn’t contain those particular brightness values. Also don’t be worried if gaps appear in your histogram. If the scene is comprised mainly of blacks and whites, you should expect to see very few pixels of midrange brightness values, because they simply aren’t in the scene as you’ve exposed it. Although gaps in a camera’s histogram are no problem, problematic gaps can occasionally arise during post-capture editing, such as aggressive Levels adjustments in Photoshop although, in this regard, the processing of RAW images is more forgiving than the processing of JPEGs.
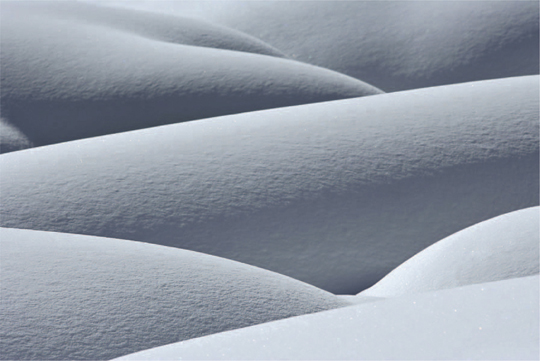
These back-lit overlapping ridges of snow make appealing patterns. We call them “intimate landscapes.” Since nearly all of the brightness values in this scene are light to entirely white with few dark areas, don’t expect to see much data appear near the left side of the histogram if the image is properly exposed.
HISTOGRAM SHAPES
The shape of the histogram does tell you a few things about the image right away. A high-contrast image will generate a lot of pixels with brightness values toward the left (black) edge of the graph and a lot toward the right (white) edge of the graph. If, on the other hand, nearly all the pixels reside on the right edge (greater brightness values) of the histogram, then the histogram is depicting a lowcontrast, high-key image, i.e., an image comprising mostly brighter tones. Conversely, should a histogram show most of the pixels having brightness values toward the left edge (lower brightness values) of the histogram, then the histogram is depicting a low-contrast, low-key image, i.e., an image of mostly darker tones. Remember, each and every scene gives a histogram having a unique shape determined by the tonalities of that scene. Also, remember that while the shape itself is set by subject tonalities, it’s the photographer’s selected exposure that sets the left-to-right location of that shape within the graph. This is a critical issue discussed in detail later in this chapter.
AVOID CLIPPING
Clipping is a condition where subject matter and exposure result in the histogram actually touching the extreme left or right edges of the graph. A histogram touching the left edge depicts some pixels recorded at such low brightness levels that they contain very little or negligible picture information. This condition is known as blocked shadows. Likewise, a histogram touching the right edge of the graph shows some pixels recorded at such high brightness levels that the sensor’s photo sites are saturated and can’t contain the correct picture information. This condition is known as blown-out highlights. It’s desirable to retain detail in the important highlights and black shadows if possible. If the dynamic range of the scene is greater than the sensor can record, it’s best to ignore the blacks and retain detail in the generally more important highlights. Photographers refer to areas of the histogram touching either edge of the graph as clipped areas, and shun them because they may lack picture detail.
Some scenes generate histograms where some brightness levels have pixel quantities hitting the top of the graph. This might happen when photographing a scene like a tree against a uniform blue sky or against sand dunes of largely similar brightness levels. For example, a spike of data between brightness levels 189 and 231 not touching either the right or left of the graph, but hitting the top edge, isn’t clipped. It’s hitting the top edge only because the graph isn’t tall enough to show the thousands of pixels in that range of brightness values. You haven’t clipped any data nor lost any picture detail, because clipping can occur only when histogram data touch or actually climb the left or right graph edges.
Problems with Clipping on the Right
Clipping on the right edge of the histogram is the more serious clipping, because it indicates that some pixels accumulated so many photons of light that they filled to capacity. When a pixel is filled to capacity, it becomes saturated and loses its ability to faithfully represent image detail. Retaining detail in important highlights is critical because bright areas in the image quickly draw the viewer’s eye and they expect to see detail. However, clipping can be acceptable where there’s no need to preserve detail in the highlights; for example, where the highlights are specular highlights, such as a brilliant reflection from a metal surface or a glare from water drops. If the sun appears in an image, the portion of the histogram representing the sun will undoubtedly be clipped because the sun is brighter compared to everything else. However, overexposing the sun is quite acceptable because we’re accustomed to not seeing any detail in it.
Problems with Clipping on the Left
One can usually avoid clipping on the left edge of a histogram graph unless a properly exposed scene has a very large brightness range; that is very high contrast. However, one can get clipped black areas in an image where there’s simply not enough light for the pixels to measure adequate picture information. When a pixel doesn’t accumulate enough photons, the pixel can’t accurately determine the true brightness and color of the spot in the scene that corresponds to the pixel. This often results in objectionable digital noise, which appears as unexpected brightness or colors in the image and looks a little like film grain. Digital noise should be strictly avoided unless it serves an artistic purpose. Noise isn’t the only problem with clipping on the left, though. Left clipping also causes inaccurate colors because the pixels are unable to record enough photons for an accurate reading of the light. If left clipping is unavoidable, software dealing with digital noise can help considerably. However, if you always expose digital images the way we do, you’ll have very few problems with clipping on either the left or right edge of the histogram.
Light has a lot to do with the brightness range of a scene. If the scene has both black and white objects at the same time and the day is cloudy, you have a fairly wide brightness range, i.e., a large contrast, but because of the soft light, your camera’s sensor might handle it without any clipping if you do your part and expose well. However, if this same scene is illuminated by bright sun so some white objects are in the sun and some dark objects are in the shadows, the scene’s contrast may be far too great for your sensor to record it without clipping.
THE PERFECT DIGITAL EXPOSURE FOR THE RAW IMAGE
The ideal RAW exposure is one that’s as bright as possible without losing highlight detail. This means the histogram should be nearly touching the right edge without actually touching. Exposing this way retains the fine detail of the highlights, while making all of the other tones, including the dark ones, as bright as practicable. This technique permits all pixels to accumulate more photons, and that’s especially important in allowing the darker tone pixels to accumulate more photons, which results in more accurate colors and lower apparent noise.
And, it’s easy to achieve this exposure by using the histogram. As we’ve said over and over, the histogram data should be as close as possible to the right edge of the graph without actually touching. If it isn’t, move it there! When in manual exposure mode, adjust aperture, shutter speed, or ISO speed to move the histogram; when in any autoexposure mode, adjust the exposure compensation control.
JPEG EXPOSURES
We realize that many of you prefer to shoot JPEG images and there’s nothing wrong with that. If you don’t plan to do a lot of post-processing with the file, the white balance choice is suitable and the exposure is good, JPEGs are perfectly suited for most applications. However, JPEG shooting demands a higher level of exposure accuracy in the camera, because JPEGs have a limited ability to be manipulated during post-capture editing in your digital darkroom. JPEG images should be shot with a slight bias toward more exposure but, unlike when shooting RAW images, you don’t want the histogram nearly touching the right edge most of the time. With JPEGs, it’s better to place the bulk of the histogram data slightly to the right of the graph’s center. However, recent advances in image-processing software that address the special needs of JPEG images may be available by the time you read this.
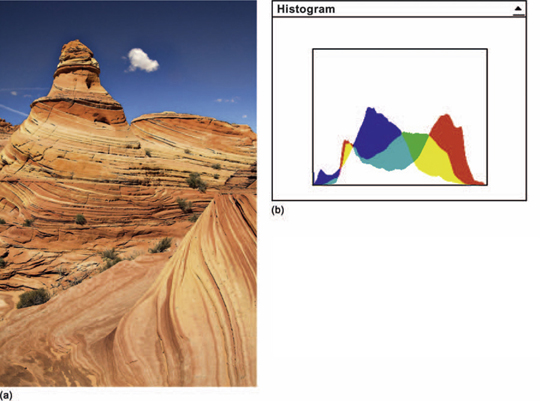
(a) The gorgeous wavy rocks at Coyote Buttes are easy to expose. Monitor the RGB histogram to make sure the color channel with data farthest to the right, in this case the red channel due to all of the red in the rocks, is nearly touching the right edge of the graph. (b) This histogram shows the red channel is nearly touching the right edge of the graph. Exposing this way preserves highlight details, captures more image data throughout the scene due to the linear nature of how sensors measure photons, and reduces noise in the shadows.
MOVING THE HISTOGRAM LEFT OR RIGHT
AUTOMATIC EXPOSURE MODES
If a histogram is clipped on its right edge, move it to the left in the next shot by adjusting the exposure compensation to subtract light. If the histogram is clipped on its left edge, or otherwise needs to be moved to the right, adjust the exposure compensation to add light. Depending on your camera, the compensation control might allow plus or minus two or three stops of light, in increments of 1/3 or 1/2-stops. Use the histogram to guide you to the very best exposure compensation. If the histogram doesn’t move when you take another image, you may be trying to make the adjustment with the flash compensation control instead of the control for the camera’s compensation. Watch out for light passing through the viewfinder when using automatic exposure, too. In certain situations, light streaming through the viewfinder influences autoexposure causing underexposure, so you should always shield the viewfinder eyepiece with its built-in shutter, its separate cover, or your careful-to-not-touch hand or hat.
MANUAL EXPOSURE
Techniques
In many ways, manual exposure is easier to compensate. Digital cameras in manual exposure mode don’t automatically set the aperture or shutter speed — you must do it manually. It’s simple enough. The cameras show an exposure-level indicator inside the viewfinder. It generally appears on the bottom or on the right side of the viewfinder display. Oftentimes the exposure indicator is duplicated on an LCD panel elsewhere on the camera.
Setting the camera controls so that the indicated exposure aligns with the zero position of the exposure indicator scale results in an exposure following the meter’s recommendation without any compensation. To introduce compensation, merely align the indicated exposure to something other than zero. Set the indicated exposure to +1 on the exposure scale to add one stop of light, to −2 to subtract two stops, and so on. The exposure indicator scales of most cameras allow adjustment in increments of 1/3 or 1/2 stops.
Should your camera not have + and − signs on the exposure scale, showing which direction of change adds light and which direction subtracts light, take this simple test: Meter a scene and set the exposure indicator to zero. Adjust the camera to add light by changing it to a slower shutter speed. The direction in which the exposure indicator moves is the direction of plus compensation. The other direction is negative compensation.
We’ve already said that we use manual exposure for nearly all of our digital photography because manual exposure makes it easier to obtain the precise exposures we demand. The disadvantage of manual exposure is that one must manually adjust the shutter speed and aperture controls when metering because the camera doesn’t do it for you. That’s also an enormous advantage! We’ll tell you why a bit later. We do admit manual exposure is also slightly less efficient when ambient light levels are frequently changing.
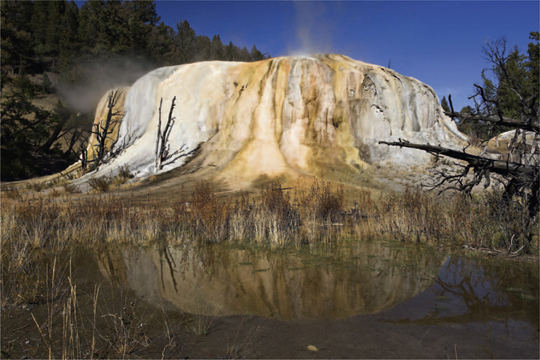
Let’s describe how we use manual exposure to photograph the gorgeous Orange Spring Mound near Mammoth in Yellowstone National Park. Orange Spring Mound is quite large and you must be close to it to prevent roads and signs from appearing in the image, so a wide-angle lens, such as a 24 – 70 mm zoom lens, is needed. The mound doesn’t move, so shutter speed isn’t important, but depth of field is very important to sharply focus the foreground and the mound itself. We’ll use f/16 to get adequate depth of field. We didn’t use f/22 because of diffraction considerations. With the aperture at f/16, we move the shutter speed control until the exposure indicator aligns with the zero position, which means no compensation. Shoot the image and check the histogram. The unique hot spring is mostly light red and yellow (the color of the bacteria living in the hot water), so the metering causes the histogram to fall short of the right-hand edge. We add 2/3 stop of light by moving the shutter speed two clicks to a slower speed (our cameras are set to use 1/3-stop increments) and we shoot another image. The new histogram is nearly touching the right edge without clipping, which is exactly how we want to expose our RAW image. Although we went through several steps, arriving at the optimum exposure took less than 10 seconds. It’s quick, simple, and precise, and we know of no better way to obtain the optimum exposure.
A torrential downpour occurred just as we arrived at Orange Spring Mound Near Mammoth. After waiting a few minutes, the storm cleared and the sun returned, making a splendid reflection in a temporary pool of water at the base of the mound. Using her Nikon’s color matrix meter, Barbara manually adjusted the exposure to the zero position using the scale in the viewfinder and took a shot to view the histogram. She found the color channel with data farthest to the right was a little shy of the right edge of the graph, so she manually added 2/3 stop of light with the shutter speed and shot another image. This new histogram showed the data were now nearly touching the right edge of the chart, exactly what she wanted.
RGB Histogram
The manual metering technique works very well indeed, but there are two more variables you should know about. First, most cameras offer a luminance histogram, also called a brightness histogram. This histogram averages the exposure for each of the three color channels (usually red, green, and blue), although some cameras use different colors. Caution! A luminance histogram’s averaging scheme makes it entirely possible to clip one or two colors, even though the averaged result shows no clipping! If you shoot a section of forest full of various shades of green, a majority of the light striking the sensor is green. This makes it easy to clip the green channel while the blue and red channels might be fine.
We prefer to use the RGB histogram. Some have suggested that we not talk about the RGB histogram because it’s too difficult for mere mortals to use and understand. We don’t agree. The RGB histogram is as simple to use as the averaging luminance histogram: You look at the graph for each color channel and note which channel has its data farthest to the right. In our green forest example green would be farthest right, and you’d get an excellent exposure by exposing so that the green channel data are snuggled up to the right edge short of actually touching. You needn’t worry about the other color channels.
How the Histogram is Created
The histogram, as stated before, is a graph in which the horizontal axis depicts the range of darkest to lightest brightness values that the camera can record. The brightness values range from pure black, shown at the extreme left end of the axis, to pure white, shown at the extreme right end of the axis. Although of limited interest to the photographer, every brightness along the horizontal axis is assigned a number ranging from 0 for pure black at the left end, up to 255 for pure white at the right end.
The vertical axis represents the quantity of pixels that have the specific brightness defined by their horizontal position. The horizontal axis of the graph, while not numbered, does represent a range of brightness values from 0 to 255, although the photographer ordinarily has no need for this numerical information. The vertical axis doesn’t have any numbers either, but the height of the graph at any specific brightness is only a graphical proportional representation of how many pixels in the image are of this specific brightness.
A histogram graph is derived from the color and brightness data extracted from the camera’s sensor. Yes, you say, that’s okay for JPEGs, but how does a camera obtain histogram data when shooting RAW images wherein the sensor data are largely unprocessed by the camera? The secret is that considerable in-camera processing is done on the RAW data, and a small JPEG is created from which the camera’s histogram data are derived.
The in-camera processing for histogram generation involves color, contrast, and white balance. Contrast is generally increased. This processing may be desirable for many purposes, but can result in a JPEG — and its resulting histogram — that don’t accurately represent the actual data of the RAW images. For example, a histogram may erroneously show highlight clipping. The error arises from the underlying JPEG having been made into an image higher in contrast whereas, in fact, the RAW image is properly exposed. Later, in RAW conversion, that image may show a perfectly satisfactory exposure even though the camera histogram implied it was overexposed by a whole stop.
So don’t be too quick to delete a RAW image if its histogram shows a small amount of highlight clipping. To be safe, though, we still advocate that RAW images should be exposed to closely approach the right edge of the graph without actually touching it, but you probably have a little more leeway than that.
We still insist, despite this additional consideration, that we use the histogram and are happy with the consistent correct exposure that our method provides. However, we suggest that, if you shoot RAW rather than JPEG, one way to obtain even greater accuracy of the histogram with reference to the RAW data is to turn off as many in-camera photo enhancement settings as possible, especially saturation, contrast, and sharpness. The image on the back of your LCD (also based on the JPEG thumbnail) might not be as immediately gratifying, but your histogram will more closely reflect your actual exposure.
Moreover, if a scene is high in contrast, we cover our bases by shooting a couple of extra frames. We do one at + 1/3 and one at +2/3. We keep all of the exposures. We begin processing by studying the most clipped file to learn whether we can retrieve all of its important highlight detail. If those details are present, we know that the sensor has accumulated all possible detail in the image and has presented it with minimum apparent noise.
THE HIGHLIGHT ALERT
This is another exposure aid that helps you arrive at the optimum exposure. It may require activation as a menu item or through a custom function. When the highlight alert is activated, any overexposed areas conspicuously flash off and on; that is flash black and white during image inspection on the LCD monitor. Photographers often say they are checking for blinkies which, if present, indicate the presence of overexposed areas in the image. If you do have blinking areas, subtract light and shoot another image. When you no longer have the blinkies, your highlights should be fine.
Don’t forget that clipping and blinkies are warnings of detail loss, but there are indeed highlights in which no detail is needed, especially specular highlights. If such highlights clip or blink, it’s okay to ignore them. A good example is the widespread sparkling of the wind-swept sea in the bright light of the sun.
EXPOSURE-MODE CHOICES
Beyond manual exposure mode, your camera may offer several autoexposure modes. Different models offer aperture priority, shutter priority, full auto, and various program modes. The program modes may address specific subjects, such as wildflowers, landscapes, sports, portraits, and close-ups. While all of these choices can work fairly well, we think having so many choices makes things unnecessarily complicated. You might think the landscape shooting mode would be perfect, but don’t use it unless you want to give up control and let the camera determine the nature of your picture. Avoid full auto, too, because it assumes you know nothing and we know that’s not the case because you’re reading this book! Besides, full auto does take away many of your choices and, in some cameras, even removes some menu options. We believe that only four of the autoexposure modes listed above are suitable for the serious landscape photographer, so let’s examine each of them.
PROGRAM AUTOEXPOSURE
This exposure mode lets the camera select the aperture and shutter speed that will be best (it hopes) for the scene. It does consider the lens in use, so it knows to increase shutter speed when longer lenses are in use to minimize the effects of camera shake, which is very important with those longer lenses! Yet, when increasing shutter speed, the mode must enlarge the aperture to maintain the proper exposure, and this results in a reduced depth of field. Of course, if shooting on a calm day and using a sturdy tripod, you won’t have a problem with camera shake, so it makes no sense to give up depth of field, especially in landscape photography. You can override the program mode to maintain the optimum depth of field by turning the aperture control. This mode makes sense for those who insist on shooting landscapes hand-held, so it’s a viable choice for some. It’s also a good choice if you’re lending your camera to someone who knows nothing about photography (very risky!). In the interest of full disclosure, you should know we never use the program mode!
APERTURE PRIORITY AUTOEXPOSURE
This mode does just what is says: You select the aperture and the camera adjusts the shutter speed to get a recommended exposure. Depth of field is important in most landscape images, so aperture priority is often used by landscape photographers. It’s quite simple to use. Set the aperture to f/16 or f/22 (remember diffraction!) for lots of depth of field, and the camera will shoot at whatever shutter speed the camera considers appropriate. The astute photographer will always intervene by using the exposure compensation control if she thinks it’s necessary to adjust the exposure.
SHUTTER PRIORITY AUTOEXPOSURE
Here, the photographer selects the shutter speed and the camera picks the aperture to give a good exposure. A specific shutter speed is normally unimportant to landscape photographers, so they seldom use shutter priority. It’s more often used by sports and wildlife photographers when shutter speeds are critical for arresting motion of moving subjects, or occasionally for the artistic purpose of depicting motion by deliberately showing blur.
However, if using autoexposure, there are times when shutter priority is very useful in landscape photography. Shutter speed can have a substantial effect on images of waves crashing on a rocky shoreline or of waterfalls. Faster shutter speeds, such as 1/250 second, tend to freeze the motion in the water while longer shutter speeds, such as 2 seconds or more, permit the water to nicely blur. As in sports photography, shutter speeds provide creative options for depicting motion in your landscape images, so it’s occasionally useful.
The colorful cliffs along Pictured Rocks National Lakeshore have very little depth, so f/11 easily covers the depth of field needed. Shutter speed is critical for shooting sharp images from a rocking boat. At times like this, it makes perfect sense to use shutter priority if you prefer to use autoexposure.
Suppose you’re in a boat or in powdery snow or otherwise prohibited from tripod use and you must shoot hand-held. Also suppose you want to use autoexposure. You can use shutter priority to lock in a shutter speed fast enough to ensure sharp images, providing you’re a steady enough camera holder.
If you were to use aperture priority in those situations, it would be all too easy to unthinkingly set the camera to f/22 and fail to notice the resulting shutter speed was far too low for sharp images. The hand-holder’s rule is that the shutter speed should be at least equal to 1/(focal length in mm) to get sharp images hand-held. With a 100 mm lens, you need a shutter speed of at least 1/100 second. And a bit faster is better yet.
MANUAL EXPOSURE
This mode does nothing automatically. You must manually set both the aperture and the shutter speed to reach the desired exposure. Manual exposure requires that you first select a metering pattern and then determine the meter’s recommended exposure by consulting the exposure indicator that appears in the viewfinder or on an LCD panel, or both. Then, either accepting that recommendation or compensating it as appropriate to the scene, you use it to set the aperture and the shutter speed.
With all the sophistication and bells and whistles of new cameras, is there any reason to use manual exposure? Well, all of the autoexposure modes have problems we consider so egregious, that we invariably use manual exposure for landscape images. A problem with manual exposure, albeit minor in landscape photography, is that you must manually set the aperture and shutter speed, which slows you down a bit. However, sometimes slow is good, as it gives more time to contemplate your composition. The manual mode’s separation of meter and camera controls can also be an advantage because the camera can’t automatically change the exposure on its own. Once you’ve learned how to meter and how to set the camera controls, the histogram makes good landscape exposures a piece of cake!
The shooter facile with manual exposure is a shooter fluent in the language of stops. He must be fully comfortable with the exposure indicator in the viewfinder and intimately acquainted with its metering scale. Does it show you plus or minus, one, two, or three stops of exposure variation? Are the increments in full stops, one-half stops, or one-third stops? For a greater exposure, should the indicator be moved to the right side of the scale, or to the left? Some cameras, such as the Nikon D3, have a vertical exposure scale. The D3 exposure scale shows ±3 stops with the plus, or overexposure, side at the top. An arrow at the end of the scale illuminates if the 3-stop limit is exceeded.
What if the exposure meter is way off scale because the camera is set to six stops of underexposure? If the metering scale shows only plus and minus three stops, it can’t show that you’re off by six stops. It will, though, show the direction of the error. By seeing the direction of the meter indication, even if not the amount, the facile shooter knows whether he’s under- or overexposed and he knows which way to change his camera controls to bring the exposure meter back into the real world. It truly is simple after you’ve done it a couple of times.
THE NEED FOR COMPENSATION
Unfortunately, excellent metering isn’t without problems. Your camera’s light meter measures reflective light, and all reflective-light meters have a huge problem. Camera manufacturers hope you capture outstanding images with excellent exposures so you’ll be a loyal and happy customer. They try their best to make a meter that will accurately determine the amount of light that’s illuminating the scene and, based on that, recommend a proper exposure.
Therein lies the rub! The meter measures how much light is reflected from a so-and-so, but the meter has no way of telling whether that amount of light is from a dark so-and-so in bright light, or from a bright so-and-so in dim light. Or, as a math major might say, we have a problem of two variables — light intensity and subject reflectance. To make a viable exposure meter, we need to find a way to get rid of one variable or the other!
Never let it be said, though, that a clever exposure meter engineer can’t solve that one! The engineer assumes the world reflects 18% of the incident light falling on it. And if the world does, so does everything in it. So, our clever engineer merely kills off one variable — how bright the subject — by simply assuming that all subjects reflect 18% of their incident light. He designs his exposure meters accordingly. Incidentally, the 18% figure is somewhat controversial, and some exposure mavens dispute its accuracy. But meter manufacturers have standardized their designs to accept it.
Subject matter having 18% reflectance is called mid-toned, or middle-toned. Some writers carelessly refer to a condition of mid-tonality as mid-toned gray, middle gray, or something similar. Danger! Middle-toned subject matter, that is something of 18% reflectance, may be of any hue in the color spectrum! There’s mid-toned green and mid-toned purple and mid-toned blue. In fact, any color can exist in a mid-tone reflectance or in any other reflectance; for example, there’s dark red, light red, and mid-toned red.
Getting back to my exposure meter. If my meter measures the light reflected from my so-and-so, and then performs an appropriate arithmetic operation on it, my meter then knows what the incident light is and presents an appropriate exposure recommendation.
Well, that’s all well and good, except for one little thing. The world as a whole may indeed average 18% reflectance, but we can’t photograph the world. We only photograph specific parts of the world, and those parts may have quite different reflectance values. As I write this, we just had 8 inches of snow fall at our home, and the reflectance of new fallen snow is probably over 90%. The black robes of a judge have a reflectance far lower than mid-toned 18%. (For that I won’t hazard a guess for fear of legal repercussions!)
At this point, we come to an all-important revelation. Study this until you know it backwards and forwards. Not only know it, but understand it. Because the meter designer made an assumption of an 18% reflectance world:
Any metered subject gives a meter recommendation that will cause that subject to be mid-toned in the image.
• My white cat, it will appear as a mid-toned cat (here, gray) in the image.
• My black rat, it will appear as a mid-toned rat (here, gray) in the image.
• My very dark fuchsia hat, it will appear as a midtoned fuchsia hat in the image.
• My very light chartreuse mat, it will appear as a mid-toned chartreuse mat in the image.
Many landscape scenes — such as snowy mountains, tan-colored sand dunes, a forest ablaze with yellow leaves in autumn, or black lava fields — are all far from middle-toned. The meter doesn’t know that it’s looking at a scene varying considerably from middle tone, so the meter does its thing and recommends a shutter speed and aperture combination that causes the scene to be rendered as middle tone, which is not, of course, the correct exposure.
The meter tries to figure the brightness of the scene that’s determined by the amount of ambient light illuminating the scene and the reflectance of the objects that make up the scene. Is this dense aspen forest middle tone, darker, or lighter? Due to the overwhelming abundance of golden leaves, it probably is lighter, but your meter doesn’t know that, so it may suggest an exposure that’s too dark. This situation is precisely why you have and must use exposure compensation to capture the best exposure possible.

As pointed out previously, if you aim a meter (either a hand-held spot meter or the one in your camera) at white snow, the meter will suggest an exposure that causes the image to have mid-toned snow. Gray snow is not pretty. Point the same meter at a black lava field and the meter will suggest an exposure that results in a mid-toned lava field, which is far too light.
USING EXPOSURE COMPENSATION
The camera manufacturers, who are well aware of the meter characteristics, have added exposure compensation controls to your camera. If you use automatic exposure modes, you should learn to use the compensation control. Learn where it is on the camera. It’s often a button or dial with plus and minus signs imprinted on it. Now here’s a very important thought, which is unfortunately counterintuitive for many, but extremely important:
When metering a subject lighter than middle tone, you must add light to the meter reading, and when metering a subject darker than middle tone, you must subtract light from the meter reading.
Perhaps a mnemonic will help you remember this. Just remember that many smart lads are good photographers, and LADS is an acronym for Light, Add — Dark, Subtract. Hokey? Maybe, but if it saves a picture someday.…
When in manual mode you add or subtract light generally by changing shutter speed or aperture. We say generally, because a photographer sometimes elects to change the ISO setting or use a filter. Light is added or subtracted when in an autoexposure mode by changing the setting of the autoexposure compensation dial.
Caveat: Be careful to identify and use the compensation control that operates on camera natural light exposure, and not the compensation control that operates on flash exposure. Of course, if you’re shooting flash images and need to introduce compensation, then you must use the flash compensation control.
AUTOEXPOSURE PROBLEMS
We know the vast majority of nature photographers rely on autoexposure modes and exposure compensation when necessary to get fine exposures. Most are happy with autoexposure and it does work, but we really don’t think it’s the best way to expose most nature images. Should we leave autoexposure’s problems alone and not rock the boat? No, it would be a disservice to you to omit a discussion about the serious shortcomings of autoexposure, especially for landscape photography. Besides, if you attend one of our field workshops we will insist (in a friendly way, of course) that you use manual exposure, because it’s so much faster, easier, and precise.
Snow scenes like these frosted willows with Idaho’s Black Mountain in the background aren’t difficult to expose. Yes, the snow may cause the camera to underexpose the image. So, use the exposure compensation control to add light or meter manually until you get the histogram appearing its best.

We could go on and on about autoexposure pitfalls, but in an effort to keep this book to a size you can lift, we’ll briefly cover the key problems.
LIGHT THROUGH THE VIEWFINDER
You may get underexposed images when your camera is set on autoexposure and your eye isn’t up to the viewfinder during the actual exposure time. This is a common occurrence for landscape photographers because they tend to mount the camera on a tripod, compose through the viewfinder, and then step back as they release the shutter. They do so to avoid touching and wiggling the camera during the actual exposure. An honorable goal indeed. However, when the viewfinder isn’t shaded by the photographer’s eye shielding the eyepiece, stray light enters the eyepiece. That stray light adds to the light coming through the lens and wrongly makes the meter think that the measured light is much brighter than is correct. The meter reduces its recommended exposure accordingly, and the scene is substantially underexposed. This problem sun, you probably won’t have difficulty. However, if the scene you’re photographing is dark or you’ve darkened it with filters and if there’s a fairly bright ambient light shining on the viewfinder, you will probably get underexposed images. Note that using the compensation control to add light won’t help.
This problem is well known to camera manufacturers. Some have incorporated an eyepiece shutter and some offer an accessory eyepiece cover to close off the viewfinder when using automatic exposure and your eye isn’t up to the viewfinder. If your camera doesn’t have a shutter or a cover for its viewfinder, hold your hand closely in front of the viewfinder without touching the camera. Also effective is the hat trick: Solve the problem by holding your dark hat to shade the viewfinder from stray light. Incidentally, that same dark hat can be helpful in shading the front of the lens to reduce sun-caused lens flare. Any of the shading methods are monotonous when needed frequently, especially with the always lost accessory eyepiece cover; a little monotony is far better than a lot of underexposed images!
Barbara and our dog Yogi Bear are photographing a natural arch in the Alabama Hills at dawn. She’s using manual exposure, so there’s no need to cover up the viewfinder. If you use any autoexposure mode, be sure to prevent any light from passing into the viewfinder to avoid underexposure.

Your eye is shading the viewfinder when metering in the manual exposure mode. Once the exposure is set, you can ignore the ambient light entering the viewfinder, because without the photographer’s deliberate intervention, the exposure can’t change. With stray light no longer a problem for the photographer, she’s free to concentrate on other matters. That benefit alone is enough to make us choose manual exposure!
COMPOSITION CHANGES
Changing the composition is another source of difficulty when using autoexposure. Assume you’re photographing a lovely waterfall. You start by framing the waterfall fairly tight so the image is about 80% white water surrounded by 20% dark rocks and pine trees. Using the histogram and exposure compensation control, you determine the optimum exposure. Everything is fine until you recompose to make the waterfall smaller and include more of the dark surroundings. If the metering method in use is influenced by the area of the dark rocks, the meter will see things get darker and will add light to its recommended exposure. The additional light might easily overexpose the white water. Of course, one should always check the histogram and highlight alerts, although it takes time, to ensure a good exposure!
Composition changes are less dangerous when using manual exposure. You can zoom in and out all day long while maintaining the same exposure as long as the ambient light doesn’t change. The re-arrangement of one’s dark rocks and light trees during zooming may indeed induce changes in the meter recommendation, but the camera can’t change its shutter speed or aperture without the photographer’s concurrence.
The foregoing discussion is true even with most variable aperture zoom lenses, provided you’re stopped down a ways from the maximum aperture. You’re probably shooting at about f/16 to maximize the depth of field, and a typical modern zoom lens at smaller apertures is no problem. Those lenses can maintain f/16 at any focal length. However, if you’re at the maximum aperture of, say, f/3.5, and at the shortest focal length, upon increasing focal length to zoom in on the waterfall the aperture will automatically change toward f/5.6 or thereabouts. This necessitates a corresponding change in shutter speed to maintain the same exposure. A nuisance at best; a photographic disaster at worst.
SUBJECT INFLUENCES
If your subject changes from one shot to the next, you might have autoexposure problems. We think of landscapes as fairly immobile, but some landscapes certainly change, even though you don’t change composition. Have you ever photographed on a foggy morning when the fog thickens and then thins? If the exposure is correct for the scene when it’s shrouded in thick white fog, images will certainly be overexposed when the fog thins and reveals more dark tree trunks in the scene. Try photographing waves crashing on the rocky shoreline. You want to keep detail in the white wave, so you use autoexposure, exposure compensation, and the histogram and a blinkies indicator to get the o ptimum exposure. Let’s say the wave has been filling one-third of the image. What happens when an especially powerful and dramatic wave fills two-thirds of the image?
The meter now sees a lot more white water causing the meter to reduce the exposure and underexpose the image. None of these situations are problems for manual exposure.
(a) Union Falls may be the most beautiful waterfall in Yellowstone National Park. It’s well named because two rivers join together at the top of the cliff just as they plunge over the edge. You’ll notice the smaller creek on the left-hand side. We believe that manual exposure is the most efficient way to photograph this magnificent waterfall. Once the exposure is set for one composition, we can recompose at will and the exposure remains good as long as the ambient light doesn’t change. (b) We can zoom in tightly and still avoid exposure problems using manual exposure. Autoexposure systems do poorly because now there’s a far higher percentage of light tones in the image, so the meter may automatically reduce the exposure — exactly what you don’t want. You may choose to use autoexposure, but be aware that every time the meter “sees” a different percentage of tonalities in the scene, it may change the exposure automatically and inaccurately.

WHEN THE BACKGROUND CHANGES
Changing backgrounds is a common problem for action shots of wildlife. Think about white snow geese taking flight at the Bosque del Apache Wildlife Refuge in New Mexico. As they leave the water, they might be against dark blue water. Then they’re against yellow brush-covered hillsides, and as they fly higher they appear against the light blue sky and may even pass a white cloud. The changing backgrounds keep changing the automatic exposure. However, the ambient light on the geese is constant, so the exposure changes are incorrect. This can happen with landscapes too, if you change your position. It’s possible to nicely isolate a vibrant red maple tree at the peak of autumn color against a dark forest background. Use the normal technique of getting the histogram exactly where you want it. Then change the shooting angle by walking down the hill so the tree is equally and nicely isolated, but against the light blue sky. Most metering modes will automatically consider not only the tree, but also the light background, and cause underexposure of both sky and foliage.
Neither of those examples are problems for manual exposure, but autoexposure modes can snatch control from the photographer’s hands and ruin an image without his awareness. This is precisely why we dislike autoexposure!
UNEVEN PANORAMA EXPOSURES
The ability to stitch digital images together has opened the world of panoramic photography to everyone. By shooting several images of a sweeping landscape and overlapping each image by about 30%, it’s quite easy to stitch them all together. This works well only if the images have identical exposures, which is only likely when using manual exposure. Suppose you use autoexposure on a panorama where one end of the scene is full of dark pine trees and the other end is light gray rocks. As you pan from one end to the other, the change in subject tonality will cause the camera to change exposure. The different exposures on the rocks and the trees may not be noticeable, but each section of the panorama will have a different sky. But you want the sky to be uniformly blue, not light on one side of the image and dark on the other. That’s another reason we recommend manual exposure when shooting panoramic images!
BACK TO BEING DIPLOMATIC
We have highlighted some of our more serious objections to using autoexposure. However, we do realize that plenty (perhaps the majority) of photographers rely on autoexposure. They get fine images too, if they use their exposure compensation wisely and check the histogram after each shot. There’s no right or wrong choice here. The decision to use manual or automatic exposure is entirely up to you. Only you know which way works best for you. Our choice is manual exposure and yours could be aperture priority, and we would both be right. We felt it was important to fully disclose how we meter and why. Even if you decide to use autoexposure, at least we have disclosed some of the problem situations you’ll certainly and frequently encounter so you can look out for them.
COMMON EXPOSURE MISTAKES
DON’T TRUST THE CAMERA’S LCD MONITOR
Don’t judge exposure by how the image looks on the LCD monitor! Trying to judge exposure by viewing the monitor is the most widespread common mistake our students make. Wouldn’t you agree that the angle you use to view the monitor affects the apparent exposure of the image that’s displayed? Doesn’t bright ambient light make the image look darker and dim ambient light make the image look brighter? Does your camera let you adjust the monitor brightness? All of these variables make judging the exposure quality by viewing the LCD monitor virtually impossible! You must judge exposure by the histogram only! You must judge exposure by the histogram only! You must judge … Okay, okay, we’ve made our point.
The exposure technique we use is widely accepted by serious photographers. It’s called exposing to the right (ETTR). If you do use ETTR, you’re exposing to preserve highlight details while still giving the shadows the best possible exposure. But your images will likely appear on the camera’s LCD monitor to be overexposed and washed out. They aren’t overexposed if there’s a good histogram, so don’t let the image’s appearance on the monitor scare you.
DON’T TRUST HOW THE IMAGE LOOKS ON THE COMPUTER MONITOR
Also, be careful about judging the exposure by how it looks on the computer monitor. Ambient light in the room, the brightness setting of the monitor,the overall calibration of the monitor, and its viewing angle all change the apparent exposure. In the computer, just like in the camera, you must evaluate the exposure only by histogram. In post-capture editing use the histogram that’s shown in your image-editing software.
USE THE HISTOGRAM AND HIGHLIGHT ALERT
We’re constantly amazed at how many photographers don’t know they have these important exposure aids. Often they aren’t even activated! Be sure to activate them and be certain that you know how to use them as a guide to the optimum exposure. We agree that most camera manuals (perhaps all) do a poor job of explaining the histogram and how to use it. Nevertheless, the histogram and the highlight alert are the most powerful tools available for shooting good exposures, shot after shot.
HAND-HELD METERS
For years we shot large-format cameras to make gorgeous 4 × 5 inch transparencies. These cameras didn’t have a built-in meter, so we used hand-held spot and incident meters to make thousands of images. We often hear that a camera meter is okay, but that hand-held meters are far more reliable and accurate, especially for landscape photography. In our opinion, though, the histogram is the most accurate and reliable. Hand-held meters are expensive. You have to carry them with you and they need batteries. An incident-light meter only works when you can place the meter in the same light that illuminates the scene. If you’re standing in the shade and your autumn foliage is in the early morning light, you’re out of luck. Just try to correctly expose a sunset using an incident-light meter! You can’t do it. A hand-held spot meter works a little better, but if you’re using devices that cost light, such as a polarizing filter or a tele-converter, you have to modify the meter reading to compensate for the light lost to these tools.
The camera’s exposure meter, along with the histogram, is clearly the better way to determine a fine exposure for most landscapes. We have used many hand-held exposure meters, but there’s no advantage in using them with digital landscape photography. For example, a hand-held incident light meter must be in the same light as the subject. It certainly doesn’t work here as Barbara stands on the shaded side of a pond to photograph the gorgeous reflections on the other side that are nicely bathed in late afternoon golden light.

The histograms and highlight alerts of today’s digital cameras make it impossible to make a serious case for hand-held meters. A hand-held spot meter does make it easy to measure the dynamic range of a scene high in contrast, but you can do the same thing with a spot meter built into the camera. If you do a lot of flash photography — and most landscape photographers don’t — then a flash meter could come in handy at times. We don’t understand why some feel hand-held meters are better than the camera’s meter. Everyone has a choice, but we feel your money is better spent elsewhere. The meter that came with your camera is quick and precise, so use it!