
8
Special Subjects
We’re fortunate to have spent decades photographing our favorite subjects year after year. We have photographed the gorgeous autumn color of Michigan’s Upper Peninsula every year since 1985. Waterfalls are always appealing to photographers, and snow offers its own special magic to the landscape. Kayaks work exceedingly well for photographing many wetland habitats and everyone loves the red light of sunrise and sunset. These topics are all specialties for which we have developed numerous shooting strategies to ensure photographic success. Let’s cover each subject in more detail so we can share some of our observations and strategies to help you capture dazzling images.
USE BOATS TO PHOTOGRAPH THE LANDSCAPE
Let’s face it, some spectacular landscapes just can’t be photographed from land. The incredible colors and patterns of the sheer rocky cliffs along Michigan’s Pictured Rocks National Lakeshore are a perfect example. The cliffs face northwest and they can’t be shot from the nearest land, Grand Island, because it’s miles away. The water abutting the cliff face is more than 12 feet deep, so setting up a tripod in the water is out of the question. This colorful shoreline must be photographed from a helicopter or from the water, and shooting from the water is much less expensive when you’re accompanied by 18 students!
Let’s cover the strategies for successfully photographing this colorful shoreline, which can easily be adapted to your own situation. First, consider the light. The most colorful sections of Pictured Rocks National Lakeshore face the northwest, so at dawn the cliff face is in shadow and the colors are muted and dull. Early afternoon sun begins to light the face of the cliffs, but the small overhead sun causes high contrast, glare on the wet rocks, and washed-out colors. It ends up that the only good time to photograph those exquisite colors is the last 2 hours of a sunny day, in the low-contrast golden light. The time of the year matters, too. Remember that the cliffs face northwest. The sun sets farthest north during late June, so more of the cliffs are illuminated by the sun from early June through mid-August. Then, from September through early May, much of the cliff face is in shadow during the late day because, in those months, the sun is setting farther to the south.
Au Train Falls is superb for giving our students the opportunity to practice their compositional skills. The water flow is low during the summer, so it’s easy to walk on the sandstone in the shallow river, making it possible to photograph the cascading water from the middle of the river. We used a wide-angle lens to properly frame the leading lines in the foreground and were careful to eliminate all white sky above the falls.
Some kayaks are designed to be exceedingly stable. They’re terrific for photographing autumn color reflections and other nature subjects that can only be captured from the water. Use short lenses, use a bit higher ISO such as ISO 200 or 400, turn on vibration reduction if you have it, use more intermediate f/stops such as f/11, and brace your elbows on your knees to ensure sharp images.

To shoot the cliffs you have to be there at the right time of year and at the right time of day, in the right weather, and on the water. Use your own boat, canoe, or kayak, rent a private pontoon boat in the nearby town of Munising or, alternatively, take a Pictured Rocks cruise ship. The cruise ships depart Munising several times each day, so enjoy the best light by taking one that runs during the last hours of the day. Don’t attempt to photograph the cliffs if there’s a north wind, because the lake is too rough. Even if you’ve long had your sea legs, you’ll still want calm water to help get sharp images. Many summer days have light winds, so there’s a good chance you’ll get lucky. A gentle breeze out of the south, east, or southeast is no problem, because the cliffs block the wind along the shoreline and the water is reasonably calm.
There’s no reason to use a tripod from a boat. It hinders your ability to shoot sharp images unless the boat is perfectly still, which is rare, because a camera on a tripod moves as much as the boat is bobbing up and down on the waves. You’ll get sharper images if you hand-hold the camera, letting your body damp some of the motion of the rocking boat.
(a) Pictured Rocks National Lakeshore offers a multitude of fine images along the cliffs. Use your best boat shooting techniques and work the subject. Here we used a wide-angle lens to capture the grand landscape.

(b) We paddled closer to these two eroded rocks, using them as points of interest. We composed the scene so plenty of colorful stains from the minerals in the spring water trickling down the face of the cliff appear to the right of the rocks. At this oblique angle to the face of the cliff, we had to stop down to at least f/16 to cover the extended depth of the scene.

We always photograph the colorful face of the cliffs from our own kayaks when we’re by ourselves, or from rented pontoon boats when we’re leading a workshop. This gives us the control necessary to pick our distance from the cliffs and to stop in the most beautiful locations. We like to get within 20 yards of the cliffs so we can use a short zoom, such as a 24 –105 mm or a 70 –200 mm lens. The cliffs are colorful but very wet, so it’s wise to use a polarizing filter. The polarizer will remove the glare from the rocks and enhance the rock details and the colors. However, the polarizer also absorbs about two stops of light and increases the difficulty of maintaining a high enough shutter speed to arrest the motion of the boat. The light loss also increases the difficulty of using a small enough aperture for the desired depth of field. Fortunately, the cliff faces are fairly flat, so the conventional shot doesn’t require great depth of field. Many other shots do, however. The challenge to the photographer here is much like the challenge to a design engineer — how to juggle all the trade-offs to reach an acceptable result. A kayaking photographer shooting hand-held with a light-losing polarizer while he swings and sways in choppy bays is compelled to use every technological advantage he can squeeze out of his digital camera. Yes, he knows that the finest quality image comes from using his camera’s native ISO speed, but that’s just not in the cards right now. Now he makes a compromise. He trades off a tiny bit of quality by raising the ISO from its native speed up to 400, or 800, or maybe even 1600 or higher. He sacrifices a little quality and accepts a slightly noisier image, but he gains precious light sensitivity, which he can use for a higher shutter speed or a smaller aperture, or maybe both. He may consider this an easy trade-off, though. His modern DSLR allows higher and higher ISO speeds while still offering improvements in noise performance and overall image quality compared to the digital camera of only a generation ago.
Hand-held shooting is certainly the time for your vibration-reduction technology to pay for itself. Whether in the lens or in the camera body, it’ll help considerably in getting sharp images. Your authors both use short zooms with image-stabilization. We try to maintain a shutter speed of at least 1/100 second, and prefer to use 1/200 second to be safe. As mentioned before, Pictured Rocks has a fairly flat face, so great depths of field aren’t often required. Consequently, f/11 is adequately small most of the time, especially with short focal-length lenses.
If the water’s rough offshore from the bluff, be sure to shoot enough. Shoot lots, and statistically you’ll get a few sharp images. Try to shoot right at the top or bottom of a swell, when the vertical motion of the boat is momentarily arrested. Increase your chances of a pleasing image by using your camera’s continuous shooting mode, and fire rapid but short bursts at the tops and bottoms of the swells.
(c) Our kayak is gently rocking only a dozen feet from these vertical stripes on the stained rock. The rocks are wet, so we used a polarizer to reduce the glare, revealing the color and details underneath.

We use manual metering, the RGB histogram, and blinkies, all in the usual fashion, to arrive at the best exposure. Back-button (thumb) focusing and the continuous focus mode work quite well here. A boat is bound to be moving as you’re photographing. Continuous focus mode will help ensure sharp focusing on the cliff face as the boat drifts to and fro. If your camera doesn’t offer back-button focusing (nearly all Nikons and Canons do), then use continuous autofocus and use the shutter button.
We often use kayaks that are designed more for stability than speed. They’re wider than the skinny sea kayaks, they aren’t so tippy, and can float in very shallow water. Kayaks let you reach photogenic subjects easily when nothing else works. If the water is completely calm, as it often is on ponds and small lakes, we hand-hold as usual, but support one or two elbows on our knees to reduce camera shake. The features of modern equipment make it easy to shoot quality images from boats. We use our kayaks at every opportunity. The images obtained from the kayaks are unique and rewarding, and kayaks are just plain fun, too! Try it, you’ll like it!
WATERFALLS
There’s something special about watching and photographing waterfalls. We especially like the small woodland waterfalls that are a bit off the beaten track. We enjoy listening to their music and we wonder about the people who paused there centuries before us. We feel privileged to view nature’s handiwork that has taken eons to carve itself into what it is today.
First, you must find the waterfalls. Many are on ordinary maps, and topographic maps often reveal others. Waterfall locations are frequently promoted by local governments to attract visitors and are easy to find. Indeed, there are many waterfall guidebooks. An Internet search for waterfalls and state name will surely bring forth the guidebooks and direct information on specific falls. Many national parks, such as Yellowstone and Grand Teton, have guidebooks just on the park’s waterfalls.
It’s irritating that some waterfall guidebooks are illustrated with such poor images of the waterfalls. Seemingly, their authors are good writers and love waterfalls, but many are inexperienced photographers. They think that waterfalls photograph best in bright sunshine. Usually waterfalls bordered by trees and bushes require cloudy days to be photographed well. Trees and bushes cast harsh shadows when the falls are illuminated by direct sun, which can cause far too much contrast for a digital sensor to faithfully capture. Conversely, the soft light of an overcast day provides a far lower and more favorable contrast. If you’re traveling and can’t wait for a cloudy day, maybe you can just wait for a friendly cloud to drift by and obscure the sun, or perhaps you can just visit the waterfall very early or late in the day before the bright sun shines on the waterfall and its surrounding vegetation.
Notice Barbara’s technique of bracing both elbows on the kayak while she shoots on a calm lake. This reduces the problem of shooting unsharp images enormously. No matter how short the focal length or how high the shutter speed, always brace the camera on a solid object whenever possible. Sadly, most photographers we see who are shooting without a tripod fail to use objects when they’re readily available to reduce camera shake, and their images often suffer terribly from this oversight. Of course, there are always exceptions. Sometimes it helps to let your body absorb some of the motion. If you must shoot from a boat in choppy water when the boat is bobbing considerably, then don’t brace the camera on anything, shoot hand-held, use the fastest shutter speed you can, and hope for the best.

These tiny cascades in Great Smoky Mountains National Park photograph well in the soft light of a cloudy day. Use back-button focusing techniques (of course) to focus on the foreground rock, stop down to f/16 or f/22, and use the histogram to expose as far to the right as possible without clipping any white water that has detail.

Bright sun does work well on some waterfalls, though. In arid environments that lack vegetation, it’s possible for sunshine to light the entire waterfall. A case in point is Iris Falls along the Bechler River in Yellowstone National Park. Photograph this waterfall in the early afternoon of a sunny day and you’ll have a wonderful rainbow, adding interest to your images.
Waterfalls mean water and wet rocks. Use polarizing filters to remove the always present glare from the wet surfaces to reveal the underlying color and texture. Our students tend to have trouble adjusting the polarizing filter when photographing waterfalls, because they have difficulty seeing the effect on the plunging water. Don’t look at the water. Instead, look at the wet rocks along the margins of the waterfall. Turn the polarizer until the wet rocks are at their darkest. Wet rocks darken when polarized because reducing the glare permits their natural tones to predominate. The polarizer can also be easily adjusted at a waterfall by minimizing the glare of the water at the top of the falls, just as it spills over the edge.
Full-frame shots of waterfalls are the most common images, some suggesting vertical shots, and some suggesting horizontals. Whichever seems obvious, be sure to diligently look for the other. Zillions of photographers have already done the obvious. Be different!
Look for a way to legally and safely get close to the river, or actually into it, just downstream from a waterfall. From there a wide-angle lens and a low viewpoint will emphasize foreground water, logs, and rocks, while the river is a strong leading line taking the viewer’s eye right up to the falls in the background. Compose carefully to eliminate any white or gray sky from the background or peeking through the trees forming hotspots. Those bland skies record as bright distractions that can seriously damage an image.
Iris Falls is a thundering waterfall along the Bechler River. Photograph it in late morning when an enchanting rainbow dances in the spray. While we find it’s best to photograph most waterfalls in shade or on cloudy days, use sunlight when you can capture a rainbow in the mist.

At some waterfalls it’s possible to walk deeper into the woods and frame the waterfall with trees, which can evoke a feeling of approaching the waterfall through the forest. Composing the waterfall so it’s a center of interest, but still small in the image, is often effective and unexpected to most viewers in a pleasing way.
Most waterfall shots need plenty of depth of field, so we start by setting the aperture to f/16 and manually selecting a shutter speed to zero the exposure meter scale. We take a preliminary shot and check the RGB histogram to see which of the three color channels has data, no matter how little, farther to the right than the other channels. Then we readjust the shutter speed and shoot again to make the data closely approach, but not touch, the right edge of the graph. This technique ensures that the white water, normally the brightest part of the waterfall, isn’t overexposed.
Sometimes, though, waterfalls have areas of white water without any highlight detail that needs to be preserved. We’ll occasionally expose to deliberately clip such areas. The idea is that by giving up any attempt to get detail in those unimportant white areas, we move the entire histogram farther to the right, therefore improving the shadow areas by increasing detail and reducing noise.
Some scenes in some light have a contrast that exceeds the dynamic range of the camera, but we want to preserve both highlight and shadow detail. Waiting a few years for a later generation camera of higher dynamic range is generally not a good option, so instead we’ll use HDR techniques. We shoot a series of exposures in one-stop increments. The first exposure has the highlight areas about one stop underexposed, and the last shot has the shadow areas about two stops overexposed. All the images are merged into one final high-contrast image by the HDR software. Much more is said about the fabulous capabilities of HDR software in Chapter 9.
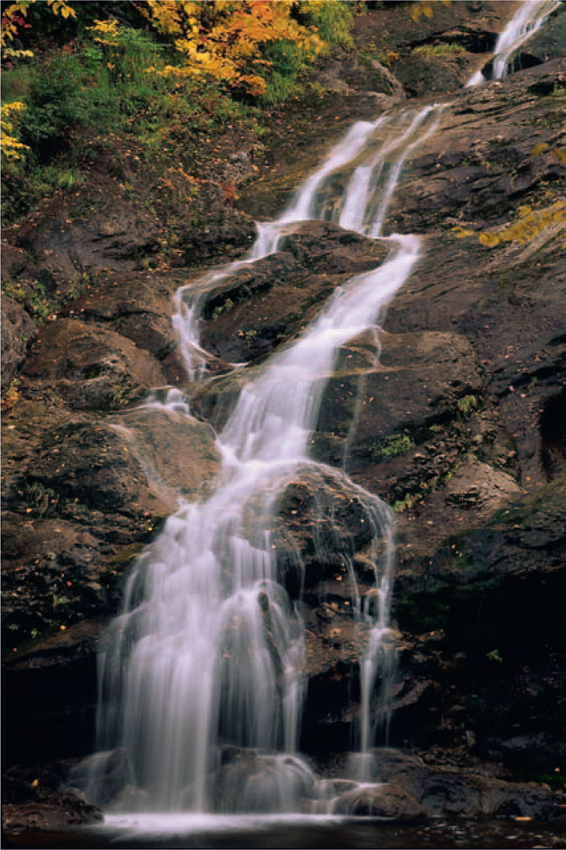
Waterfalls that make a series of plunges over a rocky cliff are often the most photogenic. This fine image is made by Al Hart, who helped tremendously in making this book more comprehensive and easier for you to read.
Waterfalls are little affected by reasonable winds, but the surrounding foliage can dance about in a most annoying manner, so it’s better to shoot in windless conditions. The erosion of eons has caused some waterfalls to create their own canyons, and sometimes those canyons can be advantageous to the photographer. For example, a north-facing waterfall might block, or partially block, a south wind and thus render that wind photographically harmless. That’s a point to consider on a windy day when deciding whether to travel to a particular waterfall. Also consider, that if a north-facing waterfall is facing a north wind, the so-called Venturi effect may actually increase the wind speed as it shoots up the canyon to the falls. That kind of wind can irritate even well-tempered waterfall photographers.
You probably want the rocks and surrounding vegetation to be as sharp as possible. Use a sturdy tripod and be sure to trip the shutter with a remote triggering device or cable release so your quivering body doesn’t impart vibrations to the camera and cause soft images. Camera vibration can also be reduced by using the self-timer. A 2-second delay works well. We usually use our self-timer, rather than a cable release, when photographing waterfalls. Remember that a tripod in fast-moving water can tremble more than a soggy doggy. Try to set the tripod legs into calm water or, better yet, get them completely out of the water by placing them on protruding rocks or logs. A motionless tripod will help ensure the maximum sharpness from your lenses.
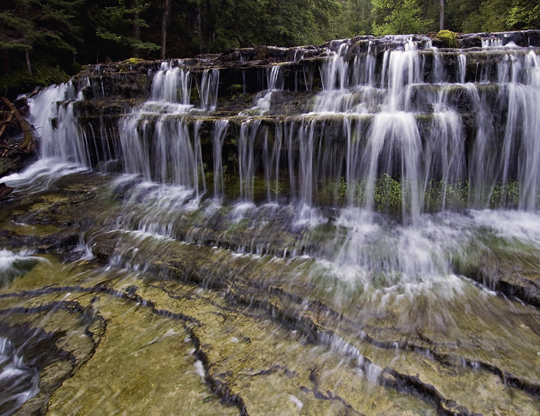
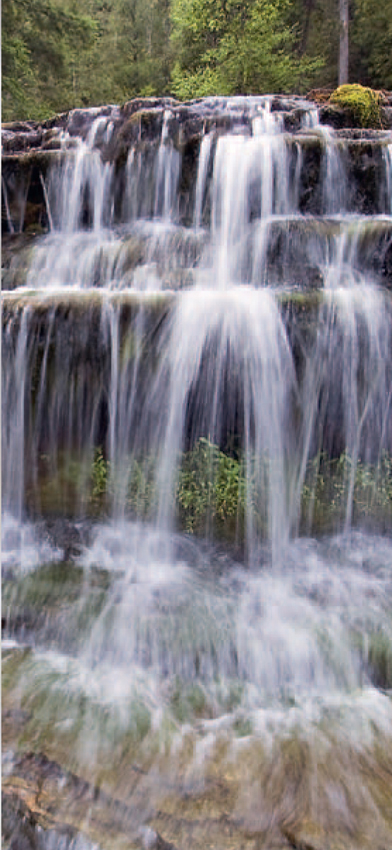
(a, b) Rock River Falls is one of our favorites, especially after the peak of autumn color, when hundreds of leaves whirl about in the pool at its base. Always look for both vertical and horizontal compositions!

Don’t forget about seasonal variations. Many waterfalls are most photogenic when the first heavy snowfall of the year covers the rocks, logs, and vegetation with fresh snow. Waterfalls surrounded by deciduous plants that turn bright colors in autumn are wonderful to behold and photograph. Spring can bring huge volumes of water cascading over the edge, and the low water of late summer may actually showcase a more delicate and intimate nature of the falls.
Waterfalls are excellent subjects for showing motion. Different shutter speeds can impart a wholly different look to the moving water. If you love the look and feel of smooth and silky water, be sure to use exposure times of at least 1 second. We remember one waterfall shot in which the low light of the overcast day, the shielding canopy of the forest, the light lost to the polarizer, the tiny aperture needed for a large depth of field, and the low ISO needed for best quality all conspired to require a shutter speed of 64 seconds!
If you want the water frozen in motion, then use faster shutter speeds, of course. Always remember: It doesn’t cost anything to shoot additional digital images, and this is a good time to vary the shutter speed to get different looks to the water. You can select the ones you like best later. Give this a try: Set ISO 100 or ISO 200, whichever is the camera’s lowest ISO. Attach a polarizing filter and set the exposure mode to aperture priority. Start with the fastest f/stop on your lens, such as f/2.8. Adjust the polarizer, focus, and compose. Use the eyepiece shutter or cover or your hand or hat to prevent stray light from entering the eyepiece and causing serious underexposure. Don’t touch the camera. Shoot and then check the exposure, not by looking at the LCD monitor, but by using the RGB histogram in the conventional way. Then shoot again, if necessary, using the exposure compensation dial to arrive at the best exposure, as determined by the histogram. Once you have arrived at the best exposure, shoot the same composition using all of the full stop apertures on your lens. If your lens covers f/2.8 to f/22, then shoot an image at f/2.8, f/4, f/5.6, f/8, f/11, f/16 and, finally, f/22. The camera automatically changes to longer shutter speeds as you stop down from f/2.8 to f/22.
Well, you ask, why use aperture priority if I want to vary shutter speed? Why not use shutter priority? The reason, briefly, is this. A typical lens, such as an f/2.8 to f/22 lens, offers only seven different full-stop apertures that can be used — not counting intermediate 1/2 or 1/3 stops, of course. Yet, most cameras have shutter speeds from at least 1/2000 second to 30 seconds, giving 17 different shutter speeds that might be used. So, using aperture priority, for any given f/stop we have 17 different shutter speeds available to accommodate differences in the subject, the light, and the ISO setting. If, however, we use shutter priority, then we have only seven different apertures available for any given shutter speed we set to accommodate the differences in the subject, the light, and the ISO setting. Consequently, in shutter priority there’s a greater chance that the camera couldn’t produce a correct exposure. For example, say you are shooting a 100 mm f/4 lens during a dark evening. If the best exposure is 4 seconds at f/4, and you’re using shutter priority, setting the shutter speed to 1 second won’t work because the lens can’t open up any farther.
(a) Use a wide-angle lens downstream from the waterfall any time you can stand in or next to the river below the fall. This shooting position produces a giant foreground that invites you into the scene. The gradually diminishing river leads you to Firehole Falls in the background.
If you really want to, you can use the poor man’s form of shutter priority: Put the camera in manual exposure mode, set whatever shutter speed tickles your fancy, and set the aperture for a correct exposure. If no such aperture is available, change the ISO.
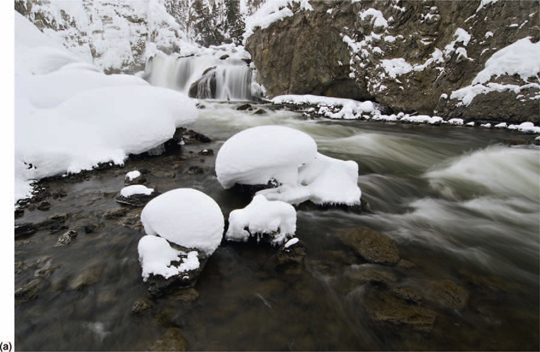
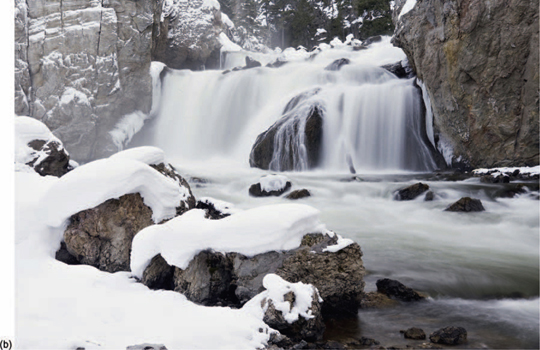
(b) This version of Firehole Falls was taken at the base of the fall, so it dominates the scene. Snow and white water are easy to expose. Use the histogram to make sure no important highlights with detail are overexposed (clipped). In this case, focus on the rocks in the foreground and stop down tof/16.
Focusing on a waterfall is straightforward. You may focus manually, perhaps even using a live view mode to more precisely focus or just help out old eyes. You may focus automatically, using an autofocus point on the place in the scene that you want in sharpest focus. Our highly preferred autofocus method uses the back-button focusing that we described in Chapter 5. We activate the middle autofocus sensor and point it wherever we want the image to be the sharpest, typically a rock along the edge of the waterfall. We push the back-button to focus, release to lock focus, recompose, and shoot using the 2-second self-timer. This method is precise, quick, and simple!
AUTUMN COLOR
Autumn is our favorite time of the year for shooting landscape images. The intense and spellbinding colors found throughout Michigan’s Upper Peninsula (called the UP by the native Yoopers) are world-class, but the generally spectacular color show is far too short. The beech-maple forests change from their all-green state to a veritable riot of yellows, oranges, reds, and browns; then to bare deciduous trees, all in a period of 3 weeks. Indeed, once the leaves begin to turn, each day brings changes that offer new photographic opportunities.
Every year for the past 20 we’ve enjoyed those 3 weeks amid the glorious colors of this special season, and we’ve learned a great deal about autumn photography that we’ll share with you now. These tips apply specifically to northern Michigan, but most of our observations and shooting strategies apply to fall color everywhere.
From year to year the date of peak autumn color varies a bit according to weather conditions. Over the past 20 years of teaching autumn color workshops near Munising, Michigan, the color has peaked as early as October 4 and as late as October 13 — a spread of 10 days. Everyone has their own idea about why those dates vary from year to year, but we notice that the colors peak earlier during dry years and later during wet ones. Sunny days during the color season speed up color development, while rainy days slow it down considerably. The maple trees that turn first are generally those growing in open fields, along the edges of a forest, and along the north side of east-west roadways. Trees growing in the interior of the forest are the last to turn colors. Leaves turn color because they’re stressed. Apparently, leaves that are directly lit by sunshine much of the time dry out quickly, which stresses them so their colors turn early. Leaves in the shaded forest are able to retain more moisture, so they turn a bit later.
Before the autumn colors peak, some early turning solitary maple trees explode into magnificent fiery red displays of intense color. Set against a foreground of brown bracken ferns and a background of green, this tree makes an appealing subject. Windless, bright overcast conditions are superb for capturing this tree. Be sure to compose so no (or little) white sky intrudes into the image.

Although the exact date of peak color does vary, the sequence doesn’t change. Colors don’t peak everywhere in the same area at exactly the same time. We know the forest around some lakes peak first, while the colors at other nearby lakes peak a week later. On a broader scale, the trees several miles inland from Lake Superior peak about a week earlier than the trees within a mile or two of the lake.
Apparently, proximity to such a large lake delays color development a bit. Perhaps this is due to the slightly warmer night temperatures or higher humidity levels along the shoreline. We use this sequence to plan how to photograph the entire color season. If you photograph autumn colors in the same area year after year, be sure to keep notes that record the sequences of peak dates for different areas, or even for single trees.
Most of our students and other photographers working the area seem to be unduly worried about catching the exact peak of the color change. The many variables affecting its date in a given year can make this an elusive moving target, and we feel that it gets far too much emphasis. Each year the color season offers a nearly infinite variety of wonderful scenes to make into even more wonderful images. Hmmmm — does even more wonderful images mean images that are even more wonderful, or does it mean even more images that are wonderful? Luckily for us photographers, the magnificent UP autumn makes it right both ways!
The date of peak color gets too much play because each part of the color season offers its own unique images to capture. For example, the beginning of the color season offers innumerable opportunities for nice images of an early turner single tree in all its autumn glory, surrounded by neighboring green trees. In fact, the entire first half of the color season features an abundance of exquisite bright red and orange leaves, especially on the trees around and about the small lakes and ponds in the nearby Hiawatha National Forest. Those trees and leaves are wonderful subjects for photographers in the Upper Peninsula of Michigan.
Peak color, of course, is spellbinding. On some roads the trees form a canopy over the top of the road, making driving seem like traveling through a tunnel of flaming color. This is a good time to find small lakes where the west side of the lake is lined with deciduous trees turning beautiful colors. There, in the golden light of the early morning sun, when the air is still and the water like glass, it’s easy to capture gorgeous images of exquisite color reflections.
These superb conditions don’t happen often enough during peak color, so scout out the best locations ahead of time, and don’t be late when the good light occurs. We generally get only one chance during each fall color season to have the conditions just mentioned and also have ominous dark gray and black storm clouds to the west. This really sets off the colors. It’s just awesome! When this happens, we change compositions and shoot as fast as possible, because the conditions are rare and spectacular but usually fleeting. The wind often begins to blow, creating ripples on the water and destroying the mirror-like reflections, or an unruly cloud covers the sun at just the wrong moment. We sometimes get superb conditions right before sunset, too, but it’s more likely to be windier then, and it’s rare to have fog on the lake, so mornings tend to be best.
Sadly, peak color lasts only a day or two at any given spot. Once the overall forest is clearly a bit past peak color, many photographers move on, following the peak color then developing farther to the south. But in their haste they waste. They waste many opportunities for superb images: images of patterns of colorful leaves lying on ferns or on the ground; images of creeks choked with leaves, perhaps swirling in a small whirlpool; or images of mushrooms emerging among the brightly colored leaves. Those opportunities only happen after peak color. The post-peak fall of the leaves opens up the forest canopy, and is a superb time to use that wide-angle lens to shoot straight up in the forest at the leaves remaining on the trees. The forest isn’t quite so thick, when a quarter of the leaves have fallen, so it’s a wonderful time to capture those now-visible and very photogenic tree trunks and branches beautifully engulfed in a sea of leafy color.
Our favorite time is from peak color to the end of the color season when nearly all color has faded to brown. We believe this is the most productive time of the color season, so stay around to work the last act in this incredible show. As a bonus, you’re more likely to get frosty mornings later in the color season, which offer exquisite macro images.
The first golden rays of sun light up the maples at Thornton Lake while a squadron of dark gray clouds drift overhead. Being at small woodland lakes on a calm morning when the opposite shore is crowded with deciduous trees in full autumn color is a highly successful strategy.

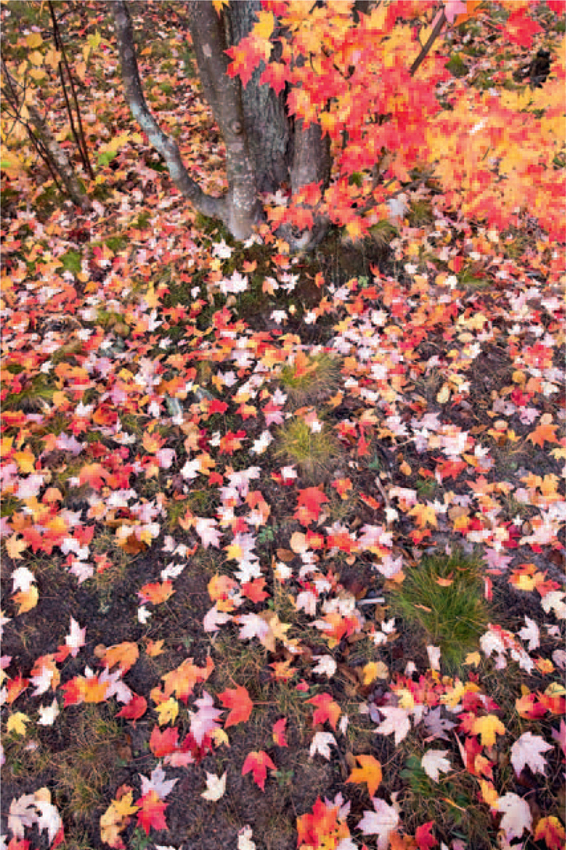
Far too many photographers move on when the peak color passes. We understand the interest in following the peak color, but so many wonderful images exist only after the peak. Here the ground is littered with newly fallen leaves. John used a 17mm focal length to capture this intimate color scene. Barbara said with a devilish smile, “next time, turnover all the leaves that don’t have the pretty side facing up.” Considering how many leaves had the “wrong” side up, I told her I prefer natural leaf arrangements.
Don’t worry too much about any specific date for the actual peak of color. Different plants peak at different times. Moccasin and Thornton Lakes are two lakes we photograph every year. Their western shorelines are lined primarily with maples and aspens. When the maple trees turn brilliant red and orange, the aspens are fading but still mostly green. A week later, the maples have discarded their leaves for their long winter slumber and the aspens turn brilliant yellow, so there is a second peak color at these lakes. Indeed, on lakes that are lined with tamarack, these unusual deciduous conifers turn brilliant yellow 10 days after the aspens drop their leaves. We’re stressing this idea of peak color as an indeterminate and drawn-out concept, because a majority of photographers give up and head south long before northern Michigan’s terrific photographic opportunities have expired.
A challenge to photographing autumn color is that weather tends to misbehave. Winter is trying to exert its dominance over summer, and steady breezes are typical. Colorful trees are difficult to photograph well when the leaves are trembling in the breeze and may be impossible to shoot on a truly windy day. The perfect conditions for photographing along the margins of the forests are the soft light of a bright cloudy day when the winds are usually short-lived, leaving dead calm conditions. Clouds lower the contrast in the forest, reducing the problems of burned-out highlights and blocked black shadows lacking detail and full of noise. Help ensure attractive images by composing so that the ugly hit-you-in-the-face white sky doesn’t appear in the image.
Try a polarizer to see if it helps. Depending on light angles, leaf shapes, and surface moisture, the polarizer may remove some glare or may do nothing. If it’s doing nothing, then get rid of it to recover the two stops or so of light that it absorbs. You might welcome that extra light to sharpen the image by increasing your depth of field or by raising the shutter speed to better arrest the motion of leaves trembling in the breeze.
It’s unusual to have cloudy skies with no breeze, so never quit shooting while you still have such perfect conditions. Think ahead by always carrying a few snacks with you so you can delay a meal when excellent shooting conditions prevail.
You can photograph autumn on a sunny day, too. A single colorful tree or clump of them can be very nicely composed against a blue sky, especially if some interesting cloud formations are drifting by. Use a polarizer to remove glare from the shiny leaves and to darken the sky so the clouds separate better. Bright sun in the forest doesn’t work well because of the extremely high contrast caused by the deep shadows. Yet, even in the presence of that ugly contrast, there are good shots of single back-lit leaves or groups of leaves. Nice shots of leaves against a pretty blue sky background can often be found by lying on your back and shooting straight up.
You’ll find that wind is a tough problem during autumn. Capturing sharp images of leaves hanging on a branch is nearly impossible if they’re even slightly moving, especially with shutter speeds of 1/60 second and slower, and chances are you’ll be using shutter speeds closer to 1/8 second. There are a few things you can do to help get images, though. The obvious solution is to forget about trying to shoot sharp images and deliberately use long shutter speeds to let the leaves blur during the exposure. This works quite well, and for a while, can make images that are fun to look at. But it gets old after a while. Another technique is to zoom the lens during the exposure. We often find a nice tree with a lot of surrounding color, set the aperture to f/16 or f/22 to reach a shutter speed of one second or so, and zoom the lens during the exposure. This makes the colors explode out of the image. The faster you zoom the lens, the more dramatic the explosion of color. If you tire of this, then photograph waterfalls, leaves floating down creeks, or leaves lying on the ground, because wind doesn’t affect these subjects too much. Remember that wind can vibrate your tripod too, making it impossible to shoot truly sharp images. Avoid using your tripod in high wind, if you can.
From the peak of fall color to the end, brilliant red is less common while orange and yellow tend to predominate. (a) The branches and leaves were carefully composed to create this colorful maple tree close-up. (b) Zooming a 70-200 mm lens during the exposure makes the leaves explode from the branches. This effect is easier to manage with a zoom that uses a collar to zoom the lens rather than a push-pull zoom because it’s smoother.

If a light wind comes and goes and you really won’t be happy until you capture this great composition you’ve found, try using what we call wind technique. Set a higher ISO such as ISO 400, ISO 800, or even higher if necessary. Don’t use a polarizer, and use an intermediate aperture like f/11. Doing these things allows faster shutter speeds, hopefully in the range of 1/30 to 1/125 second. Use a cable or remote release to trip the shutter when the leaves look like they’re perfectly still. A self-timer won’t work because there’s no way to know if the leaves will be motionless when the shutter trips at a future time. Autumn breezes are fickle that way. By waiting for lulls in the breeze and firing immediately when the leaves hold still, your chances of getting sharp images improve dramatically. Of course, you have to be patient. It may take several minutes of alert concentration before you get to shoot an image.
However, if you’re photographing a single tree or forest scene that’s more than 20 yards away, it’s difficult to see whether the leaves are moving ever so slightly, so take multiple images of the same scene and compare sharpness later on in the computer with the image blown up to 100%. Use live view, a feature found on some newer DSLRs, which allows you to compose via the LCD instead of the viewfinder to detect slight subject motion such as trembling leaves. We activate the live view feature and the grid lines that overlay it. Now the actual scene being photographed appears on the camera’s LCD. Our Nikon and Canon cameras let us magnify a section of the image by 10 ×, so it’s easy to see if the leaves are motionless. We simply watch the magnified leaves on the LCD closely. When the leaves are completely and finally motionless, we quickly press the cable release to trip the shutter. This tactic works wonderfully! It’s awesome! While there are other uses for live view, this one trick alone compels you to get live view with your next camera if your current one doesn’t have it.
Autumn color is such a very special time of the year! We all wish it might last longer, so spend as much time as you can photographing its splendor. Remember to work the subject, use excellent shooting techniques, and most of all, enjoy the season.
SNOWY LANDSCAPES
Snow does a lot of terrific things for your landscape images. If it’s deep enough, it covers many distractions such as litter, stumps, trails, logs, and bare soil. Snow cleans up the landscape. It also reduces contrast considerably. Imagine a woodland waterfall cascading over a ledge surrounded by black rocks and very dark logs. Without the snow, your camera’s sensor has trouble dealing with the highlights, the extreme whites of the cascading water, the shadows, and the deep blacks of the logs and rocks. A covering of fresh snow hides the dark areas of the scene and substantially reduces the contrast, making it easier for the sensor to record excellent detail in all parts of the scene.
We live at 7000 feet elevation in the rugged Idaho mountains near Yellowstone National Park. In most years we have permanent snow on the ground from late October through late April so we get plenty of chances to photograph snow. This is a superb time to photograph the mountains, waterfalls, icy creeks, isolated old buildings, snow shadows in the forest on a sunny day, trees covered with fresh white snow, and ghost trees that are totally encased in snow. Dress warmly, keep fresh batteries in your camera, have another set staying warm inside your winter coat and close to your body, and enjoy the magic of winter. Your digital camera, not having the mechanical burdens of sluggish motors struggling to transport cold-stiffened film, is surprisingly tough and should work fine even in below-zero temperatures.
Many photographers believe snow is difficult to expose, but we don’t agree. The histogram makes it easy to properly expose snow. Again, don’t use your LCD monitor to judge exposure. Use only your RGB histogram or, lacking that, your luminance histogram. Ensure that the edge of the histogram is as close as possible to the right edge of the graph without actually touching it. This simple method of managing exposure results in a digital image that preserves detail in the highlights while increasing the exposure of the shadow areas, thereby optimizing detail and reducing noise.
We both use the manual exposure mode, but in different ways that both work. Barbara prefers to use her Nikon’s color matrix metering mode. This metering scheme evaluates the entire scene and considers its brightness, contrast, color, and even how those factors are arranged in the scene. It then compares the measured data to a vast bank of internally stored image information, and in mere microseconds, reaches a recommended exposure. Except in unusual circumstances it’ll be correct or very close. Barbara then uses the metering scale in her Nikon’s viewfinder to manually adjust the aperture, shutter speed and, perhaps, even the ISO so that the intended exposure exactly balances the meter’s recommendation. She shoots her image and immediately checks the histogram. The matrix meter often satisfies her critical artist’s eye but, if necessary, she’ll readjust aperture, shutter speed, or ISO or some combination of the three using small increments of 1/3 or 2/3 stops to get her desired histogram and the best exposure for the image.
Barbara’s strategy works well for most shots, because it’s easy once you do it a few times, and it eliminates evaluating scene reflectance. John, though, is sometimes stuck in his old ways (his own opinion of himself), and he’s quite efficient at dealing with scene reflectance. He points his Canon’s spot meter at an area of pure white snow. Then he uses the metering scale in the viewfinder to adjust shutter speed, aperture, ISO, or some combination of these, so that the camera’s exposure will be 2 1/3 stops greater than the meter’s recommendation to compensate for the reflectance of the white snow. He polarizes, meters, focuses, composes, and shoots. Then he checks the histogram to make sure the exposure is right on. If not, he adjusts the exposure slightly, changing only shutter speed when shooting landscapes, and tries again. This exposure is usually correct.
A thick layer of frost coats these lodgepole pines during the night along the Gibbon River in Yellowstone. At daybreak, heavy cloud cover rolls in preventing the warm rays of sunshine from melting the frost. The low-contrast light is perfect for capturing this river with the distinctive “S” curve that’s so widely and pleasingly used in composition. Although this is a color image, the scene is really a study of black and white. Use the histogram to expose to the right without clipping the brightest snow.

Whether we’ve metered by matrix methods or spot methods, once we’ve arrived at a satisfactory exposure, there’s no need for further metering as long as the light doesn’t change. However, it’s prudent to periodically check the histogram to assure ourselves that the exposure data are falling where they should.
Very brilliant sunlight can be reflected from parts of a snow-covered landscape, and some of those parts may have substantial glare. Use a polarizer to minimize the glare and to darken the blue sky. Be aware that it’s possible to overly darken the sky, but you can adjust your polarizer to allow the sky to retain some color. Back-lighting works well for winter landscapes because the snow has lowered the high contrast normally encountered with back-lit subjects. F/16 is a good choice for the depth of field wanted in most landscapes. We know most lenses can be stopped down to f/22 or even more, but we avoid using f/22 and f/32 because of the image-softening effects of diffraction. We consider that the slight sharpness loss caused by diffraction becomes serious at f/22, although the starting f/stop is debated by various writers. When worrying about such disputes, always remember that the optical lab scientist and the field photographer may have entirely different interests and goals. So, don’t hesitate to shoot some additional images at f/22 if your scene truly requires an extreme depth of field to ensure sharpness in both the foreground and background.
Cloudy winter days are terrific for waterfalls, creeks and rivers, rocky outcrops, old buildings, snow-caked evergreen branches, and other subjects where the sky can easily be cropped out of the image. However, white sky isn’t nearly as offensive against a white snowy foreground as it is against the colorful landscapes during other times of the year. Take advantage of dark gray storm clouds in your winter scenes. A foreboding dark sky adds a strong sense of an approaching storm, and it can set the mood for the image.
A howling winter storm pounded this lodgepole pine forest for two days. When the snow and winds subsided, we found these tree trunks with snow plastered to them on one side especially appealing, so we slowly waddled through the deep snow shooting various compositions along the way. We like the “V” shape arrangement of the trees in the foreground.

We use snowmobiles, cross-country skis, and snowshoes to move around when shooting winter landscapes, but we live in big-snow country where snow 4 to 8 feet deep or more is commonplace. Chances are, though, that you live in a region with more modest snow, so you can get around with less dramatic winter footgear.
Photographing while the snow is heavily falling leads to many outstanding images. You can record the streaks of the falling snow by using shutter speeds of 1/15 to 1/60 second, depending somewhat on the wind speed. Find dark subjects so the falling snow streaks show up easily. Most cameras don’t like moisture, so if the temperatures are causing the falling snow to be wet, put your camera in a plastic bag with only the lens protruding through a hole in the bag. If the temperatures are well below freezing, then snow drops off camera gear without getting it wet so no cover is necessary. Obviously, your camera, just brought out of a warm car or warm house, is in peril until it gets cold. No matter the condition of the snow, always use a lens hood to keep snowflakes off the front glass. Otherwise you may discover out-of-focus blobs in your images where an inconvenient snowflake or water drop interfered with focusing a few rays of light.
Digital camera gear that gets too wet can temporarily refuse to work or, worse, can be expensively or irreparably damaged. Very cold camera gear coming in from outdoors will soon be drenched, inside and out, by condensation from the warm indoor air. Prevent this by inserting your cold gear into plastic bags and sealing them before bringing them indoors. Let them gradually rise to room temperature before opening the bags so the condensation is constrained to the outside of the bags. Be patient — it can take hours (yes, hours) for things to warm up adequately. If you need access to your batteries for recharging, or your memory cards for downloading, put them into a separate small plastic bag before coming indoors!
SUNRISE AND SUNSET
All landscape photographers love to photograph during these magical times of the day. We have all seen and photographed magnificent sunsets and sunrises, but we think you’ll agree that the vast majority are unexciting. What attributes are shared by terrific sunrises and sunsets? Most of all, you need the right combination of clouds. Even if no clouds are present, the sun will surely rise and set, but the amount of red sky is underwhelming. We want clear sky right at the horizon, but lots of clouds floating just above the horizon. That situation promises outstanding image opportunities. The warm light of the rising or setting sun can travel unimpeded through the clear area and then brightly illuminate the bottoms of the clouds, causing the sky to turn into a riot of red, yellow, gold, and magenta.
Sometimes the clouds are so thick that you think there may be no color at all, but if luck prevails, you’ll enjoy a special treat of exquisite colors in the sky. Fog, smoke, and dust (especially in the desert) are other conditions that can improve your chances for incredible colors.
Photographs of the sky alone are okay, but can generally be improved by an attractive foreground subject silhouetted against the colorful sky. Good subjects include a gnarled old tree with a lot of character, a barn, a windmill, a lighthouse, a natural arch, overlapping sand dunes, or even a geyser. Focus on the foreground object, stop down to f/16, and use the histogram to properly expose the bright sky. Don’t forget you can also use a strong flashlight or an electronic flash to paint light onto the foreground.
The colors and details of a sunrise or sunset can be nicely reflected in the calm surface of a pond or a lake, thereby doubling the area of nice color in a scene. The calm water also imparts a feeling of solitude and quiet that the image is sure to convey.
Many photographers arrive too late at sunrise and leave far too soon after sunset. (I was once told that a certain photographer always eats shoots and leaves, but I’ve never known whether that described his hectic schedule or his dining habits.)
And speaking of leaving too early, sunrise and sunset often give three separate color shows. You may get a beautiful red glow about one-half hour before sunrise, when the first rays of sunlight strike the air molecules high in the eastern sky and create intense magenta colors — a pre-glow, if you will. This period doesn’t last long, so you must be at your selected location with your gear ready and prepared to shoot. The colors then fade until the sun rises a bit more. While the sun is still below the horizon, the red rays of light illuminate any clouds floating in the eastern sky. When the sun climbs above the horizon, you may get a beautiful red sun that can be composed with a foreground subject or captured as a reflection in calm waters. To be safe, it’s wise to be ready about an hour before sunrise to catch all of the opportunities. Expect the opposite at sunset. You start with the sun hovering over the western horizon, then the red light (hopefully) lights up the clouds and, finally, you get a colorful afterglow. Sometimes the most magical light happens a full 45 minutes or even more after the sun sinks below the horizon, so don’t be too quick to leave.
Enclose your camera in a protective plastic bag to protect it from heavily falling snow. This is an ideal time to photograph any dark object because the snow will show up against the dark background if you use shutter speeds of 1/30 second and faster. Warning: Autofocus usually has difficulty focusing on the correct spot when the snow is vigorously falling, so switch to manual focus. Barbara loves her two spotted horses. If she had her way, every image in this book would have a horse in it somewhere. By the way, we live on “Spotted Pony Trail.” Guess who named it?

The clear sky near the horizon allows the reddest rays of sunlight to light up the bottoms of these clouds hovering above the dunes at White Sands National Monument. The extreme contrast between the magenta clouds and the dimly lit dunes is easily captured by varying the shutter speed while using manual exposure to record several different exposures, so the entire range of brightness levels is covered. These images are processed with Photomatix Pro, a dedicated HDR software.

This Defassa waterbuck standing along a ridge line in the rolling hills of Kenya’s Maasai Mara makes a fine silhouette against the dawn sky. We call these “wildlife scenes.” Using a long lens, we used 1/250 second while shooting on a bean bag from a vehicle. We back-button focused on the head, making sure the single activated focus point was partly on the dark animal and partly on the bright sky to get accurate focus. Then we composed and exposed for the bright background.

A lot of haze, dust, or humidity in the air is likely to cause the sun to appear as a large red ball that photographs quite nicely. If the air is clean, however, then the sun comes up tiny and bright, making it more difficult to photograph well.
Caution: Don’t ever look at the sun for an extended period, and never look at it through any optical device not specifically designed for sun observation!
While stopped way down and using your depth-of-field preview button, compose a bright sun by looking in the viewfinder, but don’t look at the sun. Look away from the part of the image where the sun resides. You’ll know when it’s in the image so just look at the darker side of the viewfinder.
A small aperture such as f/22 may cause the sun to appear in the image as a star, especially with a wide-angle lens. This can be a pleasing effect. Composing so that the sun overlaps a foreground element such as a tree branch tends to improve the star effect. If the sun is very bright, consider putting it directly behind a foreground object so little or none of the sun can be seen from the camera position. Now you have an interesting halo of bright sky around your subject.
The red clouds at sunset conveniently light up this Lake Superior beach. Although the north wind has subsided, waves are still splashing onto the sandy beach. John used Canon’s 90 mm T/S lens to make the plane of focus align with the plane on the beach. This makes it possible to use a higher shutter speed to freeze the waves more in the dim light while still sharply focusing the entire beach.

You never know when you’re going to get that truly spectacular sunrise or sunset. Keep trying, even if it means repeatedly returning to the same location. During our fall color workshops, we often take our groups to a local lake for sunrise.
At the lake, sunrise on the first morning might be good, mediocre on the second morning because of clear skies and no fog, and not much better on the third morning. We hike about 300 yards to the lake, so invariably, on the fourth morning, someone thinks that the sunrise possibilities have been exhausted and doesn’t bother to carry camera gear to the lake. This frequently fallacious failure of faith forms a fraudulent folly guaranteeing that the clouds are just right, the winds are calm, a soft wafting fog gently caresses the surface of the still lake, and the spectacular sunrise isn’t only unusually spellbinding, but lasts much longer than anyone could have imagined. Always be prepared and never give up!
USING FLASH AT DAWN AND DUSK
Everyone loves to silhouette photogenic objects against the red sky of dawn and dusk. It’s easy enough to do. Select a low shooting viewpoint so the subject is nicely isolated against the sky. Focus on the subject and meter for the red sky behind it, using the histogram to guide you. This produces an image where the subject is nicely silhouetted against the colorful sky. The subject has little or no detail and no color because it’s in silhouette. Many fine images are made that way.
However, it’s also very effective — and fun — to properly expose a bright and colorful sky and use an electronic flash to illuminate an otherwise too dark foreground. As an example, we shot at Mono Lake in the autumn of 2008. Mono Lake has an area of 66 square miles, and lies in the Great Basin Desert just east of Lee Vining, California. It’s famous for incredible numbers of birds, strange tufa towers, brine shrimp, delicate sand tufas, and no fish. We especially enjoy the wonderful sand tufa formations. We used flash to illuminate the sand tufas and isolate them against the red sky at dawn. First, we found an attractive sand tufa that could be isolated against the dawn sky by shooting only a foot above the ground. Using back-button focusing, we pointed our single activated autofocus sensor at the edge of the sand tufa so part of the sensor was on the black edge of the tufa and the other part was on the red sky. (The considerable contrast allowed the camera to easily focus, even on the dark tufa.) Then we manually metered the sky and used the histogram to get the red channel (in this case due to the red sky background) close to but not touching the right edge of the graph.
We attached our wireless flash controllers (ST-E2 for Canon and SU-800 Speedlight Commander) to the hot-shoes on our cameras. Barbara then used her SB-800, and I used my Canon 580 II to illuminate the sand tufa. We set the flash compensation to about +1 stop to properly expose the sand tufa. (Notice that we said flash compensation, not exposure compensation.) The final images had well-exposed red skies and a well-exposed sand tufa in the foreground. We admit the light is a bit unnatural because nobody expects to have bright light in the foreground with the red sky in the background, but they’re still compelling images. It really is an easy and effective technique that’s well worth learning. Just determine the background exposure first. Then use automatic flash and the flash compensation control to expose the foreground.