

The black bear cub peered from the vegetation along the road. The day was overcast and dark and I needed to keep my distance, so I used my favorite low light shooting combination of shutter-priority and Auto ISO. Canon 5D Mark III, Canon 800mm f/5.6 lens, ISO 1600, 1/800 second, f/5.6, Cloudy WB, +.7 EC, and continuous autofocus on the back-button.
Mastering Exposure
Achieving the optimum exposure is essential for capturing the ultimate in quality images. Fortunately, two exposure aids—highlight alert and histogram—offered by your camera make shooting excellent exposures straightforward. Exposure is controlled in the camera with three variables—the f/stop (aperture), shutter speed, and ISO. They all work together to determine the final exposure. It is crucially important to be able to work comfortably with these three variables. Let us now examine the most effective ways to manipulate them in order to create the images you want in a variety of situations.
EXPOSURE GUIDELINES
Always judge the exposure by viewing the camera’s histogram display. Do not judge the exposure by comparing how light or dark the image appears on the camera’s LCD display. Most cameras allow you to brighten or darker the LCD, so there is no way to know whether the exposure is optimum. If you think the exposure is too dark, turning up the brightness of the LCD display makes it look fine—but it may still be seriously underexposed.
JPEGS
When you shoot an image, the camera’s photosites in the imaging sensor measure photons of light. The camera runs numerous calculations to determine and record the amount and color of the light. These data are known as the RAW data. A JPEG is a file that most devices can read that is created from the RAW data the camera captures. The image is sharpened, the colors are determined, and much of the RAW data is discarded to allow the data to fit in an 8-bit file. In other words, a JPEG is nothing more than RAW image data that is processed by the camera. This in-camera processing can be adjusted by the photographer by their choice of white balance, sharpening, contrast, Picture Style, and other options.

A Yellowstone Checkerspot butterfly perched on a Sticky Geranium bud. Notice the histogram. Only the red channel touches the right wall and climbs it a little, but does not reach the top. With all of the warm tones in the image, you would expect the red channel to have data furthest to the right. Notice the histogram has four vertical lines between the left wall and the right wall. Each vertical line denotes a little over one stop of light. Being aware of the histogram–stop relationship makes it quicker to get the rightmost data to closely approach the right wall when shooting JPEGs only or touching it when shooting RAW images. Canon 5D Mark III, Canon 180mm f/3.5 macro lens, ISO 200, f/16, 1/8 second, Cloudy WB, manual exposure and metering. Canon 580 II flash and ST-E2 optical controller to add some fill flash to the image.
A well-exposed JPEG has its rightmost histogram data—which represent the highlights in the image—near the right wall of the histogram but not touching it. Unless there is an area in the image that has no detail anyway, do not allow the highlight alert to flash or the histogram data to climb the right wall.
RAW
Photographers who absolutely demand the highest quality usually shoot RAW images. These files include all of the data collected by the sensor and typically are 12-bit or 14-bit files, so they hold far more information than a JPEG, which only holds 8-bits of data. RAW files are preferred if you plan to process them with Photoshop, Lightroom, or other RAW processing programs. The optimum RAW exposure shows the rightmost data touching the right wall of the histogram, but not climbing the right wall—at least not very much. RAW data can be adjusted or severely changed with software to produce excellent quality images.
EXPOSURE STRATEGY SUMMARY
We will get to the details shortly, but the best way to achieve the optimum exposure in most cases is to shoot the image, check the histogram and highlight alert, then make exposure adjustments (if necessary) to meet the above exposure guidelines for JPEG and RAW images. Reshoot the image with the adjusted exposure settings.
EXPOSURE BASICS
Exposure is controlled by three variables: the aperture in the lens, the shutter speed, and the ISO. The aperture and the shutter speed determine how much light strikes the camera’s sensor. The ISO determines how much the sensor data is electronically amplified.
THE THREE EXPOSURE CONTROLS
Photographers use the language of “stops” to make exposure adjustments. A stop is a measurement of the light. Shutter speeds, f/stops (aperture), and ISO are all set up to be counted in stops. A stop in one of the variables is equal to a stop in the other two. Using stops is useful because stops make it easy to adjust the exposure by counting each one. It takes a little practice to get used to it, but once you do, using stops makes exposure exceedingly simple to control and adjust.
Shutter Speed
The camera has a shutter that can open and close to seal off the box that contains the imaging sensor to prevent light from passing through. Here’s the typical shutter speed series in seconds that many cameras offer. The difference in these values is often thought of as stops. Except for B, each shutter speed listed here is one stop apart from its nearest neighbor.
B 30 15 8 4 2 1 1/2 1/4 1/8 1/15 1/30 1/60
1/125 1/250 1/500 1/1000 1/2000 1/4000 1/8000
Become familiar with this series of numbers because you will use them a lot. The letter B stands for Bulb exposure. This is the setting you use when you wish to shoot any exposure longer than thirty seconds. To shoot a 2-minute exposure, set the camera to B, trip the camera with a cable release and hold it down or lock it. Monitor your watch until 2 minutes pass and let up or unlock the cable release to close the shutter.
Although B is a variable shutter speed, all of the others are fixed amounts. The faster the shutter speed, the less light that strikes the sensor, assuming the aperture and ISO remain the same. Each shutter speed listed here varies from its nearest neighbor by one stop of light and doubles or halves the light. A shutter speed of 1/15 second allows twice as much light to the sensor as a 1/30 of a second shutter speed, but only one-half of the light of a 1/8 second shutter speed. Except for B, going to a faster shutter speed cuts the exposure in half for each value on this chart. For example, changing from 1/4 second to 1/15 second is an exposure reduction of two stops. The image is two stops darker and the histogram data move to the left. It is likely your camera offers intermediate shutter speeds. Often with a menu choice or custom function selection you can set the camera to 1/2 stop or 1/3 stop shutter speeds. Use 1/3 stop increments to gain precise control over your exposure. Faster shutter speeds give you the ability to freeze subject motion and shoot sharp handheld images. Slow shutter speeds allow you to capture the motion of a galloping horse or a picturesque waterfall, but make it far more difficult to capture sharp handheld images.
Apertures
To be exact, the aperture isn’t the same thing as the f/stop. When a lens closes down to the shooting aperture, a series of adjustable blades move to create a tiny circular hole called the aperture. An f/stop is really a math relationship between the size of the aperture and the focal length of the lens. All identical f/stops pass the same amount of light through it. This means f/16 on an Olympus 24mm passes the same amount of light as f/16 on a Canon 180mm macro or f/16 on a Nikon 500mm lens, even though the actual sizes of the apertures on these lenses differ. Nevertheless, aperture and f/stop are freely used to mean the same thing. To avoid confusion, we will assume they are the same.
Aperture controls the image depth of field, which is the zone in front of and behind the point of sharpest focus that appears acceptably sharp to the viewer. Aperture is always a key factor in getting the image you want. Changing the aperture from f/8 to f/16 is called stopping down because the size of the aperture gets smaller and depth of field increases. The exposure is reduced by two stops of light assuming, of course, the ISO and shutter speed remain the same. Changing the aperture from f/22 to f/5.6 adds four stops of light and it is called opening up because the size of the aperture becomes larger while depth of field diminishes.
Memorize the standard f/stop series. Here it is:
f/1 f/1.4 f/2 f/2.8 f/4 f/5.6 f/8 f/11 f/16 f/22 f/32 f/45
None of your lenses has all of these. The smallest f/stop number is usually around f/2.8 or f/4. Although this is the smallest number, the aperture is the largest and it passes the most light through the lens. It is called the maximum aperture. This same lens probably stops down to f/22 or perhaps f/32. Although this is the largest f/stop number, the aperture is the smallest. We agree that getting used to the idea that a large f/number refers to a small aperture is counterintuitive, but mathematically that is the way it works.

The two major factors determining the depth of field are the aperture (f/stop) and image magnification. The more the aperture opens (f/16 to f/8, for example) or the greater the magnification, the less depth of field is generated and vice versa. A two-tailed swallowtail is photographed at f/8. Notice the depth of field completely throws the background out of focus and the blossom on the right is quite soft. Canon 5D Mark III, Canon 180mm f/3.5 macro lens, ISO 200, f/8, 1/320 second, Cloudy WB, manual exposure and focusing.

F/22 yields considerably more depth of field than f/8, but the background is distracting and the overall image sharpness declines slightly due to diffraction. Canon 5D Mark III, Canon 180mm f/3.5 macro lens, ISO 200, f/22, 1/30 second, Cloudy WB, manual exposure and focusing.

Notice the histogram for this silver-bordered fritillary appearing on the back monitor of the Canon 5D Mark III camera. Both the red and green color channels have rightmost data approximately the same distance from the histogram’s right wall. This is an optimal exposure for a JPEG because the data stops just short of the right wall. If you shoot RAW files, then let the rightmost data touch the right wall and even climb it a little. Many photographers are unaware that the highlight alert and the histogram are derived from a JPEG, which is nothing more than RAW data processed by the camera. When RAW data is turned into a JPEG image, the processing tends to make the highlight alert blink and the rightmost data climb the right wall of the histogram before the RAW data is actually overexposed. Depending on the camera, you can most likely go one stop past the right wall before you start clipping the RAW data. Canon 5D Mark III, Canon 180mm macro, ISO 200, f/11, 1/13 second, Cloudy WB, manual exposure and focus, Canon 600EX flash with ST-E3-RT radio controller at +1/3 FEC.
Each of the f/stops listed above varies from its nearest neighbor by one stop of light. F/8 delivers four times (2 stops) more light to the sensor than f/16 because the area of the aperture at f/8 is larger. Conversely, stopping down from f/4 to f/16 reduces the light by four stops, which means the sensor receives 1/16 as much light.
The depth of field is greatest with small apertures—f/16, f/22, f/32—which is useful for making as much of the image as sharp as possible. Often, though, selective focus is called for, such as in flower photography, where sharpness is desirable on only a portion of the subject or scene. Then either f/4 or f/5.6 works best to isolate the subject. The best way to handle depth of field is to memorize that f/16 and f/22 are small apertures that reduce the light passing through the lens, but deliver plenty of depth of field. F/2.8 or f/4 are large apertures that pass lots of light, but keep the depth of field shallow. Finally, your camera offers intermediate f/stop values. Set your camera to 1/3 stop increments. You do not need to memorize the intermediate values. Knowing the full stop values is good enough.
ISO
Your camera’s sensor has a native ISO speed. This refers to how sensitive the sensor is to the light. The native ISO is usually ISO 100, but it may be ISO 200 in some camera models. The native ISO speed produces the highest quality sensor data, and you should use it whenever that is feasible. Sensors are not interchangeable, but cameras offer another way to give you ISO options. How is this done? The sensor is packed with photosites that measure photons of light. The photons create a tiny electrical charge that is converted into digital data with the camera’s on-board analog-to-digital converter.
When the camera is set to ISO 400, the sensor data is amplified to simulate the exposure as if the ISO speed of the sensor really is ISO 400 instead of its native 100 or 200. This system works quite well, but amplifying sensor data also magnifies any defects in the data. For example, if you blow up an image to 200 percent and look at the dark portions of the image, you might notice odd spots of color—red, green, and blue are common—and this is called noise. Amplifying the sensor data increases the noise. If you really want to see the negative effects of noise, shoot a few images using the highest ISO value on the camera. The colors will look odd and the image appears much less sharp.
Although ISO choices vary among cameras, the Canon 5D Mark III offers the typical series that includes:
Auto 100 200 400 800 1600 3200 6400
12800 25600 H1 51200 H2 102400
Except for Auto, each ISO varies from its nearest neighbor by, once again, one stop of light. Moving from ISO 100 to ISO 400 essentially quadruples the light, though remember the signal is really amplified to simulate a more sensitive sensor. More light is not striking the sensor. Most cameras offer intermediate ISO values in 1/3 stop increments. If your camera doesn’t, it isn’t a serious shortcoming. You do want 1/3 stop increments for aperture and shutter speed, though.
Auto is a variable ISO that enables the camera to automatically change ISO as needed. It is enormously helpful when using shutter-priority in dim light. ISO 100 is the native speed of the sensor in the Canon 5D. ISO 200 amplifies the sensor data to simulate a sensor speed that is twice as sensitive to light. Each of the remaining ISO values doubles the sensitivity of the one preceding it as you move to higher values. H1 51200 and H2 102400 require a special setting to use because these ISO values produce extremely noisy images. However, sometimes noise is acceptable when there is no other way to capture an image. If, say, it is the only way to finally get a shot of Bigfoot.
The artifacts in the image created by amplifying the sensor signals with higher ISOs are being managed better with each new camera generation. We routinely use ISO 400 to ISO 1600 for wildlife images and get favorable results of the starry night skies by using ISO 3200, f/2.8, and twenty-second exposure times.
Since the camera’s native ISO delivers the highest quality data with the fewest artifacts, why use a higher ISO? Here’s a key reason: Imagine photographing a deer in the soft evening light with a 300mm lens on a tripod. At ISO 100, the shutter speed is 1/30 of a second at f/4. Even shooting on a tripod, the shutter speed is not high enough to consistently shoot sharp images with a 300mm lens, and besides the depth of field is minimal. Setting ISO 800 increases the exposure by three stops of light. Now the exposure changes to 1/125 second at f/5.6, making it far more likely to capture a sharp image with a faster shutter speed and one stop more depth of field in order to sharply record more of the deer.
LAW OF RECIPROCITY
I am not a subscriber to laws because there are already far too many of them, but I do subscribe to one important one on exposure. ISO, shutter speed, and aperture in combination determine the exposure. If you add or subtract some light with one control, you can compensate the exposure with either of the other two. For example, suppose the optimum landscape exposure is ISO 100, f/8, and 1/60 second. You decide to stop the lens down to f/16 to obtain more depth of field. Changing f/8 to f/16 subtracts two stops of light. How does one compensate for this? The obvious way is to change the shutter speed from 1/60 second to 1/15 second. Or you could leave the shutter speed at 1/60 second and increase the ISO to 400. There is no reason why you can’t use two controls to make the adjustment. Changing the ISO to 200 adds one stop of light and selecting a shutter speed of 1/30 second adds a second stop of light, which perfectly compensates the two stops of light lost by choosing f/16. This is an example of the Law of Reciprocity at work. It does take a while to get used to it, but it is worth the effort. Memorize the shutter speed, ISO, and f/stop series and it soon becomes rather easy.
EXPOSURE AIDS
HISTOGRAM
It is crucial to understand two exposure aids found in your camera. The most valuable one is the “dreaded” histogram because it appears complicated, when truly it is extremely simple to understand. The histogram is a simple bar graph that displays the brightness values measured by the photosites (often called pixels) in the sensor along the horizontal axis. The vertical height of the data gives you an indication of how many pixels have a specific brightness value. The higher the vertical height, the more pixels that occupy that brightness value.
Neither the horizontal nor vertical axis is numbered, but you don’t need to know exact numbers in any event. The key to using the histogram to get the optimum exposure is to examine the placement of the pixel data on the histogram’s chart. The histogram is generated from a JPEG file. Even if you shoot only RAW images, each RAW file has a small embedded JPEG to generate the histogram and display the image on the LCD display. Since the histogram and the highlight alert are based on a JPEG, which by convention is 8-bit data, the histogram can only display 256 brightness values. Why? Mathematically, 8-bit data is equal to two to the eighth power, which equals 256. Therefore, starting on the far left side of the histogram, the brightness value begins with zero and steadily brightens one brightness value at a time moving to the right until it reaches the maximum brightness at 255. The left side of the histogram displays the dark tones, the center shows the middle tones, and the light tones appear on the right side.
As you look at the histogram, you will notice one, two, or several mountains of data. Sometimes the data cover the entire histogram graph and sometimes they don’t. There is no perfect histogram shape as it depends totally on the scene. A forest scene with dark shadows and bright highlights will have data appearing across the entire histogram because this scene is high in contrast. Rabbit tracks in the snow will display a narrow brightness range on the histogram because nearly everything in the image is the same. Notice the histogram’s left and right sides, each of which it’s convenient to think of as a “wall.” Normally, you do not want to allow data to climb either wall very much, which is called “clipping.” Data climbing the left wall may lack detail due to underexposure. Overexposure causes data to climb the right wall. It is okay if the data touch the top of the graph as long as they do not happen on either wall. If a spike of data appears between the two walls, it merely means the histogram’s graph isn’t tall enough to display all of the tones at this particular brightness level.
An incredibly valid and useful exposure guideline is called “Expose to the Right” or ETTR for short. When shooting JPEGs, expose to make the rightmost data approach the right wall. With RAW files, let the rightmost data touch the right wall and maybe even climb it a little. Here are three key reasons to use ETTR.
1. Preserve Highlight Detail
Exposing to the right forces you to pay attention to the highlights by not letting them clip and seriously climb the right wall. The worst exposure problem is overexposing important highlights with detail because that detail is lost forever. How is it lost, you ask? Imagine a snow scene. Although the snow is white, some snow is slightly brighter than other areas of snow due to shadows. Most of the brightness values for the snow fall in the 200 to 255 range. If you overexpose enough, you push all of these values to the maximum 255 brightness value. Now all of the snow that originally ranged in brightness from 200 to 255 is the same brightness at 255. It all looks alike—think white copy paper—and detail is no longer discernible.
2. Collect the Maximum Amount of Data
Every stop of light the photosites receive doubles the data they capture mathematically. This is similar to the stops in shutter speed and f/stops. I will spare you the excruciating number details, but half of the data that you may need, especially if you process the image very much, are captured by the stop farthest to the right. The stop to the left of that captures one-fourth of the data. ETTR nicely captures the maximum amount of image data, providing better colors and smoother tonal transitions in the image. Though less important to JPEG files, having lots of data is crucially important to RAW images when they are processed with Photoshop or other software.

The drifts and snow-entombed trees are straightforward to expose. Using manual exposure, point the camera at only snow and adjust the exposure compensation control in the viewfinder to the +1.7 position on the metering scale by manually adjusting the shutter speed, aperture, ISO, or any combination. Shoot a quick shot—it does not have to be in focus—and check the histogram and highlight alert. If the histogram’s rightmost data is touching the histogram’s right wall and no “blinkies” are flashing, you are good to go. If not, make adjustments with your exposure controls until you arrive at the optimum exposure.
3. Minimize Noise in the Shadows
Digital cameras depend on electronics. All electrical devices have signal errors. These errors show up in the image as oddly colored spots called chrominance noise, or bright spots where it should be dark called luminance noise. Using ETTR allows the photosites to measure as many photons as possible without clipping on the right wall. This produces a far more favorable signal-to-noise ratio over all portions of the image and especially in the darker areas, and, therefore, noise is automatically reduced in the image.
You don’t need to remember these three reasons for using ETTR. Merely watching the histogram’s rightmost data and getting it to the right as previously explained for JPEGs and RAW files takes care of everything.
HIGHLIGHT ALERT
Be certain to activate the camera’s highlight alert if it hasn’t been already. When you overexpose a portion of the image and view it on the camera’s LCD display, overexposed areas will blink on and off. Often called the “blinkies,” these flashing warnings are to be heeded to avoid losing detail in important highlights. That said, it is possible to have highlights without detail. Glare on wet rocks and lakes has no detail anyway, so don’t worry about blinkies if they appear there. Even snow, especially on a dark cloudy day, has little detail in large areas because there is little to no contrast in the light, so large areas of the snow are identical in brightness. In this case, we often counsel our winter Yellowstone photo tour clients to allow a few blinkies in the snow when photographing the darkly furred bison to capture more detail in these hairy mammals.
UNDERSTANDING THE CAMERA’S EXPOSURE METER
The camera’s built-in exposure meter is extremely complex and able to do thousands of calculations almost instantly. Fortunately, you don’t need to know precisely how it works, so let’s summarize what you truly do need to know.
The camera’s exposure meter is incredibly good and it is the best meter to use. No longer do you need to use a separate handheld meter or avail yourself of the old “Sunny f/16 rule.” The histogram and the highlight alert in your camera offer far better ways to achieve the optimum exposure. The camera’s meter is designed to produce pleasing exposures and does an excellent job of it much of the time, but there are still plenty of situations in which the meter is found lacking. The meter attempts to determine how much light is illuminating the subject and the area surrounding the subject. It has a huge problem because there are two significant variables that determine how much light reflects off the subject. The first variable is ambient light, which is the light that is naturally present. There is less ambient light on a dark cloudy day than when the sun shines. We all agree a black American crow that is fighting with a white ring-billed gull over a scrap of food is darker, even though the same amount of ambient light illuminates both. Subject reflectance is the second major variable. Dark subjects reflect less ambient light than light ones. It is impossible to solve this exposure equation with two variables, so the camera is programmed to assume subject reflectance doesn’t vary.

Overexposing (clipping) highlights with detail is the worst sin you can commit in exposing a digital image. However, remember that not all highlights have detail. The brilliant ball of the sun, specular highlights on water, and snow on a cloudy low contrast day have little to no detail. Additional exposure will benefit the color of a bison in a snowstorm. By allowing some of the snow to clip, you capture better color and detail in the dark furry coat. Nikon D300, Nikon 200–400mm f/4 lens, ISO 2000, f/19, 1/200 second, Cloudy WB, manual exposure and AF-C autofocus on the back-button.

The same bison as in the previous image but processed as a black and white image.
Generally, cameras are programmed to a middle tonality of 18 percent reflectance. Camera makers produce the camera to assume every scene it meters averages 18 percent gray. The theory works beautifully when this is true or nearly so. The camera meters the scene and sets the exposure automatically—if you are using an autoexposure mode—and delivers a suitable exposure in many lighting conditions. However, if you photograph a scene that is mostly made up of snow, the camera meter doesn’t know the scene is mostly white. Since it has been programmed to believe it is 18 percent reflectance, the camera sets the exposure to render the snowy scene as a middle tone scene and severely underexposes it. A similar problem happens if the scene is mostly dark in tonality. That isn’t as common as a light scene, but a black field of lava would cause the meter to overexpose the scene. As sophisticated as the meter is, always remember it does not know what the subject is and doesn’t know what the optimum exposure should be. The meter considers a lot of factors, but in the end, it tries to make things middle tonality. The camera makers know about this exposure problem and provide an exposure compensation control to enable you to adjust the exposure when using automatic metering modes. If you are shooting in the manual exposure mode, then the compensation is done manually by adjusting the aperture, shutter speed, ISO, or a combination of these three. Find the exposure compensation control on your camera. You must look carefully, though. Automatic flash is controlled in a similar fashion with its own flash exposure compensation (FEC) control. Take time to be certain you know where the ambient light and the flash exposure compensation controls are located on the camera and which one is which.
METERING MODES
Cameras offer a few distinctly different metering modes. Depending on the camera system, they might be called a different name, but they all work quite alike. The Canon 5D Mark III offers four choices that include Evaluative (Nikon calls it Color Matrix), Center-weighted, Partial, and Spot metering. With slide film, spot metering was the best way to arrive at the optimum exposure. All of this has changed with digital due to the histogram and highlight alert most DSLR cameras have.
Which metering mode works best? Some photographers still cling to using the spot-metering mode, but it really is unnecessary and counterproductive today. In the old days with film, when photographing a snow scene or even a white gull, it worked best to spot-meter only the white snow or gull, compensate for the subject reflectance by adding about two stops of light to make the subject white again, and shoot the image. The truth is that evaluative metering, which looks at everything and then makes a recommendation, gets you closer most of the time. Simply compose the shot and quickly shoot an image. Now examine the white gull for example. Although the white feathers fill only a portion of the image—perhaps 25 percent—its white tones are still represented on the histogram. These white tones are the rightmost data on the histogram. Now adjust the exposure—if necessary—to make the rightmost data touch the right wall of the histogram if shooting RAW or approach the right wall, but not touch it, if shooting JPEGs. That’s all there is to it.
EXPOSURE MODES
These modes are the method the camera uses to arrive at the exposure. Though your camera may offer several, the most useful ones by far are manual, aperture-priority, shutter-priority, and program. Aperture-priority and shutter-priority are semi-automatic exposure modes. You set the ISO and one other parameter. Then the camera automatically sets the other to obtain the standard exposure. The program exposure mode is fully automatic and sets both the shutter speed and the aperture for you. We need to examine the modes in detail and make sure you understand them.
Program
The camera sets both the shutter speed and the f/stop to arrive at the standard exposure. It works quite well, especially for evenly lit average scenes. The camera knows what focal length is being used and might well set a higher shutter speed to counteract camera-shake to achieve a sharp image when using a longer focal length lens. This is all well and good, but what if you are shooting on a tripod, using a remote release, and locking the mirror up to capture a sharp image? There is no point in using more shutter speed than necessary while losing the depth of field that you need by using program.
If you are totally mystified by your camera, then program will get you started. I even use it at times when I want to photograph my friends. Perhaps we have all had a little too much fine wine and my thinking is getting fuzzy. I put the camera on program, use a flash, and fire away. I think of the program exposure mode as the party exposure mode.
Aperture-priority
This may well be the most popular exposure mode among amateur and professional photographers alike. It performs exactly as it sounds like it should. You decide the depth of field that you wish to get and then you set the aperture. In this mode, the camera gives priority to the aperture you set and the shutter speed varies as needed to deliver the standard exposure. If the exposure it delivers isn’t optimum as indicated by the histogram’s rightmost data, use the exposure compensation control to adjust it.
Although this exposure mode is enormously popular with many photographers, Barbara and I find it to be problematic and seldom use it. Indeed, we counsel our Kenya wildlife safari clients to use shutter-priority instead. Why? Here’s what happens when the client uses aperture-priority during an afternoon game drive. Leaving at 4:00 pm when the temperature is cooling down and the animals are more active, the bright sun offers plenty of light. Using ISO 400 in bright sun, the client sets f/11 for more depth of field. Since aperture-priority is set, the shutter speed floats up to 1/1000 of a second. That is a sufficiently fast shutter speed for shooting sharp images with a 300mm lens on a beanbag in the safari vehicle. Later that afternoon, the clouds roll in and the light dims by three stops. Since the aperture is fixed at f/11, the shutter speed drops to 1/125 second. With the image-stabilization activated and careful use on a beanbag, that shutter speed will still produce plenty of sharp images. As the Land Rover cruises through the forest at dusk to return to the lodge, the driver suddenly stops and turns the ignition off to provide a steadier shooting platform. Excitedly, the driver points out a leopard lying on a horizontal tree branch only 30 yards away. The photographer quickly shoots two dozen images and then the leopard drops down to the forest floor to begin its nightly hunt. The photographer views his captured images quickly and is thrilled by what he sees. Only later, when he views his images on his laptop, does he discover that none of them are sharp. The light was two stops dimmer in the forest at sunset, and 1/30 of a second just wasn’t enough shutter speed to produce sharp images. Of course, one might have realized they needed a faster shutter speed and increased the ISO, or opened up the aperture to f/4, but in the excitement of the moment, the vast majority of photographers forget to do so.
Some cameras offer options that make aperture-priority more useful. If your camera lets you set a minimum shutter speed, perhaps 1/500 of a second, for example, then aperture-priority is far more useful for action photography or still photography with long focal length lenses. With the minimum shutter speed set to 1/500 second, set f/8 for more depth of field and Auto ISO to allow the camera to set a standard exposure. Sadly, most cameras don’t offer this option, but your top-of-the-line camera often does. If your camera does, it is a very good way to lock in both the shutter speed and the aperture at the same time. Then the ISO changes to achieve the optimum exposure. This feature is becoming more common and we hope all cameras soon offer the automatic adjustable ISO option!
Aperture-priority has some merit when you wish to use a certain aperture and not let it vary. Barbara has used this exposure mode quite successfully when photographing the northern lights, which can vary in intensity from minute to minute. When using her lens with a maximum aperture speed of f/2.8, she sets aperture-priority and f/2.8. This keeps the lens wide open for all the shots and the shutter speed varies with the brightness of the shimmering lights. We are pleased to offer this one example where aperture-priority makes sense to use because in nearly all other situations, another exposure mode works far better. In other words, we can think of few situations where aperture-priority is truly the best choice. In the vast majority of photo situations, manual exposure or shutter-priority make the most sense.
Shutter-priority
This exposure mode is just the opposite of aperture-priority. Set the desired shutter speed and the camera automatically adjusts the aperture to deliver the standard exposure. Once again, if necessary, use the exposure compensation control to modify the standard exposure. Wildlife and sports photography often require using fast shutter speeds to freeze action. Shutter-priority is incredibly effective for wildlife and sports photography because it makes it possible to lock in the necessary shutter speed to ensure sharp images.
Let’s return to the leopard example we used with aperture-priority. Set shutter-priority and a shutter speed of 1/1000 of a second. The aperture varies now and it floats up to f/11 in the bright sunshine—the same exposure that aperture-priority set. When it clouds over and the light dims by three stops, the aperture opens up automatically to f/4—the biggest aperture on the lens. Of course, when the light becomes two stops darker in the forest at sunset, the lens is not able to open more and the shutter speed can’t change, so the images are underexposed. Nevertheless, it is better to be underexposed by two stops, rather than shoot unsharp images due to camera-shake. But there is a better answer that most photographers do not know about.
Shutter-priority and Auto ISO
When the light dims and you reach the maximum aperture of the lens, set the camera to shutter-priority and Auto ISO. With a 300mm f/4 lens, once the light dims enough to require a bigger aperture than f/4, such as f/2.8, the camera automatically increases the ISO to 800 to maintain the exposure at the chosen 1/1000 of a second shutter speed. If and when the light dims still more, the ISO automatically goes up to compensate for it. Be aware it is possible to run out of ISOs. If the highest ISO your camera offers is ISO 12,800, and the light is so dim that it needs a higher ISO, the images are once again underexposed. When it is this dark, though, most people call it night and it is time for dinner or star photography!
Manual
Barbara and I are immense fans of the manual exposure mode and use it at least 75 percent of the time. This mode requires the photographer to set the ISO, f/stop, and shutter speed. The exposure is manually adjusted by turning dials while monitoring a simple exposure scale in the viewfinder. It is a simple procedure after you have done it a few times.
Let’s photograph a landscape. Set ISO 100 and f/16 for adequate depth of field. Turn the shutter speed control until the exposure indicator that appears on the exposure scale in the camera’s viewfinder aligns with the zero point in the middle of the scale. We don’t have to worry about using a particular shutter speed to acquire a sharp image because landscapes don’t run around and we are using a tripod. Shoot the image and check the histogram and highlight alert. If things are overexposed, the highlight alert (if activated) will make overexposed portions of the image that you view on the LCD display flash off and on. If nothing is flashing, check the histogram to make certain the rightmost data that represent the highlights are close to the right wall of the histogram when shooting a JPEG or touching the right wall when shooting RAW. If the exposure requires adjusting, simply turn the shutter speed to a new setting that makes the adjustment. For example, if the rightmost histogram data is one stop from the right wall, slow the shutter down one stop. If the original exposure is ISO 100, f/16, and 1/8 second, slowing the shutter down to 1/4 second adds the extra stop of light.

Warthogs are middle tone in reflectance. The sunlight was steadily changing in intensity as the dark clouds floated by. When ambient light levels are constantly changing, manual exposure does not work well because it does not automatically adjust for the changing light. This is an excellent time to use shutter-priority and Auto ISO. Set the shutter speed that is necessary to capture sharp images and Auto ISO. Nikon D4, Nikon 200–400mm f/4 lens, ISO 200, f/9, 1/200 second, Auto WB, shutter-priority, and Auto ISO.
THE METERING SCALE
Many photographers are puzzled by this scale when they first attempt to use it, but it is really very simple. First, find the scale in the camera’s viewfinder. Sometimes this scale will appear in the LCD window, too. Find the zero point, which has always been the middle of the scale in every camera I have looked at. There is a plus side and a minus side. In some cameras, the minus side is on the left, as it should be, but other cameras have it on the right. Notice the range of stops on the scale. The Canon 5D Mark III, for example, has a metering scale on the bottom right of the viewfinder that shows plus and minus three stops in 1/3 stop increments. The plus side is on the right and the minus side is on the left.

The north wind generates massive waves that slam into the rocky shoreline of Pictured Rocks National Lakeshore. Early in our digital career when we tried aperture-priority for landscape photography, we discovered that it produced erratic exposures when photographing subjects that varied in size from shot to shot such as these waves. Automatic exposure modes average the tones the meter “sees.” If the exposure is perfect when the waves are small, a spectacular wave like this one causes the camera to automatically reduce the exposure because the meter “sees” more white water, which causes the camera to seriously underexpose the rocky shoreline. Returning to manual exposure solved the problem completely. Canon 5D Mark III, Canon 24–105mm f/4 lens at 70mm, ISO 200, f/18, 1/25 second, Cloudy WB, polarizer, manual exposure and autofocus with back-button control.
Some cameras offer the opposite arrangement and have the plus side on the left. Many Nikons are set up this way. Fortunately, most cameras give you a menu option to reverse the direction of the scale to make it more logical. How does it make more sense you ask? Adding light to the exposure moves all of the histogram data to the right, so it is logical to have the plus side of the exposure scale on the right, too.
Many beginners quickly become confused with the exposure scale when they turn the camera on and try to move the exposure indicator along the scale. They turn their shutter speed or aperture dials and the indicator doesn’t move. Why? In my Canon 5D model example, the scale only shows plus and minus three stops of light in 1/3 stop increments. It is likely that when you turn the camera on and point it at the scene that the setting might be beyond the scale’s range. If you start out five stops overexposed, you are not yet on the scale. With most cameras, when this happens there is an arrow or a flashing light on the side of the scale (negative side in this case) to indicate you are off the scale. If you are too dark, slow the shutter speed down until the exposure indicator begins to move. Of course, if too light, then increase the shutter speed to get on the scale. After you do this a few times, it is quick and uncomplicated to manually make adjustments.

Example of the exposure scale in the Canon 5D Mark III. The scale is especially important when using manual exposure. The scale shows plus and minus three stops of light in 1/3 stop increments. Plus or adding logically means more exposure and therefore they show on the right. Less exposure is displayed to the left. Know your scale. Some cameras have the reverse arrangement and some do not show such a wide exposure range. For example, exposure might be limited to only a plus and minus two stop range. When your camera is set to 1/3 stop increments, turning the shutter speed or aperture dial one click will move the indicator one-third stop if the exposure is on the scale. Once you get used to this exposure scale, it is pain-free to use.
EXPOSURE CONTROL DIALS
Manual exposure is far more intuitive when the dials for both the shutter speed and the aperture are set up (when viewed from the rear of the camera) so turning them to the right adds light and turning to the left subtracts light. It really makes little sense to have to remember that to add light, which moves the histogram data to the right, the dials must be turned to the left—the opposite direction. Sadly, my Canon 5D is set up this way and is counterintuitive. Fortunately, this camera and most others provide a menu option or a custom function to reverse the dial direction. Using a menu selection in my camera, I set Dial Direction During TV/AV to the Reverse Direction choice. Though not stated, it also works in the manual exposure mode. Now turning my aperture and shutter speed dials to the right adds light, moves the histogram data to the right, and the exposure scale has the plus side on the right.
Setting up your camera this way makes the manual exposure mode far easier to use. Most cameras offer many ways to reconfigure to make them more straightforward. Examine your options—and your printed manuals—carefully!
AUTOMATIC EXPOSURE MODE PROBLEMS
We use manual exposure for nearly all close-up and landscape images. We like it for about half of our wildlife images, too. We do favor shutter-priority for wildlife in fairly neutral reflectance surroundings such as the wildlife of Kenya. And when the light dims, the combination of shutter-priority and Auto ISO is absolutely terrific. Yet, for at least 75 percent of the images we shoot, we use manual exposure because it is much more uncomplicated to arrive at the optimum exposure and keep it there. Let’s look at the problems with the automatic exposure modes.
Light through the Viewfinder
This is a common and serious exposure problem for all automatic exposure modes, yet most photographers are unaware of it! Does your camera have a switch to close off the viewfinder? Did it come with a tiny plastic curtain to do the same? Your camera maker knows there is a potentially enormous problem of underexposure if you shoot on a tripod and are not peering through the viewfinder when you shoot the image. Light enters through the lens as it should. Light also enters the uncovered viewfinder. The exposure meter measures both and assumes all of this light is entering through the lens. When you shoot the image, the light that enters the viewfinder is blocked by the mirror, resulting in underexposure.
Certain conditions make the problem worse. If the scene is mostly dark, or in the shade, and the ambient light striking the viewfinder is bright, the problem is more likely to happen and be more severe. If you are using a device that absorbs light—polarizing filters, extension tubes, and teleconverters are common culprits—the problem becomes even more acute. Conversely, if you are not using light-absorbing devices and are photographing a bright scene, but the camera is in the shade, the problem will be much less or non-existent. It is easy to check to see if there is a problem. Look through the viewfinder and note what shutter speed and aperture the camera selects. Now remove your face from the camera to unblock the viewfinder and look at the exposure settings the camera will use in the LCD window. If these two exposures differ, then you have a problem. The more they differ, the greater the problem. To illustrate this, with the camera set to aperture-priority, if the camera sets 1/60 second at f/16 when you look through the viewfinder and 1/15 second at f/16 when you stop shielding the viewfinder, an underexposure problem of two stops occurs! To solve this problem, use the devices offered by your camera maker or merely hold your hand in front of the viewfinder without touching the camera to shade it while shooting. All of these solutions are a nuisance, though. When you use manual exposure, the problem goes away!
The problem with all automatic exposure modes is they allow the camera to change the exposure without permission from you. With manual exposure, once you set the shutter speed, f/stop, and ISO, the camera’s indicator on the exposure scale may move, but the set exposure doesn’t change unless you change one of the three exposure controls. Essentially, manual exposure is a superb and easy way to lock the exposure. Most cameras offer the automatic exposure lock control, but it is a nuisance to use. We nearly always use manual exposure to circumvent the light through the viewfinder problem when shooting on a tripod.
When the Background Brightness Changes
Two giraffes are feeding on the leaves of an acacia tree in Kenya’s Masai Mara. One is below the horizon and the other is standing on top of a small knoll against the sky with lots of white clouds in the early morning sunshine. Both giraffes are illuminated by the same amount of ambient light. If you use any autoexposure mode and set the optimum exposure for the giraffe below the horizon, it won’t be optimum for the giraffe with the white clouds in the background. Why? Remember that automatic allows the camera to change the exposure without your permission. When you compose the giraffe against the white clouds, the camera quickly averages the exposure. The white clouds make the overall scene brighter, even though the light on the giraffe remains the same. The white clouds cause the camera to reduce the exposure and the giraffe is now underexposed. If you had used manual, once the optimum exposure is set for the giraffe below the horizon, it would remain set for the giraffe on the knoll against the sky.
Anytime you photograph where the brightness of the background changes from shot to shot, manual exposure is a far more precise way to photograph. Here’s one more example. I was photographing Steller’s sea eagles in Japan one winter. The fishing boat I was on threw fish to the hundreds of eagles to get them to approach closely. In the early morning sunshine, the background consisted of a light-blue sky, white ice, or dark-blue ocean water. From one moment to the next, a circling eagle could be against any one of these backgrounds. If I had used an automatic exposure mode, and set the exposure for the light-blue sky, the images would be underexposed against the white ice and overexposed when the dark-blue ocean water became the background. I didn’t suffer any exposure problems because I used manual exposure instead.
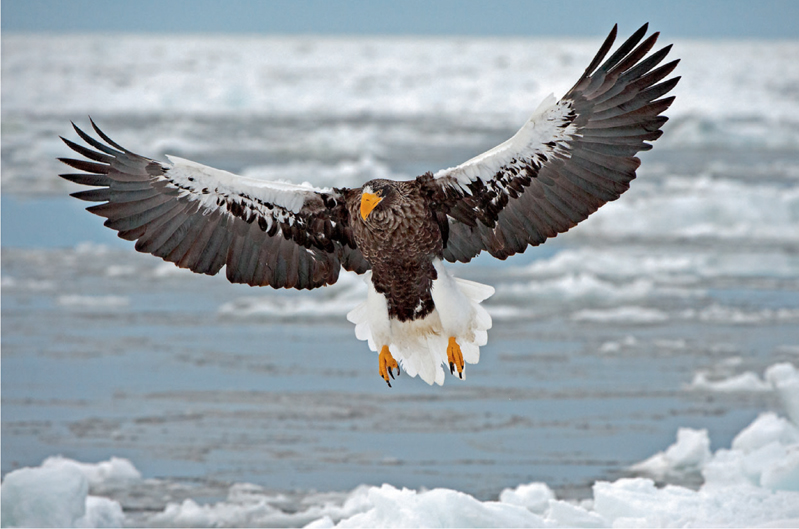
Manual exposure really shines when the tones of the background change rapidly. Autoexposure works poorly when photographing the spectacular Steller’s sea eagles in northern Japan. At dawn we boarded a fishing boat and motored out to the floating pack ice a mile offshore. The Japanese tour guide unloaded fish on the pack ice. Within minutes, over three hundred eagles arrived. On this particular morning, the background varied from dull white clouds to bright white pack ice and dark ocean water. Had an automatic exposure mode been used and the exposure was set to properly expose the eagle against the sky, the camera would underexpose the eagle against the white pack ice and overexpose it against the dark ocean. By using the manual exposure mode, once the exposure is set for the white feathers in the eagle, the eagle remains optimally exposed no matter what appears in the background. Nikon D3, Nikon 200–400mm f/4 lens at 400mm, ISO 3200, f/8, 1/1250 second, Cloudy WB, manual exposure and continuous autofocus on the back-button.
When the Size of the Subject Changes
Changing the size of the subject in the viewfinder causes autoexposure problems. Compose a white egret to fill one-quarter of the image and determine the optimum exposure. What happens when you physically move closer, or zoom the lens, to make the egret fill three-quarters of the image? Remember the meter automatically averages the scene. With the white egret filling three-fourths of the image, the meter assumes the light is much brighter and sets a darker exposure that underexposes the egret. The reverse happens, too. Compose a bison to fill one-quarter of the image and determine the optimum exposure. When the bison fills three-quarters of the image, what happens to the exposure? The meter “sees” less white snow and more black bison, so it automatically lightens the exposure to maintain the average and severely overexposes the snow. Once again, manual exposure easily and more efficiently handles these situations.
ISO Can’t Adjust the Exposure
Suppose the image is one stop too dark. Will an increase of ISO 200 to ISO 400 increase the exposure? If you are using any autoexposure mode, it won’t. If you are using aperture-priority and the exposure set by the camera is 1/125 second at f/8, changing from ISO 200 to ISO 400 merely forces the camera to change the shutter speed to 1/250 second to compensate for the increase in ISO. If using shutter-priority, doubling the ISO only forces the aperture to close down one stop to compensate. If you were using manual exposure, changing the ISO does affect the exposure!
Finding the Exposure Compensation Control
Some cameras are better than others for using and finding the exposure compensation control to achieve the optimum exposure. While the exposure compensation control might be simple to find in the daytime, is it easy to find at night? When my fingers are cold and stiff and I am shooting the stars at midnight, it is simpler for me when I can’t see to find my separate shutter speed and f/stop dials. I always know which way to turn them to add or subtract light. Even though I am wearing a headlamp, I don’t turn it on to see the camera controls because it temporarily ruins my night vision and that of all other photographers near me.
Pop-up Flash Problems
Let’s see if you are ready to graduate from this exposure chapter. You are photographing people or pet portraits on a sunny day. Using aperture-priority, the ambient exposure is 1/1000 second at f/8. The sun creates harsh shadows in the subject’s face, so you use the camera’s pop-up flash to add some light to fill in the shadows by setting the flash exposure compensation control to −1. Without the flash, the exposure is fine, but the light is too high in contrast. With the flash on, you shoot a portrait that is seriously overexposed, so you set a lower fill flash setting of minus two stops. Shoot another image and once again the portrait is seriously overexposed. What is the problem? Take some time to ponder this before reading the answer. Here’s a clue. Your clever camera knows when you are using the flash. Take your time… take more time… Another clue! The camera has a flash sync speed when using flash.

Aperture-priority sometimes is a problem with flash. Suppose aperture-priority is set and f/8 at 1/500 second is the optimum exposure. To open up the shadows under the cowgirl hat Ellie is wearing, a flash is fired at –.7 FEC. Suddenly the highlight indicator and histogram indicate overexposure. Is the flash output too much? You set less flash exposure by going to –1.3 FEC and the problem persists. Why? The overexposure is not being caused by the flash, but rather the aperture-priority mode is giving priority to the f/8 aperture and forcing the shutter to switch to the flash sync speed of 1/200 second. Ambient light is causing the overexposure! Use manual exposure or shutter-priority and set the shutter to the sync speed to avoid the problem. Canon 5D Mark III, Canon 70–200mm f/4 lens at 135mm, ISO 400, f/11, 1/200 second, Cloudy WB, shutter-priority, AI Servo with back-button focusing, Canon 600EX flash with ST-E3-RT controller and –.7 FEC.
The camera’s sync speed when using flash varies from camera to camera, but generally it is around 1/200 of a second—sometimes a little more or less. The ambient light exposure is 1/1000 second at f/8. Since you are using aperture-priority, the camera gives priority to the aperture and won’t change it. However, the camera is aware the pop-up flash is activated and defaults to the sync speed of 1/200 second in this example. The overexposure is not caused by the flash at all. The image is overexposed because the camera changes the shutter speed from 1/1000 second to 1/200 second, an increase in two and one-third stops of ambient light that causes significant overexposure. Did you get the answer? That’s okay. It took a while to figure out what happened when my photo students first encountered it. Since I rarely use aperture-priority, I never personally ran into this problem. With manual exposure, I know the camera has to be set to sync speed and I set it immediately. You could also use shutter-priority and set the shutter speed to the sync speed. Then the aperture varies to maintain the optimum ambient light exposure.
MANUAL EXPOSURE PROBLEMS
Two significant problems come to mind. First, the photographer must be able to speak the language of stops easily and quickly and be able to use their exposure dials and metering scale efficiently. Second, manual exposure does not automatically adjust for changing levels of ambient light. You must be aware of changing light and monitor manual exposures by reviewing the histogram and highlight alert from time to time. Should you add or remove a device that affects the amount of light passing through the lens—filter, teleconverter, extension tube—then adjust the exposure for them as well. There are times on a partly cloudy day when I do employ shutter-priority to monitor the ambient light because it continually changes. This also happens at dawn when the ambient light steadily brightens or at dusk when it constantly diminishes.
AUTOBRACKETING
Your camera can automatically bracket the exposure. The control varies among cameras, but it can shoot the standard exposure and it will shoot two more exposures if it is set to shoot a three frame autobracket in one stop increments. The second exposure will be one stop darker than the standard exposure and the third one stop lighter. Effectively, these two exposures, one darker and one lighter, bracket the first exposure. Many cameras allow you to set a different number of images to be included in the bracket—such as five or seven images—and the sequence—standard, darker, lighter—might be flexible, too.
Some photographers rely on autobracketing, but we rarely find a need to use it. The advantage of bracketing is if the exposure needs to be compensated, one of the exposure brackets might be the optimum exposure. The problem with that is it takes time to shoot all of the brackets, it eats up memory and fills the buffer quicker, and the best bracketed exposure might happen at the moment when the subject is poorly composed or not in sharp focus. Autobracketing is often used when shooting a series of identical compositions where the exposure needs to be varied for HDR processing, but we prefer to shoot these series manually for the greater precision it provides.
YOU CAN’T METER EVERYTHING!
It isn’t possible to meter the stars in the night sky. They are simply too small individually, even though thousands of them may be in the image. As you know, stars are bright suns like the one we have. An outstanding image of the starry night sky has no detail in the stars because they are overexposed dots. Your highlight alert probably won’t flash—none of our cameras will show blinkies—because the spots are too small. You can learn a suitable exposure for the stars by testing, but no need to wait. Try ISO 3200, f/4 or preferably f/2.8 for more stars, and 20 seconds on a dark night. Compose the scene to get as many stars as possible and you will capture a starry night sky!

Some subjects are impossible to meter. Try metering the Milky Way and you will see what we mean. We lightpainted our neighbor’s vintage cabin, meaning we used a flashlight. Trial and error over several shots taught us the length of time it took for the flashlight to illuminate the cabin. For star photography and the moon, run an exposure test. For the stars, we learned ISO 3200, f/2.8, and 20 seconds will capture plenty of them. If you want more stars, try ISO 6400, 20 seconds, and f/2 if you have a lens that fast. To photograph the moon alone, try the Mooney 11 rule—1/ISO at f/11 or any equivalent. For a crescent moon, another guideline we use is the Crescent 8 rule—1/ISO at f/8 or any equivalent. What can we say—it works! Canon 5D Mark III, Canon 24–105mm f/4 lens at 25mm, ISO 3200, f/4, 30 seconds, Daylight WB, manual exposure and metering, and flashlight to “paint” the cabin.
SUMMARY
We handle exposure as quickly and efficiently as possible. When photographing nearly all still subjects that are not running around—a waterfall moves, but doesn’t scamper about the landscape—we use the manual exposure mode. It is easier than dealing with all of the problems automatic exposure modes create. When photographing subjects that are in motion—flying birds, running cheetahs, dog sleds sliding by—then we use shutter-priority about half of the time. When photographing in dim light where the shutter speed must be maintained, the combination of shutter-priority and Auto ISO is outstanding!

The dawn sky attractively accentuates the warm hues of Wilson Arch. Unlike many arches that require a long hike to reach them, Wilson Arch is right next to Highway 191 about 25 miles south of Moab, Utah. Nikon D4S, Nikon 14–24mm f/2.8 lens at 14mm, ISO 100, f/18, 1/1.3 seconds, 10,000K WB, manual exposure and AF-C autofocus on the back-button.