

Autumn colors vary from year to year. Sometimes leaves change color early and sometimes later. Moccasin Lake is in Hiawatha National Forest south of Munising, Michigan. The lake is noteworthy because it has two periods of peak color. How is this possible? Early in the color season the maple trees turn crimson, which produces brilliant-red reflections in the lake. Eventually the maple leaves fall to the ground and then the aspens turn bright yellow fully ten days later creating an entirely different color show. Nikon D300, Nikon 24–70mm lens at 36mm, ISO 200, f/11, 1/25 second, Cloudy WB, Manual exposure mode, and backbutton focusing. Today we would use a three shot focus stack using f/8 to sharply focus this scene.
Our Digital Office
THE EVOLUTION OF OUR BUSINESS
Our office procedures and software choices have been greatly influenced by the path our business followed over three decades. In the 1980s and 1990s we primarily earned our living by sending thousands of images to stock photo agencies. They rented these images to various users for one-time use, and we received a portion of the sale price—a commission of 50 percent. We sold many images directly to calendars, magazines, book publishers, and as many other users as we could find where we would get all of the sale price. Of course, there is plenty of overhead—postage, packaging materials, film and processing costs, travel expenses, equipment costs, insurance, and much more. The net profit was always much less than the gross income from these sales.
Selling images is tedious, time-consuming, and definitely not enjoyable work. We think most photographers will agree with us that the fun part of the nature photography business is shooting the images. The work begins when you must edit, sort, label, organize, find, and store the images. Selling images became more and more competitive as ever-increasing numbers of photographers began flooding the limited marketplace with them. At the same time, the price paid for images began to fall rapidly when the supply of “usable” images vastly exceeded the demand. With the advent of digital, stock photo agencies began offering deals to clients if they bought a lot of images. This arrangement kept the income flow up for stock agencies, but it proved devastating for most individual photographers. Many images are used on websites and for other digital uses, so the number of sales greatly increased, but the low per image fees being paid demolished that income that so many photographers relied on to earn a living. By 2005 we began to see our stock sales declining. Fortunately, our nature photography business rapidly evolved away from selling images to teaching nature photography. Now that nature and outdoor photography education is our first and only priority, our office and software choices now reflect that change.
Many photo workshop clients are eager to photograph dew-laden dragonflies and other sensational subjects in the dew-drenched meadows of northern Michigan. When insects are laden with dew and naturally chilled, most of them cannot move until they dry off and warm up, providing plenty of time to make images of them. A Plamp is used to stabilize the subject to keep it perfectly still. Canon 5D Mark III, Canon 180mm macro lens, ISO 100, f/14, 1/5 second, Cloudy WB. Flash is used as the main light and the ambient light is underexposed about one stop to darken the background slightly.
I taught my first photography workshop in 1977 through a community enrichment program in Lapeer, Michigan, and continued teaching workshops in a small way over the next several years. I always had phenomenal student response to my teaching methods. Teaching came naturally to me and I enjoyed it. By 1990, Barbara joined me, and our photo workshop business absolutely exploded. We loved spending quality time with our clients in the field helping them become marvelous photographers, and they rewarded our efforts by telling their friends and becoming repeat customers. Indeed, many of our clients have taken every course we offer. As we gradually transitioned to digital around 2003, the demand for our exotic photo tours, field workshops, and one-day instructional seminars became so large that we discontinued all efforts to sell images—no time for it—and concentrated on teaching photography because it was far more fun, intellectually challenging, and emotionally rewarding.
As I write this in 2014, we remain committed to teaching photography. We cherish the challenge of figuring out ways to use the latest equipment and software innovations to help us and our students capture stunning images. We share our strategies through magazine articles, teaching, and instructional photography books such as the one you are reading now—the fifth in a series. Although our decision to spend our efforts on teaching was motivated entirely by our interests, it proved to be dumb luck, too. The abundance of cheap “good-enough” digital images that are available on the Web for commercial use seriously curtailed the income that could be realized by stock image sales. Many photographers who once earned their living primarily from stock photo sales suffered a problematic decline in income as prices being paid for images sharply declined while the cost of doing business soared. Fortunately, this unhappy trend had little impact on us because we had already abandoned photo sales. The digital era greatly increased the number of people who now wanted excellent digital images. Everyone has a digital camera now. It may only be a cell phone or iPad camera, but many eventually go on to buy a DSLR. When they do, they become a potential customer for us and everyone else who teaches photography workshops and classes.

The coastal brown bears at Hallo Bay, Alaska, are habituated to humans. The bears are not afraid of us and do not consider humans to be on their menu because they prefer grass, clams, and fish. This sow bear is reacting to a massive male bear wandering in her direction. Boar bears sometimes kill cubs and sub-adults, so the sow remains ever watchful and will ferociously defend her young. The cubs are aware of the danger and seek refuge behind their mother. Nikon D4S, Nikon 200–400mm lens with a 1.4x teleconverter at 550mm, ISO 1600, f/10, 1/800 second, Manual exposure mode, Sun WB, AF-C autofocus with the back-button control.
We mention our emphasis on teaching because it definitely affects the software choices we make, how we organize our images, and what we keep. Both Barbara and I are addicted to being in the field shooting images and teaching people how to do it. Barbara is brilliant at making computers achieve what she wants them to accomplish and uses all programs skillfully. On the other hand, I prefer spending my time working at tasks other than using computers. I get easily befuddled by their constant changes. Fortunately, Barbara is still willing to come to my rescue, or I would have booted my computer out the window years ago.
Barbara has no interest in teaching Photoshop or any other software program because she already spends enough time in the office and I am obviously unqualified. Plenty of other photographers are eager to teach this subject and more qualified than we are by a wide margin, so we’ll leave that portion of the workshop market to them. Therefore, our software choices are focused on helping us select the images we wish to keep, storing them in a logical manner, processing RAW images when necessary, and software that lets us do High Dynamic Range imaging and focus stacking.
EDITING AND STORING IMAGES
We shoot images today for the same reason as when we started doing it more than forty years ago. It’s enjoyable! Aside from that, we shoot images to illustrate our magazine articles, books, and the “slide” programs we present during our indoor seminars and field workshops. We need quality images to illustrate the techniques we use. But, we also need images to show what not to do. Normally, we get some “clunker” images without trying to do it on purpose. (All photographers shoot bad images, but good photographers don’t show them.) At times we deliberately shoot bad images because we are unlikely to accidently make the mistake that we wish to illustrate. For instance, photographing a woodland waterfall illuminated by bright sunshine isn’t something we would accidently do because we know the contrast is far too great.
Since we need images that are shot in bad light for teaching purposes though, we sometimes photograph a waterfall in bright sunshine specifically to illustrate the problem of high contrast.
Our shooting strategy is always to shoot plenty of images when the opportunity presents itself and do it as well as we possibly can. For example, I shot at least 7000 coastal brown bear images around Geographic Harbor in Alaska, and Barbara shot similar numbers. At times, two dozen bears were eagerly catching salmon all around us. The spawning salmon swam up the shallow streams and the bears chased them down. The action of running bears pouncing on swimming salmon is spectacular! Of course, I have no need for 7000 images of this and don’t wish to store all of them, either. Therefore, we use a program called PhotoMechanic to edit the images down to a more manageable number. We like PhotoMechanic because it quickly pulls up the embedded JPEG in the RAW files we shoot. This means even if we buy a new camera that wasn’t around when the software version of PhotoMechanic we are using was created, the software still can let us see the images because the JPEG is a universal file that doesn’t require updated software. With many software programs, you have to update the software, or at least download the information the program needs for the new camera to see the images.
Barbara shoots Nikon and I shoot Canon. Both companies make proprietary software for their camera system. Although we have looked at this software, we don’t use the proprietary software that much because of our photo workshop business. It is pointless for Barbara to use and master the Nikon software and me the Canon software when we have workshop clients that don’t shoot either system. Perhaps they shoot Sony, Olympus, and others. Using proprietary software is an enormous problem if one must look at images shot with other camera systems, something PhotoMechanic does easily. To be more effective photo instructors, we must use software that works with any system.
By the way, you might be wondering why Barbara shoots Nikon and I shoot mostly Canon, but occasionally use Nikon. We like both systems well, though Barbara really enjoys her Nikon lenses and D4S camera. I like both systems, but mainly shoot Canon. Years ago we realized that we were obliged to be highly knowledgeable photo instructors. We know the vast majority (perhaps 85 percent or more) of the workshop market is made up of Nikon and Canon shooters. We felt it was critically important to know everything about the Nikon and Canon systems. While we don’t know everything, we know a lot about both systems. Seldom does a Nikon or Canon question stump the two of us, no matter how detailed or esoteric. We know the flash systems, close-up systems, and the internal working of the cameras and lenses to the point that we can nearly always answer our student’s question immediately without having to look anything up!
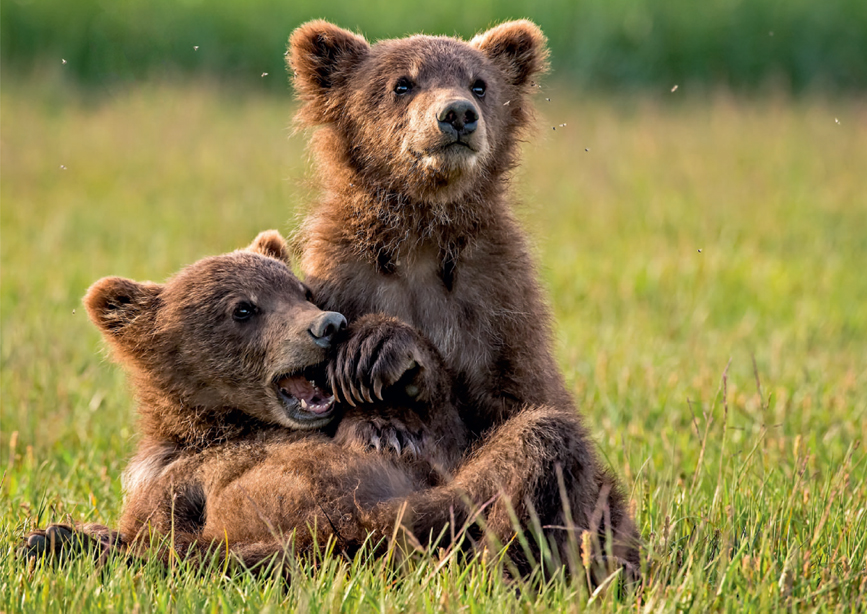
Brown bears are abundant and can be approached safely at Alaska’s Hallo Bay during early July when we spent a week with Chuck Keim on his bear-viewing boat. We were extremely lucky. A few sow bears had cubs that were born that spring and the weather was excellent. These two cubs played continuously while their mother calmly chewed grass about 50 yards away. Notice how the golden backlight subtly rims the cubs’ fur. The Nikon D4S camera is amazing because the shots produce clean images with high ISOs. Barbara used ISO 2000 to keep the shutter speed fast and to stop the lens down more to make sharp images. Nikon D4S, Nikon 200–400mm lens, ISO 2000, f/10, 1/640 second, Sun WB, manual metering, autofocus using AF-C with control on the back-button.
Let us return to PhotoMechanic, which is outstanding at working with a large number of RAW and/or JPEG images. This software is quick at pulling up RAW images. The software is especially good at letting us edit the images rapidly so that we can decide which images we wish to keep. PhotoMechanic allows one to easily label the images and organize them into folders. Before we get into editing the images, you should know that we believe “less is more.”
Some photographers believe they should keep everything because they don’t know when they might need an image, or portion of an image, at some later date. However, since there is no cost to shooting digital images once you have the equipment, it is easy to bury yourself in images and fill up all of your storage devices. Our goal is to delete as many images as possible to make it easier to find the ones we truly need and to minimize the number of storage devices we must use and back up.
HOW WE EDIT OUR IMAGES
I discovered a large and healthy patch of wildflowers on a calm overcast morning and spent the next hour photographing individual and multiple flowers. Using ambient light alone, or mixing flash with it, I shot ninety-seven total images. I simultaneously shot a large JPEG and a large RAW file to capture the appealing blossoms. Here’s my strategy for editing them to reduce the images to only the ones I need.
1. Using PhotoMechanic, I look at each image using as much of the computer monitor as possible, but I allow the histogram to appear on the right side of the screen. Any image that is obviously soft—the breeze suddenly blew—I delete immediately. If my composition fails and something is cut off that shouldn’t be, it also is deleted. Any obvious flaw that seriously degrades the image is deleted. I realize many photographers can “fix” a flaw later with software, but I have no interest in doing this, so I delete the image.
Barbara and I strive to shoot the finest possible image, which includes preventing flaws ahead of time. If the exposure is too dark or too light as shown by the histogram displayed by PhotoMechanic, I delete it. In some images, I use a flash for fill light or main light. Sometimes the flash doesn’t do what I had hoped it would, so I delete those images immediately. Many photographers simply check the images they wish to delete.
At the end of the edit, the checked images are selected and then deleted all at once. This way works quite well, but I prefer to delete as I go. It is comforting to see the total number of images that must be edited quickly decrease.
PhotoMechanic’s default setting queries you twice before deleting an image so one doesn’t accidently delete a “wanted” image. This requires another key, which must be pressed to actually delete the image and send it to the “bit bucket” or recycle bin. This is slow and cumbersome, but indeed allows you a chance to reconsider. I personally don’t like this tedious process of deleting that requires pressing Delete twice. To make PhotoMechanic send the image to the recycle bin immediately with just one keystroke, I went to Edit/Preferences/Files and checked Never Warn When Deleting Photos. Now by pressing Delete just one time the image is sent to the recycle bin. Should I make a mistake and delete an image that I wish to keep, it is easy enough to go to the recycle bin and retrieve the image.
2. Once the obvious flawed images are deleted from the set I am editing, I make another pass through the surviving images at 100 percent magnification. I carefully look at the portion of each image I focused on to make certain it is sharp. I immediately delete any unsharp images. Often I move back and forth between similar images to find the one that is the sharpest. It is important here to learn what acceptably sharp looks like. The RAW files I am looking at by viewing the embedded JPEGs within them are sharpened according to the parameters for JPEG processing in the camera. During RAW conversion processing, images can be optimally sharpened. This means the sharpness of the image that is presented on the computer monitor is not as good as the final sharpness will be when the RAW data are processed. It is extremely important to keep this in mind. Therefore, I look at the relative sharpness of the image as I edit and fully realize it can be improved later.
To help me judge the sharpness of the image, I programmed PhotoMechanic Version 5.0 to sharpen the thumbnails of the images I am viewing. Go to Edit/Preferences/Contact Sheet and check Generate High Quality Thumbnails and Sharpen Thumbnails.
3. I edit ruthlessly by looking for reasons to delete images. By the time I make my second pass through a set of images, typically more than 50 percent are deleted and sometimes the percentage is much higher. Of course, the percentage depends on many variables.
Photographing flowers while dealing with a determined breeze causes many more deletes. A mushroom emerging among autumn leaves on a dead calm morning under bright overcast light generates few images that must be deleted. I make a third pass through the images to look for identical or nearly identical photos and delete duplicates.
There is no point in keeping two or more identical photos as they are easy to duplicate when needed.
4. The images that survive my ruthless editing are now reduced to less than 25 percent on average of the number I started with. I plan to keep them permanently, unless I photograph the subject later and get better results. PhotoMechanic makes it a breeze to select the images and label them. I learned long ago to avoid attaching too much detail to an image as it becomes an enormous time waster. For example, although I photograph plenty of plants and animals that could be assigned a scientific name to label the image, I don’t bother to look them up and don’t use them. I am familiar with scientific names because I was forced to memorize hundreds of them in college botany and wildlife classes. However, adding scientific names to the files takes too much time. Should I ever have a buyer that needs the scientific name—and that hasn’t happened in forty years—I can always look it up. Instead, I merely attach the “standard” common name that is published in a current field guide. For example, instead of labeling the images of a butterfly that is abundant around our Idaho home with the Latin name, Limenitis weidemeyerii, it is labeled with its common name— Weidemeyer’s Admiral.
5. To label all of the images of the Weidemeyer’s Admiral, I select all of them and then press Control-M. This brings up the Rename Photos window, which provides a variety of ways to label all of the images that are selected at one time. Once the common name is on each image, I move all of the images to a separate folder called “Weidemeyer’s Admiral.” This folder is created in another more all-inclusive folder called “Butterflies.”

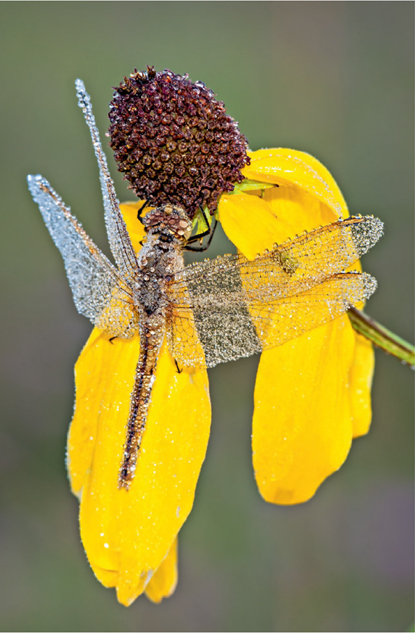
Always look for that little something extra. These good looking gray-headed coneflower blossoms benefit from the dew drops and the spider web to make a more appealing image. A Plamp was used to stabilize the flower’s stem and was carefully attached to avoid shaking off the dew drops. Eighteen images were shot at slightly different focus distances and merged with Helicon Focus to obtain the best possible overall sharpness. Focus stacking works far better than stopping down to f/22 and shooting a single exposure because the depth of field at f/22 still does not cover the subject’s depth adequately and the overall loss of sharpness from diffraction is significant. Nikon D4S, Nikon 200mm micro lens, ISO 100, f/8, 1/80 second, Cloudy WB, manual exposure and focus.
By organizing all of my images in folders, they are easy to find. All butterfly species that I have photographed (about forty) are found in the “Butterflies” folder. All images of each species are found in their own folder using the common name of the species. For example, I especially like photographing great spangled fritillaries. To find my images of this species, I merely look in a folder called great spangled fritillary. It is a simple system that works perfectly. For many photographers, it might make sense to also include the place where the subject was photographed. However, I don’t do this because I can always remember where I photograph everything, though I can’t remember what I did yesterday—and don’t ask me to explain it. By the way, this folder system is not unique to PhotoMechanic. Lightroom offers a similar system that is widely used by many photographers.

This Weidemeyer’s Admiral quietly perched on the Indian Paintbrush flower one cool morning. The ambient light is underexposed by about one stop and a Canon 580II flash was used as the main light to expose the butterfly and the flower properly. We call this main flash because the flash is the main or primary light illuminating the subject and the ambient light serves the role of fill light to prevent the background from appearing too dark. Canon 5D Mark III, Canon 180mm f/3.5 macro lens, ISO 100, f/18, 1/4 second, Cloudy WB, manual exposure and focus.
STORING IMAGES
Image sizes are becoming increasingly large with each new generation of camera models, and it is easy to shoot plenty of images. Fortunately, memory for storing images is inexpensive today. Therefore, we store all of our images on 1.5TB external hard drives that we buy at Costco. We always store the images on two external hard drives to protect us from equipment failure. We have never had a hard drive go bad, but it certainly can happen. Having at least one extra copy of your images is a wise thing to do! Because having a duplicate copy of your images on a separate storage device is desirable, that is another reason to edit the images ruthlessly to reduce the number that must be stored.
SOFTWARE CHOICES
PHOTOMECHANIC VERSION 5.0
We use this program to decide what images we wish to keep, to label the images, and to organize them into folders. Currently we have been using its basic slide program to show the images at our seminars, but we do plan to start using another software program that offers more options for slide presentations.
PHOTOSHOP
Barbara uses Photoshop’s powerful program to process RAW images. Thanks to the classes she attends taught by Charles Cramer, she is quite skilled at making Photoshop dance to her commands.
LIGHTROOM
We just started using this program and found it to be terrific for organizing and editing images. It may become my image-processing program because it can do most of the things I want to do with my images without having to go to the considerably more complicated Photoshop program.
WORDPERFECT OFFICE 12
Barbara and I began processing words with WordPerfect decades ago. We think this easy to use program is terrific. Unfortunately, nearly everyone we must send documents to uses Microsoft’s Word, so now I have switched to Word.
WORD
Although I am completely comfortable using WordPerfect, Nature Photographer magazine, for which I write columns, and our book publisher both use Microsoft Word. I can convert WordPerfect documents to Word, but it never converts the manuscript flawlessly. Therefore, I have reluctantly switched to Word. Fortunately, the problem of errors being created during conversion has been eliminated. I am getting along fine with Word and have written this entire book using Word.
ZERENE STACKER AND HELICON FOCUS
These two programs are extremely useful for processing multiple images to achieve terrific overall image sharpness and tremendous depth of field. The stack of images are shot where each image is focused at slightly different points. We start by manually focusing on the closest object we want in sharp focus, then focus a little deeper and shoot another image, and continue this process until the last image of the set includes the furthest point where sharp focus is desired. The programs sort through each image in the focus stack and select the sharpest parts. These sharp areas are then assembled into one final image where everything is tack sharp.
All photographers should get one of these programs to increase the sharpness of their images. They are especially useful for both landscape and close-up images! Go to the Resources section of this book to find contact information. Both companies offer demos on their website and a free trial download.
CANON DIGITAL PROFESSIONAL
This free software comes with any new Canon camera. I sometimes use it for creating panoramic images and image processing. I would use it more, but because I teach photo workshops, I must use software programs that work with everyone’s images and not just Canon shooters’ images. For this same reason, Barbara has not availed herself of the Nikon proprietary software.

The crab spider caught the red-tailed bumblebee late in the afternoon. Night arrived while the spider was still eating it, so the spider went to sleep. The bee was still hanging from the spider’s jaws the next morning. Barbara spotted the bee and only then noticed the spider holding it. A Plamp was used to stabilize the stem the spider was clinging to just to keep it completely still. Barbara focused on the closest spot she wanted in sharp focus, which was part of the knapweed blossom. Then she changed the focus in tiny increments and shot more images until the furthest spot was sharply focused and shot. It took twenty-seven images to cover the depth of the flower, spider, and bee. Helicon Focus is the dedicated focus stacking software that was used to combine all of these images into a single image with incredible depth of field and extreme sharpness. Nikon D4S, Nikon 200mm micro lens, ISO 100, f/8, 1/50 second, Cloudy WB, manual exposure and focus.

The first rays of amber sunshine illuminate Mt. Woodward while the meadow remains in the shadows. The contrast is too great for a single image capture, so Barbara shot a two-image exposure bracket as fast as possible to keep the horses in sharp focus. The two images were merged with Photomatix Pro 5 and final adjustments were done with Photoshop CS6. Nikon D4S, Nikon 14–24mm f/2.8 lens at 14mm, ISO 200, f/18, 1/5 and 1/20 second, Cloudy WB, Manual exposure mode, AF-C focus using the back-button control. Digital Nature
PHOTOMATIX PRO-HDR
This program is awesome for controlling high contrast. Shoot a series of images and vary the exposure by at least one stop, but not more than two stops. Cover the entire dynamic range of light in the scene. Vary only the shutter speed. Combine these images with this program to capture detail in the darkest shadows and brightest highlights.
CONCLUSION
This is the process we currently use to handle our images. However, this process has and will continue to evolve as new software becomes available or our needs change. What works so well for us may not be the best for you. Everyone needs to find their own procedure that efficiently solves the problem of capturing, sorting, organizing, editing, and storing their images.
Whatever method you adopt, it must be fast and make it easy to locate your images!