
Chapter 16: Managed Metadata Service Applications
What’s In This Chapter?
- Configuring managed metadata
- Metadata navigation
- Publishing content types
Two powerful features in SharePoint 2010 are metadata and content types. Metadata enables users to quickly and easily classify specific data about documents and list items within SharePoint by using list columns. Content types take metadata to the next level by providing a way to group a collection of metadata with a specific template. These content types can then be associated with many different lists within the site collection. Different content types can reference the same metadata (site columns), and content types can branch into several different levels.
An example of this scenario would be an organization that wants to create a standard document content type with three required metadata columns. By associating this content type with each of the document libraries, the organization provides a way to collect consistent data from many different locations. They could then create an additional department document content type that inherits from the standard document content type, thus allowing each department to add additional fields to the standard document. Using this approach enables an organization to manage the metadata and determine how it is associated with each of the different content types.
This functionality was provided within SharePoint 2007, but it was difficult for an organization to deploy and manage it on a large scale. The biggest problem arose when an organization needed to make different content types or site columns available to many different site collections as these are natively only available within the site collection in which they were created. In order to do this within the 2007 framework, solutions would have to be created to deploy the content types and site columns to each of the site collections. With the release of SharePoint 2010, the Managed Metadata service, sometimes called the Taxonomy service, enables you to create and manage column types and content types in one centralized location that then serves as a “hub” for the rest of the SharePoint farm. These terms can even be consumed across different SharePoint farms. This enables you to create and manage content types at a global level.
Advantages of the Managed Metadata Service
The Managed Metadata service offers a new way to look at content types and metadata. It allows you to provide a collection of metadata and content types to all sites within the SharePoint farm. This framework is managed at a farm level, where various settings such as preferred values and synonyms can be configured, yet it can still be expanded within sites that are subscribing to the service. Consistency and usability is improved at a global level, but functionality and the ability to customize remain in the hands of the users. Managed Metadata service offers some distinct advantages:
- A global framework — As described earlier, organizations often want to guide all of their departments to use specific columns and content types, but also provide some flexibility so that each department can extend the base schema to meet its specific needs. Through managed metadata and content type publishing, the Managed Metadata service within SharePoint 2010 provides this base schema. Site collections can consume the services and then extend them as needed to meet their specific needs.
- Consistency in data entry — The Managed Metadata service provides several key features that enable consistent entry of data. For instance, by configuring preferred values you can provide alternative selections to users when they are entering values. For example, if a user enters the term “car” or “vehicle,” an alternate suggestion of “automobile” can be displayed for their selection. This feature provides a way to easily guide users to enter the preferred values for common words. In addition, as users are entering values for keywords, suggestions of previous keywords are displayed for selection. Because options are being presented to users, it is less likely that multiple terms for the same items will be entered.
- Improved usability — In addition to enabling users to quickly and easily tag data based on a global structure, many new features greatly improve usability, including type ahead, preferred values, and recently used values. These features are available both in the SharePoint UI and within the Office applications. Users will be able to learn one approach to entering data that can be used across multiple applications.
New Managed Metadata Service Features
In addition to the usability features mentioned in the previous section, the new Managed Metadata service includes three major new feature improvements for column types, content types, and filtering.
Column Types
Two new types of site column can be configured at a global level: Managed Metadata and Managed Keywords. Managed Metadata is a choice field that is configured to pull from levels within the global term store, and the Managed Keywords field is a text field that references a global store.
- Managed Metadata — Within Central Administration, you can create term stores that are used to populate various column types within SharePoint lists and libraries. Term stores are collections of like values. These term stores can be populated manually or through a .csv import file. The terms, or keywords, in the term store are managed at a global level, and then consumed by sites and webs within the environment.
Examples of entries within a term store could include some of the following values:
- Departments
- Offices
- Categories
- Project Status
By adding these values at a global level, consistency across multiple sites and webs can be maintained. Instead of each site needing to maintain a column of the various departments within the organization, one centralized, managed list can be maintained. Combining this feature with the usability improvements such as type ahead and the data entry suggestion features enables users to easily and quickly enter standard organization data values.
- Managed Keywords — Managed keywords are similar to managed metadata, with the key difference being that the end user is able to enter new terms into the store — that is, terms that did not previously exist.
Content Types
Content types, mentioned earlier, are a powerful addition to any organization. They allow for standard templates, metadata, and workflows to be associated with different list items and document types. They provide a way for an organization to easily guide its users through adding content to the site, by showing them the specific metadata and workflows that should be associated with their content.
For example, at a global level the organization may want to collect the following information about each project document:
- Name
- Owner
- Keywords
Each department may want to also collect the following information:
- Project name
- Project type
- Assigned resources
In such a scenario, the organization would be able to take the global project document content type and expand it to capture the additional fields. Because the content type is based on the parent, Project Document, any changes to Project Document would be pushed down to the extended content type. Once the framework is in place, the rest of the organization will be able to work within that framework to meet their specific needs. As mentioned earlier, SharePoint 2010’s Managed Metadata service stores these content types in a “hub,” to be accessed and used across multiple site collections.
Filtering
One the key benefits of configuring and consuming the managed metadata available in the farm is the ability to take advantage of the new filtering features. These features allow for multi-level filtering within the managed metadata columns. This filtering is made available within the standard list views, as well as within the site navigation in the Quick Launch area. The remainder of this chapter provides an in-depth look at configuring, maintaining, and using these new features.
Getting Started with the Managed Metadata Service
The Managed Metadata service is provided to different sites through the creation of a service application. This section describes the steps required to create and define the service application.
The Service Applications Architecture
Service applications in SharePoint 2010 provide the framework for sharing content and services across multiple web apps, sites, and webs. Service applications are new in SharePoint 2010 and replace what is currently provided by the Shared Service Provider in SharePoint 2007. For a more detailed look at what makes up a service application, refer to Chapter 7.
Configuring Managed Metadata Services
Configuring the Managed Metadata service in SharePoint 2010 is pretty straightforward. Follow these steps to create and prepare a new instance of the Managed Metadata service for use within the environment.
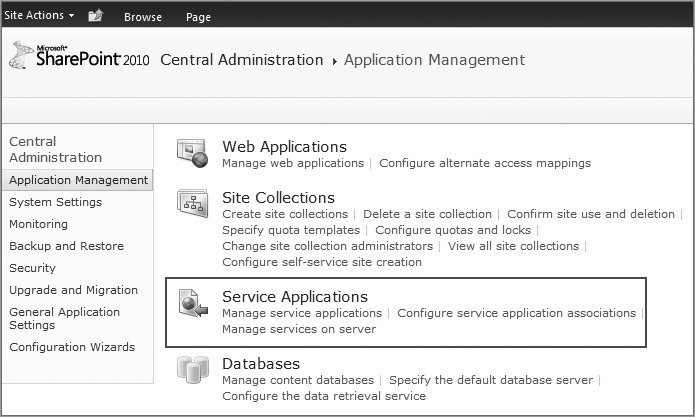
1. Open Central Administration and click the Application Management link. The Application Management screen has an entire section dedicated to the management of service applications, as indicated in Figure 16-1. These options enable you to create and edit new and existing service applications.
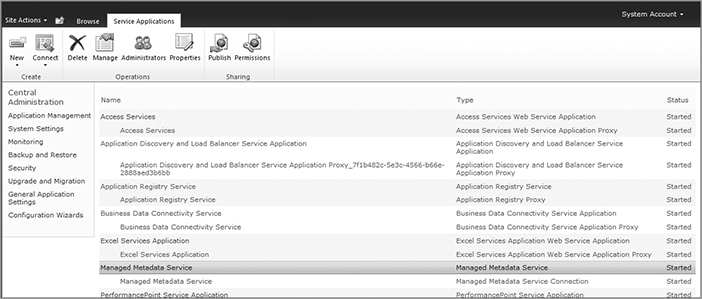
2. Click the link to the Manage Service Applications page. A listing of all service applications will be displayed. You can see all the services, their types, and their current status. Selecting any of these services will load the Ribbon, giving you quick access to the configuration elements of the service. Figure 16-2 highlights the Managed Metadata service and the corresponding Ribbon.
3. To create a new Metadata service application, select the New option from the Ribbon and select Managed Metadata service to load a new page where you can enter the service information. Table 16-1 shows the options available for configuration.
Table 16-1: Managed Metadata Service Application Configuration Options
| Option | Description |
| Name | A short name used to describe the Managed Metadata service application. |
| Database Server | Name of the server that is hosting your SharePoint databases. |
| Database Name | The specific database that will be used to store the service information. |
| Database Authentication | The type of authentication used to access the information stored in the database. Windows Authentication is the recommended configuration for this setting. |
| Failover Server | The server that will be used as the failover server. For more information on using a failover server, refer to Chapter 12. |
| Application Pool | Defines the identity that the service will run as. This service can run using an existing application pool or a new one can be created. |
| Content Type Hub | The URL entered in this property will be used as the hub for all content types. This will point to a separate site collection. |
| Report Syndication Import Errors | Select this option if you would like this service to report synchronization errors. |
| Add this service application to the farm’s default list. | Select this option if you want all sites to be connected to this service by default. |
4. Once you have configured the preceding properties, click OK to return to the listing of service applications.
You will notice that there are two different listings for your new service application. You can select these listings to configure the service’s properties. From the Service listing you can view the properties, configure the administrators, and manage the term store. Figure 16-3 shows the link to the Service listing for a Managed Metadata service application named MMS1. From the Service connection listing you can immediately access the Term Store Management Tool, shown in Figure 16-4.

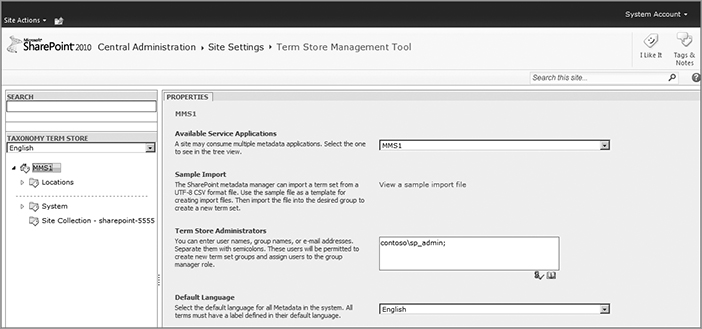
From the Term Store Management Tool, you can configure the settings shown in Table 16-2.
Table 16-2: Term Store Configuration Options
| Option | Description |
| Available Service Applications | Provides the capability to navigate between available Service Applications |
| Sample Import | Provides a sample import .csv file |
| Term Store Administrators | A collection of users or groups who have full control of the term store |
| Default Language | Specifies the default language |
| Working Languages | Specifies each of the languages available for the service application |
Connecting to a Web Application
Whenever a new web application is created, it can either be automatically associated with the default service applications or it can be configured using a custom set of service applications. Whenever you create a new Managed Metadata service application, one of the menu options will be adding it to the list of default service applications. After the service application has been created, it can only be removed from or added to the default list by the farm administrator using the Central Administration Farm Association page. If it is added to the default service applications when created, it will be available to all sites within web applications that are configured to consume the default services.
The managed metadata services available in SharePoint 2010 provide a way for companies to bring organization and structure to the process of tagging content. Tagging content refers to applying metadata to documents and content within the organization. SharePoint 2010 allows companies to define and manage this process, including both structured and unstructured data.
Structured metadata refers to a collection of terms that are tightly controlled and only modified through a strict set of reviews. Unstructured metadata refers to a collection of terms that can be updated by users at will. These are two extreme ends of the spectrum, and most organizations operate somewhere in the middle. With the new changes introduced with SharePoint 2010, both ends of the spectrum and everything in the middle can be implemented and managed. The rest of this section discusses the different methods for implementation.
Metadata services in SharePoint 2010 are implemented through the use of a term store. When the service application is provisioned, the term store is created. Within the term store, groups are created that are used to house the term sets and terms. Groups are important because they are used primarily as a security boundary. Term sets are the groupings that are used to organize the terms. At the lowest level are the terms, which are the values selected by users in the system. Each of the terms can have an associated description, synonyms, and translation or custom properties. Figure 16-5 illustrates this hierarchy.

Getting Started with Managed Metadata
Groups, term sets, and terms are created by selecting the managed metadata service you want to work with and clicking the Manage button in the Ribbon on the Service Applications page in Central Administration. Alternatively, you can simply click the name of the managed metadata service you want to work with to open the Manage screen. Figure 16-6 shows the Ribbon menu options for accessing this management page.

From within this management screen you can create and customize new content. Key actions include creating new groups, assigning group management permissions, and creating new terms and term sets. In most cases, the option to create the next level of content is provided on the parent level drop-down menu. For instance, the option for creating a new group is available on the Service Application dropdown, and the option to create a new term set is on the Group dropdown menu. An example of the Group dropdown menu is shown in Figure 16-7.

For each of the different levels of content, different menu options are available. The available configuration options are described in the following sections.
Term Store Properties
Within the term store you can configure the term store administrators and the available languages. Users who are configured as term store administrators are given full control to the term store. Figure 16-8 shows the Properties screen.

Group Properties
Within groups, new term sets can be imported or created. To create a new term set, simply select the New Term Set option and enter the required information. To import a term set, select the Import Term Set option and browse to the document that contains the term set to be imported. Import Term Sets are contained within a .csv file. Out of the box, Microsoft provides a sample term set import document that shows the required formatting. This sample import file can be accessed from the Service Applications Management page.
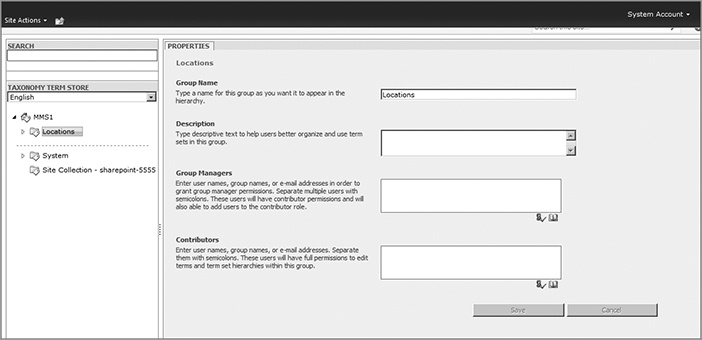
Once the group has been created, you can configure various properties for it. In addition to the Group Name and Description, there are two levels of configurable permissions: Group Managers and Contributors. Users in the Group Managers list may add items to the group as well as assign other users to the Contributor role. Users with the Contributor role will only be able to add terms and configure group hierarchies. Figure 16-9 shows the properties available for a group.
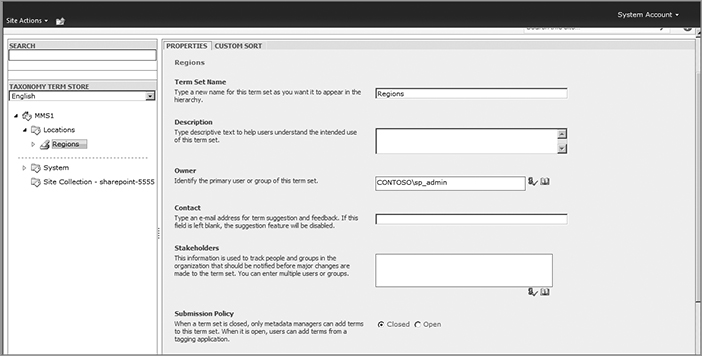
Term Set Properties
Within each term set you can configure several different properties in addition to the name and description properties. These properties can be divided into two areas: ownership and usability. From an ownership perspective, there are three different properties to be configured: Owner, Contact, and Stakeholders. The Owner property should be configured to the group or user who will have primary ownership and responsibility for the term set. The Contact property provides an e-mail address where users can submit feedback on the term set. This feedback will be valuable in determining any updates or modifications that can be made to improve the term set. The Stakeholders property enables you to keep track of various users and groups within the organization that should be notified whenever changes are made to the term set.
From a usability perspective, the following properties can be configured for the term set: Submission Policy, Available for Tagging, and Custom Sort Order. The submission policy is where the term set is configured to allow users to add items (open) or to restrict them from adding additional values (closed). If this term set is configured as an open term set, users will be able to add items to the term set whenever they are selecting values. The tagging property of the term set determines whether the items will be visible in the UI when users are selecting values. The custom sort order property allows the term set to be sorted using a custom order. A great example of this would be a term set that includes the days of the week. Logically, users would want to see the list sorted Sunday through Saturday and not in alphabetical order.
This is also the location where new terms are created. Selecting the dropdown menu from the Term Set in the tree view gives you several options for creating new terms and managing existing terms. From this menu you can create new terms, move entire term sets to new locations, create copies of term Sets, or delete entire term sets. Figure 16-10 shows the Term Set properties page; note that the options for custom sorting are located on a separate tab called Custom Sort.
Term Properties
Each property within the term store can be configured with the following properties: Available for Tagging, Language, Description, Default Label (name) and Other Labels (synonyms). These properties can be configured per language. This means you can have separate synonyms for English and French, for example, if you have the French language pack installed on the server. Once a synonym has been created, whenever it is entered, the value is stored as the default label instead. This allows users to enter the same data in multiple formats and still store the same values.
An example of this is the term set for Regions, which contains a term for the Northeast region. There are many different ways to abbreviate this term set; one user may enter NE while another enters N.E. and yet another enters North East. By creating synonyms for each of the examples listed, all users will be storing the same value of Northeast, even though they entered an alternative value for the term. Figure 16-11 shows this configuration page.

Using Managed Metadata in Sites
Once the Term Stores have been configured within Central Administration, any site associated with the service application can create list columns based on entries in the Term Store. These columns can be created as site columns or list columns, and they can be associated with content types. Figure 16-12 shows the Create Column page where new managed metadata columns are configured. Figure 16-13 shows the list view of a library that is using managed metadata columns. Notice that the columns are displayed like any other list metadata column.


The process for creating new managed metadata columns is the same as creating traditional list columns. These can be created from within a list using the Ribbon or the List Settings page, the Site Columns Gallery, or the Site Content Types Gallery (when associated with an existing content type). These galleries are accessed from the Site Settings page in a site, under the Galleries heading. When creating a new managed metadata column, the following properties can be configured:
- Description (text)
- Required Value (yes/no)
- Require Unique Value (yes/no)
- Allow Multiple Values (yes/no)
- Display Value (Term Only/Term with Path)
- Associated Term Set (Selection from Tree)
- Customized Term Set (Creation of New Tree Node)
- Default Value
The specific settings configured in the Managed Metadata Services management screen will be applied to these column settings. For instance, only term sets that have been configured as open will be able to support fill-in values (see Figure 16-14). For term sets that have been marked closed but have a configured feedback e-mail, users will be able to submit feedback but not add values to the term set (see Figure 16-15). This creates an incredibly flexible way to ensure the list contains only those values approved by the Term Set Administrator, while still being able to accept input from the user community.
Column-Specific Term Sets
When creating a managed metadata site column, you can choose the option “Customize your term set” to create a column-specific term set. This term set will be created and stored in the service application that is configured as the default storage location; however, it will only be available for use in this specific location. This implies that if it is created at the list level, it can only be referenced in that specific column within the list; and if it is created at the site level, it can only be referenced within that site. If it is created as part of a content type that is published, it would be available wherever that content type is available, thereby facilitating enterprise manageability to that term set.
Key Usability Features
Managed Metadata columns provide several key usability features that will help define the end user experience. These rich features provide a clear and easy way to create, manage, and maintain global tagging structures. These features enable users to easily use, define, and communicate suggestions for existing structures. All the commands are located within the user interface, so users will not have to leave the entry screen to take advantage of these various features.
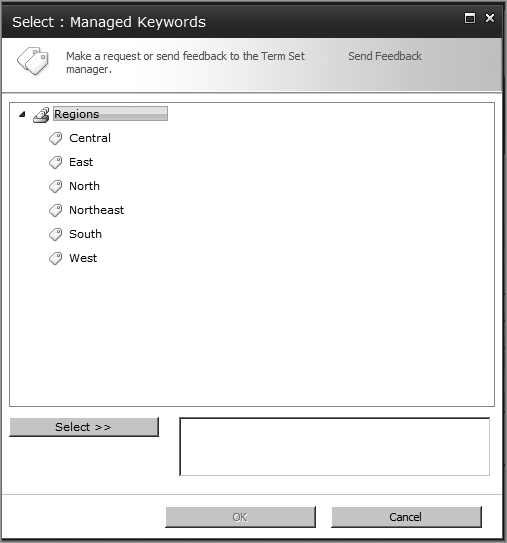
Type Ahead
When a user is entering the value for a field by directly typing the value into the text field, the field will identify what is being typed and provide selections based on the values being entered. For example, as a user types the value “Nor” into the text field, the field control will offer the selections of “North,” “Northeast,” and “Northwest.” A user can then select from among these options, without having to type the complete value. Values for synonyms are also identified; for example, if the user enters “N,” the field control would recognize the value as a synonym for the value “Northeast.”
For fields that are part of open term sets, any previously typed values are displayed for the user. This valuable feature enables users to quickly zero in on previously created entries. Figure 16-16 demonstrates this feature.

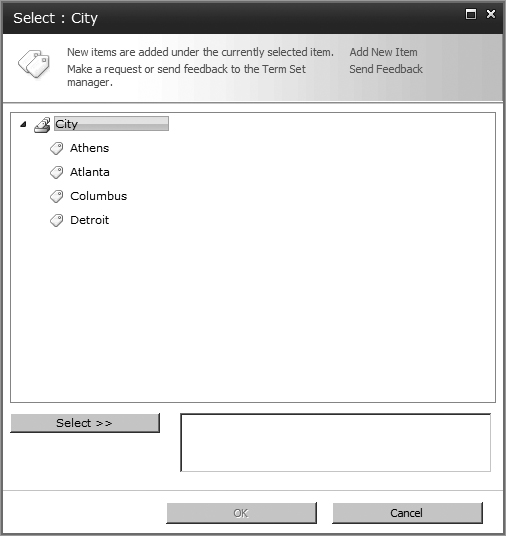
Browsing for Valid Options
Instead of manually typing the desired value, users can select the Browse icon located to the right of the field control. This option enables users to browse the tree structure of the values and select the desired value. If users don’t see the desired value, they can suggest a new value or create a new value, if the term set allows. Users can drill down multiple levels within the tree view to select their desired value. Figure 16-17 illustrates the Browse feature.

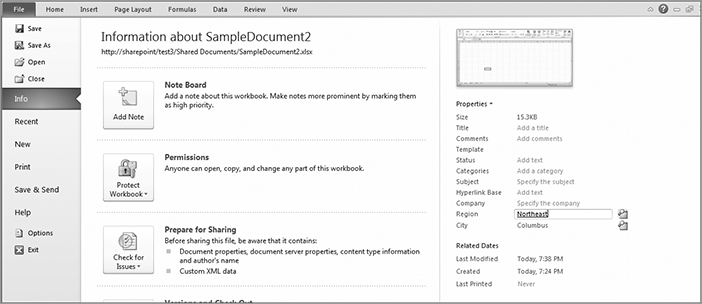
Office UI
From within the Office applications, the SharePoint document properties can be accessed in several ways. Two specific ways are through the Document Information Panel and the Advanced Properties screen. Each of these options integrates with the user interface features described above. This integration enables users to become familiar with adding content in a way that can be utilized across multiple applications. Having access to the suggestions and tree view within the Office application greatly increases the usability of managed metadata services across the organization. Figures 16-18 and 16-19 show examples of entering metadata from Excel.

Metadata Navigation
Another new feature in SharePoint 2010 is the capability to create dynamic filters based on metadata. These new filters are referred to as Metadata Navigation and can be configured from the List Settings page. From the List Settings page you can configure Navigation Hierarchies and Navigation Filters. Hierarchies display in a tree view below the Quick Launch and enable you to drill down to filter through the various list metadata. Navigation Filters enable you to enter a specific value from the tree for filtering. Figure 16-20 shows a filter for the city of New Orleans.

In addition to these navigation options, the filter can also be configured through the column drop-down menu. From this menu you can select which node of the tree to filter on and to include or exclude the descendants from the list. Note that if the column is configured to be part of the Key Filters, then filtering from the column drop-down is not enabled. Figure 16-21 shows the column filtering options. Metadata-driven, filter-based navigation is a logical and helpful addition to SharePoint 2010. Before this version of SharePoint, this type of navigation was only possible through localized customization of a SharePoint list.

Content types are a powerful feature within SharePoint that provide a single point of management of common document or list types. Content Types were introduced with SharePoint 2007 and could be used within any single site collection. If you needed to use content types across multiple site collections, the content types had to be deployed and managed at each of the site collections. This restriction made the use of global content types difficult in many organizations.
With the release of SharePoint 2010, many of these restrictions have been removed. Within managed metadata services, along with the Enterprise Term Stores, SharePoint administrators can configure a Content Type hub. This Content Type hub will be responsible for managing content types that can be published to all site collections that are consuming the services provided in the managed metadata service. Keep in mind that a single site collection can consume multiple managed metadata services.
The Content Type hub is configured once for each managed metadata service. Any site collection to which the Service Owner has access can be configured to be the site collection hub. Figure 16-22 shows the Managed Metadata Service configuration screen with the option for selecting the Content Type hub to be associated with the specific managed metadata service. Content Type hub configuration settings can be found in the Managed Metadata Service properties page.

When selecting the Content Type hub, you also have an option to report any syndication errors. This is important because it provides detailed information about specific content that is not correctly deployed to all consuming site collections. When a site collection is configured as a Content Type hub, the Content Type Syndication Hub feature is automatically activated, enabling the necessary features to become available for the site collection to publish content types.
Additionally, several new options become available on the Site Settings page and the Content Type settings page. These new options control the ability to publish content types and review specific errors from the publishing process.
Content type publishing is controlled by two different timer jobs, the Content Type Hub and the Content Type Subscriber. The Content Type Hub timer job manages the maintenance logs and the unpublished content types. When this timer job is run, content types that have been identified to be published are made available to the Content Type Subscriber timer job. The Content Type Subscriber job is created for each of the web applications and is responsible for retrieving published content types and making them available in the local content type galleries for the subscribed site collections. The timer jobs are run on a default schedule, but you can update the schedule to match your organization’s needs. Figure 16-23 shows the different timer jobs; notice that there is one global Content Type Hub timer job but a Content Type Subscriber job is created for each web application.

Creating and Publishing Content Types
Once the Content Type hub has been created, users who have access to the hub can create and manage the content types that will be published to the subscribing sites. The creation of the published content type follows the same creation process for nonpublished content types. The difference is that when a user is working within a site that has been created as a Content Type hub, additional configuration options are available in the Content Type management screen. The additional options are shown in Figure 16-24 and explained in detail in the following sections below.
Publishing, Unpublishing, and Republishing Content Types
Once a content type has been created in the Content Type Gallery on the hub site collection, it can be published to the subscribing site collections. The Content Type Publishing dialog, shown in Figure 16-25, allows you to Publish, Unpublish, or Republish a content type. Notice that it also displays the timestamp for the last successful publication.

There are three specific publishing options, explained in Table 16-3.
Table 16-3: Content Type Publishing Options
| Publishing Type | Description |
| Publish | Make this content type available for download for all web applications (and site collections) consuming content types from this location. |
| Unpublish | Make this content type unavailable for download for all web applications (and site collections) consuming content types from this location. Any copies of this content type being used in other site collections will be unsealed and made into a local content type. |
| Republish | If you have made changes to this content type, the content type needs to be “republished” before the changes are available for download to web applications consuming content types from this location. |
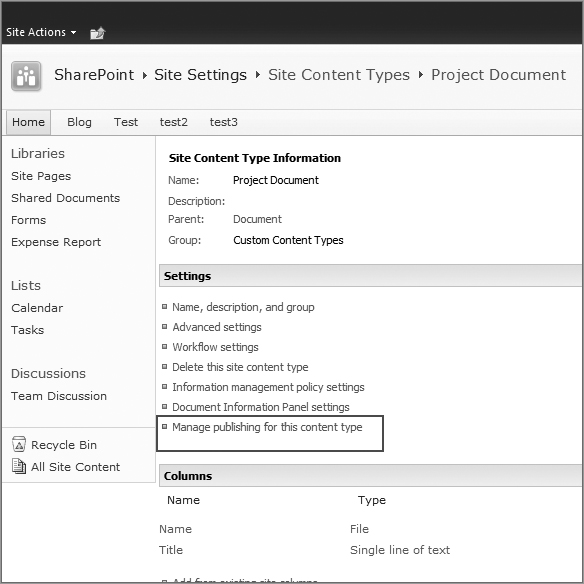
When a content type is initially published, it becomes available to the subscribing site collections. Within the subscribing site collection, the various published content types can be viewed using the Content Type Publishing option, available in the Site Collection Administration section on the Site Settings page. This configuration screen, shown in Figure 16-26, shows the different hubs that the site is subscribed to, the specific content types that have been published from those hubs, as well as a link to see the publishing error log.

When site collection administrators click on a published content type, they will be directed to the settings page within their site collection. From this screen, site collection administrators can configure the advanced settings options for this content type, as shown in Figure 16-27.
From here, the site collection administrator can configure a custom template for the content type, mark the content type as read only, and enforce an update to all content types that inherit from this content type.
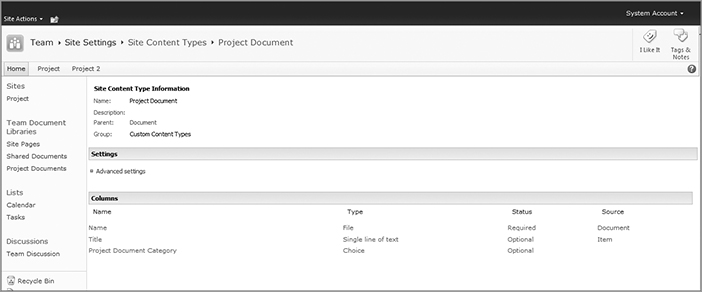
Once a content type has been published to the subscribing sites, site collection administrators in the subscribing sites can use the published content type as a parent content type for new content types. This is done by accessing the Content Type Gallery and creating a new content type. All published content types are available from the Parent Content Type dropdown, shown in Figure 16-28.

Whenever the content type is updated at the hub, it needs to be republished in order for the subscribing sites to receive the updates. The process for republishing is the same as publishing. Within the Content Type management screen, select the option to Manage Publishing Options. You will see that once the item has been published, the default option on the screen is set to republish. Clicking OK on this screen will cause the content type to be updated the next time the timer jobs run.
Whenever you have a published content type that needs to be removed from the hub, it first needs to be unpublished. The process of unpublishing a content type has a minimal effect on the sites subscribing to the content type. When a content type is unpublished from the hub, for any subscribing sites that have implemented the content type, a local content type will be created within the Content Type Gallery. The content type can then be updated within the gallery; however, any documents that were associated with the previously published content type will become read-only, and will not be updated if the associated content type in the gallery is updated.
Not all items associated with a content type can be published through the Content Type hub. Two specific examples include associated workflows and lookup columns. Any time a content type with associated workflows is published, the workflows will only work on the subscribing sites if the workflow is currently available within that site.
Content Type Service Application Error Log
The Content Type Publishing hub includes a feature that allows for the reporting of syndication errors. This syndication error list is available within the Content Type hub site collection. The list is updated whenever the update timer jobs are run and provide detailed information about any specific errors that occurred during the synchronization. Figure 16-29 shows an example of this log.
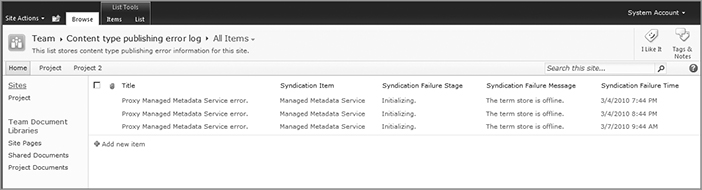
Table 16-4 identifies the information presented within this log.
Table 16-4: Error Log Fields
| Field | Description |
| Title | Error title. |
| Taxonomy Service Store ID | ID of the service. |
| Taxonomy Service Name | Name of the service. |
| Content Type Subscriber Site | Link to site with syndication errors. |
| Syndication Item | The content type that is unable to synchronize. |
| Syndication Failure Stage | The stage at which the syndication failed. Examples include pre-import checks or importing of workflows. |
| Syndication Failure Message | The specific details outlining what caused the syndication errors. |
| Syndication Failure Time | The timestamp of the error. |
The Managed Metadata service enables you to create, organize, and maintain a complete data-tagging solution for your organization. By providing the capability to create open term sets, SharePoint 2010 enables any organization to deploy both controlled and ad hoc content to users in a way that is familiar and easily accessible through products they already know and use. Content types enable you to create repeatable content structures that can be managed in a single location and deployed globally.